-
Reclaiming storage/space from 'System Data' in macOS: A tutorial on understanding the System Data usage.
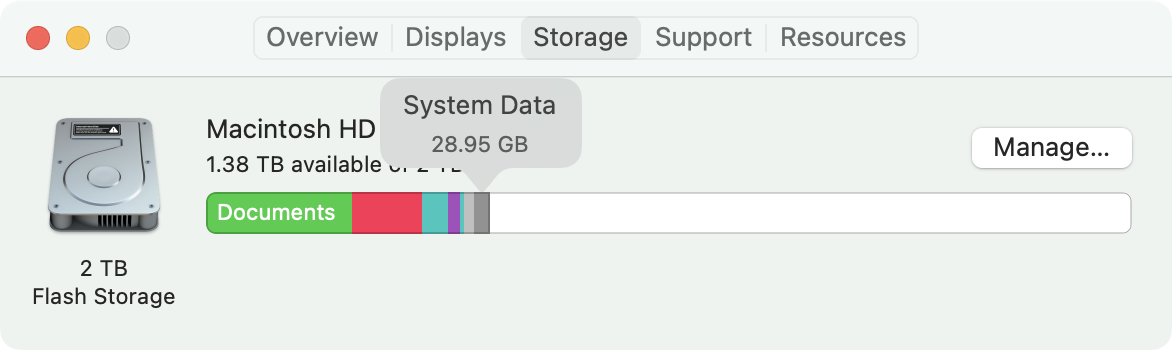
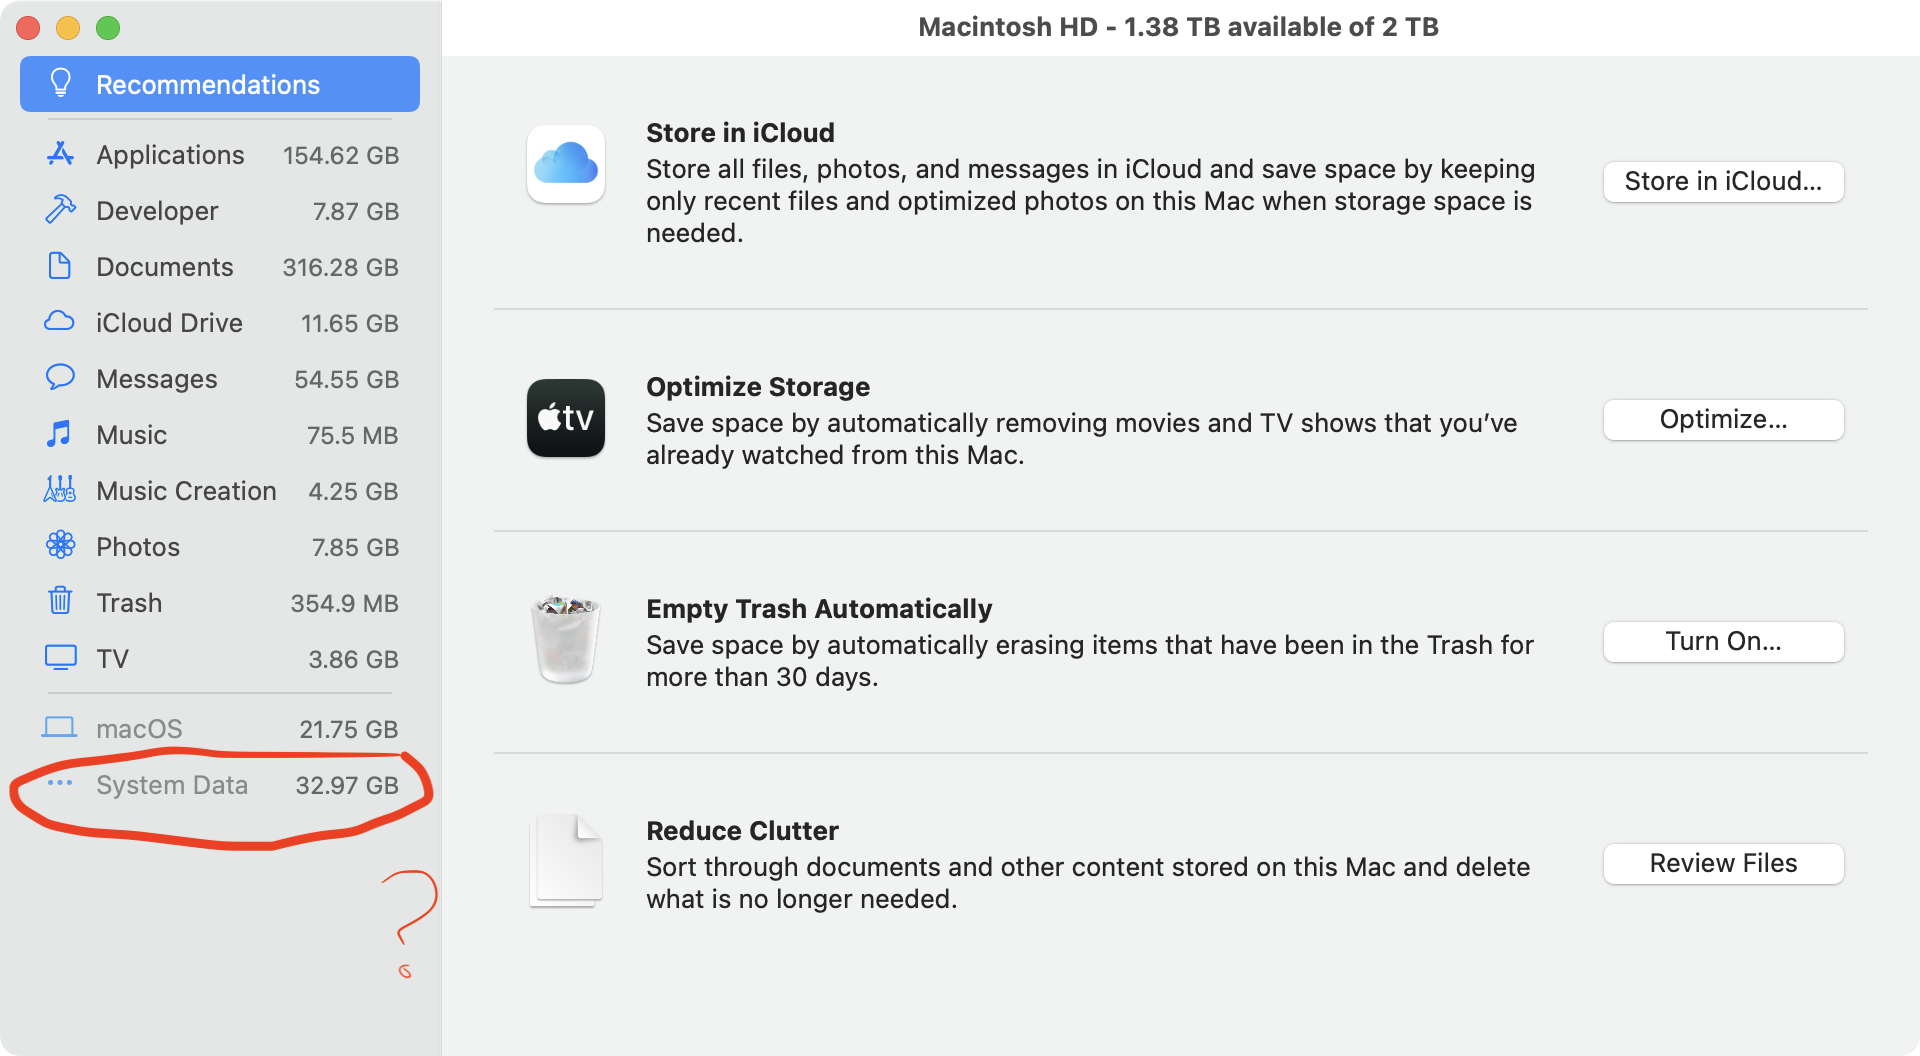
macOS is pretty great and bad at the same time, communicating how and what is taking up storage on one's Mac. Most users are probably familiar with using About this Mac -> Storage. Clicking on Manage will give you a more detailed view. The one point of contention is "System Data," as it's ominous and nebulous.
Below is a video that walks through the strategies of reclaiming space from the System Data, it's recommended as a companion to this blog post.
You can't just delete System Data... or can you?
I see pretty frequent posts on Reddit posts like "Can someone please explain how to get rid of the "sYsTeM dAtA" this?" or hyper verbose " Why do I have 130 gigs of system data 💀 (and how do I get rid of it cause a normal mac barely has like a 20 gigs or so of system memory) (I checked the usual culprit i.e. editing cache data but thats not it this time and I can't figure it out)".
This isn't because these individuals are incapable, rather that Apple does not clearly communicate what is happening nor give you any meaningful course of action. One user might have "System Data" that is is only 10 GB and another might have 250 GB. Why this difference is so large or why this difference even exists at all is not explained.
What is System data
System Data is the tally of the contents of the following:
-
/Library /System~/Library-
/usr - Invisible Files in the
~/
All these can be managed by the user with
/Systembeing the outlier. This is confusing as there are at least two Libraries on your computer and more if you have multiple users on a single computer.Hint: Tilde (~) indicates the home directory of the user, this is a *nix convention that macOS carried over.
/System- This is where macOS itself resides. Under modern macOS this resides on a separate partition that isn't manipulatable by the user. To run macOS, you need this, and Apple protects its users from tampering with the/System./Library- This is the global Library accessible to all users. Things like Fonts, Audio plugins, support libraries for applications (Such as the Adobe CC suite), and assets for Final Cut Pro end up in this folder. Audio plugins end up/Library/Audio. Fonts go into/Library/Fonts, and the bulk of Application libraries intoApplication Support~/Library- This is hidden by default (more on this in a minute), but it uses a very similar structure to/Librarywith a large number of files landing in~/Library/Application Support, things like Apple Messages, Apple Photo Libraries, Xcode Simulators, Crossover Bottles (games), Docker Containers, and Steam games within~/Library/Application Supportor~/Library//usr- This is where CLI utilities installed by Homebrew and other applications end up.
Generally, over time, when installing various Applications and utilities, they will also install items into the Libraries and accumulate. A fresh install of macOS will have very little "System Data". An old install after many years can eat up a fair amount based on the types of applications and how frequently applications are installed. Deleting the Application via the Finder will not automatically remove them. This creates orphaned files. Official uninstallers do a much better job, as do applications like App cleaner attempt to remove files that are associated with an Application, but this is not 100% effective. In some cases, the official uninstallers from reputatable companies purposely do not uninstall entirely, like from Adobe.
Unfortunately, this requires intervention on the user, which we will cover.
Displaying the Library folder in the User directory
In the OS X days, the
~/Library(the Library folder found in/Users/your-user-name/) was a visible folder that you could easily poke around in. In modern macOSes, this is hidden, which is both good and bad. It's suitable for the basic user who probably shouldn't be manipulating it but bad for anyone with an intermediate level of familiarity with the underpinnings of their Mac. It obfuscates where storage is going on behind the scenes.There are still multiple vectors to viewing the contents of the ~/Library. The easiest route is to go to the user directory and hit "Command Shift ." to display visible folders. Another method is to navigate to it from the Finder, select under Go, "Go To Folder..." and type in
~/Library.You can also make the Library permanently visible either using "Get Info" from the finder (on the user directory) and checking "Show Library" or using the terminal and running the following command:
chflags nohidden ~Library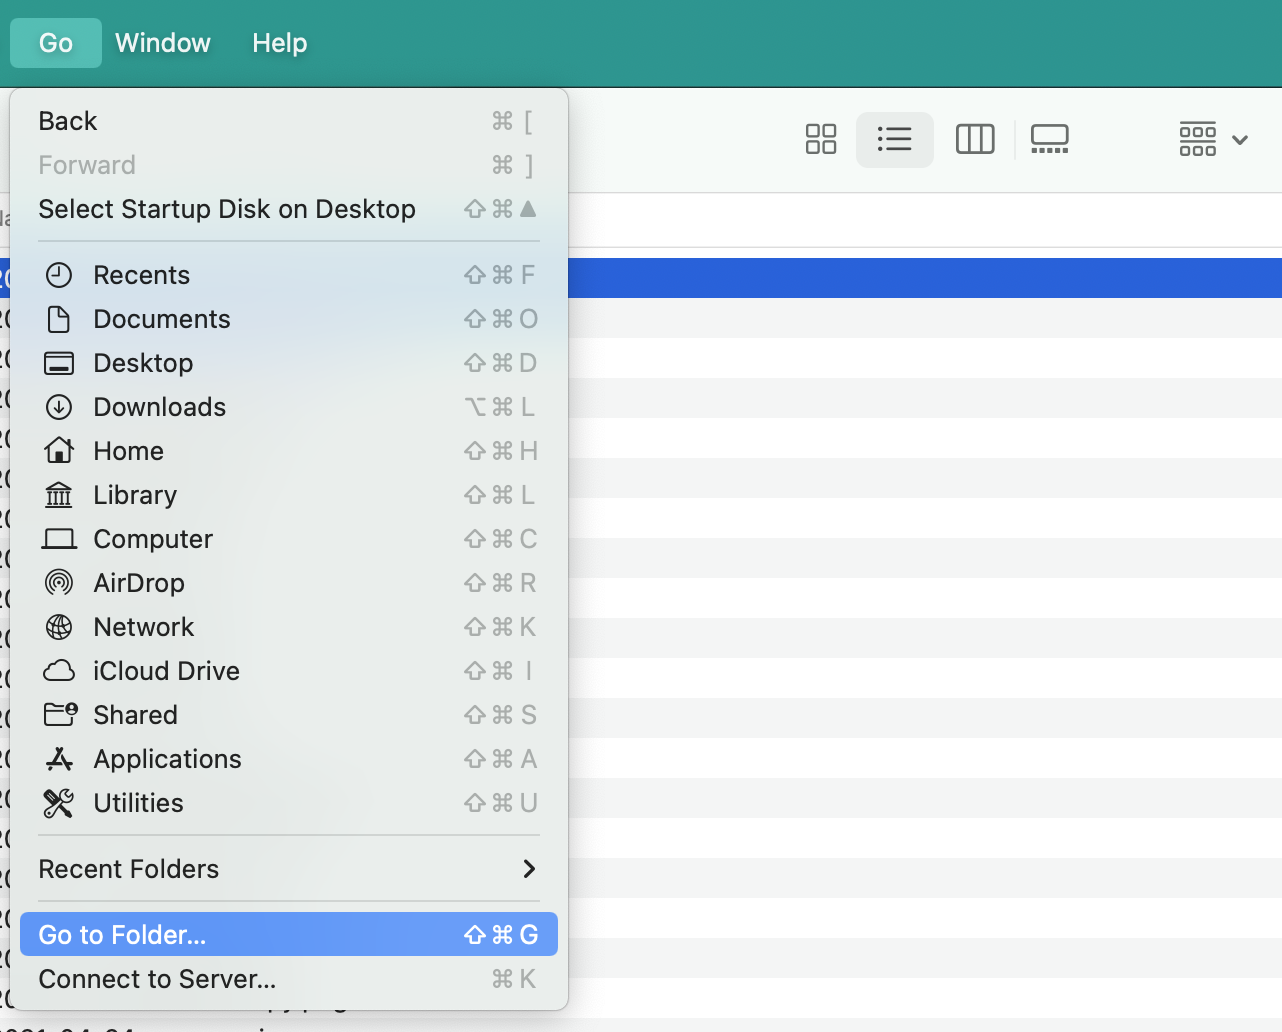
Calculating Folder Sizes
For whatever reason, still to this day, one of the advantages of macOS is the ability to calculate folder sizes from the list view. This is done by using view options "Show View Options" under View or using the keyboard shortcut, Command J. Calculating folder sizes will take time, depending on how many files are inside a folder.
Sorting folders by size makes it easy to spot where the largest folders reside.
Managing the ~/Library
The most common place to reclaim storage is from the
~/Library.Deleting items from
~/Libraryis tricky as there are important files that could break applications and a few valuable system files. There's no hard-fast rule. For example, deleting a Steam game via the Finder is safe from~/Library/Application Support/Steam/steamapps, but deleting the entire Steam Directory will cause issues. The best advice is to tread lightly. Generally, (but not always) items that land in~/Librarycan be managed elsewhere. For example, Steam Games can be removed , and Apple Messages cache can be controlled via the Apple Messages app by clearing out data over a month old.A short but incomplete list of common data hogs in
~/Library~/Library/Messages- Apple Messages can creep up in size with the number of large media files now typically shared among friends and family. Every lousy gif sent to you via text message by an aunt, gets cached in/Messages. Use Apple Messages to get a handle on your Messages.~/Library/Containers- these are freeze and sandboxed states for macOS, generally from the Mac App Store, sometimes these get orphaned. For example, if you install NBA 2K21 Arcade Edition from the Mac App Store, it'll install the application in your Apps folder and a 4 GB file within/Containers. If you delete the app by dragging the game to the trash folder from your Applications folder in the finder, you will not delete data within the container and thus will need to do this manually.~/Library/Containers/Docker- Docker is generally a requirement depending on a toolchain for developers, but containers/images are downloaded into the/Containers/Dockerfolder, the CLI utility is the best way to manage these.~/Library/Containers/UTM- UTM is a popular QEMU-based emulator for creating virtual machines and other operating systems. Installing the UTM virtual machines by default will install into/Containers/UTM. Virtual Machines often are multiple GBs per virtual machine, so this can be a place to reclaim a lot of space.~/Library/Containers/com.apple.mail/Data/Library/Logs- Log files for Apple Mail. In mail, select window/Connection Doctor Uncheck Log Connection Activity (Credit to JeremyAndrewErwin)
~/Library/Mobile Documents- This is the iCloud driver folder. The easiest way to manage this is to go to Apple ID within the system preferences and, under iCloud drive select options.~/Library/Developer- This is the location where Xcode installs its simulator environments. This can be managed within Xcode using preferences -> Components and caches cleared from the Storage "Manage" in about this Mac.~/Library/Photos- This contains the Apple Photos library and Photo management can be done via the Photos app. The entire Photos library can be uploaded to iCloud (assuming you have a large enough iCloud subscription).~/Library/Caches- Caches are application-specific temporary data. Depending on the application, these can be deleted with little repercussions. Generally, applications provide ways to manage their own caches. Deleting them is often temporary, as using an application will cause it to create new cache files as needed. It's recommended to do this every so often as you add and remove applications and upgrade them, you may end up with orphaned caches. This is best thought of as a spring cleaning activity as opposed to daily or even weekly maintenance. The same can be done with~/Library/Logsas occasionally, some applications can eat up hundreds of MBs and even GBs of data in log files.~/Library/ScreenRecordings- These are screen captures by QuickTime. Quicktime doesn't provide a smart way to manage these, and they are best deleted via the finder.~/Library/Application Support- this is where a bulk of Applications install user-specific data.~/Library/Application Support/Steam- Steam is a popular application store for games and game interaction, providing community features like in-game chat, and user profiles alongside its massive amount of videogames. Steam provides ways to delete games via it's user interface, but games can be found and deleted in the/steamappsfolder.~/Library/Application Support/OpenEmu- OpenEmu takes an interesting approach of stashing games in the Applications Directory (as do a few emulators). Games can be managed from the UI but also deleted fromGame Library/romsand artwork fromGame Library/artwork~/Library/Application Support/com.splice 2.Splice- The popular subscription-based Sample library app, Splice, stores its cache within Application Support instead of ~/Library/Caches`. It can be dumped.~/Library/Application Support/RetroArch- RetroArch has a habit of stashing quite a bit of resources in/Application Support, but deleting this directory should only be done when deleting the entire emulator.
~/Library/Application Support/Devonthink- Makers of document organization software, this can be a data hog (Credit to JeremyAndrewErwin)~/Library/Application Support/PFU- Scansnap scratch files, can be safely removed (Credit to JeremyAndrewErwin)
In summary, viewing the contents of your
~/Librarygives you an idea of where your data is going. Once you have established what is taking up space, you can then check said application to see if you can delete or remove packages/support files/items from that application.The Scourge of invisible folders
Toggling hidden files only a keyboard shortcut away, in the finder hit Command + Shift + . (period).
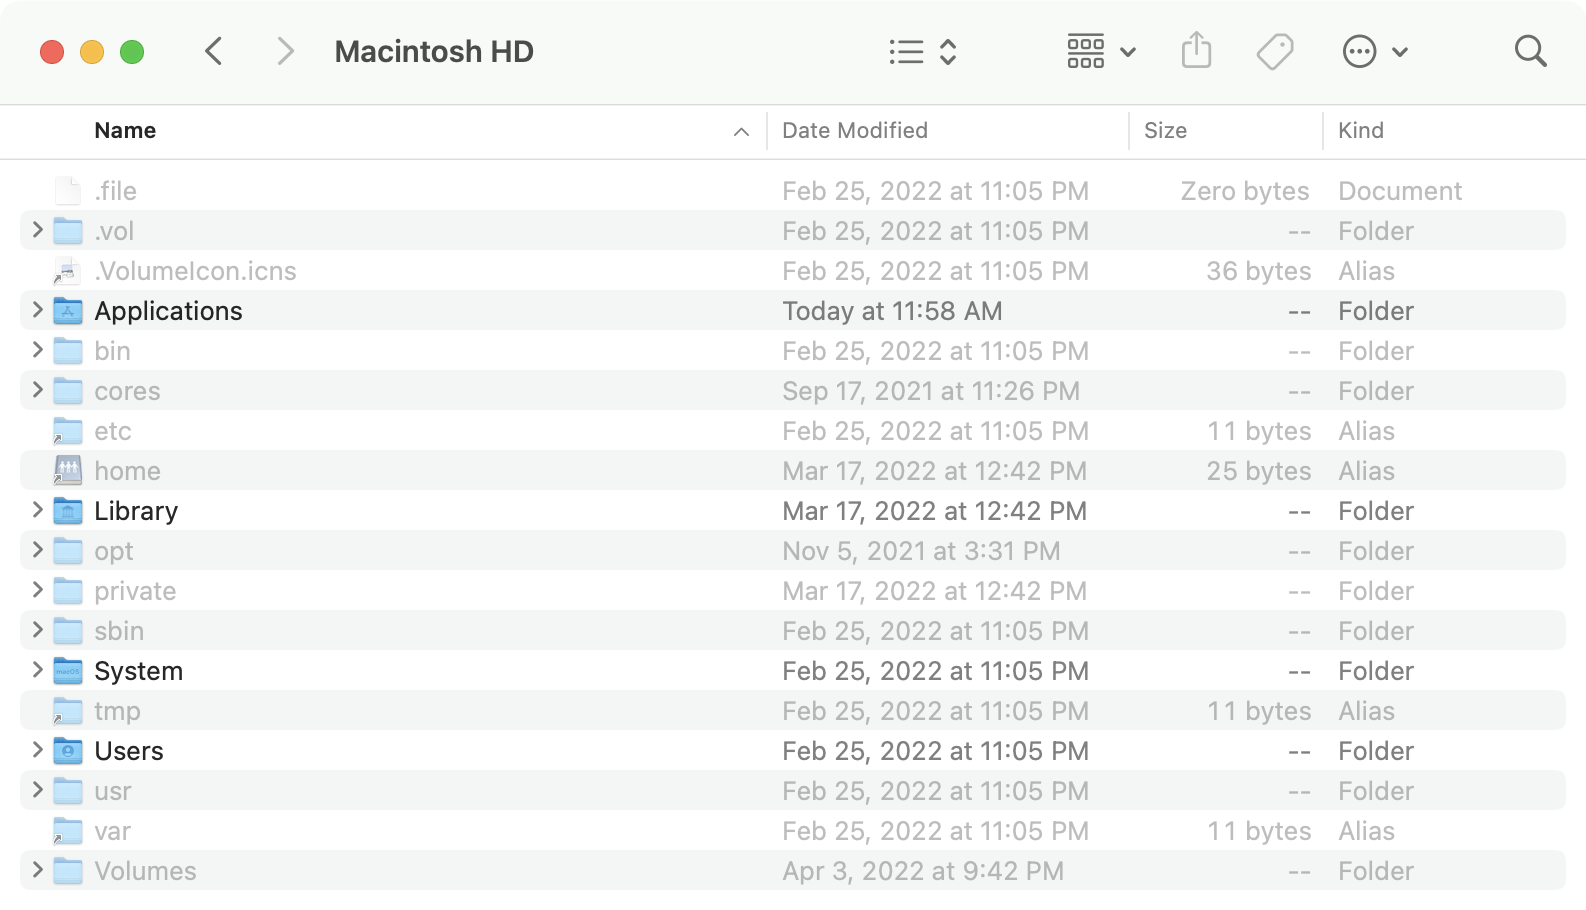
macOS has a surprising amount of invisible folders. Most are located at the root of the hard drive. These are (mostly) related to the *nix underpinnings of macOS and are essential for proper operation.
This includes
bin,cores,etc,opt,private,sbin,tmp,usr,varandvolumes, however in the~/(your user directory) has many more, as a general rule any in that start with.are created by applications and ones that are not, are OS related, which should only beTrash, which is where your Trash directory is.Homebrew users may find that they've installed a significant amount of utilities to their
usr, and it's highly recommended that you use Homebrew to remove undesired packages.These probably will not be very large for the average user, but for developers, various versions of Node, Ruby Gems, and VScode files can end up sapping 100s of MBs if not GBs. I had an issue with Node v14 installing improperly with my M1 Max and eating 8 GB per Node V14 version.
Utilities
There are a lot of not-so-great "disk cleaner" utilities that help grapple with disk storage. I've linked two tried and true free open-source utilities that have been around for a decade plus. These aren't the only valid utilities but both allow you to understand macOS better and of course, are free.
Disk Inventory X
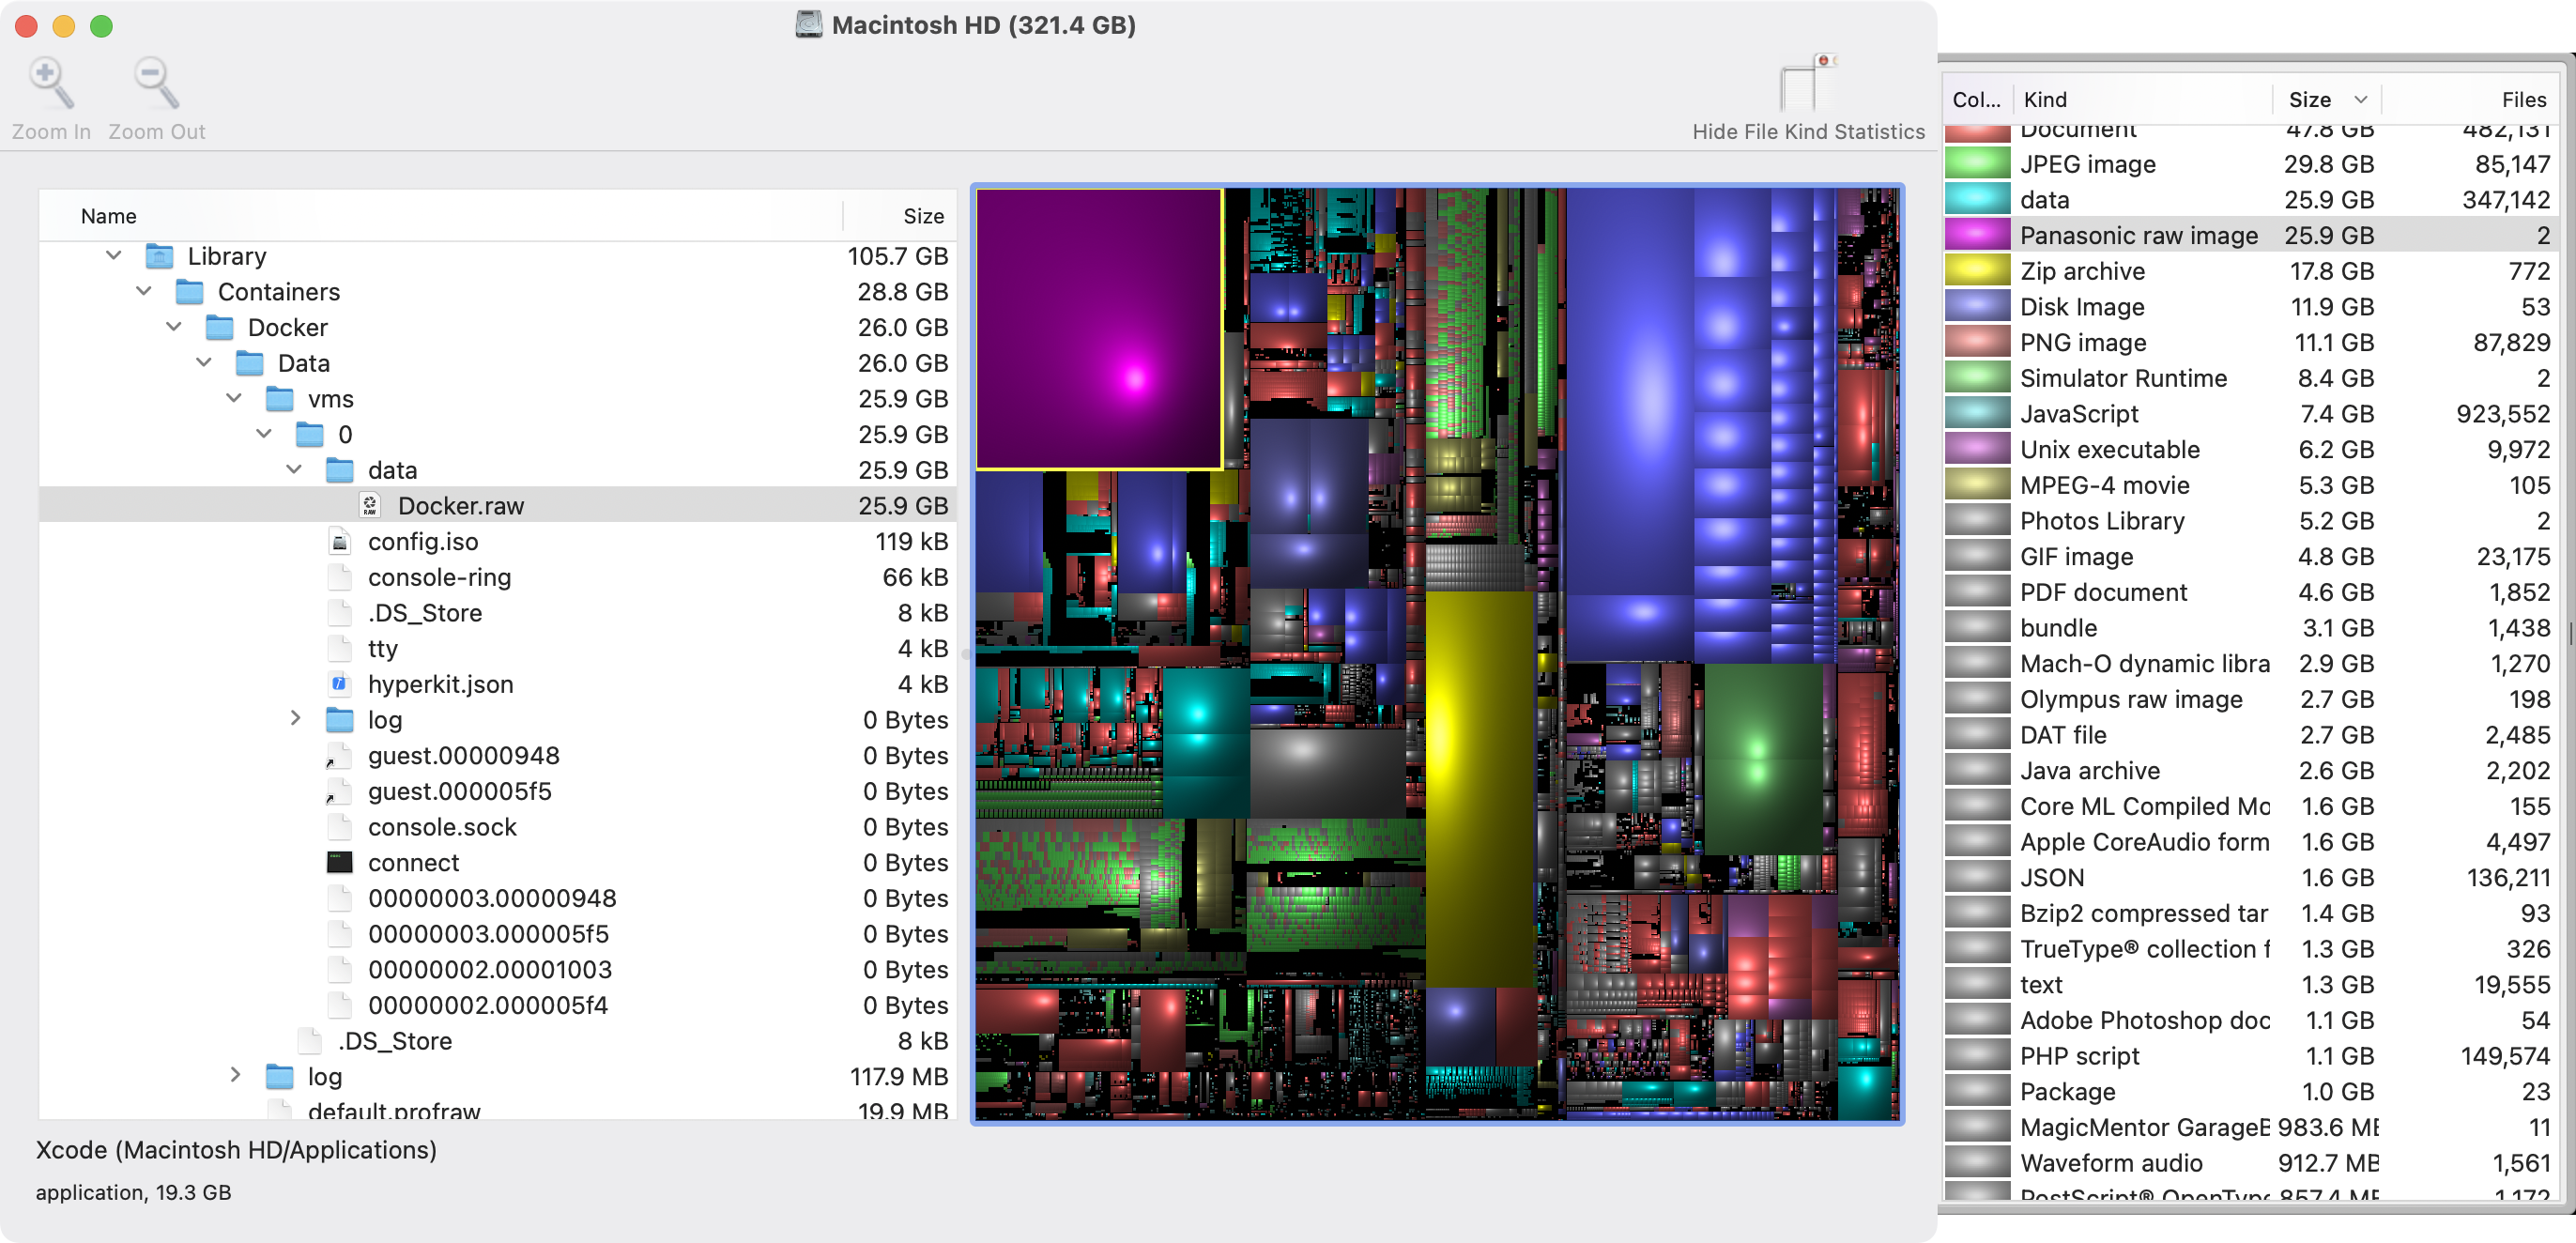
The old standby, Disk Inventory X still works under macOS 12 Monterey but requires right-clicking and opening to bypass security alerts. Disk Inventory X scans your entire Mac similarly to macOS's internal utility but does allow you to more quickly view what's taking up space in a Finder-like experience.
It benefits from showing hidden folders even if they're not set to visible. It's also not the fastest utility, somewhat out-of-date, or 100% accurate in identifying files. My Docker.raw file was identified as .RAW photographs in the above screenshot.
Onyx

Onyx makes deep cache scrubbing fast and easy.
While not specifically a utility for disk management, Onyx, the classic macOS tweaking utility, allows you to dump cache files on macOS quickly. More often this is less about reclaiming space but also forcing macOS to rebuild caches with newer/more accurate versions to help system performance.
This concludes my primer to managing your system data. Happy File Hunting!
Update: April 8, 2023: Much needed copy editing and minor corrections about pathing
-
-
Getting Drupal 9's Twig Templates Changes to Show Up / Render
I had a hell of a time getting Drupal 9 to show template changes. There are other posts and such on the interwebs about this, but none worked. Perhaps it was the lando configuration. Here are the changes I needed to make. Change the following in your
services.yml(this should be located in thesites/defaultThe exact lines are subject to change of course, but these are where I found the following in the
services.yml.line 74:
debug: trueline 83:
auto_reload: trueline 94:
cache: falseThat's it! Happy Drupal Developing (if there's such a thing).
-
Scam3 - The Problem With NFTs
I have to admit I was unfamiliar with Dan Olsen prior, but this singular herculean two-hour explanation of crypto is better than the entire HBO Max series "Generation Hustle" about grifters. If you had a sinking feeling that NFTs were a scam, this incredibly dense and darkly humorous look at NFTs ranks as easily the top things ever to appear on youtube.
I link this hoping to use my tiny bit of google index rankings in the hopes this becomes the default position on "crypto-bros". It's two hours, but I doubt there are many two hours of better YouTube.a
Also, some other YouTuber *who I think is a gaming channel?) gives an incredibly cogent explanation of the NFTs. There are a lot of really good analogies in plain speech.
-
How to fix the 'Complete your HBO Max Registration' on the Apple TV when trying to sign in into HBO Max
If you're here, you have an Apple TV, you've signed into your cable service, and you're trying to connect to HBO Max. You can't use your cable company (probably something like yourname@charter.net) and its password. When you try to sign in using your provider, you see the following message:
Complete Your HBO Max Registration
Please do one of the following
Phone or tablet: Sign in to the HBO Max app Computer: Sign in to HBOMAX.com on your computer
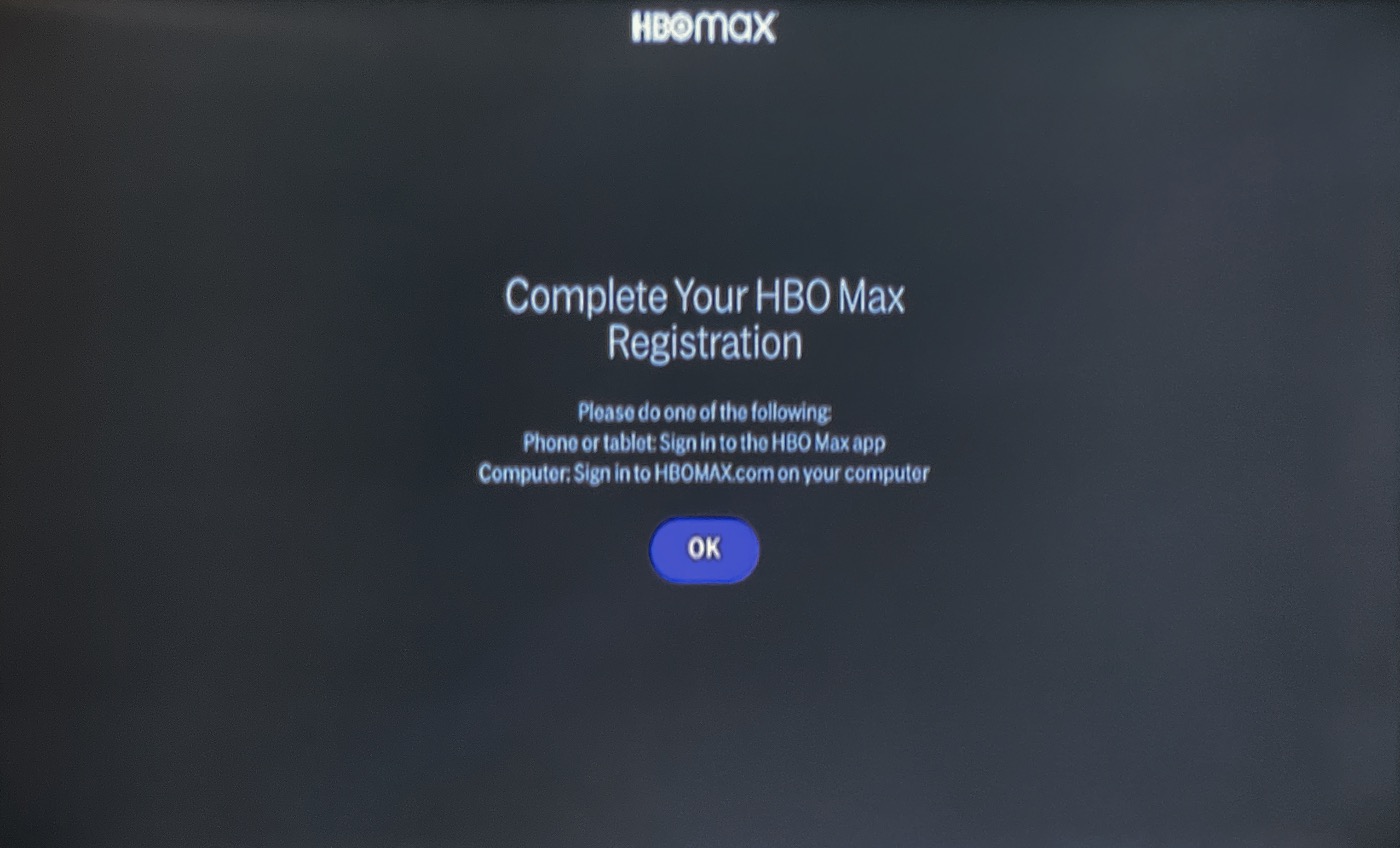
Pictured: The dreaded complete your HBO Max registration error
Below is an OK button. Nothing else is explained, and of course, HBO's documentation sucks and doesn't help.
First, use a computer, and sign in to your HBO Max account using your cable login. Next, go to your profile. Click in the upper right-hand corner and click account.
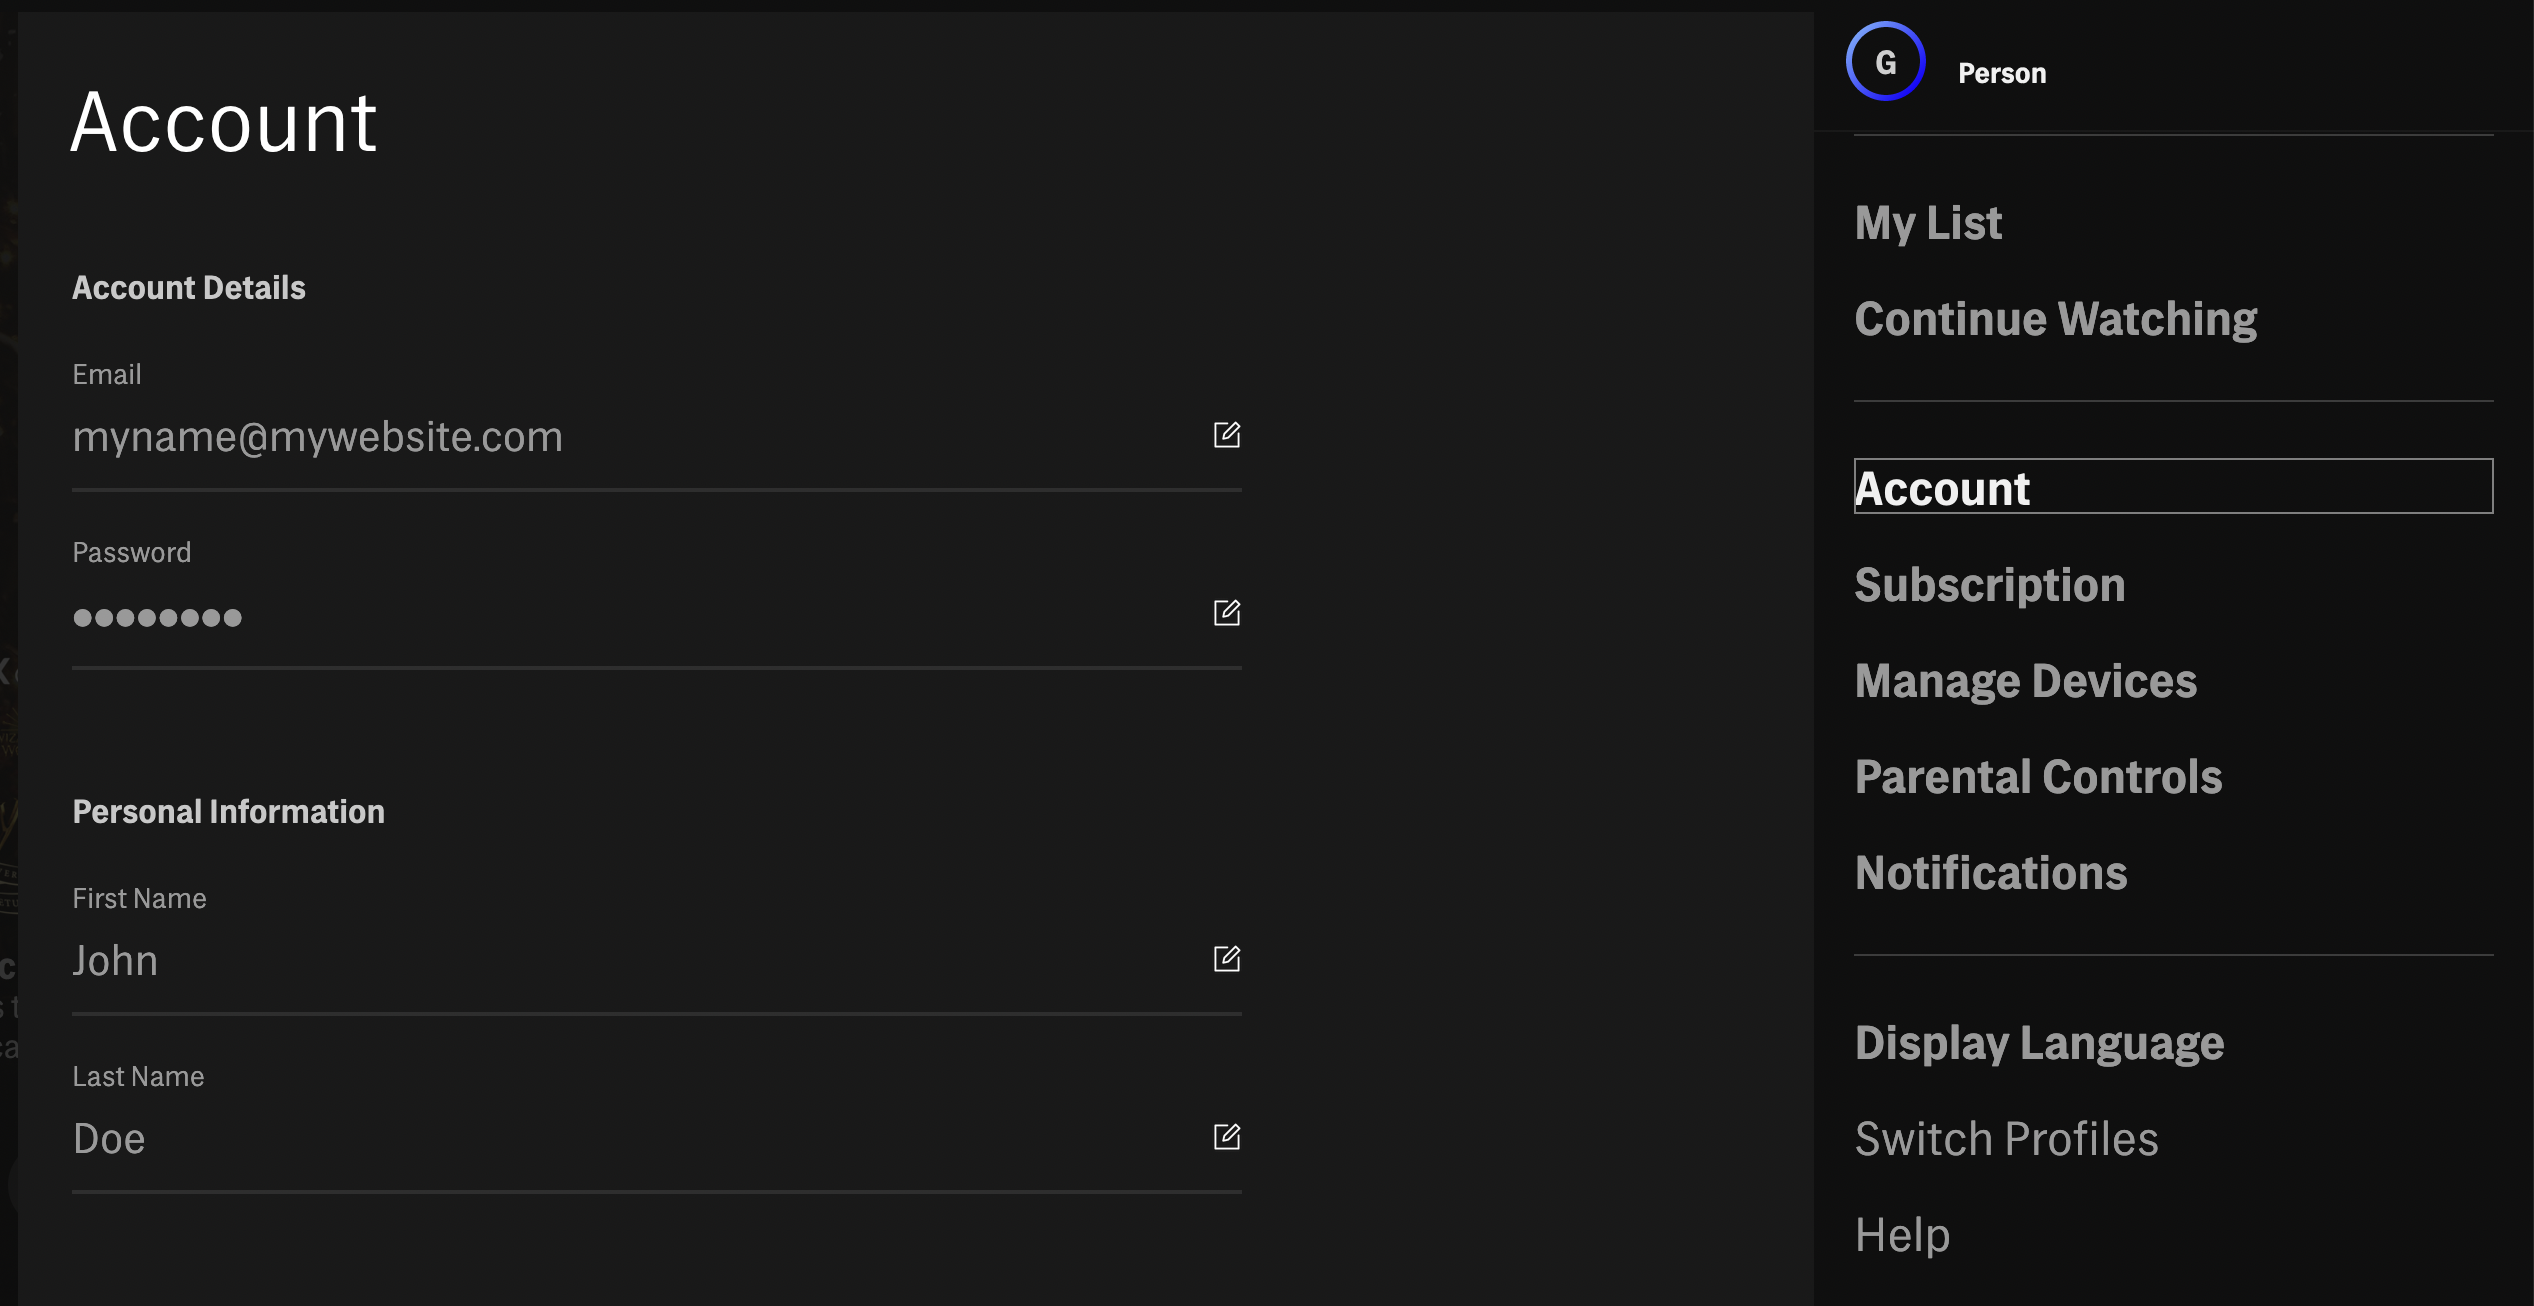
Pictured: Account window in the HBO Max website.
Make sure you have an email address here and that it's verified. You'll have to work through the verification process involving emails if it isn't. Then make sure you know the password in this section, as this will be what you're after.
Once you have verified your account, you can now go back to your Apple TV. Instead of using sign-in with your cable provider in the HBO Max app, you will use your login information from this panel (The email address as your login and the password is the password).
I also noticed that after the sign-in, it goofed, and it didn't seem to work. I quit the app, and it loaded again, this time presenting me with a profile choice, and HBO Max was working.
Hopefully, this really stupid fix helps. I wasted about an hour trying to figure out what was wrong only to discover this was the issue.
-
The Definitive Mac Pro 2019 7,1 Upgrade Guide
This is a public beta :)
People don't realize how many hours writing/researching my Mac Pro guides takes, and my previous guides all started somewhere, too. The information should be accurate but expanding and formatted. If it isn't, please reach out to me. For information about changes and future plans, check the bottom of this blog post.
Thank you for understanding.
Supporters Thank you
After years of maintaining this guide for free, I now am accepting patreon supporters
Contents
- Introduction
- Glossary
- Know your Mac Pro 2019
- PCIe
- Power Supply
- Case
- Networking
- Apple T2 Security chipset
- Afterburner
- Firmware And OS
- CPU Upgrades
- GPU upgrades
- I/O Upgrades
- Storages Upgrades
- Hard Disk Drives
- PCIe SATA + SSD Sleds
- The M.2 format and Apple NGFF
- The M.2 format and host PCIe cards
- Can I use a card that isn't listed above that host's multiple NVMe drives?
- Which M.2 host is the best?
- M.2 and Heatsinks
- PCIe AHCI (Advanced Host Controller Interface) SSDs
- PCIe NVMe
- Not all SSDs are equal
- Benchmarking SSDs
- RAID and APFS and performance
- Soft RAID
- RAM upgrades
- Display Upgrades
- Audio upgrades
- Error Codes
- Windows 10 & 11
- iPhone as a webcam
- Multi-OS USB Bootable Flash Drives
- Communities & Blogs
- Apple Silicon and the Mac Pro's fate (and additional observations)
- Updates & Author Notes
Introduction
Upgrading a Mac Pro 2019 isn't hard. The information is out there, but knowing what is possible, what questions to ask, and where to find it isn't nearly as easy. This is less a how-to guide/manual than a roadmap to primary sources by other brilliant people, written to be accessible to both new and advanced users.
This is the 3rd edition of the Definitive Mac Pro Upgrade series, as I've written guides for the classic Mac Pros 1,1-5,1 (2006 - 2012) and the Mac Pro 6,1 (2013), and now the Mac Pro 7,1 (2019). The original had its roots in 2013 when I wrote up a list of Mac Pro upgrades and graphic card update articles. In 2018, I went to update the guide for recommended updates, which morphed into a complete rewrite. The result became the Definitive Mac Pro Upgrade Guide.
The 2019 Mac Pro represents the best and worst of Apple's intentions. By every measurable standard, it is the most upgraded Mac, brilliantly engineered with the loftiest "Apple tax" of any Mac ($699 wheels). Instead of embracing the rugged utility that the previous Mac Pros represented, Apple made it an aspirational device over an everyman's professional computer. Its entire design is striking, and its internals are artful. Regardless of its overpricing, it harkens back to a nearly bygone era of modular computing, which may end with Apple Silicon. While we live in a world of planned obsolescence, the Mac Pro 2019 feels even more important. There's likely one more iteration of the 2019 Mac Pro (2022? 8,1?), and then we can only speculate as to the future of the Mac Pro and the Macintosh platform.
This guide borrows heavily from my other guides and does include some direct paragraphs lifted from my other guides when appropriate.
Getting Started / Glossary
Jumping into the world of macOS can be daunting as there's a lot of assumed tribal knowledge and history, but it isn't insurmountable. I try to avoid unnecessary shorthand, but there are a few unavoidable terms. I like to write for as many people as possible and to remain accessible as my guides are read by novice and technical-minded native-English speakers to people using translation software.
There is a base assumption for understanding for sanity's sake, but hopefully, a low enough bar that novice users can follow along and learn. We all start somewhere, and no one should ever feel bad for asking questions. Examples of assumed knowledge would be the fundamental difference between an SSD and Hard Disk Drive or the basic concept of CPU cores. Many other sources can educate users on these topics and do a better job than I would. I try to explain core concepts or provide links when necessary to help educate a user. This means this guide is long but informative. The initial inclination will be to skip sections. However, some key information may often be discussed in intros and other sections. I've tried to mitigate this, but there's a lot of information to digest. If you feel that something is unclear or never adequately explained, please reach out to me and let me know as my readers are a global audience and of all walks of life and a wide variety of skillsets. I've often been humbled by people who are much more knowledgeable than me, and I appreciate anyone who points out errors or novices who feel something is confusing. Please see the Changelog for more details on how to reach out to me. We all start somewhere, and I frequently question my aptitude when I see how much heavy lifting others have done to realize this guide. For my more technical users, I depend on you for accuracy. This is truly a community effort.
Apple Silicon - There's a lot to unpack on this topic. Still, the short answer is that Apple is transitioning away from using Intel CPUs to CPUs of its own design, manufactured by TSMC using the ARM CPU instruction set, a form of RISC. There's a bit greater irony as Apple once used RISC CPUs in its Macs in the 1990s, known as PowerPC. No one knows how long Apple will continue to support Intel Macs. See 86x.
APFS - Short for Apple File System, a proprietary file system used on Mac OS and iOS. File systems define how data is stored and retrieved in an operating system. File Systems, like all software, have limitations, and APFS was used to fix many of the shortcomings of HFS+. The transition to APFS was (relatively) smooth. APFS has limitations, such as a lack of native support for RAID0 boot volumes.
Bits vs. Bytes - You probably know this one by heart: There are 8-bits to every byte. For this guide to avoid confusion, I use bytes instead of bits when discussing all things bandwidth-related, even though networking favors bits and local storage favors bytes. It's pretty easy to mistake bits for bytes as it hinges on capitalization. 10 gigabits-per-sec is written in shorthand as 10 Gbps. 10 Gigabytes-per-second is written as 10 GBps or 10 GB/s. Converting bits to bytes means dividing by eight. 10 Gbps = 1.25 GB/s (or 1.25 GBps). Download speeds are expressed by operating systems in bytes per second, which confuses consumers as internet connections are not. For example: A 100 Mbps network connection has a maximum bandwidth of 12.5 MB/s.
cMP - shorthand for classic Mac Pro. It refers to any Mac Pro released between 2006-2012. The phrase "Classic Mac Pro" only refers to these models and not the similar-looking PowerMac G5 or the 2013 Mac Pro.
UEFI - Short for Universal Extensible Firmware Interface, a specification designed by Intel to replace BIOS as the method to interface between an operating system and the platform firmware. This former isn't essential to understand beyond that it is a computer's firmware, designed to replace BIOS. This interface allows selecting a boot drive before OS X begins booting (by holding down the option), among other pre-OS loading functionality. I use the term EFI loosely to refer to the pre-boot functionality. The previous classic Mac Pros used a non-standard EFI as Apple built its earlier Intel Macs before UEFI. The Mac Pro 2019 uses UEFI. Thus, any GPU supporting UEFI (all of the current AMD GPUs) will output a boot screen.
Firmware - a term you probably have heard and already possess some understanding of, the standard definition is a program that is written into Read-Only Memory (ROMs) and requires a specialized process to change (if it can be changed at all) called Flashing.
Flash/Flashing - The act of writing over data that exists in an otherwise in Read-Only Memory (ROM) or space (Firmware).
Hackintosh - Any non-Apple hardware that is running any version of Mac OS, generally standard PCs using a lot of software workarounds and particular hardware.
HomeBrew - long-time computer users are probably familiar with the term "homebrew" regarding user/hobbyist applications written for systems that generally were closed architecture, like a videogame console. However, regarding the Macintosh platform, HomeBrew is a package manager for macOS for (mostly) command-line utilities. Package managers function, in principle, like an app store for open-source software, as you can quickly install, update, and uninstall the software from your command line. For developers, Homebrew occupies a very important space as it's one of the most preferred ways to install nodejs, python, git, MySQL, as well as utilities like youtube-dl, FFmpeg, ImageMagick, and MonitorControl.
Kext - With OS X, the architecture for drivers uses kernel extensions called .kext files. Kexts are supremely powerful and the backbone for the Hackintosh community to enable unsupported hardware. However, Apple has deprecated kexts in 10.15 Catalina for security reasons, replacing them with EndpointSecurity, SystemExtensions, and DriverKit. How this affects unsupported hardware remains to be seen. Kexts are located within /System/Library/Extension and /Library/Extensions.
OS X / macOS- Mac OS X is Apple's XNU kernel-based operating system evolved from NeXTstep. Mac OS X was rebranded to macOS in 2016. I use these interchangeably as I have a tough time accepting macOS, as it is still OS X to me. The difference is superficial. Mac OS is not to be confused with Mac OS classic (Mac OS 7.x - 9.x). Today, all of Apple's OSes share the XNU kernel and are all descendants of NeXTStep.
Metal - Previously, Apple's default graphics library for graphics acceleration was OpenGL (Open Graphics Library), used on iOS and Mac OS. Over time, OpenGL fell behind in performance and features when compared to a library like Microsoft's DirectX. Without an ideal candidate to replace it (OpenGL's successor, Vulkan, would not be released until 2016), Apple created its own graphics library called Metal and shipped it in 2014 on iOS 8 first. Later, Apple ported Metal to OSX. Mac OS 10.14 Mojave uses Metal to now power Mac OS. The new API does not support many old GPUs, as their drivers were not updated. This isn't much of a concern for 2019 Mac Pro owners.
NVRAM/PRAM - Non-volatile random-access memory (previously Parameter RAM) is a space reserved for various low-level settings found on Macs pertaining to the pre-boot settings. These settings contain data such as default boot volume, backup boot volumes, default audio output, audio levels, computer's name, Keyboard language, backlight level (for laptops), whether Bluetooth is enabled, default GPU, and so forth. The contents of the NVRAM can be viewed via the terminal using nvram -xp. The difference between NVRAM vs. PRAM is transparent to the user. NVRAM uses a small storage space using flash-based storage, whereas the PRAM uses a battery to keep the settings buffered in the RAM. Occasionally, problems can arise (generally associated with hardware upgrades) that can cause problems. Resetting the NVRAM is still referred to as "zapping the PRAM ."This is performed by holding down the Command + option + p + r keys during boot before the system chime, which will cause the computer to reboot immediately and chime again. This will clear out the NVRAM. Alternatively, the NVRAM ram can reset via the terminal using NVRAM -c, which will require restarting manually for the changes to take effect.
SIP - System integrity protection, a feature of later Mac OS introduced in OS X El Capitan, that walls off portions of low-level features of Mac OS to protect it from malware. Prior to this, any application with root-level access could read/edit/modify system files. However, sometimes, when performing certain hacks, it requires disabling during installation and then re-enabling. There are legitimate reasons why users may want to leave it disabled. See Disable System integrity protection for instructions. See About System Integrity Protection on your Mac on Apple.com for more details.
Terminal/shell - OS X is famously built on NeXTStep, which was a *nix-based operating system that gave it access to a new (old) feature, a command-line shell. This allowed Mac users to interact with the OS akin to Unix/Linux. Many advanced Mac OS operations can only be performed via the terminal, such as disabling SIP or enabling TRIM for an SSD. Users unfamiliar with the terminal world should always exercise due diligence before copying and pasting random snippets of code found on the web for the terminal. Any Mac user looking to become a power user should make an effort to learn terminal basics. The ability to operate the terminal unlocks a feature set outside of the GUI and can do many of the GUI's functions. An additional perk is that terminal skills translate to Linux and Unix, which is good for server management/networking or web development. Many utilities are command-line only, like the ever-power ImageMagick, which can batch-process images much faster than GUI applications. Prior to 10.15, Apple used Bash for its terminal but now has pivoted to ZSH.
X86 - This is shorthand for "Intel" as the Intel CPU family has its roots in the 8086 family, which would evolve to the Intel 80286 in 1982, a CPU that was not initially designed for personal computers but would become one of the foundations for the PC revolution. The CPUs would be reduced from the long "80286" moniker to shorter names like the popular "i386" successor. The CPU family eventually would land on "x86" to describe the set of instructions the CPU could execute. Apple would abandon in 2006 the IBM PowerPC (PPC) family for the Intel family, marking the 3rd time it had switched CPUs, as it originally started on the Motorola 68k instruction set.
Know your Mac Pro 2019
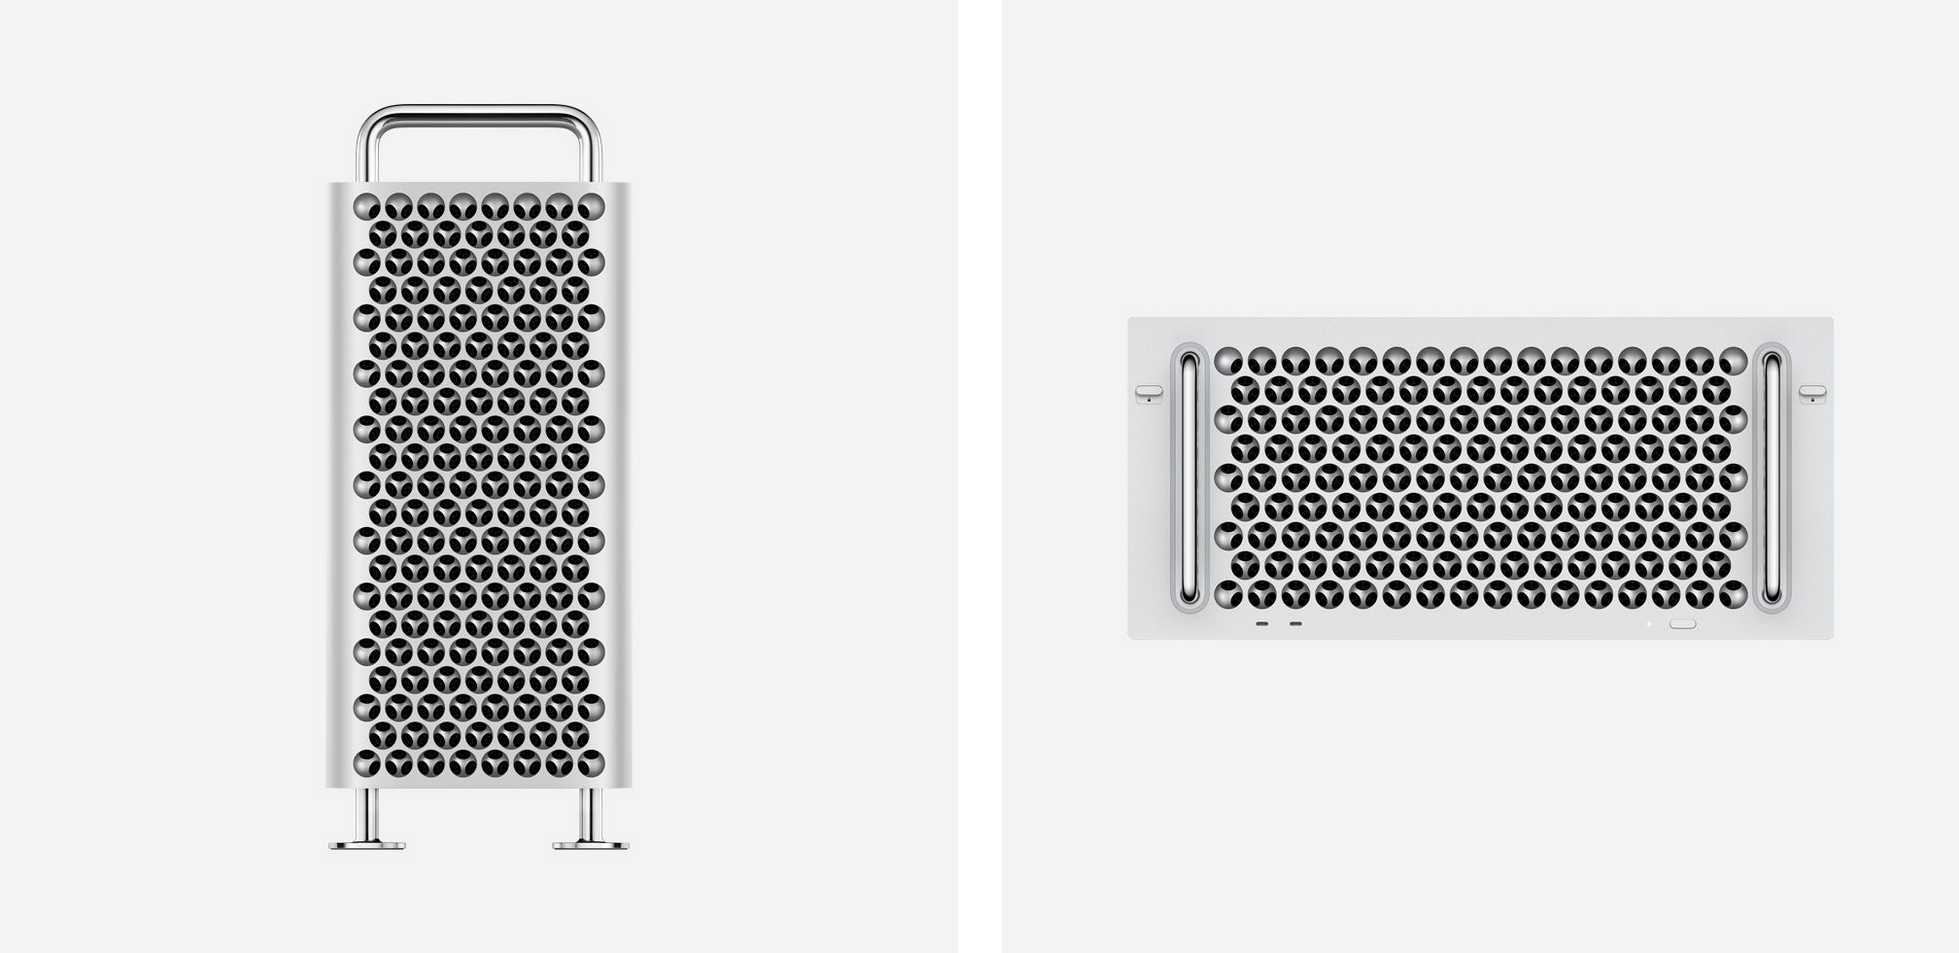
Pictured: Apple Mac Pro 2019 only comes in two form factors: tower and rack mount. Both are listed as a Mac Pro 7,1.
Photo credit: Apple.comYou can find out a Mac Pro's version by going to "About this Mac" -> System Report under the Apple menu. Currently, there is only one iteration of the 2019 Mac Pro, with the only meaningful difference being a rack mount vs. a standard case. This may change if Apple releases an updated Mac Pro.
The Mac Pro desktop can be outfitted with Apple's comically overpriced $699 wheels. OWC, never one to miss an opportunity to overcharge, offers its $249 Rover Wheels. Apple has instructions on how to remove the feet / install the wheels.
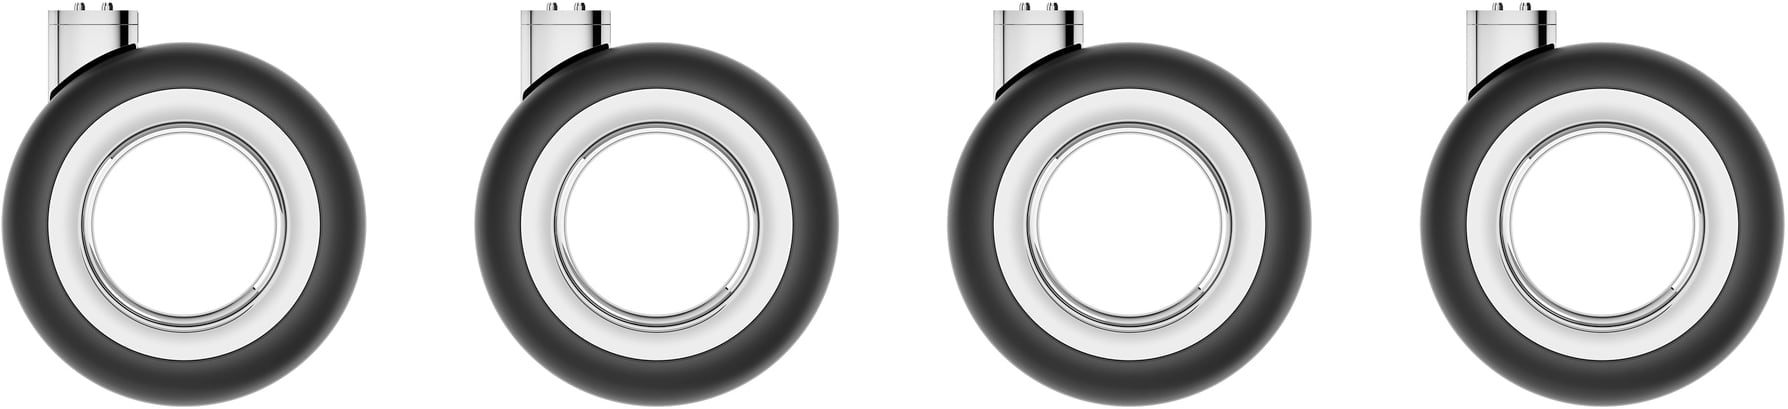
Pictured: The infamous Mac Pro wheels
Photo credit: Apple.comInstallation required. A 1/4-inch to 4 mm hex bit is included, but additional tools are necessary. Replacing the Mac Pro wheels with feet reduces approximately one inch to the height of the frame.
Specs overview
- CPU LGA 3647 (Socket P). It is removable (upgradable)
- Eight PCIe Slots (Four PCIe slots accommodate two MPX modules)
- Two SATA-3 internal Ports
- One internal USB 3.2 port
- Two USB 3 ports (on a pre-installed Apple I/O card)
- four Thunderbolt 3 ports (two on the Apple I/O card and two on the top of the case
- two 10Gb Ethernet ports
- 3.5 mm headphone jack with headset support
- 802.11ac/Bluetooth
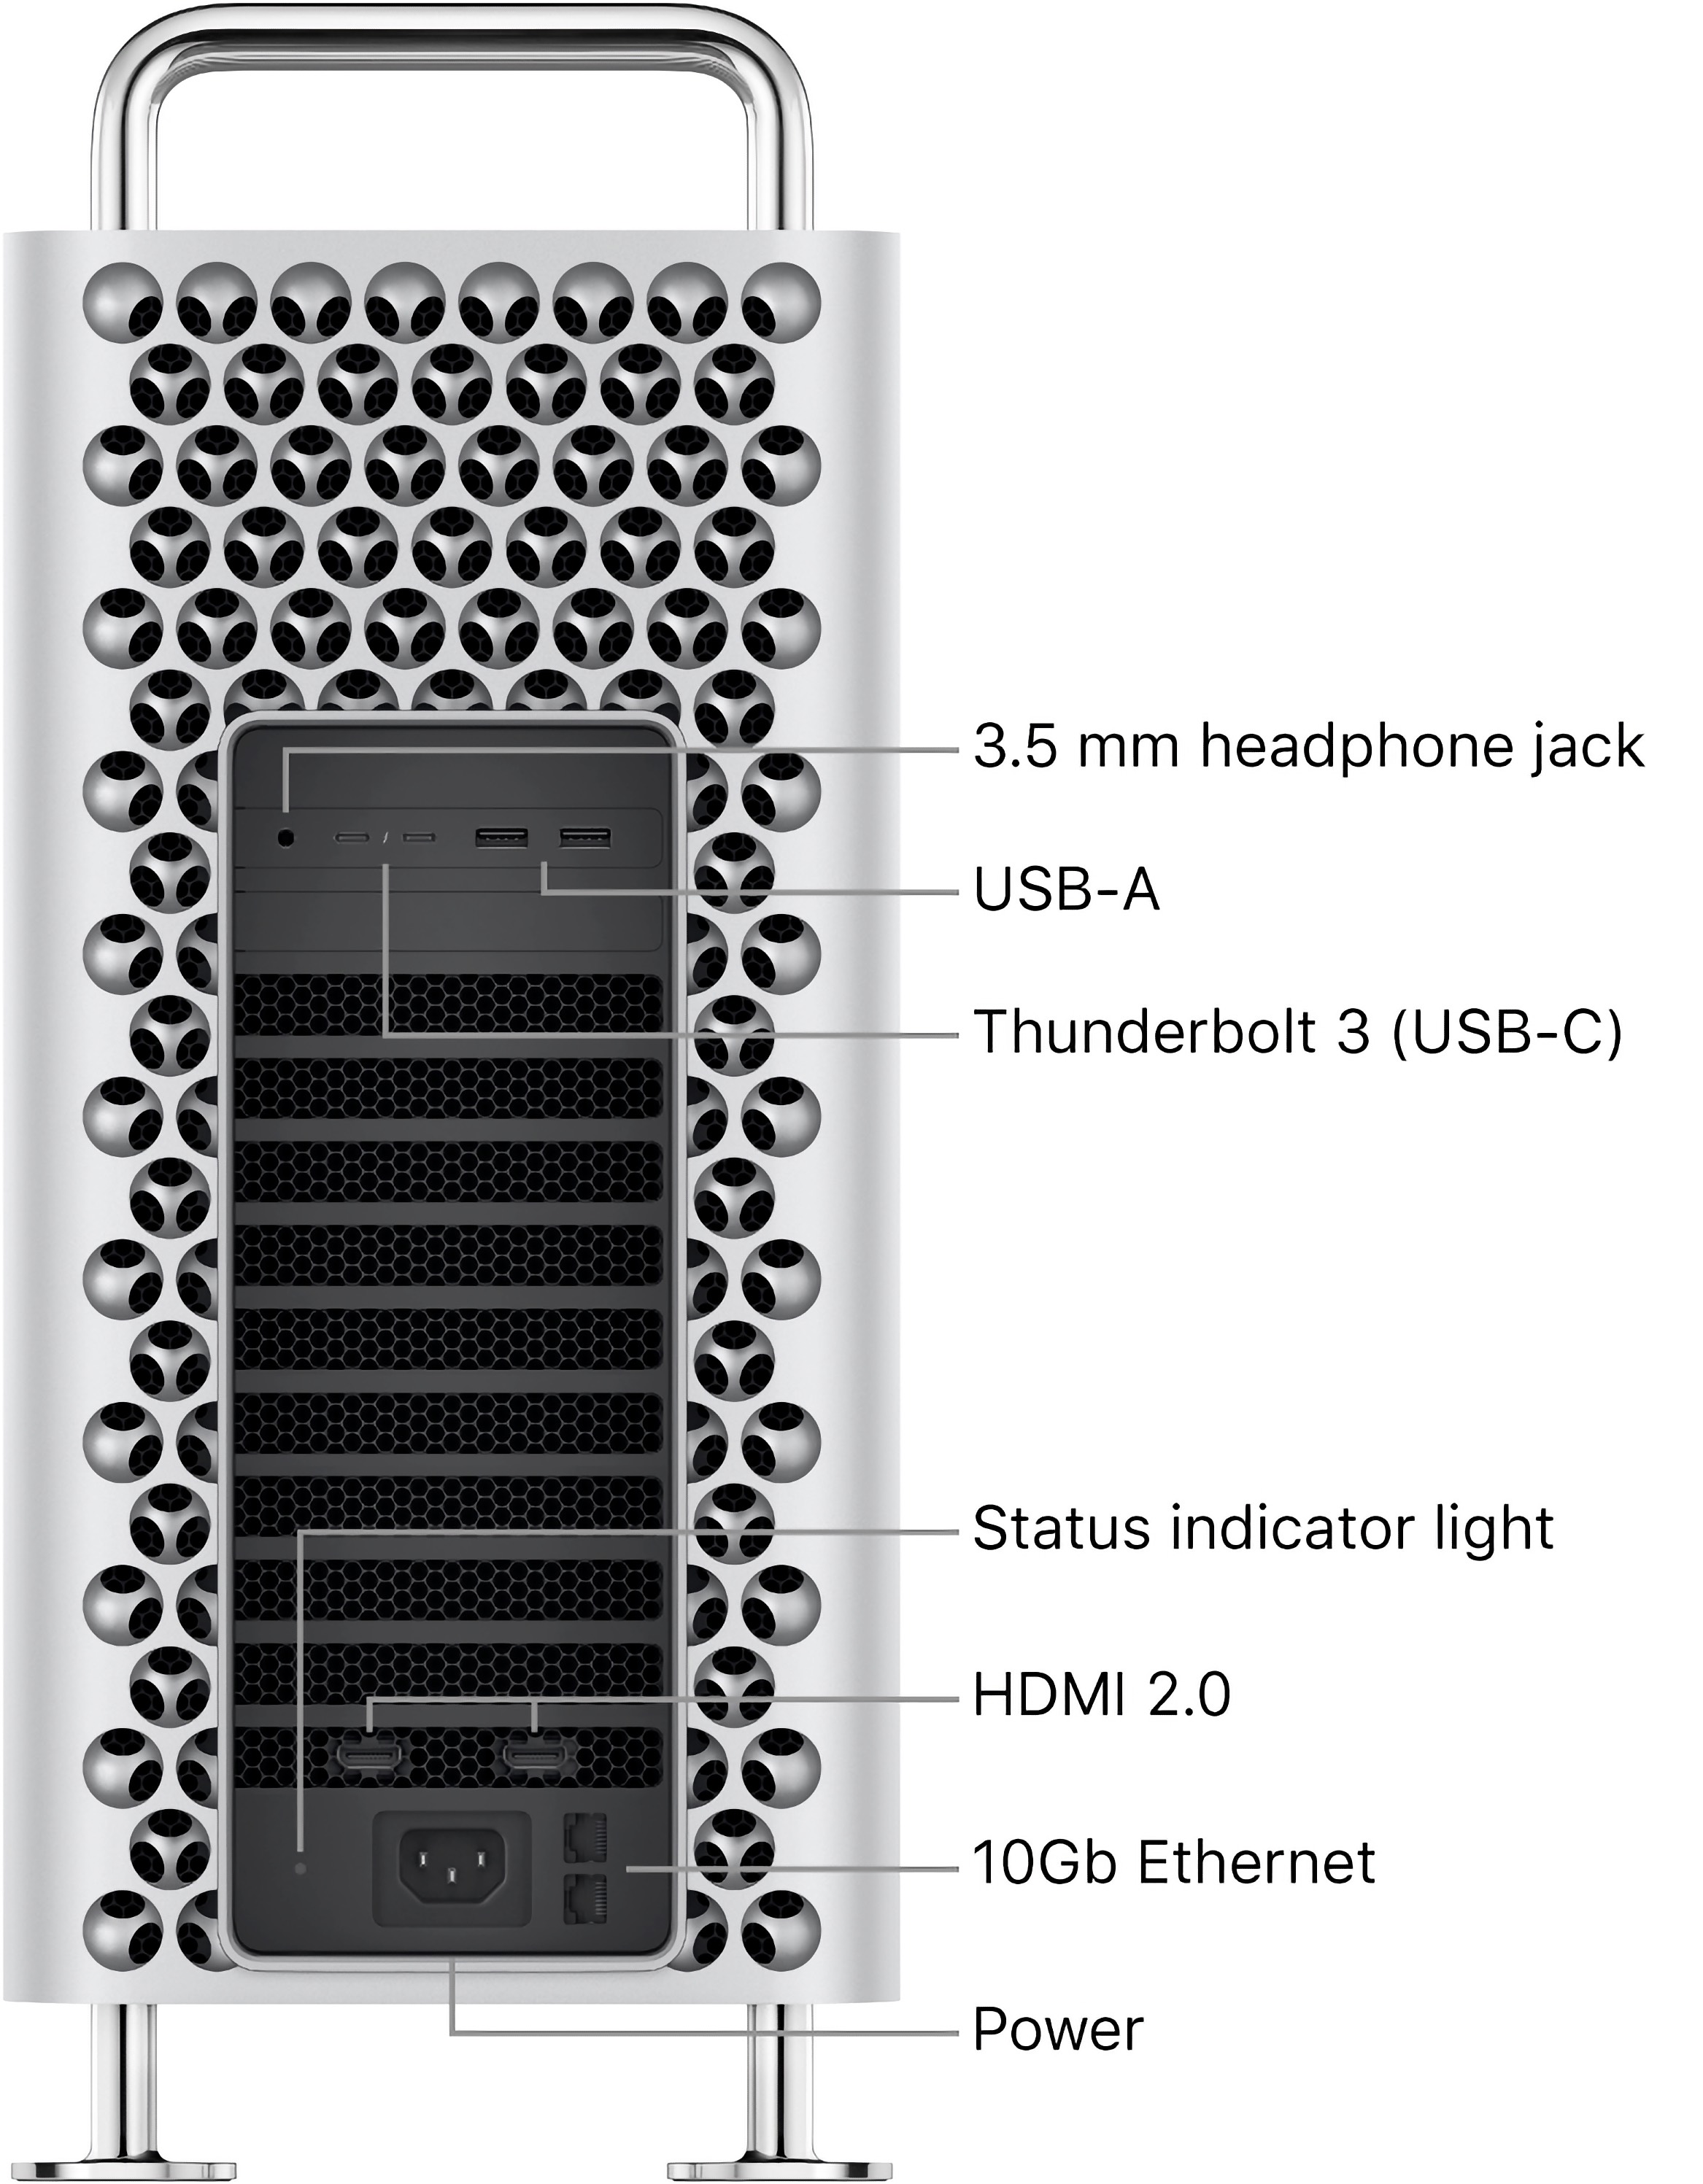
Pictured: Mac Pro 7,1 default ports
Photo credit: Apple.comApple reports that each of the two MPX bays "provides x16 Gen 3 bandwidth for graphics, x8 Gen 3 bandwidth for Thunderbolt, DisplayPort video routing, and up to 500W power for an MPX module. Mac Pro has three full-length PCIe Gen 3 slots (one x16 slot; two x8 slots) with 75W of auxiliary power available; and one half-length x4 PCIe Gen 3 slot with an Apple I/O card installed by default.
Also, see: How do you upgrade the processor in the "2019" Mac Pro? How is the processor mounted? Is it even possible to upgrade the processor?
The only difference is the 8-Core CPU that ships with the base model down-clocks RAM, but upgrading the CPU will unlock the ability to use higher-clocked RAM.
PCIe

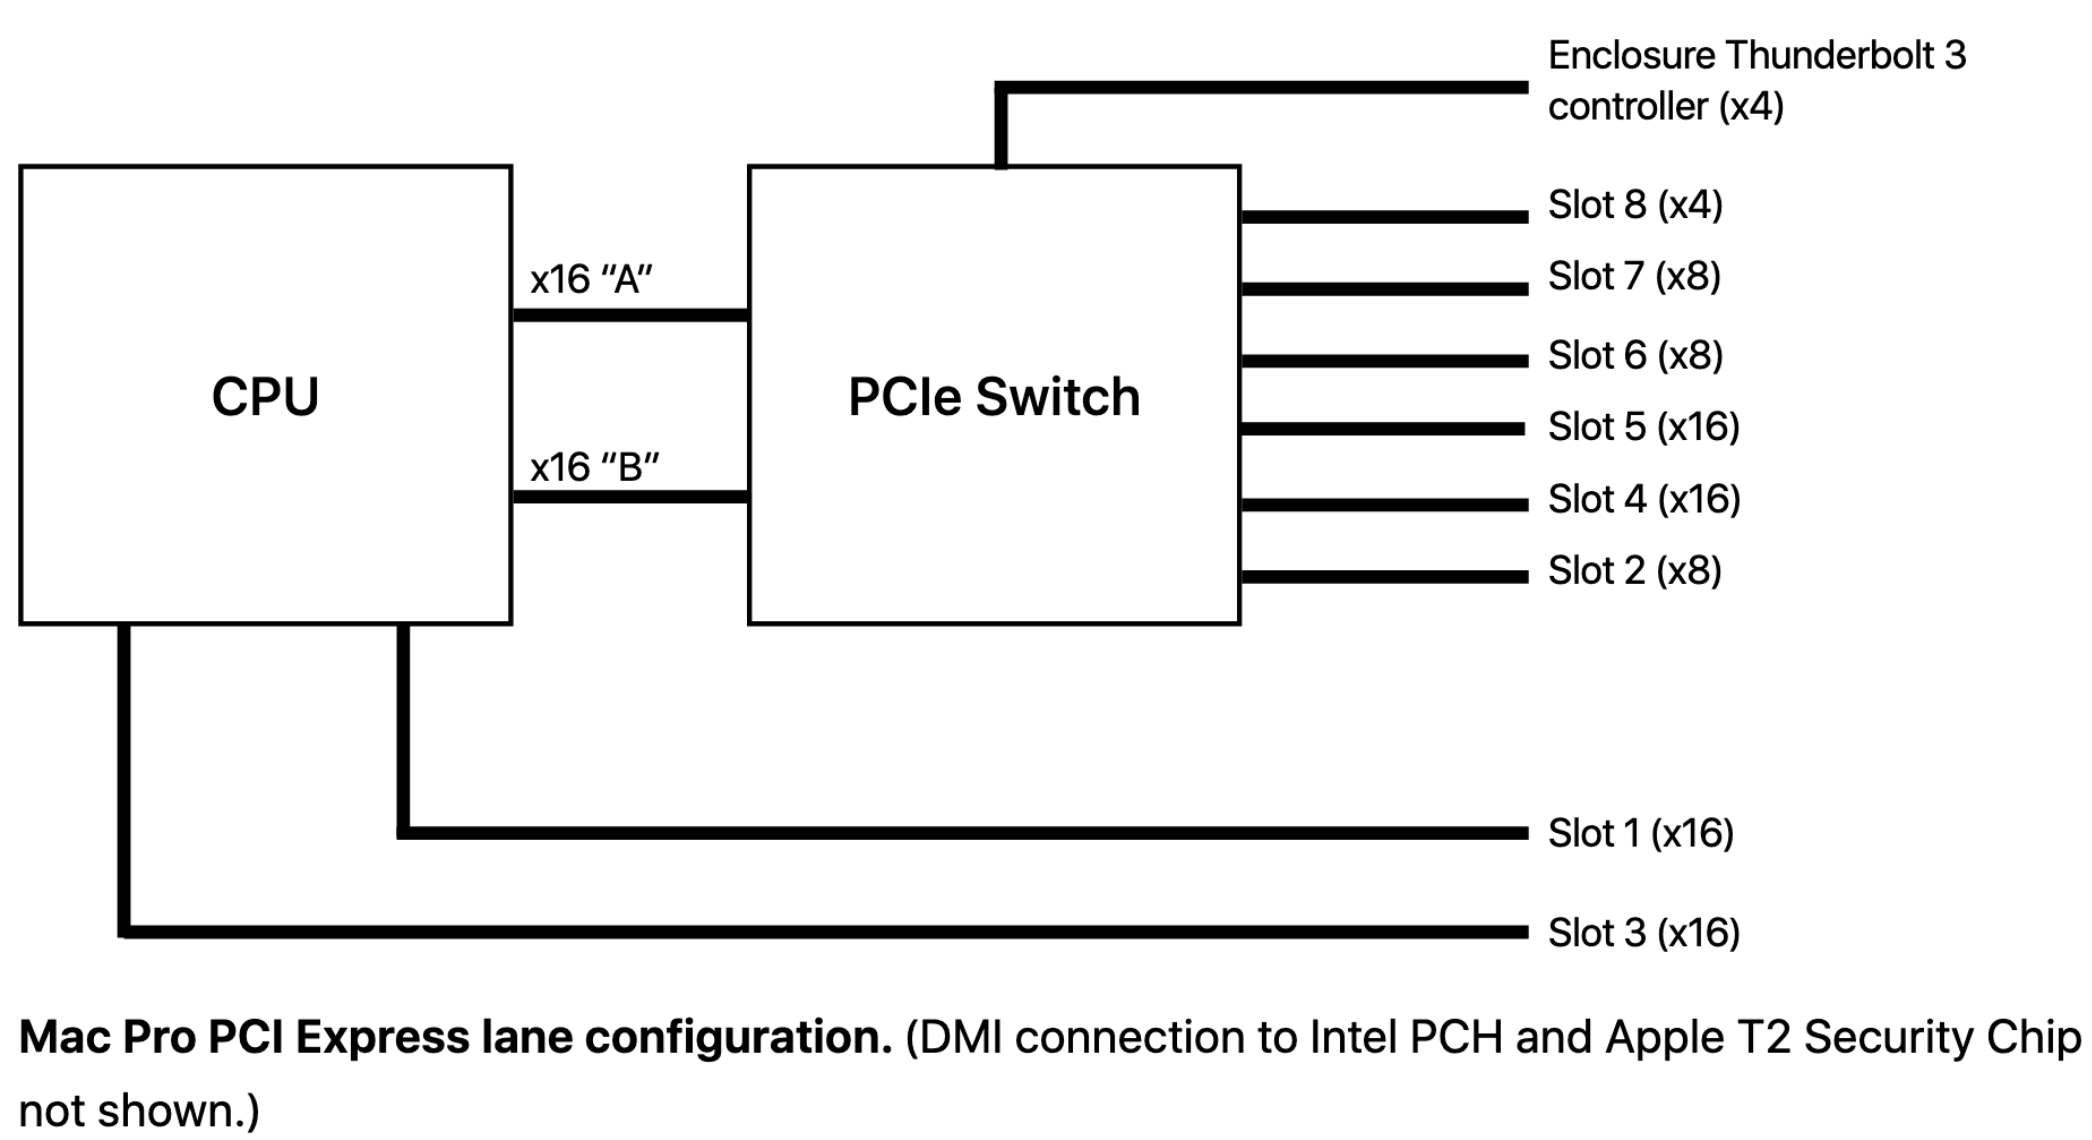
Pictured: Mac Pro 7,1 PCIe layout
Photo credit: Apple.comPeripheral Component Interconnect Express (PCIe or PCI-E) is the evolution of PCI, which migrated from a parallel bus system (where all cards in a computer competed for the same bandwidth ) to discrete connections. The Mac Pro has a total of 64 lanes that can be managed via a utility that allows the user to define what ports receive more bandwidth, defined in "lanes". PCIe has become the backbone of computers since its first iteration in 2003 and continues to be used, even on laptops for high-speed storage. Apple Silicon computers for NVMe storage do not use PCIe.
Each iteration of PCIe radically increases the speed by doubling the available bandwidth. Also, to add a minor bit of confusion, different chipsets have different amounts of total "lanes," measuring speed for a PCIe slot. PCIe slots are not all equal speed; thus, the total lanes are distributed across the PCIe slots.
Not all PCIe slots are the same. The amount of lanes a PCIe slot has access to is expressed numerically: 1x (1 lane), 2x (2 lanes), 4x (4 lanes), 8x (8 lanes), and 16x (16 lanes). The maximum speed of each lane depends on the version of PCIe a computer has. A 1.x PCIe 1x slot has access to 250 MB/s. Thus a 4x has a maximum of 1 GB/s, and 8x has a maximum of 2 GB/s, and so on. Each generation of PCIe effectively doubles the speed of a lane. A PCIe 2.0 lane is 500 MB/s and PCIe 3.0 lane is 1 GB/s. Generally, PCIe speeds are expressed in bytes, not bits. A PCIe 3.0 16x speed (16 GB/s) would be 128 Gbps (128000 Mbps). In this guide, I will use MB/s and GB/s instead of Gbps and Mbps, as transfer speeds are generally expressed in bytes, not bits.
To reiterate the dramatic speed increases of PCIe based on generation: A 16x port in PCIe 1.x has a maximum of 4 GB/s, whereas a 2.x 16x port can handle 8 GB/s, 3.x is almost 16 GB/s. All PCIe slots are backward compatible; however, the caveat is that PCIe cards may not be backward compatible (this is not common). Also, not all PCIe cards will operate at the maximum port speed, as the card's chipset may limit them. Conversely, a PCIe card may support much faster speeds but will work in any PCIe slot but will be limited by the port's maximum speed.
The Mac Pro 2019 also uses "MPX" (Mac Pro Expansion Module), a double-height PCIe slot used for Apple-branded GPUs, and the Promise Pegasus R4i 32TB RAID MPX Module for Mac Pro. Apple lists one of its reasons for MPX, citing that modern GPUs were not designed with the entire thermal design of a PC, complicated to install because of power requirements, and they do not enable video-over-thunderbolt without taxing the PCIe bus additionally.
The MPX slots have two independent Thunderbolt 3 ports with four total slots on the card. The Thunderbolt 3 controllers are on extra 8x lanes, hence having independent buses from the GPUs, leaving the entirety of the 16x slot bandwidth for the GPU.
The advantages MPX offers are more power delivery, which means not needing to run additional cabling and Thunderbolt 3 passthrough and video support. There haven't been any 3rd party MPX modules. These have entirely been GPUs. MPX is not a requirement for GPUs.
- PCIe 3.0
- 64 Total PCIe Lanes
- 8 Total PCIe SLot
- Four double-wide slots
- Three single-wide slots
- One half-length slot preconfigured with the Apple I/O card
- PCIe slots 1 and 3 direct CPU access
- PCI Express switch fabric for other PCIe lanes
PCIe lanes aren't always what they seem either, as some PCIe lanes have priority over others. The Mac Pro uses a 96-lane PEX8796 PCIe switch (PCI Express switch fabric) to manage PCIe lanes outside of the MPX slots. The MPX slots have direct CPU access. The end effect is that the direct access lanes are more performant. The end effect is that the direct access lanes are more performant. The lanes that are direct access are DMI or Direct Media Interface, which exist behind the Intel Direct Media Interface 3.0 bus MacRumors: Tsialex's about PCIe SSDs - NVMe & AHCI.
Pictured: Mac Pro 7,1 PCIe controller layout
Photo credit: Apple.comBifurcation
Motherboards, starting with PCIe 3.0, commonly support bifurcation, which allows a PCIe port to be split in half: One 16x port becomes two 8x or in quarters (16x -> four 4x slots). An 8x PCIe lane card thus can interface by splitting it into two sets of 4x lanes. This is almost exclusively used for NVMe SSDs as a single PCIe slot can connect to multiple NVMe SSDs. Bifurcation is mostly used for SSDs, allowing a single PCIe card to host two SSDs. Due to the majority of the PCIe bus being behind a controller, bifurcation isn't possible.
While the Mac Pro can use PCIe expanders (a separate technology for external PCIe slots by harassing the bandwidth of a single PCIe slot), it doesn't support bifurcation.
PCIe cards can host more than two M.2 NVMe SSDs without bifurcation, but they require specialized controller chipsets. The result is that multi-drive M.2 PCIe cards, which are Mac Pro compatible, cost more. This is also discussed in the PCIe NVMe sleds/blades section.
For a list of M. 2 cards that support multiple NVMe drives, see the M.2 SSD hosts (sleds) section.
PCIe Power Delivery
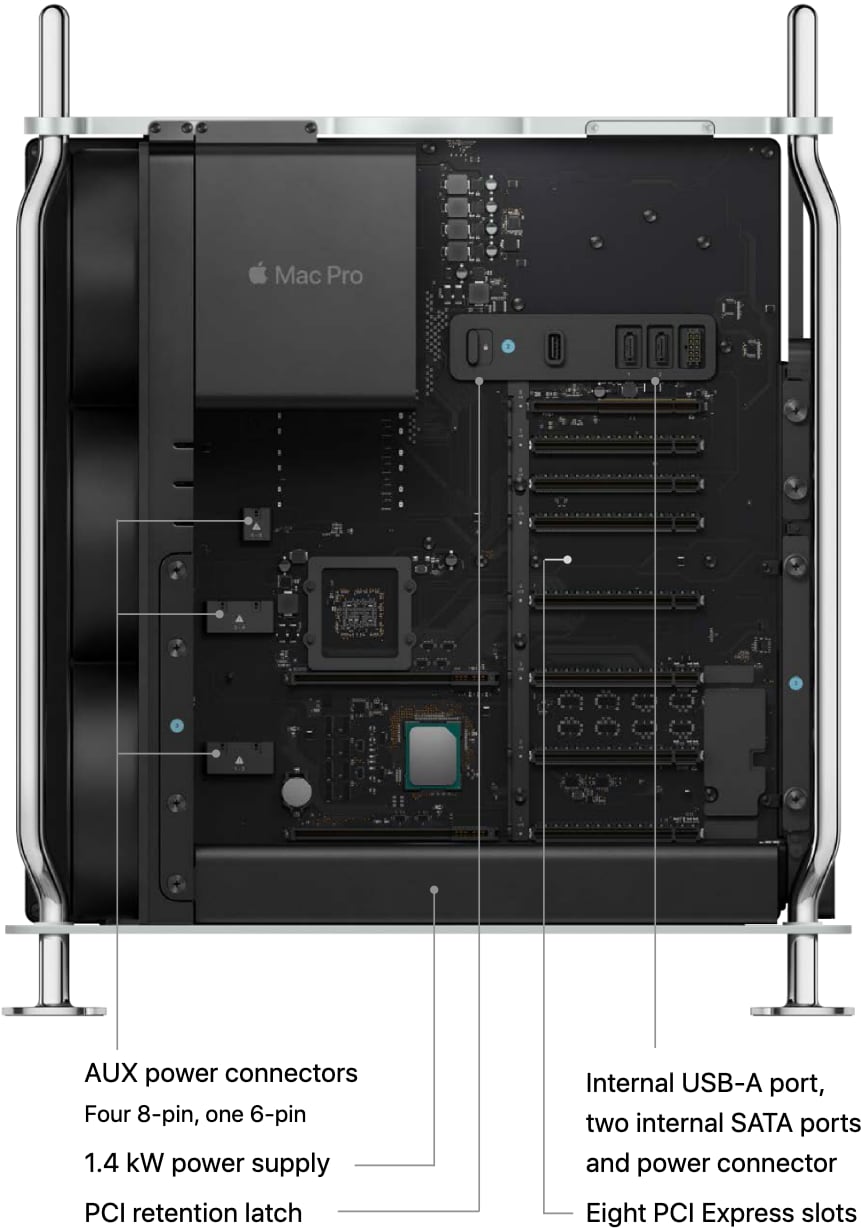
Pictured: PCIe card layout and power
Photo credit: apple.comBy default, PCIe provides power via motherboard PCIe slot, up to 75w via the port itself. The power requirements have increased for high-performance GPUs, going past PCIe's initial design. PCIe cards started coming with additional power ports and increased pins to carry more power to combat the power delivery problem. Generally, additional power is drawn directly from 12v taps off the power supply that the user can configure in PCs. The Mac Pro uses an uncommon passthrough where the PCIe power is delivered via pass-throughs on the motherboard rather than directly to the power supply and these use the mini-PCIe power cables format akin to it's older sibling, the classic Mac Pro. There are two power ports on the Mac Pros on the motherboard that can be tapped for additional power.
The Mac Pro 7,1 features:
- Four 8-pin PCIe Aux power connector (mini-PCIe)
- One 6-pin PCIe Aux power connector (mini-PCIe)
- Custom SATA power connector (see j-w.co's article on Mac Pro 2019 pin-outs)
The mini PCIe power cables are custom. Apple sells the Belkin Belkin AUX Power Cable Kit for Mac Pro but theOWC PCIe AUX Power Cables Kit is than half the price of Apple.
The MPX modules can provide up to 300w of power.
Apple I/O Card

Pictured: Apple I/O Card
Photo credit: iFixit.comThe Mac Pro 2019 comes preinstalled with a specialized card in slot 8, which features a headphone jack, two USB 3.0 Ports (5 Gb/s), and two Thunderbolt 3. The card sports a specialized routing connection that allows for routing display output from MPX modules to these two Thunderbolt 3 ports.
Due to the customized nature of the card, you cannot install a second Apple I/O Card.
PCIe 4.0 and the Mac Pro
When users complain about the lack of PCIe 4.0 on the 2019 Mac Pro, there are certainly practical reasons to want PCIe 4.0 today, but its effects depend on the device. There are a few modern PCIe 4.0 GPUs, most run at PCIe 8x 4.0, which effectively places them at the same speed as a 16x PCIe 3.0 slot. This is because GPUs do not use the amount of bandwidth most people assume they do. Puget Systems tested running an Nvidia Titan X in a PCIe 3.0 8x and 16x slot, and differences were really minor, and we can go much more modern with TechSpot.com testing out an RTX 3080 FE in a PCIe 4.0 and 3.0 computer and a smaller YouTube channel, SkuezTech tested out RX 5700 XT on PCIe 4.0 and 3.0. Again, the results barely changed. When we move to PugetSystem's test to Machine Learning Training, there's little difference between 8x and 16x PCIe slots. At least for the near future, GPUs, despite their huge power draws, aren't massive PCIe bandwidth hogs.
However, SSDs are much more capable of saturating the PCIe bus than GPUs. NVMe is based on the 4x standard. The Samsung 980 Pro can hit 6500 MB/s on a PCIe 4.0 computer and is capped at 3500 MB/s on a PCIe 3.0. Mac Pro 2019 users looking to obtain PCIe 4.0 speeds can buy specialty M.2 Host cards that negotiate more lanes for PCIe 3.0 to get the full speed. This was a common upgrade path for classic Mac Pro owners as they could use a PCIe 16x slot to get PCIe 3.0 speeds to their full potential.
Power Supply
The Mac Pro uses a non-standard PSU that does not follow the ATX convention. The power supply provides a 1.4 kW power supply capable of delivering 1280W to the system at 108–125V or 220–240V and 1180W at 100–107V. Thus far, the PSU's pin-outs have not been mapped.
The Mac Pro features internal power connectors from the motherboard:
- Four 8-pin PCIe Aux power connector
- One 8-pin PCIe Aux power connector
- Custom SATA power connector (see j-w.co's article on Mac Pro 2019 pin-outs)
See Apple.com - Mac Pro: Power consumption and thermal output (BTU/h) information.
ATX Power Supplies?
To my knowledge, no one has bothered to attempt replacing the Mac Pro's PSU with a non-Apple PSU. Few users will tax their PSU to the point of worrying about damaging it or triggering an auto-shutoff. Apple designed the PSU to handle extreme configurations such as a 2.5GHz 28-core Intel Xeon W processor, two Radeon Pro Vega II Duo MPX Modules with Infinity Fabric Link, 1.5TB RAM (twelve 128GB 2933MHz DDR4 ECC DIMMs), Afterburner card, 4TB SSD, which Apple boasts on its official documentation.
Case
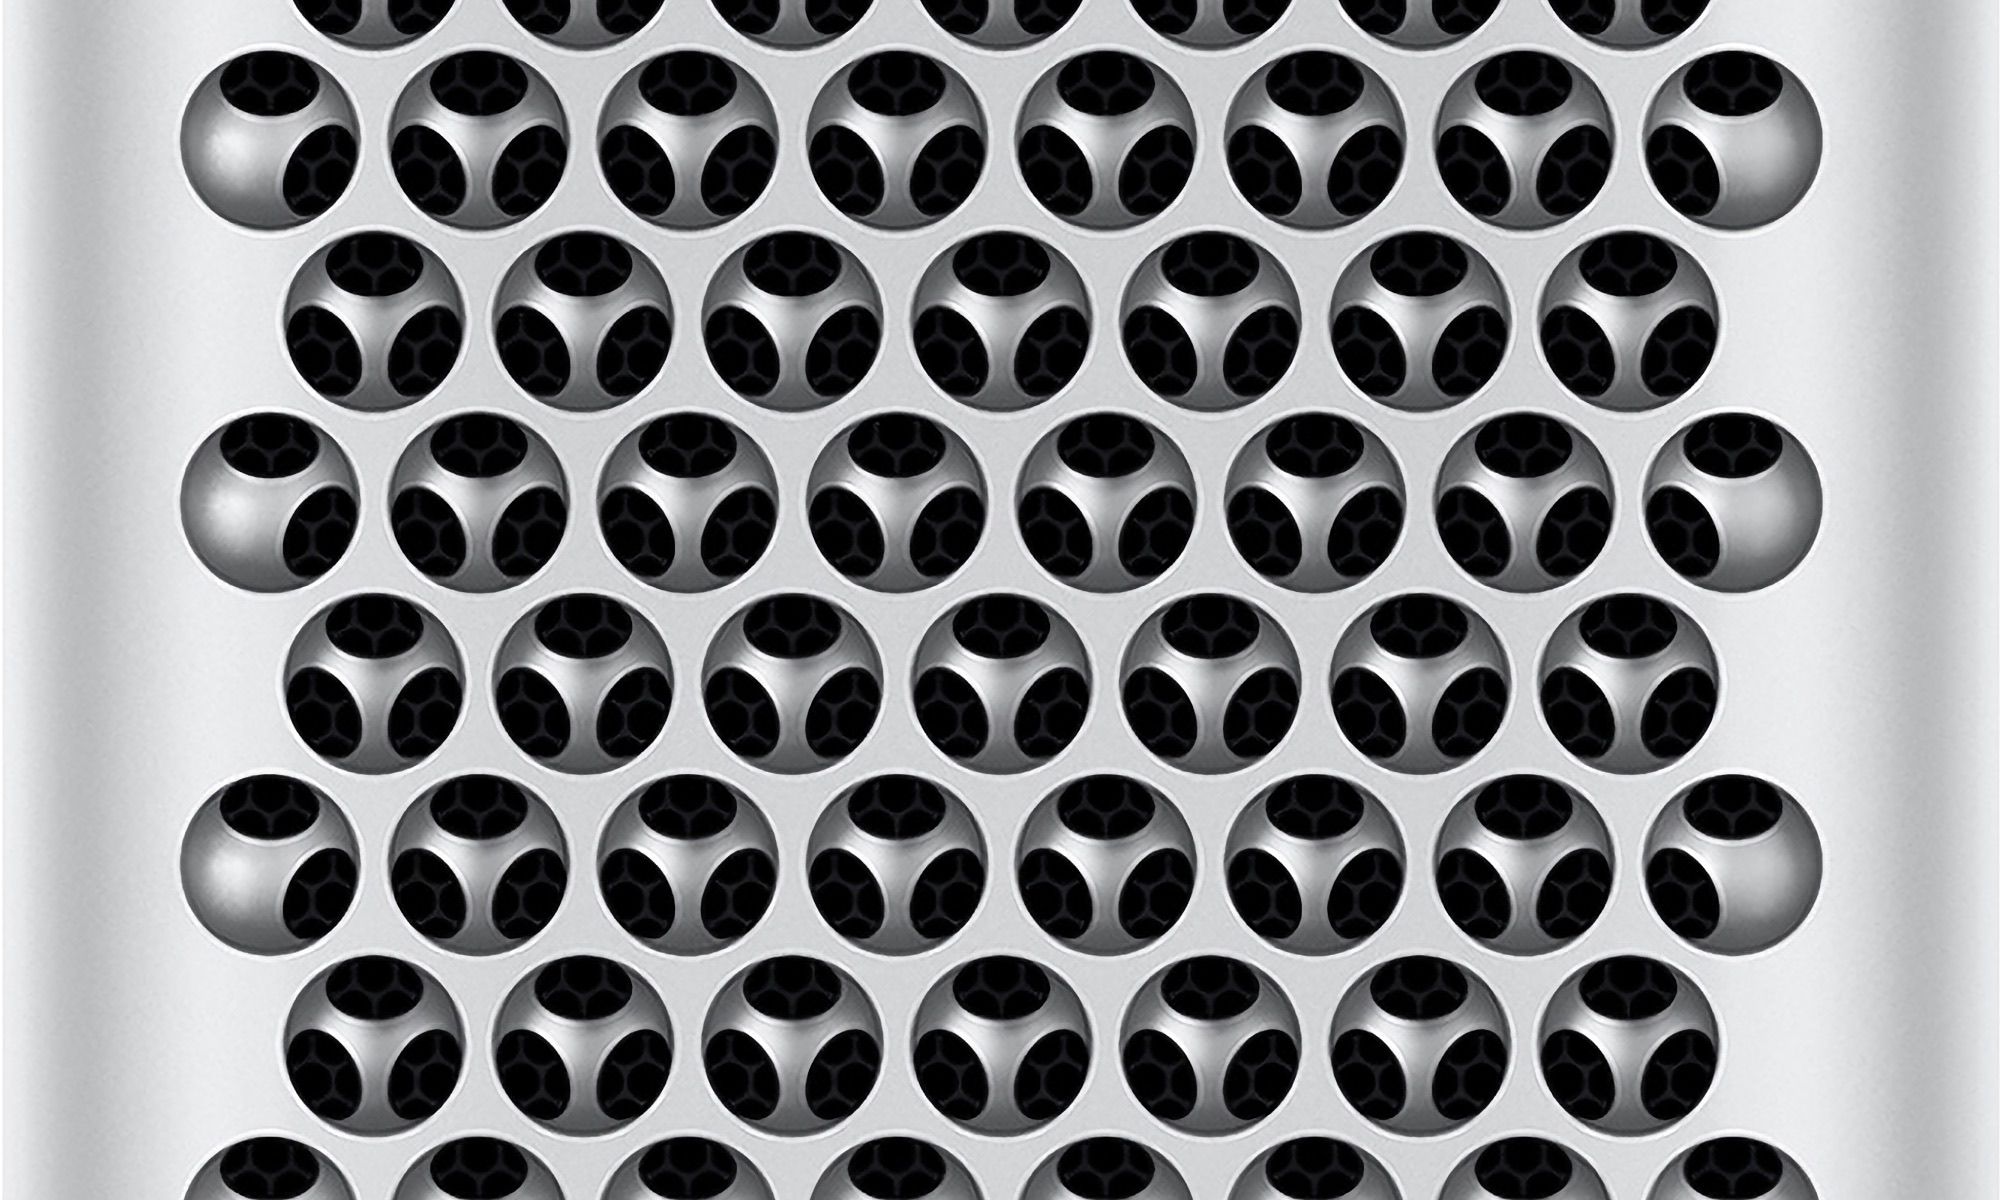
Apple's aluminum lattice design allows for a passthrough from front to back. Apple claims that the lattice design "two-dimensional open area for a high-airflow, low-impedance design that allows the system to be cooled efficiently while operating very quietly compared to competitive tower workstation systems."
While that may be up for debate if the lattice design is superior to other forced-air passthrough cases on the market, the Mac Pro 2019 is very quiet and unique.
Opening the case requires using the handle latch on the top and rotating it 180 degrees to unlock it. Due to the sliding mechanism, all the cabling must be unplugged to open the case. Snazzy Labs demonstrated in a video that you could modify the case so this isn't required.
Once the outer aluminum chassis is removed, you can the Mac Pro from multiple angles, making it very easy to work on.
To my knowledge, absolutely no one has bothered to try and replace the case, and for a good reason: I haven't used any better design cases, as the Mac Pro 2019 is incredibly easy to work on. Case mods are unlikely to be popular.
Fans
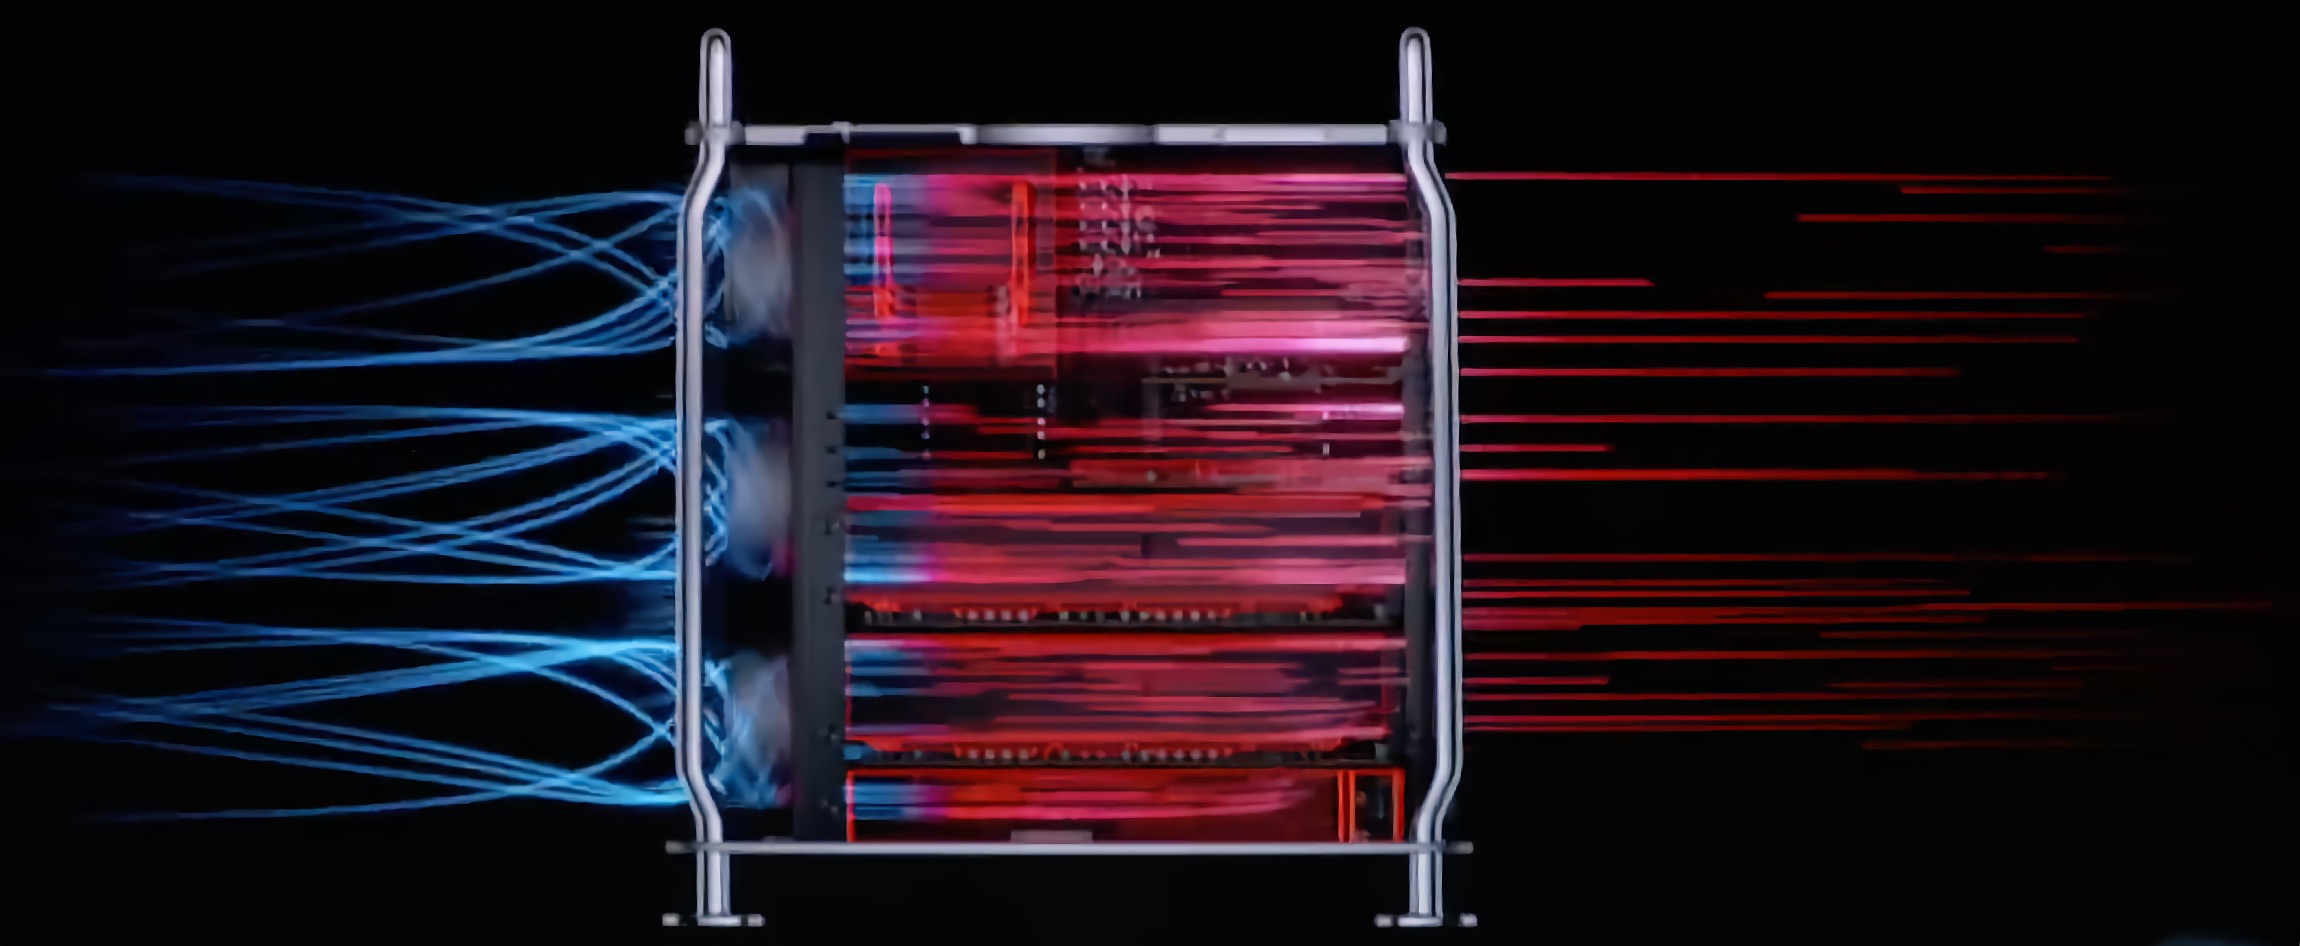
Pictured: Apple Mac Pro
Image Credit: Apple WWDC 2019 Keynote"Years ago, we started redistributing the blades," he says. "They're still dynamically balanced, but they're actually randomized in terms of their BPF [blade pass frequency]. So you don't get huge harmonics that tend to be super annoying." Popular Mechanics "The Thermodynamics Behind the Mac Pro, the Hypercar of Computers"
Thus far, no one has replaced the fans on a Mac Pro 2019, and for a good reason, the cooling design of the Mac Pro 2019 and near silence is one of the biggest selling points of the computer. At best, any fan replacement with a non-OEM model would be a lateral move.
Something loud but pleasantly pitched can be more tolerable than something quiet but irritating. "You can have something at a certain SPL [sound pressure level] that sounds really good, but you can have something that's actually at a lower SPL that grates on your nerves and sounds really awful," says John Ternus, VP of Hardware Engineering at Apple and head of the Pro and Pro Display's development. "We want to get really great performance where you either can't hear it, or if you can hear it, it's kind of a pleasant noise. A ton of analysis goes into figuring out how to optimize for that." - Chris Ligtenberg, Senior Director of Product Design, Popular Mechanics "The Thermodynamics Behind the Mac Pro, the Hypercar of Computers"
Apple's previous Macs have used non-standard fan controls and unique cooling solutions. The classic Mac Pro requires a custom PCB to be wired to interface correctly with standard PC fans. The Mac Pro 2019 is unlikely to be any easier.
Onboard networking
The Mac Pro 2019 features dual 10Gb Ethernet with independent controllers for each ethernet port.
- NBASE-T standard RJ45
- 1Gb, 2.5Gb, 5Gb, or 10Gb/s
The Mac Pro features onboard wireless networking 802.11ac Wi-Fi, IEEE 802.11a/b/g/n compatible, and Bluetooth 5.0.
Apple T2 "Security" chip
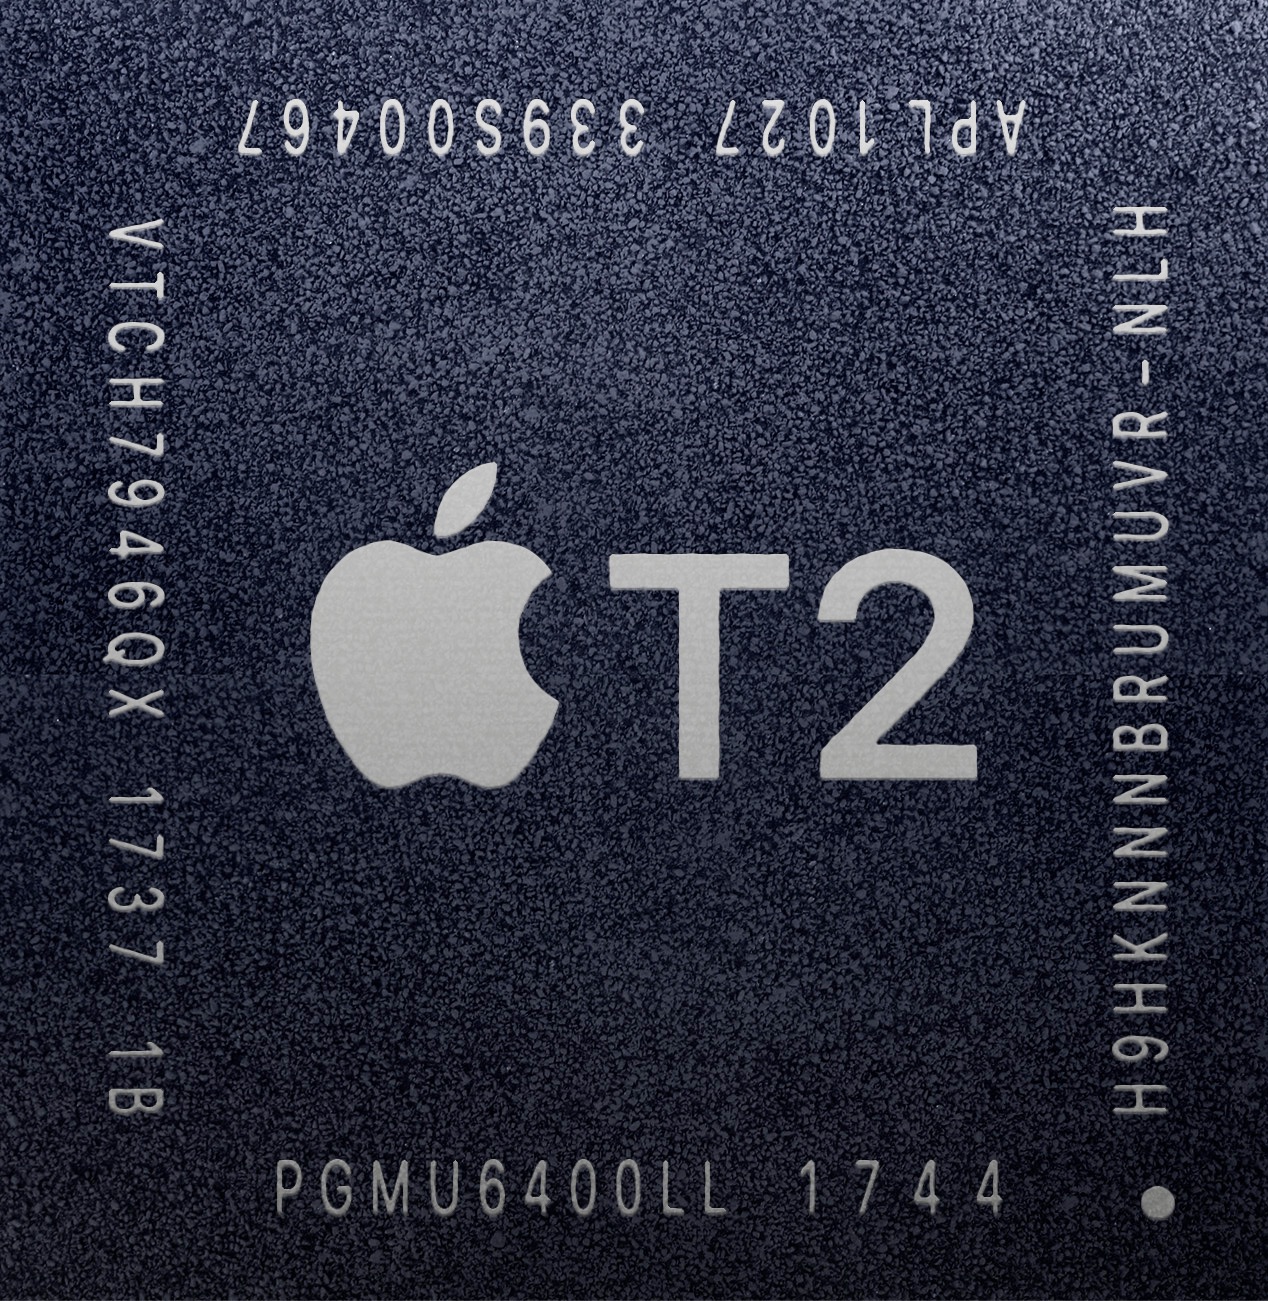
Pictured: Apple T2 Security chip
Image Credit: wikipedia.orgOne of the "features" of the Mac Pro 2019 is the Apple T2, which is a SOC designed exclusively for Apple's Intel-based Macs and is essentially a computer within a computer as it has its own RAM and CPU. The T2 integrates discrete controllers like the System Management Controller (SMC), audio, and SSD controllers, the latter used for Secure Enclave. Apple has a dedicated coprocessor for Secure Enclave called the Secure Enclave Procesor (SEP) running its own OS called sepOS, which allows for hardware-accelerated and validated encrypted boot and storage. It features its own random number generator (apart from Intel's) and provides the cryptographic operations for key management (FileVault, macOS keychain, UEFI firmware passwords, and machine's UID/GID.). The secure boot uses components that are cryptographically signed by Apple and verified by T2 during the boot sequence for boot loaders, firmware, kernel, and kernel extensions. This ensures the OS is software trusted by Apple will load. However, it has since had several security flaws found.
"Apple uses SecureROM in the early stages of boot. ROM cannot be altered after fabrication, and this is done to prevent modifications. This usually prevents an attacker from placing malware at the beginning of the boot chain, but in this case, it also prevents Apple from fixing the SecureROM. The net effect is Apple cannot fix this problem without replacing the T2 chip, but as long as a machine is bootable into DFU, it can be "repaired" by a trustworthy second machine." - Rick Mark, blog.Rickmark.me
The known T2 security compromises require physical access to the computer, which of course, any digital system is greatly compromised. An attacker has direct physical access to the system and doesn't appear to compromise FileVault.
The T2 is a variant of the Apple 10, a 16 nm 64-Bit ARMv8.1. The T2 chipset also provides an Image coprocessor, which is used for Facetime cameras on Intel Macs. The Mac Pro 2019 does not have an internal webcam, so it is unclear if the Image coprocessor is used. It also has a video codec accelerator for encoding/decoding h264/h265, speech recognition for "hey Siri," and for TouchBar Macs, runs the Touchbar.
Afterburner

Pictured: Afterburner
Image Credit: Apple.comThe Afterburner card is a curiosity by Apple. It is a PCI Express hardware accelerator for decoding only ProRes and ProRes RAW video (ProRes 422HQ, ProRes 4444, ProRes XQ, and ProRes RAW) except interleaved video (1080i). It also does not accelerate encoding.
The Afterburner card is an FPGA (field-programmable gate array) chipset. Retro game enthusiasts might be familiar with FPGAs as they've become quite popular as a hardware-level way to re-create retro game consoles without full emulation for unparalleled accuracy while allowing for modern features. The Afterburner can handle 6.3 billion pixels per second.
Apple boasts:
"It uses a secure firmware loading process that ensures it can only run Apple-authorized code and can be reprogrammed on the order of 50 milliseconds. The driver that manages the Afterburner card will load-balance ProRes decode tasks across multiple Afterburner cards if installed. With application support, Afterburner and CPU can be utilized together, enabling even higher stream counts and more demanding projects on a Mac Pro."
Codec stream type 28-Core Xeon CPU + Afterburner ProRes 422 4k 30FPS 15 streams 16 streams ProRes Raw 4k 30FPS 2 streams 23 streams ProRes Raw 8k 30FPS 2 streams 6 streams
It works within applications that use Apple's VideoToolbox APIs, such as Final Cut Pro, Blackmagic DaVinci Resolve, Adobe Premiere Pro, QuickTime Player, and other media applications.
The AfterBurner card has been since replaced in Apple Silicon with the "Media Engine," which is much more effective. The M1 Pro is able to outperform a Mac Pro equipped with the $1999 Afterburner card.
Firmware And OS
The Mac Pro 2019 is a T2-equipped Mac. The T2 chipset uses a different mechanism than previous Mac Pros to update the firmware and are unable to run "eficheck".
You can check the firmware version by going to "About this Mac".
OS upgrades
The Mac Pro 2019s were first supported in Catalina 10.15.1, which is the earliest OS they can run. If you are looking for pre-Catalina support, macOS can be virtualized with popular software like VMware Fusion, Parallels, or Virtual Box. This may or may not work for your needs.
The Mac Pro 2019 is natively supported by macOS and will likely be so for years to come.
It can also dual boot Windows or other alternative OSes, but this requires disabling SIP to allow non-Apple SSD booting.
The Mac Pro, using emulation such as QEMU, can run PowerPC versions of Mac OS with varying degrees of success.
Downloading old versions of macOS
While the earlier version of macOS that can be booted on the Mac Pro 2019 is 10.15.1, there's a wide variety of virtual machine software available. The Mac Pro's ability to have massive amounts of RAM and many CPU cores makes it ideal for virtual machines, docker setups, and QEMU.
Apple has finally wised up and allowed direct downloads of (some) DMGs, which can be found here going back as far as macOS 10.10. Apple does still sell CDs of 10.7 and 10.8 and finally offers them as a direct download. Mac OS X 10.7 Lion and Mac OS X 10.8 Mountain Lion. Below is a list of download links (and source) for previous macOS versions.
- 10.6 - Snow Leopard (Archive.org)
- 10.7 - Lion (Apple)
- 10.8 - Mountain Lion (Apple)
- 10.9 - Mavericks (Archive.org)
- 10.10 - Yosemite (Apple)
- 10.11 - El Captian (Apple)
- 10.12 - Sierra (Apple)
- 10.13 - High Sierra (Apple App Store), Achive.org
- 10.14 - Mojave (Apple App Store), (Archive.org)
- 10.15 - Catalina (Apple App Store), (Archive.org)
Disabling System Integrity Protection
As mentioned in the glossary, SIP functions as a method of system protection. Apple describes it as follows:
" (A) security technology in OS X El Capitan and later that's designed to help prevent potentially malicious software from modifying protected files and folders on your Mac. System Integrity Protection restricts the root user account and limits the actions that the root user can perform on protected parts of the Mac operating system."
Before Apple implemented SIP, any software that was granted root access (by the user entering her/his password) could modify/edit system files. Generally, a user shouldn't disable SIP unless there's a specific reason. That said, there are plenty of reasons to disable SIP, such as certain boot managers or for unsupported hardware cases. SIP can always be re-enabled.
Disabling Secure Boot
Disabling Secure Boot on the 2019 Mac Pros is generally a common behavior as the only volume the Mac Pro will boot off of is the factory SSD if you do not enable the SSD. You cannot remove the Apple-provided SSD(s) and still boot regardless if Secure boot is on or off.
Running Apps from unidentified developers
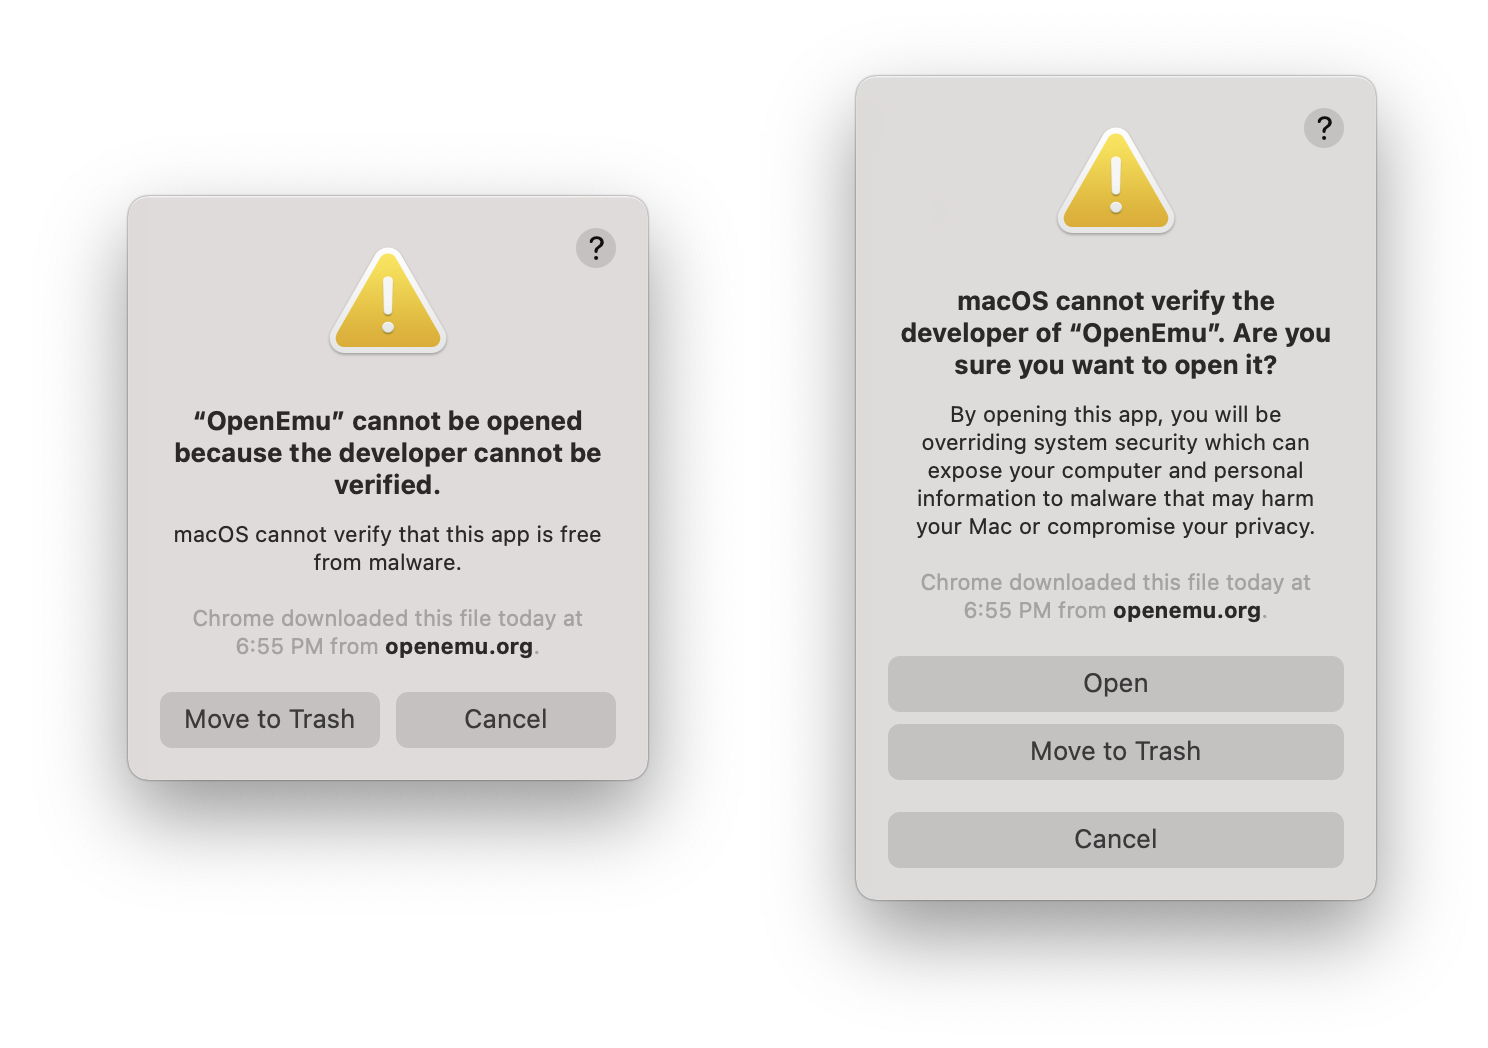
Left: the warning users will receive without right-clicking open. Right: warning message when right-clicking/option clicking bypass
Gatekeeper no longer has a "allow apps downloaded from anywhere," but it is still possible to bypass and whitelist applications by right-clicking and selecting open.
CPU Upgrades
The Xeons are built on the same architecture as its desktop-grade siblings. Every Mac Pro made (including the 2013s) has sported multicore, interchangeable Xeon series CPUs. The Xeon CPUs' main benefit has been more CPU cores, the ability to support multi-CPU motherboards, larger cache memory, more PCIe lanes, much higher maximum RAM, and Error-correcting code memory (ECC). These benefits come with a trade-off as the Xeon line had much higher price points, doesn't have built-in support for overclocking, and generally operates at (slightly) lower-clock speeds.
As a computer is the sum of many parts (not just the CPU), CPUs are not interchangeable between Xeon generations.
The Mac Pro Xeon Ws feature Turbo Boost (dynamic frequency scaling, allowing the CPU "overclock" when demanding tasks are running), Hyper-threading (Intel's proprietary simultaneous multithreading that allows for a single core to be addressed as two cores to share workloads when possible), dual AVX-512 Vector units with FMA (fused multiply-add) support and six DDR4 memory channels. AVX (Advanced Vector Extensions) are additional instruction sets for x86 that were proposed by Intel and AMD in 2008 and later adopted in CPU designs. The latest is AVX-512. Due to long-tail support and slow adoption of AVX changes by AMD, AVX requirements for applications have been slow to roll out on both macOS and Windows. Rosetta, under Apple Silicon, does not support AVX translation, also further reducing adoption by programmers to use AVX under macOS.
AMD's Ryzen 4000 series are 7-nm. Apple's A14 CPUs are 5-nm. This is one of the main drivers for Apple's switch to Apple Silicon. The original Mac Pro 1,1 shipped with a 65-nm CPU, and the 3,1-5,1 with 45 nm CPUs, with the 6,1s coming in at 22-nm. Intel hit 14 nm in 2014 with the Intel Core-M series. It wasn't until Alder Lake in late 2021 Intel moved beyond 14 nm.
Complete compatible CPU list
Note: The Apple listed maximum RAM is below what MacRumors.com Forum posters discovered.
Architecture Cores Grade CPU-Model GHz Turbo RAM Watt Max RAM Cascade Lake 28 core Xeon W W-3275M 2.5 4.4 2933 205W 2TB Cascade Lake 28 core Xeon W W-3275 2.5 4.4 2933 205W 1TB Cascade Lake 24 core Xeon W W-3265M 2.7 4.4 2933 205W 2TB Cascade Lake 24 core Xeon W W-3265 2.7 4.4 2933 205W 1TB Cascade Lake 16 core Xeon W W-3245M 3.2 4.4 2933 205W 2TB Cascade Lake 16 core Xeon W W-3245 3.2 4.4 2933 205W 1TB Cascade Lake 12 core Xeon W W-3235 3.3 4.4 2933 180W 1TB Cascade Lake 8 core Xeon W W-3225 3.7 4.3 2666 160W 1TB Cascade Lake 8 core Xeon W W-3223 3.5 4.0 2666 160W 1TB
GPU upgrades
Likely for most users, the most attractive upgrade for the Mac Pro 2019 is the ability to upgrade the GPU thanks to PCIe.
The Mac Pro 2019 GPU landscape can be divided up into two classes of GPUs: MPX and standard PCIe.
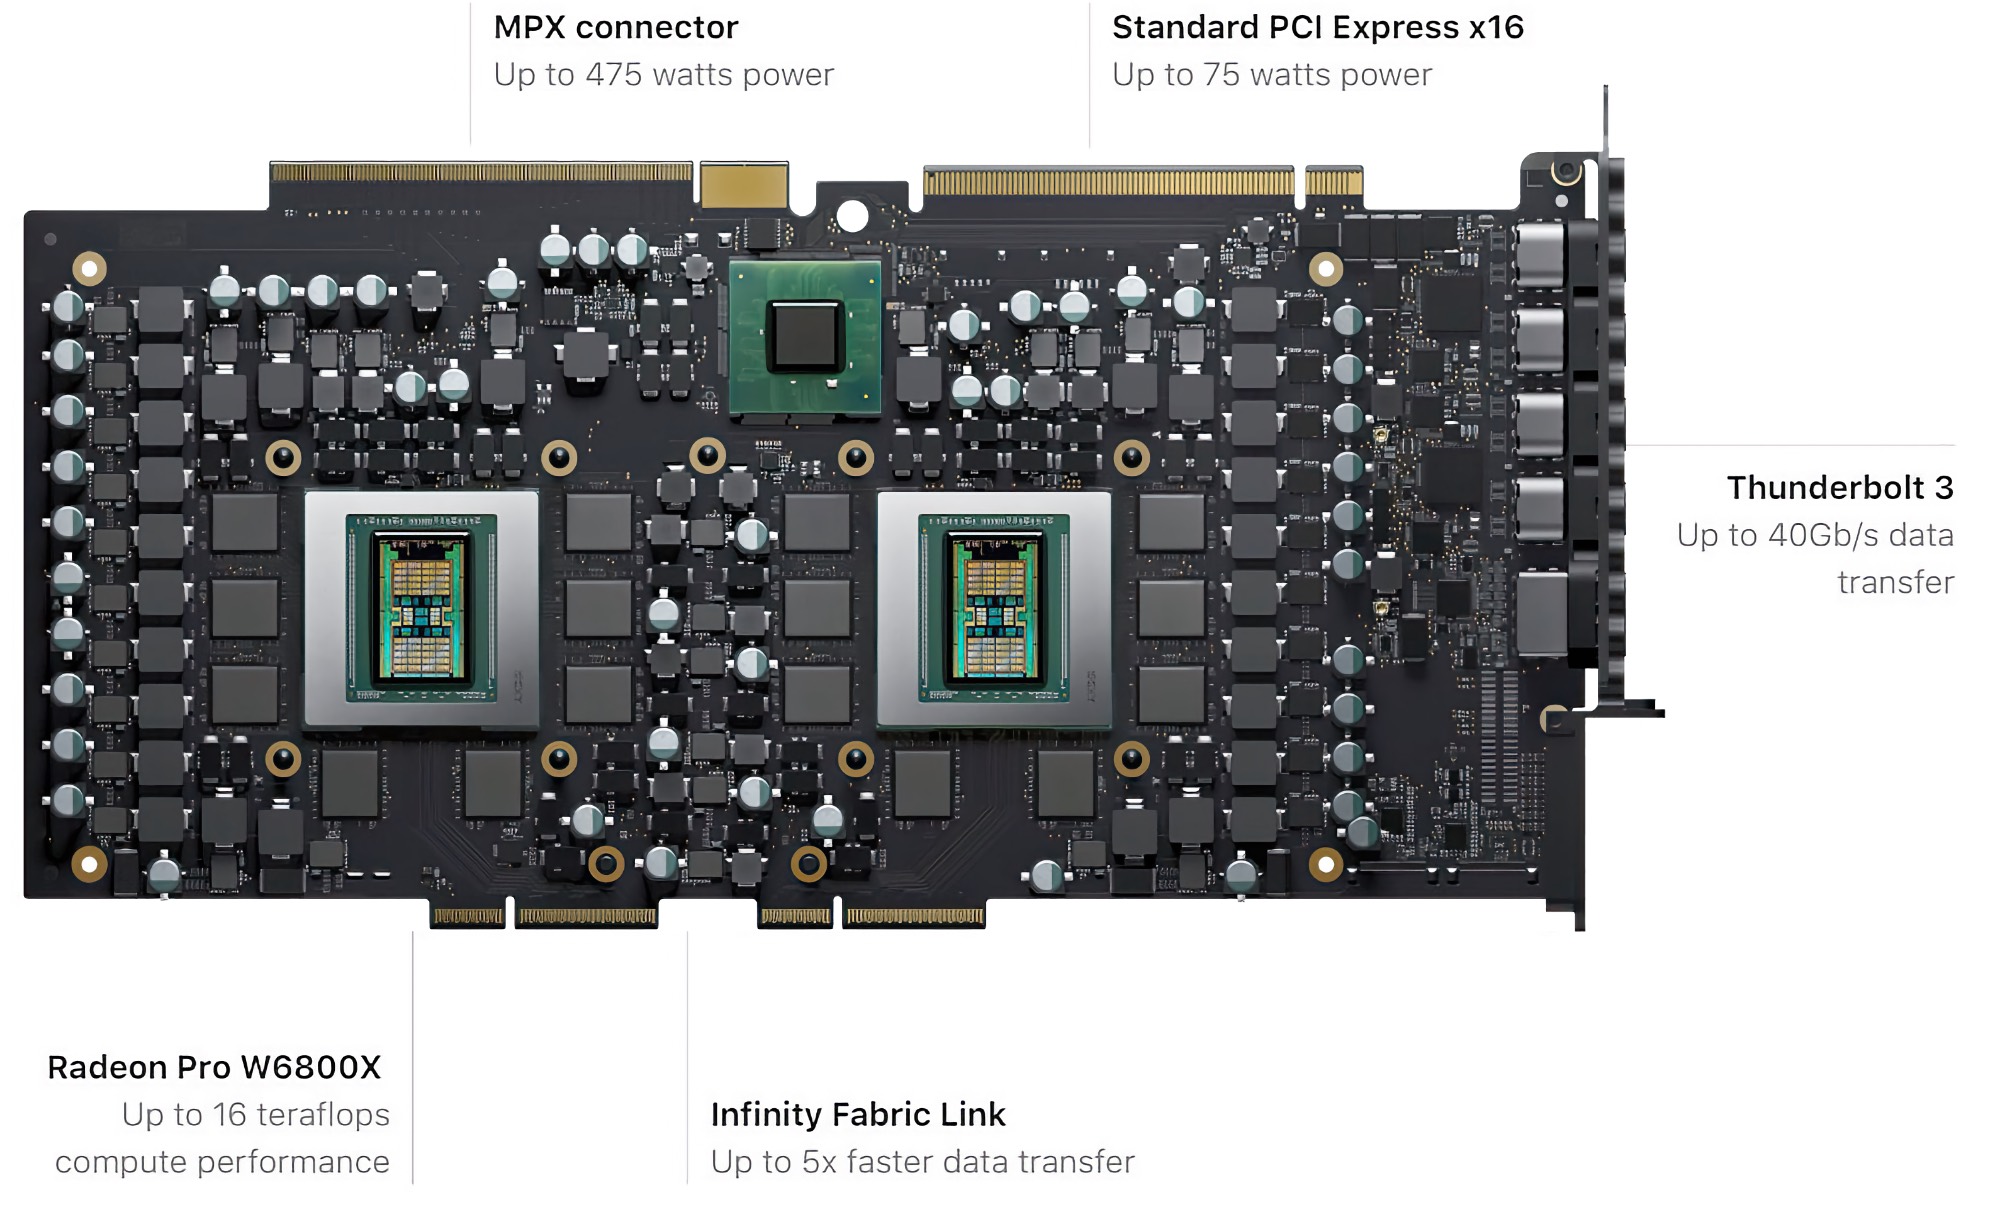
Pictured: W6800x Pro Duo MPX Module
Image Credit: Apple.comApple's MPX standard is a modified PCIe GPU that has a secondary interface to provide Thunderbolt 3 video passthrough / Thunderbolt 3 ports and additional power delivery (removing the requirement for PCIe 6 / 8 pin power cables).
The standard PCIe GPUs are non-MPX and do not have the ability to pass video through Thunderbolt 3.
Users familiar with the classic Mac Pros needn't worry about EFI boot screen support as the Mac Pro 2019s use UEFI, and thus off the shelf supported AMD GPUs can out.
NVidia and Apple
The Apple vs. Nvidia squabble easily could form a novel based on rumors, accusations, and half-truths. The hard facts are as follows:
Apple and Nvidia had a falling out after including Nvidia GPUs in their MacBooks resulting in Apple switching to AMD. For years, Nvidia was able to write 3rd party drivers for its GPUs known as web drivers. This supported Nvidia GPUs that Apple never supported and lasted years until Apple decided to revoke Nvidia's developer license at the end of 10.13 High Sierra, drastically harming Apple's most dedicated user-base. The only usable GPUs in Mojave and beyond are a handful of older Nvidia GPUs based on the Kepler architecture. The best Kepler Nvidia GPU doesn't outperform the lowest MPX GPU Apple ships. These GPUs have been omitted from this guide.
Mac Pro 2019 owners can still install Nvidia GPUs and use them in Windows or other OSes, but they are unsupported in macOS.
If you'd like to learn more about the history, I've written Apple vs. Nvidia: What happened? to try and contextualize Apple and Nvidia's relationship.
GPU lengths: Buyer Beware
The Mac Pro 2019 can only accomendate GPUs that are no longer than 305mm or 12 inchses in length. See iSwitcher.com (on archive.org) for old post. Sadly the images are lost to time.
The Compatible GPU list
As mentioned in the Nvidia section, I've elected to omit the lower tier AMD GPUs even though you can use an AMD RX 560 in 2019. If you'd like to see them, go to The Definitive classic Mac Pro Upgrade Guide, the complete aftermarket GPU List.
AMD GPU VRAM Ports Radeon Pro 580X MPX Module 8GB of GDDR5 Two HDMI 2.0 ports Radeon Pro W5500X MPX Module 8GB of GDDR5 Two HDMI 2.0 ports Radeon Pro W5700X MPX Module 16GB of GDDR6 four Thunderbolt 3 ports, and one HDMI 2.0 port Radeon Pro Vega II MPX Module 32 GB of HBM2 four Thunderbolt 3 ports, and one HDMI 2.0 port Radeon Pro W6800X MPX Module 32GB of GDDR6 four Thunderbolt 3 ports, and one HDMI 2.0 port Radeon Pro W6900X MPX Module 2GB of GDDR6 four Thunderbolt 3 ports, and one HDMI 2.0 port Radeon Pro Vega II Duo MPX Module 32GB of HBM2 four Thunderbolt 3 ports, and one HDMI 2.0 port Radeon Pro W6800X Duo MPX Module 32GB of GDDR6 four Thunderbolt 3 ports, and one HDMI 2.0 port
Non-MPX GPUs
Aftermarket GPUs do not have the Thunderbolt 3 passthrough. If an MPX module isn't present, the Thunderbolt 3 ports on the Mac will not output video. Displays will need to be attached directly to the GPU. All aftermarket GPUs will output a boot screen as the Mac Pro 2019s use UEFI. The Mac Pro 2019s cannot boot below Mac Pro 10.15.1. GPUs that perform below the RX 580 are not listed as the lowest GPU. Any Mac Pro 2019 is likely to have at the very worst, the Pro RX 580 MPX module.
The aftermarket GPUs will need PCIe power delivery, via the power ports on the Mac pro that are non-standard, see The PCIe power delivery section for more details.
Apple has elected to ignore any future GPU upgrades thus the Mac Pro 2019s are locked to 6000 series AMD GPUs, but can use other GPUs in other OSes.
AMD GPU Min OS Support Radeon RX 580 10.12.6 - Curr Radeon RX 580x 10.12.6 - Curr Radeon Pro WX 7100 10.13? - Curr Radeon Pro WX 8100 10.13? - Curr Radeon Pro WX 9100 10.13? - Curr Radeon Pro Duo 32GB GDDR5 512-Bit 10.13? - Curr Vega 56 10.13.x - Curr Vega 64 10.13.x - Curr Vega Frontier Edition 10.13 - Curr Radeon VII 10.14.5 - Curr Radeon 5500 XT 10.15.2 - Curr Radeon 5600 XT 10.15.3 - Curr Radeon 5700 10.15.2 - Curr Radeon 5700 XT 10.15.2 - Curr Radeon 6600 Unsupported Radeon 6600 XT 12.1 - Curr Radeon 6700 Unsupported Radeon 6700 XT Unsupported Radeon 6800 11.4 - Curr Radeon 6800 XT 11.4 - Curr Radeon 6800 XT *unsupported (can be used with OpenCore in 11.4+) Radeon 6900 XT 11.4 - Curr Radeon 6950 XT *unsupported (can be used with OpenCore in 11.4+)
Windows and GPUs
The MPX GPUs are compatible with Windows and will output Thunderbolt 3 over the MPX ports found in the upper-tier MPX modules. Mac Pro 2019s can boot with Nvidia GPUs or more modern AMD GPUs, but they will be only usable in non-macOS operating systems like Windows 10 or 11.
Resizable Bar?
The Mac Pro 2019 does not support Rebar (Resizable bar). Resizable BAR (Base Address Register) is a PCIe feature that enhances how CPUs access GPU memory by allowing them to view the entire GPU VRAM at once instead of in limited 256MB chunks. This technology enables faster data transfers between the CPU and GPU, potentially improving gaming and graphics performance, especially in memory-intensive tasks. AMD markets their implementation as Smart Access Memory (SAM) while Intel and NVIDIA simply call it Resizable BAR, but all function similarly by removing memory addressing limitations in the PCIe interface.
Above is a video where I both discover the lack of Resizable Bar and how installing an Intel Arc A770 isn't the best idea.
I/O Upgrades
The Mac Pro 7,1 can use a host of upgrades. The I/O (Input/Output) is a catch-all umbrella term I'm using for anything that doesn't fall under GPU, SSD interfaces, or audio PCIe cards. I/O Upgrades include networking and peripherals interfaces (USB/Firewire/SATA). This isn't a complete list of all possible I/O cards, but instead, a list of common significant I/O cards, and I'm always looking to extend the list.
USB 3.1 / USB 3.2 Gen 1 / Gen 2
The USB 3.x standard has had a few rebrandings, and the language on devices can often be confusing, as due to the recent rebranding, some devices might be labeled as "USB 3.0" or "USB 3.1 Gen 1" or "USB 3.2 Gen 1" which is entirely the same. Cynically, device makers lobbied for this change so that they wouldn't potentially lose out on sales moving forward.
Below is a small chart of names for each tier of USB.
Original Name 2013 Rebrand 2019 Rebrand Bandwidth USB 3.0 USB 3.1 Gen 1 USB 3.2 Gen 1 5 Gbps (625 MB/s) USB 3.1 USB 3.1 Gen 2 USB 3.2 Gen 2 10 Gbps (1250 MB/s) USB 3.2 - USB 3.2 Gen 2x2 20 Gbps (2500 MB/s) If the above is confusing, I do not blame you as I find it too.
USB Cards and Performance
USB 3.x cards with type-A are one of the most common upgrades for a Mac Pro. Still, it is important to understand that there is a great deal of performance difference between cheap USB cards vs. high-end ones (such as Sonnet's Allegro Pro), and this comes down to three factors: How many controllers per port, USB generation, and how much bandwidth.
Generally, inexpensive USB cards will feature one controller and 4-ports and be listed as USB 3.0 or USB 3.2 Gen 1. This means 625 MB/s is divided roughly 4 by 4 (although not exactly). A user should expect to see only roughly 150-250 MB/s on a singular port regardless of whether anything else is plugged into a card.
A USB 3.2 Gen 2 or USB 3.1 card with four ports and two controllers will likely see 625-800 MB/s per port.
USB 3.0
- Sonnet Allegro USB 3.0 / Sonnet Allegro Pro
- Inateck KT4004
- RocketU 1144D / HighPoint RocketU 1144C
- HighPoint RocketU 1144E
- CalDigit FASTA-6GU3 Pro (Discontinued)
- HighPoint RocketU 1144CM -
- Inateck PCI-E to USB 3.0 - (Caused Reboot loop in 2008 Mac Pro)
- Sonnet Technologies Tempo Duo PCIe (2x eSATA / 2x USB 3.0) - (discontinued)
- Newer Technology MAXPower 2 port eSATA 6/GBs & 2 Port USB 3.0
USB 3.x
Any card using the ASMedia ASM3142 should be macOS 10.11.x+ compatible as this controller is supported by macOS as long as it doesn't require external power. One of the most popular ASM3142 import cards (often a black PCIe card with names like Tuneway Usb3.1 Type-C, WEI-LUONG USB 3.1 to Type-C, YISUNF USB 3.1 to Type-C 2 Port, Camisin USB 3.1 to Type-C 2) is not macOS compatible due to the power requirements.
- MAXPower 4-Port USB 3.1 Gen 1
- Sonnet Technologies Allegro USB-C
- StarTech 4-Port USB 3.1 (10Gbps) Card PEXUSB314A2V
- CalDigit FASTA-6GU3 Plus (USB 3.1 / 2x eSATA)
- Sonnet Technologies Allegro™ Pro USB 3.1 PCIe
- Sonnet Technologies Allegro USB-C 4-Port PCIe
- Rosewill RC-20002 USB 3.2 Gen 2 Type-C, 2 x USB 3.2 Gen 2 Type-A ports
- FebSmart 1X USB-A & 1X USB-C 10Gbps Ports PCIE USB 3.1 Gen 2 Card
- FebSmart 2X 10Gbps USB-C Ports PCIE USB 3.1 Gen 2
- FebSmart USB 3.1 Gen 2 2X 10Gbps USB-A
- FebSmart 2X USB-C & 3X USB-A 10Gbps Ports PCIE USB 3.2 Gen 2 Card
- FebSmart 5X 10Gbps USB-A Ports PCIE USB 3.2 Gen 2
- BEYIMEI PCI-E 4X to USB 3.1 Gen 2
- LTERIVER PCI Express to 2 USB 3.1 Gen2 Type A 10Gbps Ports Expansion Card
- LTERIVER PCI Express to 2X USB 3.1 Gen2 Type C 10Gbps
- Ableconn PEX-UB158 USB 3.1 5-Port PCIe 3.0 Card (1x USB-C & 2X USB-A & 1x 2-Port Internal USB Header
SATA/eSATA
Note: Not all SATA cards are bootable on macOS. Known bootable cards will be listed as such.
- NewerTech MAXPower PCIe eSATA 6G Controller - Bootable
- MAXPower 4-port eSATA 6G PCIe 2.0 - (bootable)
- MAXPowereSATA 6G PCIe 2.0 RAID 0/1/5/10
- MAXPower RAID mini-SAS 6G-2e2i
- Sonnet Technologies Tempo SATA Pro - Bootable
- Sonnet Technologies Tempo SATA E2P
- Sonnet Technologies Tempo SATA 6Gb/s PCIe 2.0 - (discontinued)
- Sonnet Technologies Tempo SATA Pro 6Gb PCIe 2.0 - (discontinued)
- SYBA SY-PEX40039 SATA III
- HighPoint Rocket 620 2 SATA
- ORICO PFU3-4P 3 Port
- ATTO ExpressSAS H680 Low-Profile x8-External Port
- ATTO ExpressSAS H644 Low-Profile 4-Internal/4-External Port
- ATTO ExpressSAS H6F0 16-External
Ethernet (10 Gigabit +)
If I'm missing cards or any are no longer supported in macOS, please let me know.
- Sonnet Technologies Presto 10GbE 10GBASE-T
- Sonnet Technologies Presto 10GbE SFP+
- Sonnet Technologies Presto 10GbE 2-Port - (discontinued)
- Small Tree P2E10G-1-T, P2E10G-2-T, P2E10G-4-T 10GbE One-Port / Twp- Port/ Four-Port 10GBase-T
- Small Tree P2E10G-2-XR, P3E10G-4-XR, P3E10G-6-XR Two-Port / Four-Port/ Six-Port 10GbE 10G-SFP+
- Small Tree P2E10G-1-SR, P2E10G-2-SR, P3E10G-4-SR, P3E10G-6-SR One-Port/ Two-Port / Four-Port / Six-Port 10G-SFP+
- Solarflare / Solarstorm Cards (drivers last updated in 2013) - see release notes for supported devices
- Chelsio- See Release notes on drivers for supported devices
- Solarflare - See Release notes on driers for supported devices
Storage Upgrades
The Mac Pro 2019 can use a variety of storage options, including SATA Hard disk Drives, SATA SSDs, AHCI SSDs, and NVMe SSDs, and Apple's proprietary NGFF SSDs.
Hard Disk Drives / SATA connections
Like many data interfaces, SATA (aka Serial ATA) has gone through multiple iterations: SATA1 (max transfer speed of 150 MB/s), SATA2 (max transfer speed of 300 MB/s), and finally, its last incarnation, SATA3 (max transfer speed of 600 MB/s). The Mac Pro 2019s sport two internal SATA3 ports and a USB 3.0 port, allowing them to use three internal drives without any additional controller cards.
The Mac Pro 2019 does not come with any internal drive mounts, and thus, the internal drive bays must be purchased / 3D printed/manufactured. Even in the high-speed era of NVMe SSDs, SATA is still useful as the price-per-gigabyte price still favors mechanical (Spinning disk) hard disk drives.
</p>The Mac Pro 2019 uses a custom power connector to provide power to SATA3 devices. This makes adding in internal SSDs even more of a hassle beyond lacking standard mounting. (see j-w.co's article on Mac Pro 2019 pin-outs)</p>Thanks to their price-per-gigabyte, mechanical hard drives are still a place in the SSD world, especially for backup. The Mac Pro can use any SATA Hard disk drive, including 2.5-inch drives with 2.5-inch to 3.5-inch mounting brackets for the 4 drive bays. This extends to eSATA as well, although an eSATA PCIe card must be present to make use of eSATA drives.
Not all HDDs are equal, and more goes into HDDs than cache sizes and RPMs. Many of the inexpensive HDDs use Shingled Magnetic Recording (SMR), which lowers the cost per gigabyte by allowing more data on a platter but with a performance penalty. It's important to do research, depending on the application.
Any external HDD should be presumed to be compatible with Mac OS (outside of extreme edge cases).
PCIe SATA + SSD Sleds
Once very popular with classic Mac Pro owners, PCIe sleds are PCIe cards that are a SATA3 controller with one to two mounts for 2.5 SATA drives. Users can still use PCIe SATA 3 cards + SATA SSD drives. These are compatible with the Mac Pro 7,1 but generally represent a legacy vector for Mac users transitioning from a classic Mac Pro to the 7,1 as it provides two SATA 3 ports or users with a collection of SATA SSDs.
There are numerous makes, including Sonnet Technologies (Tempo SSD (2x 2.5 SSD), OWC (Accelsior), and Newer Technology.
The M.2 format and Apple NGFF
M.2 (also known as NGFF, Next Generation Form Factor) is the latest common format for high-speed SSDs. M.2 is the interconnect, and modern motherboards often have M.2 card slots built-in, especially in the laptop market. M.2 itself doesn't dictate the underlying technology. The M.2 format has a standard set of pin-outs, whereas Apple's variant uses a non-standard pin-out.
M.2 has two main variants, AHCI and NVMe, which are discussed in the AHCI SSD and NVMe SSD sections. Apple's variant is no different and supports AHCI or NVMe. In the 2019 Mac Pros, these are exclusively NVMe.
By default, the Mac Pro comes equipped with internal SSD(s) using proprietary Apple SSDs. These are managed by Apple's T2 chipset and are required for booting. These are user-replaceable but require Apple-certified SSDs (you cannot use NGFF to NVMe adapter) as they require T2 compatibility. Once the SSD has been replaced, you'll boot into restore using the Apple configurator 2. Apple lists the process here and also has a support document on its website about Apple Configurator 2 and Intel Macs. Apple sells its internal SSDs at its website for incredibly poor pricing, at $600 for 1 TB. Most users will elect to boot off NVMe SSDs as the single drive performance of the Apple SSD is underwhelming and wantonly overpriced for lower storage configurations.
One of the quirks of the Mac Pro 2019s is if you remove the Apple SSDs, even if Secure Boot is disabled, the computer will fail to boot.
The M.2 format and host PCIe cards
One half of the NVMe puzzle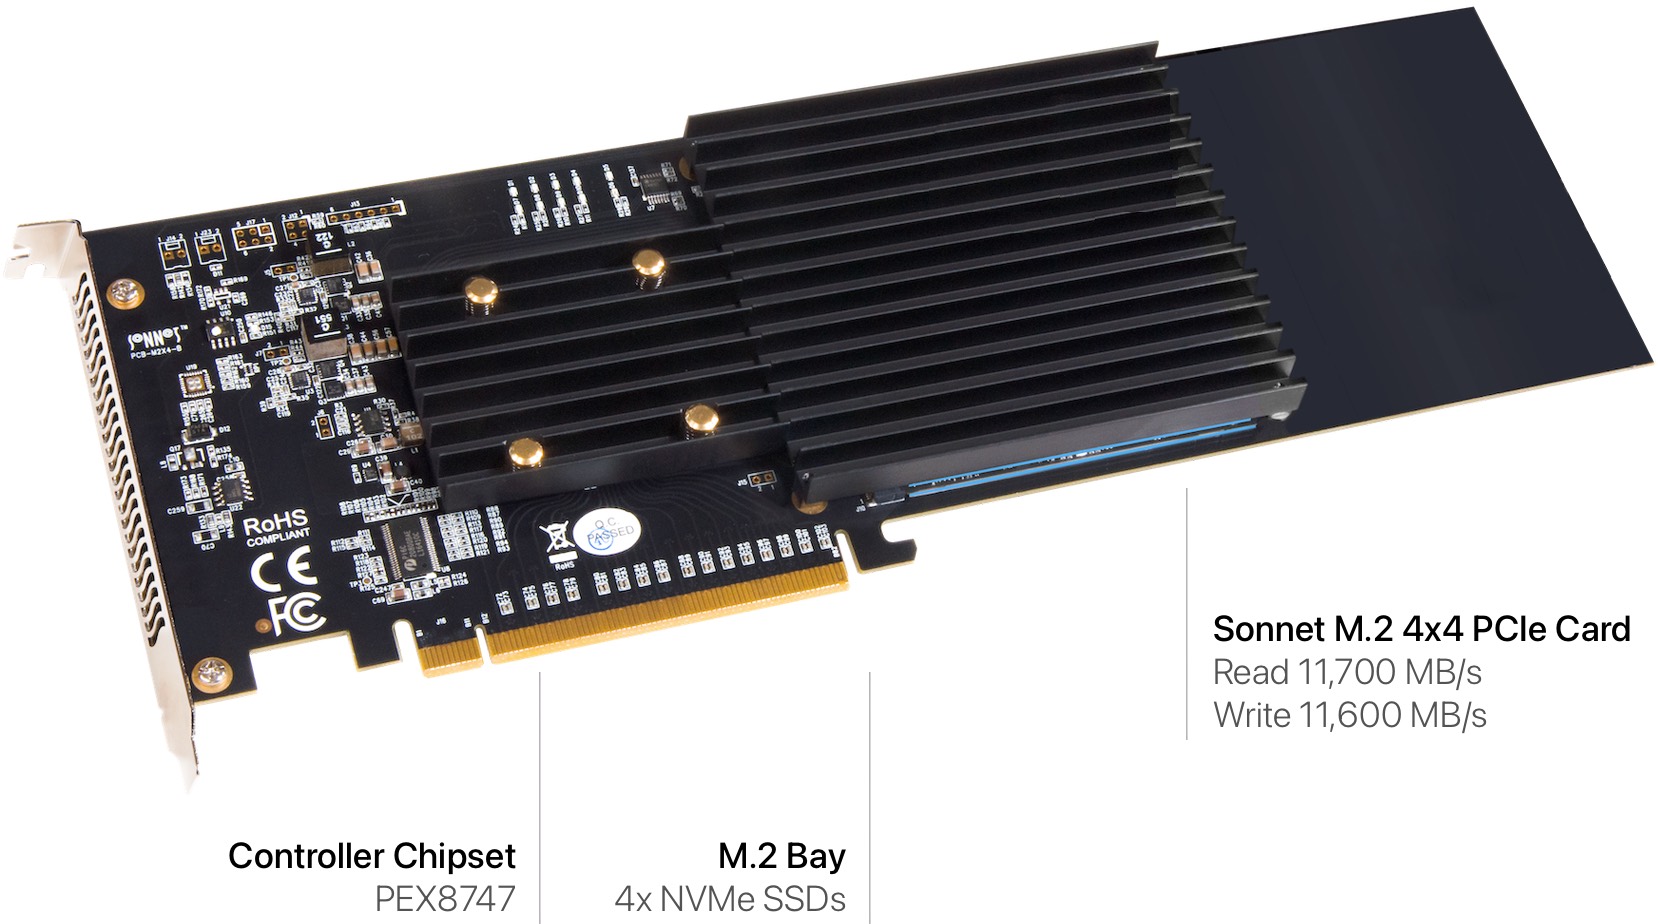
Pictured: Sonnet M.2 4x4 PCIe Card (with controller chipset for multiple NVMe SSDs)
Pre-edit Image Credit: Sonnet.comApple's Macs with removable SSDs all use non-standard slots for NVMe Apple's semi-proprietary NGFF variant, which doesn't have an official name. For example, previous-generation Macs like the Mac Pro 2013 or MacBook Pros 2013-2015 allowed NGFF key adapters to convert to standard M.2 pin-outs. Apple introduced the first upgradable storage with the T2 chipset on the iMac Pro, which only accepts Apple-OEM drives. To my knowledge, no third-party makers sell Apple NGFF SSDs.
Using M.2 SSDs requires a host PCIe card, as the Mac Pro 7,1 does not have any standard M.2 slots. The Mac Pro 2019 doesn't quite have the PC field's options for host card options because it does not support bifurcation, the ability to split high-speed PCIe port into two lower speed ports (see the PCIe portion of this guide for more info). Instead, the Mac Pros must use cards with controller chipsets specifically for computers that do not support bifurcation, hence making them more expensive. Also, it is important to note that some M.2 cards' physical sizes can pose problems for certain host cards, so go to the MacRumors thread for more info.
Multi-drive cards use a controller chipset such as the ASMedia ASM2824 and PLX8747. Users can search for cards that use the ASM2824 or generic PLX8747, as they are usually compatible with MacOS.
TThe ASM2824 chipset is currently the most popular NVMe chipset for multiple NVMe drives as it's less expensive and able to achieve faster speed caps in single-drive performance, although the PLX8747 is the performance crown used in the Sonnet and Highpoint 16x cards.
Classic Mac Pro owners will be happy to learn that with the PCIe 3.0 bus comes a lot more performance for SSDs, but PC users might be disappointed to learn that the Mac Pro's performance is capped to PCIe 3.0.
Multi-drive cards with a single drive can sometimes have issues, specifically the lesser ASM2824 cards, requiring both slots to be filled to prevent crashes.
Generally, many users opt to boot off a single SSD and use RAID as a storage/scratch disk.
Below is a list of known-good adapters. Most generic NVMe single-slot hosts are compatible with Mac Pro 2019.
- lesniakrafal: How to Install Mac OS Catalina on a soft RAID Volume
- Appletalk Australia: HOW TO: Install MacOS Mojave onto a RAID0 volume with APFS that is Bootable
Model NVMe M.2 slots Kingston HyperX Predator (AHCI only) 1 NGFF M key M.2
This is a generic card with multiple variants by various importers1 Lycom DT-120 1 ULANSEN M.2 to PCIe 1 Angelbirds Wings PX1 1 Aqua Computer kryoM.2 1 Aqua Computer kryoM.2 Evo 1 Wolftech pulsecard 1 RIITOP M.2 NVMe/DIEWU TXB122
(This particular card has multiple variants by various importers)2 Syba I/O Crest SI-PEX40129 (ASM2824)
(This particular card has multiple variants by various importers (ASM2824)) Warning: New versions of this card appear to require two drives present2 Ableconn PEXM2-130 / StarTech PEX8M2E2 / Lycom DT-130 / etc
(This particular card has multiple variants by various importers (ASM2824))2 Accelsior 4M2 (PLX8747) 4 Amfeltec Squid series
Some are PLX87474 PLX8747 Generic 4 Highpoint 7101A (PLX8747) 4 HighPoint Technologies SSD7540 4 ASM2824 Quad M.2 NVMe SSD
(aliexpress generic card) confirmed working by MacProUpgrade (requires FaceBook Membership). This card is also available from many no-name white-label vendors: Add On/ADWITS/RIITOP/BGNing, etc.4 Sonnet MacFiver* 2 Sonnet M.2 4x4 PCIe Card FUS-SSD-4X4-E3: 4 Sonnet M.2 4x4 PCIe Card (Silent) 4 Sonnet M.2 8x4 Silent Gen4 8 *The Sonnet MacFiver is a unique card that has 2 NVMe slots + USBc + 10 GBe.
Can I use a card that isn't listed above that host's multiple NVMe drives?
Almost 95% of the time, no, but other cards are floating out there that might. Most M.2 hosts rely on bifurcation. The Mac Pro does not support bifurcation. See the bifurcation section for details. Many cards that support bifurcation can be used for a single drive, giving users the illusion it might work with multiple cards. Popular cards like the ASUS Hyper M.2 x16 Card v2 4 x M.2 Socket 3 will not host multiple drives in a Mac Pro. However, if the card uses the ASM2824, PEX8732, or PLX8747 chipset, you can use it. An easy way to tell if a card doesn't have a chipset is if it is significantly cheaper than the Ableconn PEXM2-130 / StarTech PEX8M2E2 / Lycom DT-130 / etc. (this card has many importers) in your area of the world. If it is, it most likely doesn't have a controller.
Which card is the best?
Inevitably, this question will be asked. It's complicated to recommend a single card because of the price. From a pure performance standpoint and hassle-free experience, the four-port cards from Highpoint and Sonnet are the most desirable. Each company has a high reputation with Mac users.
M.2 and Heatsinks
When looking at SSD options, you'll probably notice some hosts include heat sinks and others do not.
It's easy to find conflicting info on AHCI and NVMe SSDs and heat sinks. The short answer is that SSDs are intelligent enough to self-throttle if they get too hot. Thus, it is extremely unlikely heat will damage them. NVMes run warm, but it takes quite a bit to heat them. The NAND memory itself doesn't require any cooling and is generally supposed to be warm to the touch. The controller chipset is the portion of the SSD that heatsinks benefit the most from cooling. There have been debates about whether cooling could be detrimental, but the current consensus is that a passive heatsink, at worst, doesn't do much and likely keeps the SSD running at optimal speeds, so it doesn't have to use thermal throttle. Even a cheap generic SSD heatsink often causes a drop of 10-15C (roughly 50 degrees Fahrenheit).
For most users, self-included, the heatsink won't change day-to-day operation. Only when you get to cards that can operate four drives, it tends to be the general consensus that a heatsink is advisable as there are multiple NVMes in close proximity that could lead to thermal throttling. Also, PCIe 4.0 and especially 5.0 drives operate hot thus recommended to add passive heat sinks.
Aftermarket heatsinks can be bought and attached to SSDs. Still, if you do go this route, some experts recommend removing the label, as many labels function as heat distribution/heat dissipation, like those found on Samsung drives. Multi-drive M.2 cards require a heatsink over the PCIe switch/controller chipset as the popular ASMedia 2824, or the PLX8747, runs warm. Often, this is folded into the entire chassis, like in the Highpoint and Sonnet designs, which provide a large heatsink that works for both the PCIe card itself and the drives.
PCIe AHCI (Advanced Host Controller Interface) SSDs
AHCI is the technology behind the SATA standard.
Mac Pros can boot AHCI SSDs faster than the standard SATA drives, offering significantly faster speeds, often double that of 2.5-inch SATA-connected SSDs. These are not nearly as strong performers as NVMe as they tend to cap out at 1500 MB/s (usually more roughly in the 1 GB/s mark). Most NVMe adapters also accept AHCI. However, due to the speed limitations and age, few models are on the market. The price per GB tends to be high, as the industry has largely pivoted to NVMe for its huge performance advantages.
Generally, most people and manufacturers only reserve the term AHCI SSD for M.2 sized drives, although some places will list SATA SSDs as AHCI.
PCIe NVMe
NVMe (Non-Volatile Memory Express) is currently the pinnacle of storage due to its extreme performance. NVMe is roughly triple to quadruple the read/writes of SATA (and often nearly double of AHCI M.2 SSDs), clocking in at transfer speeds over 3 GB/s in PCIe 3.0 and for the latest PCs, 5 GB/s with PCIe 4.0 drives. Also, due to the improvements in SSDs, NVMe tends to sport faster 4k Random read/write times, which also greatly affects the "zippiness" of a computer. NVMe was constructed to work only via the PCIe standard; thus, it has a speed advantage over AHCI.
Some cards can host multiple NVMe SSDs, but many or most PCIe NVMe multi-SSD adapters require bifurcation, which is a technology not supported on the Mac Pro, which allows a PCIe slot to be split. For example: One 16x port becomes two 8x ports (see the PCIe portion of this guide for more info). Multi-drive NVMe cards that support the Mac Pro are more expensive as they have a controller that handles the PCIe IC and registers, and some are more powerful than others.
The Mac Pro is limited to PCIe 3.0 outside of ultra specialty cards like Highpoint SSD7540, which addresses more PCIe lanes to compensate for the speed of PCIe 4.0 NVMes. The PCIe switch lets the user toggle the PCIe maximum speed.
To summarize. NVMe speed is a function of three factors: the NVMe sled, the NVMe itself, and the PCIe port's maximum speed.
Not all NVMes are Mac OS compatible. Rather than list all that are compatible, here's a short list of incompatible or ones that need firmware update models, as they are few and far between.
- Samsung 950 PRO
- Samsung 970 EVO Plus*
- Samsung PM981
* The Evo and Evo Pro variants of the 970 are Mac-compatible. There is a firmware update for the Evo Plus that fixes issues. Most drives at this point should have the new firmware preinstalled at this point in time, but it should be noted.
Not all SSDs are equal
While this guide will not explain the finer points of SSDs, it is important to understand that SSDs come in multiple variants based on their storage capacity and even sometimes different controllers and memory cell technology with the same model (more on this later). Data density in mechanical hard drives has greatly improved read/write speeds as more data can be read by a drive-head on a hard drive each time the platter rotates. More data per square millimeter = more data read per second. This is one of the main reasons why HDD performance has steadily increased over time. However, the same cannot be said for SSDs. Each storage unit in an SSD is represented as a cell. The first SSDs could store a single bit per cell, positive or negative. This is referred to as a single-layer cell. Shortly after came the introduction of the Multi-Layer Cell (MLC), which allowed for 2 bits per cell. Then came Triple Level Cell (TLC), which allowed for 3 bits of data per cell, and finally, Quad Level Cell (QLC), which can store 4 bits per cell. The doubling of data per cell comes at a price: speed and reliability. This additional data load per bit increases stress on each cell and takes more time to access the data, which is fractional, but 3 bits vs. 4 bits means 8 vs. 16 possible values stored in an individual cell and more time to retrieve and write.
SLC is the fastest/most reliable but also the most expensive. QLC drives have certainly dropped the price floor in the SSD market but are hard to recommend with their reliability being untested, with only roughly 1000 read/write cycles (the data can be overwritten roughly 1000 times before that cell becomes unstable and is retired). Worse, in huge file transfers, QLC can occasionally dip below HDD speeds. TLC offers roughly 3000-5000 read/write cycles, making it three to five times as reliable as QLC, and it's much faster. Samsung estimates 114 years for 1 TB TLC. Although this is entirely unproven, Windows utilities provide entirely-hypothetical guestimates of your SSDs life. Does a QLC have 1/5 the reliability of a TLC SSD? Is it worse? Does it compare to a mechanical HDD? There are better sources on the internet, but it is somewhat speculative. The best estimates are using Mean Time to Failure vs. Terabytes, which is written from large data centers, and we simply do not have the data. My bet is that QLC would easily outlast an HDD, but I would pay the extra money for a TLC drive.
Memory density isn't the only factor, the very first SSDs didn't use a controller with a DRAM cache, and thus performance would "stutter. In an effort to harness the power of SSDs, controllers started packing DRAM to store the data map as DRAM is much faster than NAND and alleviated a common choke point in the SSD design. Many inexpensive SSDs are now also switching to DRAMless configurations, which generally result in lesser performance and lesser longevity due to the lack of a buffer to quickly read/write to before going to the SSD. Tomshardware's has an excellent summary of DRAMless SSDs.
Lastly, larger SSDs (of the exact same model) tend to be faster as they have more channels than the controllers on the NVMe itself.
Some makers, especially during the pandemic due to shortages, have quietly altered the specs of their SSDs without making it clear to their customers. Linus Tech Tips has a great video demonstrating this, and publications have even revised their ratings after component swapTom's Hardware dropped its rating of Crucial's P2 after discovering they moved from TLC to QLC memory.
Benchmarking SSDs
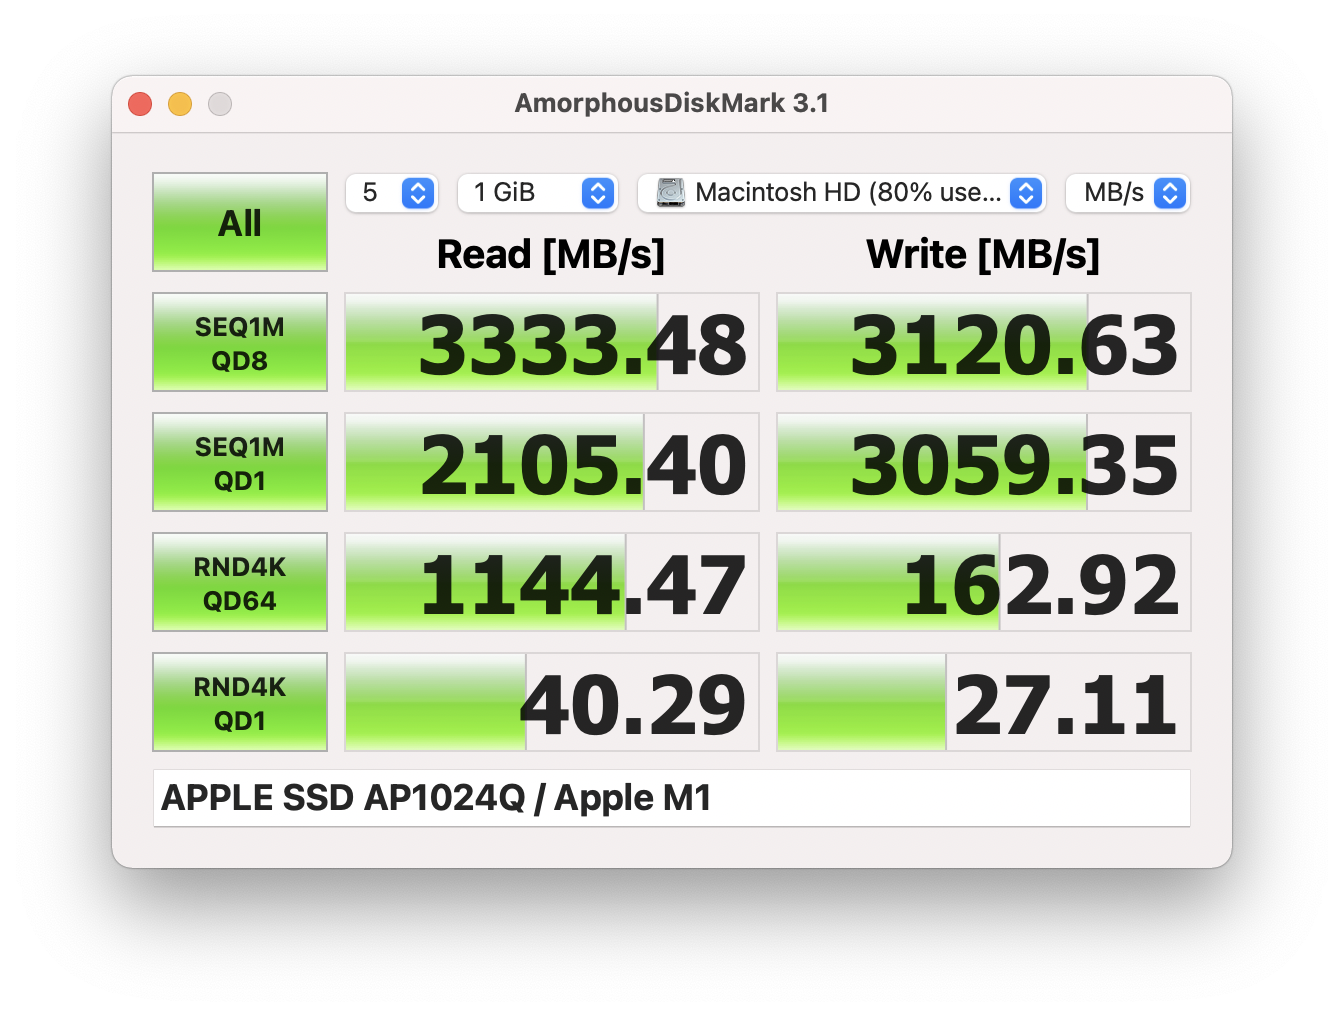
Pictured: AmorphousDiskMark
The best benchmarking software for SSDs is on Windows, as there are a plethora of utilities, whereas the Mac landscape is limited. Mac Pro 2019 owners can boot Windows to benchmark SSDs (assuming it is formatted in NTFS or a file system that Windows supports), but it isn't ideal. Previously, users would use utilities like AJA Disk Speed or Blackmagic disk speed, which are, quite frankly, bad as they only test continuous read/write speeds. The popular Windows utility, CrystalMark now has a Mac clone called AmorphousDiskMark. It tests more aspects of an SSD, such as random read/writes, and can use IOPS (Input/output operations per second ) instead of MB/s. I've written more about it in a blog post, AmorphousDiskMark is CrystalDiskMark for macOS; let's all stop using BlackMagic Disk Speed Test and AJA Disk Test.
RAID and APFS and performance
As previously mentioned, RAID after AFPS is very ugly for booting. The process involves cloning your boot disk to a single disk drive and cloning the updates back to the RAID array. This remains unchanged from 10.14 - 12.x I recommend reading Catalina on RAID with APFS on MacPro 5,1.
RAID0 may be "worth it" for users looking for maximum performance. A 16x NVMe RAID0 can hit 12000+ MB/s read and write speeds, but far more important is that it improves the latency, giving a perceptual "snappiness" that is noticeable, as demonstrated in this old but good article by PCPER.com, Triple M.2 Samsung 950 Pro Z170 PCIe NVMe RAID Tested – Why So Snappy?.
Soft RAID
RAID (Redundant Array of Inexpensive Disks) comes in management styles, hardware controllers that handle the RAID volume's setup and presents the RAID cluster as a single volume to the OS and RAID that relies on OS drivers to manage the RAID cluster. macOS supports soft raid for those looking to make use of multi-volume drives for both RAID 0 (striping, no data mirror) and RAID 1 (Data mirroring, no parity/striping). If you need help remembering the RAID axiom, it goes, "RAID 0 means you'll get zero files back if a drive fails in a RAID 0 cluster". Mac OS also supports RAID 1 + 0 (often incorrectly referred to as RAID10), allowing for the benefit of mirroring the parity/striping drives. RAID 1+0 requires a minimum of 4 drives at the cost of 1/2 the array's storage.
However, with the switch to APFS, Apple no longer supports APFS for soft RAID for bootable volumes. Hardware RAID is still supported with APFS as the OS is unaware of the RAID Cluster. NVMe cards like the Western Digital Black AIC will work under macOS despite being a raid array, thanks to the hardware controller. This is how the internal SSDs on the Mac Pro 2019
Making APFS bootable requires first having a bootable drive, then creating an APFS RAID array, and then cloning the boot drive to the RAID array. Any updates to the OS will require first updating the boot drive and then copying over to the RAID array, as you cannot update the RAID volume's OS. This is usually done using Carbon Copy Cloner but means users will spend a non-trivial amount syncing amount of syncing data as the usual update flow is: sync APFS RAID to single drive APFS, then boot single drive APFS, update, then sync to APFS RAID array, finally booting back to the APFS RAID array.
Ram Upgrades
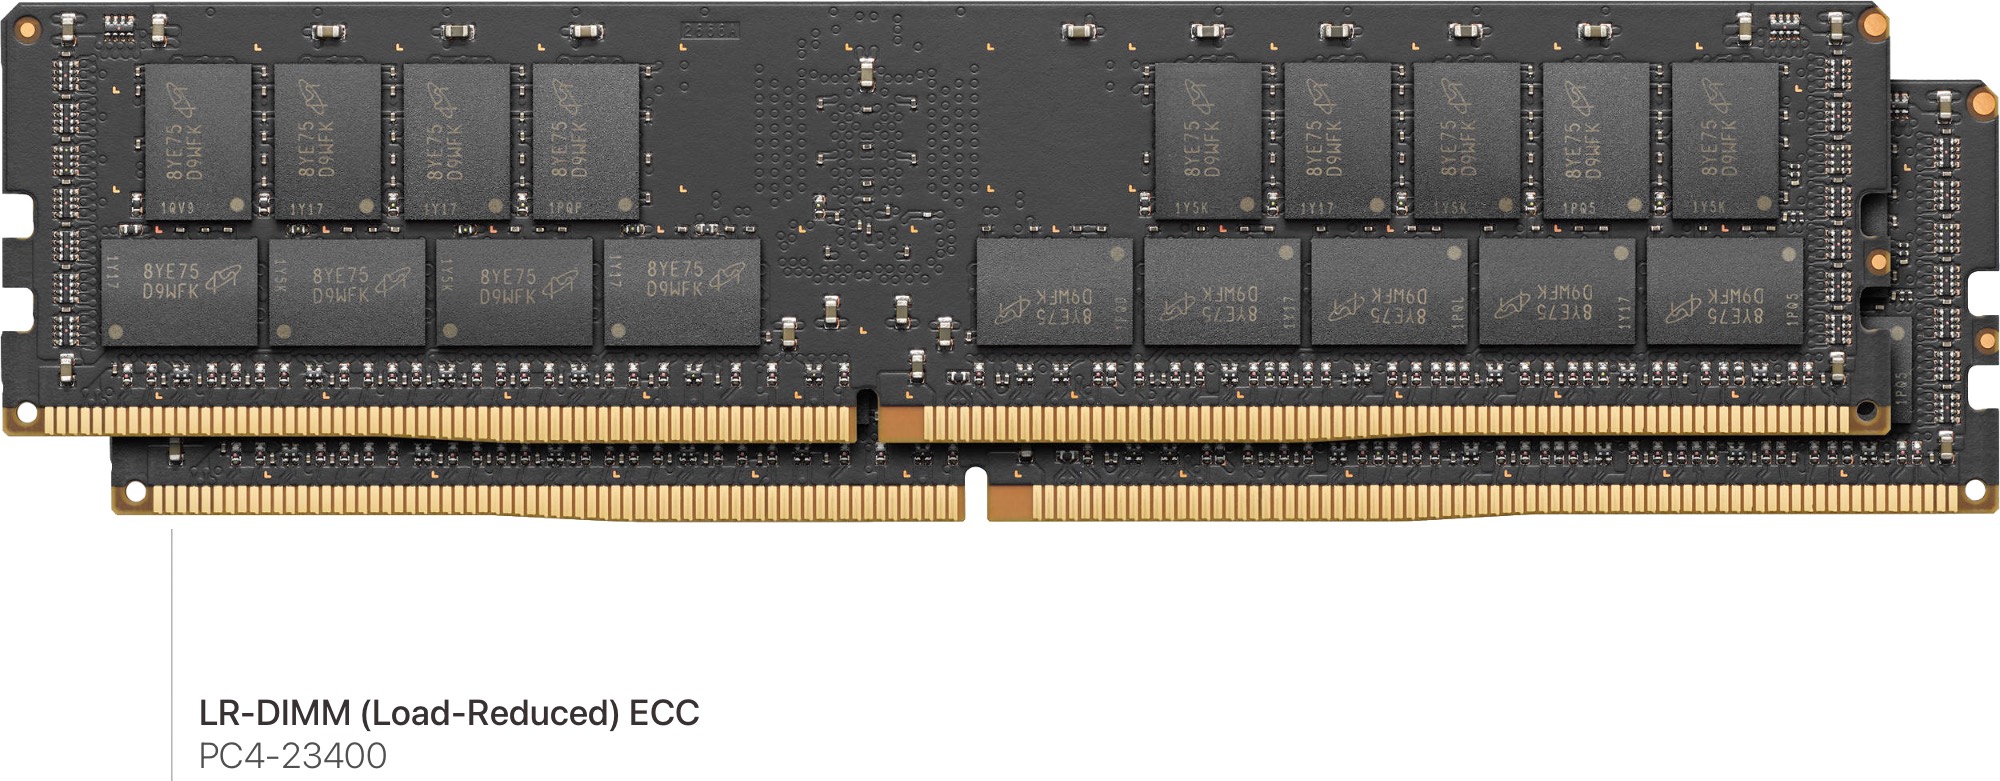
Pictured: LR-DIMM
Photo credit: Apple.comThe Mac Pro 2019's RAM capabilities depend on what CPU you have installed, although the RAMs on either CPU are so high that the vast majority of users needn't be concerned. Apple.com: official documentation lists the top memory specs as 768 GB/1.5TB depending on the CPU configuration, but MacRumors forum members have discovered this is 1 TB / 2TB.
While RAM is fairly straightforward, users should read the following section closely as there are some gotchas concerning configurations.
Mac Pro model Max RAM Unofficial Max RAM Speed Type 8-core 768GB 1TB 2666MHz DDR4 ECC LR-DIMM or R-DIMM 12-core 768GB 1TB 2933MHz DDR4 ECC LR-DIMM or R-DIMM 16-core 768GB 1TB 2933MHz DDR4 ECC LR-DIMM or R-DIMM 24-core 1.5TB 2TB 2933MHz DDR4 ECC LR-DIMM or R-DIMM 28-core 1.5TB 2TB 2933MHz DDR4 ECC LR-DIMM or R-DIMM
RAM speed and R-DIMM vs LR-RDIMMs
The Mac Pro uses 2933MHz DDR4 ECC RAM R-DIMMs or LR-DIMMs, although the 8-Core version uses 2666 MHz DDR4 ECC RAM (Apple ships these with 2933 Mhz RAM, which is automatically downclocked by the CPU). Apple ships its factory RAM type depending on RAM configuration. Users with the 8-Core Model shouldn't buy 2666 MHz RAM if they have ANY intention of upgrading in the future.
The following is from Apple.com Mac Pro (2019) memory specifications, so if you acquire a Mac Pro from a third party, you will want to check what type of DIMMs you have or ask the seller what type it has before purchasing more RAM.
- R-DIMMs for configurations up to 192GB (6x32GB).
- LR-DIMMs for configurations of 384GB (6x64GB) or more.
- 2933MHz DDR4 full-length DIMM. Mixing memory speeds is not recommended.
- Error-correcting code (ECC)
- 8GB, 16GB, 32GB, 64GB, or 128GB DIMMs
- Registered (R-DIMM) or Load-Reduced DIMM (LR-DIMM). Do not mix R-DIMMs and LR-DIMMs.
- 288-pin
- Use the same size memory modules across all slots to maximize performance.
- DIMMs with heatsinks are not supported and may damage the DIMM mechanism.
The general rule is if you're using below 32GB modules, you should use R-DIMM, and if you plan to use more than 32GB Modules, you should use LR-DIMMs I recommend reading Server Memory: RDIMM vs. LRDIMM and When to Use Them for further reading.
The W-3223 / W-3235 / W-3245 have a listed maximum of 768 GB of RAM, and the W-3265M / W-3275M have a listed 1.5 TB Maximum. Users have observed 1TB and 2 TB, respectively.
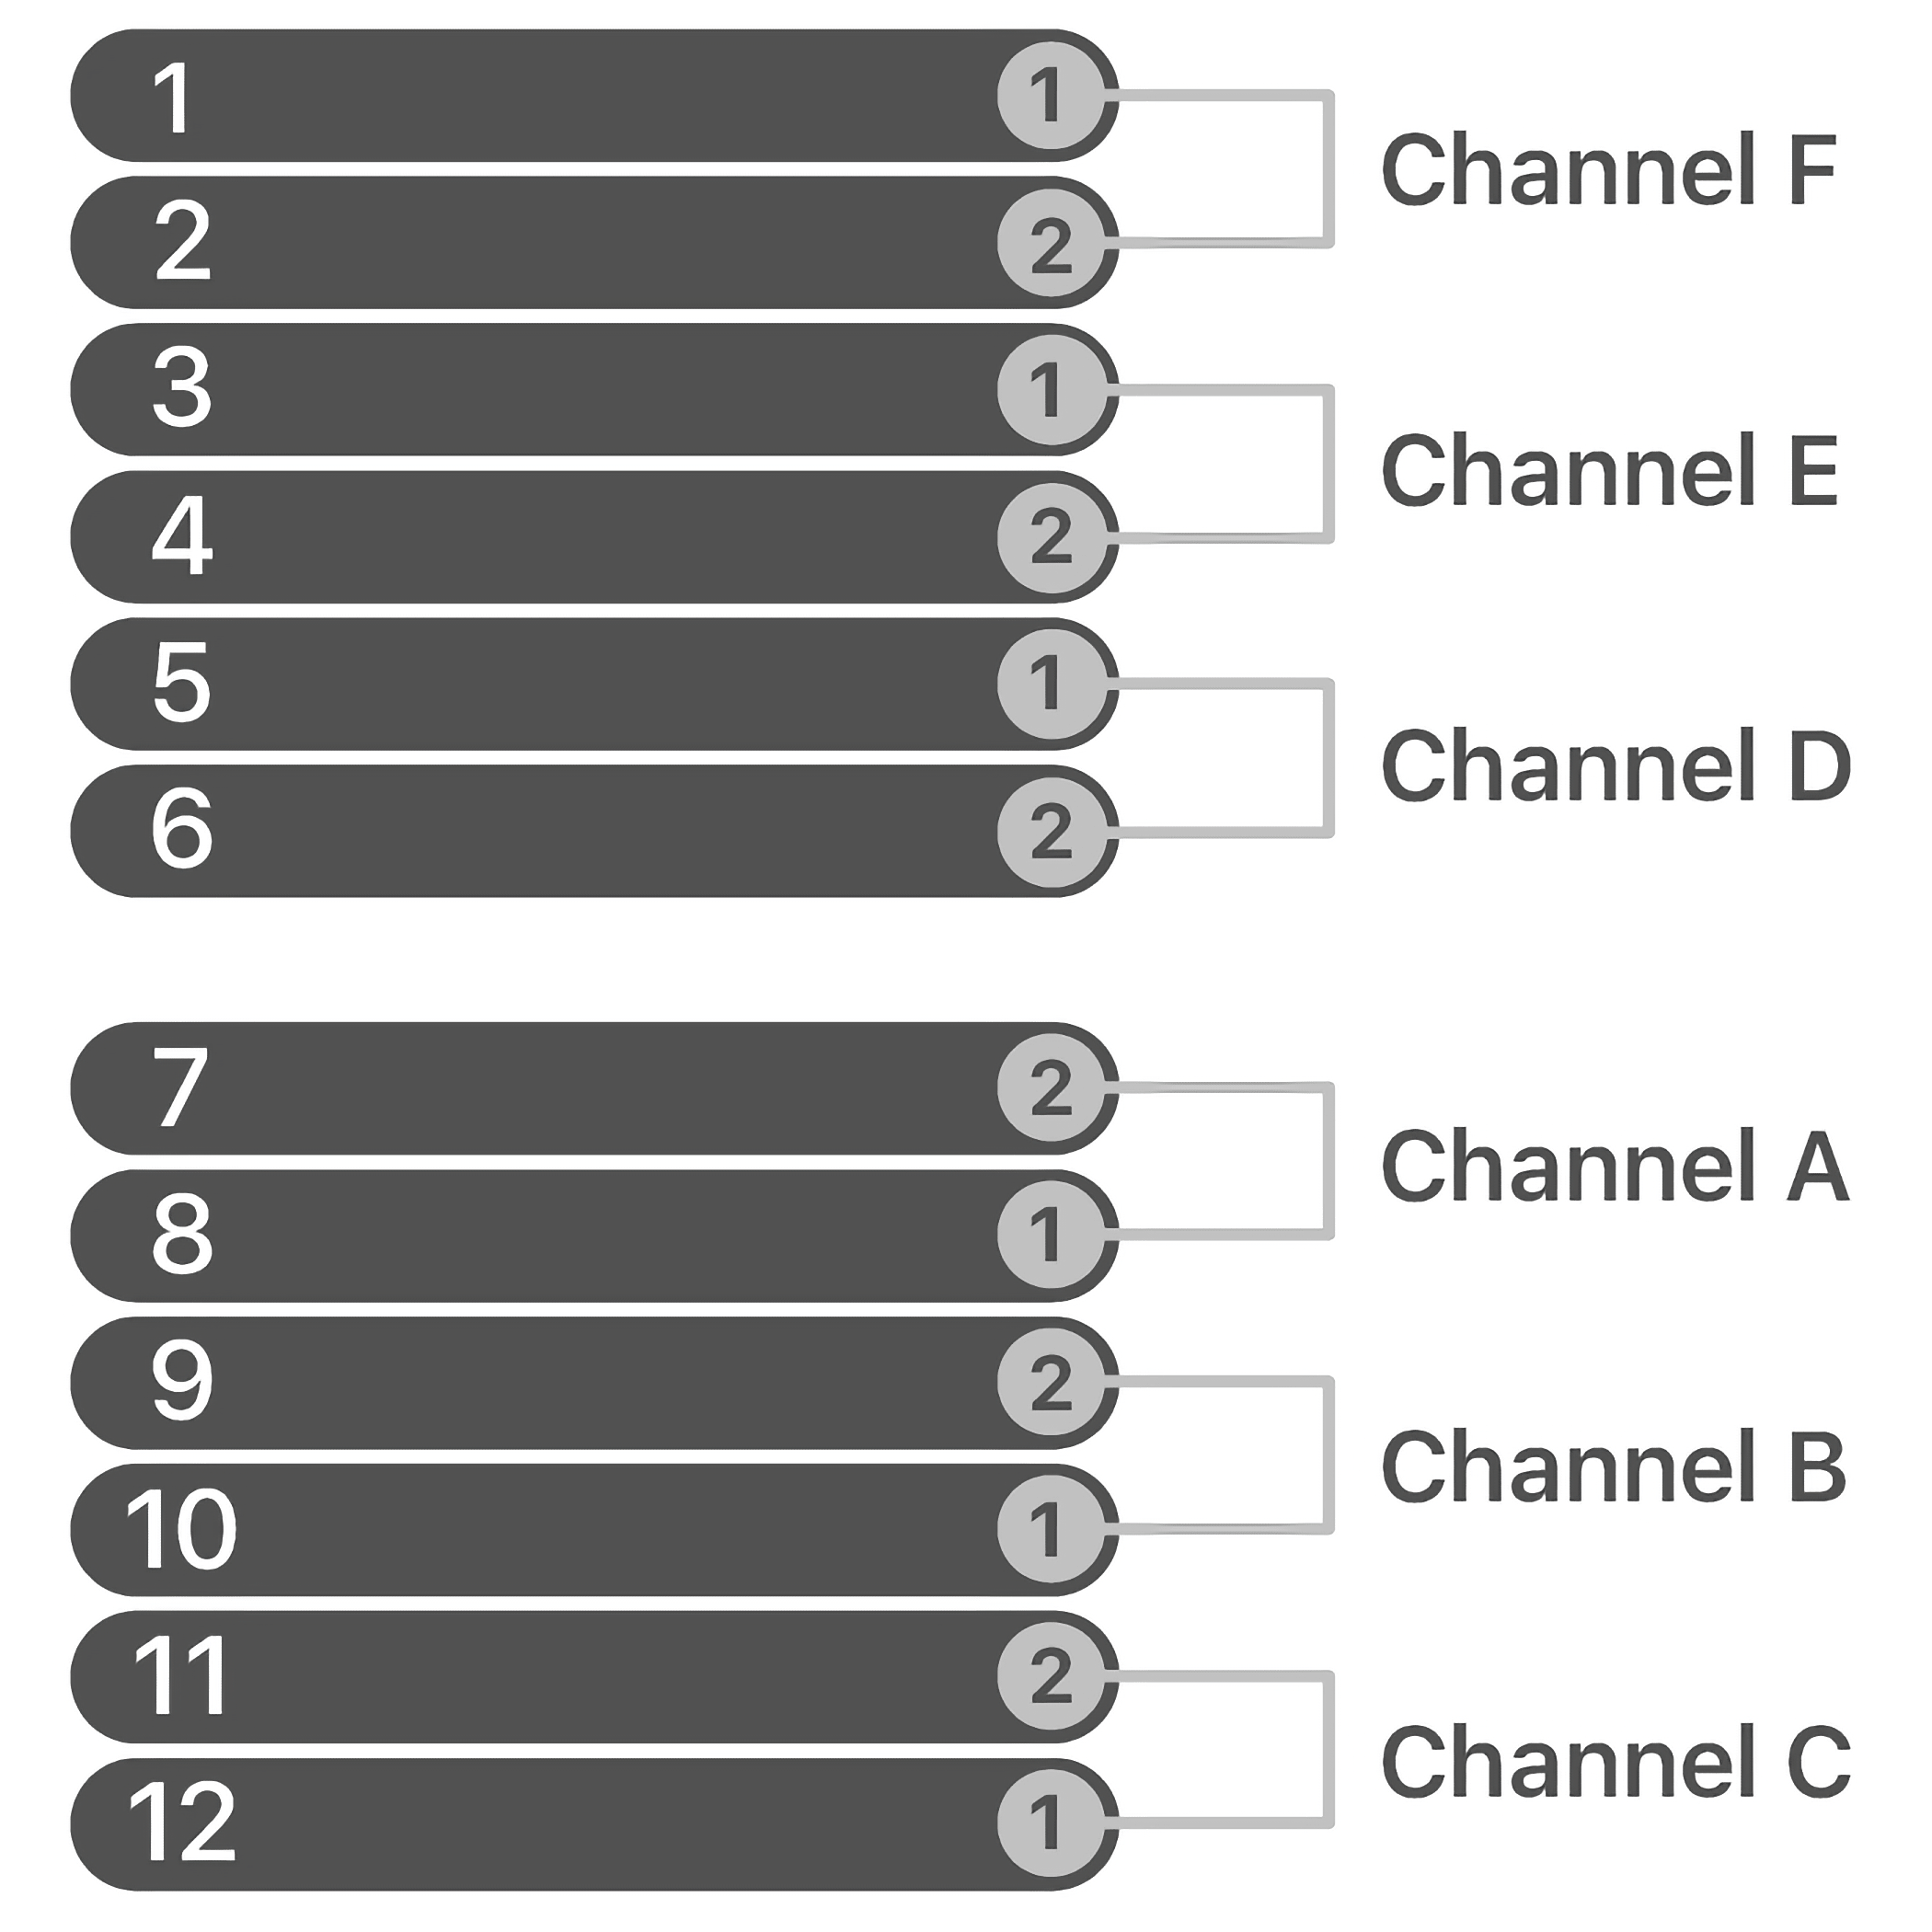
Pictured: Apple RAM Configuration
Image Credit: Apple.comRAM is bought in pairs and installed on the backside of the Mac Pro. The case over the RAM slots also has a pictorial guide to display the proper RAM configurations, and this can be checked in the "About this Mac." The RAM utility in this Mac can also detect faulty ECC DIMMs.
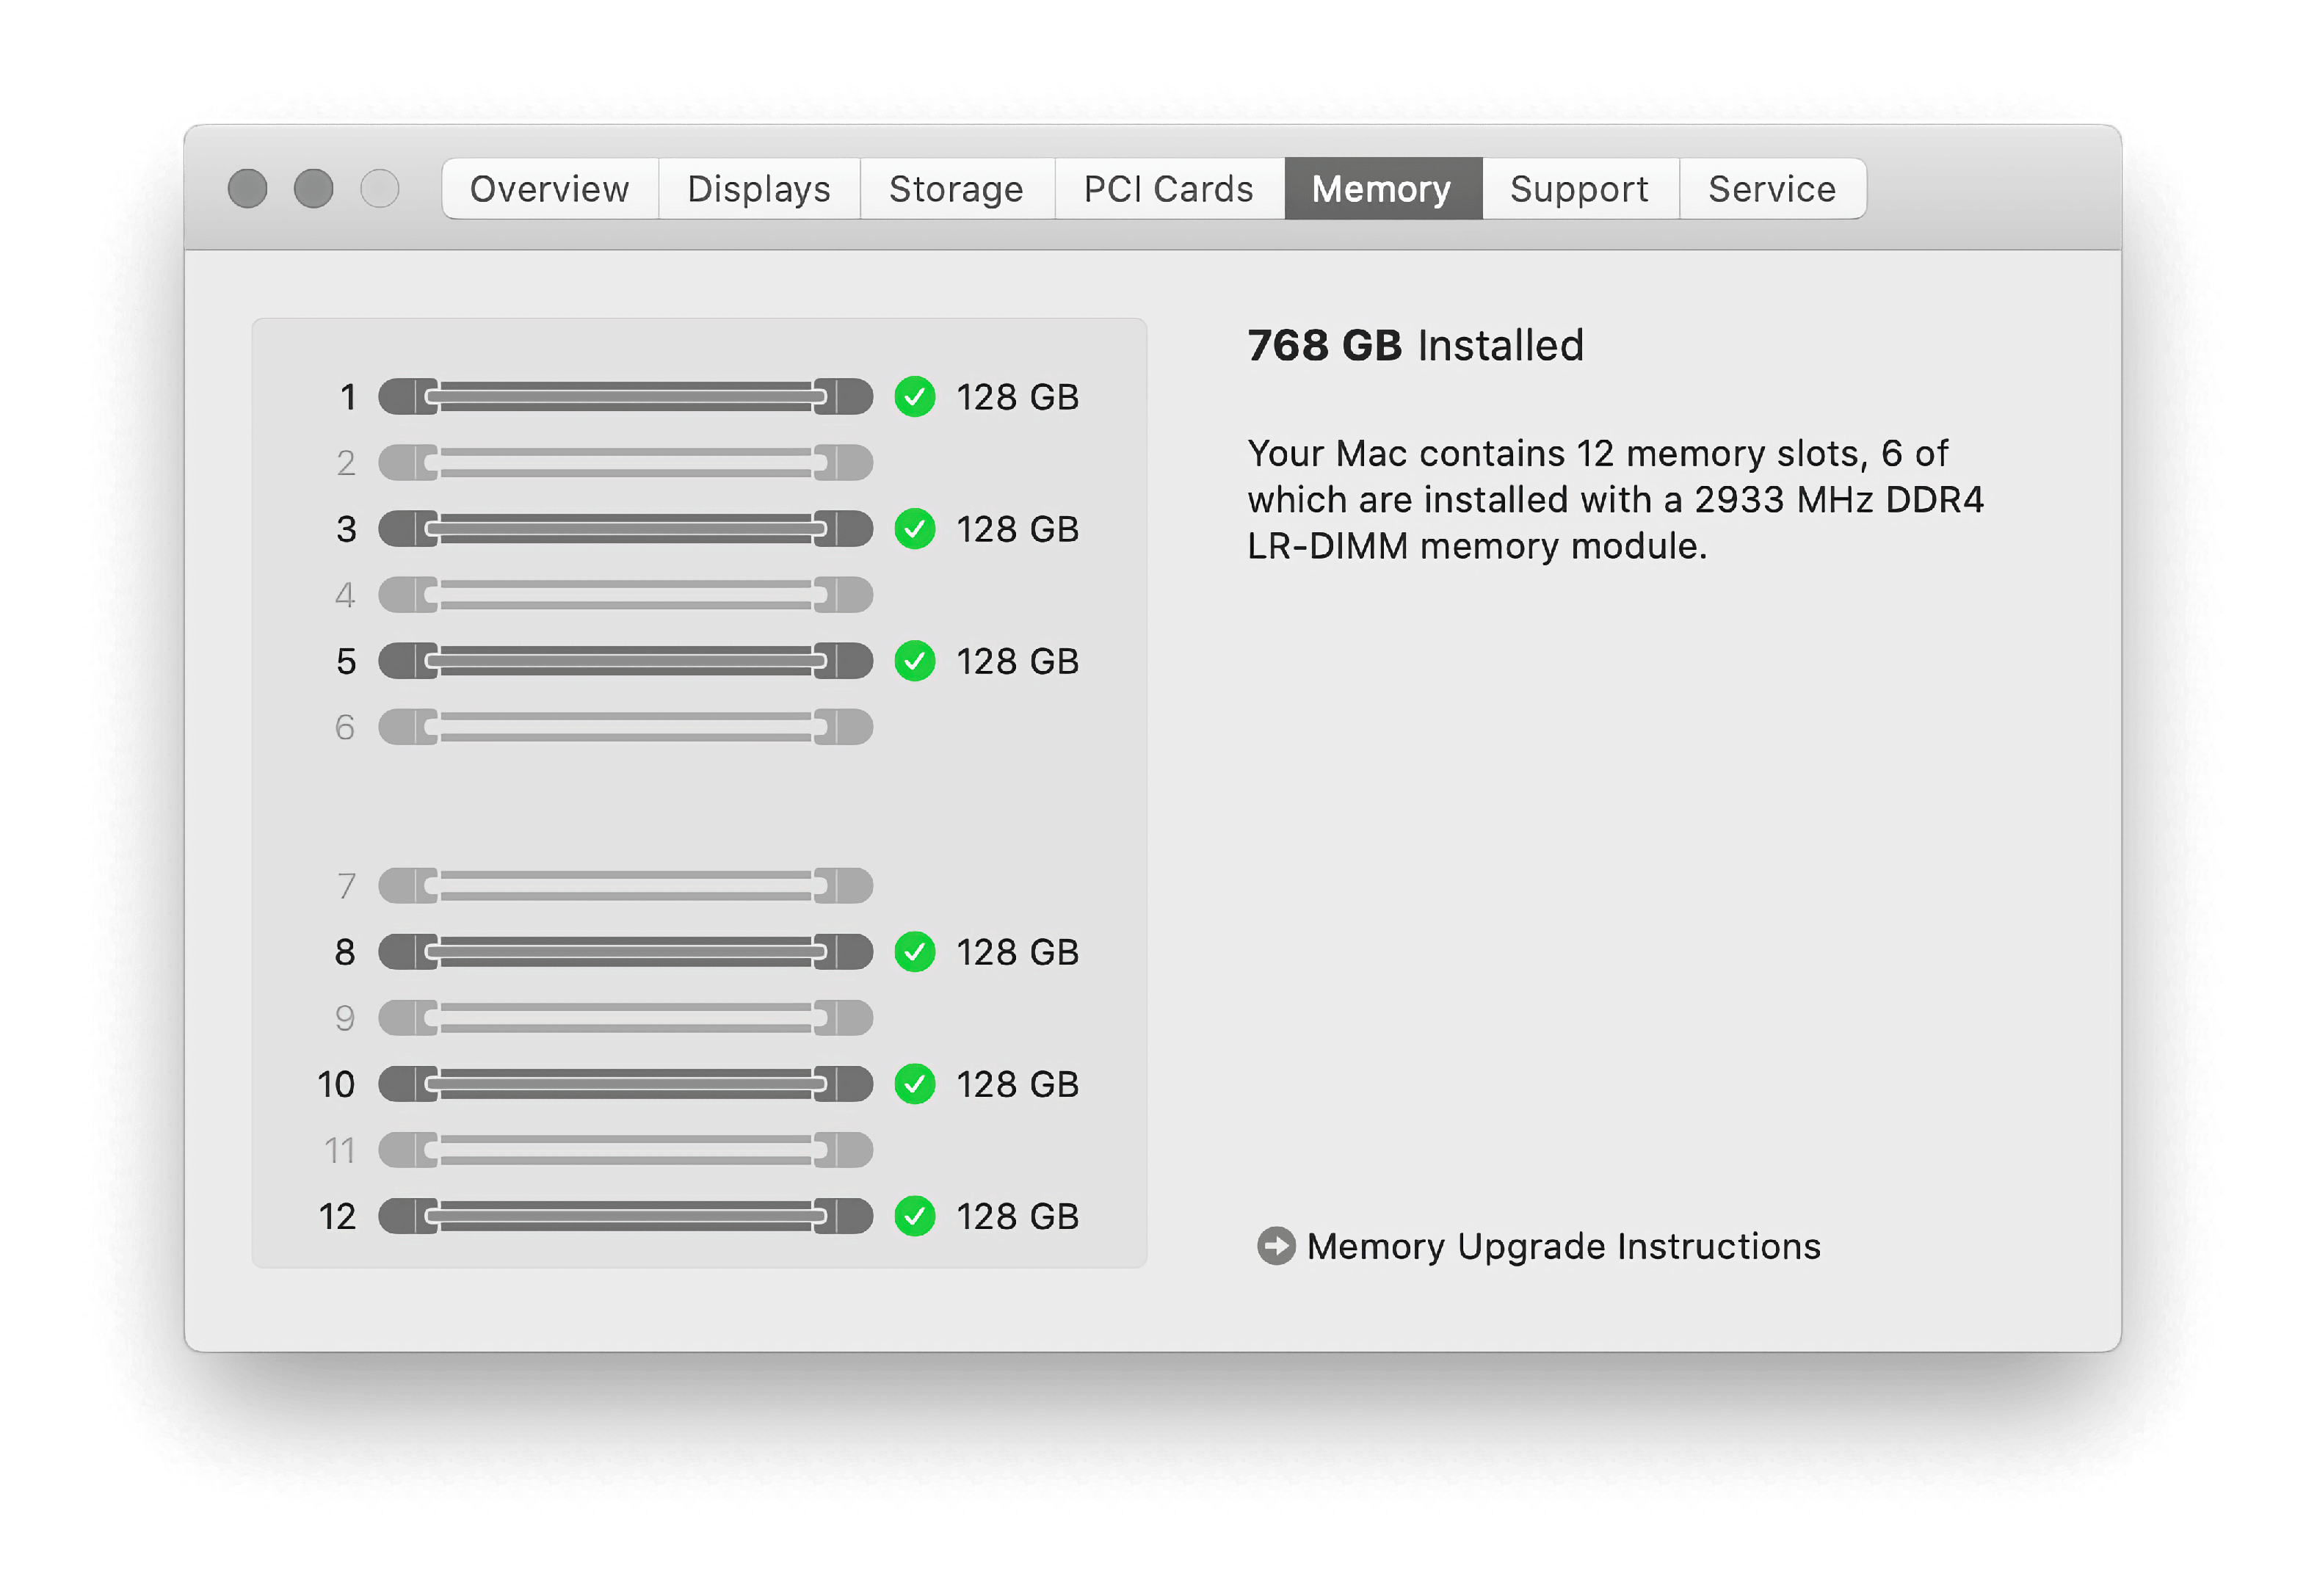
For top performance, the Mac Pro 2019 is installed with 6 or 12 DIMMs to run in 6-Channel mode. Otherwise, the memory controller will be operating in 2 or 4 modes. The performance is fairly negligibly.
Display Upgrades
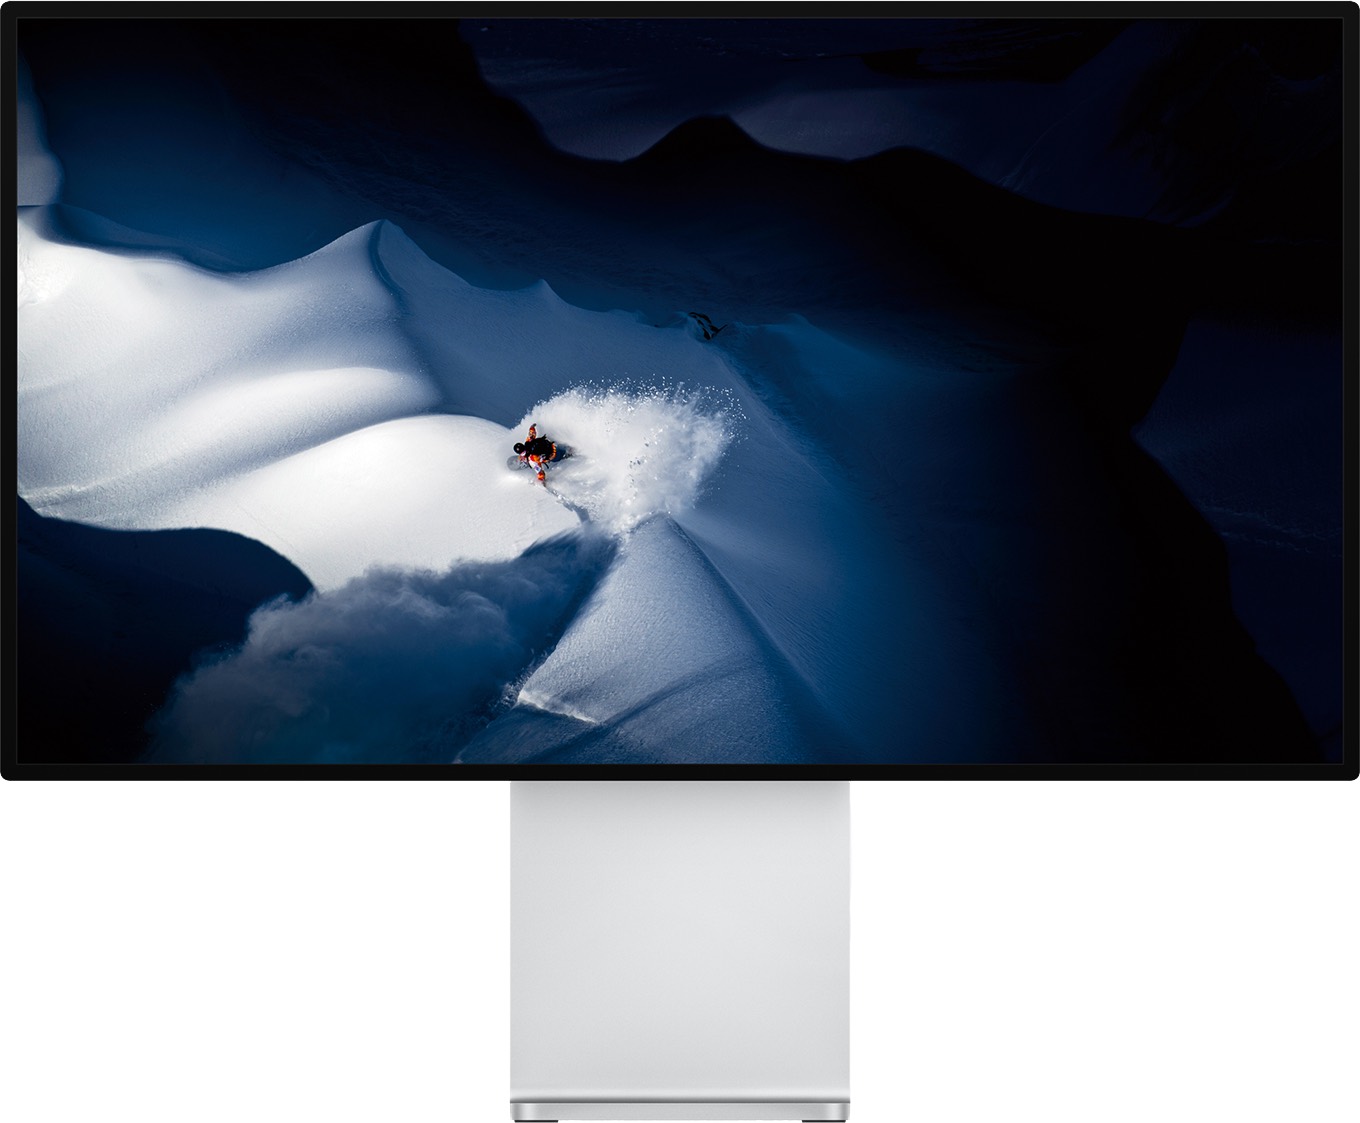
Pictured: Pro Display XDR
Photo credit: Apple.comThe Mac Pro's display limitations are a factor of graphics cards, what OS you are running, and whatever monitor you can afford or are willing to pay for. The Mac Pros running 10.9 or later can use resolution scaling akin to Macs that ship with "retina" (high-density pixel-per-inch displays).
8k and macOS?
While the Mac Pro 2019 certainly can support hardware capable of 8k, thus far, the OS appears to be the limiting factor even in macOS 12 Monterey, MacRumor.com forums have an in-depth look into trying to get single cable 8k displays working, and thus far, it hasn't gone well until very recently. macOS does not support 8k out-of-the-box but clever MacRumors.com user ZombiePhysicist have found a working solution. It isn't perfect, and it remains to be seen how effective this strategy is with other hardware configs, but the workaround requires:
- Monterey 12.1
- 8k capable GPU
- DisplayPort 1.4 to HDMI 2.1 cable
- SwitchRez
Unfortunately, we do not have native support as 8k displays continue to drop rapidly in price. 6k seems to be the highest supported resolution currently. Displays that use dual inputs like Dell UP3218K 8k (or '8k4k') display support in macOS? are a bust as well. I suggest reading MacRumors MacRumors.com: SOLVED: 8k Displays Running on Mac Pro? Any? What Video cards would work that support 8k HDMI 2.1/Displayport 1.4/2.0 displays on Mac Pro? YES, you can.
High refresh rates and macOS?
The Hz of a display measures how many times a second the screen is refreshed, which defines the maximum frames-per-second (FPS) a display can render. A 120 Hz display can render a maximum of 120 FPS. 60 Hz is generally considered the minimum refresh rate for "smooth" user interfaces, like mouse tracking, dragging windows, scrolling, etc. As computer hardware has improved, so have refresh rates. FreeSync and G-Sync are technologies that allow for variable refresh rates to improve the visual experience (prevent effects like "tearing"), especially in the realm of gaming. Mac OS currently does not support Freesync/G-Sync. Both tonymacx86 and MacRumors forum members have experienced the same sort of issues. The workaround is to disable the G-sync and Freesync if the monitor does not produce any video output. Under Windows 10, FreeSync/G-Sync is supported as the limitation is tied to Mac OS.
Using a 4k TV as a display
The short answer is: yes, you can do it. TVs generally require some minor tweaking of the picture, such as enabling overscan correction in macOS. Those looking to use a TV as a full-time monitor should keep a few things in mind. Not all TVs use Chroma 4:4:4 subsampling. Video editors probably are familiar with this concept as not all cameras are 4:4:4 but may not realize nor are all displays. Chroma subsampling refers to pixel clusters and data representation. The Human eye is much more receptive to changes in luminance than color. Thus, video data can be compressed easily by tracking clusters of chroma values and mapping them over pixels of chroma value. This works great for video codecs when the data is at an endpoint where precision isn't as important (a streaming video, for example). TVs, in an effort to cut corners, often use this in the panels to both improve response times and lower cost, whereas PC displays are almost always 4:4:4 outside of extremely odd-ball instances. With lower Chroma Subsampling, things like text look blurry due to the decreased chroma resolution. Rtings has a great running list of The 6 Best 4k TVs For PC Monitors and pictorial examples of Chroma subsampling. A 60 Hz 4:4:4 Chroma Subsampled 4k 43-inch display suitable for a PC can be had for as low as $230 USD, making them popular for many users. Mac OS supports audio over HDMI as well. See the GPU section for details.
Notably, with the increase in size comes a decrease in sharpness. For a monitor, one intends to sit at a normal desk distance. 43 inches is appropriate as its Pixels Per Inch (PPI) is approximately 102 PPI. For comparison, Apple's 30-inch Cinema display was roughly 101 PPI, and its 27-inch Cinema Display was 109 PPI. Apple's laptops pre-retina generally had around 110 PPI, and its retina laptops had 220 PPI. A 4k 42-inch TV is roughly 105 PPI, making it appropriate as a very large standard-definition display. I suggest the PPI calculator for calculating a display's PPI quickly.
HDMI 2.1 is stupid like USB
Regardless of your Mac Pro's configuration, congrats, it's HDMI 2.1 as of December 14th, 2021.
The new features of HDMI 2.1 are impressive, like eARC (for comms), higher refresh rates/resolutions (10k@120Hz max), Dynamic HDR, auto-Gaming mode to trigger low-latency modes, etc. Your expensive Mac Pro 2019 probably doesn't support any of these new features, but it is HDMI 2.1. How could that be?
HDMI has decided to take the same messy route as USB and renamed all previous HDMI 2.0 devices to 2.1 regardless if they only support 2.0 features. In fact, manufacturers moving forward are only allowed to apply to have devices certified as HDMI 2.1. This means that, effectively, to be an HDMI 2.1 cable/device, all it has to do is support HDMI 2.0. What features the device in question supports, fortunately, isn't entirely a mystery. There is a requirement that HDMI 2.1 devices need to call list what exact HDMI 2.1 features they use.
This effectively means every GPU that the Mac Pro 2019 supports with HDMI 2.0 also is "HDMI 2.1," regardless of whether they support any new HDMI features. Expect to have a lot of confusion, just like USBc and the wacky world of USBc cables and devices. While I try not to editorialize a lot in this guide, this is a terrible move by the HDMI standards board that'll confuse buyers, and this is likely because the partners on the HDMI board do not want to list "HDMI 2.0" devices for fear of missing out on sales. Welcome to modern consumer electronics.
Pro Display XDR
Apple launched the Pro Display XDR with the Mac Pro, its first stand-alone monitor since the Apple Thunderbolt Display. The 32" Pro XDR sports a true 10-bit display, mini-LED backlit with a resolution of 6016 x 3384, aimed at professionals, although it received flak for a $4999 display that charged $999 for the stand and not even including a power button. While accurate for color, it is not as accurate as professional displays targeted at color grading.
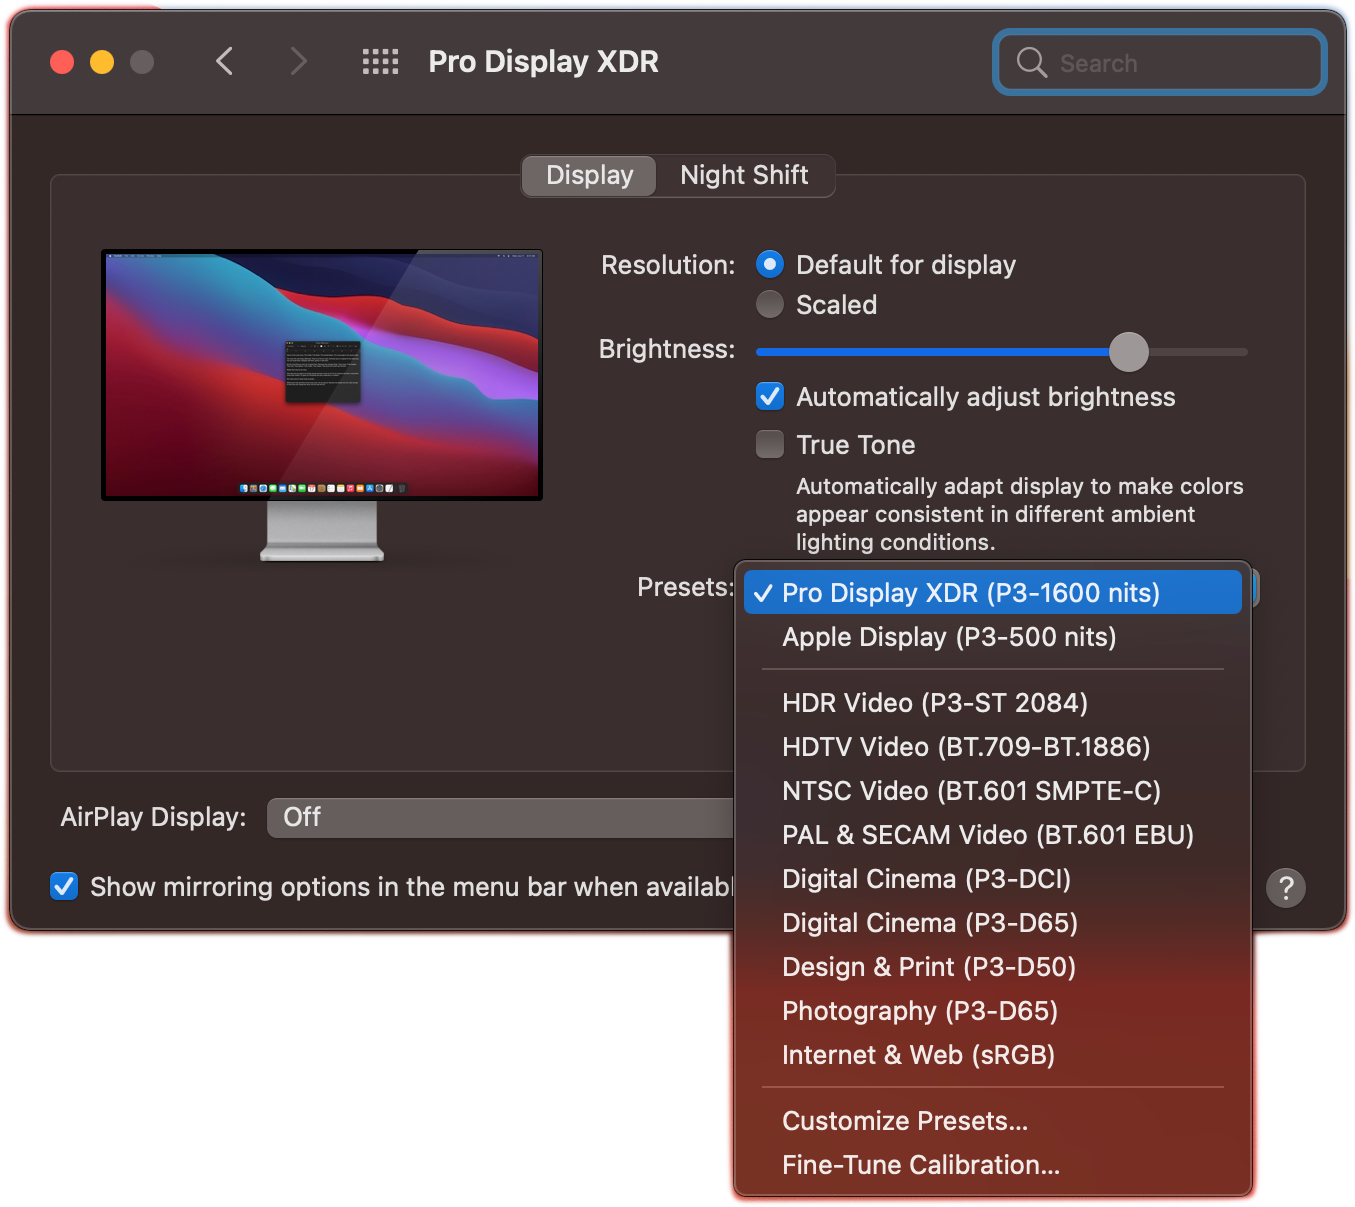
Pictured: Pro Display XDR Settings
Photo credit: PetaPixel.com- P3 wide color gamut (99% coverage), 10-bit color depth
- IPS LCD panel
- Anti-reflective coating, optional Nano-texture glass
- 576 full-array local dimming zones
- Timing Controller (TCON) for parity between LED backlight/LCD display
- 1600 Nits 39% of the screen area at once
- sustains 1000 nits across the whole display indefinitely
- 16 dBA fans for near silence in "typical" room conditions
- Three USBc Ports
- VESA Mount
The XDR only accepts video via a single Thunderbolt 3 port. The full white paper can be found Apple.com: Pro Display white paper.
Recommended Places to Go for Monitor Recommendations
The wonderful thing about monitors is the large variety, but it can make it daunting to select one. I'm personally a fan of the following sites: Rtings, PCmag, Wirecutter, Consumer Reports, Tomshardware, Digital Trends, as all sites do actual hands-on reviews as opposed to listicles of dubious rapport.
Audio
The Mac Pro 2019 sports a single 3.5 mm jack for audio output and can output audio over HDMI, USB, or Thunderbolt. It doesn't feature audio input.
Prosumer/Professional Audio
Professional hardware is less of a grab bag than consumer audio as Mac OS has a very long and proud history as the defacto choice for studios, audio engineers, and musicians. CoreAudio supports low-latency multichannel audio interfaces without any specialized drivers. For most audio interfaces, the basic functionality works out of the box. That said, audio interfaces come in various formats, like PCIe Cards, USB, Firewire, and Thunderbolt, and additional functionality can be tied to both the drivers and compatible software.
CoreAudio allows device aggregation, which will map multiple pieces of hardware to appear to software applications as a single device, making it easier to assign inputs and outputs to a software application. Listing compatible hardware would be a losing game for this guide, as there are decades worth of compatible gear. Most USB audio interfaces are HID-compliant, meaning even inexpensive USB audio boxes designed for Windows are generally compatible on a fundamental level with Mac OS. However, if they rely on additional drivers, they may not work with Mac OS. It's best to do your research. Hardware makers like Ableton, AKIA, Apogee, Behringer, Focusrite, IK, Korg, Line, M-Audio, MOTU, Native Instruments, Numark, Presonus, RME, Steinberg Tascam, Universal Audio, and Yamaha make almost exclusively hardware compatible for both Mac OS and Windows (not one or the other). There's plenty more I didn't list. Again, I must stress about doing your homework. Most likely, the piece of PC audio gear you have your eyes on is Mac-compatible.
Overall, the Mac Pro is an extremely audio-capable workstation.
Mac Pro 2019 Error Codes
The 7,1s has one of the more ingenious design choices: placing light error codes on the top of the case. The following information is from Apple.com: Mac Pro (2019) status indicator light behavior. The Rack Mount error lights appear on the front panel, whereas the tower is on the top.
Memory Error (Memory Data Error)
The status indicator light is solid amber for 0.2 seconds and repeats every second.

Housing unlocked or top cover removed while the computer is on
The status indicator light is solid amber for 0.3 seconds and repeats until the housing is locked or the top cover or access door is reinstalled.

Power button pressed while housing is unlocked or top cover is removed
Status indicator light is solid amber for half a second after the button press.

PCIe card error (System Resource Overload)
Light flashes amber twice and repeats until the computer is turned off.

Firmware recovery mode (iBoot Recovery Mode)
The light rapidly flashes amber three times, briefly flashes amber three times, then rapidly flashes amber three times. This repeats until the computer is turned off.

Windows 10/11
While Apple offers Bootcamp, the community and this guide recommend installing Windows on a separate drive from your OS. Windows can be installed by booting off a USB installer or using the Bootcamp assistant. I personally used the native Windows installer and used the brigadier utility to install Windows 10.
Installing Windows 11 is very easy using the Install Windows Utility, see Mac Sound Solutions video demostrating the process.
iPhone as a webcam
Since many people are virtually these days, webcams are in short supply. This isn't Mac Pro specific, but the iPhone's cameras are higher quality than pretty much all dedicated webcams and have decent audio to boot. I wrote a short guide on How to use Zoom with external webcams, iPhones / Android Phone, and/or Snap Camera on MacOS.
This isn't the only vector, as you can use NDI HX, but it requires more setup. OBS-NDI also interfaces with professional cameras, so it is possible to use studio cameras in video conferencing, too.
Multi-OS USB Bootable Flash Drives
On various sites, you can find "Five in one" USB solutions that include five versions of macOS on a single USB. These can be easily created by users following the directions from Apple, How to create a bootable installer for macOS. The only difference is that the user first must divide the USB flash drive into multiple partitions (large enough for the Mac OS installers) Partition a physical disk using Disk Utility on Mac.
The Mac Pro 2019 can only boot Catalina and up.
Communities & Blogs
Due to the nature of the Mac Pro and its upgradability, it's formed some of the most dedicated communities to any piece of Apple hardware. It's hard to overstate how crucial community support is for the Mac Pro's reputation as Apple's finest line of computers ever produced, the fierce loyalty users feel towards the hardware, and surprisingly open and welcoming to users of all backgrounds and walks of life. This guide is a reflection of said communities. Let me know if there's a group you feel I have missed.
- MacRumors Mac Pro Forum - The center of the Mac Pro universe, if it's happening, it's probably here. My go-to for sourcing information, as one can gather by reading this guide.
- MacProUpgrade - The premier Facebook group, very international with Mac Pro users across the globe. It requires requesting access, but they let anyone in. I'm there. Also, it is a strangely friendly and nice community. They are always willing to answer questions from the obscure to novice and have a lot of high-tier creative professionals who can answer your questions about AVID, Premier, FCPX (etc.) related to your Mac Pro.
- Mac Pro Users - Another major FaceBook group for Mac Pro users, smaller but still helpful, and it has the benefit of being public too (no signup process and can be browsed without a Facebook account). It is a helpful and friendly community with a lot of creative professionals, too.
- Reddit.com/r/macpro - Not as large as the Facebook group but active, friendly, helpful, and of course, has the benefit of not being under the regrettable Facebook umbrella.
- Reddit.com/r/mac - Mostly useful for Apple news and general questions, one of the essentials of the Mac world.
- blog.greggant.com/topics/#macpro - I've written for six years now semi-frequent Mac Pro-related blog posts.
Apple Silicon and the Mac Pro's fate (and additional observations)
The biggest burning question is, "How long will Apple support X86?". The short answer is no one knows how long Apple intends to support Intel Macs. We have two statements from Apple: they will offer Intel Macs until 2022, and they pledged to support x86 for years.
Apple has transitioned its Mac lineup two times now, from 68k to PPC and from PPC to x86. To assist the previous transition, Apple offered Rosetta a real-time translation layer to run PPC binaries on x86, which included both PPC and x86 libraries for applications to access. Apple has Rosetta 2, which works similarly this time, translating x86 to ARM. In an ironic twist, ARM is the second time Apple has switched to a RISC-based CPU.
Apple transitioned to x86 quickly, starting with offering in late 2005 Intel iMacs and laptops using the Core Duo, which quickly jumped to the 64-bit Core 2 Duos mere months later and, in 2006, refreshed its entire lineup with stark and drastic performance increases. Apple supported PPC Macs until 2009 when Mac OS X 10.6 Snow Leopard dropped support. Apple supported PPC for roughly three years.
However, the lay of the land is different today. In 2005, Apple sold 4.5 million Macs. Today, Apple sells roughly 20 million Macs. Roughly, Apple has 140-150 million still supported Intel Macs in Big Sur, vs. Apple, the 15 million PowerPC Macs that were capable of running OS X when Apple switched to x86. Apple is also no longer the same company and now faces increased scrutiny as it finds itself the most valuable tech company and often the world's most valuable company. We can safely assume that Intel Macs will be supported until 2025, as Apple has supported PPC Macs for almost three years. My guess would be 2026-2027. It's also worth noting that in May of 2020, Microsoft stopped distributing the 32-bit version of Windows 10 ( even owners of 20-year-old Pentium 4 desktops could run Windows 10 ). Windows will undoubtedly support old Intel Macs for many years. For comparison, Apple dropped 32-bit CPUs in 2011, axing support for the first 2005 Macs featuring Core Duo CPUs.
Updates & Author Notes
This guide is the 3rd iteration of the Definitive Mac Pro Upgrade Guide. This guide will be more media-centric than previous guides to accommodate more styles of information gathering. The goal is to have more imagery and video to assist in learning the many concepts in this guide. Also, as the information is "fresh", it's much easier to cite official documentation.
Stylistically, I was never a fan of my "Useful links" found in the Definitive Mac Pro Upgrade as they often lacked context.
04/20/25 - Added that Resizable bar isn't supported.
03/26/25 - Lots of copy editing! Added Windows 11 quick install. Added more recent videos and removed the ancient SSD one. Added info about the Sonnet MacFiver and Sonnet 8 port card.</li>
08/14/24 - Broken link fixed to iSwitch blog.
10/11/22 - Added open core info about 6850/6950 XTs, added power cable info for PCIe power cables. Added links to OWC's Belkin alternative.
01/10/22 - Added Mini PCIe power cable spec,
01/03/22 - Image Width fix for mobile
12/29/21 - Minor copy editing, SATA 3 power information, PCIe power information, more up-to-date 8k info
12/28/21 - Added links and info about Apple wheels.
12/27/21 - Added Apple I/O Card, T2 section, and networking section, added 6600 XT.
12/25/21 - Added contents for easier navigation, added info about HDMI 2.1, first editing pass with a lot of typos, spellings, and poorly worded passages fixed.
12/24/21 - Added Windows info, ports image, cleaned up I/O section somewhat, added communities section, extras, Added displays section
12/23/21 - images added to RAM, SSD, Afterburner, cooling, quotes added about cooling, moved raid info below SSDs, more info in PCIe section
12/21/21 - SSD section info added, RAM info extended, error codes added
12/20/21 - SSD section started
12/19/21 - init
</small>
-
Emulating Mac OS 9.2 with sound on Apple Silicon and Intel
I've already written a slap-dash guide on how to use QEMU on Apple Silicon prior to there being an Apple Silicon native version. Now there is one and that makes things easier. As always emulation is a legally grey area. This guide has an additional video if you'd like to follow along and see the relative performance.
Easy Mode!
- Download latest UTM release from github (grab the DMG)
- Install it and launch it
- Click the UTM gallery and find Mac OS 9 and click "Open in UTM", you may need to locate the app on your computer. It'll automatically download and launch when done
- You'll need to manually engage the mouse/keyboard by clicking the icon. To release your mouse and keyboard, click the command+control option
Hard mode!
You'll need the following on your Mac to get started:
- Xcode
- Xcode's Command utilities (How to install here)
- Homebrew
- ability to follow instructions to use the terminal
Xcode is Apple's IDE for developing software for macOS and iOS/tvOS/iPadOS and it includes a lot of software that is beneficial to power users. Homebrew is a package manager for installing open-source software on the Mac. Think of it as the App Store but for mostly command-line utilities.
You can check if you homebrew installed on your mac by running brew and seeing if it gives an error or additional instructions
brewInstalling QEMU via Homebrew
brew install qemuThat's it!
Setting up QEMU and installing Mac OS 9
First, we need to make a hard drive disk image. Anyone familiar with virtualization will understand this concept. It's just a file that contains a virtual hard drive. Once it's done installing we can create our virtual hard drive. The utility is called
qemu-imgThe comand
qemu-img create -f qcow2 myos9.img 2GLet's break down this down.
qemu-imgis the name of the utility application that qemu comes with to create disk images.create-f is format andqcow2is QEMU's file format of choice for disk images.-f qcow-M is the model, and our model is a mac99 which is a G4 Mac. The other option QEMU supports is a Beige G3.myos9.imgis the name of the disk image and you can give this any name you want with a .img suffix. You can specify the path of this image but I'm going to leave at the default, which is in the root of your user directory.2Gstands for 2GB. Notably, this file will not eat up 2 GBs of space. Rather it's just capped at 2GB. You can make it whatever you like, but 2 GB is plenty for my needs. .
Hit enter to run this command and application. It'll happen very fast as this utility is very quick.
I want to be very clear that terminal commands aren't magic. Anyone can look up with *nix utilities manuals by using the man command or searching in a search engine,
qemu-img manand get detailed explinations like this page that explain the various flag options. No one is born knowing esoteric flags like this, and this is how users such as myself figure out comamnd line utilities. If you're already a terminal user who knows aboutman, awesome.Step 2: Download Mac OS 9
I recently discovered the Mac OS 9 lives version of macOS 9.2 installer, which is tailored for emulators like QEMU, as it launches to the disk utility and is a stream lined install It's about 500 MB. Download it.
Step 3: Running QEMU
The command:
qemu-system-ppc -L pc-bios -boot d -M mac99 -m 512 -hda myos9.img -cdrom path/to/disk/imageNow we're going run the
qemu-system-PPC,app which is exactly what it sounds like. It's emulating a PowerPC processor. Here's a quick break down of the flags.-L pc-bios-L is bios. I'm still not sure if this is necessary or there's a more correct way but this works perfectly fine. We are telling the emulator to use PC bios.-boot d-boot is self explainatory. This is the boot drive for the computer, like old PCs used to use. Macs never had this, it's strange but this what we have to do. The D drive is the CD-Rom and C drive would the Hard Drive.-M mac99-M is the model, and our model is a mac99 which is a G4 Mac. The other option QEMU supports is a Beige G3.-m 512-m is memory, and this expressed in megabytes. I'm using 512 MB which is a lot for the Mac OS 9 era. It should be plenty.-hda myos9.img-hda is our hard drive and this is the disk image we created. This can be a path to the disk image.-cdrom path/to/disk/image-cdrom should be self explainatory as well. This is the path to the CD ROm's dsik iamge. Replace thepath/to/disk/imagewith the path to the disk image. The easiest way to get this is to find the disk image you downloaded and drag it into the terminal.
Hit return to launch the emulator. It'll take a minute or so to boot, usually with a strange yellow screen then it'll change to the Mac boot sequence. Once you ahve booted, you'll need to use the disk format utility. If you're using the Mac OS 9 Lives installer, this will be open on boot. Format the drive and close the utility.
Then within your virtual environment, run Apple Software Restore or the Mac OS installer if you're using a different Mac OS 9 installer. This will go fast with the Mac OS 9 Lives installer.
Now we need to shut down. You can use ctrl-alt-g so you can move your mouse and just close the window or if you go the terminal hit control-c, you'll immediately shut down that application.
Now it's time to boot our Mac. We'll use the same command, but we don't need the cdrom and we need to remember to swap our boot drive letter as we aren't booting off the CD Rom drive to the c drive.
qemu-system-ppc -L pc-bios -boot c -M mac99 -m 512 -hda myos9.imgCongrats, you should be able to boot Mac OS 9!
Installing Software
What's an OS without software? Websites like macintoshgarden.org and archive.org have old software to download. There's plenty more and you can find them with search engines. In my video I downlaoded Sim Ant and Unreal but the software doesn't need to be a game. Download a disk image and then you'll need to attach the downloaded disk image to the command string when booting:
qemu-system-ppc -L pc-bios -boot c -M mac99 -m 512 -hda myos9.img -cdrom path/to/disk/imageThe only difference between the Mac OS installer and this, is that we are booting of the Hard drive's disk image. QEMU doesn't come prebaked with sound but we can build our own from the source code.
QEMU screamer.
In my video I followed this guide. You'll only need the first four commands int the section and it takes a bit. You can go to it or follow the commands below.
Step 1
Clone the repository.
git clone --recursive -b screamer https://github.com/mcayland/qemu.git qemu-screamerOnce finished:
cd qemu-screamer/Step 2
Install the dependencies via homebrew (if you followed the first part, much of these will be already installed).
brew install libffi gettext glib pkg-config autoconf automake pixman ninja meson gnutls jpeg libpng libslirp libssh libusb lzo ncurses nettle snappy vdeStep 3
Configure the build.
PKG_CONFIG_PATH="$(brew --prefix)/opt/ncurses/lib/pkgconfig" ./configure --target-list="ppc-softmmu"Step 4
Go into the build folder and now build the app.
cd build/make -j$(sysctl -n hw.ncpu)From here you can now run your disk images using this copy of QEMU screamer from the build folder (or wherever you place it). You'll need the correct path to your disk iamge. You do not need to use the Homebrew installed version of QEMU to set up Mac OS 9, all of it can be done with this version.
./qemu-system-ppc -L pc-bios -boot c -M mac99 -m 512 -hda path/to/myos9.imgIt'll most likely be two directories outside of this project so it'd be:
./qemu-system-ppc -L pc-bios -boot c -M mac99 -m 512 -hda ../../myos9.imgAnd that's it for installing and running QEMU with sound. QEMU works great for games that do not require 3D hardware on the Mac as RAVE or Glide would take a lot to reverse engineer. You can play 3D games in software rendering modes in QEMU. Of course, QEMU isn't limited to gaming but this is probably one of the more popular uses for PowerPC emulation, and it's very fast.
In my previous article, I demostrated how to boot Mac OS X 10.0 - 10.4. I suggest checking it out if you'd like to try your hand at emulating Mac OS X. There's a few more flags that need to go into it as later Mac OS Xs require USB and some enviroment flags that I had to figure out through trial and error.
-
The M1 Pro and Max Window Server Memory Leak Fix
So I've run into a stupid problem with the M1 Max under macOS Monterey: The WindowServer eats up a lot of RAM, much more so it should. I've seen other people with WindowServers eating 10s of GBs of RAM, which is unacceptable. The fix?
Above is the video, but you prefer written instructions if you're like me. Especially when its simple, so here it is:
- Open up system preferences
- Click Displays and then disable promotion (set your display to 60 Hz)
- Reboot! Leave ProMotion disabled, lest you want to feel the wrath of the WindowServer.
Okay, so it's not a "fix" so much as a workaround until Apple patches it.
-
M1 Max review
The M1 Pro and Max is here and I have many things to say about it. I tried to condense it down into a succinct review but realized it wouldn't be that interesting. Instead, I decided to bring my Mac Pro 2019 into it.
This is by far the most work I've dumped ever into a video project, featuring my trademarked stilted on screen presence and overly long winded narration over cheap motion graphics.
Huge thanks for ALBATROSS for letting me use his music for speaker the test. He's a bilingual hip hop artist who raps in English and Russian≥
ALBATROSS - Serdtze♥️ - LIVE Acoustic
ALBATROSS - Serdtze (Birchpunk music video) - One of the craziest music videos I've seen in the best way possible, complete with a plot, huge VFX in set in a dystopian Russian cyberpunk future with art collective, Birchpunk.
Benchmark sources (in order of appearance)
pugetsystems: Apple M1 MacBook vs PC Desktop Workstation for Adobe Creative Cloud
phoronix: Apple macOS 10.15 vs. Windows 10 vs. Ubuntu 19.10 Performance Benchmarks
anandtech: Apple's M1 Pro, M1 Max SoCs Investigated: New Performance and Efficiency Heights
barefeats: Max MacBook Pro versus 2019 Mac Pro
barefeats: M1 Max MacBook Pro versus 2019 Mac Pro - Part 2
barefeats: M1 Max MacBook Pro versus 2019 Mac Pro's Newest GPUs
techgage: Adobe Premiere Pro May 2020 AMD vs NVIDIA GPU Encoding Performance
Recommended links (in order of appearance)
Marques BrownLee: Reviewing EVERY iPhone Ever!
Will APPLE make a DISCRETE GPU for the Apple Silicon Mac Pro?
Sources (in order of appearance)
extremetech: The 2016 MacBook Pro Keyboard May Fail Twice As Often As Older Models
zdnet: A journalist's wrecked MacBook keyboard tells a terrible story
extremetech: Dust Is Still Breaking Apple’s Improved MacBook Pro Keyboards
9to5mac: The latest MacBook Pro has a different keyboard, so is it safe to buy an Apple laptop now?
appleinsider: Apple confirms new MacBook Pro models have only slower UHS-II SD card slots
techradar: What is CFexpress? The new camera memory card format explained
appleinsider: Apple's T2 chip makes a giant difference in video encoding for most users
ymcinema: The new MacBook Pro is More Powerful for 8K Video Editing Than the Mac Pro
engadget: ARM unveils Cortex-A7 processor, 'big.LITTLE' computing
pcmag: Intel's Alder Lake Combines 'Performance' and 'Efficiency' CPU Cores on One Chip
techspot: Intel Alder Lake-P sample beats Apple's M1 Pro and M1 Max in leaked benchmarks
macrumors: Five Games Worth Firing Up to Show Off Your New MacBook Pro
tomshardware: Market Researchers Make Predictions: DDR5, GDDR6, GDDR6X, LPDDR5, LPDDR5X Examined
tomshardware: AMD's Zen 5 CPUs, APUs Will Likely Tap TSMC's 3nm Process Node
pcmag: Intel 'Alder Lake' CPUs to Support PCIe 5.0, DDR5 RAM
anandtech: Samsung Announces First LPDDR5X at 8.5Gbps
tomshardware: LPDDR5X Memory Extends Speeds to 8533 MT/s
ymcinema: What’s the Ideal Laptop for Video Editors: RTX Studio or Apple M1 Max?
dpreview: Apple M1 Max First Impressions: A MacBook Pro that's actually 'Pro'
techradar: The Apple M1 Max means you don't need a gaming laptop for video editing anymore
phonearena: Mini-LED iPad Pro display issues explained: What's "blooming" and is there a fix
LTT: Does High Frame Rate matter
bloomberg: Apple’s Product Design Has Improved Since Jony Ive Left
ifixit: We Have the Right to Repair Everything We Own
macrumors: Mac Pro Rumor roundup
bloomberg: Apple Preps Next Mac Chips With Aim to Outclass Top-End PCs
-
A healthy distrust of the Metaverse
I feel like it's almost trite to point out how wacky and the wrong Meta is. I'm almost positive that I'm hardly the first person to question why any would want to create the Metaverse based on Neil Stephenson's breakout novel, Snowcrash. For those who haven't read it, it's a tongue-in-cheek parody of the cyberpunk genre with everything ratcheted up to 11, but also wildly imaginative, donning us with the common lexical use of "Avatar." It's a technocratic dystopian universe where society is so fractured that nation-states exist by neighborhood enclaves, generally aligned with various corporations and/or political ideologies or ethnicities. The world's resources are out of reach for all but the extremely rich thus, everyday citizens exist in an alternate escape reality, called the Metaverse.
If that sounds unappealing and a bit on the nose, it's because it is. I don't know if I can lob any extra insight other than I'm confident that Facebook will wedge NFTs into the Metaverse in an upcoming press release./p>
Now, what is interesting is an interview by Wired Magazine, ‘AR Is Where the Real Metaverse Is Going to Happen’ with Niantic CEO John Hanke (the company that brought the world Pokemon Go). The most interesting thing is the tonality of Wired Magazine, which with a healthy distrust of this technology. While I don't read Wired regularly, I have read Wired articles over the past 20 years. This feels like the new default position instead of a contrarian, skeptical, neo-Luddite, or paranoid position. I'm not sure when this shift happened at Wired, but I certainly felt my faith in progress via the internet in the mid-2000s wane pretty sharply. That was earlier than most people I know but hardly the first. Now, as we're fully into the current decade, it feels like skepticism is the default position as it feels irresponsible not to be.
</section>
-
Speed Up iCloud Photo Uploads from iPhone
The first time I used this method was back in 2015 when I originally wrote this article, after getting an iPhone 6 128 GB with iCloud's basic data plan. It was taking days to upload photos and it was annoying. I decided to test a theory, not letting my iPhone sleep. In roughly 3 hours, my phone uploaded 4,000 photos; a massively increase over the previous three days landing somewhere between 5000-6000 photos.
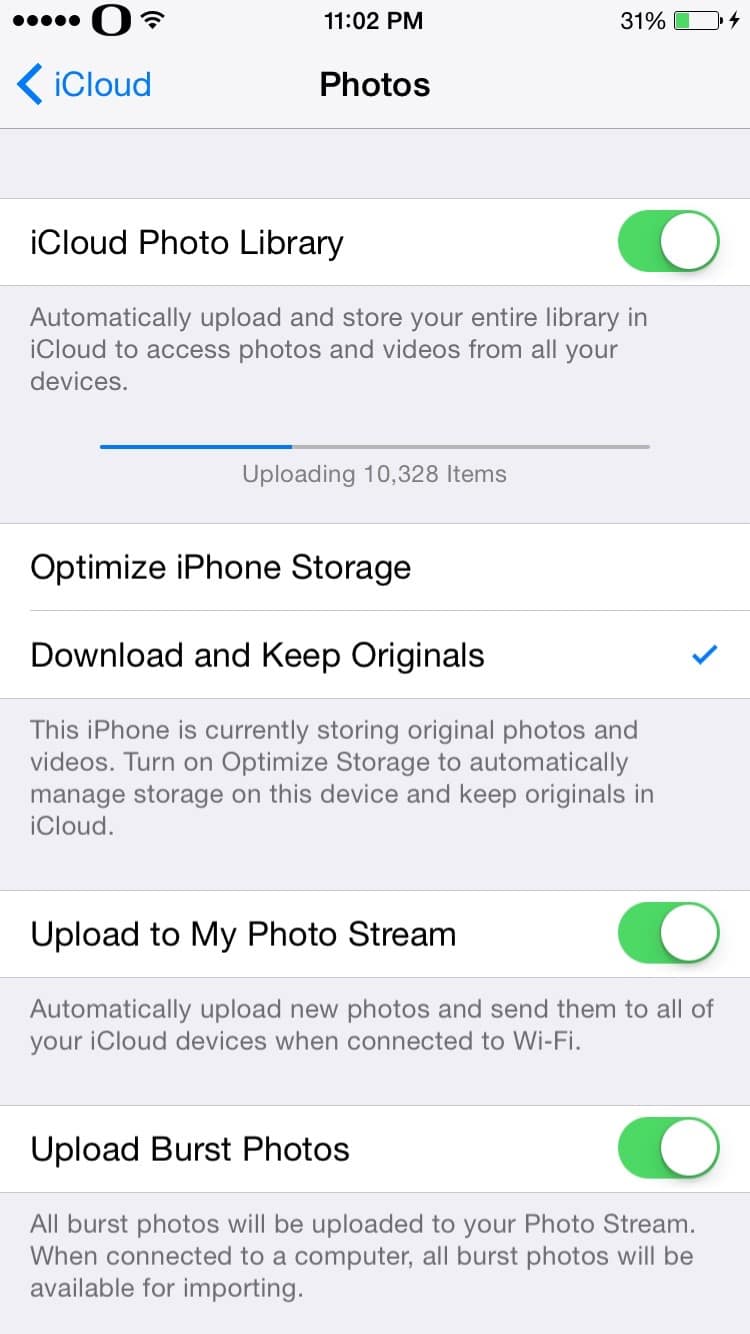
Picture: Uploading photos back in 2016 on an iPhone 6
The second time I used this method was in 2020, when I switched to a 2 TB plan, moved my RAW photos into iCloud, and merged a separate library. I left my Mac syncing while my iPhone 12 did the same.
I started toying with methods to speed up uploads. Here's the process I figured out:
The Zero-Sleep Method
- Plug in your iPhone and connect to Wifi
- Open settings
- Go to display and brightness
- Select Auto lock and set it "Never"
- Return to settings and tap your profile
- Tap iCloud
- Make sure iCloud Photos is enabled and leave it on this screen....
- .... and wait, this will take along time, depending on library size and your internet speed. This will not "speed up" uploading, rather keep it continously uploading.
A few users reported leaving it on the Photos screen worked as they could see the progress bar there. Also, if you're looking to keep things moving and have unlimited data or a huge data plan, you can enable unlimited updates.
- Go to settings and scroll down and tap Photos
- Tap Cellular Data
- Warning, this will use a lot of cellular data! Toggle on Cellur Data and unlimited updates
-
Apple vs. Nvidia. : What happened?
If you've been using macOS for a while, you might remember a time when Apple had both GPU options from ATI (purchased later by AMD) and Nvidia. In fact, the Macintosh was the first platform to sport the GeForce 3 in 2001. Nvidia even made a special chipset that was found in the 2008 MacBooks that helped deliver better GPU performance and skipped the Intel integrated chipsets. </p
Then suddenly, Apple stopped using NVidia chipsets. The last Macs featuring an Nvidia GPU was in 2015.
The video version differs slightly as it includes more personal ancedotes and asides.
Appleinsider isn't my favorite source for Apple news as it's too evangelical, generally portraying Apple as the protagonist in its reporting. Still, I have to give them credit as they've followed the Apple/Nvidia saga better than any other publication. It's Apple's management doesn't want Nvidia support in macOS, and that's a bad sign for the Mac Pro is a great first stop, but it's a bit dated and self-referential. I've tried to piece together the narrative as told by many news reports over the years, much of it I read as it was happening. It's a particular topic that interests me as it dates back to when I bought my first Nvidia GPU in 2001, a VisionTek GeForce 3, and used DOS with nvflash.exe to load the Mac Firmware onto the GPU. It was a crazy leap of faith as I read some guy who claimed to have done it on XLR8yourmac.com (once a powerhouse of a website for power users) and then reported back the steps I used to flash the card to the community. Over the years wrote a few popular guides on using Nvidia GPUs on the Mac and wrote a lot about Mac GPUs as part of my monstrous The Definitive Classic Mac Pro (2006-2012) Upgrade Guide. I don't have any particular insider info, but what I do have is the power of hind-sight.The history of Nvidia and Apple
The first Mac to ship with an Nvidia chipset was the Nvidia GeForce 2 MX, with the G4 Digital Audio in 2001, and Apple would also at the same time ship the PowerMacs with an option GeForce 3 GPU.
In 2004, 30-Inch Apple's Cinema Display release was delayed by Nvidia's GeForce 8600 Ultra yields, not producing the cards in a timely enough fashion for Apple's liking. Still, Apple continued to offer plenty of Nvidia options. As important as Apple was during this time frame, it wasn't the goliath it is today.
The year 2008 is when the relationship with NVidia changed during a flurry of events. Apple pulled into a legal battle that was primarily between Nvidia and Intel. To understand this, we have to jump back to 2004.
In 2004, Intel and NVIDIA joined forces for a patent licensing agreement for Intel CPUs with integrated memory controllers, the MCP79 and the MCP89. Then in 2008, Nvidia produced Nehalem-based chipsets that bypassed the Intel Northbridge (Memory controller) and South Bridge (I/0 controller) chipset. Apple was the first PC maker to adopt Nvidia's new chipset. The advantage was that Apple was going to be able to simplify its GPU strategy. It'd allowed Apple to stop using the underwhelming Intel integrated GPUs and unify them to mirror the desktops. At the time, Intel's integrated GPUs were pretty bad and could not support OpenCL, thus limiting the amount of offloading to the GPU that Apple could reliably bank with the OS.
Intel was much more central to Apple as a business partner, and Intel enjoyed Apple in its company roster. Nvidia pulling a fast one on Intel put Apple in the center of its own controversial strategy.
Predictably, Intel then filed suit against Nvidia, throwing Apple's plans into disarray. Neither company was endeared to Apple, as the squabble had many industry people speculating that Apple may look into AMD processors, even though AMD had very few competitive offerings in the laptop space. Nvidia tried to court Apple into its legal saga but ultimately failed, leaving Nvidia feeling spurned. Apple continued to use Nvidia GPUs, but sadly, its lower-end offerings were constrained to Intel's supremely mediocre integrated GPUs. This wasn't the only issue Apple was having with its relationship with Nvidia.
Meanwhile, in 2008 Nvidia was hit with a securities lawsuit around knowingly shipping faulty GPUs and trying to mitigate the problem through firmware, burning $196 million for replacements. HP at the time said it had 24 models of laptops affected, and Dell had 15. Apple had 2, the MacBook Pro using the GeForce 8600M GT.
GPUs were failing at a steady clip (not just for Apple), and Apple had to extend its warranties for consumers in 2009 (ending in 2012) and issued a software update in 2009 trying to mitigate the GPU issues. The problem came down to the soldering that held the a chip it's printed circuit board cracked under thermal stress. This still landed Apple in a class action lawsuit. Nvidia saw Apple as a smaller player and refused to extend support costs beyond an unknown amount of money (it only handed out $10,000,000 to Dell after it threatend to pull from Nvidia), putting another twist in the Apple relationship. This was the dividing moment by most accounts.
By this point, multiple publications reported a frosty air between Nvidia and Apple, although the high-end MacBook Pros would continue to use Nvidia GPUs.
Tried to use an AMD chipset in the MacBook Pros in 2011 and ended up in yet another class action lawsuit over faulty GPUs. Apple would switch back to Nvidia in 2012 MacBook Pros.
2013 marked a substantial shift away from Nvidia. Apple went with long-time Nvidia rival AMD for its partnership to produce custom variations of the Radeon FirePros for the 2013 Mac Pros. The iMac 2014s moved to AMD with the introduction of the 5k iMac.
If there was any hope of Nvidia and Apple reconciling, 2014 was the end of it. Nvidia went litigious against Samsung and Qualcomm over mobile graphics patents, filing a lawsuit over mobile GPUs. They went as far as to try and block shipments of Samsung Galaxy S / Note /Tab lines, with speculation that Nvidia wanted the iOS and Android business. At this time, Apple was still relying on components from Qualcomm and Samsung for its mobile units.
Things seemed quiet. Nvidia had ported CUDA to macOS and created Web Drivers even while Nvidia still was producing GPUs for Apple as their relationship fizzled.
Apple had embraced OpenCL, the popular framework used for GPU accelerated computing tasks. Nvidia had created its own closed alternative, CUDA, and using its marketing power to court various software publishers to use it over OpenCL. NVidia's CUDA did not work on AMD hardware, thus giving Nvidia a competitive advantage if a software maker chose to use CUDA. Adobe embraced CUDA even on macOS and thus earned CUDA a favored position among creative professionals, especially those using the Adobe Suite. Adobe went as far as to build CUDA specific applications for Nvidia GPUs. In the background, Apple was poaching industry talent for it's own GPU ambitions.
Nvidia continued a quiet strategy for macOS by bringing support for its later GPUs on macOS and updating CUDA. This meant classic Mac Pro owners, eGPU users, and Hackintosh users could enjoy the latest Nvidia hardware under macOS, which continued uninterrupted for nearly seven years. Many Mac professionals invested in Nvidia hardware as AMD's offerings generally paled against Nvidia at the higher end, and CUDA offered a lot more performance in Adobe video applications like Premiere Pro and After Effects. Nvidia didn't overtly flaunt its web drivers, and it came as a surprise to many Mac users to learn that they could buy Nvidia GPUs and use them in their Mac Pros. As a personal anecdote, I wrote two popular guides on using a GeForce 700s series and GeForce 1000 series GPU in a Mac Pro.
With the release of macOS 10.14 Mojave, everything changed. Outside of the people on Infinite Loop, no one knew for sure that Apple's grand ambition was to merge macOS and iOS hardware. Most users at the time feared the iOSfication of Apple's software instead of hardware.
For years, Microsoft had a huge leg up in the graphics department by owning its own graphics API in the form of DirectX. OpenGL, Apple's preferred graphics API, had floundered in the late 2000s, whereas DirectX, for all its faults, leaped ahead of OpenGL in graphics capabilities and support.
Rather than wait for the next open-source library, Vulkan, to formalize, Apple developed its own graphics API, Metal, for use with iOS. Microsoft most certainly inspired Metal. Bringing Metal to macOS was all-but given and was ported to macOS in 2019, set to replace both OpenGL and OpenCL and skip Vulkan support.
macOS 10.14 Mojave required metal-compatible GPUs. At some point, during the macOS Mojave beta, Apple pulled Nvidia's ability to sign its code, which ended Nvidia's support for macOS in one spiteful, anti-competitive move. In order for GPUs to be Metal compatible, they needed drivers, and Nvidia wasn't able to release drivers.
Nvidia publicly announced that it had working metal drivers on its forum, but Apple had revoked its developer license leaving the blame squarely at Apple's feet. Nvidia even called out apple on his support page but has now since modified it.
My personal take is that it boiled down to CUDA, Metal, and the M1. CUDA represented a significant problem for Metal adoption. In order to get professional applications on board with Metal, they had to cut out CUDA, and my guess is that NVIDIA was not willing to give up CUDA in its driver. Yet again, this was the impasse between Apple's management and Nvidia.
In order for Apple to launch Apple Silicon very smoothly, they needed everyone to support Apple's current technologies, and CUDA was a roadblock to that success.
Apple also knew the aftermarket install base for NVidia GPUs was quite small and limited to classic Mac Pro users and adventurous people who had eGPUs and the Hackintosh community. The group of people this affected was a group Apple the past decade has seemed vaguely resentful of: users who like modular computing. Axing Nvidia was another blow against modularity and another win for Apple's tight-fisted control of when products are obsolete.
The goalposts have now changed. The question isn't whether Nvidia and Apple will get along. It is now whether Apple will allow external GPUs or dedicated GPUs. At the time of writing this, this MacRumors on its buyer's guide page lists that it thinks that apple will release GPUs that outstrip AMD and Nvidia's current offerings.
Usually, MacRumors is pretty on point. Still, I'm just hyper skeptical the year-over-year gains in the GPU market have been not just consistent but going up also. Nvidia and AMD are two of TSMC's biggest clients. They, too, will have access to the same manufacturing processes as Apple. They've been doing it much longer, and they're very good at it.
I have a very unusual take on this whole thing, and that is that in the future, we're going to see macs that absolutely rock at laptop performances and low wattage.
Also, we'll probably see iMacs in a year or two that can edit 8k natively but also can't ray trace and are pretty crap when it comes to things like TensorFlow.
To quote myself after I received my first Apple Silicon mac in December of 2020: "for the portable class of computing, Apple silicon looks like it'll be unmatched, and expensive brute force versus efficiency will be the story of x86 versus Apple Silicon versus ARM, and I expect there will always be a clear winner. Welcome to the next decade of computing."
-
Uninstall Iriun Webcam
Iriun Web Camera on the Mac is a bit of a pain to uninstall. Utilities like AppCleaner will not completely uninstall all the Iriun as it doesn't know about the services that run in the background, which will continue to run the background of your computer regardless if it's uninstalled or not.
Fire up Activity monitor, and search for iriun, and force quit any tasks it has operating (there should be at least two).
Next, you'll need to delete the following (this will be from the library located at the root of your boot volume, not in your /Users/ ):
/Library/CoreMediaIO/Plug-Ins/DAL/IriunCamera.plugin/Library/Audio/Plug-Ins/HAL/IriunMic.driver/Library/LaunchDaemons/com.iriun.cmio.DPA.camera.plist/Library/CoreMediaIO/Plug-Ins/DAL/IriunCamera.plugin
These will likely require your admin password to delete. That's it. Enjoy your Iriun free life as it'll stop popping up as an input option.
-
The Definitive Trashcan Mac Pro 6.1 (Late 2013) Upgrade Guide
Contents
- Know your Mac Pro Models
- CPU Upgrades
- GPU Upgrades
- OS Upgrades & OpenCore
- Firmware Upgrades
- Storage Upgrades
- RAM/Memory Upgrades
- ThunderBolt 2 to PCIe
- Thunderbolt 3 / USB 3.1c
- eGPUs
- Cooling
- Repairs
- Changelog
Introduction
To mark the first anniversary of my wildly successful blog post (garnering tens of thousands of views), The Definitive Classic Mac Pro (2006-2012) Upgrade Guide, I'm proud to announce a sequel. The Definitive Trash Can Mac Pro 2013 upgrade guide started in jest on social media as the guide no one wanted, seeing as the Mac Pro 2013. The 2013 Mac Pro is a tale of hubris for Apple, as it over-promised and under-delivered and is considerably less upgradeable than its predecessor. Is there a need or demand for such a guide? I don't know, but here we are, and while the origins are jocular, the rest of this guide is serious. While most users (and Apple engineers) probably prefer the moniker "cylinder," the trash can title stuck due to its obvious physical characteristics.
The Mac Pro 2013 has the dubious honor as the longest-produced Macintosh, besting the Macintosh Plus produced from 1986 to 1990 without an upgrade. The 2013 Mac Pro was conceived as the original Mac Pro's successor, eschewing the modularity for a (debatably) stylish and radical redesign. After a few positive reactions by publications for its foreign looks, it quickly became snubbed for its lack of upgradability and stability, and Apple's complete and absolute antipathy (verging on enmity) towards it.
The Mac Pro 2013 has been prone to an abnormal rate of failures due to heat, with a nameless Apple exec quoted as saying, "think we designed ourselves into a bit of a thermal corner if you will". Apple also took steps to extend its repair program, but problems persist. Despite the naysayers, the Mac Pro 2013 isn't without its fans (no pun intended), as at the time of its unveiling, it was a powerful, quirky computer with a diminutive form factor. Despite its limited upgradability, the computer is a modular design, and nearly every significant part can be replaced. Only the 2019 Mac Pro since it has allowed for the range of user serviceability (although the iMac 5k is a close second). It's the bridge to a bygone era where CPUs and, storage, and even GPUs were removable.
Perhaps the 2019 Mac Pro a return to PCIe, but more than likely, 2013 will be the template.. Edit: The Mac Pro 2019 marks an expensive return to PCIe.
Know your Mac Pro Models
The Mac Pro line debuted in 2006 and has had eight major iterations by Apple's nomenclature: 1.1, 2.1, 3.1, 4.1, 5.1, 6.1, 7,1, and now 8.x. These are also generally referred to by the year 2006 (1.1, 2,1), less commonly 2007 (2,1), 2008 (3,1), 2009 (4,1), 2010-2012 (5,1), and 2013 (6,1). The other terms for these computers are "Cheesegrater" (2006-2012), "Trash can" (late 2013), and "Cylinder." For this guide's purpose, I will refer to the Mac Pro as a "trash can" as the 2013 (as does much of the internet). Please note This guide only covers the 2013 Mac Pro.
Please note This guide only covers the 2013 Mac Pro. For all other models, I've written a massive guide, The Definitive Classic Mac Pro (2006-2012) Upgrade Guide.
Configurations
Apple has only shipped a grand total of 3 base configurations with a fourth build-to-order option for the 12-core CPU. Apple has only made one minor change in the past six years to the Mac Pro 2013 by removing the original base configuration and lowering the remaining models' prices.
- Apple Mac Pro "Quad Core" 3.7 GHz, 12 GB of RAM, 256 GB SSD, and dual FirePro D300 2 GB of GDDR5 (4 GB total). Discontinued April 4, 2017,*
- Apple Mac Pro "Six Core" 3.5 GHz, 12 GB of RAM (16 GB after April 4), 256 GB SSD, and dual FirePro D500 2 GB of GDDR5 (4 GB total). Discontinued April 4, 2017,*
- Apple Mac Pro "Eight Core" 3.0 GHz, 12 GB of RAM (16 GB after April 4), 2256 GB SSD, and dual FirePro D500 3 GB of GDDR5 (6 GB total).
- Apple Mac Pro "Twelve Core"* 2.7 GHz, 12 GB of RAM (16 GB after April 4), 256 GB SSD, and dual FirePro D500 6 GB of GDDR5 (12 GB total). This is a build-to-order option only.
CPU Upgrades
Apple has never acknowledged the upgradeability of the Mac Pro CPU, but the Mac Pro 2013's CPU is not soldered, thus making it upgradeable. Only four CPU configurations were offered by Apple, E5-1620v2, E5-1650v2, E5-1680v2, and the E5-2697v2, but users soon discovered that the E5 v2 family was compatible. Unlike the previous Mac Pros, the Mac Pro 2013 was only offered in a single CPU configuration.
From personal observation, the E5-2697 can be found cheaper on eBay and local used markets (in the US) vs. the E5-2695 is considerably cheaper on aliexpress. This varies based on your local markets, as the European markets tend to be much more expensive than North America.
Credit to the CPU list goes to Mac Rumors forum member ActionableMango.
Architecture Cores CPU-Model GHz Turbo RAM Watt Ivy-Bridge 12 core E5-2697 V2 2.7 3.5 1866 130W Ivy-Bridge 12 core E5-2696 V2 2.5 3.3 1866 130W Ivy-Bridge 12 core E5-2695 V2 2.4 3.2 1866 115W Ivy-Bridge 10 core E5-2690 V2 3.0 3.6 1866 130W Ivy-Bridge 10 core E5-2680 V2 2.8 3.6 1866 115W Ivy-Bridge 8 core E5-2687W V2 3.4 4.0 1866 150W Ivy-Bridge 8 core E5-2667 V2 3.3 4.0 1866 130W Ivy-Bridge 8 core E5-2673 V2 3.3 4.0 1866 110W Ivy-Bridge 8 core E5-1680 V2 3.0 3.9 1866 130W Ivy-Bridge 6 core E5-1660 V2 3.7 4.0 1866 130W Ivy-Bridge 6 core E5-1650 V2 3.5 3.9 1866 130W Ivy-Bridge 4 core E5-1620 V2 3.7 3.9 1866 130W
Useful Links
GPU Upgrades
Yes, the Mac Pro's GPUs can be swapped out, but only three different GPUs were ever produced for it, the AMD FirePro D300 2 GB, D500 3 GB, or D700 6 GB. Apple has kept tight control on these (any official repairs require the GPUs to be returned to Apple), and thus few-to-none exist on the aftermarket, and the two higher GPUs are prone to failures thanks to a wattage ceiling. For most intents and purposes, it is cheaper to buy a Mac Pro 2013 than to track down two GPUs. Apple discontinued the entry-level Mac Pro 2013 that sported the D300. All-new Mac Pros sold after April 4th, 2017, have either a D500 or D700.
For other GPU options, see the eGPU section.
Useful Links
OS Upgrades
The Mac Pro 2013 was supported on macOS 12 Monterey. It does not support Sidecar. Currently,
OpenCore is a work in progress, fairly stable to get the Mac Pro 2013s up and running macOS 13 Ventura. For the latest information see, OpenCore Legacy Patcher and MacRumors: macOS 13 Ventura on Unsupported Macs ThreadThe Mac Pro 2013s do not support AVX2 CPU instructions, which may create some incompatibilities with certain software.
Firmware upgrades
The Mac Pro 2013 has had a few firmware upgrades. Unlike previous Mac Pros, where a firmware upgrade allowed for faster CPUs/RAM, AFPS, and NVMe booting for certain models, the Mac Pro 2013 has been meager. The MP61.0120.B00 boot ROM included support for NVMe booting (found in the High Sierra update). Most recently, the boot ROM version 128.0.0.0.0 was included in the 10.14.4 Developer Preview. With some firmware upgrades, some users found 4k displays no longer supporting 60 Hz, which requires an SMC reset and removing the offending PLists. See the useful links below. Previously, the updates were distributed separately from the OS, but they were distributed in 10.13+. they have been distributed with OS.
- 10.14.2: 127.0.0.0.0
- 10.14.4: 130.0.0.0.0 - removes requirement for Apple SSDs to perform firmware upgrade
- 10.14.6: 131.0.0.0.0
- 10.15.3: 134.0.0.0.0
- 10.15.4: 135.0.0.0.0
- 10.15.5: 136.0.0.0.0
- 10.15.6: 137.0.0.0.0
- 10.11.1: 426.0.0.0.0
- 12.4 430.120.6.0.0 - Sleep wake panic fixed
Notable, Some users cannot update the bootrom without the Apple SSD. It's recommended to hang onto the original SSD with a copy of MacOS to perform Firmware updates.
To check your firmware version, go to About This Mac -> System Report. It will be listed on the first screen under Boot Rom.
Useful Links
- Apple.com: Mac Pro EFI 2.0 (released Dec 19, 2013) - This update improves system reliability during reboot, resolves an issue with memory self-test, and improves graphics power management when using Boot Camp.
- Apple.com: Mac Pro SMC Firmware Update 2.0 (released Feb 26, 2014) - This update enables Mac Pro to enter Power Nap without running the fan for most Power Nap activities and addresses a rare issue where a low-speed USB device may not be detected at boot.
- MacRumors: Fixing Monitor no longer does 4k@60 High Sierra
Storage Upgrades
There's a large number of external storage upgrades for the Mac Pro 2013, from USB 2.0/3.0 to ThunderBolt 2.0, and listing them all would be an exercise in futility. What's important to understand is that there are many multi-drive enclosures, spanning everything from RAID to multiple SSDs. External SSDs perform well in Thunderbolt 2, able to achieve roughly 1.2 GB/s depending on the storage solution in various tests.
Internally, The Mac Pro does feature one SSD slot, using a custom Apple SSD running at PCIe 2.0 x4, capable of a maximum of 2 GB/s. Very few native third-party solutions exist, but they are out there by makers like OWC and Transintl.
That said... users have figured out how to shoe-horn NVMe drives into the Mac Pro, offering top-tier performance and much better prices. Unfortunately, no one has taken the time to compile a list, so the known so far are: Samsung 960, Samsung 970 Pro, Toshiba XG3, and Crucial P1. Samsung released a firmware fix for certain models as well, including the 970 Pro,
The Mac Pro 2013 uses the same interface as the 2013-2015 MacBooks. There's a cottage economy of NVMe adapters now floating around. The first adapters that users tackled, such as the GFF M.2 PCIe SSD Card, required a bit of filing and tape to successfully mount the card, which users on MacRumors were able to pull off. NVMe with ST-NGFF2013-C; Vega Internal GPU; Mac Pro 2013 (6,1). Later adapters like the Sintech NGFF m.2 NVMe SSD adapter do not require modification. The quick summary is you'll need a Mac Pro running 10.13+, an adapter, and an NVMe SSD with a Sintech adapter. If you, for some reason, choose the GFF adapter, you'll need tape, a file, and some free time.
Currently, the only vector for multiple M.2 NVMe drives internally is the Amfeltec Angelshark Carrier Board. This keeps the original port intact and thus allows for three internal NVMe drives.
Working SSD list
This list is from MacRumors by the user maxthackray, so all credit goes to him. Generally, it can be assumed that NVMe drives will work long as they do not use 4k sectors by default.
- Adata NVMe SSD : SX6000, SX7000, SX8200, SX8200 Pro etc.
- Corsair NVMe SSD : MP500, MP510
- Crucial NVMe SSD : P1
- HP NVMe SSD : ex920, ex950
- OCZ RD400 (and all Toshiba XG3-XG4-XG5-XG5p-XG6 line)
- Intel NVMe SSD : 600p, 660p, 760p etc.
- MyDigital NVMe SSDs : SBX - BPX
- Kingston NVMe SSD : A1000, A2000, KC1000
- Sabrent Rocket
- Samsungs Polaris NVMe SSD : 960 Evo, 960 Pro, 970 Evo, 970 Pro
- WD Black NVMe SSD v1, v2 and v3
Drives in red require NVMe drives with 4K sector sizes which require changing.
Incompatible NVMes
- Samsung PM981
- Samsung 950 Pro
- Samsung 970 Evo Plus*
*Firmware update fixes this particular SSD. It should be regarded as working unless buying used.
Useful Links
- ifixit: Mac Pro 2013 SSD replacement
- NVMe with ST-NGFF2013-C; Vega Internal GPU; Mac Pro 2013 (6,1)
- MacRumors: Upgrading 2013/2014 Macbook Pro SSD to M.2 NVMe
- Everymac: How do you upgrade the storage in the Gray Cylinder Mac Pro models? How many drives of what type are supported?
- Apple.com: Mac Pro (Late 2013): Removing and installing flash storage
RAM/Memory upgrades
Officially most sites list the maximum ram for the 2013 as 128. The Mac Pro 2013 uses PC3-15000 DDR3 ECC (1866 MHz) RAM, 4 RAM slots. The Maximum DIMM size is 32 GB. Maxing out the RAM can be a somewhat pricey endeavor, but sites like aliexpress and eBay.
Upgrading to 128, however, lowers the bus speed so most users elect to use 64 GB.
ThunderBolt 2 to PCIe
There's a fair amount of options today on the market, like the Sonnet Technologies Echo Express SE1 - 1 PCIe Slot (roughly $200), and it scales up rather quickly.
The biggest modifications to the Mac Pro 2013 aren't internal but rather massive PCIe enclosures that generally cost in the $1500-4000 range, making them often as expensive as the computer itself. There are a few options on the market, like the Sonnet xMac Pro Server, which adds three full-length PCIe slots (you can see it on youtube), and the absolutely absurd JMR Quad Slot Expander adding 4 PCIe slots and 8 drive bay just to name a few. For the truly curious, you can see the JMR expansion system innards.
Not all PCIe enclosures support eGPUs. I've included in the eGPU section is a list of enclosures that support GPUs.
Additional Notes on Thunderbolt 2
There's a wide variety of Thunderbolt 2 products, chiefly storage systems (including RAID setups), and ThunderBolt 2 docks still on the market. Due to the sheer amount, I'm unable to list them all, but it's important to remember that a fair amount of functionality missing from the 2013 Mac pro can be recaptured with Thunderbolt 2 like previously mentioned, PCIe slots, eGPUs, and the like.
The Mac Pro 2013 to date includes six Thunderbolt ports, the most found on any Mac before or since. To obtain peak performance, it's recommended that displays be connected separately from other high bandwidth utilities like external storage.
The Mac Pro 2013 can drive three 4k displays or six 2560 x 1600 displays, and with the June 16, 2015 firmware update, three 5k displays (using two ThunderBolt ports and the HDMI port) internally.
Thunderbolt 3 / USB 3.1c
The Mac Pro 2013 can't be upgraded to Thunderbolt 3 bus speeds, but that doesn't mean it can't use Thunderbolt 3 / USB 3.1c devices (at the speed of Thunderbolt 2). Apple has a Thunderbolt 3 (USB-C) to Thunderbolt 2 Adapter, which is bi-directional, meaning the same adapter can also be used for Thunderbolt 3 Macs to use Thunderbolt 2 devices. Notably, not all Thunderbolt 3 devices are backward compatible, so you may want to check with the manufacturer for compatibility.
eGPUs
It's nearly impossible to talk about the Mac Pro 2013 without mentioning eGPUs. Mac OS now supports AMD eGPUs (almost) natively and macOS 10.14.x does not allow for modern nVidia support, making it nearly a one-way path for eGPU. NVidia support for later eGPUs is limited to a maximum of Mac OS 10.13.x, and that does not appear to be changing due to a disagreement between Apple and NVidia. Unless this changes, this guide will not list Mojave incompatible NVidia eGPUs despite the later GPUs being supported in Mac OS 10.12.x and 10.13.x. Currently, the RX (580x, 570x) line and the Vega (Vega, 48, 56, FE ) line by AMD are Mojave compatible, and the Keppler line by NVidia is Mojave compatible. The eGPU.io community has a searchable database. If going for an eGPU, I highly recommend upgrading to Mac OS 10.13+ as it includes more native support, thus much easier to set up, to the point of being (nearly) plug and play.
Note: All Thunderbolt 2 Macs require disabling SIP and running Purge Wrangler to enable eGPU support.
Lastly, Catalina requires some changes with eGPUs, and I highly recommend epgu.io - State of EGPU for Macs - Catalina 10.15, the short answer is PurgeWrangler continues to be the most common vector for support.
AMD GPUs
Note: Minimum OS list required may not be correct. Please contact me if incorrect
AMD GPU Min OS Support Supports Metal R7 260X 10.12 - Curr Yes R9 270 10.12 - Curr Yes R9 280X 10.12 - Curr Yes R9 290X 10.12 - Curr Yes R9 380 10.12 - Curr Yes R9 380x 10.12 - Curr Yes R9 390 Requires hack Yes R9 Fury 10.12 - Curr Yes R9 Fury X 10.12 - Curr Yes Radeon 450 10.12 - Curr Yes Radeon 455 10.12 - Curr Yes Radeon 460 10.12 - Curr Yes Radeon 470 10.12.6 - Curr Yes Radeon 480 10.12.6 - Curr Yes Radeon 555 10.12.6 - Curr Yes Radeon 555x 10.12.6 - Curr Yes Radeon 560 10.12.6 - Curr Yes Radeon 560x 10.12.6 - Curr Yes Radeon 570 10.12.6 - Curr Yes Radeon 570x 10.12.6 - Curr Yes Radeon 580 10.12.6 - Curr Yes Radeon 580x 10.12.6 - Curr Yes Radeon Pro WX 2100 10.12- Curr Yes Radeon Pro WX 3100 10.12- Curr Yes Radeon Pro WX 4100 10.12- Curr Yes Radeon Pro WX 4130 10.12 - Curr Yes Radeon Pro WX 4150 10.12 - Curr Yes Radeon Pro WX 4170 10.13? - Curr Yes Radeon Pro WX 5100 10.13? - Curr Yes Radeon Pro WX 7100 10.13? - Curr Yes Radeon Pro WX 8100 10.13? - Curr Yes Radeon Pro WX 9100 10.13? - Curr Yes Vega 56 10.12.6 - Curr Yes Vega 64 10.12.6 - Curr Yes Vega Frontier Edition 10.13 - Curr Yes Radeon VII 10.14.5 - Curr Yes Radeon 5500 XT 10.15.2 - Curr Yes Radeon 5600 XT 10.15.3 - Curr Yes Radeon 5700 10.15.2 - Curr Yes Radeon 5700 XT 10.15.2 - Curr Yes
macOS 10.14 Mojave Supported NVidia eGPUs - Only Keppler series GPUs are supported
- GTX 650
- GTX 660
- GTX 670
- GTX 680
- GTX Titan
*eGPUs require Mac OS 10.12 or above.
Confirmed working Enclosures with Mac Pro 2013: Note there may be more.
- Akitio Thunder2
- AKiTiO Node
- Asus XG Station 2
- Blackmagic eGPU
- Mantiz Venus
- Razer Core X
- Sonnet Breakaway 350
Useful Links
- egpu.io: 2013 Mac Pro (FP D500 x2) [3rd,6C,E] + RP 580 @ 16Gbps-TB2>TB3 (Blackmagic eGPU) + macOS 10.13.6 [itsage]
- Barefeats: Pumping Up The 2013 Mac Pro
- eGPU.io setup guide: 10.9 to 10.12
- eGPU.io setup guide: 10.13+
- Troubleshooting eGPUs on macOS
Cooling
Outside of the extreme JMR solutions PCIe slot Rackmount cases, Mac Pro 2013 cooling solutions remain pretty slim. Pro Cooling Base by SPEED Designs is the only other solution I'm aware of designed specifically for the Mac Pro. Most users elect to use various laptop cooling pads to place under Mac Pros (which do seem to help). If anyone has any information about physical mods or Mac Pro 2013 specialty cases, I'm all ears, and please reach out to me (see the bottom of this post).
Useful Links
Repairs
The Mac Pro 2013 earns the distinction of sporting a modular design. There's not a lot to say here since iFixit gave it an 8 out of 10 for repairability and has pretty much every part in its Mac Pro Late 2013 Repair Guide. If you can do it, they probably have a beautiful step-by-step pictorial guide.
Mac Pro 2013 won't sleep
MacRumors members note that Hand-off can affect a 2013's ability to sleep. Disabling seems to be the fix.
Communities & Blogs
You're not alone. There are more people out there than you'd think who still love the Mac Pro 2013.
- MacRumors Mac Pro Forum - The center of the Mac Pro universe.
- MacProUpgrade - a private but very popular Facebook group, primarily classic "Cheesegrater" Mac Pro users with some 2013 users.
- Mac Pro Users - another major FaceBook group for Mac Pro users, smaller but still helpful, and it has the benefit of being public too (no sign-up process and can be browsed without a Facebook account).
- eGPU.io - The go-to place for eGPUs.
Collected Articles
Buying used Mac Pro 2013s
Most forums when this question is posed is don't. The chief reasons are: price and stability. The updated Mac Mini may have a soldered on CPU and storage, but with the Core i7-8700B is much faster than the 12 Core Mac Pro in single-core performance and spitting distance of the multicore in Geekbench scores, and packs Thunderbolt 3, which is double the bandwidth for the inevitable eGPU, and comes with USB 3.1c support out of the box, and doesn't have a history of frying itself. Plus, it's new, comes with a warranty, and is even smaller. Then there's the iMac 5k, which has an upgradeable CPU making for faster than the base iMac Pro when tricked out too. I personally would not buy a Mac Pro 2013 with much better and cheaper alternatives. The 2009-2012 Mac Pros, which pack oodles more upgrades and stupidly better GPU options, or the aforementioned Mac Mini, even with an eGPU, would be roughly the same cost of a lower-end used 2013. Unless the used market prices drastically change, the Mac Pro 2013's shortcomings are too significant to make me ever consider one.
Always make sure the computer is able to output video before buying. Next to, the lower the AMD GPU model, the more chance it will remain problem-free. Unfortunately, Apple stopped selling the D300 Mac Pros long ago, so it may be better to track down a D500 model. Next up, many users have placed their Mac Pro 2013s on laptop coolers to help with the thermals. Due to the exceptionally tiny case, there are no internal cooling hacks beyond turning the fan up using 3rd party software. Lastly, have an exit strategy, you may live a full problem-free existence with a 2013 Mac Pro, but you may also end up with its GPUs failing. Apple has closed its free replacement program for GPUs as of April 2018, and internet prices list anywhere from $700-$1200 from Apple or authorized service centers to replace the GPUs. At this price, it is effectively cheaper to buy a replacement Mac Mini. Working GPUs in the 3rd party sector are virtually impossible to find, and the rare ones that pop up fetch the price of Apple replacements. To be fair, this is the same problem laptop users face. While it is common sense, if you contract or freelance or work where you provide your own hardware, always have a plan that minimizes downtime. Despite being a modular design, the most failure-prone component is the absolute hardest to replace due to the lack of any inventory. Also, Apple quotes 3-5 days for a Mac Pro 2013 GPU replacement. This isn't to say it will fail, but there are plenty of horror stories on the internet. This could be the case in a relatively small, vocal group, but the general consensus is that the Mac Pro 2013 is not the most stable design.
Changelog

Due to the ever-evolving list of possible upgrades and hacks, this guide is a living document. Thus the information contained may change. I've included a robust log of recent changes to help repeat visitors discover new content. Making and maintaining this guide takes a fair amount of work, and feedback from users is greatly appreciated to make this the most accurate/best guide possible. If you have new information not included here, suggestions, corrections, or edits, please feel free to contact me. I get a fair amount of questions. I try to answer them as best I can. I'd recommend asking the MacRumors forum or MacProUpgrade group first, as I'm just one person vs. the collective intelligence of a community. Notably, I do not own nor have I ever owned a Mac Pro 2013 (not that I wouldn't take one, but it is cost-prohibitive), so anyone who can provide more accurate information, please do!
07/03/24 - Error correction on VRAM, some minor copy edits
01/31/23 - OpenCore
12/27/22 - Typo corrections, more ventura info
10/11/22 - Typo correction 3.7 GHz. Added info about Ventura. Firmware update added.
01/22/21 - Added list of the firmware updates that have been released with notes about firmware. Added cooling base station info, slightly edited intro, and copy editing to remove typos.
05/12/20 - Massive GPU list updated. SSD updated. Catalina notes on eGPU updated. Minor visual update.
10/15/19 - Added note on Catalina and 32-bit + firmware versions. Badly needed copy editing.
10/07/19 - It's catalina time. Added OS Section, fixed an error about max RAM, included RAM specs, and included the link to the Amfeltec NVMe M2 adapter. Added another two links to eGPU section.
07/05/19 - Added notes on sleep issues, mild intro update.
05/07/19 - a second update, Thanks to the feedback of Brennan F and Daniel C for feedback on SSDs and eGPUs and some copy editing to boot.
05/07/19 - First release and one year anniversary of my first Definitive Mac Pro Upgrade Guide. Fun fact, this guide is over 2300+ words, whereas my other guide is 13,000+ words. Part of the amount of writing can be chalked up to having to discuss different models, five in total, spanning 6 years. This guide covers another 6-year span and only one model. It goes to show how upgradeable the previous Mac Pros were and how much less Apple has cared about them since.
</section>
-
Every OS X (macOS) 10.6 Snow Leopard Nature Desktop - in Glorious 5k Resolution
Recently, I converted every Abstract Desktop background that shipped with 10.6 Snow Leopard, in Every OS X Snow Leopard Abstract Desktop - in Glorious 5k and 8k Resolution after being inspired by the wonderful 512 Pixel's Every Default macOS Wallpaper – in Glorious 6K Resolution post. I hand touched up the photos besides upscaling, sharpening, smoothing/blurring, retexturing, denoising, graining depending on the photos. Some had weaker sources than others due to focus/compression etc. For a long explination of how I made these, scroll to the bottom.
The above is an excerpt on a video I'm working on about OS X Snow Leopard, the most beloved OS X/macOS release, but I have other opinions ;) If you are at all curious, you can check out the Apple related vids I've made on the YouTubes.
All the photos are in their original 16:10, in the 5k (if there's such a resolution) 5120 x 3200 as I wanted users to be able to position the desktops as they see fit. Also adding Light / Dark desktops as I have time.
The iPhone wallpaper versions are 2000 x 2778 which should give wiggle room to position the backgrounds, see Apple'sChange the wallpaper on your iPhone for instructions on how to set your iPhone wallpaper.
Aurora
Download Aurora 5k (6.5 MB)
Aurora Blue
Download Aurora Blue 5k (8.1 MB)
Cirques
Download Cirques 5k (20.4 MB)
Clownfish
Download Clownfish 5k (14.5 MB)
Dew Drop
Download Dew Drop 5k (4.2 MB)
Earth
Download Earth 5k (7.5 MB)
Earth Horizon
Download Earth Horizon 5k (8 MB)
Download Earth Horizon (iPhone)
Evening Reflections
Download Evening Reflections 5k (21.3 MB)
Download Evening Reflections (iPhone)
Flowing Rock
Download Flowing Rock 5k (26.1 MB)
Gentle Rapids
Download Gentle Rapids 5k (7.3 MB)
Download Gentle Rapids (iPhone)
Golden Palace
Download Golden Palace 5k (16.4 MB)
Download Golden Palace (iPhone)
Horizon
Download Horizon 5k (4.2 MB)
Iceberg
Download Iceberg 5k (14.1 MB)
Ladybug
Download Ladybug 5k (2.7 MB)
Leopard Aurora
Download Leopard Aurora 5k (4.9 MB)
Download Leopard Aurora (iPhone)
Pond Reeds
Download Pond Reeds 5k (4.2 MB)
Rock Garden
Download Rock Garden 5k (18 MB)
Rocks
Download Rock 5k (11 MB)
Snow Leopard
Download Snow Leopard 5k (10 MB)
Download Snow Leopard (iPhone)
Snow Leopard Prowl
Download Snow Leopard Prowl 5k (13.8 MB)
Download Snow Leopard Prowl (iPhone)
Snowy Hills
Download Snowy Hills 5k (8.1 MB)
Stones
Download Stones 5k (17.2 MB)
Tahoe
Download Tahoe 5k (17.2 MB)
Tranquil Surface
Download Tranquil Surface 5k (9.4 MB)
Download Tranquil Surface (iPhone)
Water
Download Water 5k (3.2 MB)
Zebra
Download Zebra 5k (11.3 MB)
Bonus
Pond Reeds (Light / Dark) Dynamic Wall Paper
Download Pond Reeds Dynamic 5k (5.2 MB)
Pond Reeds Dark Wall Paper
Download Pond Reeds Night 5k (4.2 MB)
Download Pond Reeds Night (iPhone)
Aurora (Light / Dark) Dynamic Wall Paper
Aurora Reeds 5k (9.2 MB)
The Abstract Desktop Series from Snow Leopard


Check out Every OS X Snow Leopard Abstract Desktop - in Glorious 5k and 8k Resolution for the Abstract backgrounds from OS X 10.6.
Snow Leopard Videos I've made
Was Snow Leopard the greatest macOS? I made a video about that. Wonder what it's like to use Snow Leopard in 2024? I made a video about that too.
Note: I don't think the above video conveys how much I like Snow Leopard.
About these images
I do not own these images and thus am providing these free-of-charge (as I do with everything on my blog). These are images that shipped with OS X 10.6 Snow Leopard and upscaled for modern computers.

One of the very frequent tasks computers do is upscaling raster images, aka zooming in or increasing the size of an image. This happens when you zoom in on an image in an application like Preview or Photoshop, or zoom in on a web browser or pinch and zoom on your iPhone. Upscaling has come a long way in the past few years, with machine-learning-assisted upscaling algorithms. These use tricks like taking into account the hue/luminosity (color and its brightness) of surrounding pixels and filling in what it believes the new pixels should be. Before machine-learning, upscaling meant duplicating pixels (nearest neighbor) or duplicating pixels and creating transitions between the hue/luminosity (bilinear). If you have a sharp line, perhaps a sharp mountain silhouette against a sunset (or in my case, a cat whisker against the ground), the machine-learning algorithm will "notice" the sharp contrast between the two areas as it has been "trained" to do so. It will then infer that it should try and keep the sharpness rather than lose the detail, when it creates new pixels to fill the space from upscaling.

While none of these upscales are nearly as good as a high-resolution photo, ML upscaling provides a much better result in a pinch. The ML upscaling is much better at preserving details in the image, such as Mr. Orange's whiskers, his fur, and his pet tag, while providing nice soft results on the areas out of focus. ML (machine learning) upscaling has become popular with modern GPUs. In Windows, AMD and NVidia GPUs can take a videogame rendered at 1440p and upscale it to 4k as it takes less effort for the GPU to upscale the image than it takes to render an image with a lot more pixels, enabling the GPU to churn out higher frame rates and keeping more visual fidelity than using bilinear upscaling. Of course, machine learning isn't limited to uspcaling (or even images).
Machine learning can also be used to provide other types of "best guesses" like denoising images that have artifacts from compression, like JPEGs which are a "lossy format", meaning to save data, they alter the photos to consume less space. Lossy compression is used extensively for media as you do not need a byte-for-byte accurate representation of the original data. Depending on how much compression and what sort of codec (compression type), it will introduce evidence of the compression. Everyone is familiar with the effects of lossy compression, be it an image of low quality, a video with blocky noise, or an audio file that sounds garbled. Machine learning can undo some of this, but it's highly imperfect as it's trying to guess what the original source was trying to convey.
I first tried Gigapixel but ended up just using Pixelmator Pro. Each background was individually treated, using the ML upscaling but with a combination of multiple layers with sharpening, blurs, denoising, grain, and old fashion brush tools on layer masks. As a UX Developer, I split my time between graphics applications and good ol' fashioned coding as my job is to take static pixel images and turn them into code for interfaces for web and mobile applications, although I do often do "full-stack," which is a nice way of saying "everything". I've gone away from Adobe products years ago, with Sketch / Figma / Pixelmator Pro / Final Cut Pro partly out of personal preference and following the industry.
A great example of the power of just a few simple masks is the Ladybug image. First, I nabbed the image from the Snow Leopard Parallels virtual machine on my Mac Pro. Then I imported it into Pixelmator Pro. I converted it to 16-bit, then I created two layers of the exact same image. One I left alone. In the second layer, I used the ML Denoise to get rid of the JPEG artifacting. I used ML upscaling, which upscaled both layers. I masked the non-denoised layer in the Ladybug and used a tiny bit of grain and sharpening, and painted in the hairs on the grass blade. Then I used the blur tool on the larger out-of-focus areas on the denoised image. I went back and lightly burned the Ladybug's antenna. Once I was happy with the result, I downscaled the image from 8k to 5k and left the same color profile same as the original. My goal was to recreate the original as much to the spirit as the original image rather than, say, create an HDR (high dynamic range) version.
Each image was hand treated, although some images had better sources than others. I'm sure another artist with more time could bring these even better to life as I tried to keep roughly an hour-ish per image (as a UX developer, time budgets are a harsh reality for me). If you create your own versions, please reach out to me, as I'll happily link them.
I hope you enjoy, and if you're an Apple nerd and like mediocre camera work, and awkward on-camera presence, you can find me on YouTube and this blog.
If this blog looks familiar to you, you've probably seen, The Definitive Classic Mac Pro (2006-2012) Upgrade Guide or The Definitive Trashcan Mac Pro 6.1 (Late 2013) Upgrade Guide
-
Mac MAME Arcade emulation & NeoGeo using OpenEMU and SDLMame for Apple Silicon or Intel Native.
There are two main routes to get up and running with MAME under macOS, OpenEMU, and SDLMame. OpenEMU is the vector most users will want to use, but it isn't Apple Silicon native (but will still run fine in Rosetta). I've made a video, but if you're like me, you probably prefer the written version.
OpenEMU and Mame
OpenEMU is a beautiful core-based emulator (akin to RetroArch) that supports many game consoles. It's designed to be the one-stop-shop for Mac emulation, and it does a fantastic job. It's gorgeous and easy to use..
Step 1: Download OpenEmu Experimental
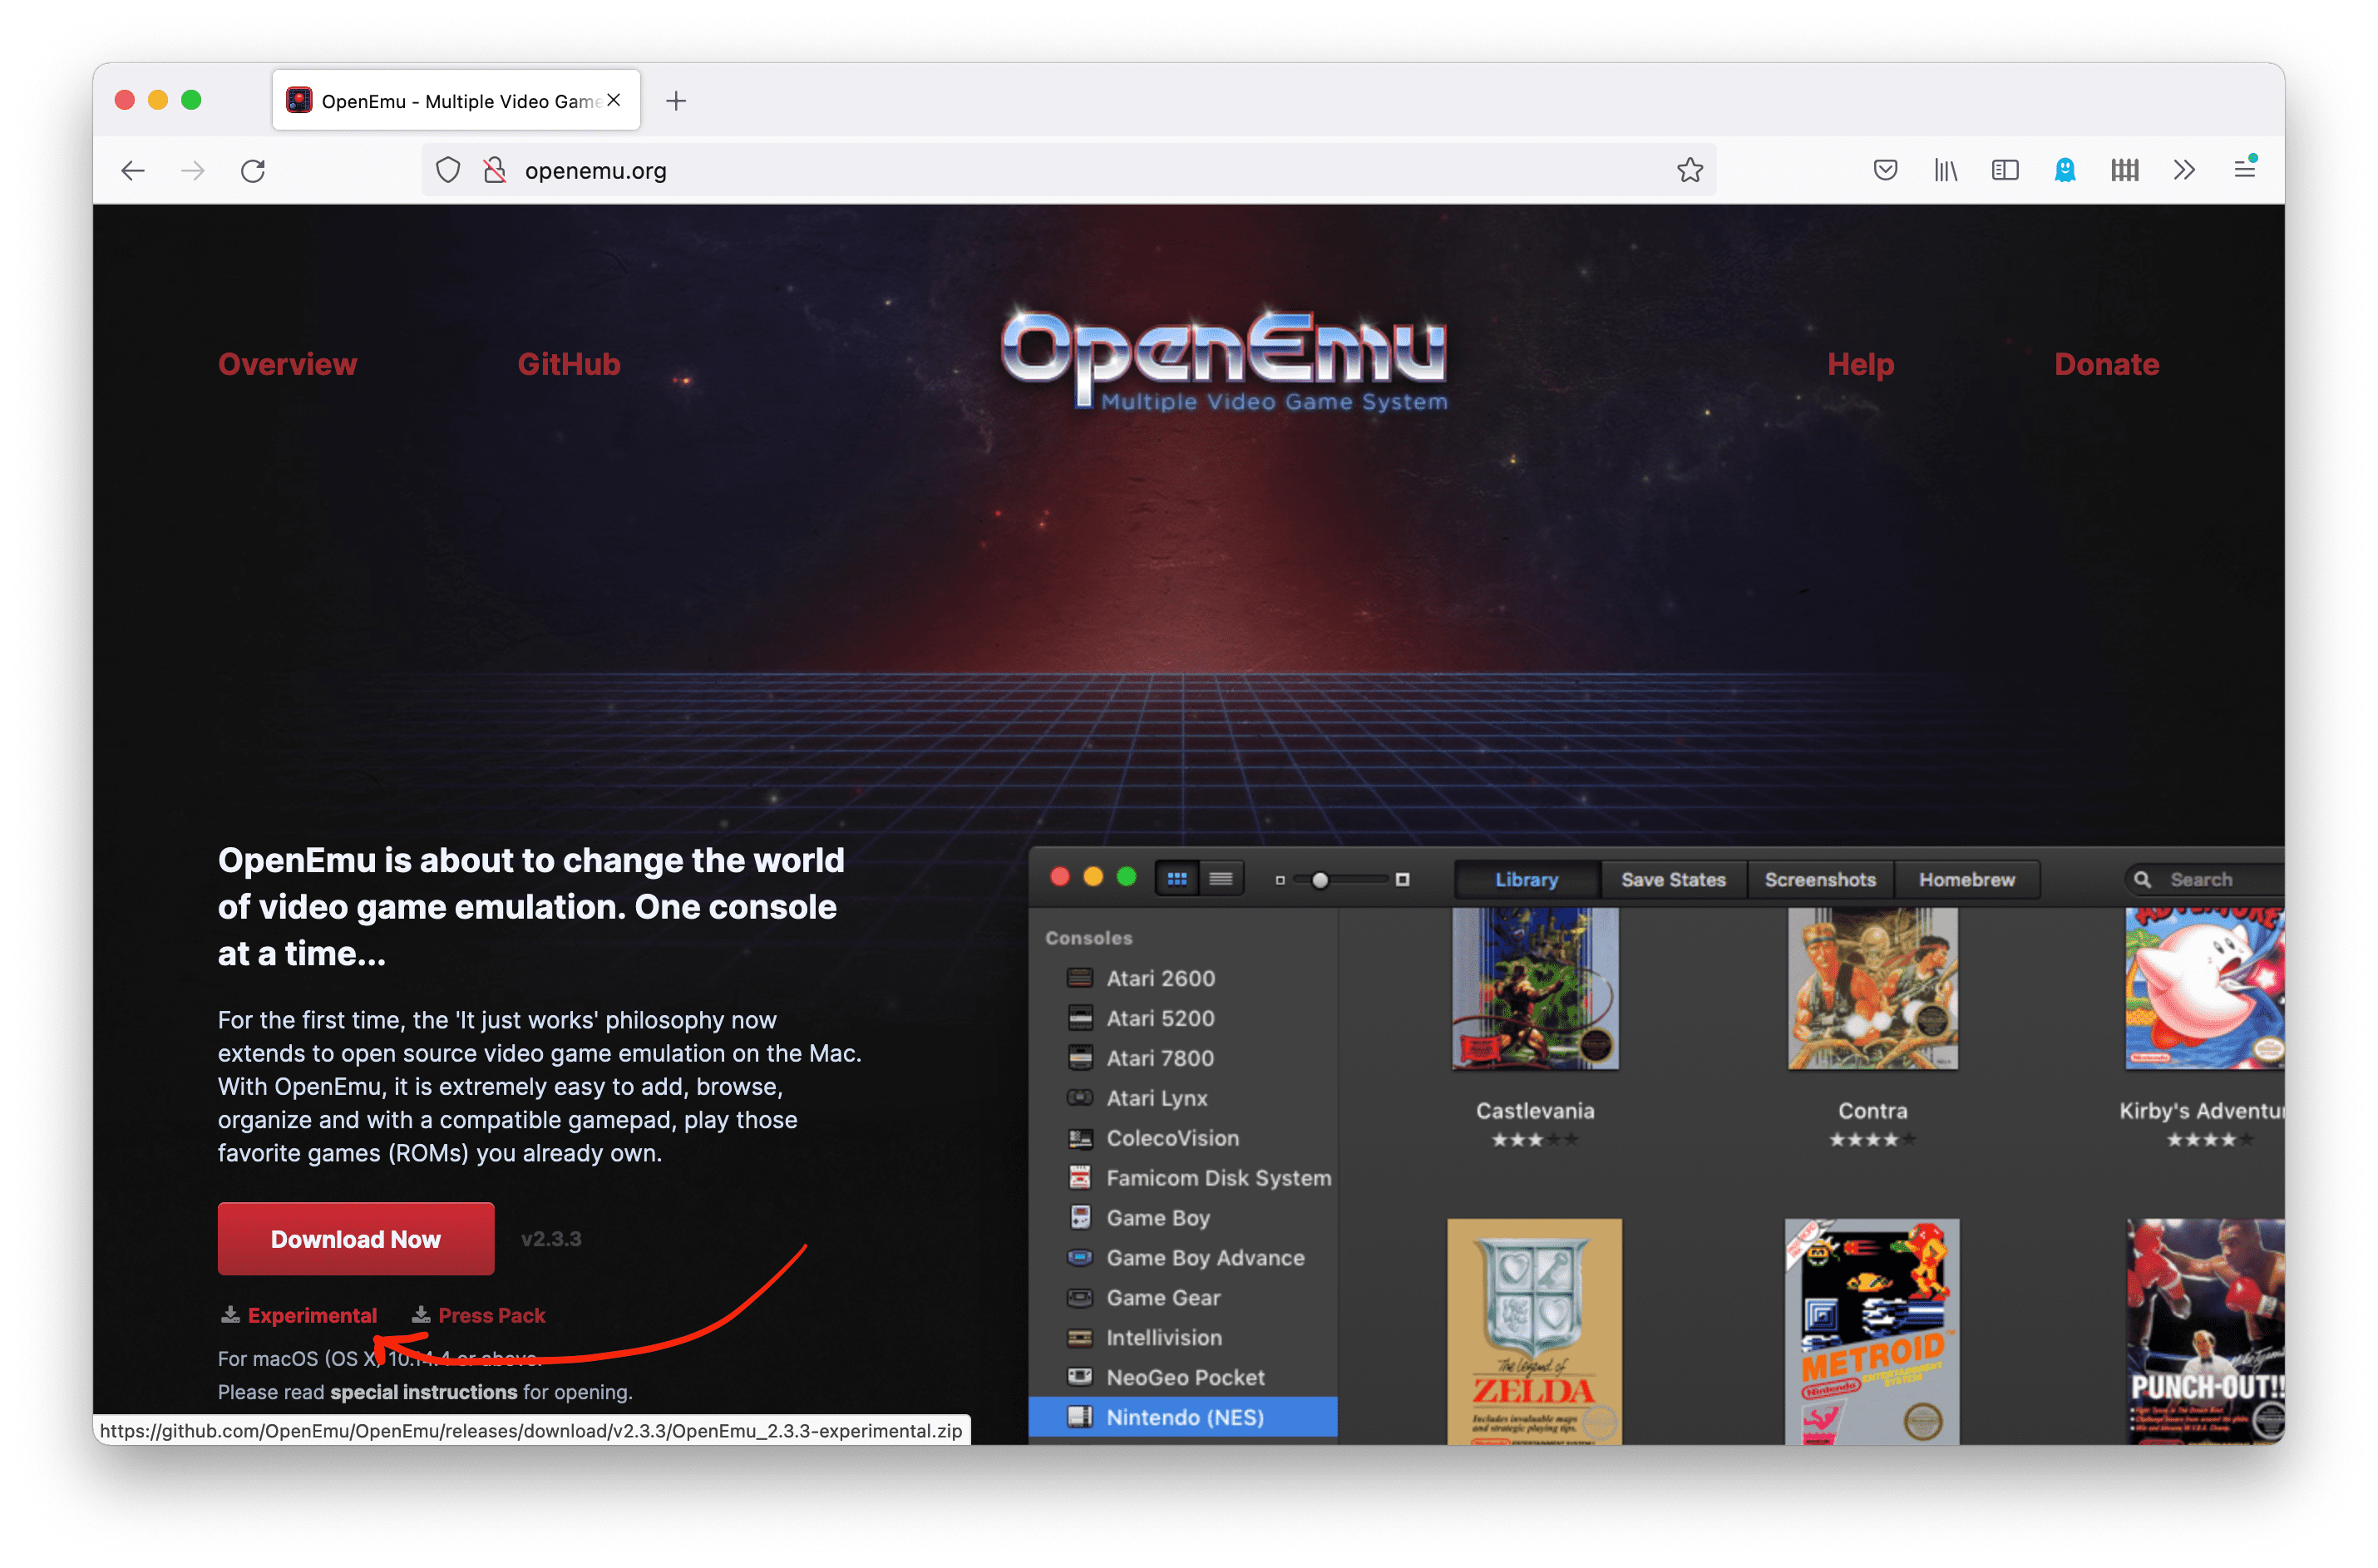
Regular OpenEMU does not support the MAME core, so you need to get the experimental version fromopenemu.org. I'm unclear as to why after years, the MAME version is still experimental. If I had to guess, it's likely because there are a few missing assets (the control menu for MAME doesn't have a skeuomorphic graphic, for instance), and it doesn't filter out BIOS files.
Step 2: Safelist MAME (Big Sur 11.x and above)
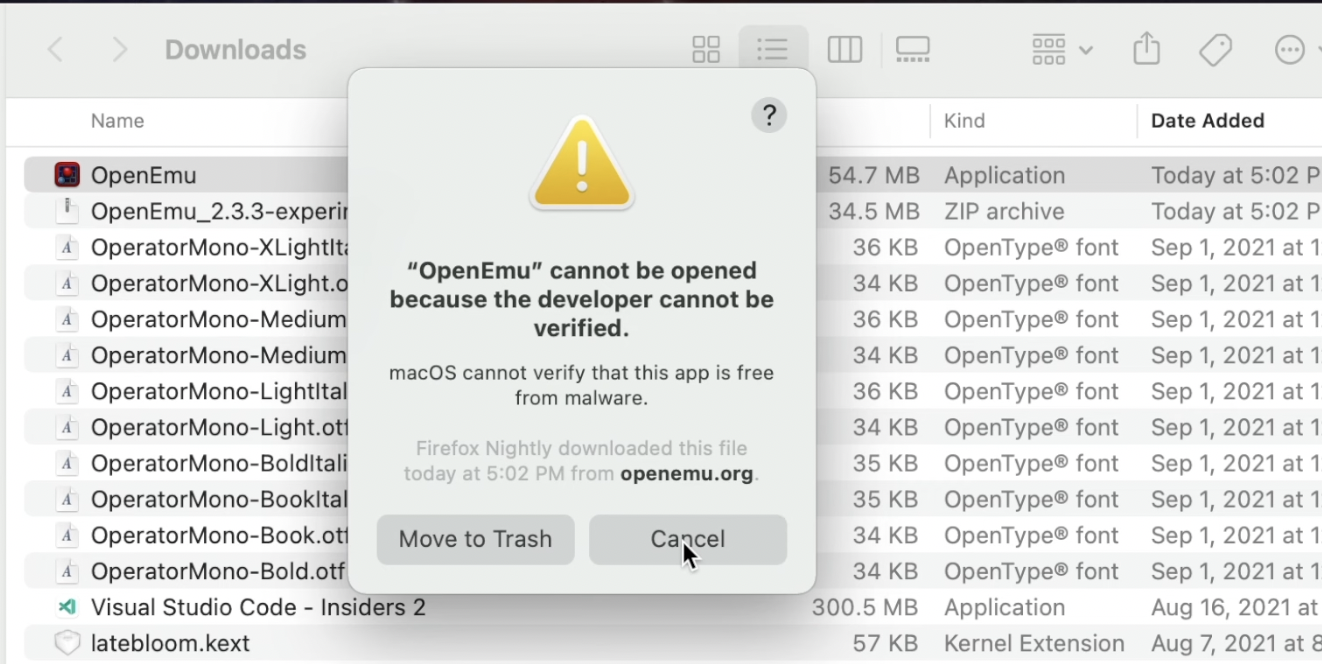
OpenEMU is open source but it isn't signed, you'll see an error if you try an execute it.
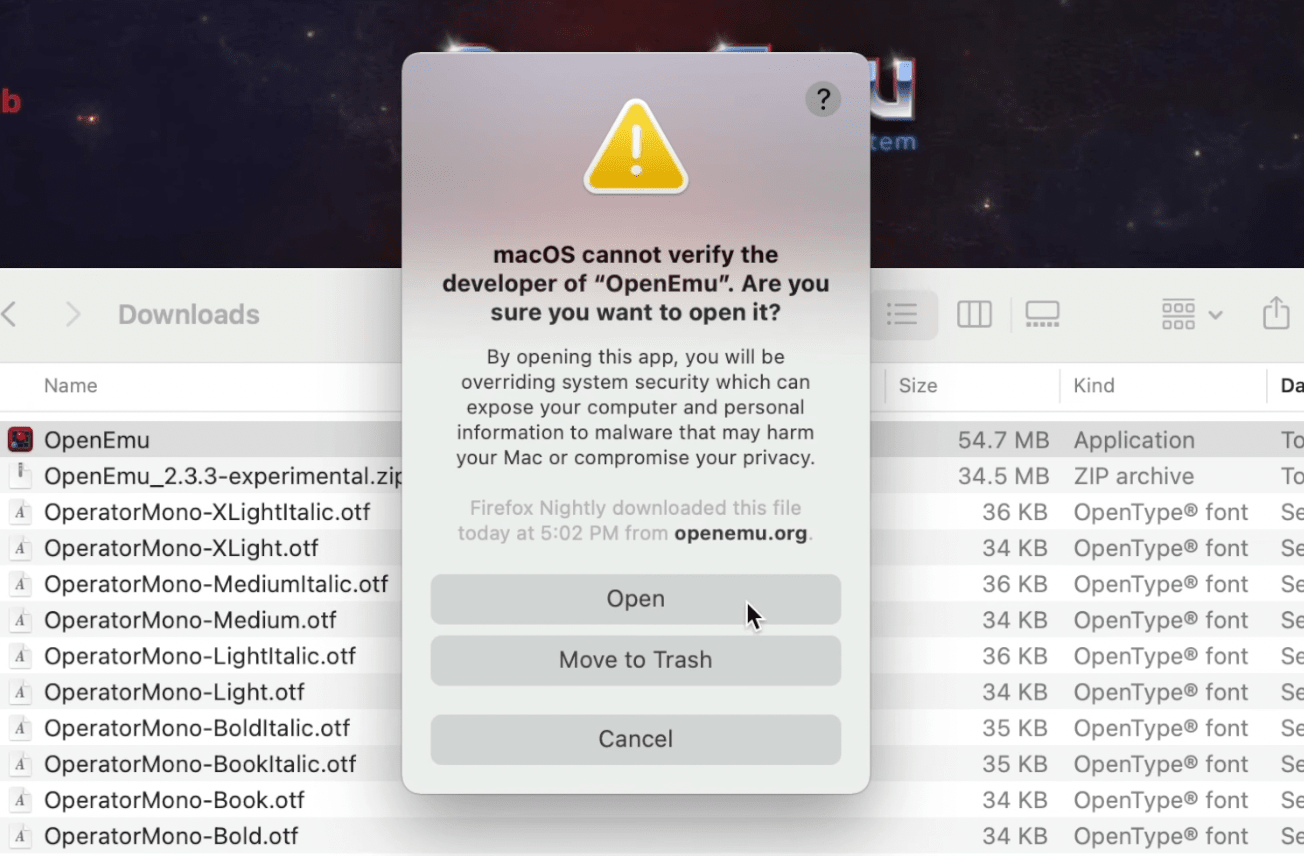
Right-click OpenEMU, and select open to bring up the prompt that will let you run the application.
Step 3: Install the MAME core
Launch OpenEmu, open preferences, and select cores. Click the install button next to MAME.

Step 3: Install games
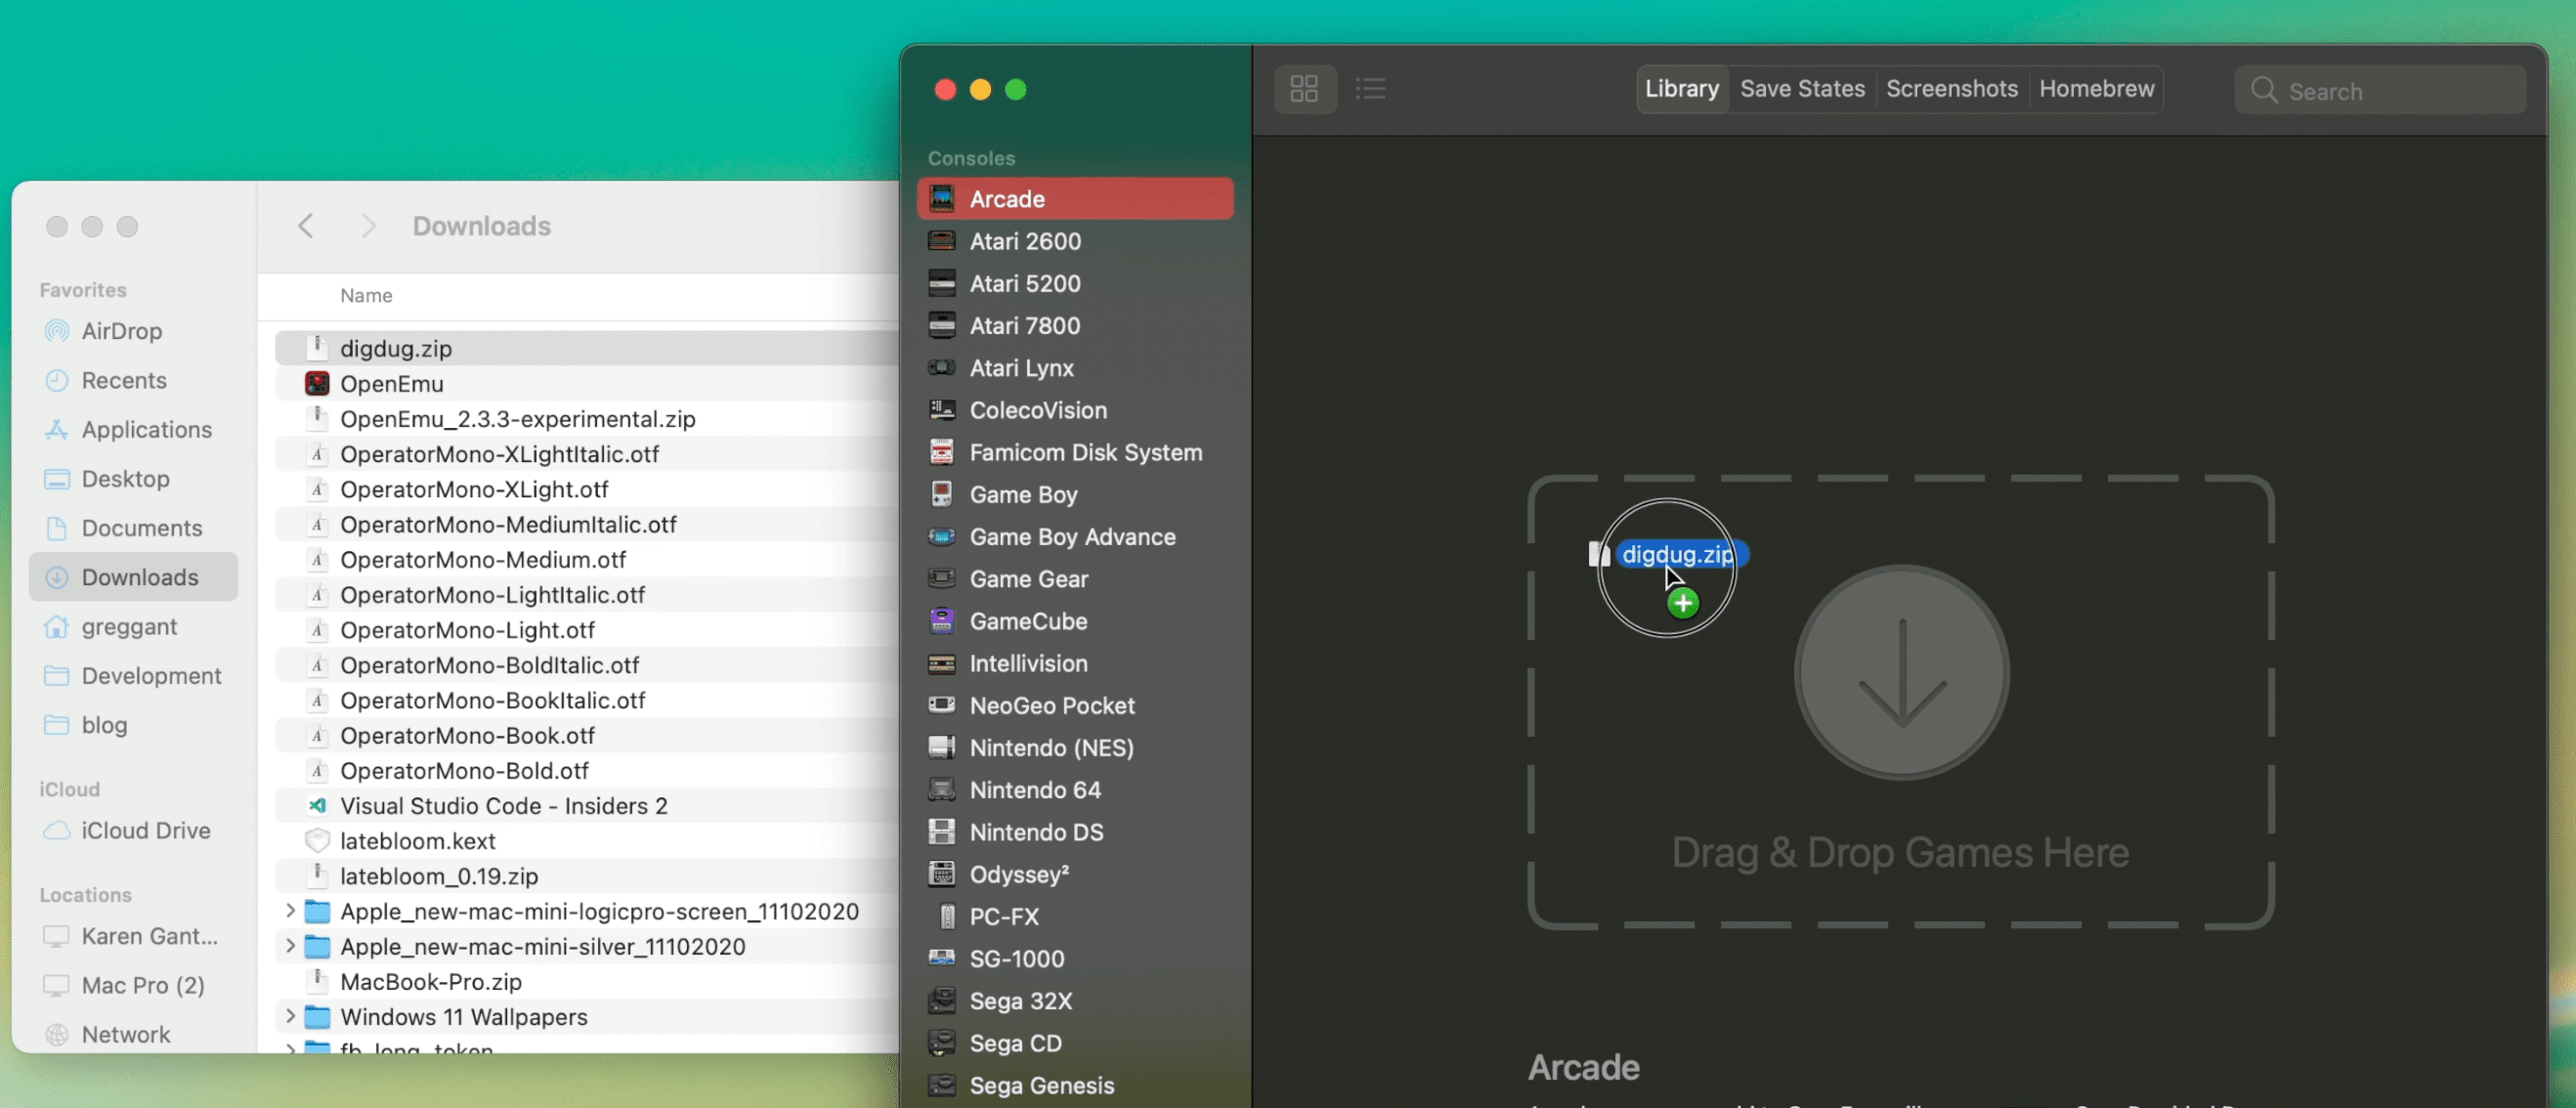
Installing games is pretty straightforward. Drag the .zip files into OpenEMU under the Arcade tab. MAME games are file name specific, unlike most other emulators, so do not change the name. Also some games have dependencies.

If the game you are trying to play has a dependency, it'll display an error when you try and launch the game, with the name of the missing file. You'll need to install that file by dragging it onto the window. Do not decompress MAME game .zip files.
Please do not ask me for game files. They exist in a legal grey area. Try a popular search engine or archive site like Archive.org for information about ROMs.
Step 4: Optional: NeoGeo Emulation
Emulating NeoGeo games requires one extra step, you'll need to get the NeoGeo BIOS Rom. Drag the Neo Geo zip into OpenEmu. You'll see the NeoGeo ROM in your game list, but ignore it and double-click the games as you normally would. I had some difficulty finding one that worked in more modern distributions of MAME.
SDLMAME / MESS
SDLMAME is a macOS port of MAME and MESS that features both native Intel and Apple Silicon support and (previously) has been updated much more frequently than OpenEMU's MAME core. For years, OpenEMU was stuck at MAME version .149.1, from 2013. As of writing this, OpenEMU is currently in lock-step with SDLMAME as both feature version 0.235, but OpenEMU is not Apple Silicon native. SDLMame is a port of MAME by @sdlmame_osx. It also features MESS which emulates many retro consoles as well.
The downside is that SDL Mame's UI is pretty minimal, and it requires being launched from the command-line but works great.
Step 1: Download the SDL2 Framework
Go to libsld.org, and download SLD2 for macOS and decompress it. Next, install the SDL2.framework into (in your root)
Library/Frameworks. SLDL2 is a library for cross-platform development designed to provide low-level access to hardware such as I/O and graphics cards. Many Steam ports for macOS are based on this library.Step 2: Download SDLMame/Mess
Go to sdlmame.lngn.net, and download Apple Silicon or Intel version depending on which type of CPU your Mac has. Decompress it into a folder of your choosing.
Step 3: Safelist SDLMame/Mess
This is where things get a little strange, as if you try and execute SDLMame, it'll give you the same warning as OpenEMU. Right like the
mameunix executable and click open. It'll open the terminal and crash. This is fine. Close this terminal. The application has now been safelisted.Step 4: Install ROMs
Drag your ROMs into the ROMs folder within SDLMame (If it doesn't exist, create one). Just like OpenEMU games may require dependencies. NeoGEO games require the Neo Geo BIOS.
Step 5: Launch SDLMame using the terminal
YYou'll need to navigate to the directory that SDLMame is in (or locate it). The easiest way is to use the change directory command then drag the folder onto the terminal. It should look something like:
$ cd /path/to/sdlmameNow that we're in the directory, we can check to see if we see the mame executable using list.
$ lsIf you see mame, you're ready to go. Launch the mame executable.
$ ./mameSDLMame's UI might seem a bit rough but it does support the mouse. Be sure to use the configure options with Device Mappings and General Input to configure your game controls.
Happy Emulating!