-
Goodbye FireBug

Today, Mozilla announced it was retiring FireBug. Inevitably native browser development tools eclipsed FireBug, but I can't help but say "Goodbye" as there are so very few singular pieces of software that have such a bearing on my life. When a friend of mine introduced me to FireBug, and I realized back in 2007 I could see in real-time the effects of CSS, little did I know it'd lead me down the path of web development.
-
Pure CSS (scss) Bootstrap compatible circular progress bars
First off, credit where credit is due. I found a pretty good start to a circle progress bar by Alimul Al Razy via a random google search.
I rather liked the approach and made my own modifications, pairing down the animation and step generation into two For loops, and making use of
data-attributes. You can see it on CodePen. It's quick and easy to style up and does not require bootstrap.$howManyStepscontrols how many levels of percentage needed, if you need increments of 5%, enter 20, increments of 2 would be 50, etc.See the Pen Pure CSS (SCSS) Bootstrap compatible circular progress bars by Greg Gant (@fuzzywalrus) on CodePen.
GitHub Gist
-
NearStory Launch

I don't make it habit of plugging products on my blog, but this one warrants it.
Longtime office mate, Giovanni Salimena, is officially launching his iOS application, NearStory. It's already up in the app store and its free to download and free to use. Near story aggregates news/audio content related to your location, so that you can learn the local history of the area around you.
-
Installing Provenance (OpenEmu) on iOS 11 without a jailbreak

Following up yesterday's post on how to install PPSSPP, I decided to add the instructions for how to install Provenance on iOS 11 without jailbreaking. I wrote in 2015 a guide on how to install emulators via Cydia and sideloading services which is worth checking out for more information on emulation on iOS. Provenance is THE go to emulator for retro iOS gaming, as its based on the wildly popular OpenEmu and boasts MFi gamepad support. Best of all, it is incredibly easy install compared to RetroArch or PPSSPP. Only RetroArch provides a wider range of support. Provenance boasts support for:
- Sega
- SG-1000
- Master System
- Genesis / Mega Drive
- MegaCD
- Game Gear
- 32X
- Nintendo
- NES (Nintendo Entertainment System)
- Famicom Disk System
- SNES (Super Nintendo)
- Gameboy / Gameboy Color
- Gameboy Advance
- Atari
- 2600
- 7800
Requirements
Building iOS applications requires installing Xcode, so if you haven't installed Xcode or updated to Xcode 9.0, download it. Once installed, launch Xcode and then launch a terminal session. Run the following to install the CLI utilities for Xcode.
xcode-select --installStep 1: Download Provenance
Either download the zip from https://github.com/jasarien/Provenance or via the terminal.
git clone https://github.com/jasarien/ProvenanceStep 2: Provenance.xcworkspace
Open the xcworkspace file (Not Provenance.xcodeproj)!
Step 3: Set up the xcworkspace
- Set up the project to the Provenance app
- Set the target to your iOS device (be sure you have it connected)
- Change the bundle identifier to something unique
- Set up your developer profile
Step 4: Build!
Hit build, you're good to go. Provenance is incredibly easy to set up. Go to the official wiki for full details on how to use of the emulator.
If you encounter the error, Untrusted Developer: "your device management setting do not allow using apps from developer... on this iPhone. You can allow using these apps in Settings."
Go to Settings -> General -> Profiles & Device Managment and under developer App, tap your profile to allow apps.
Congrats, you're now ready to use Provenance.
Step 5: Adding games to Provenance
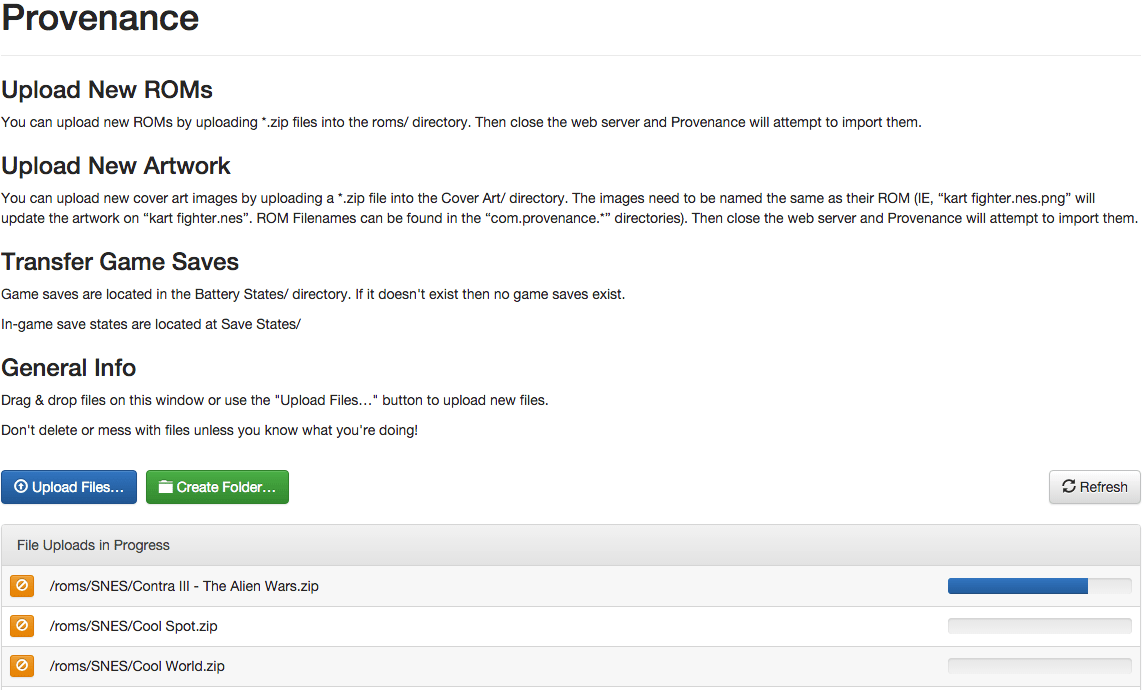
Make sure you iOS device and computer are connected to the same access point. Tap on the Provenance icon on your iOS device. Click the + icon to start the webserver. Go to your computer and navigate to the URL in the message on the screen of your iOS device.
Leave your rom files in .zip file to save space. You can queue up as many games as you want using shift click from the file menu. Sub Folders do not appear to be work within the Roms folder.
Provenance is one of the better iOS apps. You'll probably want to pick up a MFI enabled controller to get the most out of it.
- Sega
-
Installing PPSSPP on iOS 11 without a jailbreak
Installing PPSSPP on iOS 11 isn't particularly hard but does require several steps which can be mildly daunting for non-developers or non-iOS developers. I based this guide off of the official guide but realized it provided scant details to troubleshoot any issues.
Important support disclaimer
PPSSPP, as of writing this is, not officially supported on iOS 11. iOS 11 was the reckoning for older apps, dropping 32-bit support. From a development standpoint, often this means replacing out-of-date libraries that require more than mere hours of work. Videos on youtube and articles claiming iOS 11 PSP emulation are generally posted around 2015 or 2016 running iOS9/iOS10, well before even the iOS 11 beta with updated titles to garner views. Some video and articles posted more recently, again, show complex sideloading claiming iOS 11 support but the project hasn't been updated. Websites like RedmondPie are distributing IPAs, they won't work. If you'd like to keep tabs on iOS 11 support, I'd suggest looking at Builds.io as they'll likely build the first stable iOS release for their service or better the official PPSSPP github. The emulator, Happy Chick, often featured in these YouTube videos and articles, also does not support iOS 11, which also uses the PPSSPP core. PPSSPP will launch on iOS 11 but it will be unable to load a game, this is due to 32 bit only support for dynamic recompilation as the emulator must on-the-fly recompile code meant for the PPSSPP. This guide should be accurate if/when PPSSPP gains 64 bit dynarec support and I plan to update this guide when that day comes. If you are interested in a fully functional emulator for iOS 11, I have a guide for installing Provenance, which supports a host of 8-bit and 16-bit era consoles (SNES, Genesis, Sega CD, NES, Master System, GameGear, GameBoy, etc).
These instructions should work for iOS 9 / iOS 10 devices as well.
For more information about Emulation on iOS, please see my very extensive guide iOS Emulation, gamepads, Cydia, Xcode, builds.io - A Tutorial for iOS emus. It's geared as primer for iOS emulation and the various ways emulators can be installed on iOS.

Requirements
Building iOS applications requires installing Xcode, so if you haven't installed Xcode or updated to Xcode 9.0, download it. Once installed, launch Xcode and then launch a terminal session. Run the following to install the CLI utilities for Xcode.
xcode-select --installIf you do not have an Apple developer ID, you will need to create one.
Step 1 Confirm MacPorts is installed
port versionIf you get an error message or about version matching or command not found, Go to MacPorts Releases and download the version of macports that matches your OS version.
Step 2
Navigate in your terminal to the directory you'd like install the project to.
Run in your terminal: (this may take a bit depending on your internet connection)
git clone https://github.com/hrydgard/ppsspp.gitAfter its installed navigate into your newly cloned repository,
cd ppssppNext from ppsspp directory run the following:
git submodule update --init --recursiveStep 4
Next we want to create the PPSSPP.xcodeproj and dependencies in an directory called build-ios. This will take a bit.
mkdir build-ios
cd build-ios
cmake -DCMAKE_TOOLCHAIN_FILE=../cmake/Toolchains/ios.cmake -GXcode ..
If you get an error:
Error: Current platform "darwin 16" does not match expected platform "darwin 15"
Error: If you upgraded your OS, please follow the migration instructions: https://trac.macports.org/wiki/Migration
OS platform mismatch
    while executing
The above error means you have the incorrect version of MacPorts. Go to the link listed above and download and install it.
Step 4
Open up PPSSPP.xcodeproj in the build-ios folder in Xcode.

Select in the menu, the PPSSPP app icon, instead of ALL_BUILD. If you do not do this, you will not successfully build the app. Next Under Project -> Build For, select running.
Plug in your iPhone or iPad into your computer and select the target as your device instead of a simulator.
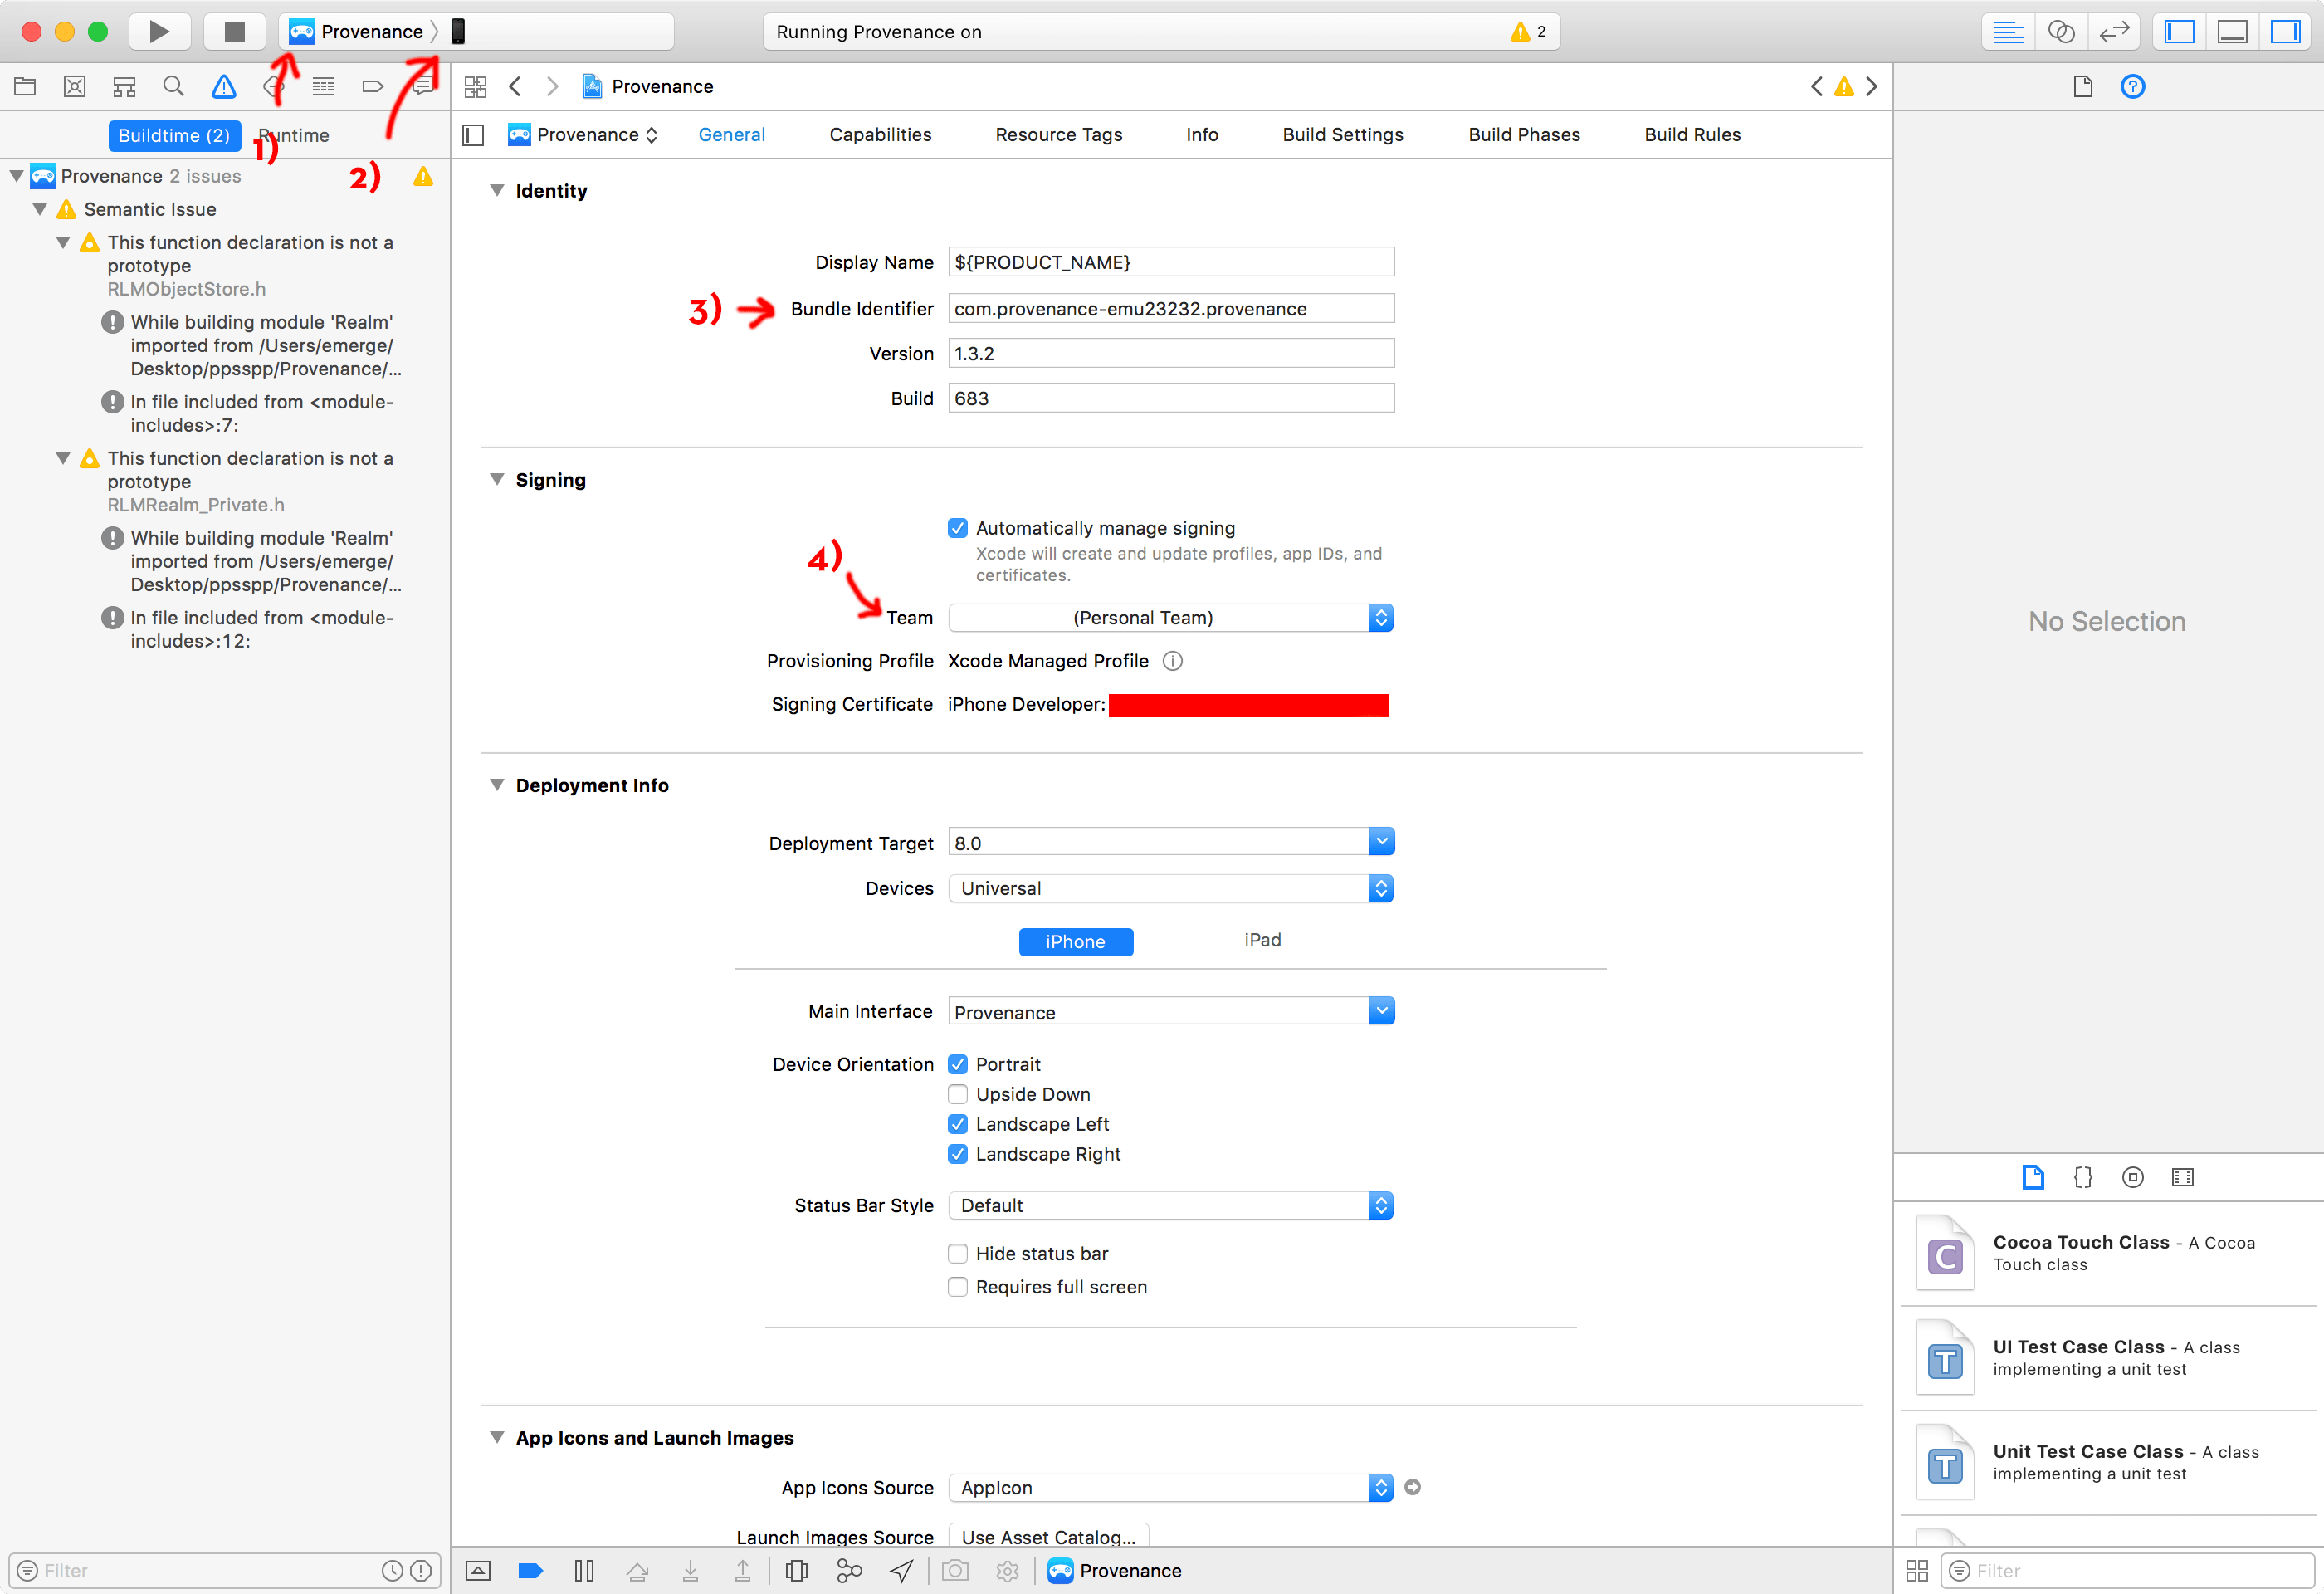
If you hit build, mostly likely you will get a provisioning error. Assign it to your developer ID. If you haven't added your developer ID, go to Xcode -> Preferences -> Accounts, and add your developer profile. In the general tab of the PPSSPP project assign your developer profile to the Signing section.
Hit build. If Xcode errors out abt the bundle identifier, give a random string after the .org name.
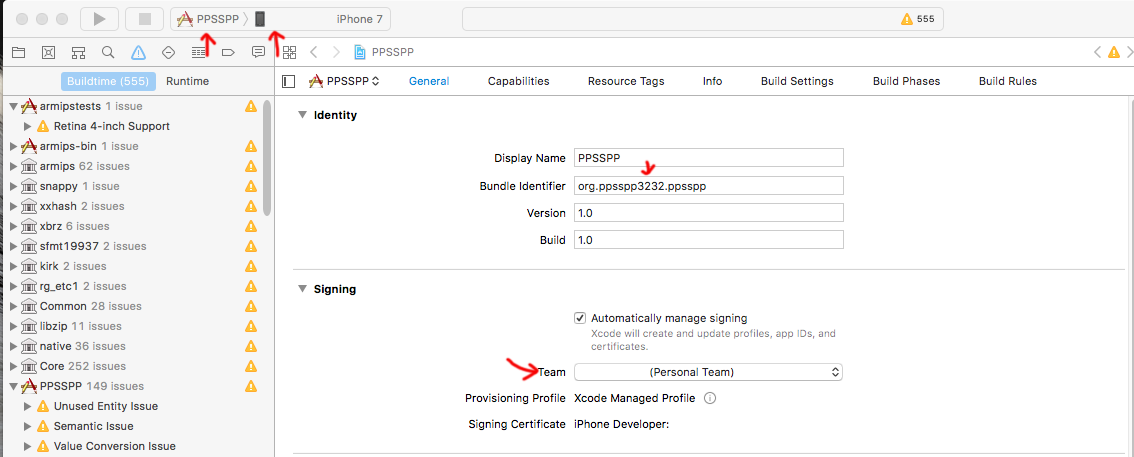
Image: Properly configured PPSSPP project requires the fields to be set.
Step 5

You should now see PPSSPP on your iOS device.
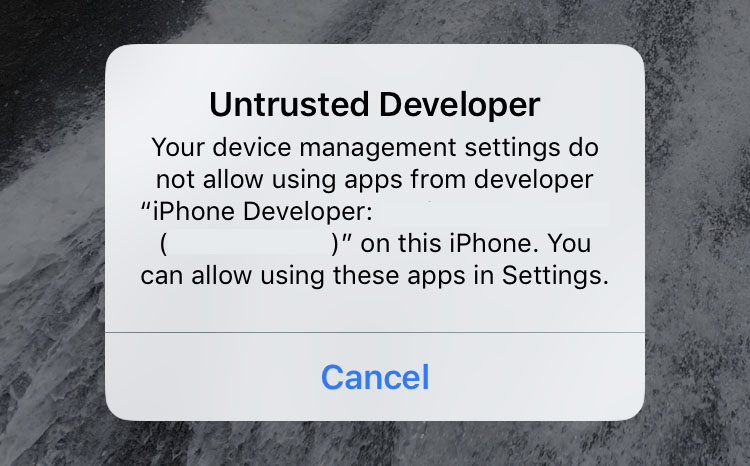
If you encounter the error, Untrusted Developer: "your device management setting do not allow using apps from developer... on this iPhone. You can allow using these apps in Settings."
Go to Settings -> General -> Profiles & Device Managment and under developer App, tap your profile to allow apps.
Congrats, you're now ready to use PPSSPP. Note, as of writing this, PPSSPP's iOS 11 support is incomplete. PPSSPP will launch but freezes when gamesattempt to load due to the dynamic recompiler not being 64 bit.
If you'd like to build an iOS 11 compatible emulator, check out installing Provenance
2017-10-23: Added support disclaimer.
2017-11-20: Added further support disclaiming, PPSSPP still isn't iOS 11 compatible as it looks like youtubers are looking to cash in on the desires of would be gamers through questionable URLs. Why trust me? There aren't any ads here, I'm not getting paid to write this but there are ads on the YouTube vids and websites. Just sayin'
2017-11-21: Further disclaimer clarification, looks like RedmondPie is linking a busted IPA file. Until the PPSSPP github project is updated, there will be no iOS 11 PPSSPP support. It's that simple.
-
Creating an SVG Fill animation
Recently I was tasked with creating a fill animation on an SVG; a request has come up a few times recently even for my company's website. The animation as described would rise up to reach a certain predetermined point and stop, like a vertical progress bar. I didn't find any 100% useful guides but was able to piece together from previous SVG work, and a few good stack overflow finds the basics.
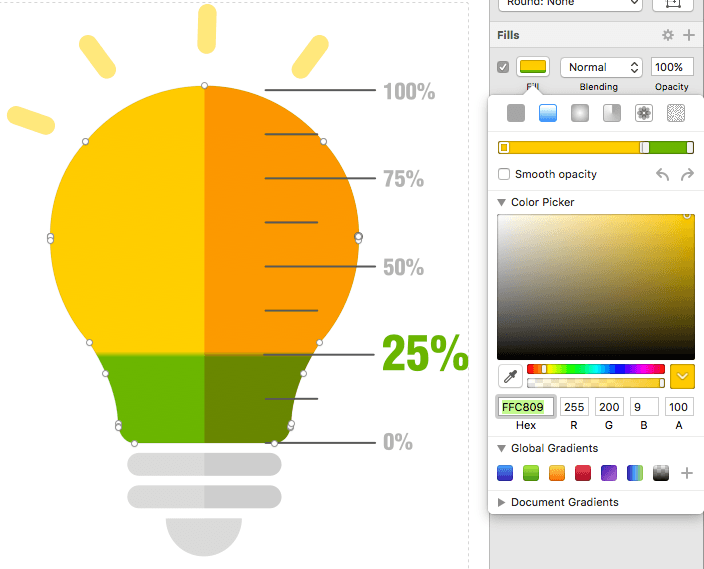
Creating an SVG fill animation requires some knowledge of a graphics program like Sketch or Illustrator. For this example, I'll be outlining what I did in Sketch to treat the graphic, but this is not Sketch specific. I'll do my best to make this novice accessible but some basic understanding.
Step 1: Treating your graphic
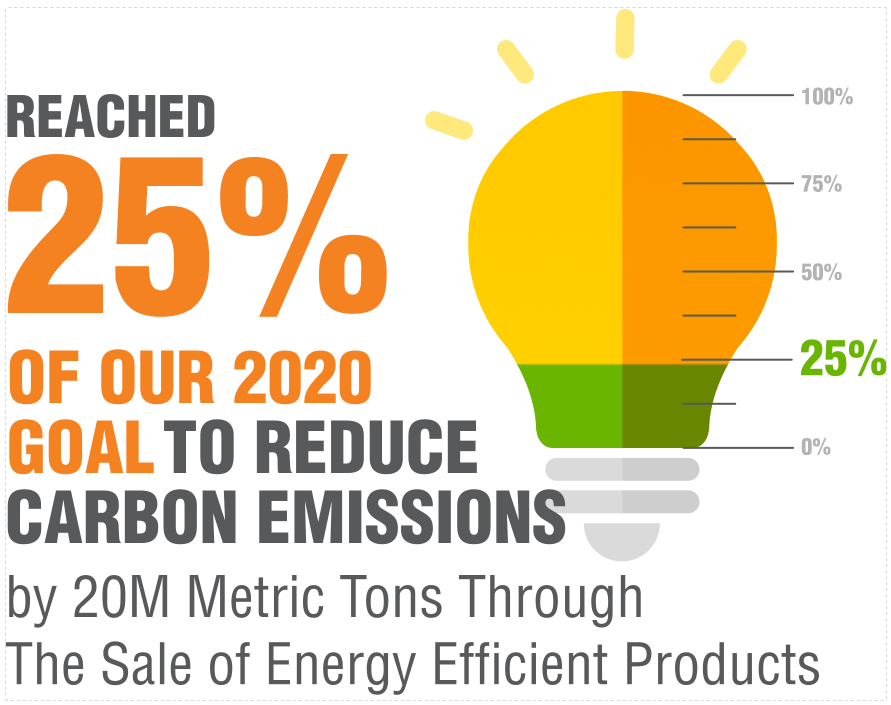
Creating a fill animation requires the right graphic. To pull off this animation, we need a polygon that's a solid color for the vertical progress bar effect. This particular animation will rise up to the 25% mark as outlined by the article.
Originally this graphic's green fill was a separate layer. While this a correct way to illustrate this, it's not easily animated. If we were to stretch the image, the effect would appear like the animation below.
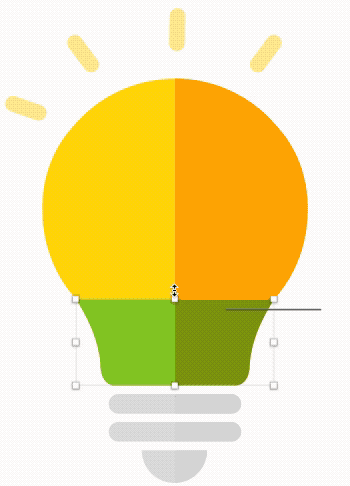
Instead, a much simpler solution is to use a gradient fill. Due to the trickiness of SVGs and gradients, make sure the gradient points extend the entire length of the fill; otherwise, the start and end points can create problems. Sketch is a little picking about gradient points, so don't worry if you can see the gradient transition. We will correct this in the XML of the SVG after exporting. Make sure you name your SVG polygons as this will become very useful for CSS as these will become the IDs for each polygon.
Step 2: Export and paste
Note: A caveat of the SVG format is that it requires being inline on a page for CSS to be able to target the SVG nodes. If it's linked via SRC, CSS is then unable to target the XML in the SVG. We want CSS control as we will be using it to set the gradient.
Paste in the SVG into your HTML (feel free to remove any XML comments in the header). There are two things to observe: All the SVG gradients are declared
<defs>in the section of SVG and that the gradient is linked within the polygon.Step 3: Creating more gradients
To create our animation we're going to need three gradients:- Default Gradient - this will be our default unfilled state
- Animation Gradient - this will be our gradient that contains <animate> tags within our gradient
- Finished Gradient - this is the final animation state, this will be our simple bobbing animation that loops infinitely after the animation has completed
In the defs, I'm going to do three things: first name gradient and secondly set the second stops to the same endpoint to create the illusion of a solid line. Lastly, I need to make the light bulb "empty" so I'll set the offsets of the last two gradient stops to 100%.
  <linearGradient x1="0%" y1="0%" x2="0%" y2="99.9334221%" id="bulbGradient-default">
      <stop id="stop1" stop-color="#FFC809" offset="0%"></stop>
      <stop id="stop2" stop-color="#FFCF06" offset="100%"></stop>
      <stop id="stop3" stop-color="#6CB31D" offset="100%"></stop>
  </linearGradient>
Copy and paste and rename the gradient to match this pattern. It'll take a bit of trial and error but set the final stop offset points.
  <linearGradient x1="0%" y1="0%" x2="0%" y2="99.9334221%" id="bulbGradient-animate">
     <stop id="stop1" stop-color="#FFC809" offset="0%"></stop>
     <stop id="stop2" stop-color="#FFCF06" offset="73.5%"></stop>
     <stop id="stop3" stop-color="#6CB31D" offset="73.5%"></stop>
 </linearGradient>

 <linearGradient x1="50%" y1="0%" x2="50%" y2="76.9334221%" id="bulbGradient-end">
     <stop id="stop1" stop-color="#FFC809" offset="0%"></stop>
     <stop id="stop2" stop-color="#FFCF06" offset="73.5%"></stop>
     <stop id="stop3" stop-color="#6CB31D" offset="73.5%"></stop>
 </linearGradient>
Step 4: Animation
We can't target the defs via CSS, but we do have another tool, SMIL animation. SMIL is depreciated, but it works for linear gradients. SVGs can contain animations. SMIL is supported in all browsers sans IE/Edge (more on that later). For this example, we're going to use
animateAnimate consists of the attributeName (the part we want to animate in our parent), duration, values and repeat count. Normally we'd use CSS animations as they're more well supported but as of writing this, I've yet to find any way to animate gradients without complex JS. Within our stop tags, we'll add the animate values. Fortunately, for both animations, the last two stops will contain the same animation to continue our solid line effect.If we do not declare a
beginproperty, the animation will automatically regardless if we can see it once the DOM is ready. To prevent this, we need to set the begin time asindefiniteotherwise our animation will begin to play. We may not even see our animation or see a strange jump. We also need to give each animate property an unique ID so we can target them.<linearGradient x1="0%" y1="0%" x2="0%" y2="99.9334221%" id="bulbGradient-animate"> <stop id="stop1" stop-color="#FFC809" offset="0%"></stop> <stop id="stop2" stop-color="#FFCF06" offset="73.5%"> <animate attributeName="offset" dur="2s" values="1; 0.735;" repeatCount="1" begin="indefinite" id="bulbGradient-animate-stop1"/> </stop> <stop id="stop3" stop-color="#6CB31D" offset="73.5%"> <animate attributeName="offset" dur="2s" values="1; 0.735;" repeatCount="1" begin="indefinite" id="bulbGradient-animate-stop2"/> </stop> </linearGradient> <linearGradient x1="50%" y1="0%" x2="50%" y2="76.9334221%" id="bulbGradient-end"> <stop id="stop1" stop-color="#FFC809" offset="0%"></stop> <stop id="stop2" stop-color="#FFCF06" offset="73.5%"> <animate attributeName="offset" dur="5s" values="0.995; 0.95; 0.995; 0.95; 0.995;" repeatCount="indefinite" begin="indefinite" /> </stop> <stop id="stop3" stop-color="#6CB31D" offset="73.5%"> <animate attributeName="offset" dur="5s" values="0.995; 0.95; 0.995; 0.95; 0.995;" repeatCount="indefinite" begin="indefinite" /> </stop> </linearGradient>Step 5: CSS
Finally, we need to set up our CSS so control our
linearGradient, each gradient being assigned to a CSS state. The following is written in scss.#bulb-icon { #Bulb { fill: url(#bulbGradient-default); } } #bulb-icon.animate { #Bulb { fill: url(#bulbGradient-animate); } } #bulb-icon.end { #Bulb { fill: url(#bulbGradient-end); } }What we have is a pre-animation state gradient, the actually animated gradient, and then the final state after the animation for the gradient.
Step 6: Javascript
First, we need to create objects from our
animatetags, this way we can access the methods available to them.var bulbstop1 = document.getElementById('bulbGradient-animate-stop1'); var bulbstop2 = document.getElementById('bulbGradient-animate-stop2');After that, it is time to write simple our JS. We want to create an animation based on time via JS using a simple
setTimeoutfunction to change the class after it is done. The animation is 5 seconds long, so I've made the setTimeout a few ms shorter than 5 seconds. To trigger the animation I need to use thebeginElement()method. This initializes the animate.function animate(){ $("#bulb-icon").attr("class", "animate");; setTimeout(function(){ $("#bulb-icon").attr("class", "end");; }, 4995); bulbstop1.beginElement(); bulbstop2.beginElement(); } animate();Note: I learned about the
beginElement()method from a great blog post at properdesign.rs which I highly recommend reading.IE Support
As mentioned previously, Internet Explorer and Edge do not support SMIL with no plans to support SMIL. However, we can add SMIL support with Fakesmile, an Internet Explorer shiv.
Our final Product!
See the Pen SVG Animation by Greg Gant (@fuzzywalrus) on CodePen.
Update 10/20/17: Added in more info about JS. Added the restart animation to CodePen. Added info about
beginElement
-
Total Eclipse Oregon
"Welcome back to daylight Portland. So that's it, the last solar eclipse to be seen on this continent in this century..
And as I said not until August 21st, 2017, will another eclipse be visible from North America. That's 38 years from now. May the shadow of the moon fall on a world at peace" - Frank Reynolds, ABC News
Such unbridled optimism... :(

Pictured: Hubbard, Oregon. Captured on my OM-D EM5
A total eclipse is something to behold as it touches more than the eyes. There are a few silly things I never considered going in which were all obvious in retrospect, the sudden temperature drop, the quiet as all traffic stopped and birds (mostly) stopped chirping, the distant cheering, and the 360-degree sunset. As fortunate as I was to witness it, friends in Salem and north of Corvallis reported being able to see the stars. I feel no need to place any more special significance on the experience than the beauty of nature and astrophysics. That alone should be enough to inspire...
The lead quote by Frank Reynolds can be found at 9:12.
Also, bonus, watch at eight as the commentators speculating as to what Oregon was like 360 years ago, the last time the path was nearly the same.
-
Simple GUI for an image conversion script on OS X
This project has less practical value that I'd like to admit, but I decided to go down the rabbit hole of trying to figure out how to create simple GUI for a bash script. This script takes a retina image and down converts into a plethora of formats. Perhaps one day this could be wedged into a straightforward Xcode project that gives it a real GUI and thus more options. I merely ported my my CodeKit 3 hook to an independent shell script and added Zenity after exploring a few options. Notably, there is no error catching.
Dependancies
    brew install imagemagick --with-openjpeg
    brew install webp
    brew install mozjpeg
    brew install zenity
GitHub Jist
-
Creating a CodeKit 3 Hook Tutorial - for Webp & JPEG2000 image conversion
Despite writing the most comprehensive review of Codekit on the internet, there's a feature I've never spent much time within Codekit: hooks. Most of my day-to-day dev is now in Gulp/Grunt/Webpack thus I haven't dedicated the time to set up a hook. Personal antidotes aside here's a quick tutorial on how to get started with CodeKit Hooks, using a simple bash script to hook into the exceptionally powerful ImageMagick.
I highly recommend checking out my previous post on JPEG 2000 and WebP for a more in-depth look at creating JPEG 2000 and WebP assets manually. The quick and short is there are (somewhat) better image formats that have been developed for lossy image compression, as the JPEG format is now 25+ years old. Modern web browsers support a smattering of new formats, but no single format is the clear winner. Safari supports JPEG2000 and HEIF(barely). Chrome/Opera support WebP. IE11/Edge supports JPEG XR. WebP/JPEG2000/JPEG-XR all support alpha layers, and presumably HEIF. JPEG2000 / WebP supports both lossy and lossless image compression and JPEG-XR and JPEG2000 8-10 bit color. Firefox in atypical new format crisis the laggard (Remember Ogg anyone?). Sadly, JPEG-XR is a headache due to proprietary hell and is mostly absent on macOS(OS X) or Linux, and HEIF is too avant-garde. BPG is pretty much DOA.
Creating a Hook
CodeKit 3 hooks allow CodeKit to tap into your Mac's terminal or Applescript, and trigger scripts to process files. The aforementioned can be exceptionally handy. CodeKit's documentation is pretty solid for getting started with hooks but novice and junior devs might be a bit perplexed as to how or why you may want to do this.
For those who haven't used or perhaps heard of ImageMagick, it is a CLI utility that allows you to process images in any number of ways, like batch convert file formats, scale images, add borders, remove alpha masks and more. This tutorial only includes a very particulary example of ImageMagick and will require some basic terminal usage. If you'd like to learn more basics of ImageMagick, I suggest reading Process images for your blog with ImageMagick. Most novice developers should feel comfortable with the terminal enough to understand the few basic lines of code in this project. Junior developers should always be wary of executing random terminal commands, especially ones that ask you use sudo commands. All the bash scripts presented should be harmless and do not require sudo.
Step 1 - Homebrew
Install HomeBrew. In your terminal, type:
brew - vIf running the previous command returns "command not found", go to Homebrew's website, which should have the installation instructions on the first page.
Step 2 - Installing ImageMagick
Once homebrew has been installed or verified that it has been previously installed, its time to install ImageMagick with JPEG2000 support as by default it does not come pre-baked with JPEG2000 support or WebP. Fortunately, WebP only requires installing separately.
      brew install imagemagick --with-openjpeg
      brew install webp
Note: If you have a previous version of ImageMagick installed, you may need to run
brew uninstall imagemagickto include JPEG2000 support. Annoyingly, ImageMagick will merely write JP2 files as the source file's file format if OpenJPEG is not present but with the caveat of appending the file with the new file suffix. This is very confusing, misleading, and frustrating. It took me roughly an hour to deduce that JPEG2000 requires OpenJPEG with ImageMagick. If you find ImageMagick creating JPEG2000 files that are massively larger than a PNG, Runmagick identify -verbose filenameto see if your JPEG2000 is truly a JPEG2000. If it reports your .jp2 file as a PNG, then you are missing OpenJPEG.Step 3: Creating a CodeKit 3 Hook
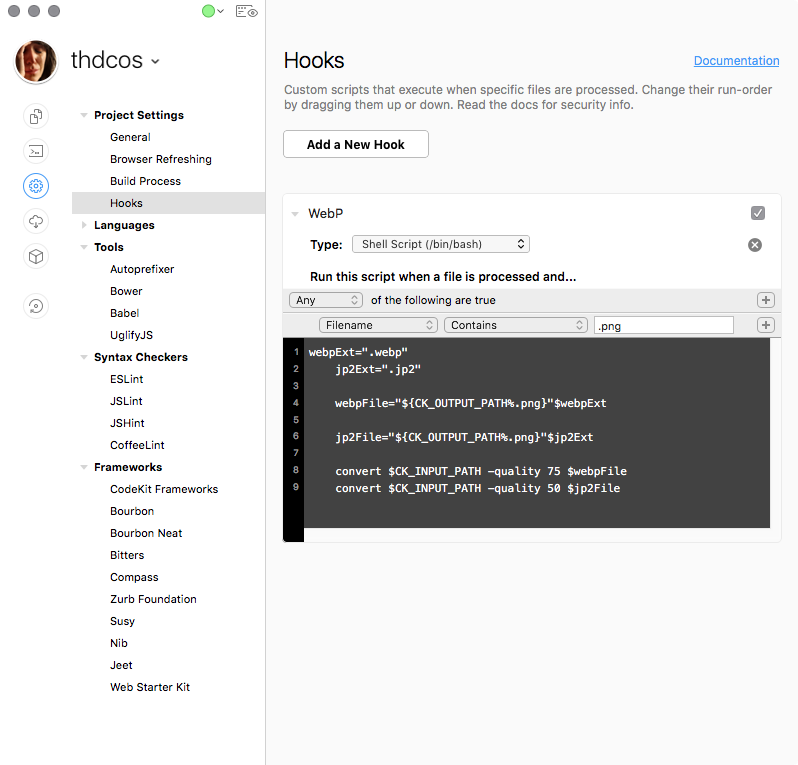
In CodeKit, click on the gear icon, and click hooks. Click add a new hook. For this example, we're going to create a Shell script (Terminal bash script). Codekit has its own variables that can be passed into your shell script.
The basics of converting files in ImageMagick is pretty simple:
convert input.file -quality (numeric setting) output.fileImageMagick will export the file type based on you the suffix you choose. My goal is to create both a JPEG2000 and WebP image using ImageMagick in the same directory as the original PNG.
    webpExt=".webp"
    jp2Ext=".jp2"

    webpFile="${CK_OUTPUT_PATH%.png}"$webpExt

    jp2File="${CK_OUTPUT_PATH%.png}"$jp2Ext

    convert $CK_INPUT_PATH -quality 75 $webpFile
    convert $CK_INPUT_PATH -quality 50 $jp2File
NNotably, there are many ways to go about this, but I went for simple. Here's a quick rundown of what the following code does:
$CK_INPUT_PATHand$CK_OUTPUT_PATHare both CodeKit 3 variables that are passed into a shell script. You can read about them here.webpExt=".webp"andjp2Ext=".jp2"are bash vars I use to append a file name.${CK_OUTPUT_PATH%.png}removes .png from the output path.webpFile="${CK_OUTPUT_PATH%.png}"$webpExtmakes a variable with the correct path/filename - .png suffix + .webp suffix. JPEG2000 support convert $CK_INPUT_PATH -quality 75 $webpFileruns ImageMagick's convert function on the CodeKit input file and then processes it with quality 75, and exports it the CodeKit 3 location with the proper file type that I set up in previous steps.- I repeat this on JPEG2000.
Pretty simple right?
Hopefully, it was. If it wasn't, don't sweat it. The terminal is pretty much using a computer without handrails. CodeKit may buffer you from the terminal, but it's entirely worth your time as a developer to get comfortable with it and expected in most types of development.
The quality settings will need to be tweaked. Often its better to do this sort of processing hand as I've had some wildly varying results on JPEG2000 and WebP, but this is a simple way batch convert PNGs to WebP and JPEG2000 images, so Chrome/Safari users (99% of North American mobile users) can enjoy smaller image file sizes. Also, PNG with CodeKit's ImageOptim on PNGs can be hyper-effective, and for simple images often best JPEG2000 and Webp.
Bonus: MozJPEG
If you'd like to use PNGs as sources, you can also create JPGs of your images using MozJPEG. MozJPEG only supports a few input formats. This script assumes you have a high-quality PNG. Its recommended not to use Codekit's PNGquant on the source PNG. Notably, this script could be exampled using ImageMagick accept @2x only images and resize them. Here's a more involved script that will take Retina PNGs and convert them into 2x and 1x JPEG2000, JPEG, and WebP. The quality setting is arbitrary. You'll want to set up a source folder and build folder otherwise you'll end up with recursive files.
Install MozJPEG
brew install mozjpegBash Script for CodeKit (read above for notes)
    # vars for use later
    webpExt=".webp"
    jp2Ext=".jp2"
    jpgExt=".jpg"
    ppmExt=".ppm"
    pngExt=".png"
    twoX="@2x"
    oneX="@1x"

    # make half size PNG path name, create a 1x PNG.
    halfsizepngFile="${CK_OUTPUT_PATH%.png}"$oneX$pngExt
    convert  $CK_INPUT_PATH -resize 50%  $halfsizepngFile

    # webp
    convert $CK_INPUT_PATH   -quality 75 "${CK_OUTPUT_PATH%.png}"$twoX$webpExt
    convert $halfsizepngFile -quality 75 "${CK_OUTPUT_PATH%.png}"$oneX$webpExt

    # jpeg2000
    convert $CK_INPUT_PATH    -quality 70 "${CK_OUTPUT_PATH%.png}"$twoX$jp2Ext
    convert $halfsizepngFile  -quality 70 "${CK_OUTPUT_PATH%.png}"$oneX$jp2Ext

    # ppm temp for MozJPEG
    ppm2x="${CK_OUTPUT_PATH%.png}"$twoX$ppmExt
    convert $CK_INPUT_PATH  $ppm2x
    ppm1x="${CK_OUTPUT_PATH%.png}"$oneX$ppmExt
    convert $halfsizepngFile  $ppm1x

    # jpeg (MozJPEG)
    cjpeg -quality 70 $ppm2x > ${ppm2x%.ppm}$twoX$jpgExt
    cjpeg -quality 70 $ppm1x > ${ppm1x%.ppm}$oneX$jpgExt

    # remove temp ppm
    rm  $ppm2x
    rm  $ppm1x
Double bonus
I ported the same script as above to a jenky UI meant to be used outside of CodeKit.
Update August 19, 2017 - Added second script with image resizing + MozJPEG and corrected missing WebP installation step.
-
Getting started with Webp, JPEG2000, and JPEG-XR (2019)
Updated for 2019
An oxymoron can occur in a year, everything and nothing can change. That's exactly what happened since I wrote this guide in late 2017. Now in January 2019, I figured it was time to update this guide.
I've had an affinity for image optimization, going as far as to test out Google's guetzli, a hyper-optimized JPEG encoder and running a comparison of ImageOptim vs. Squash 2. I decided to revisit something I've meant to test out: Alternative image formats.
For those who aren't as versed in image compression, our choices are familiar for bitmapped images: JPEG (lossy, no alpha), PNG (Can do alpha, optimized by pre-processing with lossy strategies), BMP, and GIF (LZW and a complete waste of bandwidth). However, there are other image formats that browsers support:
- JPEG 2000 (Safari 5+) - supports alpha, RGB/CMYK, 32-bit color space, lossy or lossless
- JPEG-XR (IE9-11, Edge) - supports alpha, RGB/CMYK, n-channel, lossy or lossless, progressive decoding, 32-bit color spacing
- Webp (Chrome, Opera, Android Browser, Edge 18+, Firefox 65+) - supports alpha, lossy or lossless.
If you're keeping score, you're probably noticing
two things: That's a fractured landscape, andFireFox wasn't mentioned, both are true. When I first wrote this guide, FireFox hadn't backed a format, and instead chose to write its own JPEG encoder (MozJPEG) that offers a 5% data savings as opposed to adding support for WebP, or either JPEG format. However, in FireFox 65, on target for early 2019 will soon support WebP and with Edge switching to Chromium comes WebP support.So far no browsers support HEIF (high-efficiency image format), Apple's newly preferred image capture format for iOS, although I documented recently the fate of its support on macOS recently. (it's actually quite good).
From my experiences, avant-garde image formats shouldn't necessarily be viewed as saving pace so much as delivery more quality at the same file size as each format seems to yield varying results, especially in the cases of JPEG2000 and JPEGXR, as drastically reducing the file size will produce so-so results. However, comparing like images at the same file size, both yield better results highly tuned JPEG libraries like MozJPEG or guetzli. As a general rule, you shave about 10% off of a JPEG (after optimization) with JPEG2000/XR to deliver like results, JPEGXR being the laggard of the of the two. WebP tends to deliver like results at slightly better file sizes.
Combining classic bandwidth saving strategies like: minification of CSS, uglification of js, lazy loading, inlining the crucial CSS to speed up time-to-paint, and such with avant-garde formats can shave off hundreds of kilobytes.
Looking forward: WebP, HIEF, and AVIF
When I wrote this guide, Internet Explorer had a bit more of a foothold, and it was unclear of Edge would manage to dig itself out of its hole. JPEGXR's future also is unclear if Microsoft will continue support for XR now that it's moving towards WebP. For the obsessive or people with user bases with heavy Internet Explorer usage, JPEGXR is still an option, but for everyone else, I'd skip JPEGXR moving in 2019. hen there's BPG and FLIF, which no browsers have embraced nor announced support for, effectively banishing them to the realm of the forgotten.
Apple is the only WebP holdout and has not announced plans to support it. In the iOS 10 beta and macOS Sierra beta, Apple tested WebP support but removed it before finalizing support. Strangely, despite Apple's investment in HEIF, it's not even supported in Safari's technical preview. I'm not holding my breath for WebP support on Safari.
Lastly, WebP might a be a bump in the road to AVIF (AV1), a royalty-free open joint venture from engineers at many firms such as Mozilla, Google, Cisco and so on. FaceBook raved about AV1 as superior to x264 and VP9 video formats. Mozilla plans on supporting AVIF, so at least one major browser is onboard with others likely to follow. The results look promising although, like all things in compression, there's rarely a clearcut winner.
Quick Primer
There's plenty of other places that perform comparisons, but the long and short is that per kilobyte. JPEG2000, JPEG-XR and WebP deliver considerably better images than JPEG and (often) PNG, and it doesn't take too much effort. I'd recommend reading the following, David Walsh's WebP images and Performance and playing with the incredibly nifty a format comparison tool.
All three image formats do not require any purchases although JPEGXR is the most cumbersome of the formats on macOS.
What you need:
- A high-quality source file (preferably lossless)
- JPEG-XR: Microsoft provides a free photoshop plugin that can be downloaded here or nab XnView
- WebP: WebPonzie provides the most painless and easy to use solution. XnView also has WebP support. A small company, Telegraphics, also provides a webp plugin. I had minor issues with it.
- JPEG2000: Photoshop, Preview both have native support. XnView also has JPEG2000 support. (I've had the best results using Apple's Preview for whatever reason)
Since there isn't a excellent singular solution, you'll need to open the high quality source image and open the image in the listed programs. Photoshop can handle exports to all three formats (with the aforementioned plugins) making it the closest to a one-stop solution, followed by XnView (which can be cumbersome). With JPEGXR's fate in future Edge iterations hanging in the wind, WebPonzie + Apple's Preview is completely viable.
ImageMagick
ImageMagick is the other one stop solution, and it's a CLI utility, quite powerful and fast although occasionally a little obtuse with the flag options for each file format to toggle features like lossless or target sizes. Depending on your terminal comfort, this may be the easiest method. Getting start however is pretty straight forward.
The easiest way is to use Homebrew, a package manager for mac CLI utilities. If you have Homebrew already installed, run the following commands in your terminal (install both ImageMagick and webp), otherwise go to the afformentioned link:
    brew install imagemagick --with-openjpeg
    brew install webp
    brew install jxrlib
Imagemagick includes several CLI utilties, but the one we're concerned with is convert. Converting a file to webp looks like the following:
convert path/to/file.png -quality 50 path/to/new/file.webpThe same goes for JPEG2000 and JPEGXR it requires using the correct extension. Tweaking the quality takes tinkering for each format.
convert path/to/file.png -quality 50 path/to/new/file.jp2The markup
Adding multi-format support doesn't require much, just a picture element. Below is an example of a simple picture. This can be mixed with srcset.
  <picture>
    <source type="image/webp" srcset="path/to/image.webp">
    <source type="image/jp2" srcset="path/to/image.jp2">
    <source type="image/jxr" srcset="path/to/image.jxr">
    <img src="path/to/image.jpg" alt="alt description">
  </picture>
Final Thoughts
Really, that's all it takes. Notably on macOS previewing JPEG-XRs is a pain and on it's way out, whereas at least WebP can be previewed in Chrome. It takes Photoshop or opening a JPEG XR in XnView then going to the actions tab, applying a filter so you can view the original JXR file (it's cumbersome). I created a CodeKit script to automate WebP and JPEG2000 and CLI bash script to convert images to WebP / JPEG200 / MozJPEG using ImageMagick. At the very least, you'll be providing better images at the same file sizes as a normal JPG. JPEG XR likely on the way out, even if its still supported by Edge. JPEG 2000 will never be embraced by the industry at large. WebP has a lot of traction these days. HEIF and AV1 though might soon replace WebP. JPEG isn't going anywhere, anytime soon.
- Jan 21, 2019 - added ImageMagick information
- Jan 14, 2019 - rewrite of about 1/2 the content, restructured and added information about future formats.
- Aug 17, 2017 - Correction on JPEG 2000 and SRCset
- Jul 26, 2017 - Original article published
-
The case for iTunes Match for all in a permanently ephemeral world
Last week I had an interesting conversation with a co-worker. She had taken her laptop to Apple. Apple restored her computer but it wiped her iTunes library, and she was confused as she assumed she'd get her music back. She doesn't have Apple Music or Match, but he did get some of it back. She only has the free iCloud 5 GB library which was sufficient to restore most of her docs, and the rest were on cloud services like Google Drive (as our office uses Google Drive). Add in another layer, Apple allows all music purchases to be redownloaded but doesn't extend the service to users without buying match. While hardly an Apple apologist, my knee-jerk reaction was "Well, yeah, you have to pay for it." However, I kept thinking about it after the conversation. Expectations being what they are, media is no longer finite. It lives and always lives: Spotify, Apple Music, Google Play, Netflix, HBOGo, Hulu, Audible, Amazon Kindle, Apple Photos, Google Photos. While we do not expect physical books, CDs/Vinyls, DVDs, Blu-Rays, Photo albums to magically exist in vast media centers, the cloud hype has given a strangely disconnected permanently ephemeral (ephemerally permanent?) quality to digital media; that it should be forgotten until remembered. Google already gives away music/photo storage for free, and Amazon does as part of it's mostly buried Prime services so why doesn't Apple?
iTunes has been a mess for years, and there's been a cottage industry of music purists who've abandoned iTunes, with utilities like Waltr, PhoneView, iMazing, and the music players Swinsian, Tomahawk and Vox Music Player. Perhaps match should be the driver to keep people in the iTunes sphere.
While it's nothing new to point out the brokenness of iTunes, iTunes Match should be a killer feature provided for free with iTunes long as you're using an Apple ID as a free service or included as a bonus for anyone who pays for iCloud regardless of the storage tier. It's confusing and disjointed for the average user.
-
Squeezer - A review

It's not every day I discover a task manager GUI utility that I haven't heard of. Apparently, today is such a day as I randomly came across SqueezerApp, a minimalist pre-processor.
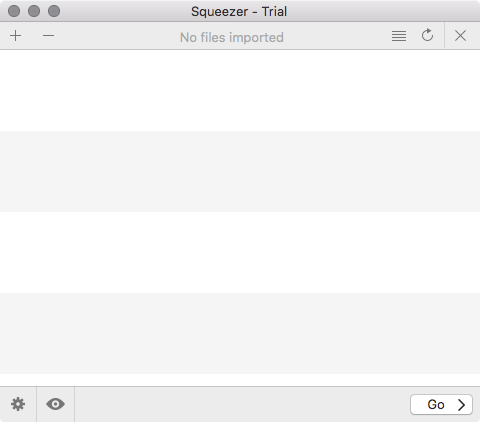
Pictured: Main app window is sparse
In my previous reviews of GUI task managers for front-end development, I went so far as to write glossaries for them so novice readers could find the reviews more accessible. However, due to the narrow lens of this utility, I'm going to skip this. I highly suggest novices read my review of CodeKit 3 as it goes far far more in-depth than this review ventures into the world of task managers, preprocessors and code compiling. I do my damnest to make my reviews effable, convert esoteric front-end web developer speak into human speak rather than pointless pontification. I'll be using words/phrases like task manager, minification, and uglification, with the assumption that you are already familiar with them or you've skimmed through CodeKit 3 Review.
Squeezer is the most minimalist task manager I've seen to date. For a course refresher: Task managers are programs set to execute pre-defined actions based on events. These events can be chained to many behaviors, but the most common is by manually triggering (usually by a terminal command or in GUI apps, via a button) or when a file is changed. The most common are terminal based applications that do not include GUIs such as Grunt / Gulp / Webpack and are used to compile pre-compiler languages like Sass or TypeScript into browser readable CSS and Javascript. These pre-compiler languages offer benefits of syntactic sugar (making code easier to read/understand) and ability to perform shortcuts to simplify development. This is only scratching the tip of the iceberg when using task managers as they can be configured to do highly specialized tasks like scanning for unused CSS or spin up a headless browser to perform visual auditing. The problem though is that these task managers take a lot of overhead to set up. For junior developers, it may be more important to focus on coding than tooling. For seasoned developers, it may not worth the time investment to create the tooling for a small project.
Capitalizing on the need, both CodeKit and Prepros have filled the niché of GUI task managers, (and quite well I might add). CodeKit 3 is powerful enough to be viable in a professional environment, and my review of CodeKit 2, I used CodeKit 2 off and on professionally for 9 months (mixed with Grunt). However, GUI task managers do not offer the flexibility of Grunt, Gulp or Webpack. GUI task managers are about ease of use as most users find GUIs far more intuitive than using a terminal and text configured files. The value that a GUI task manager is the simplicity and ease of use it brings.
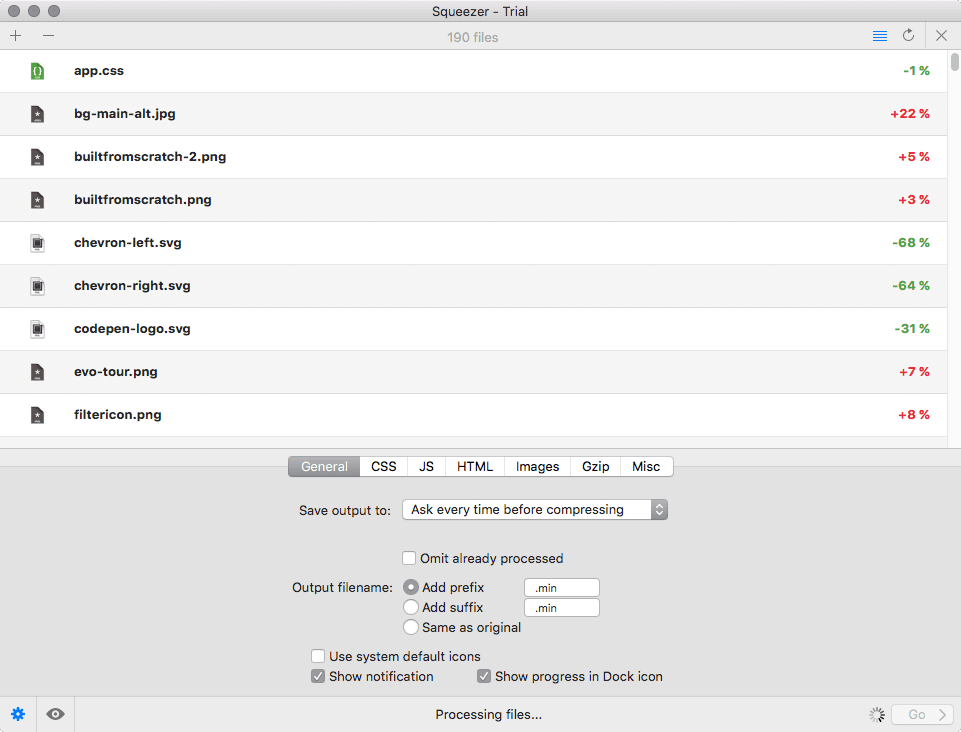
Pictured: General settings only allow one single path to export compiled code/images to.
The Review
Squeezer's website is a bit low on info. There's no information as to what engines it's using to process files, versions of compressors and so forth. It's a mystery box and poking inside the app reveals little. The website is almost a non-entity, and it's developer, Yanis Zafirópulos lists himself as "Dr. Kameleon", adding to the mystery.(If there's ever a red flag, it's someone who calls themselves a doctor without a full Ph.D.). Also, Chameleon? I could infer plenty more. To be clear, I'm joking... I doubt that there's any ulterior motive to less transpicuous.
Part of the reason I'm learning just now about the application is that there are several "Squeeze" named OS X applications, like the high-end video compressor, Sorenson Squeeze (formerly Squeezer), PDF Squeezer, and a few other utilities making for a tough SEO battle. Finding the official website takes more google-fu than one would expect.
Squeezer supports the following:
- HTML: Minification
- CSS: LESS, Stylus, Scss/Sass and CSS compiling/minification
- JavaScript: ES6, CoffeeScript or TypeScript compiling/minification.
- Images: PNG, JPEG (compression), SVG (minification)
Unlike CodeKit or Prepros, Squeezer isn't made for monitoring your entire project. Typically, with CodeKit or Prepros, the setup project looks something like this:
- Drag project folder into application window and wait for a second for the application to scan your project
- Via the GUI's folder structure, click on the parent Sass/Less file, JS file and set the output locations. Configure JS concatenation.
- In the project settings, enable/disable features like Linting
- As long as CodeKit or Prepros is open, it will compile your code. The application will remember your settings and create settings a file in your project folder that can be distributed with your project so others can quickly jump in with minimal configuration.
- Errors are logged in a central error log. The error log highlights problems in your code
Squeezer is significantly different. Squeezer only wants to know about your parent files. Dragging the entire project into Squeezer will create unexpected results, creating a bunch of partials of compiled code. I made this mistake when testing it and ended up with a CSS file matching every Sass file in my project, plus the properly compiled code when it hit the parent most CSS file. To make matters more confusing, if you enable file watching, Squeezer will not automatically trigger files unless the parent Sass file is manipulated. Even on single page sites, I like to divide up my Sass into separate .scss files. The shortcomings are immediately apparent, as I'm used to Gulp / Grunt / Webpack / CodeKit / Prepros which watch all your Sass and/or CSS and/or JS and recompile your CSS / JS whenever any of said files are manipulated. This isn't simply a preferred methodology, is the most sensible as you never have to remember to trigger your CSS or JS builds. Everything happens automatically.
So this leaves Squeezer in a strange space. It's a minimalist utility, but it also is more work to use. If you're simply looking to process Sass files in a project just once with the aid of a GUI, I still find CodeKit and Prepros easier.

Pictured: There's a few mystery options such as "advanced optimizations" and "remove all special comments except the first one."
Squeezer doesn't offer a proxy server either to inject your CSS changes, or trigger reloads when your JS/HTML (or other assets like Python/PHP) changes. Quite simply Squeezer is the most minimal task manager.
Who is it for?
If you only need to compile one type of code, then perhaps this is the GUI utility you've dreamed off. Just drag in the parent file, and it'll recompile on saves or perform a single compile. The problem is, I don't know anyone who works like this.
Lastly, it's worth mentioning that Squeezer is the cheapest of the GUI utilities.
Pictured: JS options are thin
Final Thoughts
Several things jumped out at me while writing this review:
- The one day trial for a development utility feels mildly insulting. I wanted to test the software and found myself against the gun to test it. I'm unwilling to pay $15 for something that I'm unable to even test drive properly. In fact, I may have missed settings and may have some inaccurate information in this review.
- Squeezer is not as easy to setup as CodeKit or Prepros nor does it have an easy way to specify multiple paths for individual file types.
- Little documentation, no real support to speak of and a few "mystery" options that'd require me looking at the code to see what they do. I didn't have time to test all options. My review contains more information about Squeezer than its documentation.
- Even at almost half the price of its competition and functionality, it's not a viable utility outside of the most bare-bones projects.
- Image optimization actually managed to INCREASE file sizes of many PNGs and JPGs run through ImageOptim and proceeds to overwrite them with the larger files. If image optimization is increasing the file size, then it shouldn't bother to apply changes.
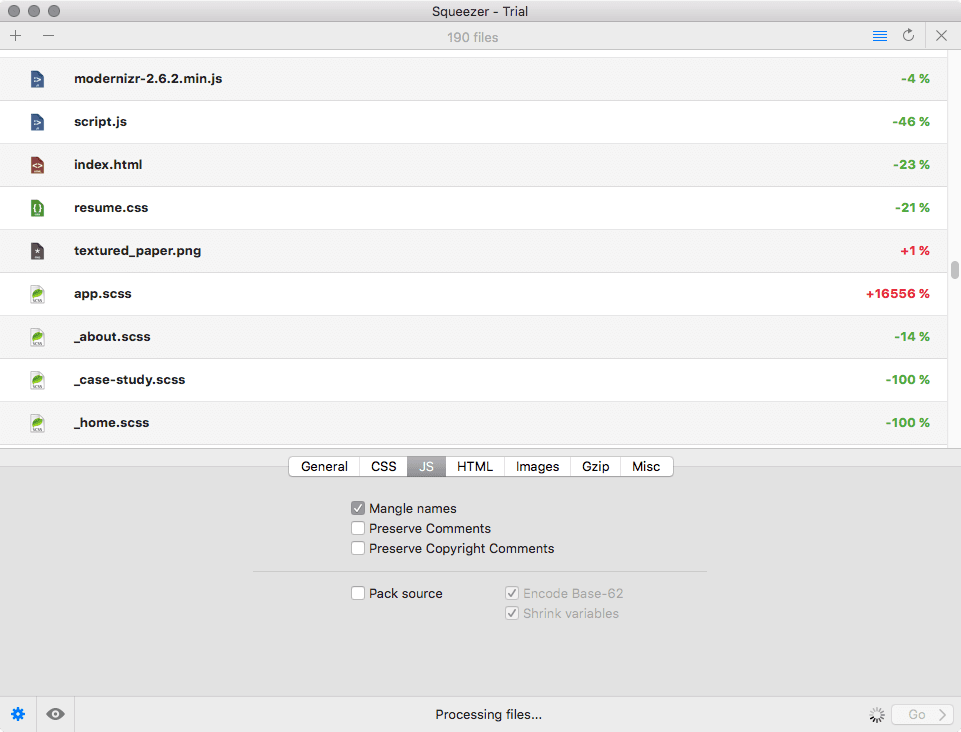
- Squeezer logs inaccurate minification stats for Sass as it compares the parent file vis the entire compiled CSS, rather than unminified compiled CSS vs the newly minified CSS.
- There's no error console, and files that shouldn't have compiled still compiled.

Pictured: Squeezer did a great job with vector images but ended with questionable results with PNGs
I hate to trash on an indie developer I but just cannot recommend Squeezer when CodeKit and Prepros exist, even at double the price. I do think there is room for an even more simple task manager than CodeKit or Prepros but I found Squeezer too simplistic to mimic a workflow even for a very straightforward static website. It may fit others workflow and it has a free trial but even that has its shortcomings of being laughably short, making it difficult to evaluate if there are workable patterns for Squeezer. Add in the lack of documentation or clarity on the compiler versions, no proxy serving/live-reload and stupid logic on image compression, and Squeezer is a bit of a dud. It functions as advertised but without much grace. Squeezer feels like a beta more than a refined application.
Moving Forward
Pictured: The Misc options mostly should exist under other tabs like "Just compile".
Squeezer isn't a total bust, it performs the tasks it purports to do but without any finesse. It really wouldn't take much to make this utility a viable solution. It's a good start and perhaps it could be a useful task manager if just a few things changed. The biggest changes I'd ask for out the gate are:
- Allow multiple export paths, at the very least by file type. Compiled JS goes into JS folder, compiled CSS goes to CSS folder, images go to the images folder, etc.
- Extend the CSS/JS watch to include imported files or allow the entire directory to be moved into the project window.
- Clean up the options; it's baffling that there are "just compile" options in the Misc tab instead of under the file types they pertain to.
- Add in an error log. I didn't see an. The file size savings is misleading if Sass files or JS files contain imports. The app either should compare the compiled file against all the sources or not at all.
- Add at the very least live-reload support (CSS Injection would be nice)
Adding those five features would make this usable and inexpensive alternative.
Version Reviewed: 2.0
Price: $15
Website: squeezerapp.com
-
Simple Sass Mixin For Color Theming
I don't post much in the way of code on my blog, most of my tech posts are bug fixes or esoteric configuration. I’ve been sitting on a nifty sass mixin for about two years. and I've recently ported it to codepen. It’s clever for color theming elements. What it requires is:
- A predefined list/set of colors
- The desire to use all of these colors on multiple CSS attributes (borders, backgrounds, color, etc) and UI elements
- A simple way via CSS to set the color dynamically
See the Pen Sass parent mixin by Greg Gant (@fuzzywalrus) on CodePen.
Sass doesn't have arrays. Thus you need to iterate through multiple lists, one to define the CSS name and one with the corresponding color value. This can be taken further so other elements on a page could use other themes, even if the parent theme is different.
See the Pen Sass mixing by Greg Gant (@fuzzywalrus) on CodePen.
In no way is this limited to colors only, this could be done with lists of any attributes and values.
-
Thoughts on Front End Development 2017 Q1
This is a slightly belated follow up to "Thoughts on Front End Development in late 2016". The idea is to chronicle thoughts I've had between the last time I wrote about front-end development by quarter. I like to pretend this blog is about front-end development and not random hacks for emulators, pining for new Mac Pros and audio gadgetry.
- I finally used Docker on a project and its wonderful (I'll admit I did not do the tooling to set up the container). It'd be interesting to try and fold in the front end techs into a docker container.
- Chrome is kinda glitchy again when dealing with React. I've had better luck with code injection on Safari the past few weeks.
- • I set up Webpack for our two apps at my company. Webpack is mysterious (unlike piping in Gulp) but damn if it isn't necessary for React. I even saved the day for a coworker with custom fonts. It turned out to be configuring MIME types for font loading. It really shouldn't be this hard, but it is.
- I started on another side project like CSSFilterGenerator.com, and it'll be on React.
- I'm happy to work on another Django project. I wish I had more projects with Django.
- Drupal 8 should be headless and do away with its own goofball templating. Ship it with popular templating options.
- For the first time I'm (almost) full stacking a site (at my current job), with Expression Engine.
- The next step for React and me is getting into Redux.
- Windows 10 S makes me sad. It means Edge will gain market share. It's also pretty much an anti-pattern, desktops are open, and Windows best strength has been: its huge library of software. Limiting it to the Windows Store is pretty much terrible, sure its $50 to "unlock" it but if I were Apple, I'd be laughing myself to sleep.
- I wish Node apps idled better.
- Changing OS X to target tabs instead of new windows really has been a surprisingly big change in my day-to-day.
- Net Neutrality is on the ropes again... If there's ever an example of nepotism and a conflict of interest, its appointing Ajit Pai to run the FCC. We're living in a kleptocratic kakistocracy
-
Audio Bit Rate Calculator
I wrote this some time ago as part of a review of a Focusrite Scarlett 6i6 audio capture box, but decided to break it out into its own separate page. This calculator uses the signal-to-quantization-noise ratio formula, Nyquist frequency, and bitrate formulas to calculate various properties of uncompressed PCM digital audio quickly.
Common formats:
* *Enter bit depth
BitEnter Sample Rate
KHzEnter Audio Channels
channels
Maximum Dynamic Range
Pressure Level Values
Frequency Range (folding frequency)
*DVD-A has multiple format options, and uses MLP (lossless compression) so the bitrates represent the decoded data-stream.