Creating a CodeKit 3 Hook Tutorial - for Webp & JPEG2000 image conversion
Despite writing the most comprehensive review of Codekit on the internet, there's a feature I've never spent much time within Codekit: hooks. Most of my day-to-day dev is now in Gulp/Grunt/Webpack thus I haven't dedicated the time to set up a hook. Personal antidotes aside here's a quick tutorial on how to get started with CodeKit Hooks, using a simple bash script to hook into the exceptionally powerful ImageMagick.
I highly recommend checking out my previous post on JPEG 2000 and WebP for a more in-depth look at creating JPEG 2000 and WebP assets manually. The quick and short is there are (somewhat) better image formats that have been developed for lossy image compression, as the JPEG format is now 25+ years old. Modern web browsers support a smattering of new formats, but no single format is the clear winner. Safari supports JPEG2000 and HEIF(barely). Chrome/Opera support WebP. IE11/Edge supports JPEG XR. WebP/JPEG2000/JPEG-XR all support alpha layers, and presumably HEIF. JPEG2000 / WebP supports both lossy and lossless image compression and JPEG-XR and JPEG2000 8-10 bit color. Firefox in atypical new format crisis the laggard (Remember Ogg anyone?). Sadly, JPEG-XR is a headache due to proprietary hell and is mostly absent on macOS(OS X) or Linux, and HEIF is too avant-garde. BPG is pretty much DOA.
Creating a Hook
CodeKit 3 hooks allow CodeKit to tap into your Mac's terminal or Applescript, and trigger scripts to process files. The aforementioned can be exceptionally handy. CodeKit's documentation is pretty solid for getting started with hooks but novice and junior devs might be a bit perplexed as to how or why you may want to do this.
For those who haven't used or perhaps heard of ImageMagick, it is a CLI utility that allows you to process images in any number of ways, like batch convert file formats, scale images, add borders, remove alpha masks and more. This tutorial only includes a very particulary example of ImageMagick and will require some basic terminal usage. If you'd like to learn more basics of ImageMagick, I suggest reading Process images for your blog with ImageMagick. Most novice developers should feel comfortable with the terminal enough to understand the few basic lines of code in this project. Junior developers should always be wary of executing random terminal commands, especially ones that ask you use sudo commands. All the bash scripts presented should be harmless and do not require sudo.
Step 1 - Homebrew
Install HomeBrew. In your terminal, type:
brew - v
If running the previous command returns "command not found", go to Homebrew's website, which should have the installation instructions on the first page.
Step 2 - Installing ImageMagick
Once homebrew has been installed or verified that it has been previously installed, its time to install ImageMagick with JPEG2000 support as by default it does not come pre-baked with JPEG2000 support or WebP. Fortunately, WebP only requires installing separately.
      brew install imagemagick --with-openjpeg
      brew install webp
Note: If you have a previous version of ImageMagick installed, you may need to run brew uninstall imagemagick to include JPEG2000 support. Annoyingly, ImageMagick will merely write JP2 files as the source file's file format if OpenJPEG is not present but with the caveat of appending the file with the new file suffix. This is very confusing, misleading, and frustrating. It took me roughly an hour to deduce that JPEG2000 requires OpenJPEG with ImageMagick. If you find ImageMagick creating JPEG2000 files that are massively larger than a PNG, Run magick identify -verbose filename to see if your JPEG2000 is truly a JPEG2000. If it reports your .jp2 file as a PNG, then you are missing OpenJPEG.
Step 3: Creating a CodeKit 3 Hook
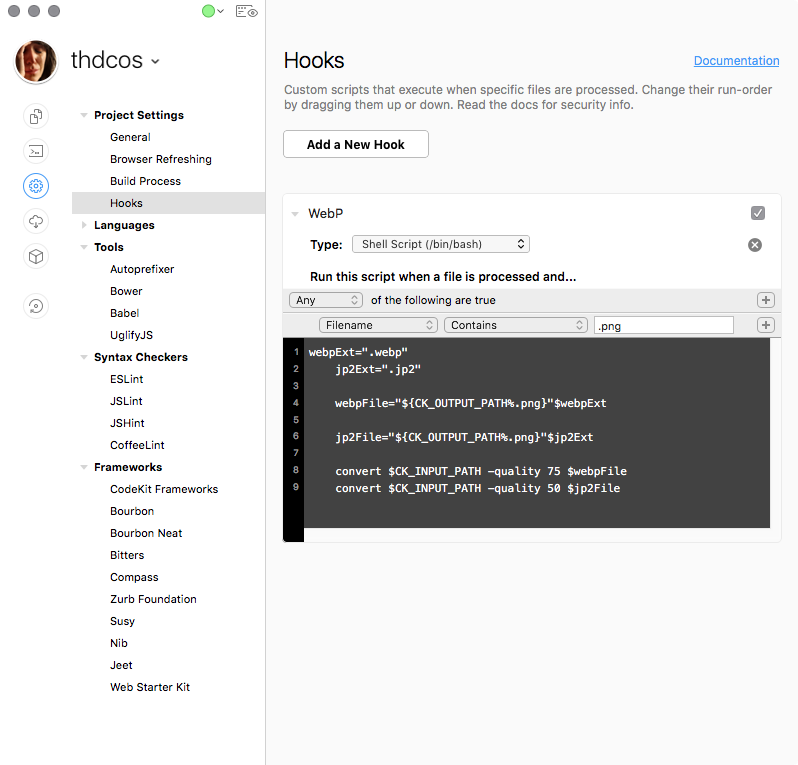
In CodeKit, click on the gear icon, and click hooks. Click add a new hook. For this example, we're going to create a Shell script (Terminal bash script). Codekit has its own variables that can be passed into your shell script.
The basics of converting files in ImageMagick is pretty simple:
convert input.file -quality (numeric setting) output.file
ImageMagick will export the file type based on you the suffix you choose. My goal is to create both a JPEG2000 and WebP image using ImageMagick in the same directory as the original PNG.
    webpExt=".webp"
    jp2Ext=".jp2"

    webpFile="${CK_OUTPUT_PATH%.png}"$webpExt

    jp2File="${CK_OUTPUT_PATH%.png}"$jp2Ext

    convert $CK_INPUT_PATH -quality 75 $webpFile
    convert $CK_INPUT_PATH -quality 50 $jp2File
NNotably, there are many ways to go about this, but I went for simple. Here's a quick rundown of what the following code does:
$CK_INPUT_PATHand$CK_OUTPUT_PATHare both CodeKit 3 variables that are passed into a shell script. You can read about them here.webpExt=".webp"andjp2Ext=".jp2"are bash vars I use to append a file name.${CK_OUTPUT_PATH%.png}removes .png from the output path.webpFile="${CK_OUTPUT_PATH%.png}"$webpExtmakes a variable with the correct path/filename - .png suffix + .webp suffix. JPEG2000 support convert $CK_INPUT_PATH -quality 75 $webpFileruns ImageMagick's convert function on the CodeKit input file and then processes it with quality 75, and exports it the CodeKit 3 location with the proper file type that I set up in previous steps.- I repeat this on JPEG2000.
Pretty simple right?
Hopefully, it was. If it wasn't, don't sweat it. The terminal is pretty much using a computer without handrails. CodeKit may buffer you from the terminal, but it's entirely worth your time as a developer to get comfortable with it and expected in most types of development.
The quality settings will need to be tweaked. Often its better to do this sort of processing hand as I've had some wildly varying results on JPEG2000 and WebP, but this is a simple way batch convert PNGs to WebP and JPEG2000 images, so Chrome/Safari users (99% of North American mobile users) can enjoy smaller image file sizes. Also, PNG with CodeKit's ImageOptim on PNGs can be hyper-effective, and for simple images often best JPEG2000 and Webp.
Bonus: MozJPEG
If you'd like to use PNGs as sources, you can also create JPGs of your images using MozJPEG. MozJPEG only supports a few input formats. This script assumes you have a high-quality PNG. Its recommended not to use Codekit's PNGquant on the source PNG. Notably, this script could be exampled using ImageMagick accept @2x only images and resize them. Here's a more involved script that will take Retina PNGs and convert them into 2x and 1x JPEG2000, JPEG, and WebP. The quality setting is arbitrary. You'll want to set up a source folder and build folder otherwise you'll end up with recursive files.
Install MozJPEG
brew install mozjpeg
Bash Script for CodeKit (read above for notes)
    # vars for use later
    webpExt=".webp"
    jp2Ext=".jp2"
    jpgExt=".jpg"
    ppmExt=".ppm"
    pngExt=".png"
    twoX="@2x"
    oneX="@1x"

    # make half size PNG path name, create a 1x PNG.
    halfsizepngFile="${CK_OUTPUT_PATH%.png}"$oneX$pngExt
    convert  $CK_INPUT_PATH -resize 50%  $halfsizepngFile

    # webp
    convert $CK_INPUT_PATH   -quality 75 "${CK_OUTPUT_PATH%.png}"$twoX$webpExt
    convert $halfsizepngFile -quality 75 "${CK_OUTPUT_PATH%.png}"$oneX$webpExt

    # jpeg2000
    convert $CK_INPUT_PATH    -quality 70 "${CK_OUTPUT_PATH%.png}"$twoX$jp2Ext
    convert $halfsizepngFile  -quality 70 "${CK_OUTPUT_PATH%.png}"$oneX$jp2Ext

    # ppm temp for MozJPEG
    ppm2x="${CK_OUTPUT_PATH%.png}"$twoX$ppmExt
    convert $CK_INPUT_PATH  $ppm2x
    ppm1x="${CK_OUTPUT_PATH%.png}"$oneX$ppmExt
    convert $halfsizepngFile  $ppm1x

    # jpeg (MozJPEG)
    cjpeg -quality 70 $ppm2x > ${ppm2x%.ppm}$twoX$jpgExt
    cjpeg -quality 70 $ppm1x > ${ppm1x%.ppm}$oneX$jpgExt

    # remove temp ppm
    rm  $ppm2x
    rm  $ppm1x
Double bonus
I ported the same script as above to a jenky UI meant to be used outside of CodeKit.
Update August 19, 2017 - Added second script with image resizing + MozJPEG and corrected missing WebP installation step.