The Definitive Guide to iOS/iPadOS emulation
As of April 2024, Apple has allowed emulation as long as they don't use JIT. This has opened up the floodgates to a technology that virtually every other modern platform in existence allows. Emulation can be used for many things, but gaming is the most popular use case for average users, and thus, this guide will focus entirely on gaming.
This guide is a living guide and is in the process of being built out. The goal is to demystify iOS emulation and make it accessible. Thanks to the r/EmulationOniOS community.
Also available in video!
If you prefer a video version of this guide, I've made a video version that covers everything you need to get started with iOS emulation.
- Glossary
- Getting Started / Requirements
- File Management
- Legal Considerations for ROMs and BIOS Files
- iOS vs Android
- Emulators
- Sideloading: Interpretation vs JIT
- Controllers and iOS
- Dumping Your Own ROMs... on an iPhone?
- Creating Your Own PlayStation / Sega CD / NeoGeo ISOs
- Communities
- Version History
- macOS Emulation Guides
Does this guide seem familiar? Perhaps you've seen my The Definitive Classic Mac Pro (2006-2012) Upgrade Guide, The Definitive Trashcan Mac Pro 6.1 (Late 2013) Upgrade Guide or The Definitive Mac Pro 2019 7,1 Upgrade Guide. These are all free of charge, free of advertisements and annoying trackers, labors of love. You can find me on YouTube and patreon.
Glossary
Emulation has a lot of jargon that comes with it. As a quick refresher, here's a list of terms that will be used throughout this guide.
- BIOS (Basic Input/Output System) – A small program essential for some emulators to replicate the original hardware's startup process and functionality. Required for systems like PlayStation and Game Boy Advance.
- Core – A specific emulator module within a front-end system (like RetroArch) designed to emulate a particular console. It is an application within an application.
- Emulator - software or hardware system that mimics the behavior of another system, allowing one device or platform to run software or applications designed for a different environment. It replicates the original system's functionality, including hardware and software interactions, without requiring the original hardware.
- Firmware – Low-level software stored in a device's ROM or flash memory that controls hardware functions. Some consoles require firmware files for proper emulation.
- Frame Skip – A feature that skips rendering frames to improve performance, reducing the number of frames displayed per second and affecting lower frames-per-second (FPS). This was a common technique with underpowered hardware. Modern iOS/iPadOS devices almost never need to make this compromise. Generally, poor performance is due to other factors like using too many game enhancements.
- Front-End – A graphical user interface that simplifies the process of using multiple emulators and managing game libraries. RetroArch is a popular front-end for multiple emulators.
- JIT (Just-In-Time compilation) - A method that dynamically compiles code during execution, improving emulation performance but restricted by Apple's policies
- IPA (iOS App Store Package) – A file format used for iOS apps that can be sideloaded onto devices using tools like AltStore or Cydia Impactor.
- ISO (International Standards Organization file) – Files distributed with a .iso suffix adhere to the ISO 9660 standard. A .iso is a disk image file that contains a complete copy of a CD/DVD game commonly used for PlayStation, Dreamcast, and other disc-based consoles.
- libretro - An open-source development interface that allows for the easy creation of emulators, games, and multimedia applications that can plug straight into any libretro-compatible frontend. RetroArch and Provenance are a front-ends that uses libretro cores. Libretro cores have been ported to an incredibly diverse set of operating systems like Linux, Windows, macOS, Android, iOS/iPadOS/tvOS/visionOS, and CPU architectures like x86 (Intel/AMD), ARM, Risc-V, and even PowerPC. Almost all iOS/iPadOS emulators are based on libretro and is the backbone of iOS emulation.
- Native Resolution - the original display resolution of the emulated console.
- ROM - (Read-Only Memory) is a type of non-volatile memory that stores firmware or software permanently and cannot be easily modified or erased. In emulation, a ROM refers to a digital copy of a game's software extracted from a physical cartridge or disc, allowing it to be played on an emulator.
- Save State – A snapshot of a game's current state that can be saved and loaded at any time, allowing players to resume gameplay from that point.
- Side Load – Sideloading is the process of installing apps on iOS/iPadOS devices from sources other than the official App Store, typically by using tools like AltStore, which allows access to emulators that use JIT compilation and other features restricted by Apple's App Store policies.
Getting Started /Requirements
Emulation is software that mimics another device's hardware and software environment, allowing your iOS device to run games and applications originally designed for different systems like the Nintendo Game Boy, PlayStation, or Sega Genesis.
Requirements:
- A device running iOS 17, iPad OS 17 or later
- Free space on your device
- Optional but recommended: A gamepad
- A bit of patience
Modern iPhones and iPads are powerful machines; the iPhone 16 Pro in raw CPU computing bests an 8-Core Mac Pro 2019. Any device capable of running modern iOS has enough processing power to emulate many different platforms. In the late 1990s, an iMac G3 233 MHz could emulate a NES and do reasonably well at SNES emulation. The biggest impediment for most devices will be storage as 32-bit era consoles like the Sony Playstation, Sega Saturn, or PPSSPP games can easily eat 600 MB per game, and in the case of the PSP, over 1 GB.
An emulator cannot understand interactions the console was not programmed for, such as touching menu items in an SNES game. While emulators feature touch controls, gamepads are highly recommended as console games are designed specifically for controllers; thus, all touch controls are mapped to key presses. Touch controls are either unable or very difficult to use for some interactions, such as analog triggers.
Legal Considerations for ROMs and BIOS Files
Understanding the Legal Landscape
The legal status of game ROMs and console BIOS files exists in a complex gray area that varies by country and jurisdiction. While emulators themselves are generally legal software, the content they run often raises copyright concerns.
ROM Files
ROMs (Read-Only Memory) are digital copies of game cartridges, discs, or other media. From a legal standpoint:
- Personal Backups: In many jurisdictions, making personal backup copies of games you legitimately own is considered legal under fair use doctrines.
- Downloaded ROMs: Downloading ROMs of games you don't physically own is generally considered copyright infringement, even if you previously owned the game but no longer do.
- Time Limitations: There is a common misconception that games become "abandonware" after a certain period. However, copyright protection typically lasts for decades (in the US, copyright extends 95 years for corporate works), and most classic games are still under copyright protection.
Of course, said files are often distributed openly on the internet and found via search engines.
See the ROM Dumping and Creating ISOs section on how to make legal backups of your games library.
BIOS Files
BIOS files are even more legally sensitive than ROMs:
- Copyright Protection: Console BIOS files are protected by copyright and are generally not intended for distribution.
- No Abandonment Provisions: Even for discontinued consoles, the BIOS copyright remains in effect.
- Reverse-Engineered Alternatives: This is why many emulators (like those mentioned in this guide) offer reverse-engineered open-source BIOS alternatives that don't infringe on copyrights.
Best Practices
To stay on the safer side of the legal spectrum:
- Only create backups of games you legally own.
- Don't distribute ROMs or BIOS files to others.
- Support developers by purchasing games when they're available on modern platforms.
- Consider using legal alternatives like official re-releases or subscription services that offer classic games.
Legal Alternatives
Many companies now offer legal ways to play classic games:
- Nintendo Switch Online (NES, SNES, N64, Game Boy games)
- PlayStation Plus (PlayStation classics)
- Virtual Console and classic collections
- GOG.com and other digital stores that sell classic games
This guide is not intended to encourage copyright infringement. The technical information provided is for educational purposes and for those who wish to play games they legally own on modern devices.
Note: This section provides general information, not legal advice. Laws vary by location and interpretation. When in doubt, consult legal resources specific to your region.
iOS/iPadOS vs Android
This guide will likely never feature a comprehensive breakdown comparing iOS vs Android, but Android has a considerable advantage compared to iOS.
Due to its more open nature, Android has a decisive advantage. While iOS/iPadOS emulation dates back to the jailbreaking era of iOS, Android app stores have officially allowed emulation from virtually the beginning, meaning there are many more mature emulators. Android also places fewer restrictions on emulation; thus, emulators exist for more modern consoles, like the Sony PlayStation 2, Sega Dreamcast, GameCube, Wii, and even the Swìtch.
The diversity of the Android ecosystem has spawned full-blown console-like Android devices such as the Odin 2, a high-end device that features a built-in gamepad akin to a portable videogame console. Devices like the Odin 2 feature memory cards, allowing for a relatively inexpensive way to store game collections.
Android is also more forgiving about 3rd party controller mapping, whereas iOS has a much more limited ability to map 3rd party controllers. This gives Android an accessibility edge as less conventional layouts and input devices can be mapped according to user preference.
Mainstream iOS/iPadOS emulation, while relatively young by comparison, still offers a great experience. Apple's hardware is second to none, as there are few devices that can match an M3 iPad in raw performance. Android does not make the setup easier in my experience, but rather, it offers a lot more options. This guide will help you get the most out of your iOS or iPadOS device.
Android is the superior option if emulation is your primary concern.
File Management

iOS has a very locked-down file system, but it does provide multiple ways to transfer data to and from your device. The most common methods are:
- USB File Transfer - USB File Transfer is the most reliable and recommended method, but it requires a computer.
- iCloud Drive - iCloud Drive allows for dynamic file management but requires a subscription for more than 5 GB of storage
- AirDrop - Airdrop is the most convenient but is limited to Apple devices.
Transferring via USB
Transferring files via USB, as stated, is the preferred method due to speed, reliability, and accessibility.
- Connect your iPhone or iPad to your computer via cable. You may need to authorize the device on your computer and/or device.
- Open Finder on your Mac or File Explorer on your Windows PC.
- Your device should appear in the sidebar or as a drive in the finder. Click on it to bring up the iPhone pane.
- Click on the Files tab to access the file system. You should see a list of installed applications that support file transfers, including your emulators. Due to the limitations of Apple, you cannot access any files within a folder
- Drag and drop files to your device on the Application icon. You can drag and drop entire folders.
Regardless of file transfer type, file management is almost entirely handled on the device using the Files app. For detailed instructions, see Organize files and folders in Files on iPhone. Files can be accessed between applications. This is very useful for sharing ROM libraries between emulations such as RetroArch and Delta, which can both emulate a subset of the same consoles (NES, SNES, GameBoy, Gameboy Advance, DS, and N64). They can share files rather than storing duplicate copies of the same game.
To select all, tap a file, and then from the lower left corner, click select all.
To move a folder or file, long press it, and then select move.
Third Party File Management
Dude, to the arbitrary limitations Apple places on file management, there is a cottage economy of phone management applications, the most prominent being iMazing. These applications allow for viewing and editing the contents of directories that exist on an iPhone. Unfortunately, these applications do cost money but are easier to use than Apple's Files app.
Adding games to Emulators
Once games have been transferred, adding games to the emulator in question is relatively easy.
Every emulator follows the same pattern for adding ROMs to its library by clicking some sort of add + or Add games button, then locating the files and selecting all or pointing a scan function to the directory. A few emulators have default locations like PPSSPP that will auto-scan. Only DolphiniOS requires the ROMs to be located in an exact directory.
Emulators
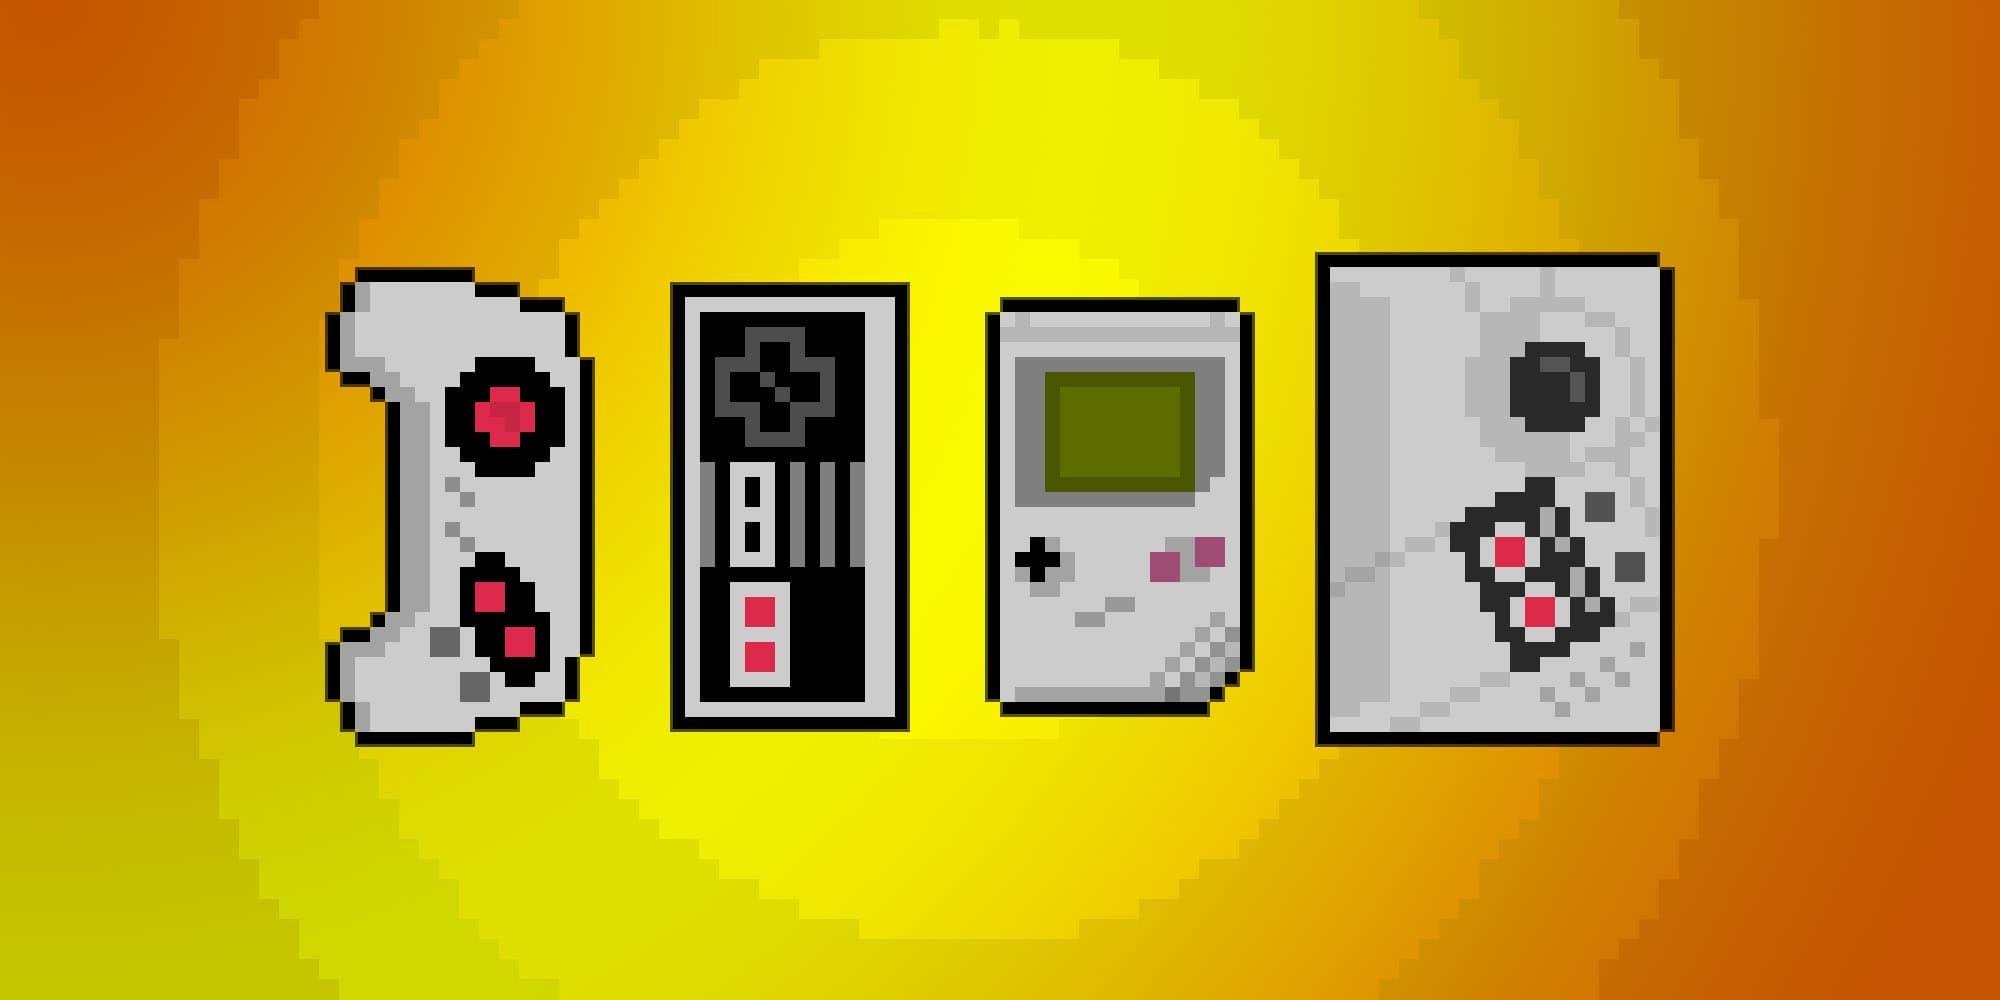
Emulators on iOS exist in two camps: App Store and Sideloaded (see lists below). iOS's emulation selection is slim, but fortunately, almost all of the major consoles are covered up to the 32-bit era. Here is the list of consoles supported, all of which have RetroArch support. Emulators like Delta use the same cores that are found in RetroArch.
- Amstrad - CPC
- Arcade - MAME / NeoGeo / CPS 1-2-3
- Atari - 2600, 5200, 7800, Jaguar, Lynx
- Bandai - WonderSwan
- ColecoVision
- Commodore - C64,C128, Plus4, Vic20, Amiga
- DOS - DOSBox
- GCE - Vectrex
- Magnavox - Odyssey 2 / Phillips Videopac+ (O2EM)
- Microsoft - MSX+
- MNec - PC Engine / TurboGrafx-16 / CD, PC-98, PC-FX
- Nintendo - NES, SNES, N64, DS, Gameboy, Gameboy Color, Game Boy Advance, Virtual Boy, 3DS
- Palm OS
- Sega - MasterSystem, Game Gear, SG-1000, Genesis / MegaDrive, Saturn
- Sharp - X68000
- Sinclair - ZX 81, ZX Spectrum
- SNK - NeoGeo Pocket / Color
- Sony - PlayStation, PSP
- 3DO
- Thomas - MO/TO
- Uzebox
App Store Emulators
There are several emulators available on the App Store that Apple sanctions. These emulators are limited in scope and are generally focused on older consoles.
Delta, Consoles, Provenance, PPSSPP, and RetroArch are recommended emulators. Delta/Provenance both offer a very low-resistance, native iOS experience at no charge. The PPSSPP core powers iOS emulation, but the dedicated app exposes the most features and makes configuring the advanced graphical options exceptionally easy. RetroArch is the most popular and powerful front end for LibRetro.
- AdBoy - App Store
- ArcEmu - App Store
- Consoles - App Store
- Delta - App Store, Official website
- iGBA - App Store
- eNES - App Store
- Folium - App Store
- Gamma - App Store, Official website
- LinkingBoy - App Store
- Nin10 - App Store
- PPSSPP - App Store, Official website
- Provenance - App Store, Official website
- RetroArch - App Store, Official website
- RetroMan - App Store
- SameBoy - App Store, Official Website
- Super16bit - App Store
- UNDS - App Store
- Xone - removed from app store
- YabaSanshiro2 - App Store (full version), App Store (lite),
Side Loaded Emulators
There are several emulators that exist outside of the Apple App Store due to the policies Apple imposes, chiefly around the usage of JIT runtimes. The author responsible for porting DolphiniOS has a short blog post that explains the state of JIT and iOS in more depth.
The current roster of non-App Store iOS apps are:
- DolphiniOS - GameCube / Wii - official website
- Flycast - Builds Store, Github
- Ignited - Official Website, GitHub
- MelonX - Switch - official website
- Play! - Playstation 2 (PS2) - official website
- Provenance - Multi-console - official website - Also offers a version with JIT support
iOS / iPadOS Emulator Compatibility Table
The table below shows which consoles are supported by each emulator available on iOS/iPadOS. This can help you quickly determine which emulator to use based on the systems you want to play.
Multi-console
Multi-console emulators are largely LibRetro front-ends that expose varying degrees of support and options.
| Console | RetroArch | Delta | Folium | Consoles | Ignited | Provenance | Sideloaded Only |
|---|---|---|---|---|---|---|---|
| Nintendo (NES) | ✓ | ✓ | ✓ | ✓ | ✓ | ✓ | ✗ |
| Super Nintendo (SNES) | ✓ | ✓ | ✓ | ✓ | ✓ | ✓ | ✗ |
| Nintendo 64 (N64) | ✓ | ✓ | ✗ | ✗ | ✓ | ✓ | ✗ |
| Nintendo DS | ✓ | ✓ | ✓ | ✗ | ✓ | ✓ | ✗ |
| Nintendo 3DS | ✗ | ✗ | ✓ | ✗ | ✗ | ✓ | ✗ |
| GameCube / Wii | ✗ | ✗ | ✗ | ✗ | ✗ | ✗ | DolphiniOS |
| Nintendo Switch | ✗ | ✗ | ✗ | ✗ | ✗ | ✗ | MelonX |
| Game Boy | ✓ | ✓ | ✗ | ✓ | ✓ | ✓ | ✗ |
| Game Boy Color | ✓ | ✓ | ✗ | ✓ | ✓ | ✓ | ✗ |
| Game Boy Advance | ✓ | ✓ | ✓ | ✓ | ✓ | ✓ | ✗ |
| Virtual Boy | ✓ | ✗ | ✗ | ✓ | ✗ | ✓ | ✗ |
| PlayStation (PS1) | ✓ | ✗ | ✓ | ✗ | ✗ | ✓ | ✗ |
| PlayStation 2 (PS2) | ✗ | ✗ | ✗ | ✗ | ✗ | ✗ | Play! |
| PlayStation Portable (PSP) | ✓ | ✗ | ✗ | ✗ | ✗ | ✓ | ✗ |
| Sega Master System | ✓ | ✗ | ✗ | ✗ | ✗ | ✓ | ✗ |
| Sega Genesis/Mega Drive | ✓ | ✗ | ✗ | ✓ | ✓ | ✓ | ✗ |
| Sega CD | ✓ | ✗ | ✗ | ✗ | ✗ | ✓ | ✗ |
| Sega Saturn | ✓ | ✗ | ✗ | ✗ | ✗ | ✓ | ✗ |
| Sega Dreamcast | ✗ | ✗ | ✗ | ✗ | ✗ | ✗ | Flycast |
| Sega Game Gear | ✓ | ✗ | ✗ | ✓ | ✓ | ✓ | ✗ |
| Sega SG-1000 | ✓ | ✗ | ✗ | ✗ | ✗ | ✓ | ✗ |
| TurboGrafx-16/PC Engine | ✓ | ✗ | ✗ | ✗ | ✗ | ✓ | ✗ |
| TurboGrafx-CD/PC Engine CD | ✓ | ✗ | ✗ | ✓ | ✗ | ✓ | ✗ |
| NeoGeo Pocket/Color | ✓ | ✗ | ✗ | ✓ | ✗ | ✓ | ✗ |
| WonderSwan | ✓ | ✗ | ✗ | ✓ | ✗ | ✓ | ✗ |
| Arcade (MAME/FBA) | ✓ | ✗ | ✗ | ✗ | ✗ | ✓ | ✗ |
| Atari 2600 | ✓ | ✗ | ✗ | ✓ | ✗ | ✓ | ✗ |
| Atari Lynx | ✓ | ✗ | ✗ | ✓ | ✗ | ✓ | ✗ |
| 3DO | ✓ | ✗ | ✗ | ✗ | ✗ | ✓ | ✗ |
| Intellivision | ✓ | ✗ | ✗ | ✗ | ✗ | ✓ | ✗ |
Notes:
- ✓ = Supported in App Store version
- ✗ = Not supported
- Sideloaded = Requires installation outside the App Store using AltStore or similar methods
- RetroArch supports many additional systems not listed, including various computer platforms (Commodore 64, Amiga, DOS) and more arcade systems
- Provenance may support additional systems in its sideloaded version with JIT support
- Emulation quality can vary significantly between emulators for the same platform
- The Consoles app has announced future updates that will add support for Nintendo DS, Sega Master System, Sega CD, Sega Saturn, SG-1000, 3DO, and Intellivision
- 3DS support for Provnance may still be only in the side loaded version
Single / Limited Console
There are a plethora of NES or Gameboy targetted emulators to choose from.
| Console | AdBoy | ArcEmu | iGBA | eNES | Gamma | LinkingBoy | Nin10 | PPSSPP | Retroman | SameBoy | Super16bit | YabaSanshiro2 |
|---|---|---|---|---|---|---|---|---|---|---|---|---|
| Nintendo (NES) | ✓ | ✓ | ✗ | ✓ | ✗ | ✗ | ✓ | ✗ | ✓ | ✗ | ✗ | ✗ |
| Super Nintendo (SNES) | ✗ | ✗ | ✗ | ✗ | ✗ | ✗ | ✓ | ✗ | ✗ | ✗ | ✓ | ✗ |
| Nintendo DS | ✓ | ✗ | ✗ | ✗ | ✗ | ✗ | ✗ | ✗ | ✗ | ✗ | ✗ | ✗ |
| Game Boy | ✓ | ✓ | ✓ | ✗ | ✗ | ✗ | ✓ | ✗ | ✓ | ✓ | ✗ | ✗ |
| Game Boy Color | ✓ | ✓ | ✓ | ✗ | ✗ | ✗ | ✓ | ✗ | ✗ | ✓ | ✗ | ✗ |
| Game Boy Advance | ✓ | ✓ | ✓ | ✗ | ✗ | ✓ | ✗ | ✗ | ✗ | ✗ | ✗ | ✗ |
| PlayStation (PS1) | ✗ | ✗ | ✗ | ✗ | ✓ | ✗ | ✗ | ✗ | ✗ | ✗ | ✗ | ✗ |
| PlayStation Portable (PSP) | ✗ | ✗ | ✗ | ✗ | ✗ | ✗ | ✗ | ✓ | ✗ | ✗ | ✗ | ✗ |
| Sega Genesis/Mega Drive | ✓ | ✗ | ✗ | ✗ | ✗ | ✗ | ✗ | ✗ | ✗ | ✗ | ✗ | ✗ |
| Sega Saturn | ✗ | ✗ | ✗ | ✗ | ✗ | ✗ | ✗ | ✗ | ✗ | ✗ | ✗ | ✓ |
Notes:
- ✓ = Supported in App Store version
- ✗ = Not supported
Supported OSes and Pricing Chart
All side-loaded emulators are currently free. Mac versions of side-loaded emulators do not require side-loading. Not listed Mac emulators include PCSX2, and RPSC3.
| Emulator | macOS | iOS | iPadOS | watchOS | tvOS | visionOS | Pricing |
|---|---|---|---|---|---|---|---|
| AdBoy | ✓ | ✓ | ✓ | ✗ | ✗ | ✗ | 🟢 |
| ArcEmu | ✓ | ✓ | ✓ | ✓ | ✗ | ✗ | 💰 |
| Consoles | ✓ | ✓ | ✓ | ✗ | ✓ | ✓ | 💰 |
| Delta | ✗ | ✓ | ✓ | ✗ | ✗ | ✗ | 🛍️ |
| iGBA | ✓ | ✓ | ✓ | ✗ | ✗ | ✗ | 🛍️ |
| eNES | ✓ | ✓ | ✓ | ✗ | ✗ | ✗ | 🛍️ |
| Folium | ✓ | ✓ | ✓ | ✗ | ✗ | ✗ | 💰 |
| Gamma | ✓ | ✓ | ✓ | ✗ | ✗ | ✗ | 🛍️ |
| LinkingBoy | ✗ | ✓ | ✓ | ✗ | ✗ | ✗ | 🛍️ |
| NiN10 | ✓ | ✓ | ✓ | ✓ | ✗ | ✗ | 💰 |
| PPSSPP | ✓ | ✓ | ✓ | ✗ | ✗ | ✗ | 🟡 |
| Provenance | ✓ | ✓ | ✓ | ✗ | ✗ | ✗ | 🛍️ |
| RetroArch | ✓ | ✓ | ✓ | ✗ | ✓ | ✓ | 🟢 |
| Retroman | ✗ | ✓ | ✓ | ✗ | ✗ | ✗ | 💰 |
| SameBoy | ✗ | ✓ | ✓ | ✓ | ✗ | ✗ | 🛍️ |
| Super16bit | ✓ | ✓ | ✓ | ✗ | ✗ | ✗ | 🟢 |
| UNDS | ✗ | ✓ | ✗ | ✗ | ✗ | ✗ | 🛍️ |
| Yaba Sanshiro 2 | ✓ | ✓ | ✓ | ✗ | ✗ | ✗ | 💰 |
- 💰 = Requires Purchase
- 🛍️ = Offers In-App Purchase(s)
- 🟢 = Free
- 🟡 = Free. Completely optional purchase. Mac App is not in App Store.
Delta
Links: App Store, Official website
Delta is a multi-emulator that supports a wide range of consoles, including the Nintendo Entertainment System (NES), Super Nintendo Entertainment System (SNES), Nintendo 64 (N64), Nintendo DS, Game Boy, Game Boy Color, and Game Boy Advance and provides a very-iOS native experience for its UI making it the easiest to use emulator in this list. It is free on the App Store. It's a minimalist emulator that focuses on ease-of-use above customization and seems entirely focused on Nintendo consoles.
Adding ROMs
Transfer ROMs to your iPhone; from the main screen, click the + menu and locate your ROMs. Delta will automatically sort them between the supported consoles
Save States
In Delta, save states are triggered by clicking the menu button during gameplay. This will allow you to bring up the load state or save state menus. When saving a state, click the save state option and then click the + button to save a new state. Loading states is even easier; just tap Load State from the menu, locate the save you'd like to load, and tap it. Your game will resume in the exact place depicted in the screenshot.
Optional Nintendo DS BIOS
Delta uses the MelonDS core, which uses, by default, reversed-engineered open-BIOS and does not require Nintendo DS BIOS to function. However, there may be extreme edge cases where this might cause minor issues (likely saving games). You can provide your own BIOS files by transferring the three required files to your iPhone. In Settings, locate Core Settings and tap the Nintendo DS. You'll need to provide a bios7.bin, a bios9.bin and thefirmware.bin. Tap and link them.
Nintendo (NES) Games not loading
If you have a problem loading NES cores, quit the emulator and relaunch it. Swipe to your NES collection. Long press and hold on to a game to bring up a preview. You should see the game running in a preview. From there, tap open. NES games should be playable
Folium
Links: App Store, official website

Folium is another multi-console emulator which can emulate - Game Boy Advance, Nintendo DS, Nintendo Entertainment System, Super Nintendo Entertainment System, PlayStation 1, and most interestingly, the Nintendo 3DS. It is a paid app, costing $4.99, and has mixed reviews. It supports optional JIT hook-ins for 3DS emulation performance enhancements.
The emulation author has chosen to obfuscate some of the emulation cores and what services they are providing, making it a bit... odd. The developer is active on r/EmulationOniOS
Adding ROMs
TBA
Save States
TBA
Optional BIOS
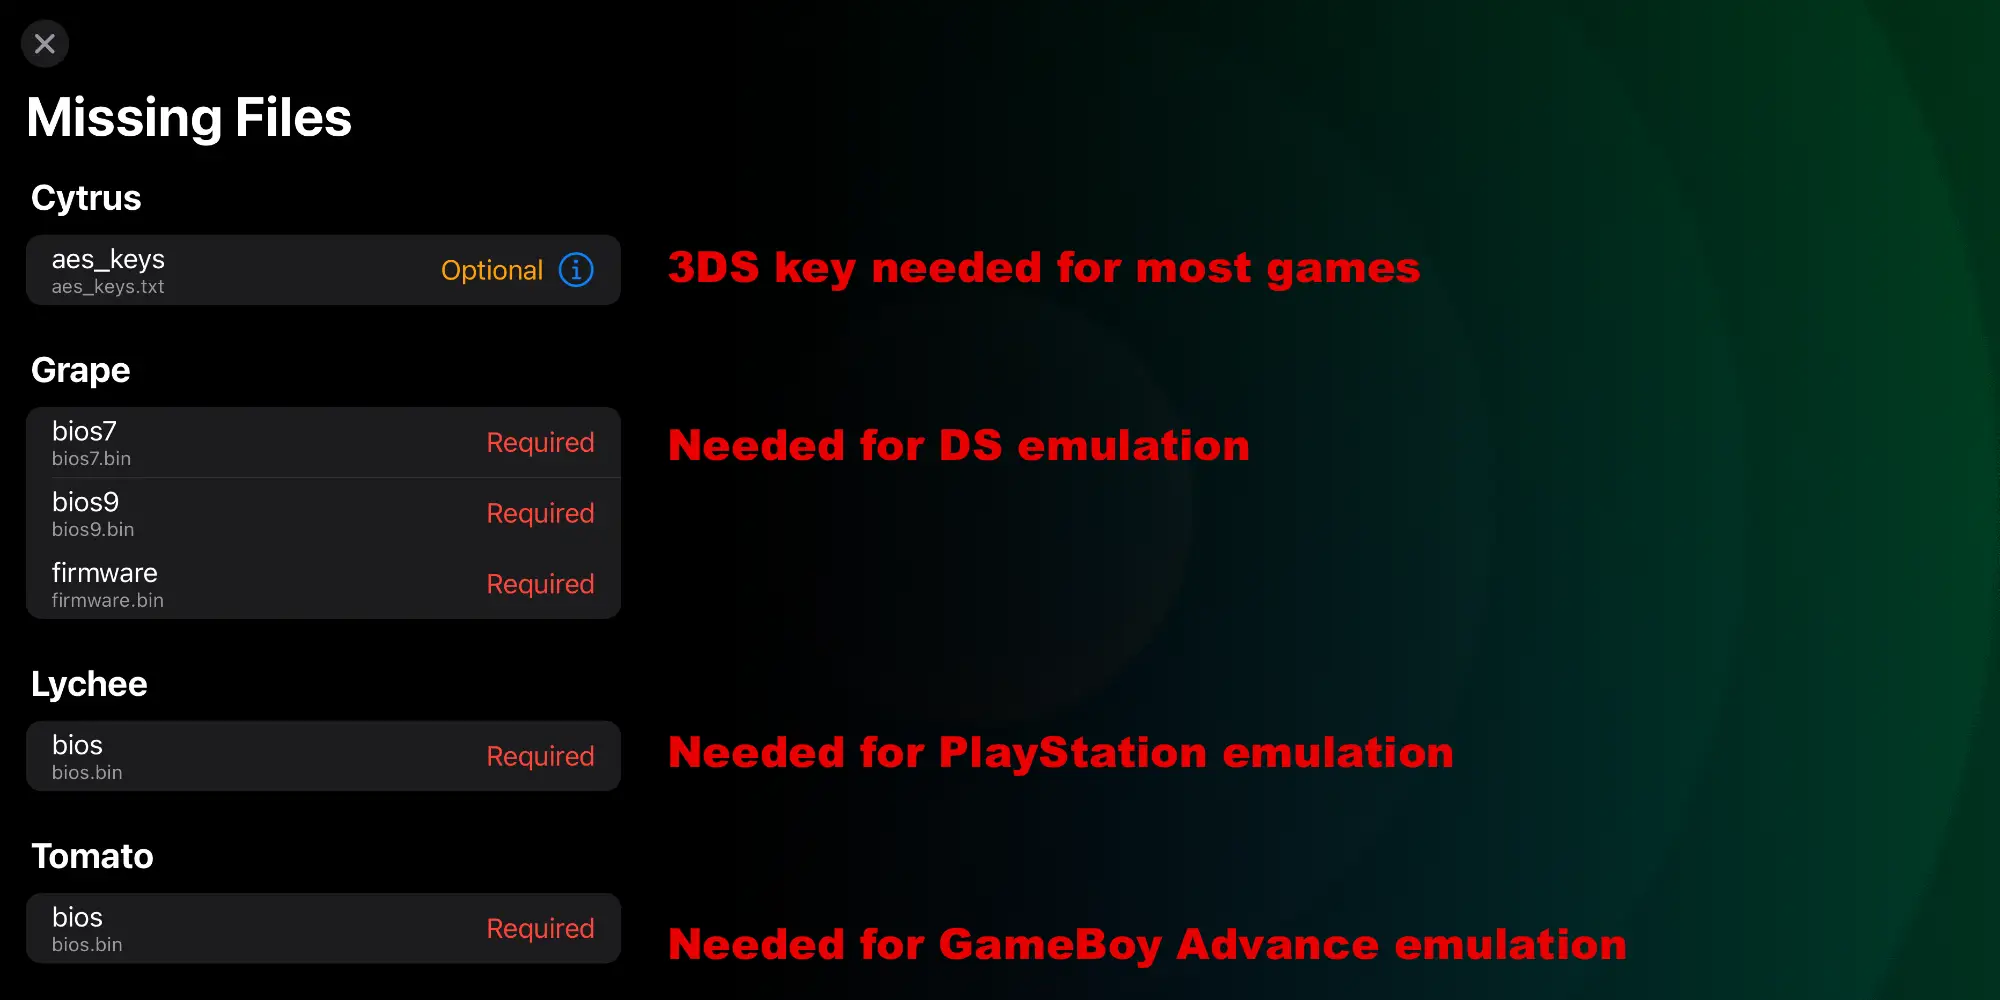
Under Folium's settings is a "missing files". These are the BIOS files that are required for certain emulation cores.
Cytrus - AES keys (3DS)
AES (Advanced Encryption Standard) keys for the 3DS are cryptographic keys that Nintendo uses to encrypt various system files, game data, and content on the Nintendo 3DS platform. These keys are essential for decryption and proper handling of 3DS content in emulators. Cytrus is a relatively new emulation core. In order to play encrypted content, which most games are, you'll need to provide an AES Key.
Grape - Nintendo DS emulation
The Nintendo DS requires three bios files, the bios7.bin, bios9.bin and firmware.bin. This is based on the NooDS core.
The author recommends placing the cores in Grape/sysdata, although the application allows for linking.
Lychee - PlayStation 1
PlayStation 1 emulation requires a BIOS file. There are many options, such as scph5500.bin. The Emulation core is currently unknown.
Tomato - Game Boy Advance
The GameBoy Advance requires a bios.bin. The Emulation core is currently unknown.
Consoles
Links: App Store, Official website

Information coming soon.
Gamma
Links: App Store, Official website
Gamma is a semi-paid emulator that offers an advertisement-supported free tier. It has received criticism as it collects some personal data (almost certainly for the advertisements). It is a reasonable one-time $5 purchase and is continually being improved.
Adding ROMs
Transfer ROMs to your iPhone; from the main screen, click the + menu and locate your ROMs. Gamma supports bin/cues and ISOs. The paid version will support compressed files but seems only auto-decompress them.
Save States
In Delta, save states are triggered by clicking the menu button during gameplay. This will allow you to bring up the load state or save state menus. When saving a state, click the save state option and then click the + button to save a new state. Loading states is even easier. Just tap Load State from the menu, locate the save you'd like to load, and tap it. Your game will resume in the exact place depicted in the screenshot.
Optional BIOS
Gamma uses the PCSX-ReARMed core, which uses, by default, reversed-engineered open-BIOS and does not require a BIOS to function. However, there may be extreme edge cases where this might cause minor issues (likely saving games). You can provide your own BIOS files by transferring a BIOS file to your iPhone. In Settings, locate Core Settings and tap the PlayStation. You must provide a bios.bin file. Tap and link them. It does not need to be named bios.bin
PPSSPP
Links: App Store, App Store (Gold), Official website

PPSSPP is the gold standard for emulation experience as it cannot only play PPSSPP games but also enhance them beyond the original console's ability. Modern iPhones have enough horsepower to greatly enhance the graphics output of the PPSSPP titles.
Adding ROMs
Transfer ROMs to your iPhone; from the main screen, click the refresh menu and locate your ROMs. PPSSPP supports .iso, .cso, .pbp, and .chd.
Save States
In PPSSPP, save states are triggered by clicking the menu button or tapping the screen to bring up touch controls. This will allow you to bring up the load state or save state menus.
Graphics Options
Rendering Mode
- Backend: Determines the graphics API used for rendering; different backends may offer varying performance and compatibility on your device.
- Rendering Resolutions: Controls the internal resolution at which games are rendered; higher values provide sharper visuals but require more processing power.
- Software Rendering (Slow accurate): Uses CPU instead of GPU for rendering, providing better compatibility for problematic games at the cost of significantly lower performance.
- Display Layout and Effects: Controls how the game is displayed on the screen and allows the application of visual effects like shaders or filters.
Framerate Control
- Frame skipping: Skips rendering certain frames to maintain game speed on slower hardware; helps performance but may cause visual stuttering.
- Frame Skipping Type: Determines the method used when skipping frames, affecting how smoothly animations appear during performance optimization.
- Auto frameskip: Automatically adjusts frame skipping based on current performance to maintain target speed; provides dynamic optimization without manual adjustment.
- Alternative speed (in %, 0 - unlimited): Allows custom adjustment of emulation speed as a percentage of normal; useful for speed runs or slowing down challenging sections.
- Alternative speed 2 (in %, 0 - unlimited): Provides a second preset speed option that can be quickly toggled; convenient for switching between different emulation speeds.
Speed Hacks (Can cause rendering errors!)
- Skip buffer effects: Bypasses certain visual effects that require buffer operations; improves performance but may cause visual glitches in some games.
- Disable Culling: Turns off the removal of non-visible polygons; can fix broken visuals in some games but may reduce performance.
- Skip GPU readbacks: Prevents the GPU from sending data back to the CPU; can significantly improve performance but may cause graphical issues or crashes.
- Lazy texture caching (speedup): Delays texture loading until absolutely necessary; reduces memory usage and improves performance but may cause brief texture pop-in.
- Spine/bezier curves quality: Controls the precision of curved surface rendering; lower values improve performance, while higher values enhance the visual quality of curved objects.
Performance
- Render duplicate frames to 60 Hz: Repeats frames as needed to maintain smooth 60Hz output even when the game runs at lower framerates; reduces stutter but doesn't affect actual game speed.
- Buffer graphics commands (faster, input lag): Queues up graphics commands for batch processing to improve performance; may introduce slight input delay as a trade-off.
- Hardware Transform: Uses GPU acceleration for geometry transformations instead of CPU; typically provides significant performance gains but may cause visual glitches in some games.
- Hardware Tessellation (greyed out): Would use GPU to generate additional geometric detail on surfaces; currently unavailable on iOS devices.
Texture Scaling
- Upscale Type: Determines the algorithm used to enhance texture quality; different methods offer varying balances between quality and performance.
- Upscale Level: Controls how much textures are enhanced in resolution; higher values provide sharper textures but require more processing power and memory.
- Deposterize: Reduces the banding effect in textures that have limited color gradients; smooths out color transitions but may slightly blur sharp edges.
- Texture Shader (Greyed out): Would apply custom effects to textures; currently unavailable on iOS devices.
Hack Settings (May cause glitches)
- Lower resolution for effects (reduces artifacts): Renders certain visual effects at a lower resolution than the main game can improve performance and reduce visual artifacts in some games.
Provenance
Links: App Store, Official website
Provenance is one of the oldest iOS emulators, going back to jailbreaking days, going back at least to 2016. Provenance is a much more 'iOSified' front end of libretro, supporting roughly the same set of cores as RetroArch. Due to its history in iOS emulation, it has a strong user base.
Adding ROMs
Provenance has the ability to use a Web Server UI, akin to older iOS applications like GoodReader and Airdrop. Provenance's official website has a guide on how to use this feature. It works by creating a temporary web server that is accessible via HTTP (Web browser) on your local network and offers a simple upload solution.
Web Server
Make sure your device's WiFi is turned on and connected to the same network as your computer.
In Provenance: Turn on the Web Server:
Select the
+button in the Game Library, or…In Settings, select the
Import/Exportoption.)
Web Server Active. Make note of the
[device-ip]Access from a web browser, Web UI :
http://[device-ip]WebDAV:
http://[device-ip]:81
AirDrop
- Open the AirDrop window via macOS Finder.
- Drag & Drop file(s) onto yourself/your device.
- Locate and tap Copy to Provenance option. Done
File Sharing
Like other emulators, Provenance supports USB transfer. The ROMs go into Documents/Import
Save States
Press the menu button while playing a game. Choose the Save States option. From here, you can press the + button to create a new save state. You can also tap on an existing save state and choose to overwrite that state with a new one. This cannot be undone, so be sure that you back up the save state before doing this if you wish to keep it.
To load from an existing save state, press the menu button after loading a ROM. Here, you will find all of the save states you've manually created, as well as the automatic states. Tapping on a save state will present a menu allowing you to load the state.
Optional BIOS
Provenance uses the libretro cores, which require BIOS files for certain systems. These are the BIOS files required for certain systems:
- Atari 5200 -
5200.rom - Atari Lynx -
lynxboot.img - CBS ColecoVision -
coleco.rom - Nintendo Famicom Disk System -
disksys.rom - Nintendo Game Boy Advance -
gba_bios.binOptional! - NEC PC Engine Super CD-ROM² System / TurboGrafx-CD -
syscard3.pce - NEC PC-FX -
pcfx.rom - Palm PalmOS -
bootloader-dbvz.rom+ OS ROMpalmos41-en-m515.rom*,palmos40-en-m500.rom,palmos52-en-t3.rom,palmos60-en-t3.rom
*Only palmos41-en-m515.rom is required - Philips CD-i -
cdimono1.zipMust manually put inRetroArch/system/same_cdi/bios/ - Sega CD -
bios_CD_U.bin,bios_CD_E.bin,bios_CD_J.bin - Sega Saturn -
saturn_bios.bin - Sony PlayStation -
scph5500.bin,scph5501.bin,scph5502.bin - Copy over ROMs - required if you want to play any games
- Copy over BIOS files - required for certain consoles
- Change the User interface - the default interface is designed for touch controls. The XMB interface is much better suited for gamepads
- Update the assets - RetroArch pulls support files for several of its features that are important to update as soon as possible after downloading
- Scan Directory(s) - Add games so RetroArch can list the games
- Configure Cores - this can be done as needed, but it's important to understand the capabilities to enhance emulation
- Shaders - completely optional but can enhance the visual experience
- Enjoy!- At this point you are ready to enjoy your library of games on your iPhone. Be sure to check out features like Save States
- Transfer ROMs to your iPhone
- From the main screen, click the + menu and locate your ROMs. RetroArch supports .zip files.
- Locate the directory your ROMs are in. You'll need to click the directory to bring up the file navigator. Any folders copied into the root of the RetroArch Directory will be in the parent directory.
- Open the folder on your iPhone and select "Scan Directory". Depending on how many ROMs you have, this can take a bit. ROMs will not show up until all directories have been scanned.
- Gameboy Advance -
gba_bios.bin - NeoGeo -
neogeo.zip(Placed in ROMs folder as well) - Nintendo DS -
ios7.bin,bios9.bin,firmware.bin - Sega CD -
bios_CD_E.bin,bios_CD_J.bin,bios_CD_U.bin - Playstation -
scph5501.bin(you can use many different bios) - TurboGraphix-CD -
syscard1.pce,syscard2.pce,syscard3.pce - Update Assets: Downloads graphical interface elements like menu icons, fonts, and background images that enhance RetroArch's visual appearance.
- Update Controller Profiles: Retrieves predefined button mapping configurations for various controllers, making it easier to set up your gamepad without manual configuration.
- Update Cheats: Downloads cheat databases for different games, allowing you to activate classic cheats and modifications like infinite lives or level skips.
- Update Databases: Retrieves game information databases that help RetroArch identify your ROMs, display correct metadata, and enable game-specific optimizations.
- Update Overlays: Downloads on-screen button layouts and visual frames, useful for touchscreen devices or for adding aesthetic borders around your gameplay.
- Update Slang Shaders: Retrieves graphic filters and effects that can enhance visuals by simulating CRT displays, smoothing pixels, or adding various visual enhancements to your games.
- Game Boy / Game Boy Color - Gambatte
- Game Boy Advance - mGBA
- NEC PCEngine / TurboGGraphix-16 / PCEngine-CD / TurboGraphix-CD - Beetle PCE
- NES - Nestopia
- Nintendo DS - Melon DS
- Sega Master / System Genesis (Mega Drive)/ Sega CD - Genesis Plus GX / Genesis Plus GX Widescreen (may not work with all games)
- Sega Saturn - Yabause
- SNES - BSNES / BSNES HD Beta (for Mode 7 Games)
- Playstation - Beetle PSX HW
- Graphics enhancements (resolution scaling, texture filtering)
- Performance adjustments (speed hacks, frame-skipping)
- Audio quality settings
- System-specific features (PGXP for PlayStation, HD Mode 7 for SNES)
- Region options (NTSC/PAL)
- Input latency adjustments
- Scale - 3x (720p) for HD Beta and older phones, 5x (1200p) for BSNES on newer phones
- Perspective Correction - On
- Super Sampling - On
- Internal GPU resolution - 2x or 4x
- Texture filtering - SABR
- MSAA - 2x or 4x or 8x
- PGXP Operation Mode - Memory Only
- PGXP Primitive Culling - On
- PGXP Perspective Correct Texturing - On
- While playing a game, bring up the RetroArch menu
- Navigate to Quick Menu → Shaders
- Enable the Shaders
- Select Load Shader Preset to browse available shader presets
- Choose a shader from the list (e.g., CRT shaders are in the "crt" folder)
- Once loaded, select Apply Changes to see the effect immediately
- From the Shaders menu, select Prepend Shader or Append Shader
- To save your chain, select Save Shader Preset from the Shaders menu
- Scale2x + CRT-Royale (good balance of sharpness and authenticity)
- SABR + Lottes (excellent for 16-bit era games)
- xBRZ + Dot Matrix (perfect for handheld console emulation)
- ScaleFX + CRT-Geom-Deluxe (for a more realistic CRT look)
- Open the Settings app on your iOS device
- Navigate to Privacy & Security
- Scroll to the bottom and tap Developer Mode
- Toggle the Developer Mode switch to ON
- Tap Restart when prompted
- After your device restarts, you'll need to unlock it and confirm that you want to enable Developer Mode
- Your device may need to restart once more
- Signing them yourself
- using a third-party app like AltStore
- Option 1: Signing IPAs and installing them via Xcode. This is best done with the $ 99-a-year Apple account. You do not need a 3rd party place to run a JIT streamer (an external service that funnels the recompiled code to a device).
- Option 2: Sideloading via AltStore or SideStore. This method gets around every seven days resigning requirement that a free developer account has. It also doesn't involve manually creating your own certification. Post iOS17, JIT cannot be enabled on the device. Once the application is installed, you will need to use a VPN to connect to the JIT streamer. There are two main options for JIT streaming:
- JIT Streamer - a popular website that allows users to stream JIT code via the internet to their device.
- SideJITServer - a local server that allows users to stream JIT code via a local network to their device. It must be connected to the server, but private VPNs can achieve this.
- stikjit - a newcomer that promises to allow on-device JIT for iOS 18
- Log into your Apple Developer account.
- Go to the Certificates, Identifiers & Profiles section.
- Click on "Identifiers" in the sidebar.
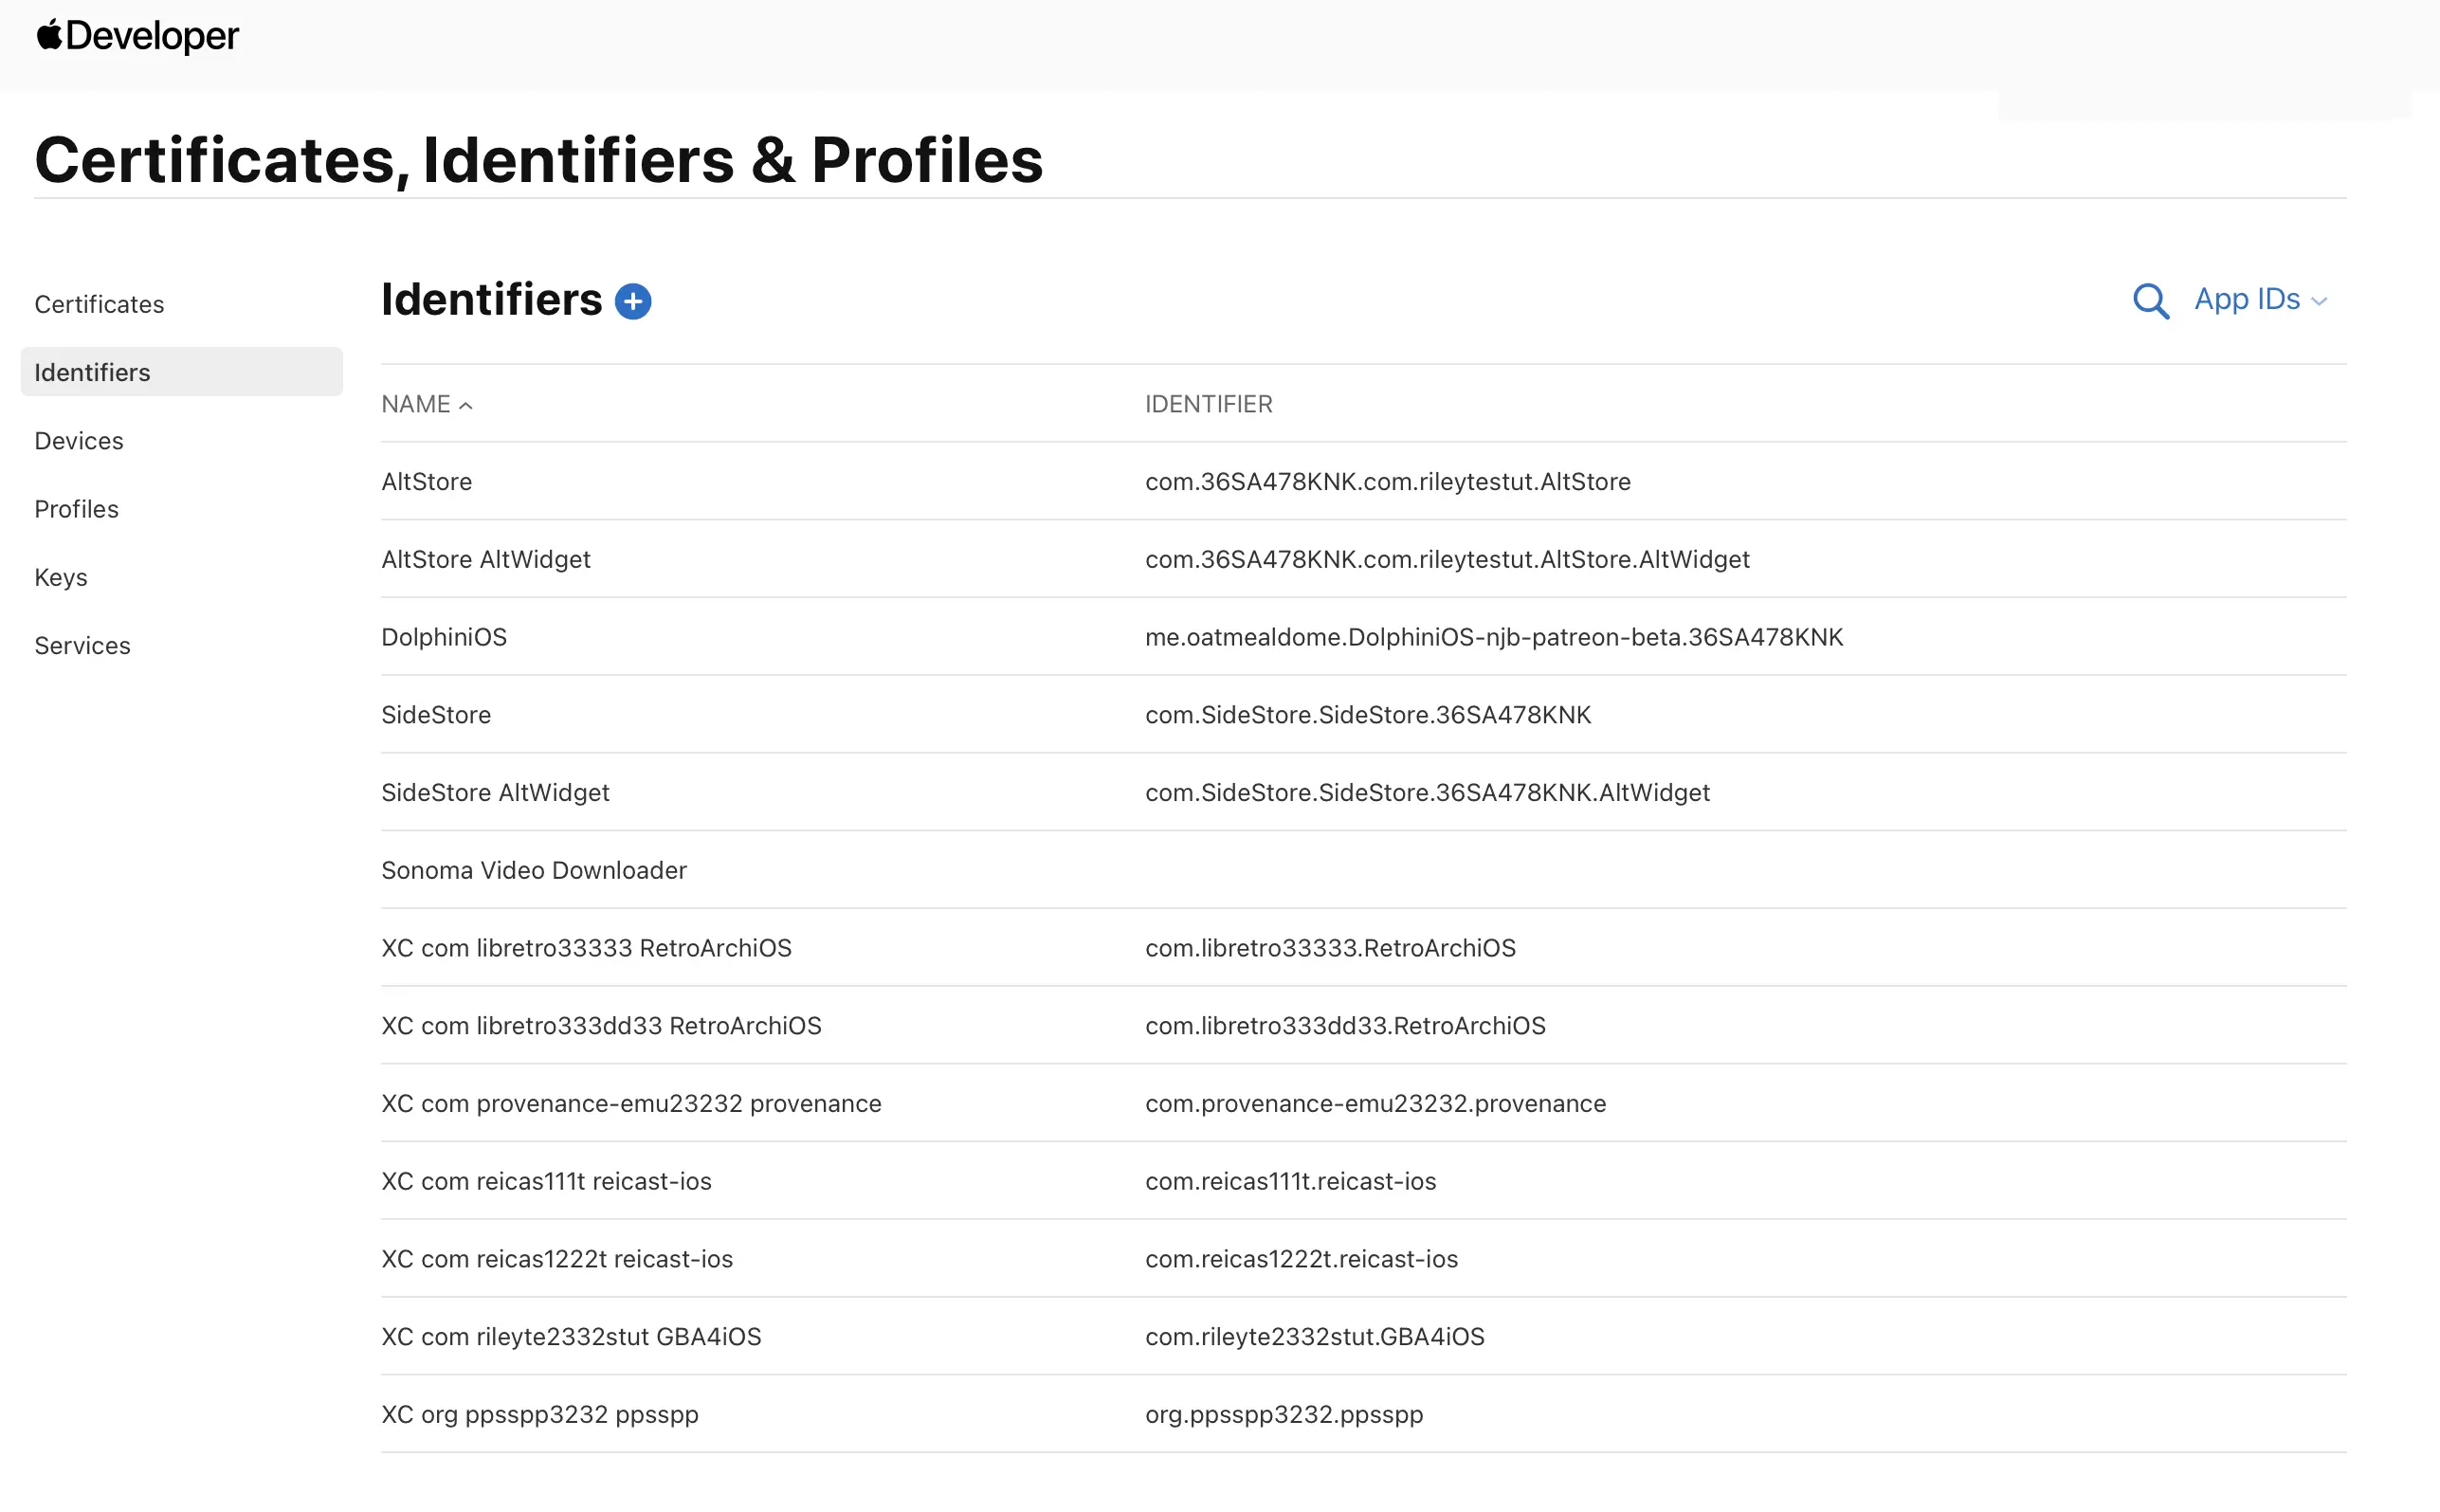
- Click the + Identifiers.
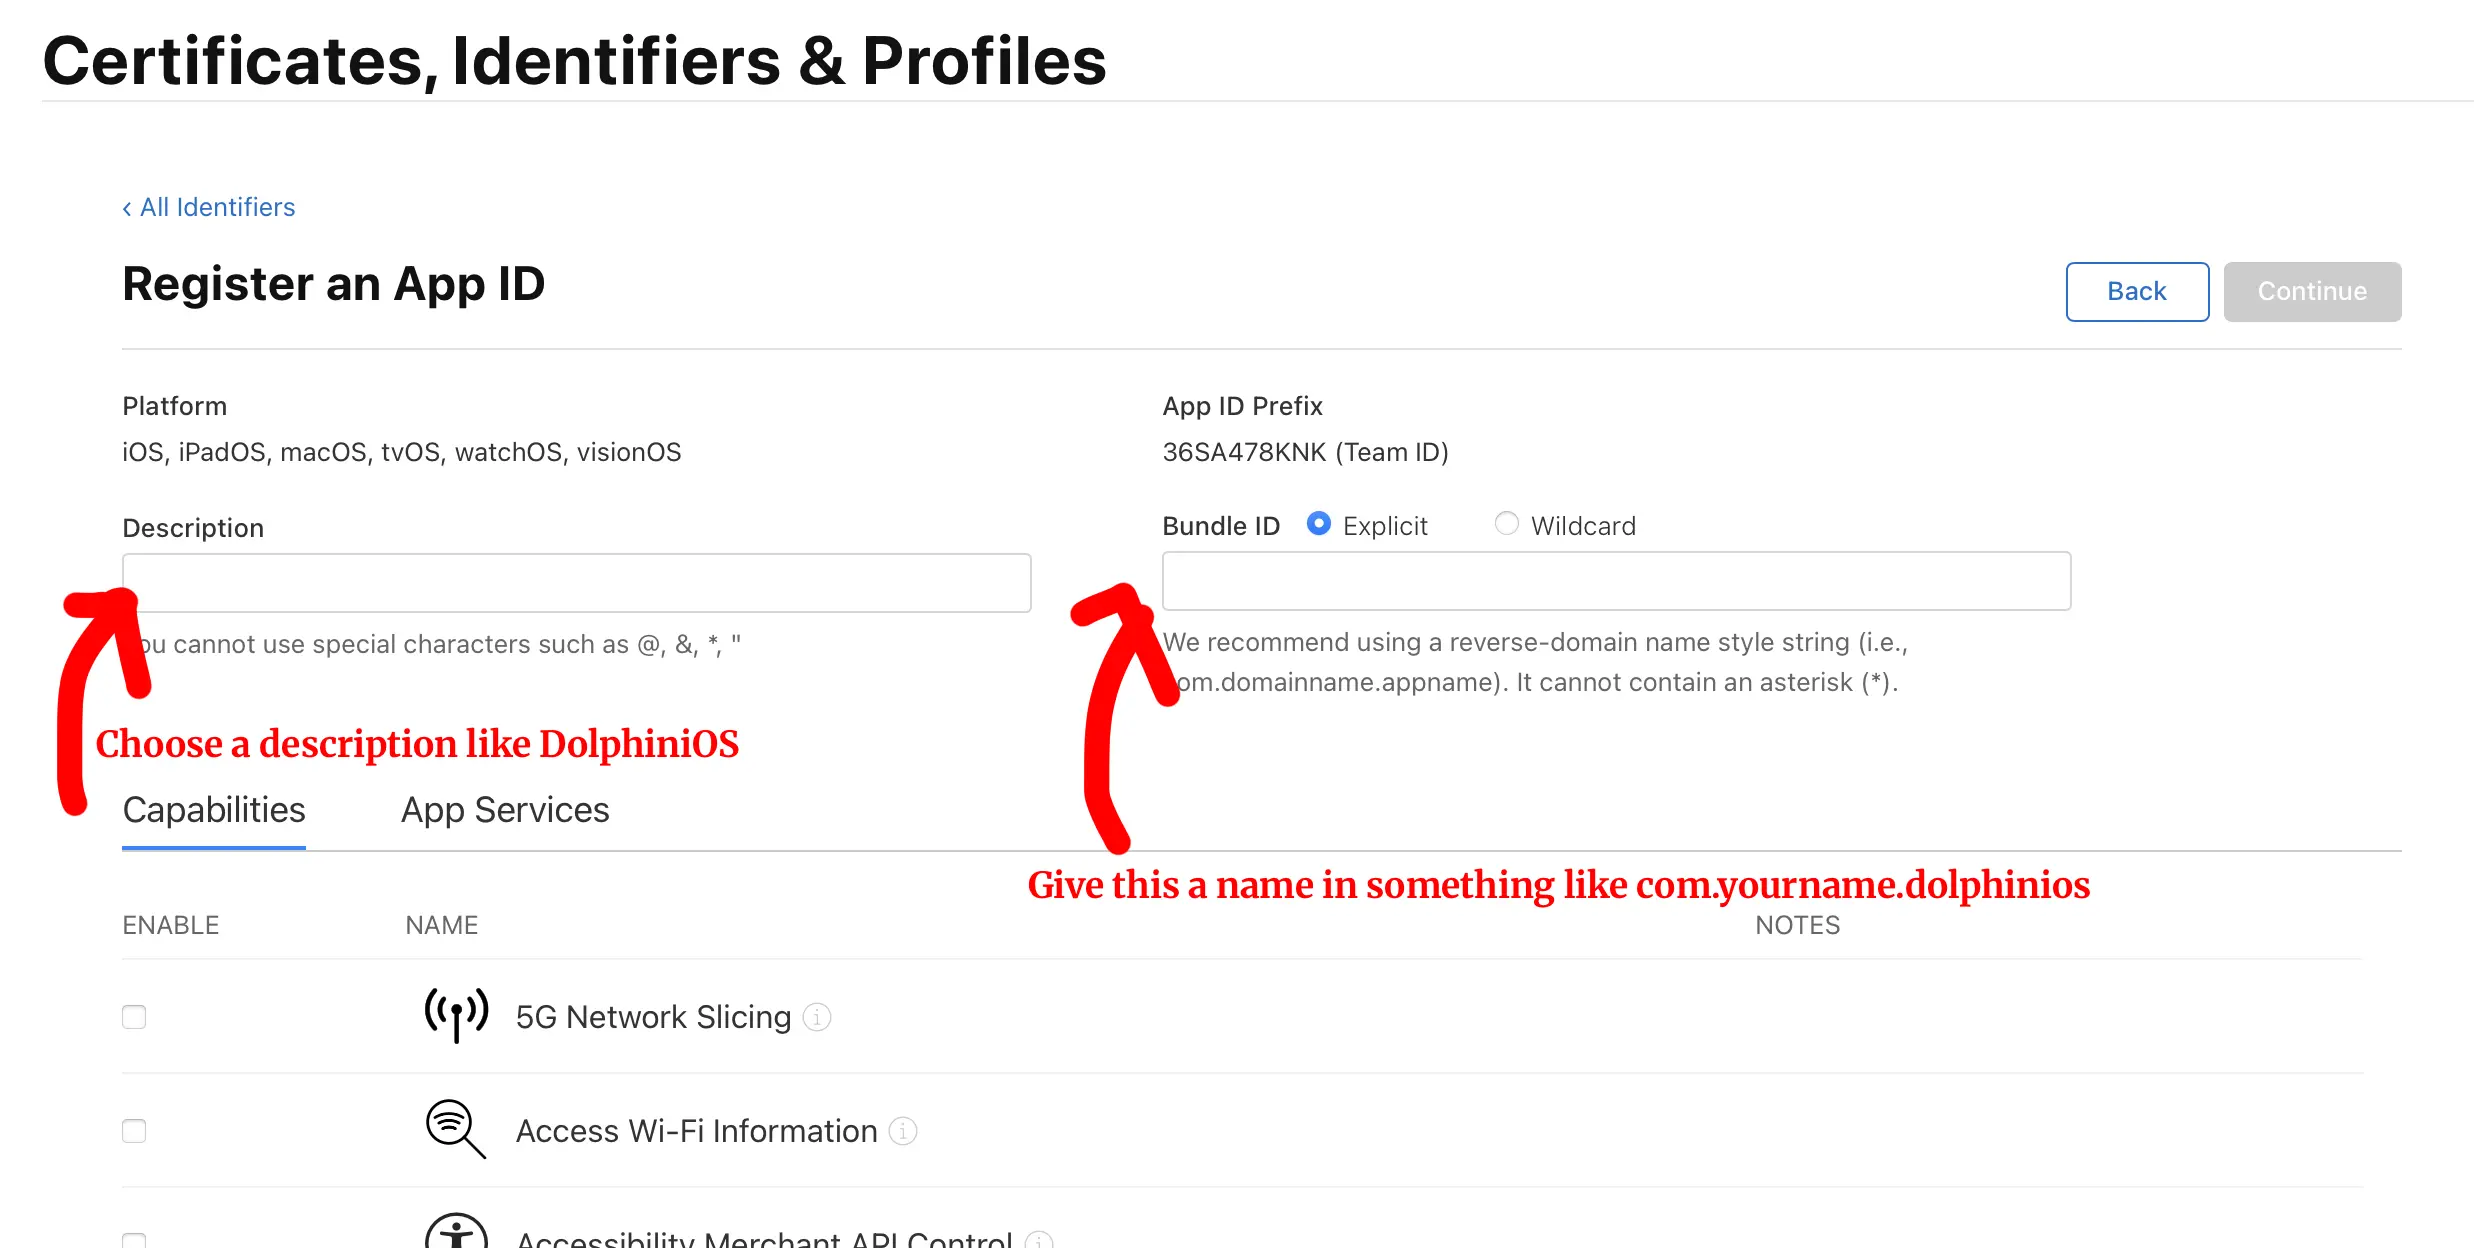
- Give the name of the description something like DolphiniOS and the identifier something like DolphiniOS.
- After the Identifier has been created, go to Provision, click Register New Profile, and select iOS.
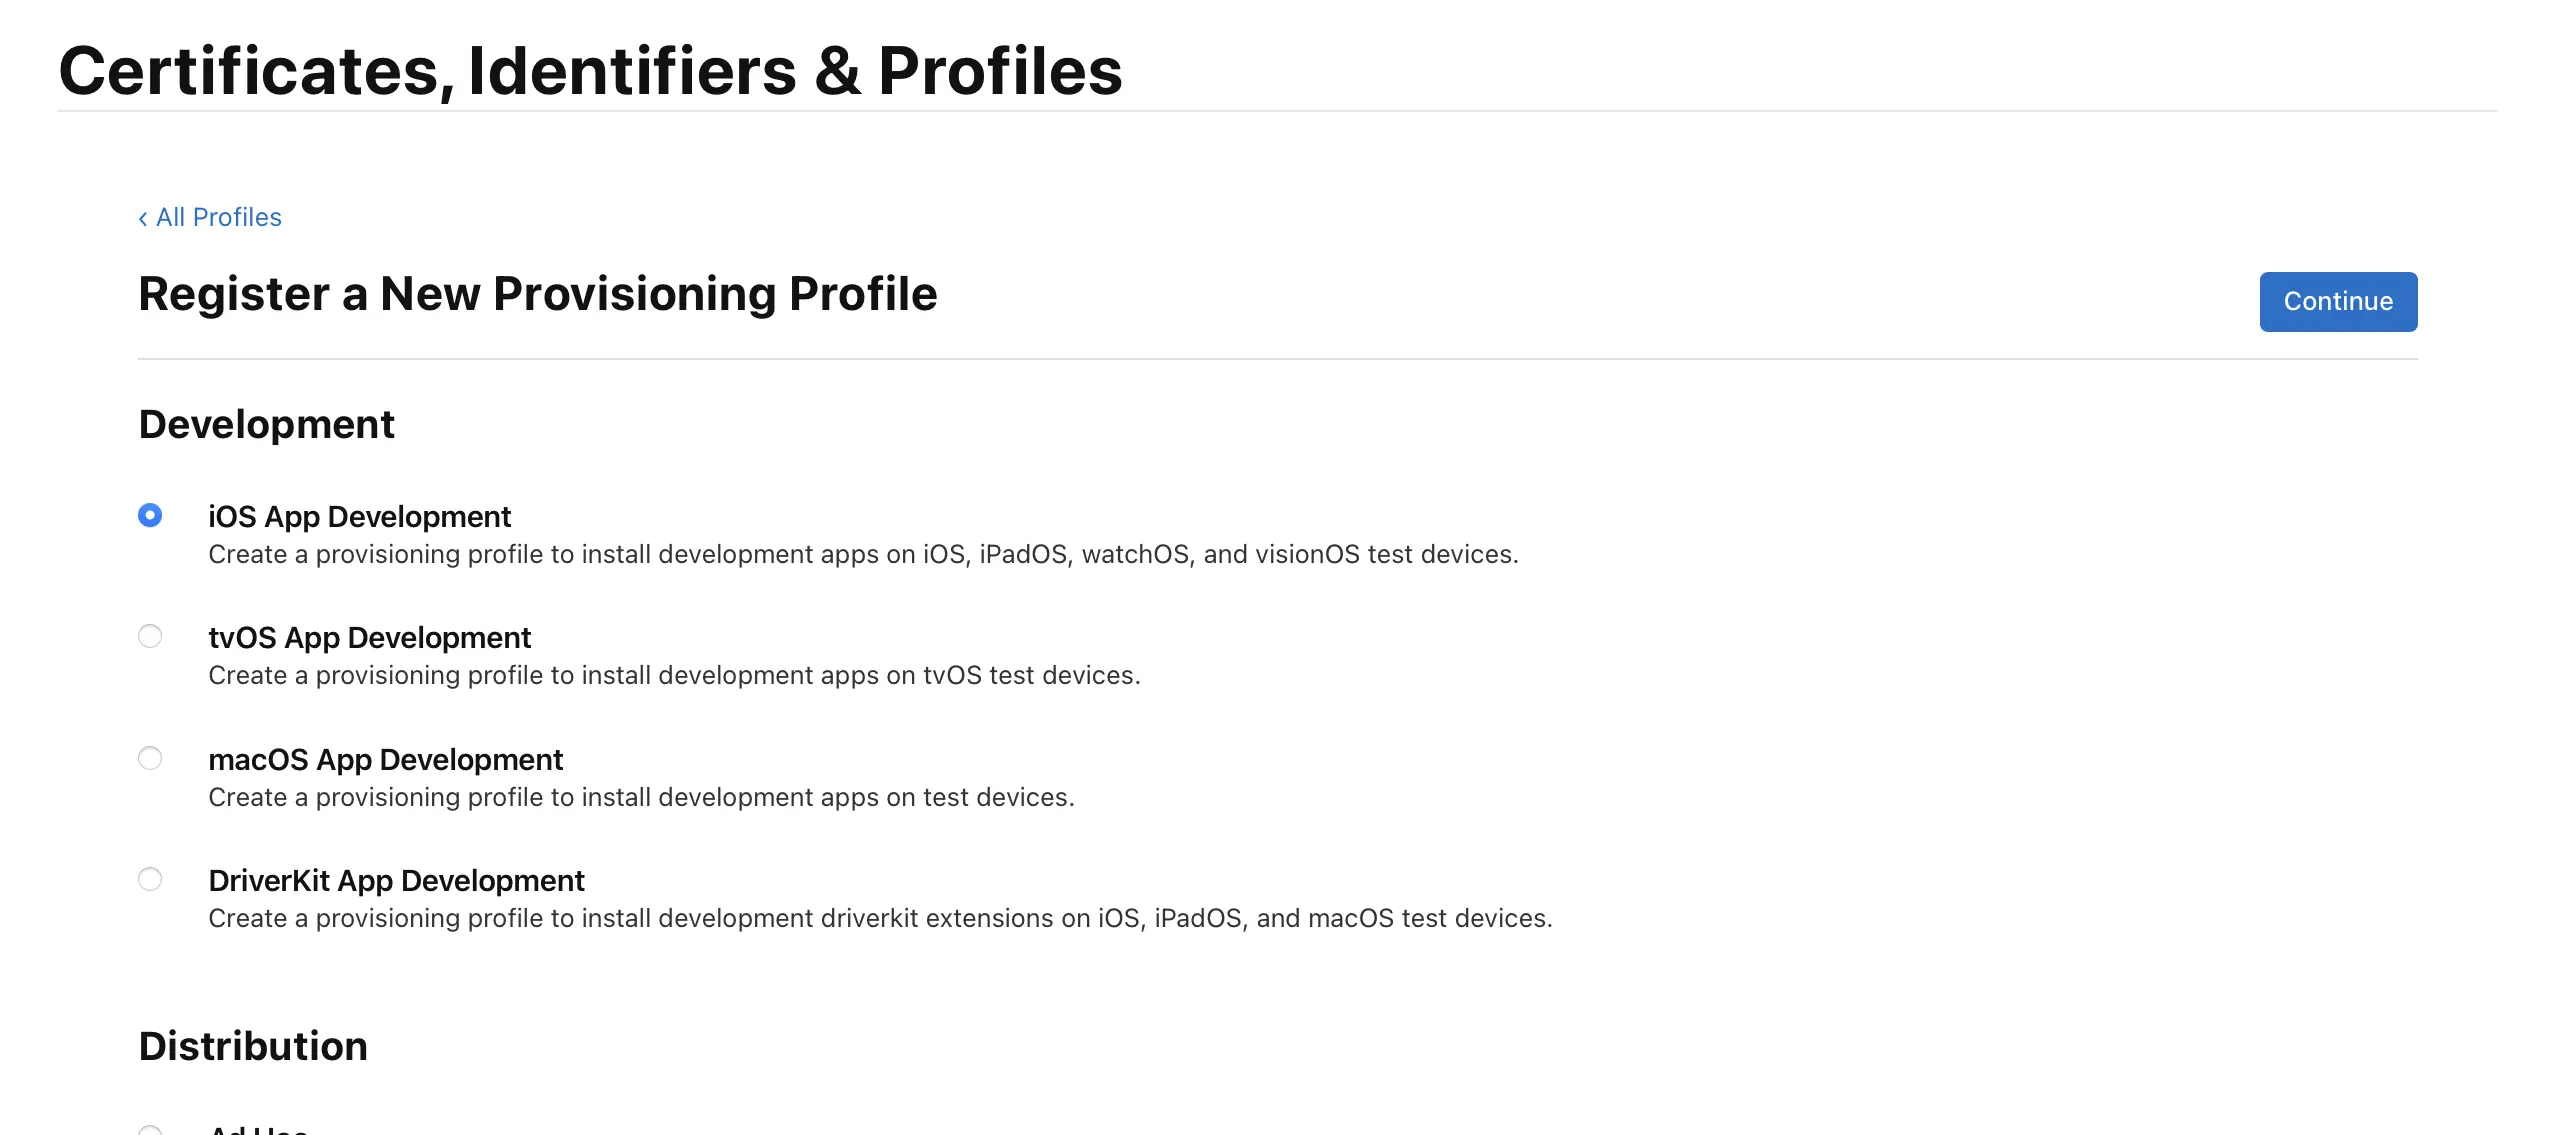
- Select the Identifier we just created
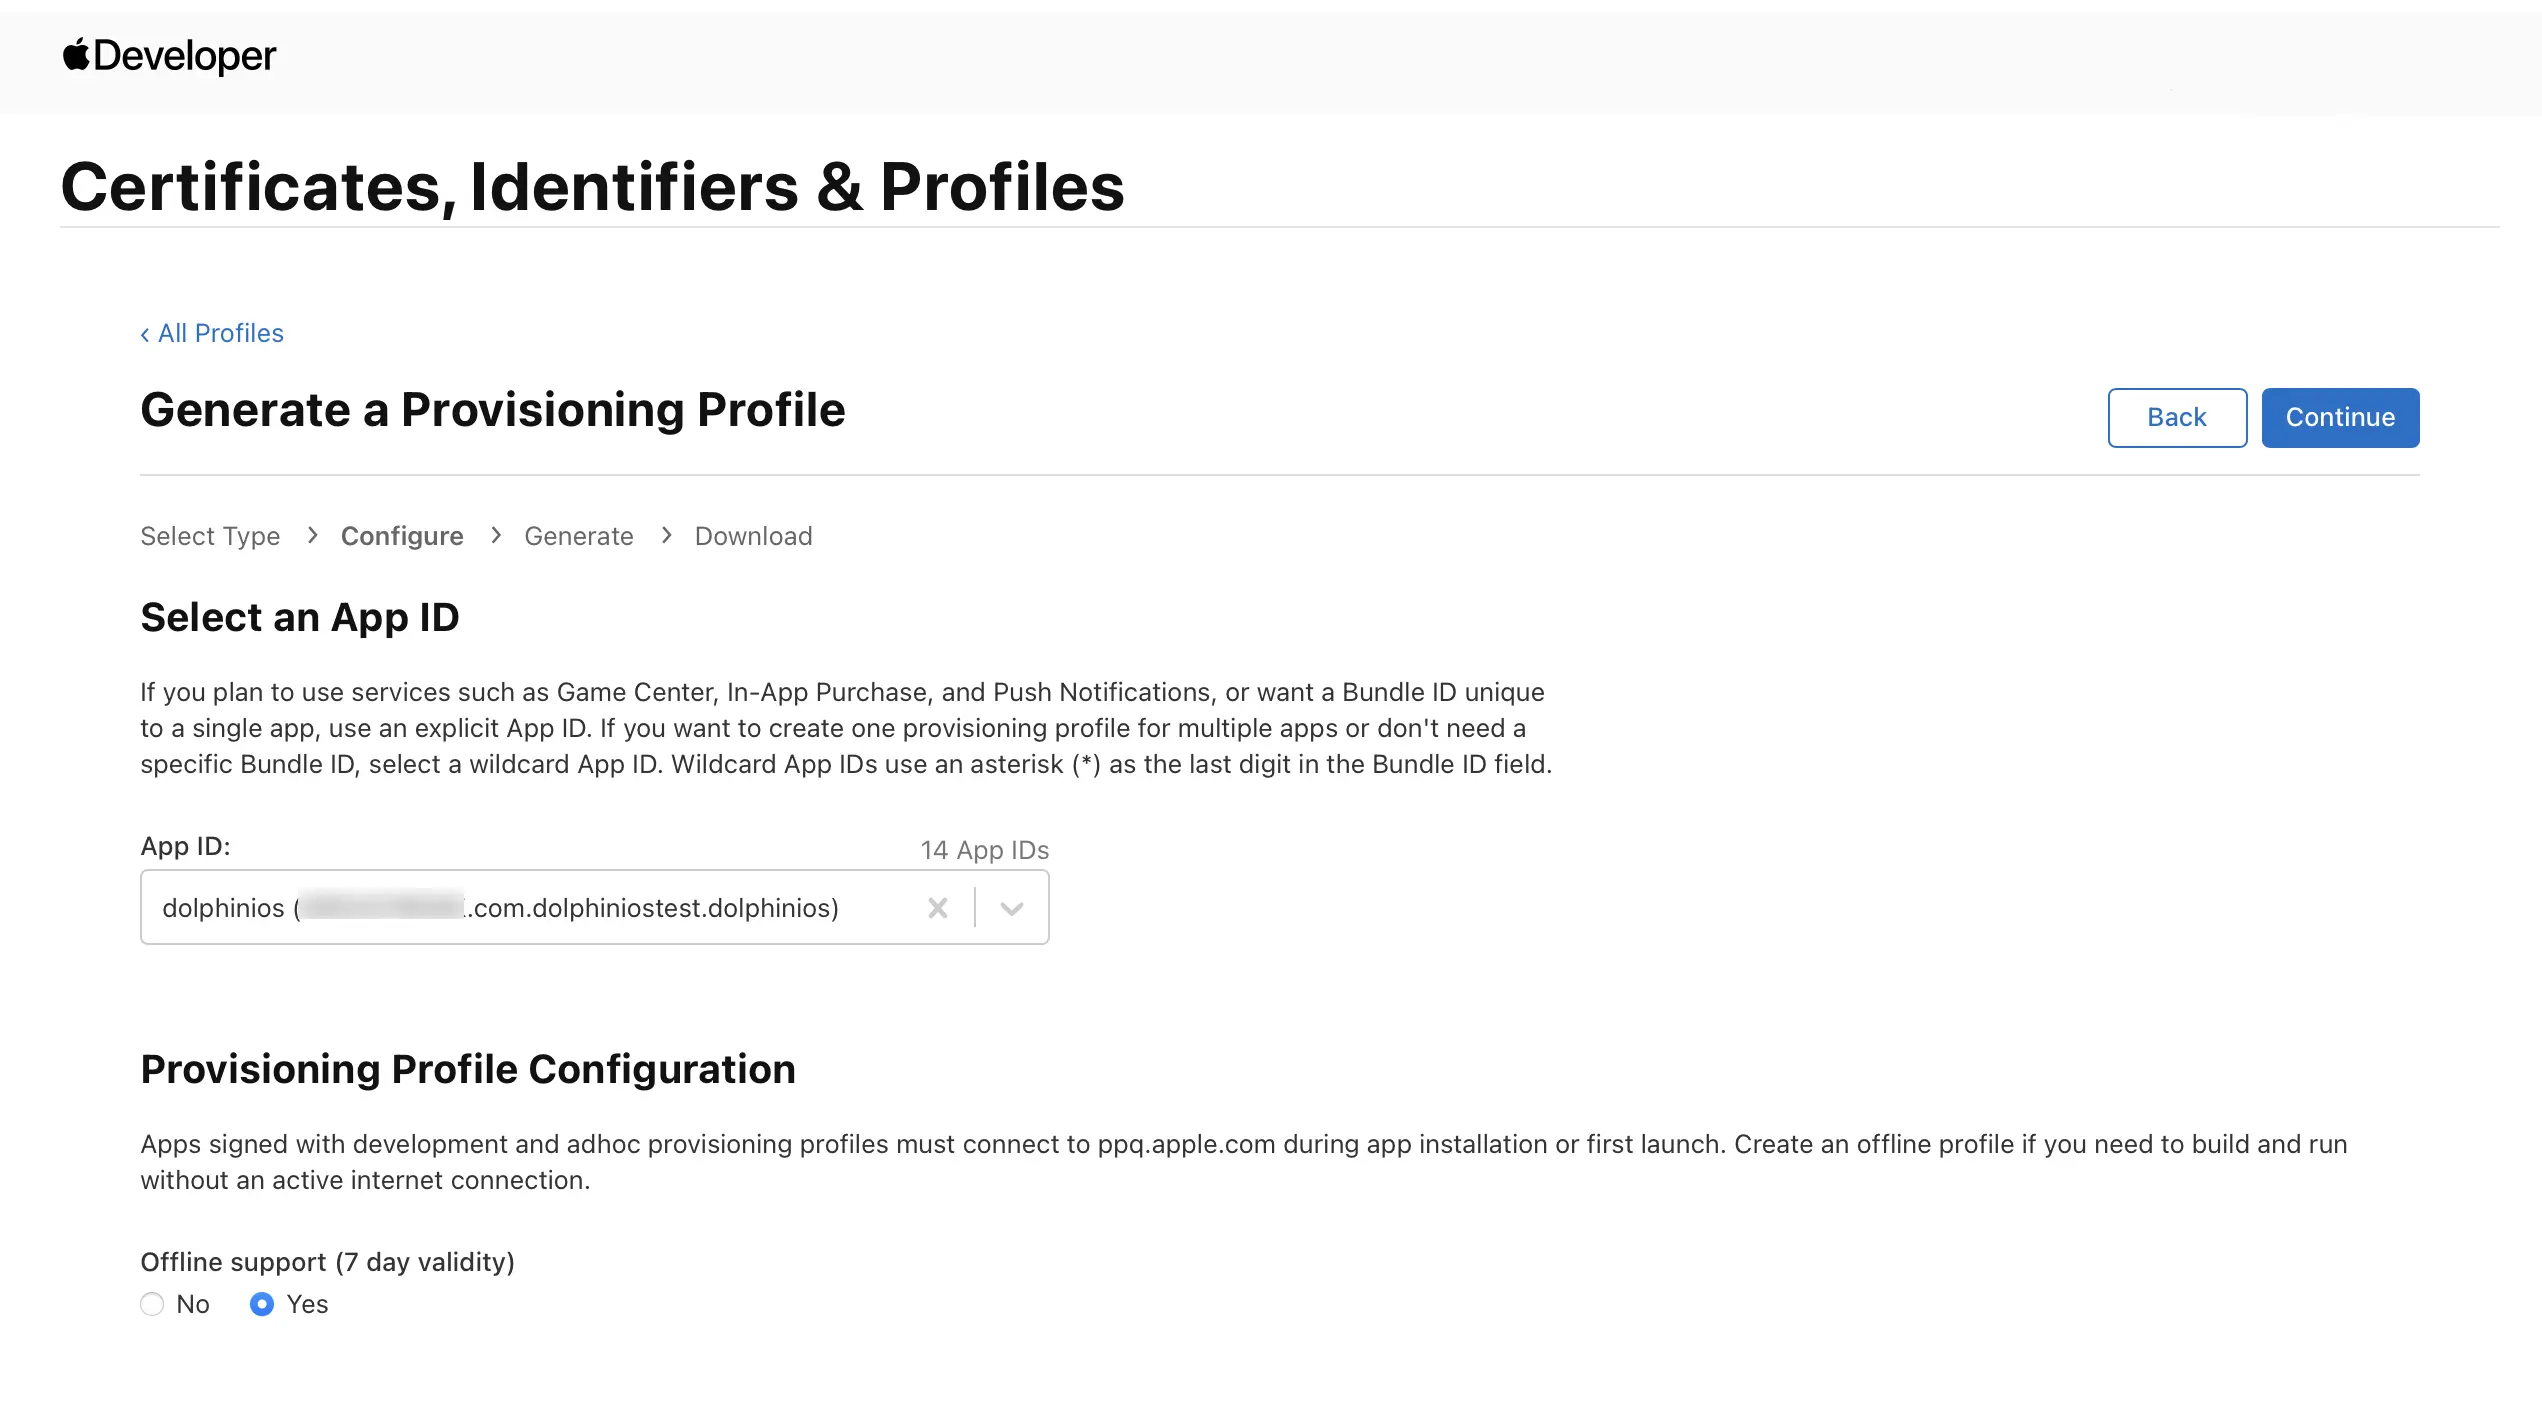
- Check the boxes for your device(s) and click continue.
- Give the provision a name like "DolphiniOS".
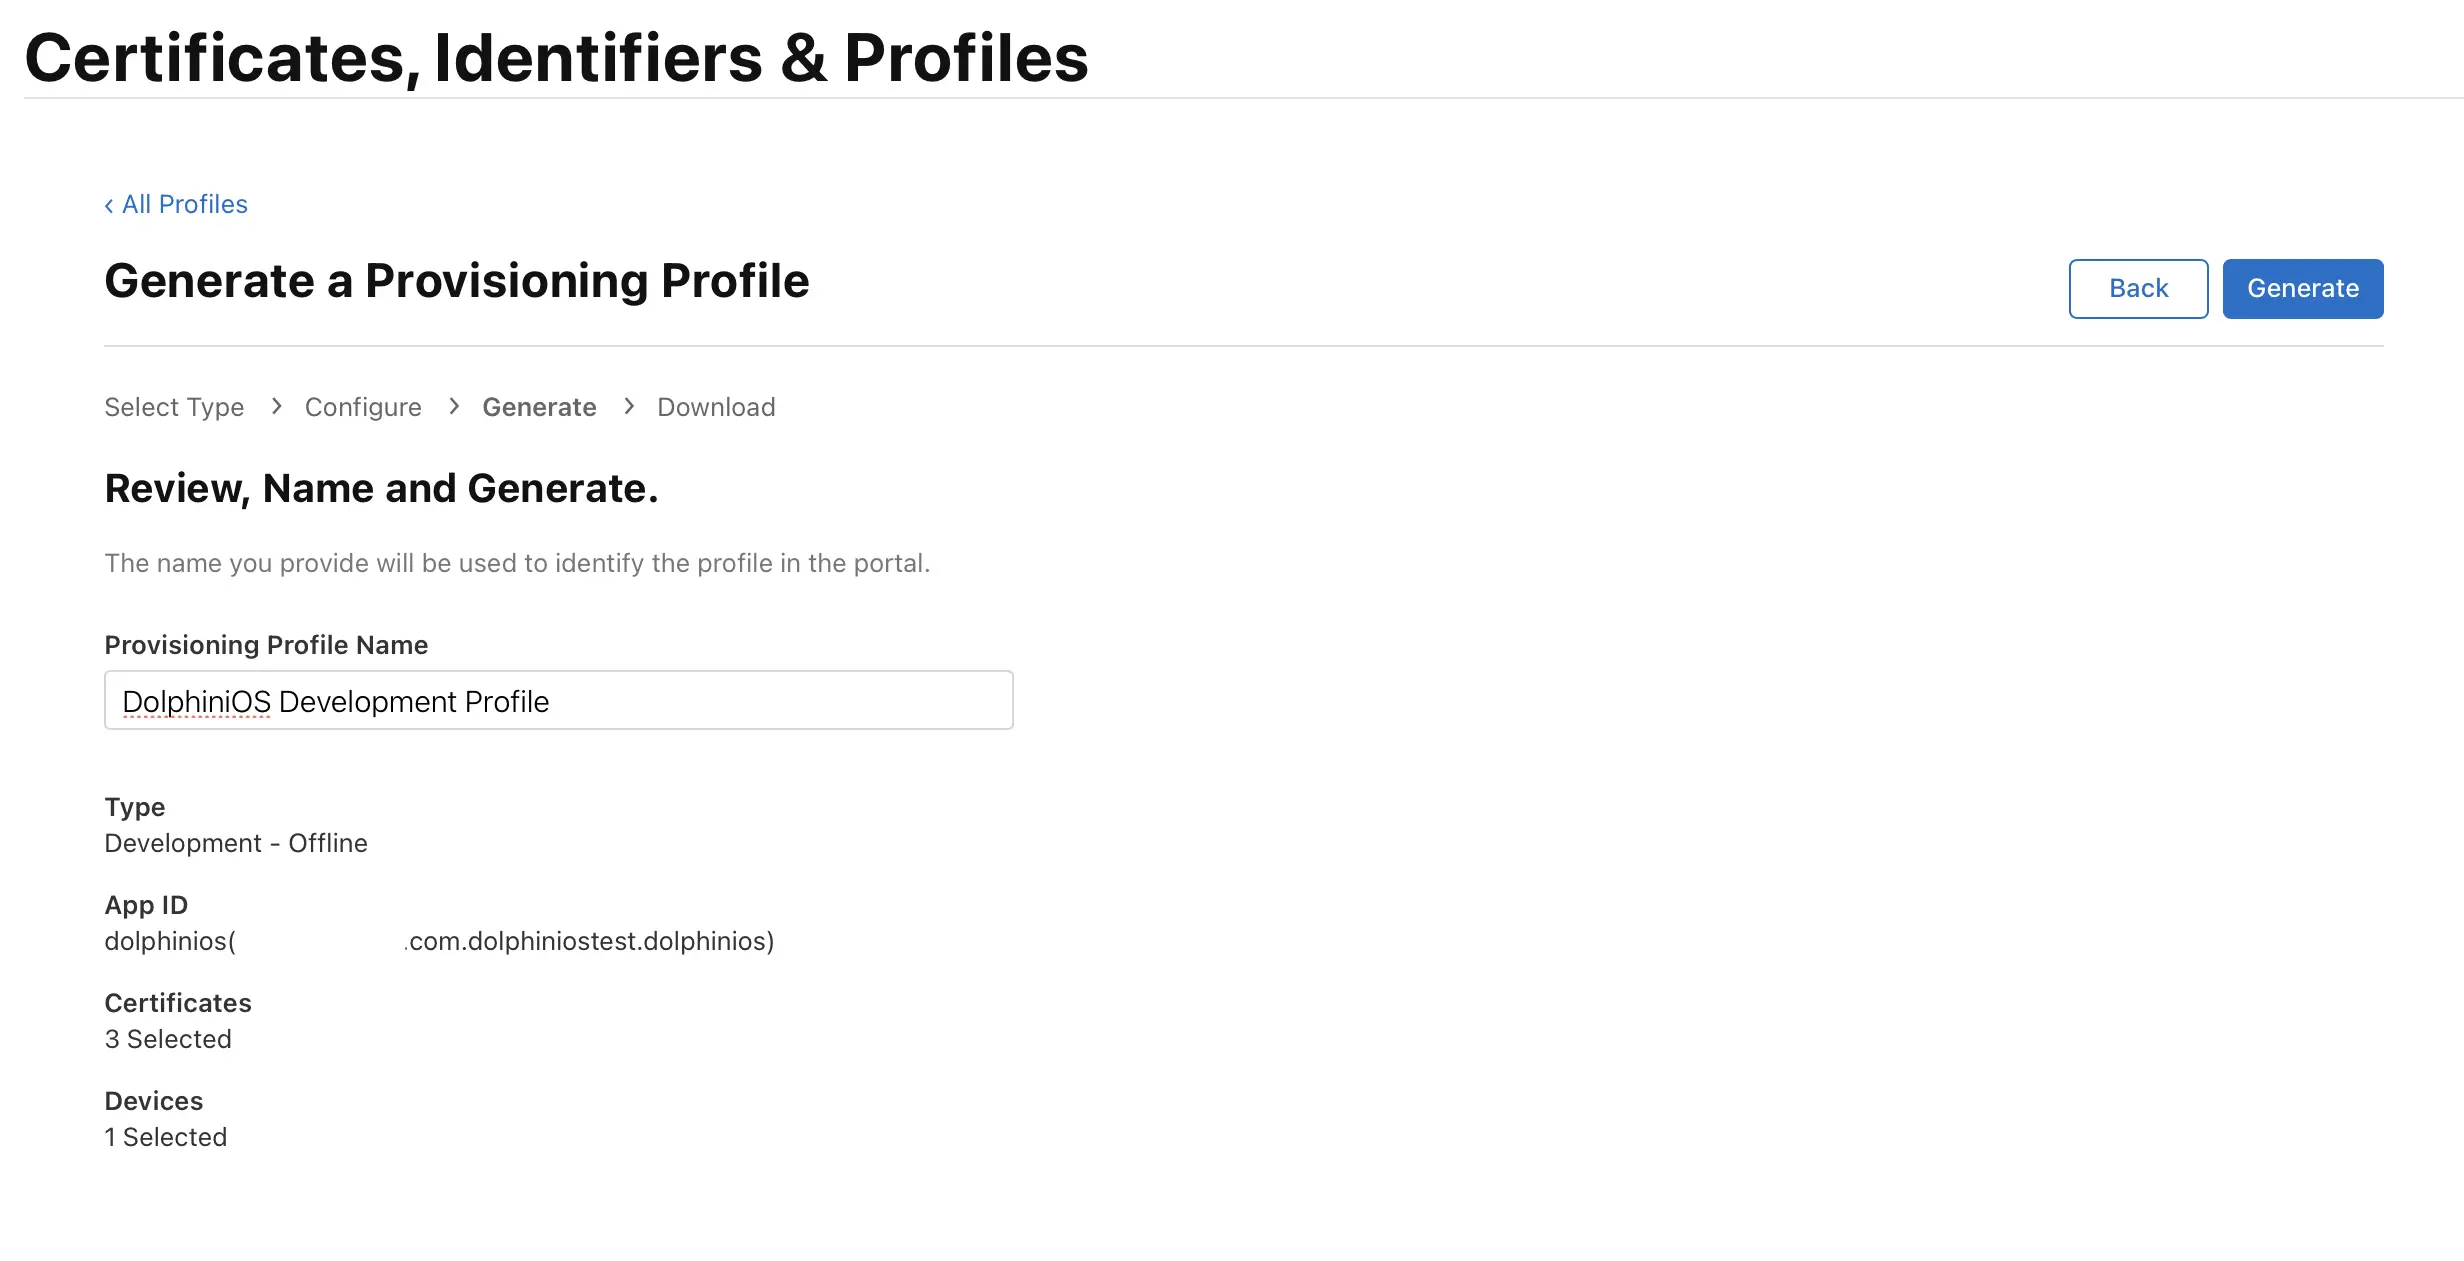
- Download the provision file and save it to your computer.
- Download iosappsigner for your computer and install it.
- Open iosappsigner and select the IPA file you downloaded, for example dolphiniOS.ipa
- Select the provision profile you generated,

- Leave everything else and click Start.
- Open Xcode and connect your iPhone to your computer.
- In Xcode, go to Window > Devices and Simulators (or press Shift+Command+2).
- Select your iPhone from the list of devices on the left panel.
- It may take a bit for the first time to set up, but once finished, click the + button.
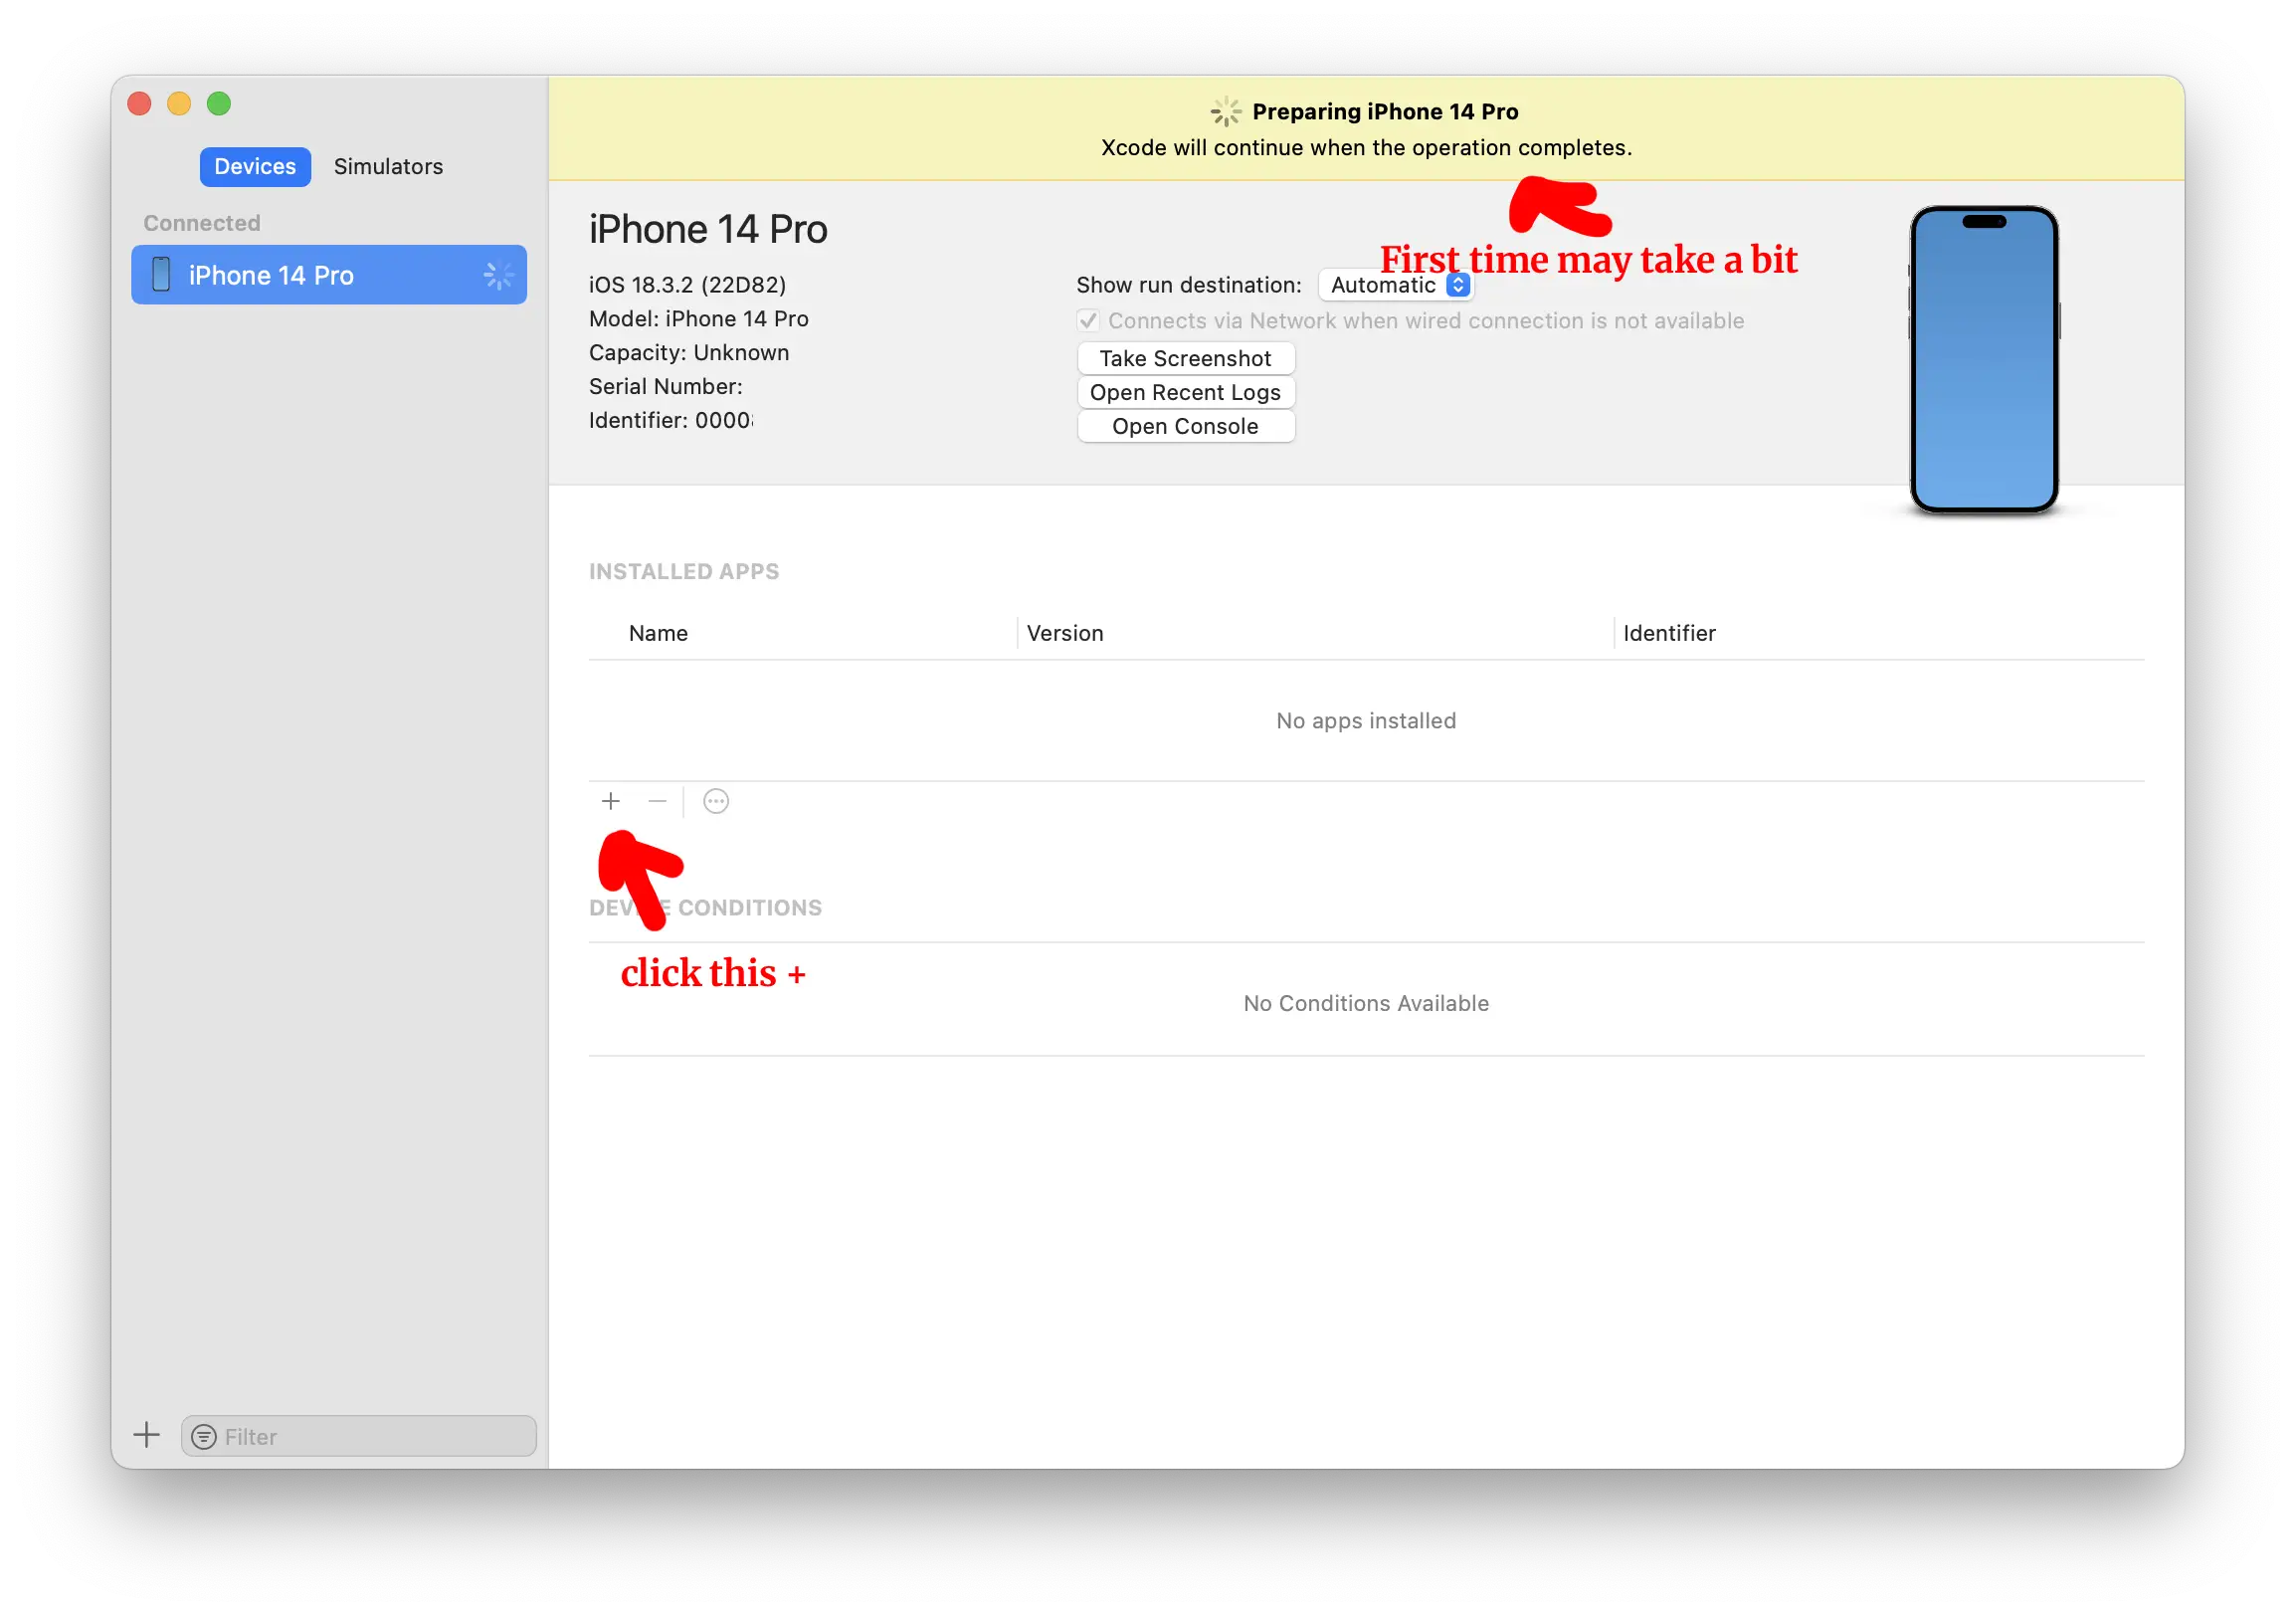
- Add your newly signed IPA
- An Apple developer account (free)
- Developer mode enabled (See above)
- Download and install AltStore on your Mac or Windows computer and JitterBug. faq.altstore.com: How to install AltStore (macOS) or faq.altstore.com: How to install AltStore (Windows). Users in the EU can use Altstore PAL.
- Open AltStore and click the icon in the menu bar (Mac) or system tray (Windows).
- Connect your iOS device to your computer via USB
- Click Install AltStore to sideload the AltStore app onto your device
- Enter your Apple ID and password when prompted
- The AltServer should inform you that it has been installed but may not. Wait about 10 minutes. If nothing has happened, check your phone to see if the AltStore was installed. If you do not see it, reboot your phone and check again. If you cannot find the AltStore, go back to AltServer and try again.
- Open AltStore on your device and sign in with your Apple ID. Follow the onscreen prompts. Be sure to refresh the app as it instructs.
- In the Alt Store, click sources and add oatmealdome for DolphiniOS.
- Download Wireguard VPN from the App Store
- Connect your phone and run Jitterbug.
- Open Jitterbug
- Authorize your phone
- Run a second time to generate a pairing file. It should land in
~/AKA root of your current user folder
- Upload the file to the JITStreamer website. It should auto-download a .conf file for Wireguard
- Transfer the file to the iPhone or iPad
- Open Wireguard and import the .conf file
- Connect to the VPN
- From the Jitterbug website, download the shortcut and run it on your dive
- Install SideStore or sideloadly, or AltStore. (If you use Sideloadly or Altstore, you'll also need StosVPN. See guide for more dtails.)
- Download the StikJIT, direct link to the Nightly build
- Make sure you have quit SideStore. Use Jitterbug to create an pair file.
- Relaunch SideStore and enable JIT for the Apps you'd like to use
- GameSir G8 - a very well-loved and often copied design by other makers.
- Backbone controller - an ultra slim controller that has it's own companion app and audiojack
- Razer Kishi V2 - game controller by the famed PC gaming, Razer.
- 8Bitdo Ultimate - Retro controller mod specialist also makes game controllers
- EasySMX M15
- ATUTEN Phone Gaming Controller
- Zike Z331
- G-Story Controller
- XPlode
- Saffan Game Controller
- PlayStation DualShock 4 Wireless Controller
- PlayStation 5 DualSense Wireless Controller
- PlayStation 5 DualSense Edge Wireless Controller
- Xbox Wireless Controller with Bluetooth (Model 1708)
- Xbox Wireless Controller Series S
- Xbox Wireless Controller Series X
- Xbox Elite Wireless Controller Series 2
- Xbox Adaptive Controller
- Nintendo Joycon Controllers*
- Connect the ROM dumping hardware to your iPhone via a USBc or Lightning to USB adapterr
- Open the Files app. Go to the root of the iPhone and navigate to the connected device
- Locate the ROM file and copy it to your iPhone's storage
- Insert the PSX game disc into your Mac's DVD drive.
- Open Disk Utility (located in Applications -> Utilities).
- Click on the PDX game disc in the left-hand column of Disk Utility.
- Click the "New Image" button in the toolbar.
- Choose "DVD/CD Master" as the Image Format and "None" as the encryption.
- Click "Save" and wait for the disc to be copied to your Mac.
- Once the disc has been copied, you can rename the .cdr file to .iso.
RetroArch
Links: App Store, Official website
RetroArch is a powerful front-end for emulation cores. The best way to think of it is as a bunch of separate emulators that a GUI glues together, built on Libretro. The advantage of this is that emulators can improve and focus entirely on emulation and not user interfaces. It also means that certain aspects of configuration can be shared, such as user inputs, save-state preferences, and so on.
Recommended configuration steps
RetroArch out of the box is a bit daunting, nor is it the most user-friendly. These are the recommended steps to getting the most out of RetroArch and are covered in this guide
This section is a work in progress!
Adding ROMs
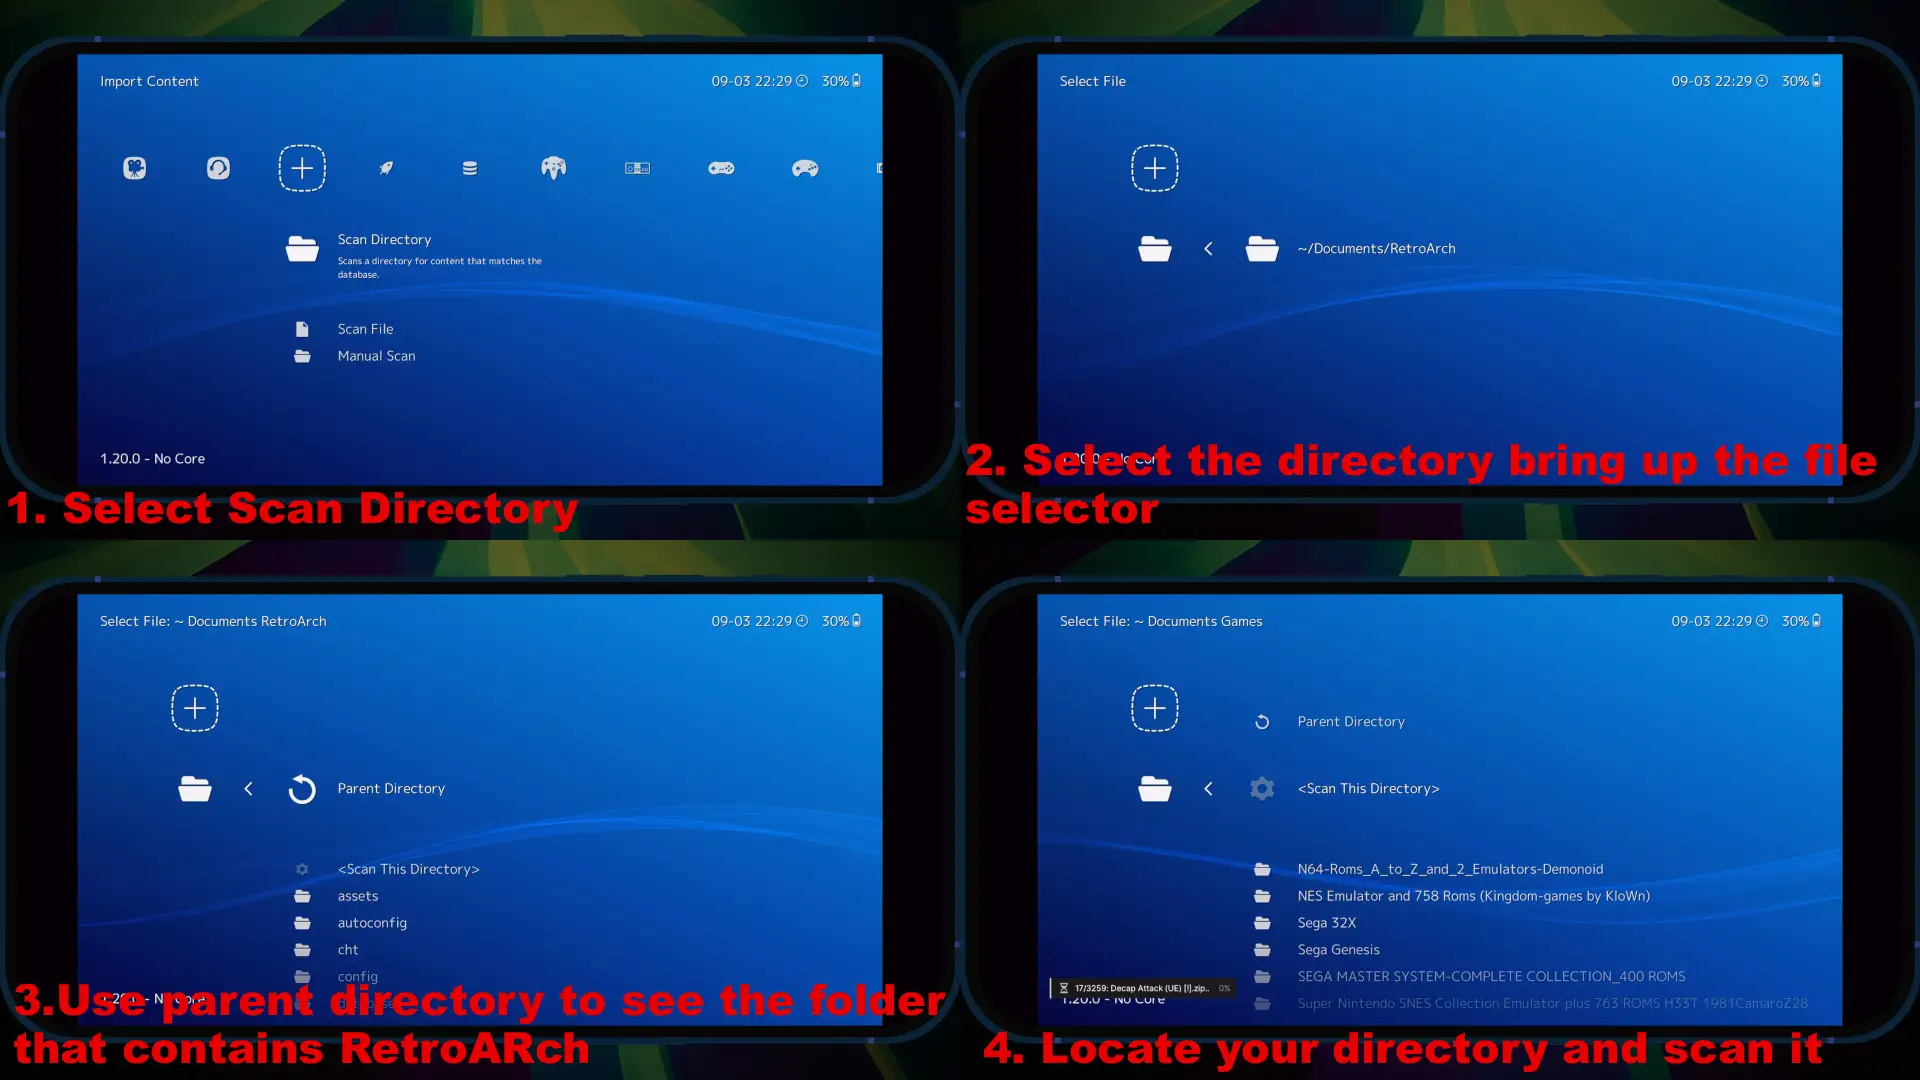
RetroArch can add individual games by using Load Content, but also, from the add menu, can scan entire directories, multiple folders deep. However, it will not monitor the directory; thus, a scan will be required if games are added or removed from a directory.
Changing the user interface

Out of the box, RetroArch is configured to use the GLUI, a user interface that is touch-friendly. If you intend to use a controller, I highly recommend changing the user interface.
Tap "Settings" then "User Interface," scroll to the bottom of the screen, and tap "Menu." Select XMB. You'll need to quit RetroArch and relaunch it before the changes take effect.

After the change, you should see the more visually appealing XMB interface. For a full menu map, see docs.libretro.com: XMB menu map as this contains the full list of where all the menu options live.
BIOS Files
The consoles that require bios for operation currently for iOS in RetroArch are:
Installing BIOS
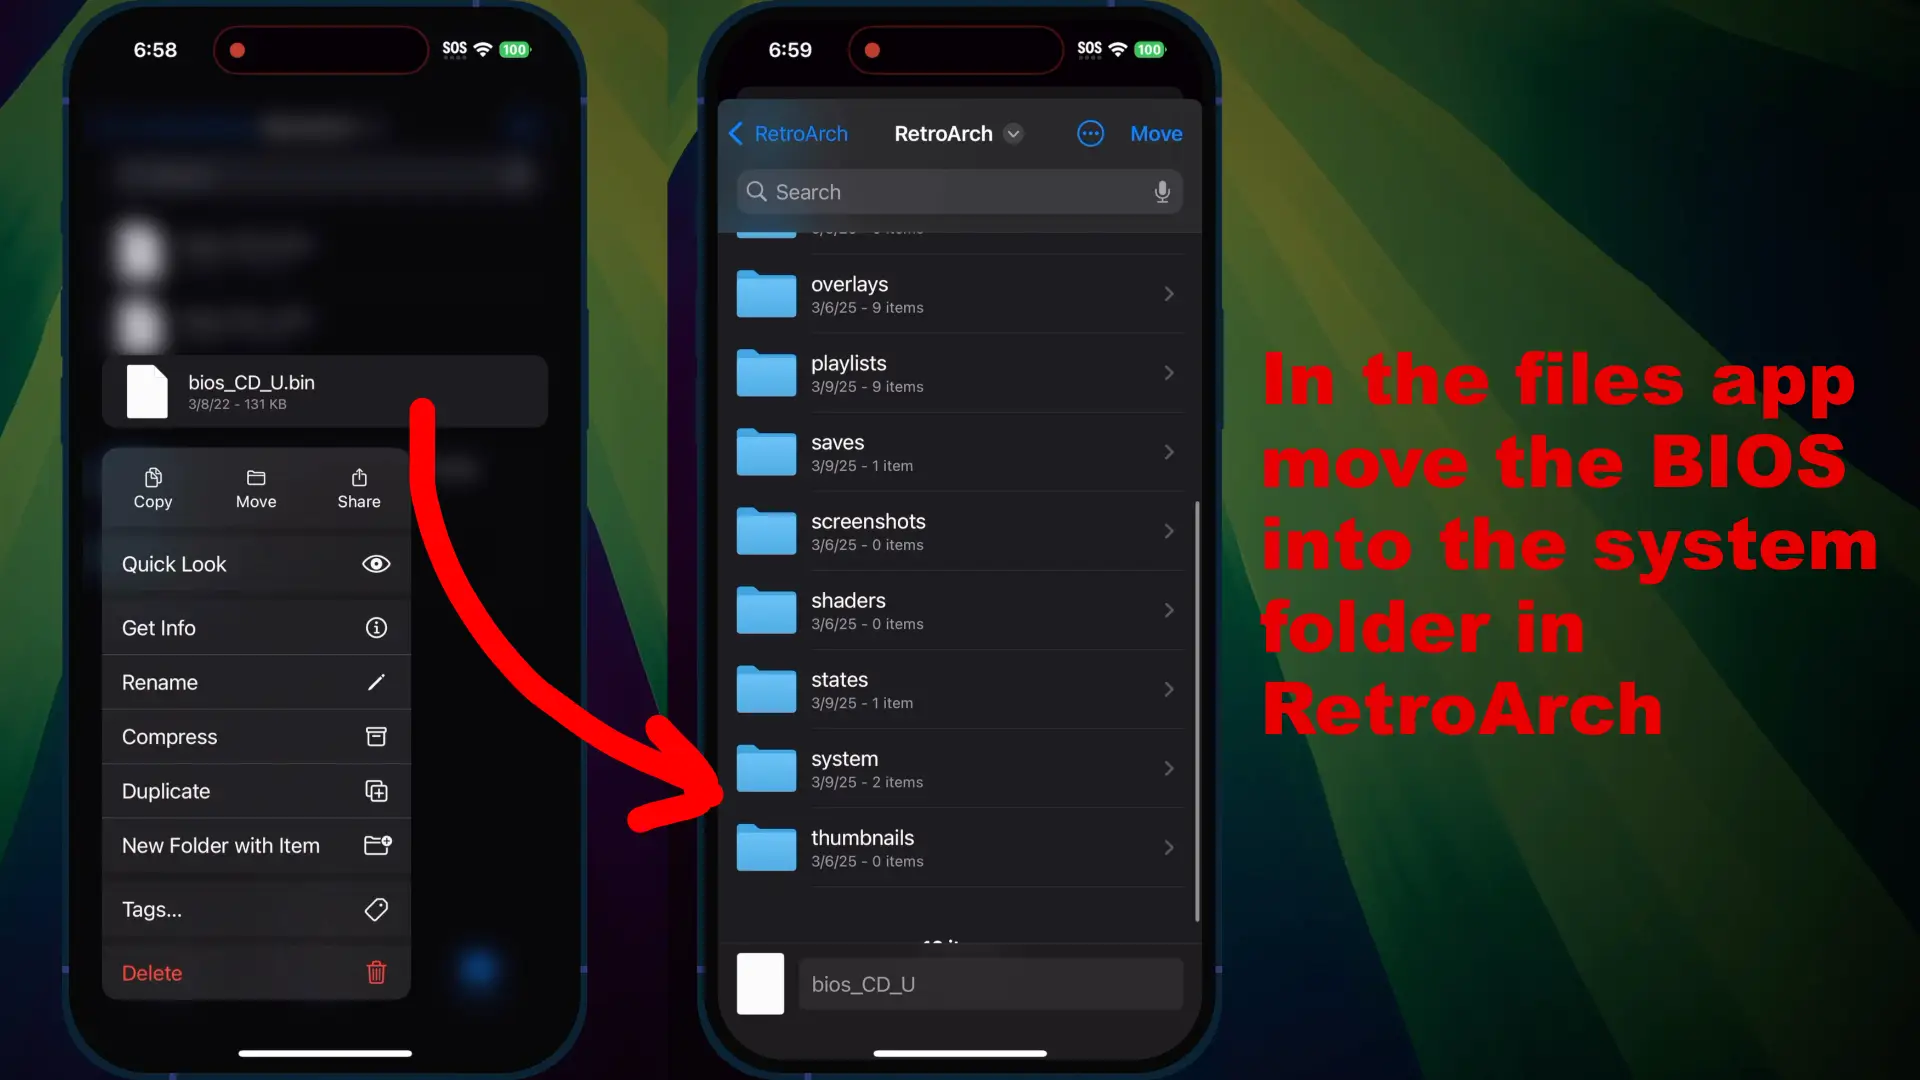
RetroArch's default location is /RetroArch/system, this can be changed in the preferences however it's recommended that you move using the Files app on your phone the BIOS into this folder.
RetroArch maintains a list for every platform it supports and the BIOS required.
Online updater

RetroArch pulls support files for several of its important features to update as soon as possible after downloading.
From the main menu, tap "Online Updater." From here, you can update the following:
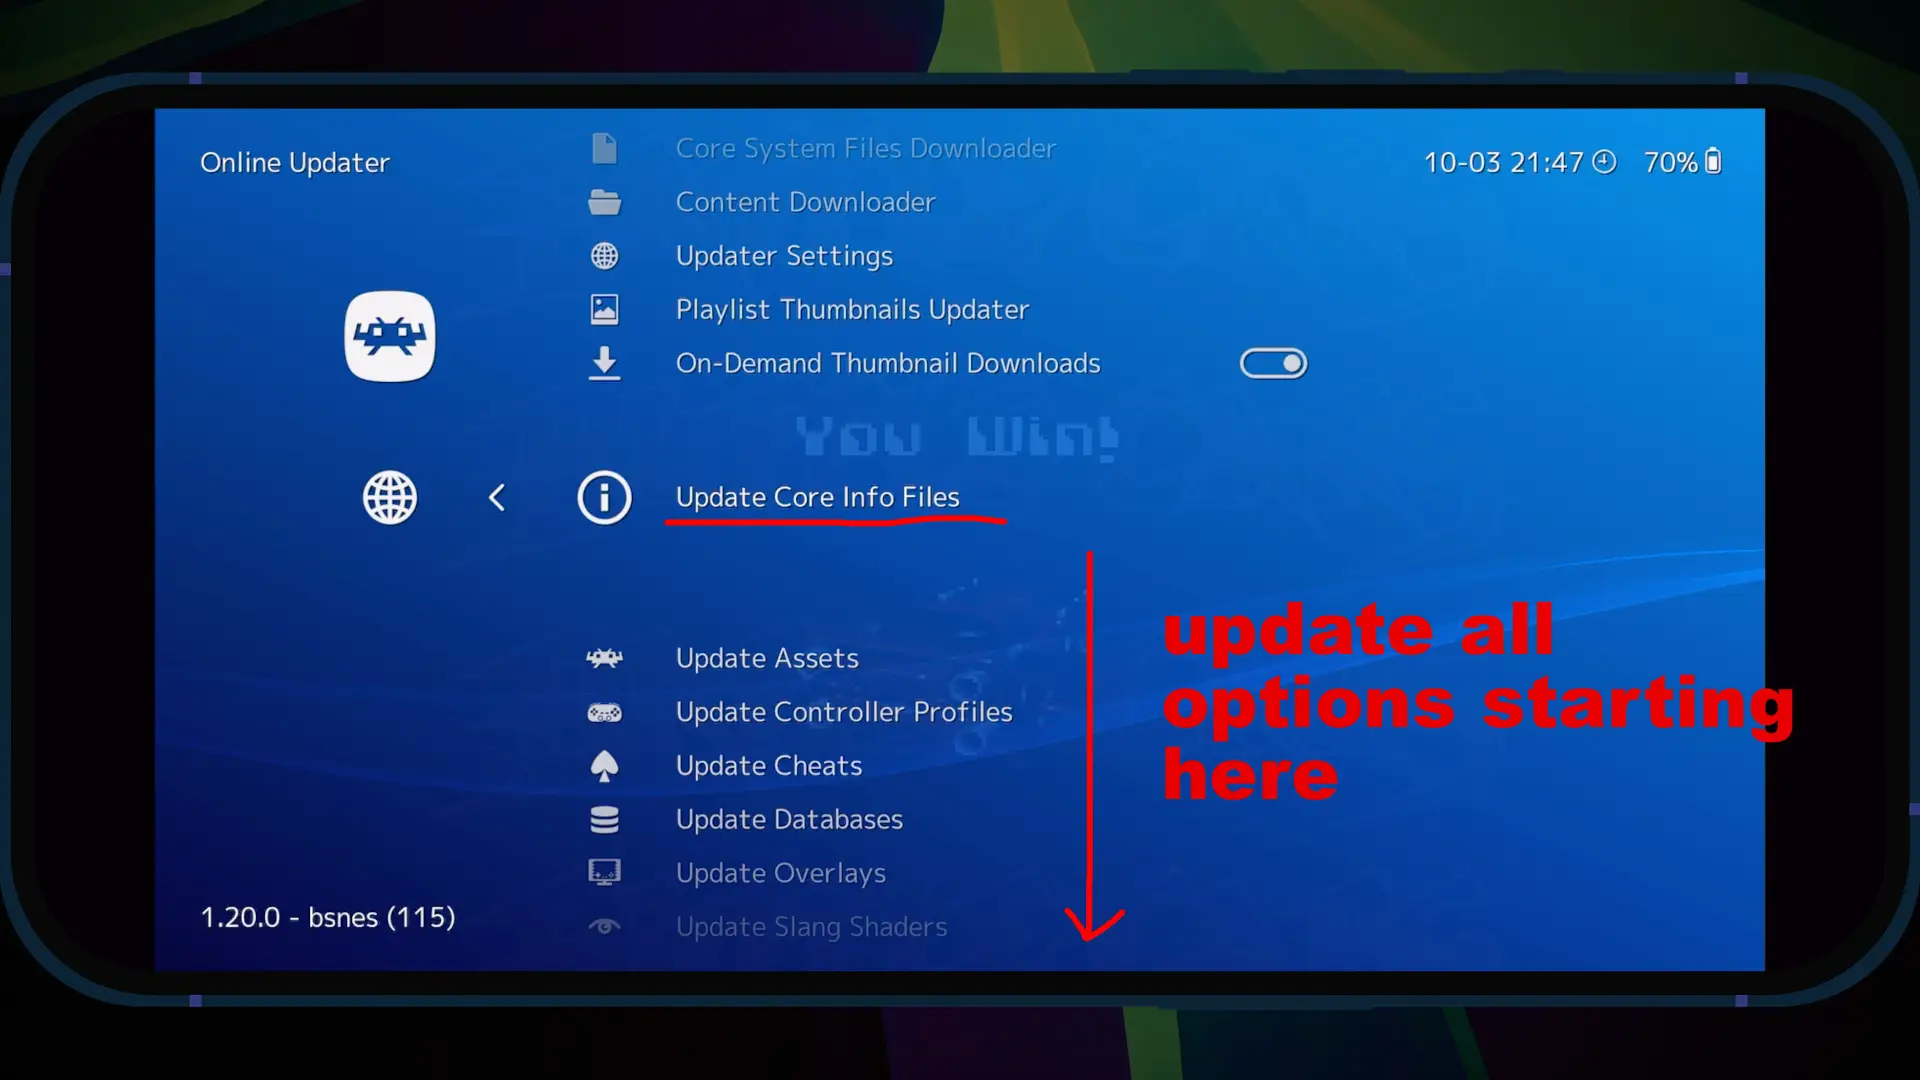
It's recommended that you update all of these, especially following this guide
Recommended Cores & Configurations

Retro Arch often has multiple cores performing the same function. In the cases where these exist, I've tried to narrow them down to what I've found to be the "best," in my opinion. Do experiment and read up on the core differences, as your priorities might differ. Some cores are designed for accuracy, some for speed, and some for enhancements.
Select A Core and Core Configuration
When you first select a ROM, you'll be presented with a variety of options, and you'll likely need to select a core. You can always change this by using "Set a Core Association" or "Reset Core Association"
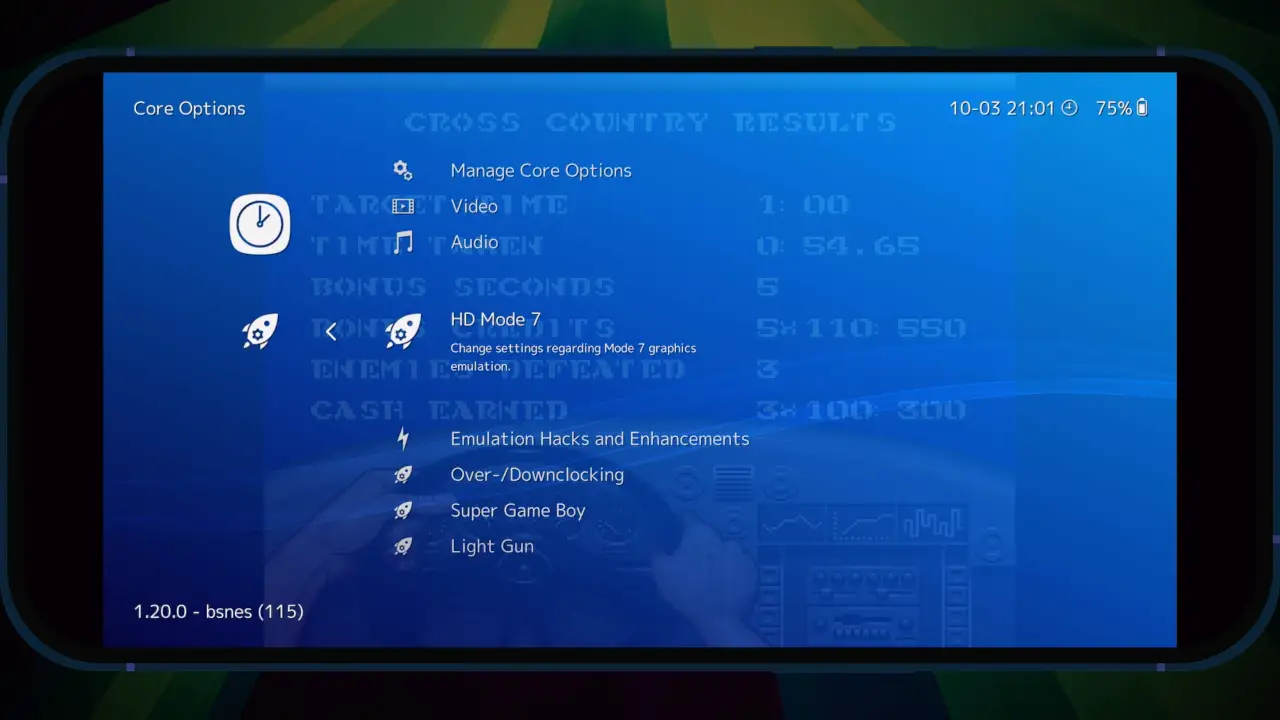
Core Options
Core Options in RetroArch are game system-specific settings that allow you to customize how each emulation core functions. Unlike global RetroArch settings that apply to all systems, Core Options are tailored to the specific emulated console or computer system you're using. Every core has its own set of options. From the menu when running a game, go to Core Options.

Some of the emulator options exist outside of the Core Options, for example, BSNES's HD Mode 7 options exist in a menu outside of Core Option as do some settings for Beetle PSX HW.
Each core has its own unique settings, which may include:Recommended Core Options for BSNES and BSNES HD Beta
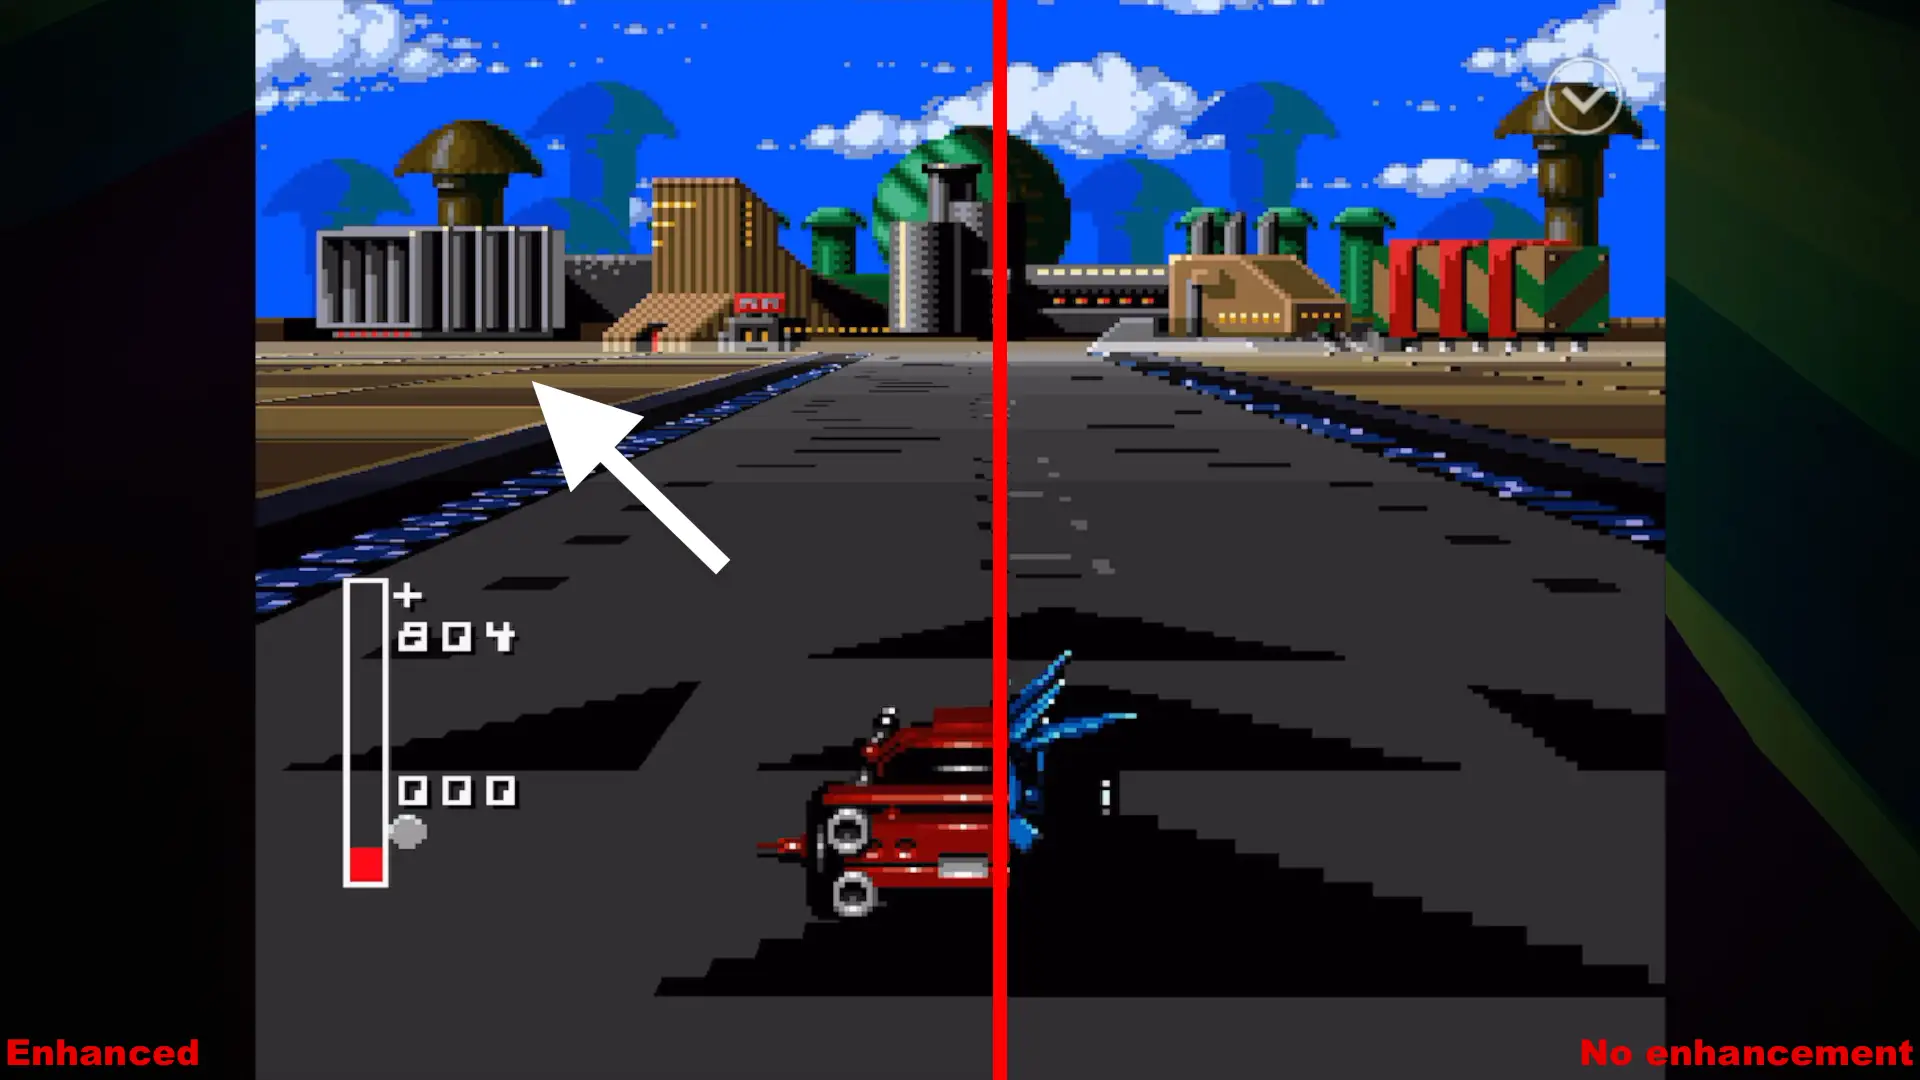
BSNES is a cycle-accurate SNES emulator that aims to provide the most accurate emulation possible but also offers the ability to enhance Mode 7 games. Mode 7 titles include Pilot Wings, Mario Kart, and F-Zero. For a complete list, see wikipedia.org: Mode 7, Both BSNES and BSNES HD Beta can enhance Mode 7 rendering, with the HD Beta adding the ability to render games in widescreen during Mode 7 sequences.
Core Options
As of writing this, the HD Mode 7 for BSNES exists in different places depending on the version of BSNES you are using. In BSNES, this is listed in the core menu as HD Mode 7, whereas in BSNES HD Beta, it is in the core options. HD Beta is much more CPU intensive, so you may need to lower the scaling, especially depending on your device.
Recommended Core Options for Beetle PSX HW

Beetle PSX HW is an emulation core that offers quite a bit of customization options to enhance PlayStation graphics, such as increasing the resolution, better polygon processing, anti-aliasing, and more. Here are some recommended settings:
Core Options
Emulation Hacks
Beetle PSX HW has the ability to manipulate the way the PlayStation renders polygons to help improve visual fidelity. Beetle PSX HW's PGXP (PlayStation Geometry Precision) capabilities correct the polygon jitter and texture warping that occurs in PlayStation games due to the console's limited floating-point precision. This feature enhances 3D rendering by maintaining proper polygon alignment and improving texture mapping accuracy, resulting in a much more stable and visually pleasing image without the "wobbling" effect seen in original PlayStation games. PGXP can be enabled in the core options and offers various levels of correction, from basic coordinate precision to advanced perspective-correct texturing.
Go to the Emulation Hacks menu and select PGXP. Enable the following:
Shaders
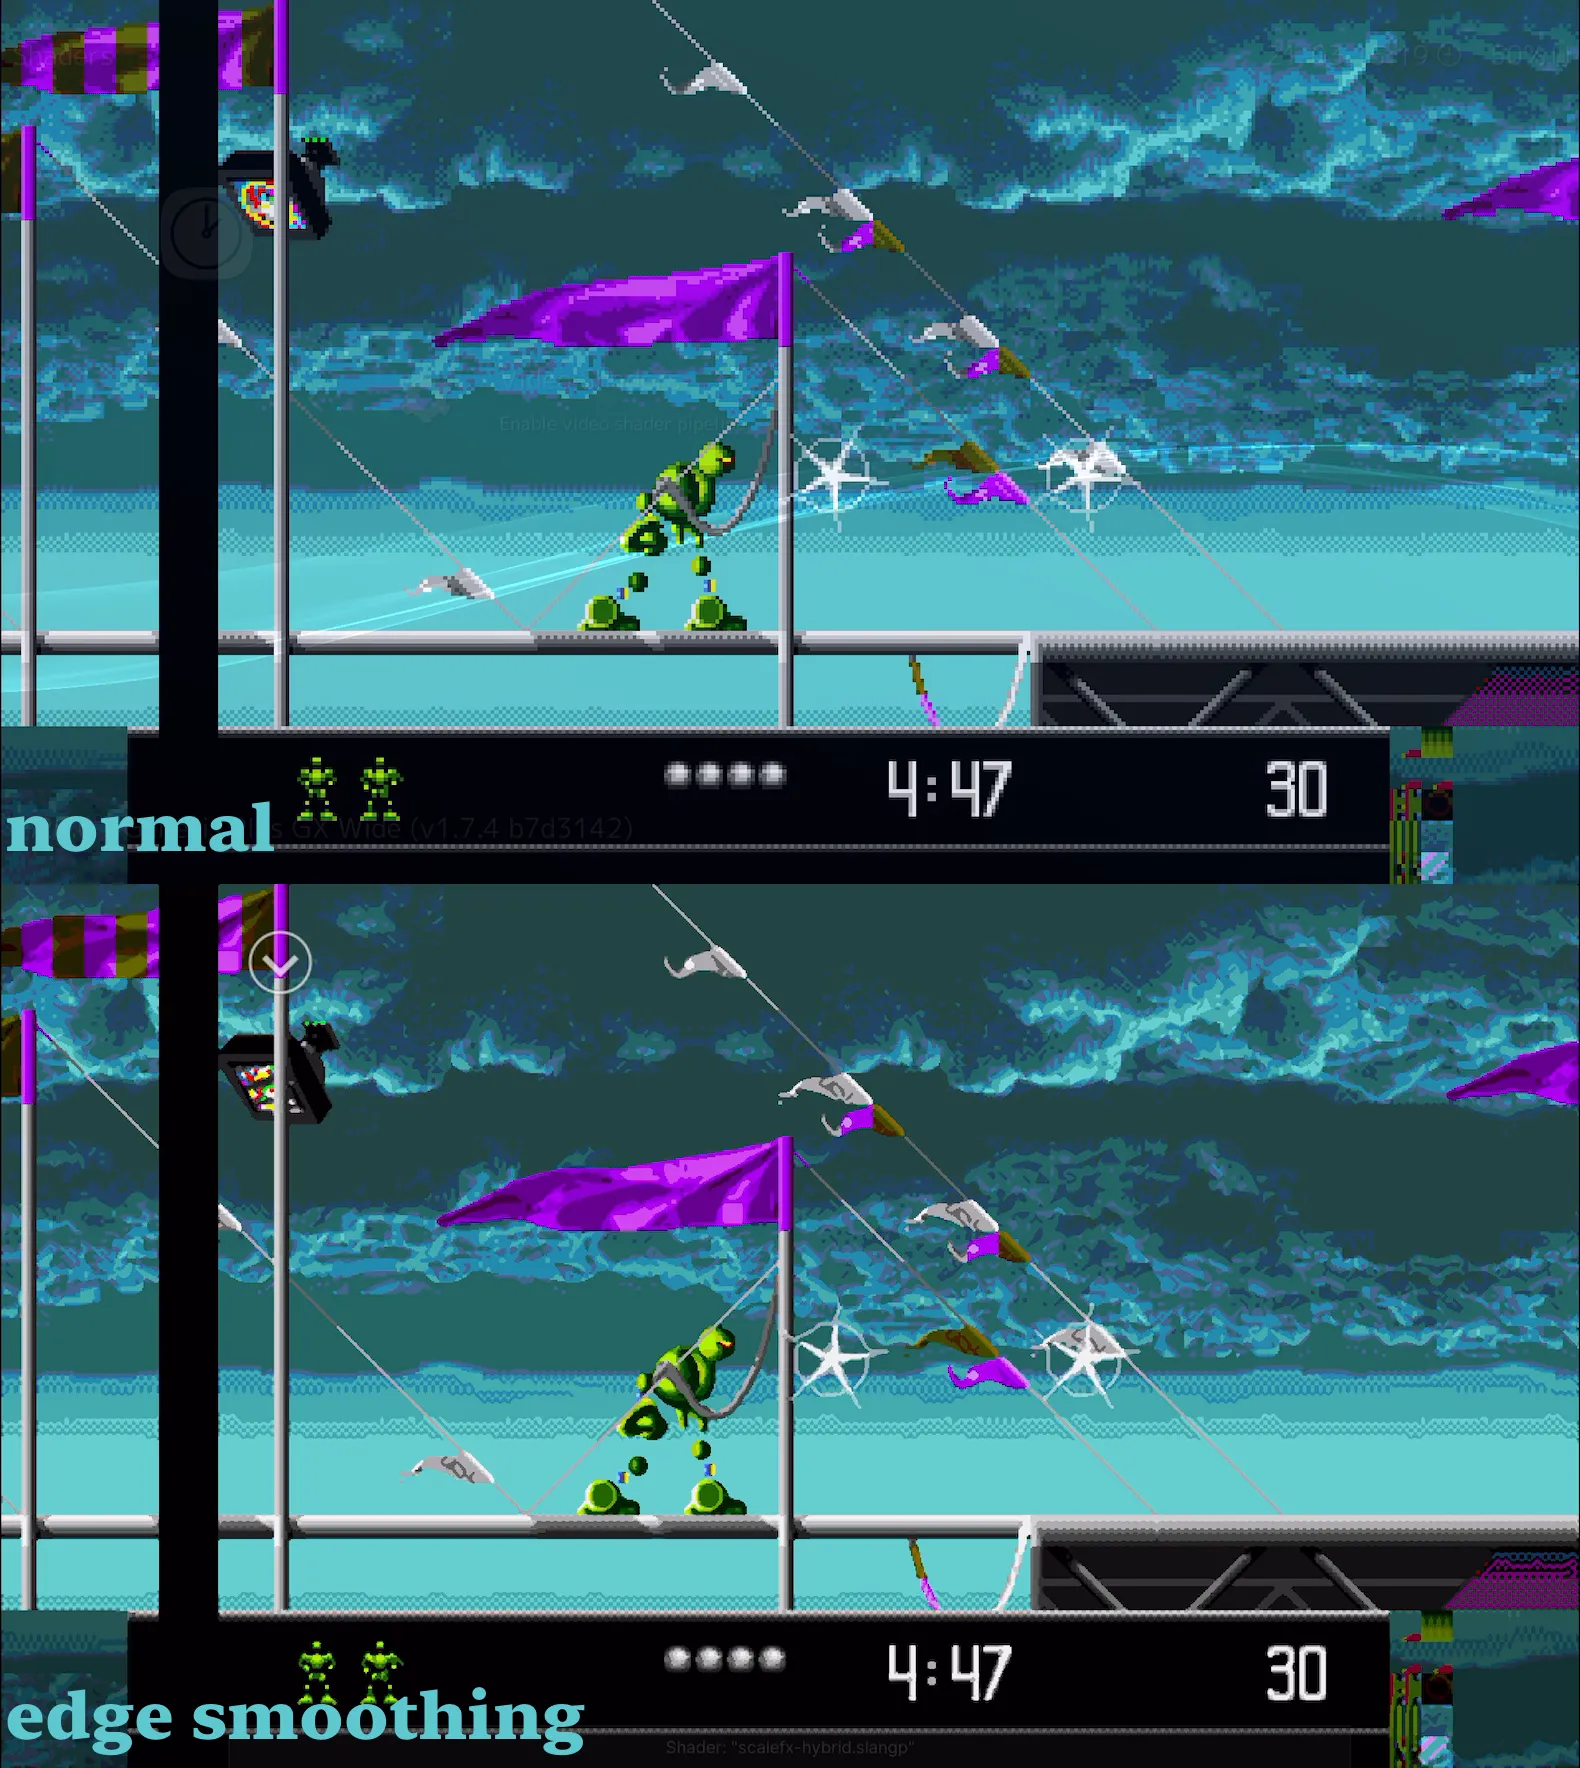
Shaders in RetroArch are visual filters that can transform the appearance of games by applying post-processing effects, such as CRT scanlines to mimic old TVs, smooth scaling to reduce pixelation, or various color adjustments to enhance visuals. They allow players to either recreate the authentic look of the original hardware or dramatically improve and modernize the appearance of retro games without affecting the actual gameplay. They can be chained together.
Shaders are performed post-emulation when a single frame enters the frame buffer. This means they are agnostic or unaware of the emulator that produced them. A good way to think of shaders in RetroArch is as filters similar to filters you can apply to a photograph after it's taken. You can't adjust the shutter speed, aperture, or what's in frame or focus, but you can simulate some of these things with a filter. The same goes for shaders. They cannot fundamentally change how a console is emulated to increase its output resolution; rather, they can take the image it outputs and manipulate it.
Users on popular forums and places like Reddit will often post their preferred settings, which can yield incredible results. See Reddit: Shaders are game-changing for retro games and emulation for a good example.
Chaining Multiple Shaders
Order matters! Place scaling shaders before visual effect shaders. >Common chains include an upscaler (like "xbrz") followed by a CRT effect. Some popular combinations:
Shaders can be configured per console and title basis. Generally, shaders are more popular on non-polygon-based titles or 16-bit titles as many modern emulators offer more opportunities to enhance visuals at the emulation level than post-processing the image.
Save states
While playing a game, bring up the RetroArch menu by tapping the screen with two fingers simultaneously (or using your configured menu button). In the Quick Menu, scroll down to find "Save States" and tap to enter this section. RetroArch provides 10 save slots (0-9) for each game. In the Save States menu, select "Save Slot" and choose your preferred slot number. To load a save state, from the Load State, select the save state from the slot you'd like to use.
Auto Saves
Auto Saves are a feature that will automatically save your game when you exit it, akin to how an iOS game can resume to where you last were when tabbing between apps. To enable auto saves, go to System Settings and then Saving. Toggle both.
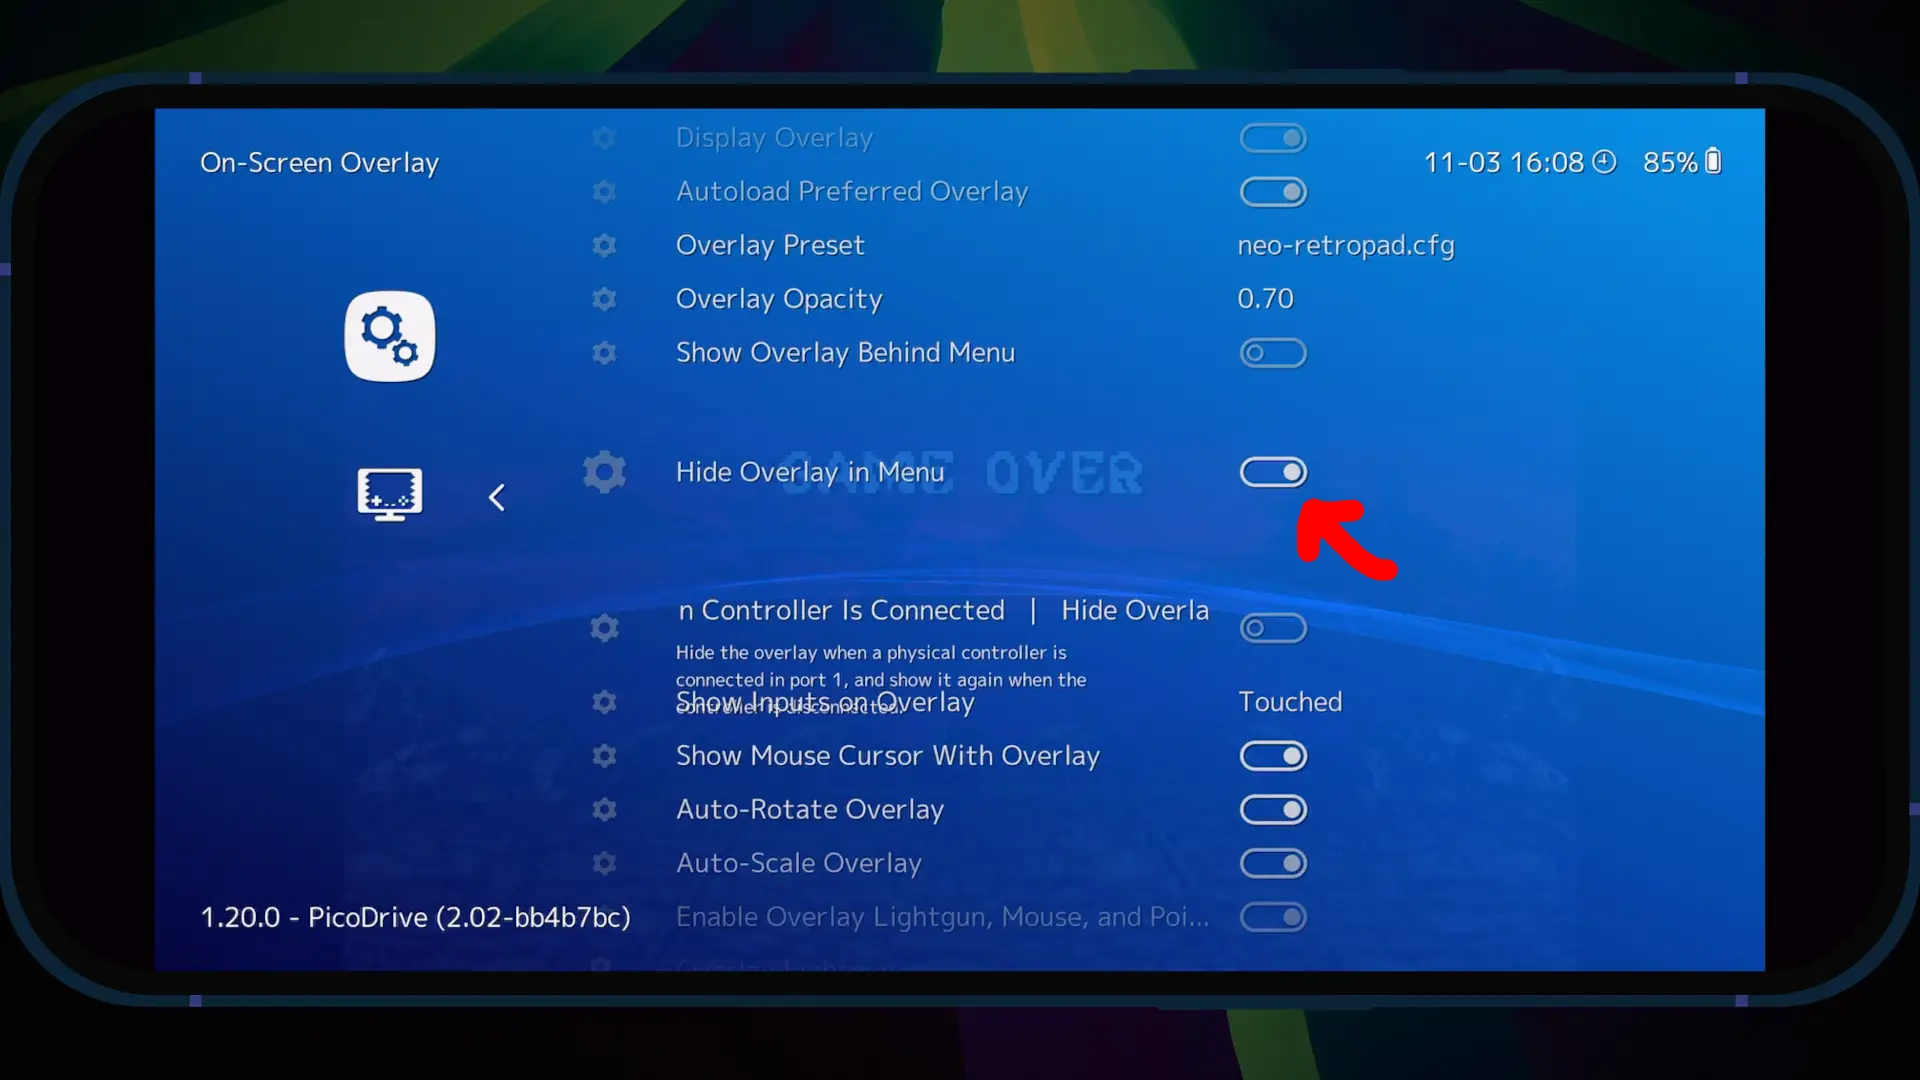
Hide overlay when Control is connected
A default behavior that most users will want to enable is auto-hiding the on-screen overlays when a gamepad is connected.
Tab to settings and select "User Interface," and then to "On-Screen Overlay." Locate "Hide Overlay when the controller is connected" and toggle it on. You can still access the touchscreen overlay by tapping the screen during gameplay.
Sideloading: Interpretation vs JIT

Sideloading takes a bit of self-education. Please read this section carefully before asking for help on forums.. Also, please consult the earlier sections like the Glossary, Getting Started and Emulation sections if you are new to emulation.
Sideloading is the act of installing applications outside of Apple's app store. The two main paths are downloading IPAs (applications) and signing them or using a Sideloading application like Sideload AltStore to sign the applications.
Apple only allows for interpretation. The emulator reads and decodes each instruction from the emulated system one at a time and then executes a corresponding routine on the host machine. It is easier to implement and debug since each instruction is handled individually. However, since every instruction is processed individually, it results in slower overall execution because of repeated decoding and function calls.
Just-In-Time (JIT) Compilation groups sequences of instructions (often basic blocks or functions) and compiles them on the fly into native code for the host CPU. This compiled code is then executed directly. Apple does not allow JIT Compilation due to security concerns and platform control. An application that featured JIT Compilation would be able to run any code on the device, which is a security risk and also would allow for applications within applications, a way to skirt around Apple's App Store monopoly. There's an upfront cost for compiling code blocks, which may not be worthwhile if the code is executed only a few times, but for newer systems where repeated functions are executed many times, this becomes a larger performance advantage.
Important: Enable Developer Mode
Developer Mode is required for sideloading emulators outside the App Store, regardless of what method you pick. Follow these steps:
Note: Developer Mode remains enabled until you manually turn it off or restore your device.
Sideloading IPAs - Your Choices
The very first step in sideloading is getting an application (.IPA) onto your iPhone, which is the act of sideloading. There are two main methods for sideloading IPAs on iOS devices:
Both methods have their pros and cons, and the choice depends on your preferences and technical expertise.
Due to security provisions in iOS, the only apps that you can debug processes of are ones that have the correct certifications in iOS, even with developer mode enabled. This prevents an application like AltStore from enabling JIT in an emulator like Dolphin. Whereas if you sign your own application with your own provisions, you can then debug the application and enable JIT on the device.
AltStore is an application designed to allow users to sideload apps on iOS devices without jailbreaking. It uses a unique method of sideloading that allows users to install apps directly from the iPhone by downloading them and signing them.
Option 1: Signing IPAs and Installing via Xcode
The most surefire way to sideload an IPA is to sign it yourself with your own developer profile. Using debug modes with your phone, you'll be able to enable on-device JIT with this method. One of the better set of instructions was originally posted Reddit.com: DolphiniOS works.
Note: Sideloaded apps expire after 7 days with a free Apple ID. You'll need to reconnect to your computer and reinstall them. An Apple Developer Program membership ($99/year) extends this to one year.
Part 1: Setting up developer app
Part 2: Signing the App
Part 3: Installing the App
Option 2: Sideloading via AltStore or SideStore
Sideloading apps via the Alt Store allows IPAs to be signed and authorized on the device. In my emulation video, at the 20-minute mark, I demonstrate the process. Requirements:
Enabling JIT Streaming
There are two ways to use JIT Streaming, via JIT stramer or SideJITServer. This process is demonstrated in the video version of this post in the DolphiniOS chapter at the 20:01 minute mark.
JIT streamer has the instructions on its webpage. The steps are as follows:
SideJITServer
SideJITServer requires being on the same network; however, you can create your own VPN to your private network and connect to it remotely. Instructions are on the GitHub project. I plan to fork and dockerize this service. The advantages of hosting your own JIT service are security and performance, and it is the recommended way for people with a bit more technical aptitude.
Please check back soon as I will be adding a guide on how to host your own JIT server using Docker.
StikJIT
Inevitably readers will skip straight to this section but I highly recommend reading entire Sideloading to give much needed context.
StikJIT is very new as of writing this and promises on device JITs. It requires using a special VPN that redirects to itself as the JIT compiler is hosted on the device. This eliminates the issues of needing to host the JIT server externally or connect to someone else's hosted JIT streamer. It should deliver faster performance.
Reddit.com: StikJIT Instructions using LiveContainer. Live Containers allows you to install more than 10 development apps to skirt around Altstore limitations.
How to set up StikJit
I haven't had the free time to set up StikJIT so, for now, I will defer to the current go-to guide: reddit.com - How to Setup StikJIT for iOS (On-Device-Offline-JIT). This is only for iOS 18.
The Process is as follows:
You should also disable background refreshing for any JIT apps. iOS 18.4 beta 1 currently does not work and requires ankJIT.
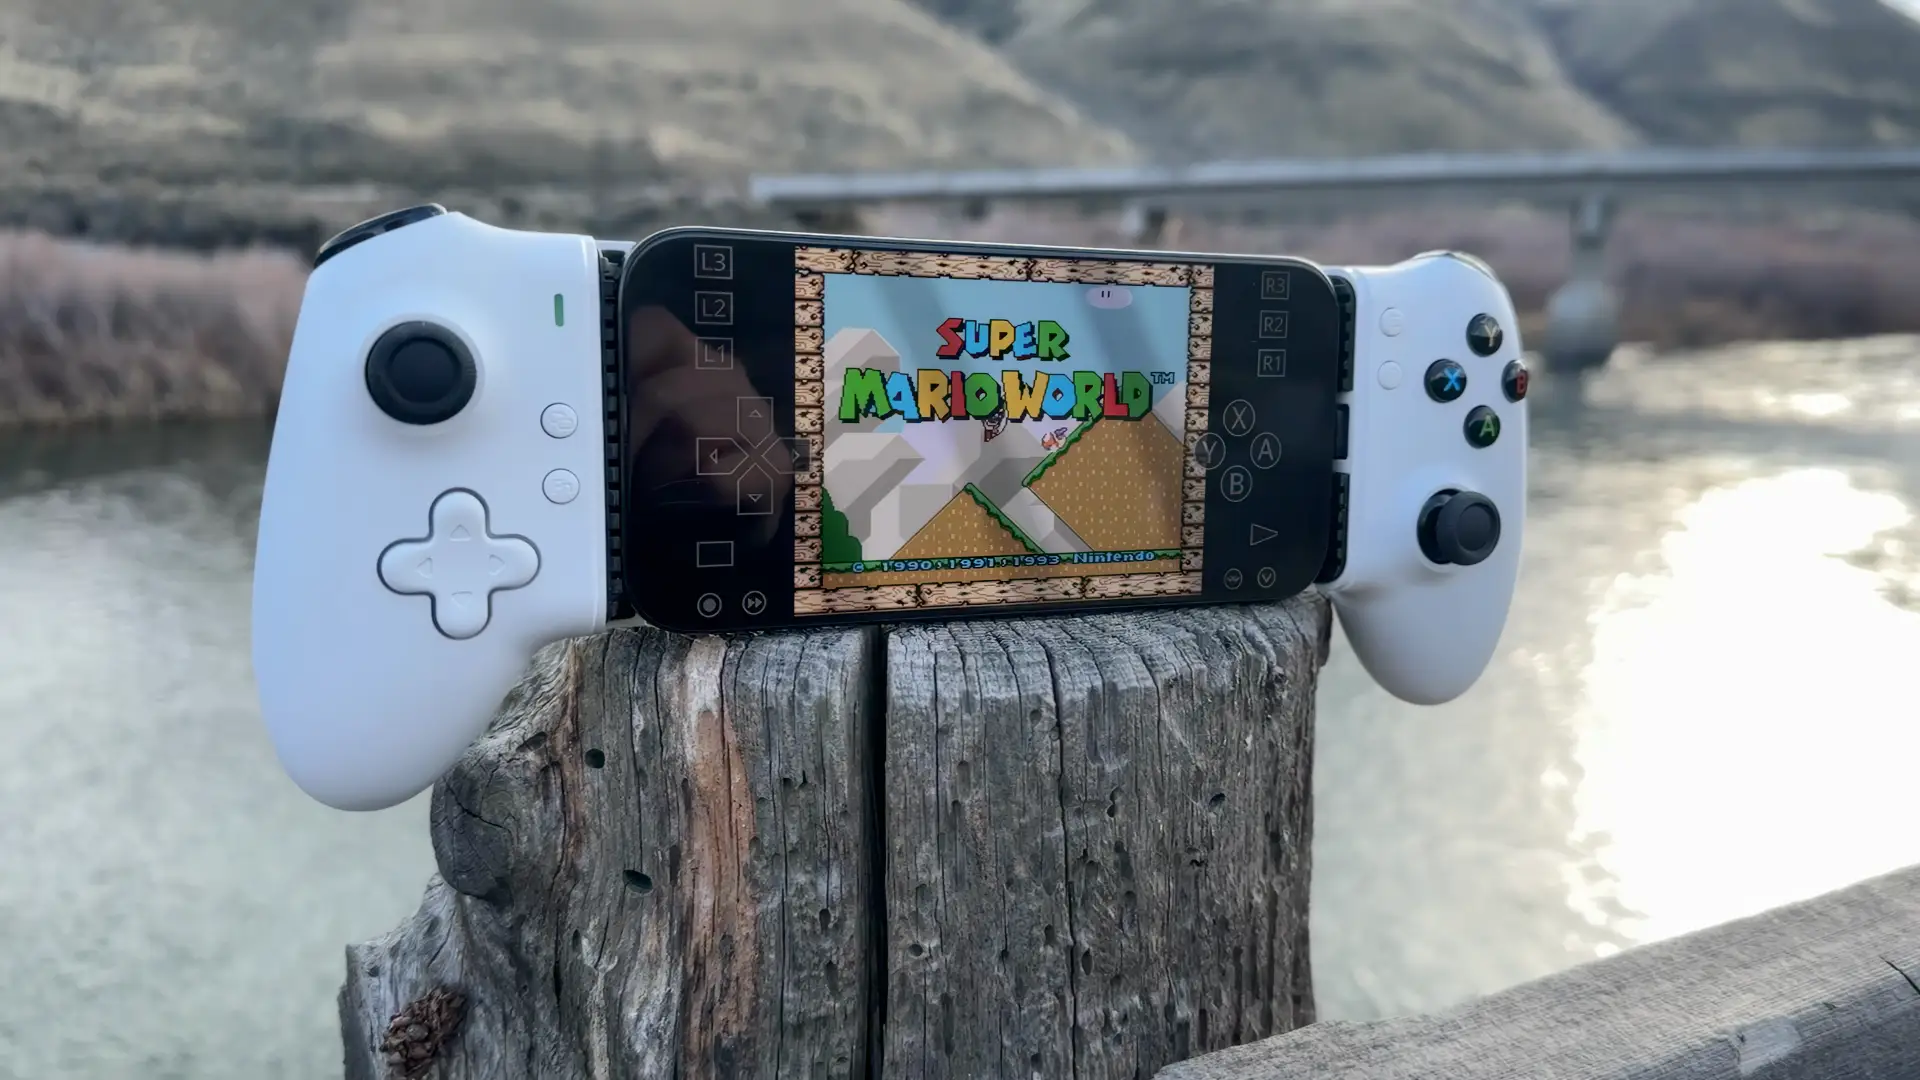
Controllers and iOS

iOS supports out-of-the-box various styles of controllers, both controllers designed specifically for phones and controllers designed for game consoles.
Premium mobile gaming controller options include:
There are also a host of clone controllers that are largely based on the Gamesir that are generally regarded as "good" and come in some different colorways and may be more price-friendly.
Console Supported controllers include:
For more information, see: Apple.com: Connect a PlayStation wireless game controller to your Apple device and Apple.com: Connect an Xbox wireless game controller to your Apple device. *The Joycons do not seem to be officially supported, but they work. See TheVerge.com: iOS 16 supports Nintendo's Switch Pro and Joy-Con controllers.
iOS, unfortunately, is limited in its ability to map buttons, and thus, not every button a controller may work.
Controller clips
If you already have a game console controller, one of the least expensive ways to add a hardware controller to your iPhone is via clip mechanisms. These allow you to use high-quality controllers with iOS, but they aren't the most ergonomic due to the weight distribution. However, they do let you explore the capabilities of mobile iOS gaming without spending much money. There are many to choose from, like OIVO PS4 Controller Phone Mount Clip, or OIVO PS5 Controller Phone Mount Clip. There are a lot of these on Amazon, like Orzero PS5 Magnetic Controller Phone Mount Clip that makes use of MagSafe or Orzero Magnetic Controller Phone Mount Clip for X box Series X/S, X box One/One S/One X. There are many to pick from; I suggest searching Mobile Gaming CLip and then appending whatever parameters from there.
Dumping ROMs ...directly to an iPhone?

In the modern era, USB ROM dumping hardware exists for most platforms. Users with their own game libraries can archive their games using these devices. Prior to the USBization of such devices, generally, this was limited to Windows and Linux, and sometimes Mac OS/OS X. Today ROM dumping can be performed directly, even to an Android or iOS /iPadOS device. YouTuber, Will it work? Can you play physical N64 cartridges on the iPhone?, demostrates using a JoeyN64 cart flasher, directly with an iPhone.
These are the basic three steps that any ROM dumping hardware will require. However, there's no guarantee that all ROM dumping hardware will be compatible with iOS/iPadOS, but it is now possible and very easy to make legal backups of your games.
Creating your own ISOs from PlayStation 1 / Sega CD / NeoGeo games

Creating PSX backups is pretty simple if you are terminal savvy. All you need is a Mac with a disc drive. Disk utility can create disc images, but you can do this more quickly via the terminal. This process is often referred to as "Ripping,"
Disk Utility
Disk utility is an application located in Applications -> Utilities on every Mac computer.
Terminal
Using the terminal is a bit quicker and more flexible than Disk Utility. The following command will create an ISO file from a PSX game disc:
hdiutil makehybrid -iso -joliet -o ~/Desktop/PS1_Backup.bin /Volumes/PLAYSTATIONExplanation of the command:
- hdiutil makehybrid: The macOS utility for creating disc images
- -iso: Creates a standard ISO9660 filesystem (required for PS1 games)
- -joliet: Adds Joliet extensions for longer filenames
- -o ~/Desktop/PS1_Backup.bin: Specifies the output file (note the .bin extension commonly used for PS1 game, .iso should also be supported by most emulators)
- /Volumes/PLAYSTATION: The input directory (mounted PS1 CD)
You will need to alter the paths listed. I highly recommend using AI to demystify terminal commands. While AI isn't the most reliable, it is when it comes to debugging terminal commands. Both Claude and ChatGPT, even at the free tiers, are great for copying and pasting error codes or asking for help when modifying commands.
iOS Emulation Communities
Emulation is a vast and complex topic and is ever-evolving. The best place to get help/lend help get the latest and greatest information is in communities.
Version History

- 04/08/2025 - Much needed copy editing and fixed broken Anchor. Added more info for StikJIT
- 04/07/2025 - Stikjit tutorial linked.
- 04/02/2025 - More info about Stikjit.
- 03/31/2025 - prelimary info about Stikjit.
- 03/30/2025 - Consoles correctioin on TubroGraphix support, responsive table, oversized header images on mobile, added a bit more organization to the controllers and recommendations
- 03/28/2025 - Added more info about JIT Streaming and the differences between JIT and interpretation. Added instructions for Xcode and corrections. Added more images to the guide. The guide now roughly 10,000 words long.
- 03/27/2025 - Added ROM dumping.
- 03/26/2025 - Added info about JIT Streaming. Added Nin10 as I missed it in the compatibility chart. Updated the Consoles app to accurately reflect the compatibility state.
- 03/25/2025 - Tables, tables and more tables. Thanks to Reddit feedback, I added a boatload more emulators. This required to break apart the table and add in a pricing / OS Table. Added a few more graphics to sections.
- 03/24/2025 - Big update. Added rough draft of Folium information and communities, added support section, added Sideloading info, added Provenance. Already over 8000 words.
- 03/23/2025 - Create ISOs, macOS emulation, editing, more images, added info about updater and default location for BIOS in RetroArch. Already crossed 6500+ words.
- 03/22/2025 - Added to do, thanks to Reddit feedback; I didn't know Provenance was on the App Store. Added ISO section and Mac emulation links. There's plenty to do! Already nearly 6000 Words in 5 days of writing. This guide probably is going to be massive. It's unrelated, but I also cleaned up the JS on my blog to make it even more minimalist.
- 03/21/2025 - Minor Edits
- 03/20/2025 - Flycast info, started recommended settings for Retro Arch, added Yabause recommendation
- 03/19/2025 - Expanding content (added controllers, more images, more on RetroArch)
- 03/18/2025 - Initial Draft
To do list:
- More RetroArch explainers
- More on shaders
- Xcode App Signing
- DolphiniOS / MeloNX coverage
- Animated GIFs where it makes sense to illustrate behaviors or settings
- Evenutally make a Mac version of this
Mac Guides
I've made quite a bit of emulation-related content related to macOS as well.
- Sony PlayStation 1 - Video
- Sony PlayStation 2 - Written & Video
- Sony PlayStation 3 - Video
- Microsoft Xbox - Written and Video
- MAME (arcade) - Written and Video
- Mac OS 9 - Written and Video