-
Bootstrap 4 isn't quite what it's cracked up to be...
Love it or hate it, bootstrap has been a mainstay of front-end development since 2011. I've watched it grow and now, dare I say, flounder.
Rather than recant the ups and downs of each generation, Bootstrap 3 was wonderful for its simple flexibility. Most of the time, I whittled down Bootstrap to the bare minimums, often using only its grid (modified with my own breakpoints) and in-name-only classes like
.btn, as they're lexiconic to bootstrap. Any project, I could rely on like-markup and classes to Bootstrap even if the project was largely not-bootstrap. Bootstrap 3's Sass logic was simple and easy, but bootstrap 4 is silly.- Bootstrap 4 now uses Sass includes for breakpoints. Why? I cannot fathom a reason a realistic reason why. This is counter-intuitive. Everything is include hell.
- Most of the generative sass logic has been abstracted into mixin hell. It's starting to resemble the clusterfuck that is Foundation.
- The cross-dependency of Sass isn't predictable. Example: If you comment out forms, it will break nav functionality. There's a lot of senseless overhead.
- The JS is starting to suffer bloat. The collapse.js now is 375 lines, now up from 212 lines. Unminified, the Javascript has ballooned from 69k to 163k.
- Lite and dark themes are written into the code in such a way, it's not easily abstracted out.
- While small, some of the icons are inlined SVG images, which means removing if custom icons are used, more senseless payload.
Bootstrap 3 was the right mix of complexity to return on investment, but Bootstrap 4? I'm starting to think otherwise. So far, there's not enough compelling for Bootstrap . Conversion to REM units is nice as well as opt-in to Flex box. Dropping IE8 is a good move. Glyphicons need to go for accessibility. The overall CSS is smaller. I like that. The hackability though? Less so.
-
Bandwidth throttling / simulation in macOS (OS X)
Often as a developer, you want to simulate the experience of limited bandwidth for people with slower internet connections. Chrome and FireFox have this built into the browser, but it only affects the browser and doesn't provide robust parameters for latency or affect the rest of the experience. Safari doesn't have this, and it's in part to the Network Link Conditioner utility provided as an additional tool.
To install the Network Link Conditioner, you'll need the following:
- Apple Developer account (no paid licensing is required)
- Xcode installed
Next, go to downloads for Apple Developers and sign in. The Network Link Conditioner utility is packaged in with other utilities. Search for Additional Tools or use one of the links below.
- OS X 10.10 users should download Hardware IO Tools for Xcode 7.3
- OS X 10.10 users should download Additional Tools for Xcode 8.2
- OS X 10.12 users should download Additional Tools for Xcode 9
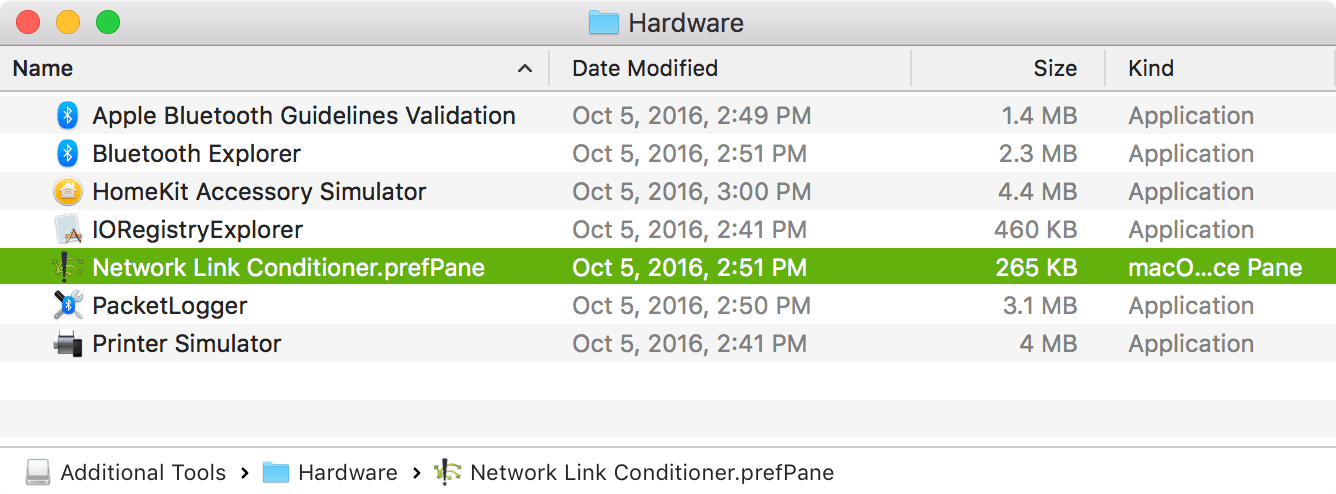
Open up the DMG and install Network Link Conditioner.prefPane by double-clicking it. (Note: in Additional Tools, it'll likely be in the hardware folder)
Using Network Link Conditioner
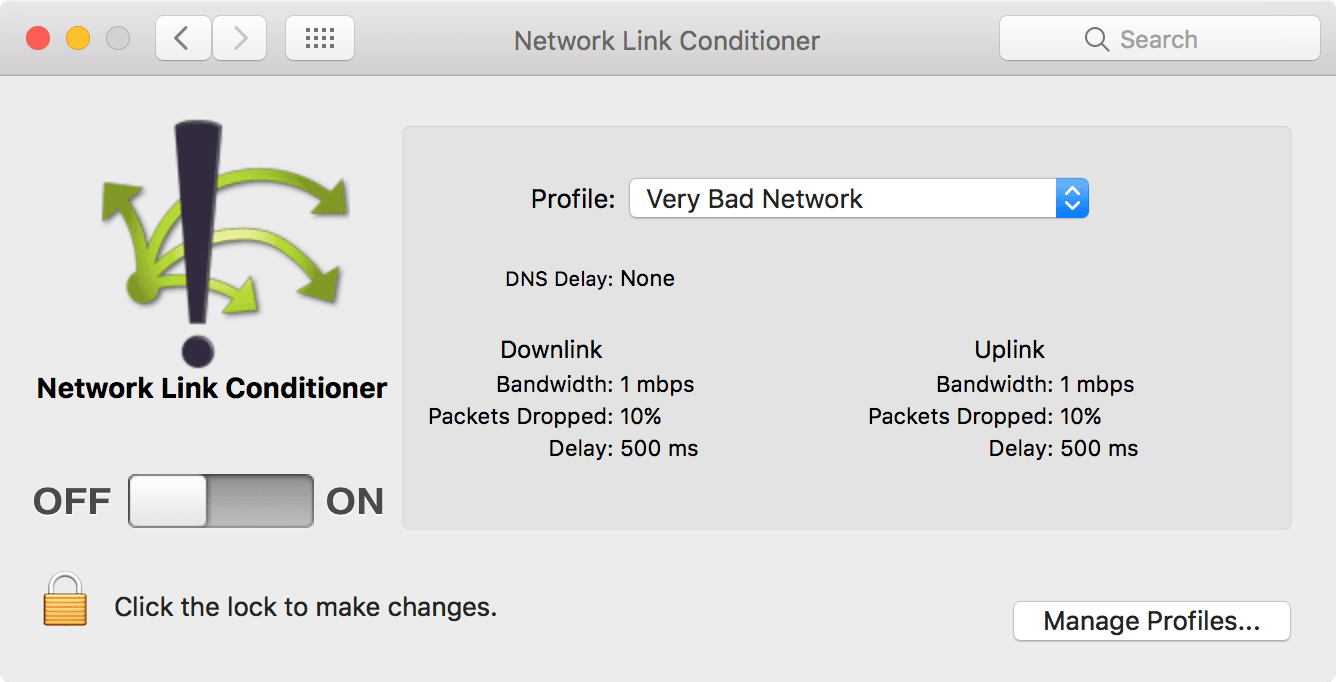
Open up the system prefs on your computer. Click on Network Link Conditioner and click on/off to toggle it on, and the drop down to use presets. You can create your own with the Manage Profiles.
Congrats, now you can enjoy slow internet.
-
Integrating Node KSS with Gulp
First I off, I highly recommend reading CSSTricks' Build a Style Guide Straight from Sass, it's a game changer for auto style guide generation. That said, I assume if you're at this page you're already a convert.
I'm going to assume the following:
- node-kss is installed in the same directory as your gulpfile
- node-kss has been set up and is generating a style guide.
- you have at least very rudimentary understanding of gulp
If either of the first is untrue, please go to the CSS tricks link as it's a wonderful guide and will get you a working spot >Node-KSS has a gulp repository but its wantonly out of date. I recommend not using it. Fortunately chaining it's pretty easy. First, we need to install gulp-shell in our gulp project.
npm install --save-dev gulp-shellNext, we're going to need to require gulp shell in our gulp file, this can vary based on your set up, it may be var or const depending on if you're running ES6 or not or part of a larger declaration:
ES6
const shell = require('gulp-shell')ES5
var shell = require('gulp-shell')Next we're going to create in our gulpfile a task to execute the command to run node-kss (note you can run alterations of said command if your configuration is different, kss is not required to be installed in the same place as gulp.)
gulp.task('kss', shell.task(['./node_modules/.bin/kss --config kss-config.json']));Lastly, we now need to reference this task in another task. Below is an example of how I'm using it, I created a watch task called "styleguide", a slightly modified version of my default task. Your task will differ from mine
gulp.task('styleguide',['serve'], function() {
  // Watch .scss files
  gulp.watch(appDefaults.styleDirectory+'**/*.scss', function(event) {
    console.log('File ' + event.path + ' was ' + event.type + ', running tasks...');
    gulp.run('sass');
    gulp.run('kss');
    });
    gulp.watch(appDefaults.myJavascriptDirectory , function(event) {
      console.log('File ' + event.path + ' was ' + event.type + ', running tasks...');
      gulp.run('scripts');
      gulp.run('compress');
    });
    gulp.watch(appDefaults.watchJavascript).on('change', browserSync.reload);
    gulp.watch(appDefaults.watchHTML).on('change', browserSync.reload);
});
Note that I applied
gulp.run('kss');after my Sass task has run, this will generate a style guide. Since the style guide generates new HTML on every save, mygulp.watch(appDefaults.watchHTML).on('change', browserSync.reload);is triggered because of my project's directory structure. This is why I created a separate task named "styleguide" as I do not always need my kss task to run, and do not want to interfere with live CSS injection via browserSync. Your needs will vary.
-
Gulp Boilerplate
Every now and again, I remember I have a GitHub account and throw something simple up there. I made a Grunt Boilerplate years ago and finally got around to making one for Gulp. There are a few features I still need to stick in, but I like to have a starting point rather than re-inventing my tasks every project.
Gulp-Sass-JS-BrowserSync-Boilerplate
Features all the greatest hits:
- Sass processing
- CSS Browser auto-prefixing
- CSS minification
- JS Uglify (minification)
- BrowserSync (Inject CSS changes + follow, reload on JS change)
This is mostly for my own benefit, but if anyone finds it useful, I'm glad. You can nab it here Gulp-Sass-JS-BrowserSync-Boilerplate
-
When Node-Sass fails Installing
So you're here because bash is outputting some big mess that looks like the following when you tried to install gulp-sass or node-sass via NPM. You've probably updated Node and NPM, switched versions in NVM or HomeBrew and are beating your head while node-sass isn't installing. The issue is likely not in the node or npm version but the package.json.
  > node-sass@0.8.6 install /Users/<path-to-project>/_gulp/node_modules/gulp-sass/node_modules/node-sass
> node build.js

(node:43004) [DEP0006] DeprecationWarning: child_process: options.customFds option is deprecated. Use options.stdio instead.
  CXX(target) Release/obj.target/binding/binding.o
In file included from ../binding.cpp:1:
../../nan/nan.h:339:13: error: no member named 'New' in 'v8::String'
    return  _NAN_ERROR(v8::Exception::Error, errmsg);
            ^~~~~~~~~~~~~~~~~~~~~~~~~~~~~~~~~~~~~~~~
../../nan/nan.h:319:50: note: expanded from macro '_NAN_ERROR'
# define _NAN_ERROR(fun, errmsg) fun(v8::String::New(errmsg))
                                     ~~~~~~~~~~~~^
../../nan/nan.h:343:5: error: no member named 'ThrowException' in namespace 'v8'
    _NAN_THROW_ERROR(v8::Exception::Error, errmsg);
    ^~~~~~~~~~~~~~~~~~~~~~~~~~~~~~~~~~~~~~~~~~~~~~
../../nan/nan.h:324:11: note: expanded from macro '_NAN_THROW_ERROR'
      v8::ThrowException(_NAN_ERROR(fun, errmsg));                             \
      ~~~~^
../../nan/nan.h:343:5: error: no member named 'New' in 'v8::String'
    _NAN_THROW_ERROR(v8::Exception::Error, errmsg);
    ^~~~~~~~~~~~~~~~~~~~~~~~~~~~~~~~~~~~~~~~~~~~~~
../../nan/nan.h:324:26: note: expanded from macro '_NAN_THROW_ERROR'
      v8::ThrowException(_NAN_ERROR(fun, errmsg));                             \
                         ^~~~~~~~~~~~~~~~~~~~~~~
../../nan/nan.h:319:50: note: expanded from macro '_NAN_ERROR'
# define _NAN_ERROR(fun, errmsg) fun(v8::String::New(errmsg))
                                     ~~~~~~~~~~~~^
../../nan/nan.h:348:9: error: no type named 'ThrowException' in namespace 'v8'
    v8::ThrowException(error);
    ~~~~^
../../nan/nan.h:355:65: error: no member named 'New' in 'v8::String'
    v8::Local<v8::Value> err = v8::Exception::Error(v8::String::New(msg));
                                                    ~~~~~~~~~~~~^
../../nan/nan.h:356:50: error: expected '(' for function-style cast or type construction
    v8::Local<v8::Object> obj = err.As<v8::Object>();
                                       ~~~~~~~~~~^
../../nan/nan.h:356:52: error: expected expression
    v8::Local<v8::Object> obj = err.As<v8::Object>();
                                                   ^
../../nan/nan.h:357:65: error: too few arguments to function call, expected 2, have 1
    obj->Set(v8::String::New("code"), v8::Int32::New(errorNumber));
                                      ~~~~~~~~~~~~~~            ^
/Users/<user>/.node-gyp/8.1.2/include/node/v8.h:2764:3: note: 'New' declared here
  static Local<Integer> New(Isolate* isolate, int32_t value);
  ^
In file included from ../binding.cpp:1:
../../nan/nan.h:357:26: error: no member named 'New' in 'v8::String'
    obj->Set(v8::String::New("code"), v8::Int32::New(errorNumber));
             ~~~~~~~~~~~~^
../../nan/nan.h:369:12: error: no member named 'New' in 'v8::String'
    return _NAN_ERROR(v8::Exception::TypeError, errmsg);
           ^~~~~~~~~~~~~~~~~~~~~~~~~~~~~~~~~~~~~~~~~~~~
../../nan/nan.h:319:50: note: expanded from macro '_NAN_ERROR'
# define _NAN_ERROR(fun, errmsg) fun(v8::String::New(errmsg))
                                     ~~~~~~~~~~~~^
../../nan/nan.h:373:5: error: no member named 'ThrowException' in namespace 'v8'
    _NAN_THROW_ERROR(v8::Exception::TypeError, errmsg);
    ^~~~~~~~~~~~~~~~~~~~~~~~~~~~~~~~~~~~~~~~~~~~~~~~~~
../../nan/nan.h:324:11: note: expanded from macro '_NAN_THROW_ERROR'
      v8::ThrowException(_NAN_ERROR(fun, errmsg));                             \
      ~~~~^
../../nan/nan.h:373:5: error: no member named 'New' in 'v8::String'
    _NAN_THROW_ERROR(v8::Exception::TypeError, errmsg);
    ^~~~~~~~~~~~~~~~~~~~~~~~~~~~~~~~~~~~~~~~~~~~~~~~~~
../../nan/nan.h:324:26: note: expanded from macro '_NAN_THROW_ERROR'
      v8::ThrowException(_NAN_ERROR(fun, errmsg));                             \
                         ^~~~~~~~~~~~~~~~~~~~~~~
../../nan/nan.h:319:50: note: expanded from macro '_NAN_ERROR'
# define _NAN_ERROR(fun, errmsg) fun(v8::String::New(errmsg))
                                     ~~~~~~~~~~~~^
../../nan/nan.h:377:12: error: no member named 'New' in 'v8::String'
    return _NAN_ERROR(v8::Exception::RangeError, errmsg);
           ^~~~~~~~~~~~~~~~~~~~~~~~~~~~~~~~~~~~~~~~~~~~~
../../nan/nan.h:319:50: note: expanded from macro '_NAN_ERROR'
# define _NAN_ERROR(fun, errmsg) fun(v8::String::New(errmsg))
                                     ~~~~~~~~~~~~^
../../nan/nan.h:381:5: error: no member named 'ThrowException' in namespace 'v8'
    _NAN_THROW_ERROR(v8::Exception::RangeError, errmsg);
    ^~~~~~~~~~~~~~~~~~~~~~~~~~~~~~~~~~~~~~~~~~~~~~~~~~~
../../nan/nan.h:324:11: note: expanded from macro '_NAN_THROW_ERROR'
      v8::ThrowException(_NAN_ERROR(fun, errmsg));                             \
      ~~~~^
../../nan/nan.h:381:5: error: no member named 'New' in 'v8::String'
    _NAN_THROW_ERROR(v8::Exception::RangeError, errmsg);
    ^~~~~~~~~~~~~~~~~~~~~~~~~~~~~~~~~~~~~~~~~~~~~~~~~~~
../../nan/nan.h:324:26: note: expanded from macro '_NAN_THROW_ERROR'
      v8::ThrowException(_NAN_ERROR(fun, errmsg));                             \
                         ^~~~~~~~~~~~~~~~~~~~~~~
../../nan/nan.h:319:50: note: expanded from macro '_NAN_ERROR'
# define _NAN_ERROR(fun, errmsg) fun(v8::String::New(errmsg))
                                     ~~~~~~~~~~~~^
../../nan/nan.h:406:13: error: no member named 'smalloc' in namespace 'node'
    , node::smalloc::FreeCallback callback
      ~~~~~~^
../../nan/nan.h:141:71: note: expanded from macro 'NAN_INLINE'
# define NAN_INLINE(declarator) inline __attribute__((always_inline)) declarator
                                                                      ^~~~~~~~~~
../../nan/nan.h:416:12: error: no matching function for call to 'New'
    return node::Buffer::New(data, size);
           ^~~~~~~~~~~~~~~~~
/Users/<user>/.node-gyp/8.1.2/include/node/node_buffer.h:52:40: note: candidate function not viable: no known conversion from 'char *' to 'v8::Isolate *' for 1st argument
NODE_EXTERN v8::MaybeLocal<v8::Object> New(v8::Isolate* isolate, size_t length);
                                       ^
/Users/<user>/.node-gyp/8.1.2/include/node/node_buffer.h:55:40: note: candidate function not viable: no known conversion from 'char *' to 'v8::Isolate *' for 1st argument
NODE_EXTERN v8::MaybeLocal<v8::Object> New(v8::Isolate* isolate,
                                       ^
/Users/<user>/.node-gyp/8.1.2/include/node/node_buffer.h:67:40: note: candidate function not viable: requires 3 arguments, but 2 were provided
NODE_EXTERN v8::MaybeLocal<v8::Object> New(v8::Isolate* isolate,
                                       ^
/Users/<user>/.node-gyp/8.1.2/include/node/node_buffer.h:60:40: note: candidate function not viable: requires 5 arguments, but 2 were provided
NODE_EXTERN v8::MaybeLocal<v8::Object> New(v8::Isolate* isolate,
                                       ^
In file included from ../binding.cpp:1:
../../nan/nan.h:420:12: error: no matching function for call to 'New'
    return node::Buffer::New(size);
           ^~~~~~~~~~~~~~~~~
/Users/<user>/.node-gyp/8.1.2/include/node/node_buffer.h:52:40: note: candidate function not viable: requires 2 arguments, but 1 was provided
NODE_EXTERN v8::MaybeLocal<v8::Object> New(v8::Isolate* isolate, size_t length);
                                       ^
/Users/<user>/.node-gyp/8.1.2/include/node/node_buffer.h:55:40: note: candidate function not viable: requires at least 2 arguments, but 1 was provided
NODE_EXTERN v8::MaybeLocal<v8::Object> New(v8::Isolate* isolate,
                                       ^
/Users/<user>/.node-gyp/8.1.2/include/node/node_buffer.h:67:40: note: candidate function not viable: requires 3 arguments, but 1 was provided
NODE_EXTERN v8::MaybeLocal<v8::Object> New(v8::Isolate* isolate,
                                       ^
/Users/<user>/.node-gyp/8.1.2/include/node/node_buffer.h:60:40: note: candidate function not viable: requires 5 arguments, but 1 was provided
NODE_EXTERN v8::MaybeLocal<v8::Object> New(v8::Isolate* isolate,
                                       ^
In file included from ../binding.cpp:1:
../../nan/nan.h:427:26: error: no member named 'Use' in namespace 'node::Buffer'
    return node::Buffer::Use(data, size);
           ~~~~~~~~~~~~~~^
fatal error: too many errors emitted, stopping now [-ferror-limit=]
20 errors generated.
make: *** [Release/obj.target/binding/binding.o] Error 1
gyp ERR! build error
gyp ERR! stack Error: `make` failed with exit code: 2
gyp ERR! stack     at ChildProcess.onExit (/Users/<user>/.nvm/versions/node/v8.1.2/lib/node_modules/npm/node_modules/node-gyp/lib/build.js:258:23)
gyp ERR! stack     at emitTwo (events.js:125:13)
gyp ERR! stack     at ChildProcess.emit (events.js:213:7)
gyp ERR! stack     at Process.ChildProcess._handle.onexit (internal/child_process.js:197:12)
gyp ERR! System Darwin 16.7.0
gyp ERR! command "/Users/<user>/.nvm/versions/node/v8.1.2/bin/node" "/Users/<user>/.nvm/versions/node/v8.1.2/lib/node_modules/npm/node_modules/node-gyp/bin/node-gyp.js" "rebuild"
gyp ERR! cwd /Users/<path-to-project>/assets/_gulp/node_modules/gulp-sass/node_modules/node-sass
gyp ERR! node -v v8.1.2
gyp ERR! node-gyp -v v3.6.2
gyp ERR! not ok
Go to package.json and look at the versions. Most likely the version is locked to a very old version of node-sass or gulp-sass in your project (or the project you're using), switch it's version to something recent, (as of writing this, it is
"gulp-sass": "^3.0.0", or"node-sass": "^4.7.2"). Congrats, it'll now install!
-
Safari's Autofill needs to be redesigned
All major browsers have built-in login managers that save and automatically fill in username and password data to make the login experience more seamless. The set of heuristics used to determine which login forms will be autofilled varies by browser, but the basic requirement is that a username and password field be available.
Login form autofilling in general doesn’t require user interaction; all of the major browsers will autofill the username (often an email address) immediately, regardless of the visibility of the form. Chrome doesn’t autofill the password field until the user clicks or touches anywhere on the page. Other browsers we tested [2] don’t require user interaction to autofill password fields.
Thus, third-party javascript can retrieve the saved credentials by creating a form with the username and password fields, which will then be autofilled by the login manager.
Source: freedom-to-tinker.com
Ironically before the holidays, I had to deal with this from the opposite end as auto-form filling from Safari was filling out hidden fields.
Consider the following
- Safari's autofill can fill out more than just username/password.
- Safari's autofill does not give you the ability to view the stored information in its local database other than site entries.
- Safari's autofill will fill out
visibility: hiddenanddisplay: none - Safari's autofill does not trigger a DOM event on display
visibility: hiddenanddisplay: none. Safari does allow to query forinput:-webkit-autofillbut testing for this means super hacky setTimeout and setInverval hacks. - Safari does (mostly) respect the HTML5 convention but will ignore autofill off on username or password fields
This leads to a bizarre world where Safari is egregiously handing out info that can't be vetted.
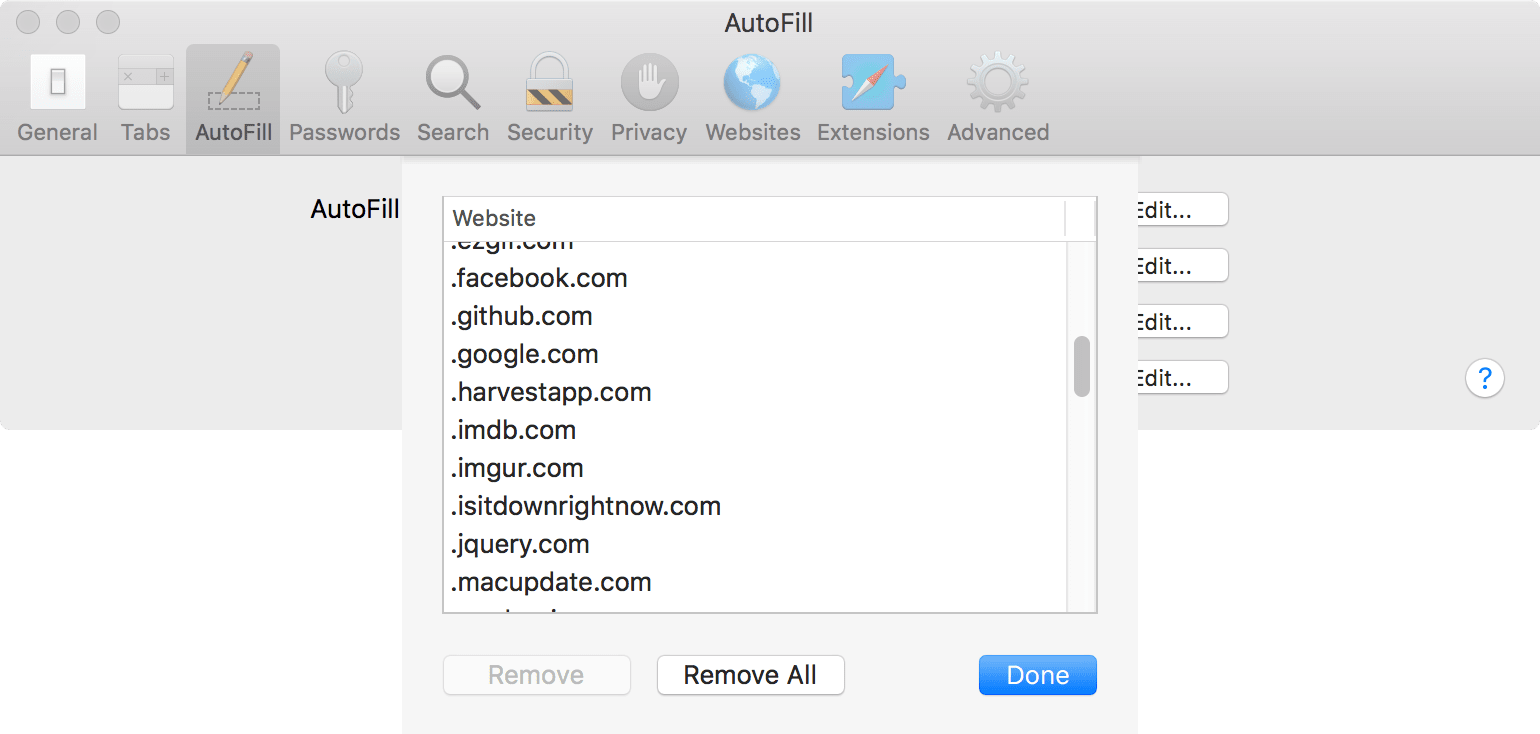
Pictured: Safari's autofill manager for non-username/passswords (other), doesn't allow you to see what information its autofilling or edit the values. I found some surprising entries in my Safari autofill manager.
I had the problem where a donation form was falling our API validation as Safari's autofill was completing hidden form elements without invoking changes and creating scenarios we hadn't previously considered. It took error logging to figure out Safari was the culprit, and a heavy dose of intuition to figure out that it was autofill.
The solution was to add autofill and disabled but lead me to wonder about the potential abuses of autofill. Apparently, I wasn't the only one.
-
ImageOptim vs Squash 2 - Comparing PNG optimization - A Squash 2 review
For years I've leaned on ImageOptim as my go-to for image optimization. I tend to be a little obsessive, using modern formats (WebP, JPEG 2000) and testing out avant-garde projects like Guetzli by Google. I recently decided to finally try out Squash by Realmac Software.
Over the years, codecs have improved remarkably, especially in the realm of video: For example: H.261 (1984, 1988) -> MPEG-1 (1988-1991) -> MPEG2 aka H.263 (1996-2015) ->MPEG4 aka H.264 (1999-current) -> High Efficiency Video Coding (HEVC) aka H.265 or MPEG (2015 - current). Each iteration with the ultimate goal of improving video quality with at lower bit rates. This doesn't even cover the other formats, VP8, VP9, Ogg Vorbis, DIVX, 3IVX, Sorenson, Real Media and the many others that occurred the past 30 years which all have had variations of mainstream success. Audio has had a similar vector from LMA4:1, Mpeg, MP2, Mp3, ACC, Ogg, AC3, DTS to name a few.
However, static images haven't had the wide range of codecs (most formats are lossless proprietary files used by various image editors) and have been almost entirely relegated to five formats, SVG, BMP, PNG, JPEG and GIF for distribution. You may occasionally PSDs or EPS files, or photography formats like DNG or standard-free RAW, but those fall into the same category as video codecs like ProRez, DNxHD, Cineform. These are intermediate formats that require specialized software to view/edit and converted when distributed beyond professional means (sans EPS).
We're starting to see future image formats like Google with WebP, and Apple with JPEG2000 and HEIC, and Safari allowing inline MP4s to be treated as images but for the past 10 years, much of the action in image compression has been trying to squeeze out ever last single byte out of the existing formats, almost entirely for JPEG and PNG (and SVG but that's a different story) A lot of the slow movement of web formats has to do with the W3c. It took Cisco buying and distributing the Mp4 patent for free to move MP4 to the accepted video formation for Microsoft, Apple, Google, and Mozilla. It may take some similar act of corporate benevolence to bring a successor to JPEG.
Interestingly though, there's a been a concerted effort to squeeze every bit of optimization out of the existing formats: JPEG has MOZJpeg, Guetzli, JPEGOptim, and Jpegtran. PNG has Zopfil, PNGOUT, OptiPNG, AdvPNG, PNGCrush. These all differ as some are encoders, and some are strictly optimizers but the end game is to extract the most out the formats which often involves trickery to exploit the compression. Both ImageOptim and Squash are GUI front ends that make use of these optimizations to create the best JPEG or PNG per kilobyte possible. These libraries do not come without a penalty, that being CPU cycles. These all can take minutes to execute on larger images, and the longest being Guetzli, a 8 MP image can take around 40 minutes to encode even a 5th generation Core i7. We're probably quickly approaching the end of the law of diminishing returns. If you're using Guetzli, I'd argue it's easier to provide alternative image formats (WebP / JPEG 2000) as opposed to burning hours encoding a hand full of images as you'll get better results for the people who can see them (Safari and Chrome users). The rest, however, are still viable.
PNG Compression tests
Settings used: ImageOptim (default)
- Zopfli
- PNGOUT
- OptiPNG
- AdvPNG
- Strip PNG meta data
- Lossless
- Optimization Level: Insane
Squash 2
- More Compressed (slower)
Test 1: Complex Webpage screenshot
- Original: 2.3MB (2,298,405 bytes)
- ImageOptim: 1.7MB (1,685,034 bytes)
- Squash: 1.7MB (1,663,095 bytes)
Kaleidoscope Show differences results: >No differences
Winner: Squash
Squash Savings over ImageOptim: 21,939 bytes (21.9K), 1.3%Test 2: Simple Webpage screenshot
- Original: 33K (33,173 bytes)
- ImageOptim: 18k (18,538 bytes)
- Squash: 18k (18,538 bytes)
Winner: Tie
Kaleidoscope Show differences results: No differences
Neither of these is terribly surprising, Squash uses LibPNG and Zopfil, which are open source PNG optimizations. I'm a little surprised that Squash shaved off a few more K. To make sure this wasn't a fluke, I tested another screenshot, 2.9MB (2,880,886 bytes), again Squash 2 won, (1.1 MB) 1,116,796 to (1.1 MB) 1,140,793, for a savings of 23,997 bytes (24k). On very large PNGs, Squash 2 has the advantage. I checking PNGCrush, brought it down 1,126,420 bytes.
Test 3: Large Photograph
- Original: 10.4 MB,(10,403,651 bytes)
- ImageOptim: 6 MB (5,927,713) bytes)
- Squash: 5.6 MB (5,597,048 bytes
Kaleidoscope Show differences results: No Differences
Winner: Squash
This last test weighs in the most for the favor of Squash, 330,665 bytes is significant, even if only a 6% difference
The Results...
While hardly the epitome of comprehensive testing, Squash does provide slightly better PNG compression. That said, ImageOptim is quite good for the sticker price of free. Squash 2 is part of SetApp collection or $15 stand alone. Squash isn't as accomplished in JPEG optimization as ImageOptim but seems to be best PNG GUI utility for OS X. It's surprising too, as ImageOptim offers more options for optimization and the same optimization libraries. You can't really go wrong using either utility.
Mini Review of Squash
Squash is essentially a drag and drop no brainer utility, drag images in and Squash does the best. If you've used ImageOptim then you're familiar with it. The big differences between ImageOptim and Squash are mostly cosmetic as both do the same operation. Squash appears to be no faster than ImageOptim nor does it have has as many options. The UI does provide a goofy animation and annoying sound (I killed the sound effects immediately).
Where Squash won at PNGs, it lost out on lossless JPEG compression. Test routinely showed that ImageOptim shaved off on average about 5% more off JPEGs although individual tests differed wildly.
Squash 2 is a minimalist utility through and through. Drag images in and it outputs compressed ones. Quite possibly the best thing Squash offers over ImageOptim is one of the most simple, it allows you to create new versions of the file appended with a suffix. ImageOptim overwrites images which can be undesirable.
-
Detecting Content Blockers is a losing battle, but you can be smart and ethical when doing so...
There's been a bit of a cat and mouse game between adblockers/content blockers and advertisers/analytics/trackers. The short answer is you aren't going to defeat them single-handedly. Many of the libraries designed to detect them will fail as they're inevitably blocked once a content blocker is updated to detect them. As someone who once ran a website, that hit 150,000 unique visitors a month funded by advertising, I'm sympathetic the publisher's plight. As a content writer, I value analytics, I use google analytics on this site as it helps me understand what content resonates, what channels people use to find my content and how they consume it. As developer with a touch fo UX, logging and error tracking is extremely helpful. A service like loggly can help me find errors, and design better to catch edge cases that aren't on the "happy path" and make data-driven decisions about a product. However, the advertising industry has perniciously proven they are not to be trusted. There's a reason why as a user I surf with Ghostery/1blocker, block cross-origin cookies (on my desktop, kill all cookies), use a VPN, and disabled flash long before most people to dodge the dreaded forever flash cookie. Privacy matters.
This is my attempt create an ethical framework around content-blocking from the perspective of a developer/content create/publisher.
A quick list of observations
I've assembled a list of facts/observations about content blockers.
- Adblock/Adblock Plus focus on advertising but not analytics. This could change in the future.
- 1blocker and Ghostery are particularly good content blockers. Both will block
<script>tags from loading, or anyonerrorcodes at the src level - Content blockers are not fooled by appending
<script>tags via javascript to the DOM. - 1blocker and Ghostery will not be removed from the DOM, thus any checks to see if they exist will be true.
- 1blocker and Ghostery can detect anti-blockers popular scripts and prevent them.
- Browsers are more aggressively pushing privacy settings, FireFox leading the charge and Safari not far behind.
- If your website fails to work with one of the popular content blockers working, you are cutting out 20% of audience.
But I'm a special snowflake!
Using powers for goodSo as a developer/UX designer you're suddenly faced with a problem. Your website or web app has features that break when content blockers are enabled. You've already made sure that your core functionality isn't tied to anything that will be blocked by content blockers.
Likely your client or manager will ask "can't you just go around the content blocker?".
The short answer is "No". You will not forcibly defeat content blockers, and if you try, you're signing up for the unwinnable, all consuming, cat and mouse game. However, you can potentially detect content blockers, rather than defeat them. With a service like Loggly, you can easily check if the
_Ltrackervar has loaded.if (typeof _LTracker === 'undefined' || _LTracker === null) { //execute code }Suddenly we're at the ethical precipice as we can do a number of things with this information. I've assembled a list of the ethical paths.
Ethics of content blocking code
Most Ethical:
Website/WebApp's core features work any warnings until user reaches an ancillary feature that may be broken. User is able to complete core functions (consume content, use navigation, submit forms).
Example: Videos still work. User is able to place orders but 3rd party chat tech support may be broken. User is informed.
  if (typeof _LTracker === 'undefined' || _LTracker === null) {
    //If and only if function on page requires service
    //inform user.
  }
Fairly Ethical:
User receives warnings on every page, encouraging to whitelist site regardless if functionality is affected.
Example: User is pestered with a whitelist site message. User is still able perform operations. Videos still work. User is able to place orders. 3rd party live chat tech support may be broken. User is informed.
  if (typeof _LTracker === 'undefined' || _LTracker === null) {
    //display global message.
    //Inform user that analytics are helpful for improving the service
  }
Least Ethical:
User is blocked from consuming content until site is white listed regardless if functionality is affected.
  if (typeof _LTracker === 'undefined' || _LTracker === null) {
    //display global message.
    //obfuscate content/block content/disable features when error is present.
  }
No Ethical Stance: Site does not attempt to detect any blocked content. Site either functions or does not. This is the majority of websites.
This model isn't free of problems, its almost entirely from the lens of a non-advertisement supported website, like a campaign site / company site/ ecomm / SaaS. While these sites may contain advertising and tracking, all the aforementioned are either have revenue generated by sales (Sass/Ecomm) or lead generation (Campaign/Company). Websites that are dependent on ad-revenue adhere a different set of ethics and variables.
Other methods for checking for a script loaded.
Checking for variable existance is the most fail safe method to see if a script has loaded. While the
onerrorwill not work on an individual scrupt tag, you can write in scripts to the head with the following code. This though comes at a mild expense of code execution and may not work in all scenerios.
-
Google PageSpeed Insight lacks commonsense and is becoming irrelevant
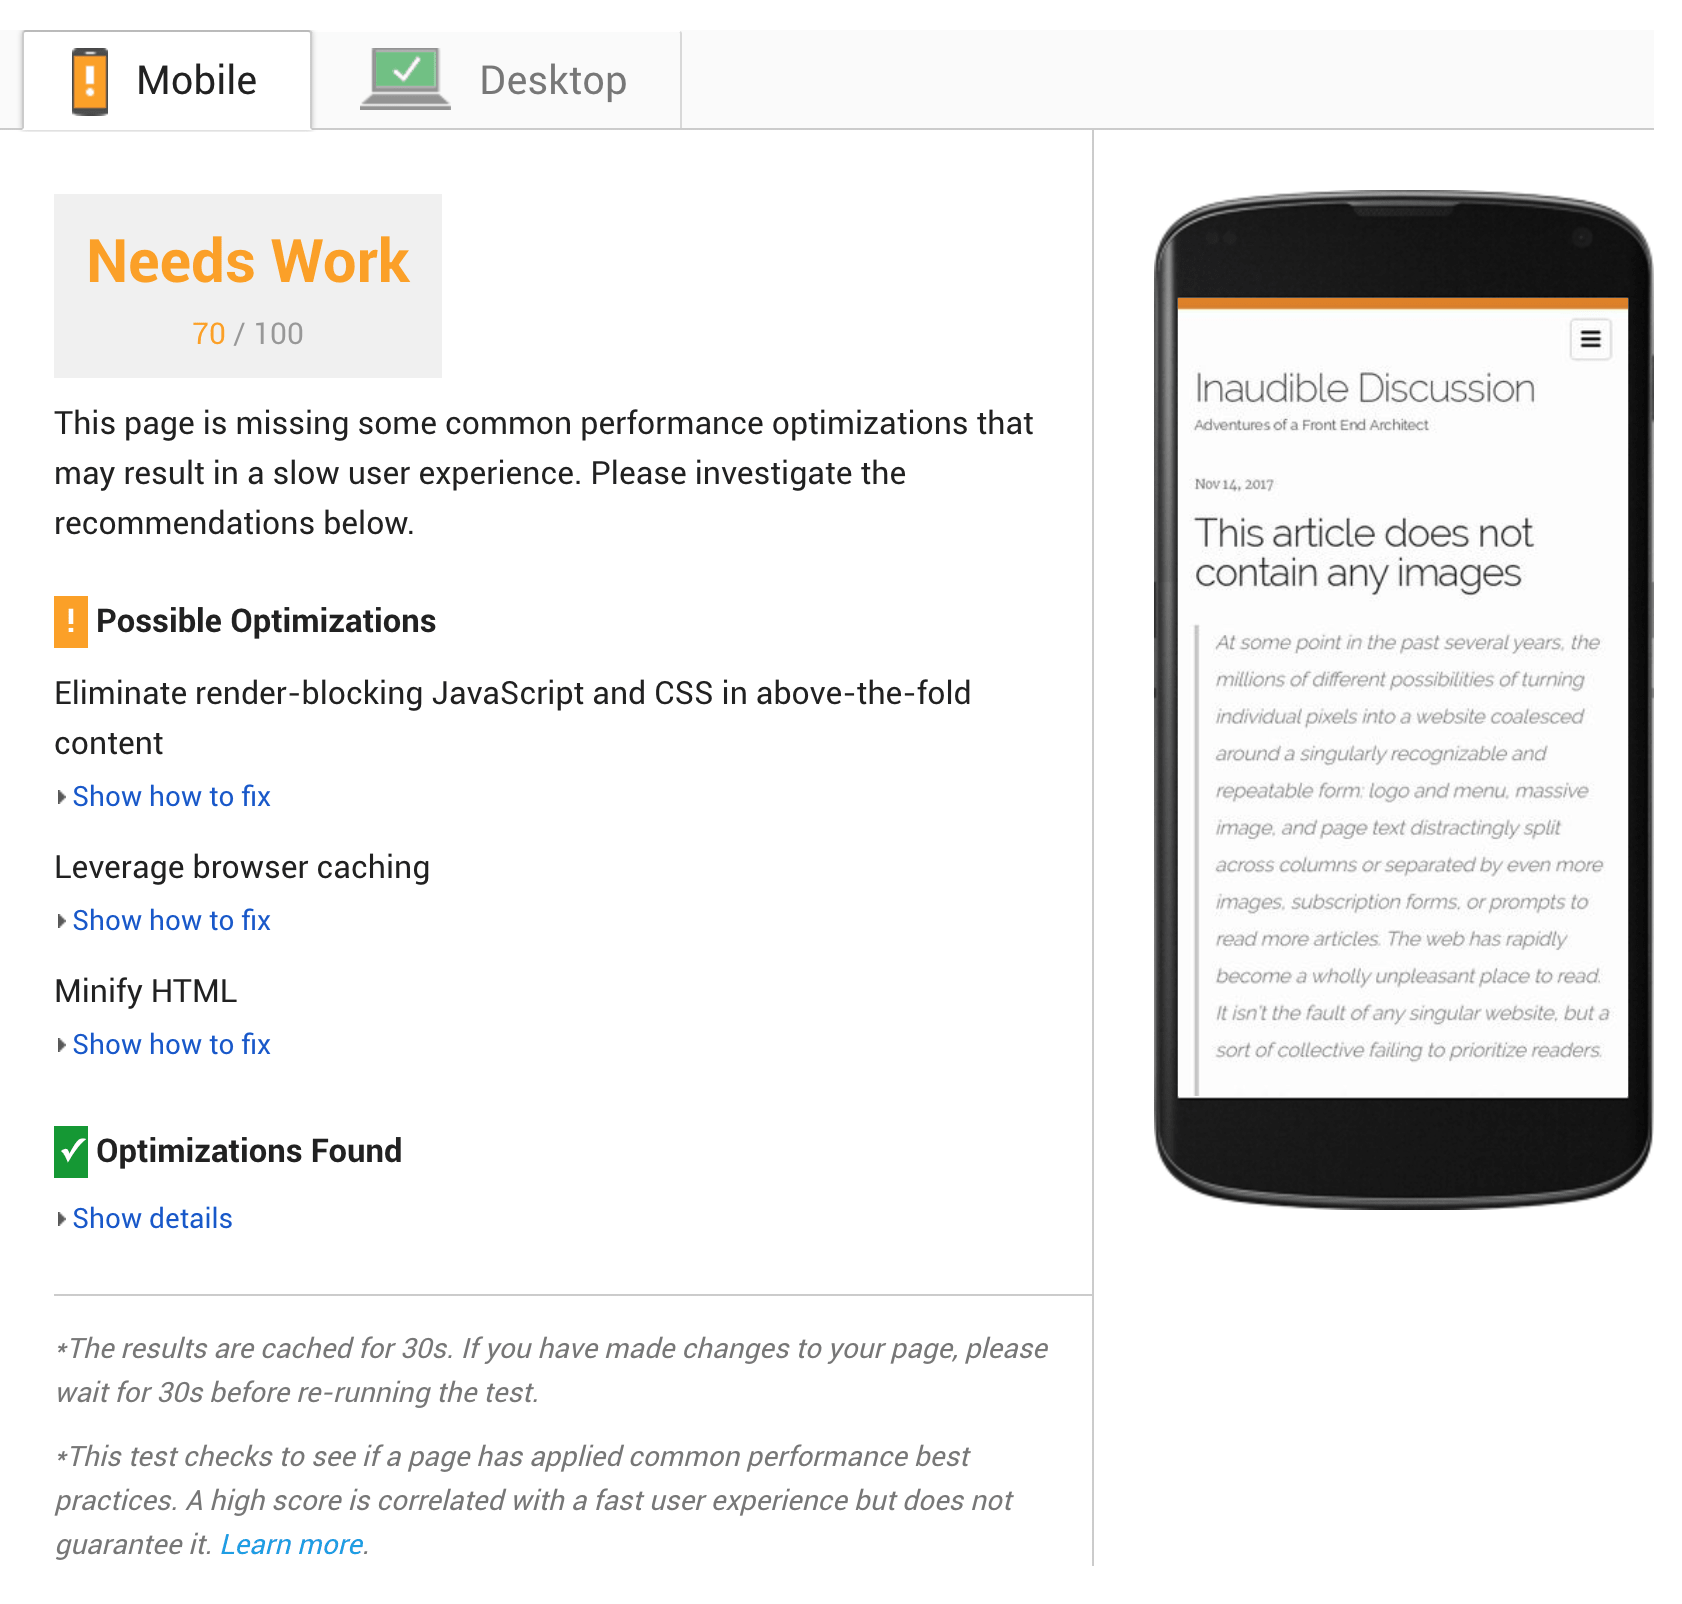
This has been something that has irked me for some time now, and I haven't unloaded a good rant on development in some time. Yesterday I wrote about image bloat and decided to add a few negligible optimizations that I've meant to do for a year or two that resulted in about 8-10k reduction per page. After I enabled HTML and CSS minification on my blog, I skated over to PageSpeed, plugged my URL in and frowned. My newly optimized blog post scored a whopping 70/100. My page is 84.5k (or 68.5K without google analytics).
For reference, wired.com scores 73 out of 100 on mobile with the total page loading 5.1 megabytes and Newsweek.com scores a god damned 84 out of 100 and loads 7.1 MB!. This is utter and complete stupid bullshit.
Here in lies the rub: While Google PageSpeed always had a "reach for the stars" mentality but is woefully in out of touch when judging a page's real world performance. A 300k page, even poorly optimized one is going to beat the 3 MB page (average page size of major websites) in load times. In the era of a smart phone data plans: a customer could load 30 poorly optimized pages for one bloated highly optimized 3 MB beast of a page. It's telling that Google stopped developing its "PageSpeed" tool into Chrome and has since relegated to its annoying web-only interface. It's become a tool that would be SEO gurus/experts/snakeoil salespersons use when hired by clients use to hold over developers and provide "recommendations" in CMS websites that do not provide easy vectors for the more avant-garde optimizations like HTML minification (which incidentally tends to save less data than CSS/JS optimization, or less than using HTTP compression).
PageSpeed says nothing about image formats beyond image scaling (and seems to be mostly tone deaf) to responsive images in reasonable margins of error. You can plug in a 500k PNG that could be served by a 40k JPEG image only to have PageSpeed score not even budge. It won't even blink if you're making an effort to support avant-garde image formats like WebP and JPEG2000 to provide more bang per Kilobyte.
PageSpeed is also frighteningly javascript unaware. "Oh, you have a BitCoin mining javascript file? Is it minified? Is it uglified? Is it GZ compressed? Yes? THUMBS UP BUDDY! Also, good job on the 'Your flash is out of date malware javascript pop up.'" If you're tricky, write in an obfuscated javascript append script to say, the 460k uncompressed D3 library and Google PageSpeed won't even bother to check.
Other poor detects revolve around iframes to popular services like YouTube / Vimeo / SoundCloud / CodePen and suggest optimizations based on the iframe content, anathema to the entire principal of CORS.
There's also zero comment on total requests on the page other than suggesting to concatenate files and create image maps, it'll ding you hard for having multiple CSS imports for Google Fonts, but doesn't give a royal damn if you're making several hundred HTTP requests. (Note: most browsers are limited to 6 requests at a time per domain, and usually cap out at around 17 simultaneous. Each request must filled or 403/404ed to open another request. This says nothing about the limitations of the server either for max clients, more requests = more server stress.)
Want to measure rendering performance? Forget it. There's no discernable metric about time to paint, or continous painting. Feel free to go nuts with CSS filters and bring a lesser device to its knees, PageSpeed doesn't care as long as your CSS is minified.
Lastly, it can be wildly inaccuraate. My page is minified HTML and yet PageSpeed's wonderful insight is that I should minify my HTML. Wat. View source on any page on this blog if you don't believe me...
There's probably a reason why I didn't notice that PageSpeed Insights had been removed in Chrome, as its mostly useless to a savvy front end dev beyond a sanity check. It can be taken that Google Pagespeed isn't a metric of your site vs other websites but rather, you vs yourself. Even that rational falls apart as it doesn't give guidance on recommendations too many factors nor does it put any judgement on data use. Google clearly cares about data use, as its questionable Accelerated Mobile Mobile project (AMP) exists. PageSpeed Insights was a tool of genius, but now it feels like it's past its prime and/or in need of some TLC. Really, what I'm asking for is perspective, and Google Pagespeed Insights doesn't have it.
-
This article does not contain any images
At some point in the past several years, the millions of different possibilities of turning individual pixels into a website coalesced around a singularly recognizable and repeatable form: logo and menu, massive image, and page text distractingly split across columns or separated by even more images, subscription forms, or prompts to read more articles. The web has rapidly become a wholly unpleasant place to read. It isn’t the fault of any singular website, but a sort of collective failing to prioritize readers.
I don’t know about you, but I’ve become numb to the web’s noise. I know that I need to wait for every article I read to load fully before I click anywhere, lest anything move around as ads are pulled in through very slow scripts from ten different networks. I know that I need to wait a few seconds to cancel the autoplaying video at the top of the page, and a few more seconds to close the request for me to enter my email and receive spam. And I know that I’ll need to scroll down past that gigantic header image to read anything, especially on my phone, where that image probably cost me more to download than anything else on the page.
This blog post is a bit of a meta-reaction seeing as this is a response to Not Every Article Needs A Picture but it's pretty rare to see any blog or news source post an article without an image, and the ban lays squarely on the cult of the "hero" image. The Hero image was a late web 2.0 design, a celebration of bandwidth and the exploding opportunity in web design, and now is feeling trite, stale images and it's only exacerbated by the Medium.com, Kinjas and every news site imaginable.
Even the print guys fail this test, newspapers like NY Times do not even follow their own print standard and wedge photos into all their articles. As Wired famously wrote, "The Average Webpage Is Now the Size of the Original Doom" (ironically on a page surpasses the 2.3 MB mark at 3 MB* ), do we really need to tax users more? I feel bad cheating my favorite publishers out of ad-revenue, but even whitelisting sites has me running back to Ghostery as I watch my Mid 2015 MacBook slow down and go into leaf blower mode to simply surf the web. On my phone, I have 1blocker but find myself mostly using RSS to this day as its fast, quick and cuts through the unnecessary pictures. Admittedly, my blog index pages fail the Doom test but it's also loading 20 articles at time (this article viewed by itself is 103k), perhaps I may still yet sneak in another feature.
*With Ghostery Enabled, Wired.com's article is a much more palatable 937K.
*With Ghostery Enabled, this article is 97k instead of 102k.
-
Installing Composer, Drush 8 and Drupal Console globally via composer on macOS (OS X)
Install Composer
Before we install Drush, we need to install globally Composer. Composer is a PHP package manager akin to NPM or Bower.
curl -sS https://getcomposer.org/installer | php
mv composer.phar /usr/local/bin/composer
Next we want to edit our .bash_profile. Go your home folder
cd ~/Create a new .bash_profile, (don't worry, if you have one, this won't overwrite it). We need to add a global entry for Composer.
touch .bash_profile
nano .bash_profile
Add the following to your .bash_profile
$ export PATH="$HOME/.composer/vendor/bin:$PATH"Install Drush
Now that we have composer installed globally, we can install Drush via composer.
composer global require drush/drush:dev-masterFinally, we can select a specific version. For Drupal 8, we want Drush 8.
$ composer global require drush/drush:8.*
-
Setting up Jekyll Admin
I’ve finally gotten around to looking into Jekyll a bit more, and one of the more exciting projects is Jekyll Admin. The documentation is a bit loose (the developer documentation is quite good). I’m writing this under the assumption that you’re using OS X/Linux or such with Ruby preinstalled (OS X comes preinstalled).
Open, up the terminal.
Step 1: Install Jekyll-admin
gem install jekyll-adminI had a bit of trouble with the install on both my MacBook Pro and my Mac Pro. If it hangs, hit command period and run the command again. It should work second go around.
Step 2: Configure Jekyll
Open up your
_config.ymlin an editor.:ocate either
gemsorpluginsin your config (depending on your version) and add Jekyll admin. Right now Jekyll admin should run, but…. before you get too far ahead of yourself, you will want to add front matter defaults to your yml file.Step 3: Add front matter defaults.
You may already have configured front matter defaults, depending on your setup. If you do not, then every used meta-data field will have to be added by hand to every post. My blog almost 99% of its content exists in posts. Thus I only needed to add a configuration for
_poosts.Make sure you have front matter defaults set up for posts. For my blog, I do not make heavy use of front matter, my configuration I added the following so every post would have pre-filled for any post the categories, tags and layout.
defaults:
  -
    scope:
      path: ""
      type: posts
    values:
      layout: post
      categories: ""
      tags: ""
Keep in mind yaml requires spaces and not tabs. Using tabs will not work for yaml.
Step 4: Run Jekyll.
Start up Jekyll as you normally would. Navigate to http://127.0.0.1:4000/admin/ after you’ve spun up Jekyll. Congrats. That’s it.
-
A mild blog update
I try to stay away from spending too much time under-the-hood for my blog. As developer and designer, I'm always prone to over-tweaking. The point of my blog is to write about development as opposed to developing. So against my own better judgment, I decided to finally unveil a new feature to my hyper-minimalist stylings that I've debated adding for a year now. All posts now can be viewed by topics.
-
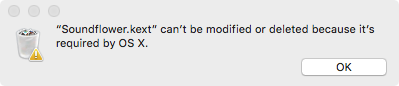
Nuking SoundFlower.kext - Soundflower.kext can't be modified or deleted
You may want want to remove Soundflower by Rogue Amoeba for some reason or another (upgrade?). For me, I noticed my FocusRite Scarlett 6i6 seems to have a driver incompatibility with some versions of SoundFlower, as would not show up in macOS However, Soundflower (for some reason or another) is viewed as required by OS X/macOS, unlike many kext files. I found this surprisingly more difficult than expected.
You're here because you've tried everything to remove SoundFlower:
- You tried the official installer DMG, and the removal AppleScript failed.
- You manually went to /System/Library/Extensions and found that you received the error "Soundflower.kext" can't be modified or deleted because it's required by OS X.
- Tried sudo rm-ing the damned file to find out its a directory and sudo rm -r doesn't work either and returns an Operation not permitted.
- Tried an app zapping app
- You tried Kext signing disabling by plugging in boot args and the first three things still didn't work...
I do have a solution and its not as practical but boot your Mac on another volume OR boot your Mac into Target Disk mode
Launch OS X on your other drive or plug your Mac into your secondary computer
Locate the soundflower.kext in /System/Library/Extensions and drag it to the trash
Try deleting, if your Mac complains, do the following:
- Launch the terminal (its located under Applications/utilities)
- Type in the following:
Sudo rm -r
Note: the trailing space is important - Drag the icon of the kext into the terminal window, it should fill out the path to the kext file.
- Hit return, your Mac will prompt you for the admin password (this will be the admin password for the drive/computer you are currently booted from, not the password for the drive you are connected to)
- Hit return, it should delete now without any hitches
- Reboot your Mac as normal.
-
Setting up a Bootstrap subtheme for Drupal 8
There are a few directions for creating sub-themes for Bootstrap but none quite covered all the steps. For simplicity's sake, I'm going to use the name
customthemefor my theme's name and title. Feel free to use whatever makes sense for your site instead of customtheme.Step 1: Install the Boostrap theme
Download the latest version of the Bootstrap theme. Decompress the contents and drag the entire folder into
core/themes/. Check to see that installed properly under the admin appearance. It should be listed under uninstalled themes. Click the install button.Step 2: Pick a starter kit
Navigate to the newly created bootstrap folder in
core/themes/, and go into the starterkit directory. You should see three folders, CDN, LESS and SASS. Each of these are variants based on Bootstrap 3. Personally, I use Sass but for this example, it doesn't matter.Step 3: Copy your preferred setup into /themes in the root of your site.
Copy the selected folder into
/themesRename the directory to something that is acceptable for Drupal's theme naming conventions (No spaces etc).Step 4: Change file names
In your site you should have:
- /config
- /install
- THEMENAME.settings.yml
- /schema
- THEMENAME.schema.yml
- /install
- /images
- logo.svg
- README.md
- screenshot.png
- /scss (this is dependent on theme you selected)
- /templates
- THEMENAME.libraries.yml
- THEMENAME.starterkit.yml
- THEMENAME.theme
Change the names of the bolded files to your themename. Change the starterkit to info. It should look something like this:
- /config
- /install
- customtheme.settings.yml
- /schema
- customtheme.schema.yml
- /install
- /images
- logo.svg
- README.md
- screenshot.png
- /scss (this is dependent on theme you selected)
- /templates
- customtheme.libraries.yml
- customtheme.info.yml
- customtheme.theme
Step 5: Edit the yml files.
/config/schema/customtheme/customtheme.schema.ymlchange the instances of THEMNAME and title.
    # Schema for the theme setting configuration file of the THEMETITLE theme.
    THEMENAME.settings:
      type: theme_settings
      label: 'THEMETITLE settings'
Example:
     # Schema for the theme setting configuration file of the customtheme .
     customtheme.settings:
       type: theme_settings
       label: 'customtheme settings'
Next open up
customtheme.info.ymland change the the THEMENAME and THEMETITLEcore: 8.x type: theme base theme: bootstrap name: 'THEMETITLE' description: 'Uses the Bootstrap framework Sass source files and must be compiled (not for beginners).' package: 'Bootstrap' regions: navigation: 'Navigation' navigation_collapsible: 'Navigation (Collapsible)' header: 'Top Bar' highlighted: 'Highlighted' help: 'Help' content: 'Content' sidebar_first: 'Primary' sidebar_second: 'Secondary' footer: 'Footer' page_top: 'Page top' page_bottom: 'Page bottom' libraries: - 'THEMENAME/global-styling' - 'THEMENAME/bootstrap-scripts'Example
   core: 8.x
   type: theme
   base theme: bootstrap

   name: 'customtheme'
   description: 'This is a custom theme.'
   package: 'Bootstrap'

   regions:
     navigation: 'Navigation'
     navigation_collapsible: 'Navigation (Collapsible)'
     header: 'Top Bar'
     highlighted: 'Highlighted'
     help: 'Help'
     content: 'Content'
     sidebar_first: 'Primary'
     sidebar_second: 'Secondary'
     footer: 'Footer'
     page_top: 'Page top'
     page_bottom: 'Page bottom'

   libraries:
     - 'customtheme/global-styling'
     - 'customtheme/bootstrap-scripts'
Step 6: Go to appearance and install
Your theme is now ready to go; it should appear in your appearence.
Step 6.5: Go to appearance and install
If you're using the CSS (precompiled bersion) version and want to use their implimentation of Bootstrap, go getboostrap.com (3.3)
If you're using the Sass version and want to use their implimentation of Bootstrap, go to getboostrap.com (3.3)and download the Sass version, decompress the folder and rename it to
bootstrapand place in the root of your theme.Additional notes
From here, you'll most certainly want to turn off theme caching. I found this guide super helpful.
I'd suggest following the tutorial to create a local
local.services.ymlto enable debugging and thecachetofalseas well. Also, I recommend checking out, the article Drupal 8 fundamentals.
- /config