-
Introducing CSSFilterGenerator.com
After noticing none of the CSS filter generators offered layer reordering, I wrote my own from scratch. It's still a beta, but it works and generates usable code! Check out CSSFilterGenerator.com. Hopefully, you find it useful too!
-
Heathe Mac Pro being mostloppy drive
Leaving this one up for posterity. As of writing this we're two generations deep into iPhones without headphone jacks and the Google Pixel is too. I skirted around the iPhone 7 doom by getting a case that offers a headphone jack. It's annoying, and user hostile but it works decently. It's not nearly as friendly as having a physical jack. I still do not own any bluetooth headphones.
Rumors aren't part of my bloggingm, but occasionally I've been prone to rant about Apple. The iPhone 7 rumor mill sparked an unusual amount of interest on my part, not for what it included but what it didn't include: the 3.5 mm headphone jack. I've always regarded the Lightning port as a senseless money grab despite mostly preferring form factor. Yesterday that rumor shifted to a slightly more sane position, the headphone jack stays! Rejoice...!?
The silliness of it all is the lightning port creates the insanity that users either must buy Bluetooth headphones or worse, a dongle for their existing headphones and forgo the ability to charge and listen to the phone simultaneously. The only advantage lightning ports offer is bus powering for noise canceling headphones which can already be attained without sacrificing the 3.5mm headphone jack, and a thinner phone that's even more prone to bending. It's the same asinine behavior that lead to the new MacBook featuring only 1 USB port, requiring pretty much all users to purchase a $79 dongle for charging/video out and the same insanity that lead to the Mac Pro being mostly panned as a flop by actual Pro users * yours truly and many pundits.
Hostile design...
Apple's opinion is ports is clear, and its disdain for modularity is frightening. While I normally agree with famed Apple pundit, John Gruber, Headphone jacks are the new floppy drive. His reasoning is flawed, very flawed.
Why would Apple care about headphone compatibility with Android? If Apple gave two shits about port compatibility with Android, iPhones would have Micro-USB ports. In 1998 people used floppy drives extensively for sneaker-netting files between Macs and PCs. That didn’t stop Apple from dropping it.
I remember 1998 too and perhaps more vividly, and everyone had Zip Drives and applications came on CD-Rom in big funky boxes. The floppy was already on its death bed, as 1.4mb was too small, the only things that came on floppies in 1998 for Mac users were drivers which could easily be printed on optical media. Everyone was asking for something better by then, hence why my PowerMac G3 450 that I bought in 1999 had one internally. While the iMacs did kill the floppy, they had USB, ethernet, a built-in modem, a CD drive and it wasn't long before they had CD-RW/DVD drives.
By the time the MacBook Air eschewed the optical drive, anyone looking to transfer files had the internet, USB drives and networks for file transfer, all faster and offering exponential storage over optical media. Much like the iMac, the MacBook Airs even added Lightning ports, a much-welcomed addition. Even by the mid-2000s, the internet had become the preferred way for most software distribution.
If anything, the 3.5mm headphone jack has hit a renaissance. My computers all have them (My media PC and Mac Pro have several). My Lightning port dock has two. My old iPod has one. My 2013 car has one. My PS4 controllers each have one. My iPad has one. My USB connected speakers, Vanatoo Transparent Ones still have one. My old Klipsch Promedias have both input and a nice front facing jack. My Numark NS7s have one (alongside its 1/4 inch), and I'm not even counting the test bed of devices I have at work for development. If we went back in time, 10 years ago, my car did not have a 3.5mm jack, nor did my game consoles have them built in, and my Motorola Razr didn't either, and that's not counting the items listed above that simply didn't exist in 2006.
Outside of a few fanboys, No one is asking for a replacement for the 3.5mm.
Apple switching to lightning port makes headphones incompatible even with their own Macs. I have a 2015 MacBook Retina on my desk as I type these very words and I can most surely assert that it does not have a lightning port but does have a 3.5mm jack. Same goes for my 2008 Mac Pro. On my desk, I have two pairs of $200+ headphones at work that at best are going require a dongle and at worse will not be usable with iOS.
The craziest part is we're in a world where we can have our cake and eat it too. Lightning port headphones, Bluetooth headphones, and 3.5mm all can continue to coexist. The Verge's Nilay Patel is 100% correct, Taking the headphone jack off phones is user-hostile and stupid, and I will not be buying an iPhone 7 if it doesn't have a 3.5mm jack.
* Edit
Gruber followed up with the following quote:
Removing the analog headphone jack is inevitable, and the transition is inevitably irritating. This is what makes Apple different. They will initiate a painful transition for a long-term gain. Other companies will avoid inducing pain at all costs — and you wind up using VGA until the mid-2010s.
This analogy is clever if you do not understand the inherent physics of the problem. Video ≠ Audio. Unlike say HDMI vs VGA which offers an inherently better picture, lightning cables do not.
Video signal transfer isn't powering a transducer. No matter the signal chain of audio, if you want to hear it, you're inevitably going to convert audio to an analog waveform by DAC to an amplifier then to a transducer. All a lightning port cable does is delay the conversion. If you've ever wondered why the staying power of analog has been so strong, its due to the physics. Using a lightning cable solves nothing, and places the amp/DAC outside something the phone already provides, which in turn equates to expensive dongles or expensive headphones. For home theaters, we use a centralized receiver that takes digital inputs like HDMI, S/PDIF (Toslink or coax), Bluetooth/wifi and USB, decodes/converts the signals to analog to be amplified and transmitted rather than sticking a DAC/amplifier in individual speaker.
Taking this stance isn't standing in the way of progress, it's actually arguing for progress, it's an open standard that's virtually future proof, almost universal until we do away with transducers as we know them. If it were truly about thinness, we'd have a simple plug adapter from 3.5mm to a thinner variant as we do from 1/4 inch to 3.5 mm. This isn't progress; this is shackling us to a closed standard that Apple can tax.
-
A week with the Focusrite Scarlett 6i6 - a review

Pictured: Scarlett features a stylish brushed red aluminum finish.
I have a bit of a history reviewing audio hardware, specifically audio I/O. Over time, the audio interface has moved away from PCIe to USB, which it now rests at as the defacto state for nearly 15 years after USB 2.0 became widespread. I've owned a few external boxes over the course of a decade, briefly, M-Audio's precursor unit that mimics today's Fast Track (Which I returned), Yamaha GO46 FireWire, and Native Instruments Audio Kontrol, and recorded two albums using the later two. I consider myself a bit of an audio geek, but without the audiophile trappings.
Recently I hit a breaking point; NI Audio Kontrol was not able to accept 1/4 inch unbalanced cables. Mystified, I decided it was time to retire the AudioKontrol and check out the offerings in 2016. Unsurprisingly, audio interfaces offer far more bang for the buck than did even five years ago, at $180 I was able to score the Focusrite Scarlett 6i6, offering more high-quality inputs and outputs than any of my previous devices at a lower price point. Even more impressive for $240, the 18i8 offers a whopping 18 potential inputs and 8 output buses.
The weak point of every USB capture device in my experience has and probably always will be, drivers (and USB itself). As an OS X (excuse me, macOS) user, CoreAudio has been mostly positive. Most USB devices if they're ASIO/CoreAudio compliant, drivers are barely needed for basic I/O. However, if the interfaces have custom buttons / internal routing or other features, then drivers are required. In the case of my AudioKontrol, the drivers were mostly negative causing glitchy behavior, and same went for my week with the M-Audio Fast Track. After dealing with years of prosumerish solutions, I decided to ante-up to Focusrite, renowned for their preamps, skipping budget players like Presonus and M-Audio.
Fair warning, this as much an overview of digital audio as a review. Now onto the review.
FocusRite Scarlett 6i6
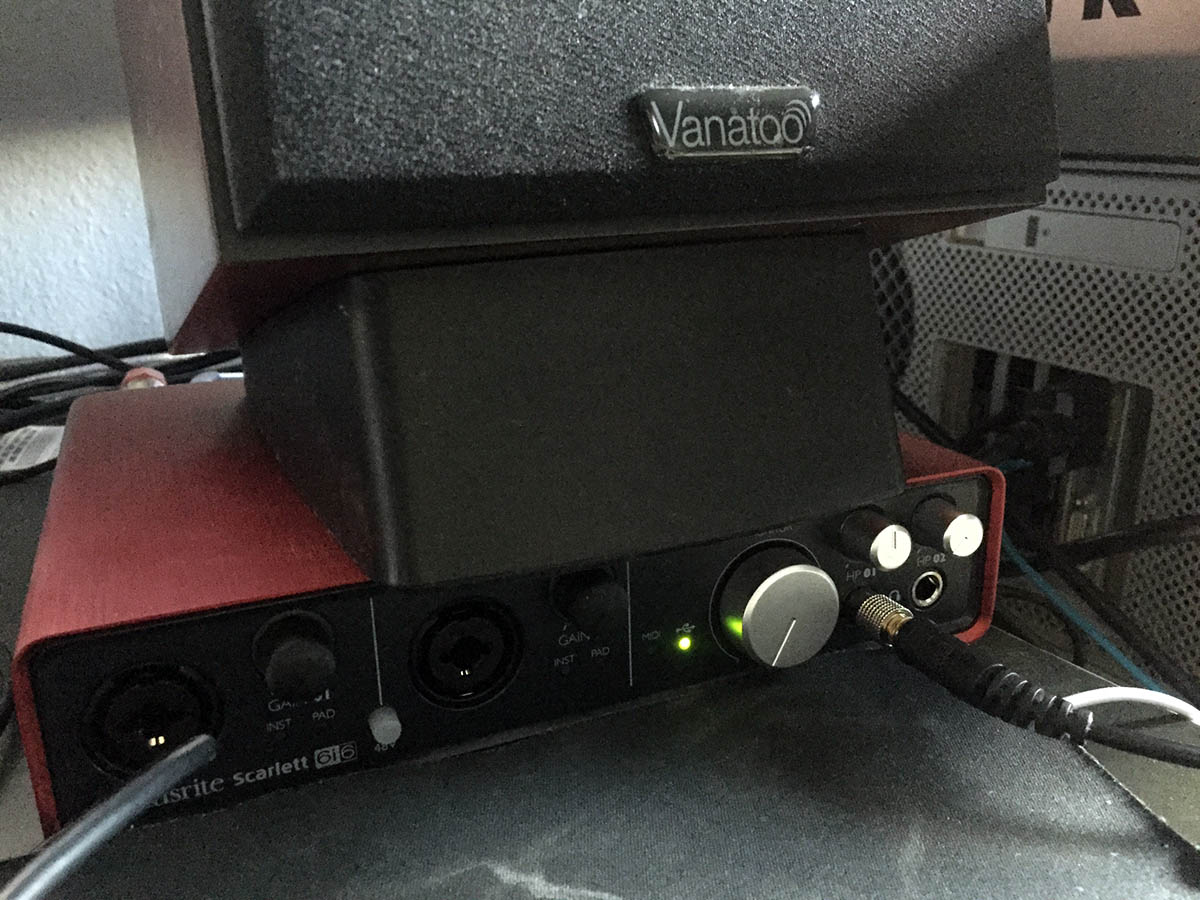
Pictured: The 6i6 makes for a good speaker rest
The Scarlett 6i6 is 6 in and 6 out but that doesn't quite accurately sum up the ports. A break down includes the following:
Inputs- 2 front facing Microphone XLR/ 1/4inch Line Inputs with hardware knobs for gain control and level monitoring (Supports 48v)
- 2 1/4inch Line Inputs
- 1 stereo S/PDIF input
- Midi in
- 2 1/4inch Headphone outputs with hardware volume knobs
- 2 1/4inch Line (monitor) headphone outputs with volume knob
- 2 additional line outputs
- 1 stereo S/PDIF output
- Midi out
If you notice, this doesn't add up to the 6 outputs in the device name but instead a total of 6 inputs and 10 outputs. The reasoning is headphones/monitors are all on the same audio bus bring it back down to 3 output buses: one for the monitors (speakers/amp + two headphones), an additional set of 1/4 inch outputs and an SPIDF cable. Each of the headphones jacks and monitors have independent volume controls but any audio routed to the monitor outputs will be outputted to those three outputs. Also notable, the Scarlett only accepts 4 analog channels in. Most users probably won't use the S/PDIF I/O (more on that later). The full tech specs can be found here.
Setting up
Focusrite surprisingly ships the Scarletts with a host of wall adapters for your country of choice but is firmly rooted in North America; I had to swap to North American standard prongs. Other than that, the Scarlett is pretty straightforward: USB cable to the computer, AC adapter to the wall, audio inputs into the device. For me, this meant plugging in my Numark NS7s into the backports and single mic.

Pictured: The mess of cabling...
Performance: latency
With digital audio, there's always (as of writing this) buffering which requires interjecting latency. No matter the device, there will be latency depending on the buffer size. The math to calculating minimum latency is quite simple: Buffer size/sample rate (in KHz) = latency in milliseconds.
Example:
512 samples/44.1 KHz = 11.7 ms
384 samples/44.1 KHz = 8.7 ms
512 samples/96 KHz = 5.3 ms
384 samples/96 KHz = 4 ms
However, this is only the absolute minimum for ONE direction, and lowering the buffer puts more stress on CPU to be sure that the buffer never is fully depleted. This becomes tougher to accomplish as the CPU is tasked with processing more information such as more fx and more tracks. Total travel times for buffering would like the following:
Example:
(in) 512 samples/44.1 KHz = 11.7 ms + (out) 512 samples/44.1 KHz = 23.4 ms minimum roundtrip travel time
(in) 384 samples/44.1 KHz = 8.7 ms + (out) 384 samples/44.1 KHz = 17.4 ms minimum roundtrip travel time
(in) 512 samples/96 KHz = 5.3 ms + (out) 512 samples/96 KHz = 5.3 ms = 10.6ms minimum roundtrip travel time
(in) 384 samples/96 KHz = 4 ms + (out) 384 samples/96 KHz = 4 ms = 8ms minimum roundtrip travel time
The math above also represents the absolute minimum for travel time for external audio to travel from an input and routed to an audio output. As stated this is the absolute minimum time, the audio travels through USB for the USB clock timer, which fires at 1 ms intervals, thus there's an latency buffer that has nothing to do with audio samples but rather continuous data flow imposed by USB. Lesser devices simply use a buffer size of roughly 6 ms for each direction (I/O) which adds more travel time, whereas higher end devices will finally tune the USB timing to minimize the delay. Someone using a low end USB device with 384 sample buffering can expect roughly a 29ms delay. Higher end boxes such as the Scarlett have fine tuned drivers to shave off crucial milliseconds for the USB buffering, and also include onboard DSP to allow onboard mixing to lower travel time delay. If this all sounds a bit confusing, it isn't as bad as it sounds.
Example:
I would like to route my Mic Input directly into my output so I can monitor my inputs without having to route my audio to my computer, to the DAW then back out USB, all of which introduces a time delay, hence latency. Doing this skips the travel time through the ASIO buffer and USB Clock. The benefit is that I effectively have zero-latency for my input monitoring and my downside is that I cannot make use of any effects in realtime from my DAW.
Higher end audio interface includes DSP effects that can be controlled via the software mixers so basic compression/EQing/reverbs/delays can be applied to live monitoring and/or use other interfaces (Firewire has a slightly better clock timing, but Thunderbolt provides even lower latency due to the PCIe bus clock).
All in all, the big step of buying the Scarlett line over a prosumer audio interface boils down to slightly better drivers and internal mixing.
Performance: The bits of it all
24 bit is an unrealistic thing; it's nearly a meaningless stat when it comes to audio gear. However there are measures that more appropriately reflect the dynamic range, but to fully understand this, we have to talk analog and math.
While I may get flack for saying this, despite issues like latency, digital has had a massive leg up over its analog predecessors, not simply from an archiving/storage perspective but also quality. The much-loved vinyl format hits roughly -80db between a signal to noise, meaning the signal is signal power is roughly 80 times stronger to the noise power, which isn't bad. Digital, however, doesn't have an analog noise floor, and sound pressures are expressed in bit depth, which is a number of steps to the current in the digital-to-analog convert (DAC).
To use an analogy I developed that works reasonably well when writing for an audio publication, Bit depth is akin to bit depth in digital imagery, instead of reflecting how many colors an image can have, it reflects how many steps in volume. The sample rate is the resolution, at which the sound is captured. What becomes interesting is that there's even a formula that explicitly tells you how the maximum dynamic range in decibels for any given bit depth. Using the signal-to-quantization-noise ratio formula: 20*log10(2^BITDEPTH-1), we can calculate the signal to noise ratio. 16-bit audio has a theoretical range of 96.33 dB, which is considerably better than Vinyl, and on par with the best of studio reel-to-reel systems. Also, it's important to understand these values represent a theoretical maximum as the Analog-to-digital converters (ADC) and digital-analog converters (DAC) rarely achieve their maximums. 24-bit audio has a theoretical range of 144.49 dB, far beyond even currently the best hardware on the market. Below I made a simple calculator to play with.
The Focusrite features 109 dB dynamic range on its inputs and outputs which is a little more than 18-bit depth. For the computer savvy 18-bit = 218 which is effectively 262144 sound level pressures vs 16-bit's 65536, or 4x times more detail. Focusrite isn't being deceitful listing 24 bit, but rather dealing with the limitations of audio production. Also notably for a reference point, the theoretical maximum for volume reproduction of 24 bit would be from silence to a NASA rocket launch (140 dB), arena rock concerts are known to be in excessive of 120 dB. It's not realistic to use the entire dynamic range of 24 bit and your neighbors would not approve if you could.
Resolution
If I haven't talked sampling rates yet, there's a reason, by most accounts, bit depth matters more than sampling rates after a certain point. 44.1 KHz can reproduce 0Hz-22KHz. Capturing at 96-KHz may reduce sound quality if your target format is 44.1 KHz through alias noise. The best way to imagine this is a photo. If you scale proportionally by half, the image will remain clear whereas, scaling to say, 45.9% of the image size would cause some of the image clarity to be sacrificed. The reason why in applications like Photoshop this isn't that big of a problem is through resampling (scaling) algorithms. This sample principle applies to audio, as the waveform must be recomputed and resampled, creating what is known as aliasing. Bit Depth downconversion uses dithering which is a lot more predictable as its a numeric reduction in values, where a range is compressed. Depending on your target format (movies = 48 KHz) or music (usually 44.1 KHz) capturing at 2x the sampling rate is the target format is preferred. The Scarlett can capture 88.2-KHz, but the advantages of higher sampling rate less obvious since DACs have become quite good over the years at filling in the gaps so-to-speak. What high resolution can do is capture above human hearing sounds, and more accurate articulation of the effects of phasing. It's not night and day, and honestly, I'm mostly hard pressed to tell the difference, as are a lot of people, however, audio processing does better with denser data, and the real advantage almost exists entirely in the DAW.
Since I touched on analog vs digital, I figure I'll put in a quip in the long-standing debate. Most of analog's love has less to with superior quality, but characteristics left due to various mediums limitations. It should also be pointed out that analog effects like harmonic distortions from tube amplification and over-saturation from tape, can and are captured by digital when recording from analog sources. For audiophiles, much of the desire is to recreate how music "used to sound," hence the love of vintage hardware. There's nothing inherently wrong with this except that it often shapes the audio debate in non-quantifiable terms and often leads to absurd claims about analog vs digital. Also to add to the debate mess has been the shift in recording techniques, mixing and mastering over time which also drastically alters the sound of a recording. (see the loudness war)
Lastly, digital for recording/listening intents and purposes exists in tandem with analog. In any digital audio path, the signal must be converted into analog electrical modulations to be fed into a transducer (speaker) or start as analog from a transducer (microphone) and have the analog signal into digital, so the devices that perform this are very important. In short, as it relates to this review, the Focusrite Scarlett quality that's professional at an absurdly low price point and it's a wonderful time for a hobbyist as digital solutions are cheap and extremely high quality. Focusrite isn't the only player making low-cost/high-quality computer audio interfaces this, but it has one of the more attractive packages.
The Real world
At the price point, the Focusrite is well speced, the 2nd generation due out this month gives a modest bump, mostly more headroom on the analog ports, 192 KHz capture/playback and analog protection circuitry for unexpected power surges, all welcome features but not game-changing. The 1st gen can be had for $180, a nice $70 price reduction making it a lot of bang for the buck.
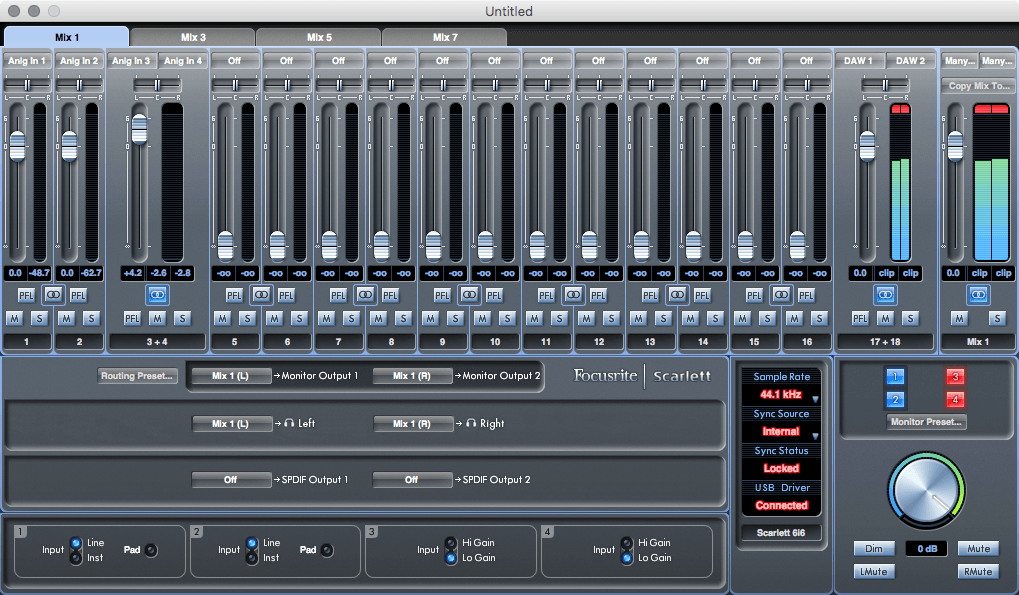
Pictured: Scarlett Mixing Software
The Scarlett drivers are straightforward although the device can be used without them you'll miss out on the analog mixing. After installing the drivers, I rebooted and launched the mixer which immediately updated the firmware of the 6i6, which took mere seconds. No word on what the firmware update did but googling revealed that it improved sample rate switching for OS X (MacOS) users and enabled standalone mode so the device can continue routing audio even if the computer isn't turned on, very cool.
The software mixer is straightforward, with handy routing presets and input gain control which is useful for the inputs that do not have hardware controls. Any configuration preset can be saved as a snapshot and instantly reloaded, likely more useful for the Scarlett featuring more inputs and outputs but still welcome. Several of the mixer elements also control hardware switches on the device like Input Gain control or line level vs instrument for the front facing ports. There's a gift and a curse, the hardware is small and compact, but it means its entirely driver and support dependent to set the device settings, whereas, with previous devices I've owned, line vs instrument gain control was hardware facing. Even with bad drivers, the AudioKontrol functioned as a simple USB input/output device regardless. With any luck though, support will be long-in-tooth.
My setup
Everyone's home studio will look a little different so to give users a chance to contrast and compare; my current setup is as follows:
Computer: Mac Pro 2008 with oodles of upgrades
Monitoring: Vanatoo Transparent Ones with a MartinLogan Dynamo 300 subwoofer, Beyerdynamic DT-990 headphones
Inputs: Numark NS7 Numark Performance Controller (motorized turntable controller with audio output), various Microphones
Midi:Native Instruments Maschine, Korg Padkontrol, Korg Microkey 37, Korg NanoPad, Korg nanoKontrol (all USB)
DAW: Cubase, Logic, Maschine
My mini studio is very hip hop centric, mostly focusing on beat composition. It's not space intensive and uses only a modest amount of hardware, and I don't have any real plans of expanding much beyond it. The only real upgrades is probably replacing my Shure SM7b with something a little more forgiving for a wider range of vocals.
Out the gate, I was already happy to simply be able to listen to my headphones or speakers without having to change my audio settings in OS X, even if only an option click away. Swapping between the two was as simple as turning the volume up, this may not seem like a big deal, but for all the love Vanatoo get, their speakers annoyingly do not have a front facing volume knob. Also, the headphone amp, while some audiophiles scoff at it, is without a doubt reasonably better than my Mac's internal headphone jack that I was reduced to using. At least the Mac Pro headphone jacks aren't pummeled with white noise like the MacBooks. Out the gate, if nothing else more accessible volume knobs and better sound via headphones. I was previously debating a headphone amp for my power hungry DT-990s, but they sound better than before and as good as I recall them when I used a Denon mid-range receiver as my main headphone amp.
The big hiccup came when trying to get audio to work in Cubase, part of it was user error as I could not get audio to output for the life of me in Cubase and only Cubase. In a moment of inspiration, I realized that my ports may not be labeled correctly in the VST panel and noticed that it carried over disabling two outputs. Cubase started showing volume meters for sound but refused to output audio. At this point, I resorted to a classic audio hack for OS X, create an aggregate device of one in the audio midi setup. For whatever reason, it worked. Annoying? Yes. All other applications functioned normally without this, meaning the issue lies somewhere between Cubase's VST engine and the drivers for the Scarlett.
Recording was easy as ever, there isn't much to say, identifying buses was a charm and recording worked great, noiseless and sounded as rich as it should have for the instrument inputs on the back. The Mic Preamps are notably a little sweeter than my Audio Kontrol, simply for the fact it'll accept unbalanced cables. The quality, when tested with a Sennheiser e935 without any other preamp, was clean and defined, and only required roughly half gain. Comparing it to the Audio Kontrol which wasn't terrible, it seemed just a hair "richer" to use a vague, imprecise term. Audio quality is certainly up to professional standards, at least in my book.
The next plus was for the first time; I was able to use live monitoring. With my AudioKontrol, it never worked if it was supposed to. I've always done monitoring via software which has meant delay. Not ideal but it worked. A quick trip to the mixer control panel and the Scarlett worked as expected. I could play my NS7s regardless if I had a track set to monitor in my DAW. It's a real benefit over the lower end devices I was using as I could live monitor my turntables without waiting for the sound to route into my computer and back out.
After a week in Cubase, there are no noticeable glitches, which Cubase on OS X... macOS... is more prone to wonkiness than many other Mac audio apps. I'm pleasantly happy with the device.
What about Midi I/O?
The FocusRite shows up in my audio pane but I'm living in a post midi cable world. The only midi devices I own are controllers: the Korg Microkey and Nano series simply do not feature Midi, leaving my Korg PadKontrol and my Maschine as the only two devices that have midi I/O. For roughly a decade or more, I've been in a Midi via USB world and thus do not own any cables. I can't comment on the Midi performance other than the software recognizes them.
A slightly different take - S/PDIF
The 6i6 is almost ideal, but the S/PDIF coax ports are almost useless for most people. So for anyone asking what S/PDIF (Sony/Phillips Digital Interface Format) is, its the common format developed for transmitting PCM audio or compressed formats such as AC3 (Dolby Digital) or DTS via 75 Ohm Coax (RCA) cables or Toslink (Optical). Toslink over time became the much-preferred format, likely for the "cool" factor, and optical cables require no shielding as RF noise does not affect light. Thus cables are lightweight and small. S/PDIF can be found on virtually home theater receivers, many standalone CD players, almost all DVD players, many computer audio cards / motherboards, all Blu-Ray players and in the professional world, DAT systems and some mixers..
S/PDIF is so ubiquitous that my Mac Pro has I/O via S/PDIF optical and most Macs (MacBook Pros, iMacs) can output S/PDIF optical with a specialized mini-Toslink cable. Digital Coax is a fading format, limited to DAT and some CD/DVD players. Outside of DAT, most formats that use S/PDIF can be transferred directly to optical media (CD/DVDs) from an optical drive bay and thus, its mostly used as a way to transmit out from a computer to a receiver or speaker system. I'm not sure about user stats but coax S/PDIF really strikes me as not very useful. I'd much prefer another set of instrument inputs for S/PDIF, a 6i4 (6 analog inputs) would be more useful, I guess most studio musicians would be in the same boat. At the very least, Toslink would be much preferred as there's a much greater chance someone has a speaker system or receiver that uses it.
The other negative is I still don't know why Cubase has a problem with the Scarlett. I've used 3 other boxes over-the-years and never required any workarounds. It works but it strikes as a precarious position as I'm not sure if I'm a DAW update or OS update away from it not working with Cubase but as of writing this it does under OS X 10.11.5. As Mac Cubase user, I'm in the minority and Logic X works fine with it.
Pros
- Value!
- Build quality
- Easy to use device mixer software
- 6 outputs linked to the "Monitor" audio bus alone, meaning two separate headphone amps and external speakers with all independent volume controls
- low latency for USB
Cons
- Mild driver issues with Cubase, works fine with the workaround.
- Coax S/PDIF really could be swapped for more useful ports. It's best to think of this as a 4 input device
11/3/2017 Update: I ran into some issues with SoundFlower. Originally I thought my unit had died and had been without for a few months, but finally got around to testing it on my MacBook Pro. It worked without a hitch, and I booted another copy of OS X on my Mac Pro. It worked. I finally narrowed it down to SoundFlower by Rogue Amoeba. If the de-installer doesn't work, I wrote a guide on how to fix it.
01/16/2018 Update: Minor editing for clarifications. Also, after a year and a half, the FocusRite is hard not recommend, even day-to-day use, it functions as my volume control for my speakers and headphones on my desktop when not being used for audio work.
-
Setting Up Focusrite Scarlet on OS X Cubase fix
Focusrite Scarlet functions as my headphone amp, alt route to speakers and speaker stand.
I recently purchased a Focusrite Scarlet 6i6 but quickly ran into problems with Cubase 8 and OS X 10.11.5; the device worked with all other audio apps which made Cubase's VST system the culprit. For whatever reason, getting my Scarlet 6i6 to work required creating an aggregate device which still mystifies me. Aggregate devices in OS X allow you to combine multiple audio I/O sources into one virtual device for use in applications, regardless if the application in question has support for things like multiple audio I/Os or even something mundane like audio input from device A and playback on the device.
Step 1: In Audio Midi Setup, create an aggregated device

Step 2: Select the Focusrite, no other inputs/outputs are needed

Step 3: In Cubase, under devices, select Device Setup and set your device to the newly created aggregate device

Confirm all the ports are enabled and labeled in a sensible fashion

Under devices, select VST Connections and set the output to the monitor output

Under inputs in the VST connections, create any necessary buses needed for input and/or assign the ports as needed.

-
A fix for UI elements that do not respond to return or enter key presses
While I usually don't write much about client-specific work about my job, I recently was hit with a minor problem: Slideshows are terrible for accessibility. After scratching my head for a few minutes, I was hit with a dead simple solution, simulate mouse clicks with JS. Check out the codepen below.
See the Pen Tabindex return fix
-
Resolving Grunt Error - libsass bindings not found in...
Running "watch" task Waiting... >> File "../scss/theme/_color-mixins.scss" changed. <br /> Loading "sass.js" tasks...ERROR >> Error: `libsass` bindings not found in /Users/~path/_build/node_modules/grunt-sass/node_modules/node-sass/vendor/darwin-x64-47/binding.node. Try reinstalling `node-sass`? Warning: Task "sass" not found. Use --force to continue.- Step 1: run
npm updatefrom the grunt directory with your package.json. This should fetch the latest dependencies that are specified in your package.json file. - Step 2: Likely if you try to run grunt, you'll experience a binding error that reads as follows:
Node Sass could not find a binding for your current environment: OS X 64-bit with Node.js 4.x. Usually this error is followed by the suggestion to of using rebuild node sass.
Runnpm rebuild node-sass - Step 3: If you're still receiving sass build issues: try updating grunt
npm install -g grunt-cliand re-running the above. Also you may need to update Node itself and check your package.json versioning.
- Step 1: run
-
Sitefinity updated logo for 2016
Trying to track down what's causing JQuery Validate to glitch out and cause a "Uncaught TypeError: Cannot read property 'addMethod' of undefined" error in SiteFinity on a client's website. When signed into the CMS there's one hundred and five instances of javascript tags. Coincidentally, I also redesigned the Sitefinity logo.

Now for an official press release:
For Immediate Release: 05/09/16
Telerik Sitefinity
http://www.telerik.com/Sitefinity Logo updated for 2016 under direction of disgruntled front end developer with no connection to Telerik
Portland, Oregon: Today unbeknownst to Telerik corp or anyone affiliated with Telerik or Sitfinity, Greg, an front end web developer with a surely disposition and contempt for french roast coffee released an updated logo for Sitefinity.
The logo shows a daring new approach in design, with virtually no treatment on the logo but instead an abstraction of the word "javascript" repeated 105 times in various states of legibility, using Operator Mono in book weight from esteemed and respected font foundry, Hoefler&Co. The design is a literal abstraction of the way Telerik has almost no regard for the way javascript is treated, and appears to randomly "shit out" javascript tags according to Greg. The alternate design was arrived after initial sketches that included a large singular pixelated middle finger, and a dead musk rat.
"This is the stuff that haunts my dreams. Who deemed this an acceptable or maintainable design pattern? Is there ever going to be a CMS that isn't some shade of terrible?" Greg ranted on his company's slack channel which elicited zero responses.
The new logo should be used in any instance of the old logo and is free for use for all.
About: This press release is 100% serious and real.
-
Maschine hangs or crashes on Loading GUI fix
It's one thing to post a fix, and it's another to explain how I arrived at the fix. As a web developer (and very very long time Mac user), my life is debugging so I have a few more tools to pull from. Hopefully, advanced users will be able to follow my logic to arrive at this fix. You can skip past the following to get the fix, but this explanation may help you to troubleshoot not just Maschine but other apps. I'm not a magician, and I do not pretend to be one, and you too with some practice and time can start learning to troubleshoot computer programs.
So recently Maschine stopped working randomly. Having a fair amount of technical prowess I wasn't too worried. I went to my Activity Monitor. For those not familiar, OS X comes with an application bundled in every install called "Activity Monitor," in your applications/utilities folder. Activity Monitor is a GUI (Graphical User Interface) to several UNIX applications that can be accessed in the OS X's terminal. These applications allow you monitor memory / CPU / network usage. As a debugging tool, it's a must as you can see if an activity is slowing your computer down by overly utilizing CPU cycles, ram or bandwidth and force quit tasks that can't be accessed by the normal force quick menu.
I fired up activity monitor and located Maschine in the list, and double clicked it to get more info about the process and to see which files it recently accessed. Even to me, most of what appears in the log files are a garbled mess of esoteric computer-speak, but I also know that there's relevant info in these logs. Fortunately, files accessed logs are straightforward. In the log, the last files accessed were plist files pertaining to it's freeze state.

As an OS X veteran, I knew offhand a few things: plist files are preference files that sometimes get corrupted. They usually can be deleted without any repercussions as the application in question will regenerate these (worst is some settings may be lost) and more importantly that the .saved has to do with OS X's ability to relaunch applications to their last known state. As a rule, Freeze states are pretty much always ok to delete, in fact occasionally you need to dump a corrupt freeze state. This is common practice in iOS when users double tap the home button and swipe up to close a frozen app as iOS doesn't by default "quit" apps, but places them into freeze states. Deleting a freeze-state simply forces the application in question to fully relaunch.
I started by dumping the Saved Application state, always an import first step in modern OS X debugging but it didn't work. After talking to my buddy Justin, he mentioned that the time Maschine stopped working when he changed plugins. So I had a hunch and decided to take a memory sample in the activity monitor. Memory samples allow you to peek inside to what your application is doing and what information is being accessed at that moment in time. Remember how I said even I don't understand much of what's in a log file? This is one of those times. We know that the application is hanging, so something is causing it to hang, and we can bet that the problem can be "seen" as the program will likely try to access something repeatedly, or we may see the last item the application tried to read before stalling out.
(the screen caps are clickable for legibility)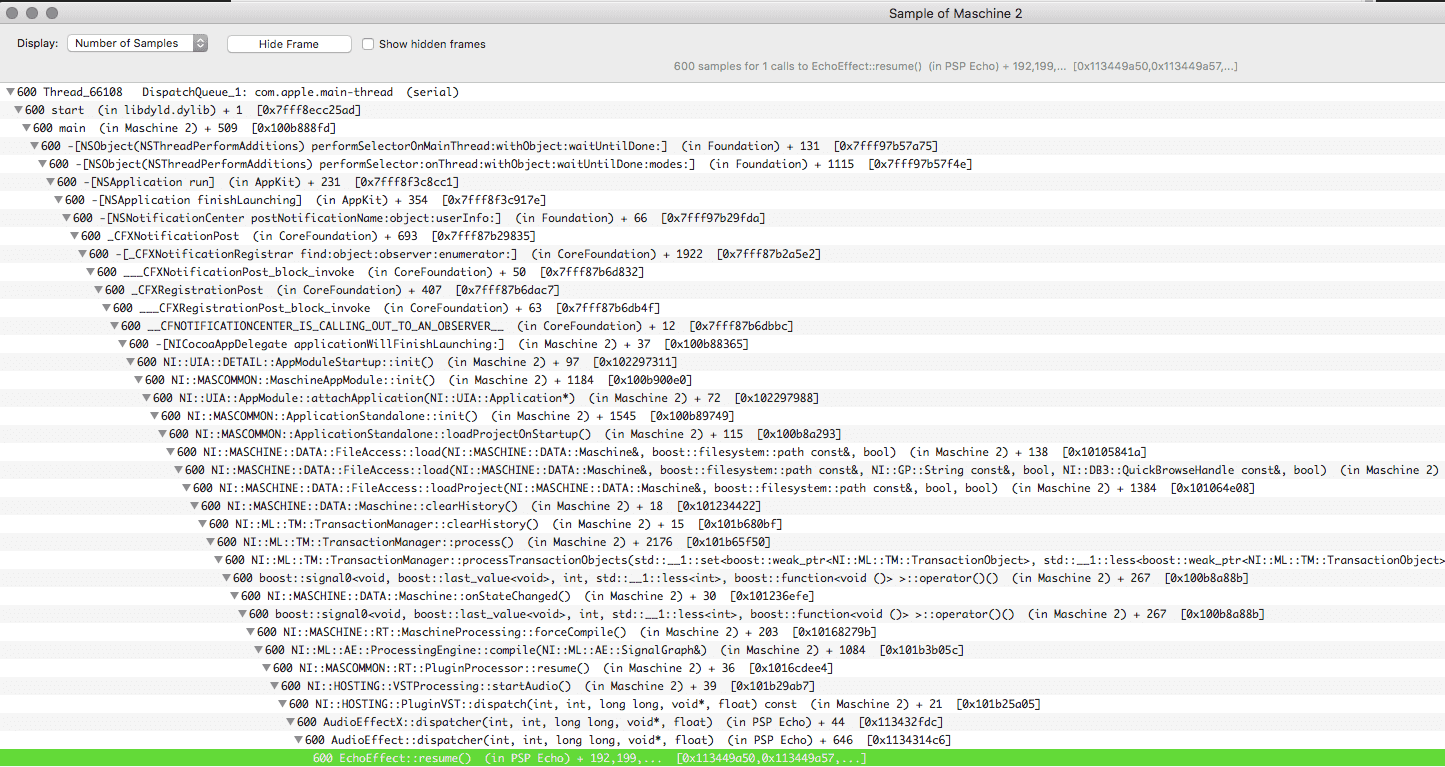
Note that during the hang, the memory sample is calling PSP echo, which is a popular audio plugin. Maschine like many audio applications runs an initial plugin scan to make sure all the plugins installed are compatible and if they aren't they're blacklisted so they will not crash the host application. This scan usually is run only if the application detects a change such as a new plugin install. This sometimes fails and causes an application to crash. Apple's Logic has the ability to detect failed launches and thus rescans its plugins on a failed launch (a somewhat recent innovation with Logic 8 or 9). Maschine is a little more limited, doesn't have this ability, so it's up to the user to manually reset the approved plugin cache. While I couldn't find the Maschine 2 location for plugins list, I found the following article MASCHINE Crashes at Startup (OS X) which pointed me in the right direction.
How to fix
Step 1: Go to the following location on your computer:
Users/[your user name]/Library/Application Support/Maschine 2/
Note: You may need to enable your user library folder visibility if you have not done so already.
Step 2: Drag all the files into your trash.
Step 3: Relaunch application.
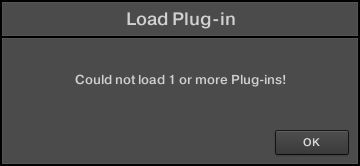
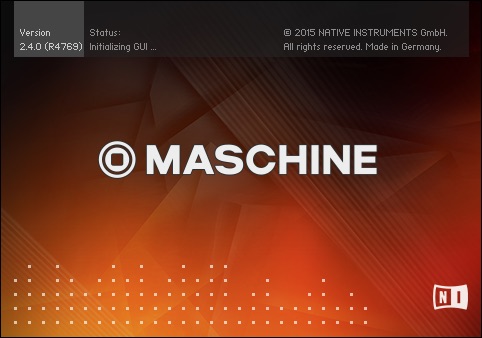
With any luck, you should see something like the message above. Happy Beat Making and troubleshooting! Remember, the activity monitor is one of the most critical tools in a power user's bag of tricks. OS X is big and complex, but almost nothing is done behind closed doors, this means there's nearly always a way to get to the root of a problem.
-
Setting up Operator Mono in Coda
I'm a big Operator Mono fan. A few months ago I wrote how to Set up Operator Mono for Atom. It involves a bit of style sheet hacking. Coda is pretty straightforward, but I realized after roughly eight years of owning Coda, I've never messed with the font formatting.
Step 1: Set the font in preference under Editor
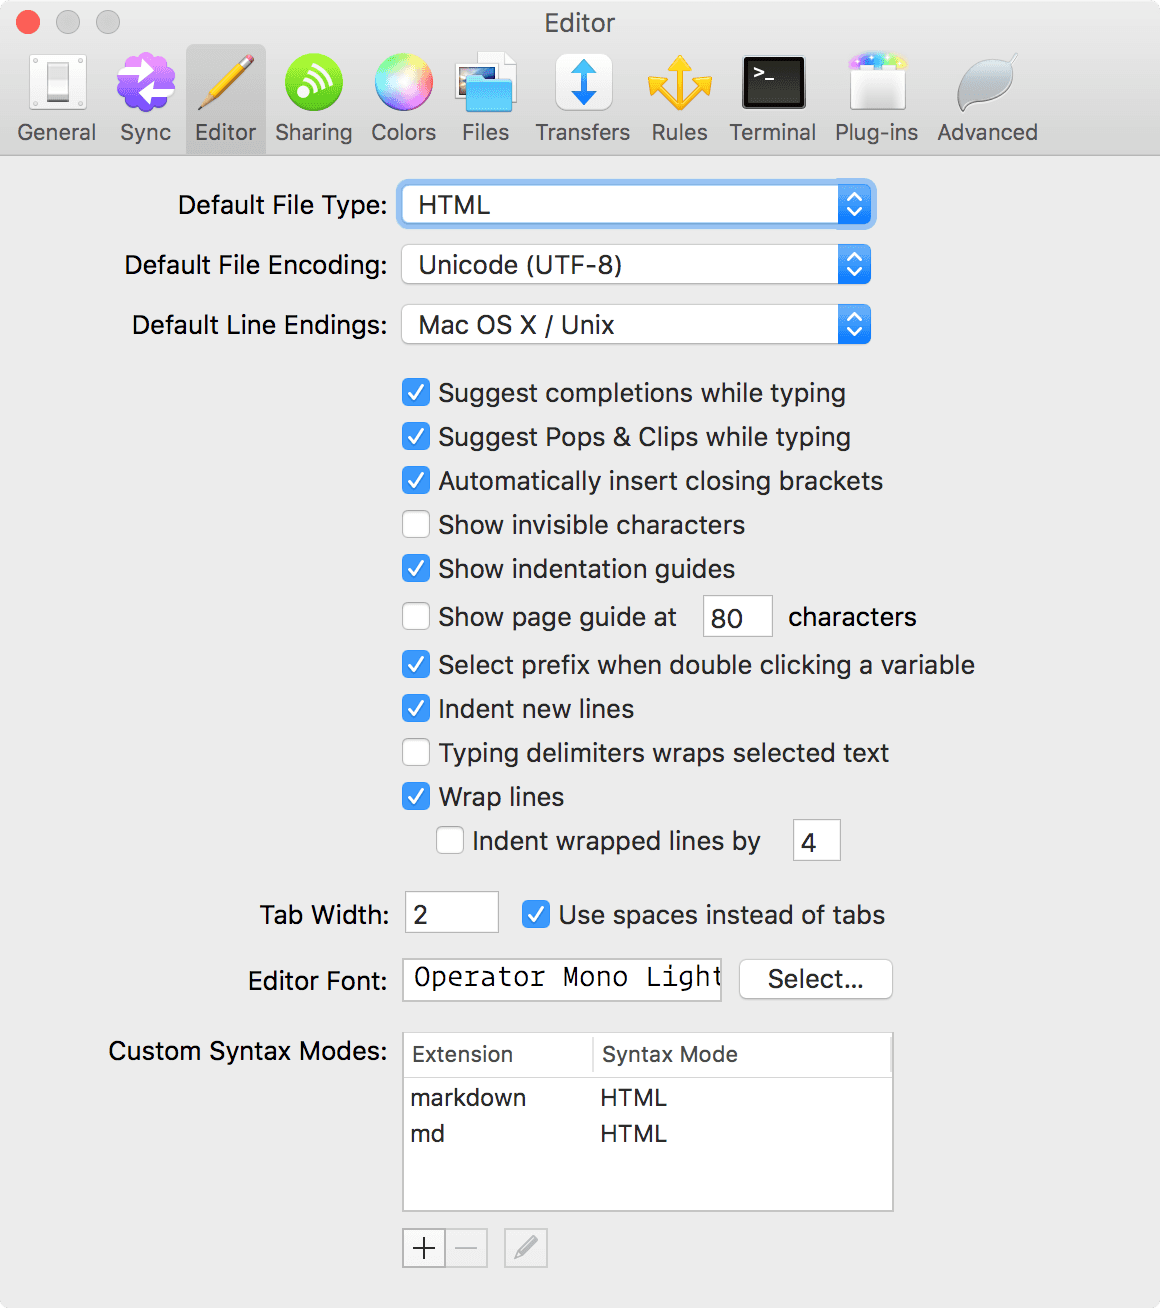
Click the Editor Font and locate Operator, select the weight you're most comfortable with.
Step 2: Setting up the italics character set
One of the best features of Operator Mono is that all its italics are an alternate character set, useful for programming. Coda doesn't pack in a style sheet akin to Atom or Sublime, which is a mixed blessing. It's pretty easy to set up but requires a little more handy work.
- Click Colors in Preferences
- Within the colors panel scroll area click on the various code examples and click the bold/italics to check boxes to change your code styles
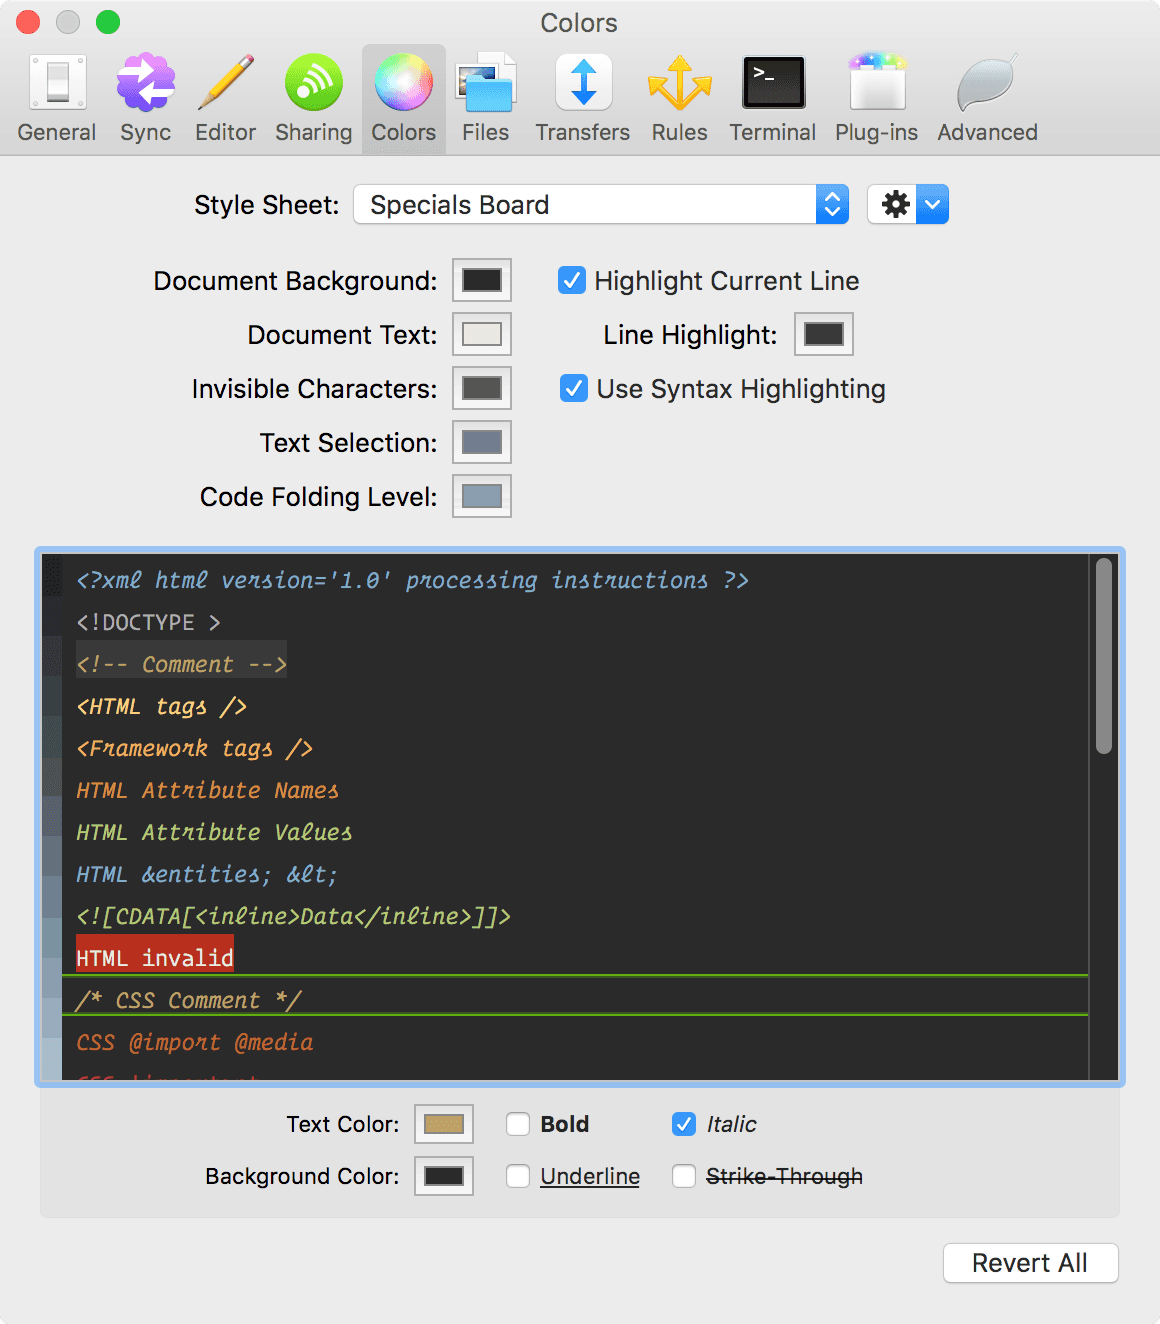
To mimic Atom's settings and the examples on the Operator Mono website, I recommend italicizing the following: all comments, tags, variables, attribute names, and leave CSS unitalicized. That's it!
-
PostCSS is really slow - PostCSS vs minification and autoprefixer
A few months ago one of the back-end developers ribbed me, "Front End Developers can't decide if they want to pre-process or post-process their CSS" after learning about PostCSS and CSSnext.
The worst part is he's right, but we've been doing both for some time unbeknownst to him. Unlike the hazier CSSNext ambition of bringing future CSS code today (based on PostCSS), PostCSS itself simply a library of tools for programmatically manipulating CSS with Javascript which is a zealous under-sale of the potential. Like any good front-end developer, I wanted to see if PostCSS made sense to use since I don't have the interest (yet) to use CSSnext.
While admittedly this isn't the most scientific test, I ran this using the current versions of gulp and grunt with their respective plugins using a rather large project build on a heavily modified version of Bootstrap 3. The result is roughly 9700 lines without minification, and a 160k CSS file minified. It's big, but it isn't massive either.

Grunt Results
Without PostCSS
- Total 586ms
With PostCSS
- Total 5.3s
Gulp Results
Without PostCSS
- Total 388ms
With PostCSS
- Total 4.75s
The configuration looks as follows:
Libsass -> autoprefixer -> minification.In the grunt task, I have a watch task that triggers libass to grunt-autoprefixer to grunt-contrib-cssmin. I replaced the prefixing/cssmin with grunt-postcss.
For Gulp, the task was nearly identical, libass to gulp-autoprefixer to gulp-autoprefixer. I replaced the prefixing/cssmin with grunt-postcss. The result is pretty much the same.
What does this mean?
The takeaway is that previously modules that PostCSS replicates are considerably slower but (and I'll use bold to stress this) this does not mean you should not use PostCSS. PostCSS still has some serious potential if you're into eschewing the pre-processor for CSSNext or looking to use CSS Modules. However, unless you need PostCSS, you shouldn't feel obligated to replace current working tasks with the CSSnext version.
-
Kite - an Indie game
Long time friend, James Treneman is a one man studio making his own game and its in the process of being Green lit on Steam. Check it out.
-
Exploring and Developing for the PS4 browser
The PlayStation 4 is quite the capable device, unsurprisingly able to run Linux. I recently bought a PS4 and in true developer spirit immediately began poking around the browser. To my knowledge, there's next to zero developer documentation. The best I could find was a single PDF from Sony which appears to be dated. My goal is to document what's known about the PS4's Browser.
My PS4 test setup
Version: CUH-1200
OS: 3.50
Gecko? Mozilla? Netfront?
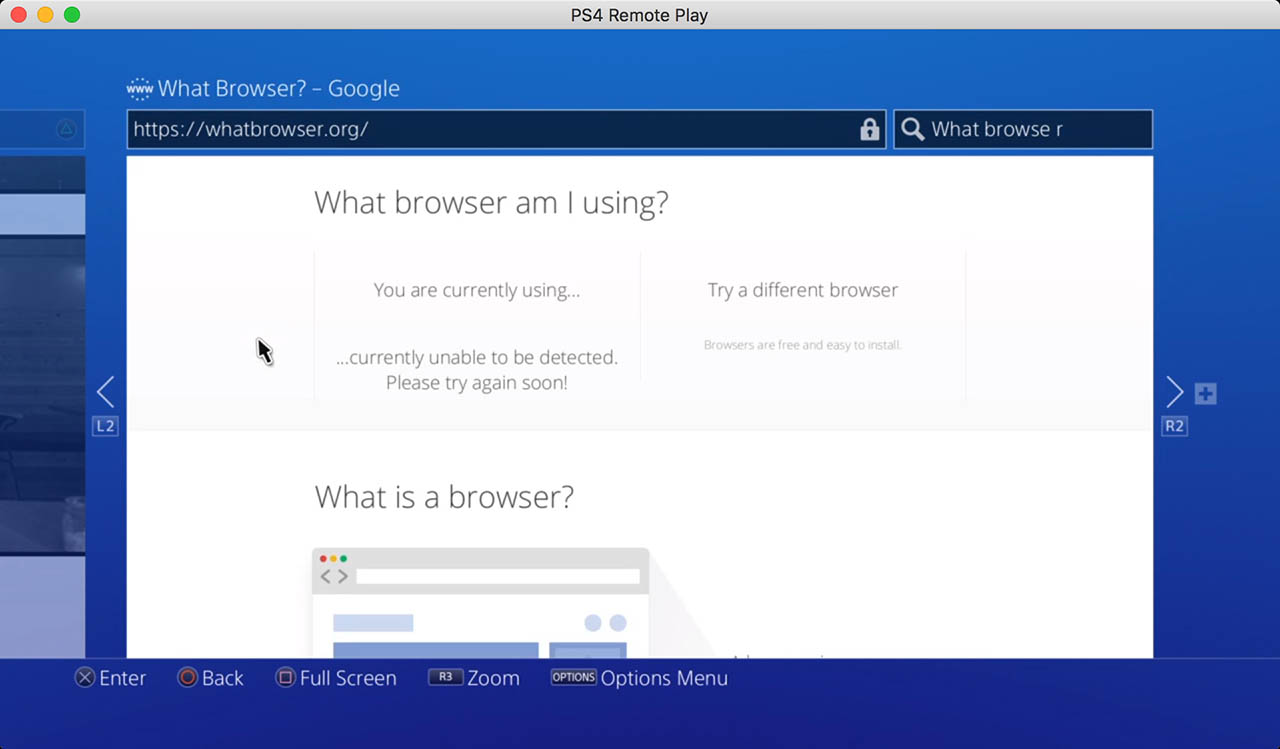
Google's whatbrowser gives an error.

whatbrowseramiusing.co reads the Gecko-Like User-Agent string.

whatismybrowser.com likely matches UA string by closest match, and returns Mozilla.
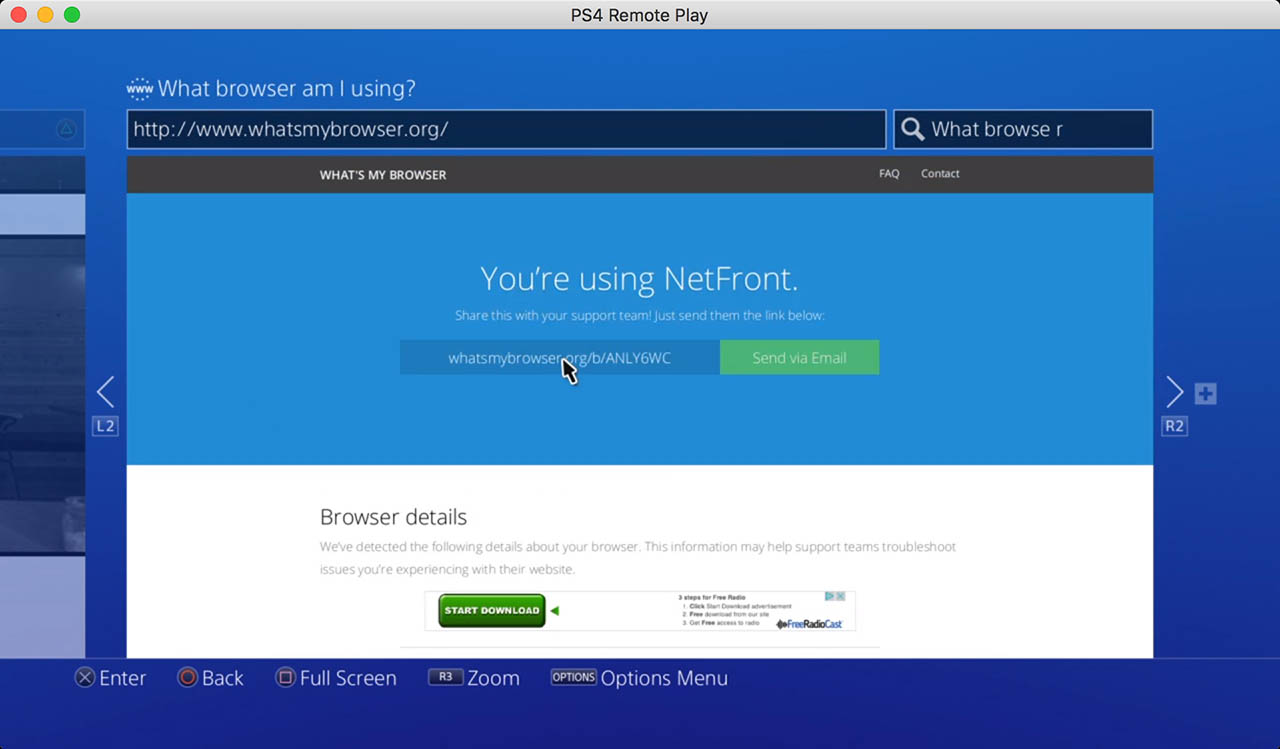
whatsmybrowser.org correctly identifies the PS4 as NetFront.
NetFront is a proprietary web browser used for the PlayStation 3, PlayStation Vita, PSP, Nintendo 3DS, Wii U and Kindle E-reader. The original Netfront Browser has since been replaced by a webkit powered NetFront NX which appears to power the PS4.
Support
Specs:
- HTML 4.01, XHTML 1.1, XHTML Basic 1.1, CE-HTML, XML 1.1, RSS feed (RSS 0.9/0.91/0.92/1.0/2.0, Atom 1.0)
- HTML 5 Support: Canvas, Canvas Text, localStorage, sessionStorage, Web Workers, applicationCache, HTML5 Input types (partial) - Notable missing: Geolocation API, HTML5 Input input attributes, picture element, srcset, service workers, web components
- CSS3 (Flexbox, full CSS3 selector support Media Queries, Animations, 2D/3D Transforms, Transitions, etc.) - Notable missing: Multiple background support
- CSS1, CSS2.1
- Javascript V 1.7+
- DOM LEVEL 2

PS4 passes all the CSS3.info's select test
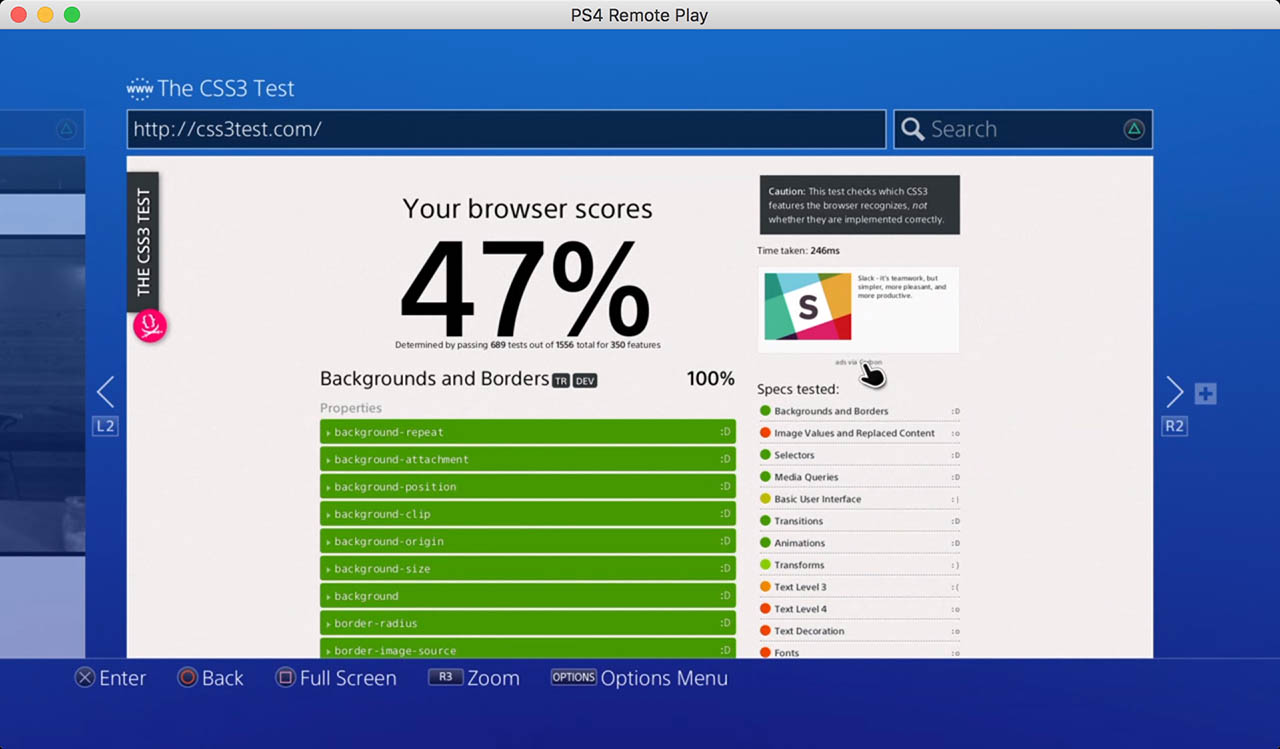
The PS4 scores relatively well on the CSS3 test (Chrome v 49.0.2623.112 scores 52%, Safari 9.1 54% and FireFox 45 63%)
Security:
- TLS1.2 *no compression
- NSS
- Configurable digital certificates
- Extended Validation
- Elliptic Curve Cryptography
- No SSL support (2/3)
Viewport: unsupported
WebGL: unsupported

PS4's webGL error
- Image Formats: JPG / GIF / PNG / BMP (32 bit + compress supported)
- Note: TIFF image format is unsupported (commonly supported in WebKit).
Video:
- Container: Mp4/HLS
- Codec H.264
- Profile: Baseline/Main/High
- Level: 4.1 or lower
- Resolution: 1920 x 1080 or lower
- Framerate: 60 fps or lower
- Bitrate: 20 Mbps or lower
- Autoplay: supported
-
Audio:
- Formats: AAC (LC or HE-AAC v1)
- Channels: 1 channel, 2 channels, 6 channels (AAC-LC only), or 7.1 channels (AAC-LC only)
- Sampling rate: 8000, 11025, 12000, 16000, 22050, 24000, 32000, 44100, or 48000 Hz
- Bitrate: 48 to 3456kbps
- MP3/WAV/AIFF/AU/MIDI unsupported
- Audio playback using the audio element is not supported.
- Direct links to audio is not supported
- PDF: unsupported
- Downloads: unsupported
Browsers Tests
Successful:
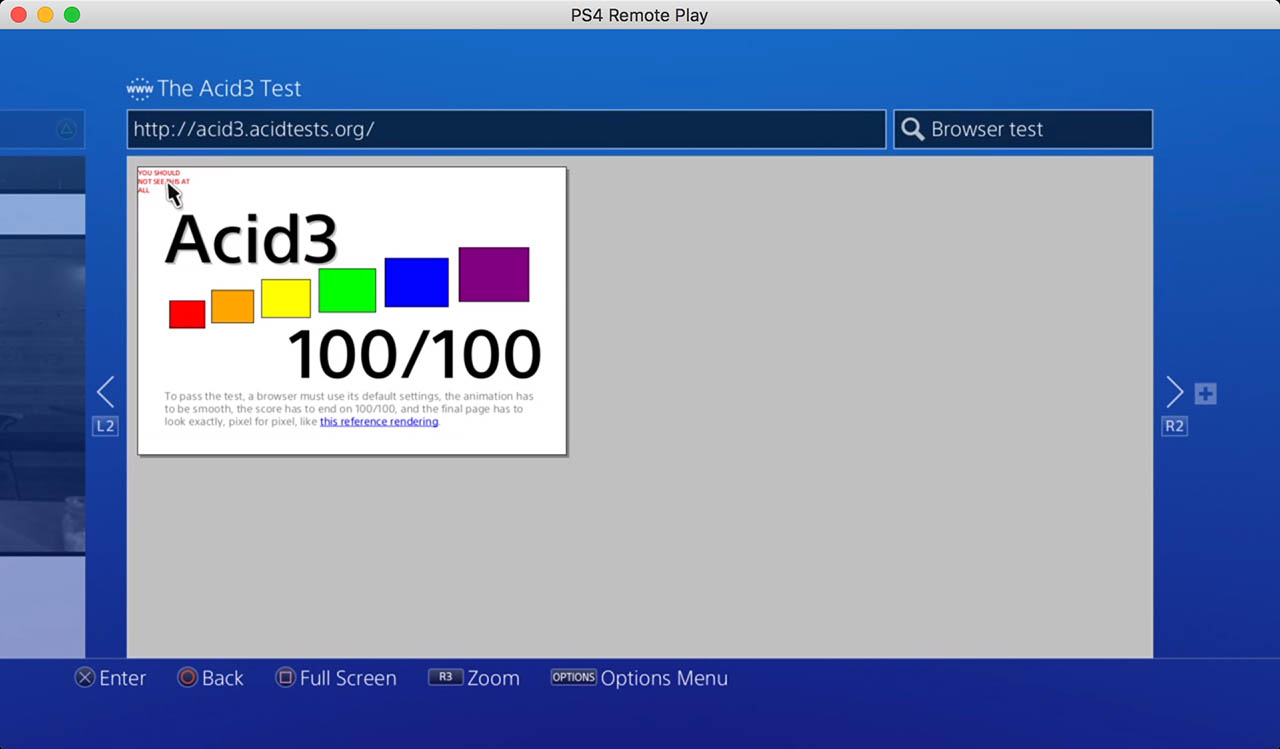
Acid3 test

Sunspider 1.0.2 test: Overall score: 3203 ms using remote login (and a game left open)
unsuccessful:

PS4's fails to load html5test.com...
Notably, some previous users have completed the HTML5 tests; you can see the scores: here.

PS4's fails during Octane test...
Not pictured: Jetstream
The PS4's weakest link appears to be modern JS support. Unsurprisingly the PS4 isn't a strong performer. In a very uncontrolled environment with three concurrent browsers open, and roughly 25 tabs and several apps, my MacBook Pro in chrome scored a 157.8ms vs the PS4's 2929ms (Lower is better). An iPhone 6 scores roughly 326.6 ms. The big differences here are that both Chrome, Safari and FireFox use highly optimized JS engines, V8, NitroJS, and SpiderMonkey respectively. However, other users report much better SunSpider benchmarks clocking around 1027ms which places roughly at the performance of an iPhone 5 when it comes to JS. While the PS4 certainly has room for improvement but is unlikely to see massive gains as I highly doubt most people spend much time in the browser outside of gaming.
More to come...
Stay tuned; I plan to update this over time. Testing the PS4 is tedious as the remote support doesn't allow text input via keyboard.
Planned tests: weinre remote debugging, FireBug Lite, BrowserSync
Anyone with better documentation or more information, please feel free to e-mail. Thanks!
-
The Encryption debate wages on
The Obama administration took a seat in the encryption debate, even in light of What's app rolling out end-to-end encryption for its billion users. Worse yet, the leaked senate bill is soft on security, high on fear. At least there's a few out there fighting the good fight.
It's almost if there's real world analogies to draw from.
-
But He's Not Wrong
Palmer continues to clarify what he meant by that blunt statement by saying “It just boils down to the fact that Apple doesn’t prioritize high-end GPUs. You can buy a $6,000 Mac Pro with the top of the line AMD FirePro D700, and it still doesn’t match our recommended specs. So if they prioritize higher-end GPUs like they used to for a while back in the day, we’d love to support Mac. But right now, there’s just not a single machine out there that supports it.”
- ShackNews.comThe only Macs capable of handling the Oculus Rift built by Apple are 3 years out of production Mac Pros... or Hackintoshes. Those of us with either still have dual booting, so there's always that. I've come to the conclusion the 2013 Mac Pro's trashcan looks are a metaphor for what Apple thinks of professionals.
-
Messages not delivered error fix
The message "Not Delivered" has eluded me longer than it should have after retiring my MacBook Pro 2012 Retina for a 2015 Retina. I was able to message anyone using an iOS device through messages but unable to send SMS to non-iOS phones. Here's the fix, it requires both your iPhone and your Mac to be handy.

Step 1:
Confirm your messages has been configured on your Mac in messages preferences![]()
Step 2:
Go to Settings -> Messages and then finally to Text Message Forwarding![]()
Step 3:
Add your computer:![]()
Step 4:
A confirmation code will be sent to your Mac in Messsages, it may take a few seconds. Be ready to punch in the pin on your iphone.That's it


