Making the most out of Time Machine (Tutorial) (updated 2019)

Time Machine is easily one of the best features of OS X, and if you don't use it, you really really really should. Computers are replaceable; personal data is not. That said, this article isn't to convert the unconverted. Instead, this is for those already using Time Machine.
Time Machine doesn't support backing up to APFS formatted volume (yet) as this is due to change in 10.15 Catalina but Mojave improved the experience of missed backups.
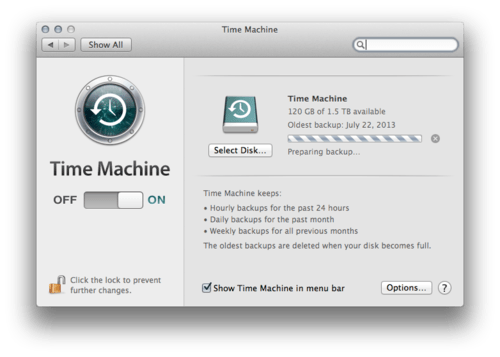
Remember, The more space Time Machine has free, the longer it can keep back up records It may seem crazy to have a year's worth of backups until you're chasing down a PDF you may have deleted anywhere from yesterday to last May.
Tip #1 - Disabling backups of space-wasting folders
Clicking options will reveal a simple interface that allows excluding folders from being backed up.
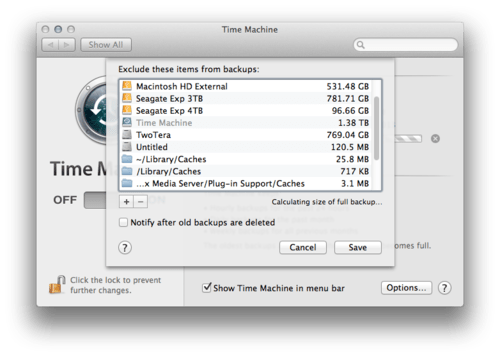
By default Time Machine backs up EVERYTHING when there are a few folders that should be disabled by default. To disable a folder, locate it and drag it onto the “Exclude these items from backups” window. If you're like me, you may have many drives to exclude.
Backing up your downloads folder is a data waste. For most people, the downloads folder the equivalent to the wild west, and you're apt to constantly decompress zips, nab massive DMGs and delete files from it. Even a deleted file will occupy space on Time Machine until all the snapshots that contain the deleted file are removed from Time Machine itself.
It's best to exclude it.
I've created a quick and dirty list of recommended files to block Time Machine. You'll need access to your ~/Library. Pro tip: When you see ~/ (the tilda represents your user folder, this is common shorthand for your user folder)
By default Lion and Mountain Lion hide the user Library folder, in all previous versions of OS X, this was accessible by the user. Punch in the following terminal command to unhide it. Its also not a bad idea to leave it unhidden as you may need access to it in the future when cleaning out OS X.
chflags nohidden ~/Library/
Recommended folders to disable (for all users)
- ~/Library/Caches - (Cache files are prone to change)
- /Library/Caches
- ~/Library/Downloads
- ~/Music/iTunes/Mobile Applications - (These can be redownloaded from iTunes or your iPad/iPhone/iPod and are constantly updated)
- ~/Library/Application Support/Steam/SteamApp - (This will not back up games using the Steam Service. Games are subject to frequent updates, and any games can be redownloaded from the steam service. Many games use Steam cloud to back up game saves).
- ~/Documents/Parallels - VMs in the past have been notoriously bad for Time Machine, VMware includes Time Machine functionality. So does Parallels. Follow their instructions if you'd like Time Machine to back up them.
- ~/Applications (Parallels)~
- ~/Dropbox - Dropbox is already in the cloud, no reason to back it up
- ~/Public (Optional: Depends on your network usage habits)
- /Incompatible Software (This will be in the root of your computer after an OS upgrade).
Tip #2 - Deleting useless backups
If you find that you've been backing up for eternity your iTunes Movie collection or some media dump folder, you may want to delete the record.
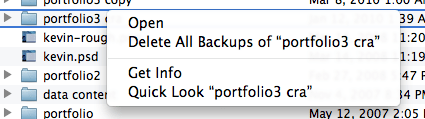
Locate the folder in question in your finder, then click the time machine icon your dock. This will take you to the folder in Time Machine. In the time machine folder, right-click the folder and select Delete All backups. This may take some time depending on the size and frequency of the backups
Tip: This the nuclear option on Time Machine, when you Delete All Backups, you are erasing any previous record of the file. However, if you do not ignore the folder, the folder will still be backed up in its current state.
Tip #3 - Utilities
As you've probably noticed, Time Machine doesn't provide much in the way of options. Fortunately, there's a fair amount of good Time Machine utilities.
Here's a few I've highlighted. Please note, there are plenty of Time Machine related utilities besides these… MacUpdate.com is a fantastic place to find Mac utilities of all types.
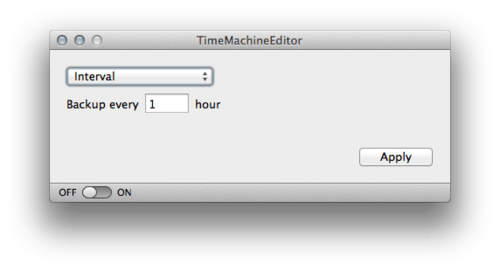
Time Machine Editor - change the backup interval updates (instead of one hour) (free)
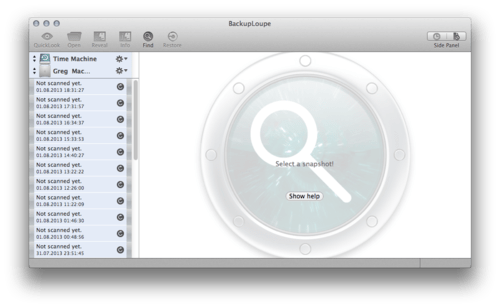
BackupLoupe - Allows you to see individual file records, including revisions, when a file was deleted from records and so forth. Only $5 and handy. A must for Time Machine junkies.
Tedium - Allows multi-time machine backups and management for old OSes (10.8+ has multiple drive support)
Back In Time - expensive but allows you to see more clearly how many iterations of a file was backed up, show deleted items and so on.
Tip #4 - Multiple HDs
10.8 added support for multiple Time Machines. Multiple HDs do not work in a manner that you may expect, backups alternate on the hour between drives. The data is neither split between drives nor do the drives backup only portions/locations (Time Machine #1 backs up the boot drive, Time Machine #2 backs up the secondary drive). You'll have two independent Time Machines, not double the space. Time Machine favors large drives.
For the average user needs, it's a little overkill. When selecting a backup drive, go big as your wallet can afford. While you can back up a larger drive with a smaller drive (assuming you're not using all your free space) a good rule is always bigger. As of writing this, a Seagate Backup Plus 4 TB USB 3.0 runs about $130 on Amazon. A drive doesn't need to be dedicated just to backups. You can partition (split) your Hard Drive into two separate volumes, a Time Machine, and Additional Storage.
Tip #5 - Using a networked drive (that isn't a time capsule)
Many routers come with USB ports that allow connection of external HDs. However, Time Machine is semi-restricted. You cannot back up to anything outside of an HFS+ disk, and it doesn't play nicely with non-Time Capsules. However, with a bit of terminal fun, you can use your own NAS storage device. You will want to start with stephenmorley's guide here based on levelofindirection.com. Read the first and check out the second.
You'll need first to enable non-(officially)supported drives and then follow up with creating the sparse bundle manually. After that it's smooth sailing.
Tip #6 - Show Time Capsule on Desktop/Finder Windows
By default, owners of the Time Capsules may notice they no longer see the Time Capsule when it's mounted. Go to your Finder Preferences and check your “Show Connected Servers” and “Show Connected Drives” and you'll see the Time Machine as before.
Tip #7 - Encrypt your backups
- Open Time Machine preferences.
- Click Select Disk or Add or Remove Backup Disk (if you have multiple backup disks).
- Select your backup disk, then click Remove Disk.
- Now set up the disk again as an encrypted backup disk. For instructions, see:
Choose a backup disk and set encryption options
Tip #8 Time Machine fails restoring from backup
If a restore fails, fear not. Restores are faster but you will not lose your important files. Check outthe full album here.
Happy backups!
This article was updated on August, 23, 2019 with fixed links, when time machine fails updating and copy edits.