Capturing Midi from Maschine 2 in Cubase 7.x & using external controllers on OS X
Capturing midi and using external controllers isn’t as straight forward as you might think with Maschine and Cubase. This tutorial was created on Cubase 7.5 using Maschine 2.4.x. The version of Cubase shouldn’t matter as the midi I/O configuration hasn’t changed terribly since even Cubase SX 1.0, but I can’t make any guarantees.
The Maschine in its default mode isn’t a standard Midi controller (although it does have a midi mode which isn’t useful for the Maschine software) capturing Midi from the pads requires a few steps for the VST.
The few tutorials I could find are Windows-centric pre-2.4, and video. So to keep from forgetting, I created this guide.
Initial Setup:
Step 1)
Add a Maschine VST, and bring up the window.
Step 2)
Select all pads in the Maschine Group (Command A works on this window or shift-click). Right click the title Group A1 in the sequencer area.

Step 3)
Under the Group panel, select Input, and make sure the Midi is active, and Thru is checked.

Step 4)
Under Sound, Input, make sure that the Thru is checked. You may want to set the channel if you intend to use separate midi channels. This isn’t necessary.

Step 5)
Under the Sound panel, go to Output, Select Midi on the right-hand side and check to make sure its Host or Default.

Step 6)
>To use the Maschine pads, you’ll need to set the input to Maschine 2 Midi Out and Maschine Midi in.

For external Controllers:
Set midi input to all.

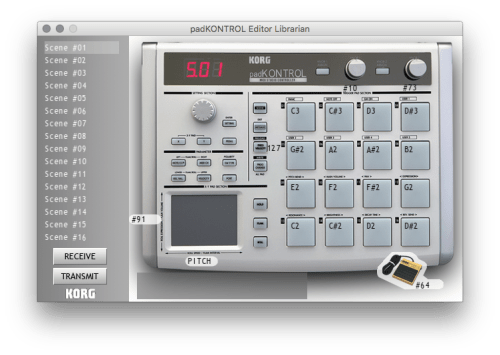
It should default to C1. I’ve found the that the translation between Korg padKontrol and Korg NanoPAD2 both need to be set to C2. Below are examples of default Korg configurations for the NanoPAD and PadKontrol.
Note: Currently I’m unaware of a way to use both internal and external pad capturing at the same time. You can use as many external controllers as you want and capture. For pads, you’ll want to make sure your root note matches your pad configuration. However, playing both the maschine and an external midi pad will trigger sounds which means you can figure out an idea and then capture each part separately.

Other thoughts:
I’ve found it best to map the Maschine Groups to start the Root note one right after another as opposed to channels so groups can be all part of the same choke group if needed, effectively letting you access more than 16 samples at once.
So the lower right pad of the PadKontrol is mapped to C2 and counts up on Scene 1, and E3 counts on up on scene 2, A4 on scene 3, etc…