-
Installing a GeForce GTX760 (GeForce GTX770/GTX780) into a 2006-2008 Mac Pro
Update March 29th, 2018
A quick heads up, I've added a new article on the GeForce GTX 1060 / 1070 / 1080 series, the information is still true but a bit dated. I recommend using preinstalling the nVidia web drivers, TonyMacX86 keeps a nice list running of version to OS version. 10.13 High Sierra or 10.12 Sierra
Below is the original instructions for installing the GeForce 700 series in a Mac Pro.

One of the unsung beauties of the later nVidia cards is they have Mac bios built in. Gone are the days of having to buy a “Mac” version of a graphics card that came preloaded with the proper BIOS or taking matters into your own hands by locating a Mac rom and flashing your graphics cards, and installing the drivers. (the first graphics card I flashed, a Geforce 3, required a PC to run the NVflash.exe). Even as 2011, I flashed an the AMD Radeon 6870 with Mac EFI Firmware. Now you can buy cards off the shelf and jam them in your Mac Pro.
I’ve noted the process in my “Recommended Mac Pro Upgrades” but I realize some users may want a more in-depth guide. Dropping a $200 graphics card into a 6 year old computer might seem crazy but with a GTX760, Borderlands 3 and Shadows of Mordor both run at 2560 x 1440, (max settings for Borderlands: The Prequel Sequel, nearly maxed out, sans the 4GB textures for Shadows of Mordor since opted for the 2GB GTX760). I’ve attached at the bottom benchmarks, further evidencing that the Mac Pro 2008 is still a viable computer for gaming. You can even find videos of youtubers jamming 970s into Mac Pros, so sky’s the limit.
This guide is also a blueprint for the ones looking sticking the GTX960 and GTX970 into Mac Pros.
Here’s how to get your Mac Pro loaded up with snazzy new graphics card in three easy steps!
Be aware::
- The nVidia drivers currently require 10.9 Mavericks or above, although you may be able to track down older drivers.
- The nVidia cards will load the EFI boot screen with the card plugged in (the screen you see if you hold down the option key and the Apple logo). You’ll want to have a backup graphics card in another slot with a monitor connected to see video before the OS X user screen. I personally have an ATI Radeon HD 2600 XT that shipped with my computer but any graphics card will do, flashed or factory as long as it can display the Apple logo on boot. You can operate the computer without an EFI graphics card, however you’ll have to manage booting using Start Up Disk in OS X and use the bootcamp tools in Windows to manage your boot drives. At the very least, keep your old graphics card somewhere safe should you ever need to do troubleshooting.
Step 1)
Purchase a graphics card, and extra mini-PCIe to standard PCIe power cable(s).
The Mac Pros use a funky mini-six-pin cable so you can’t just buy any PCIe power cable. The Mac Pro ship with two power ports. I personally bought a PCIe PCI-e Dual 6 pin Power Cable for Mac G5 nVidia ATI Video Card (Disregard the G5 mislabeling on Amazon, its for a Mac Pro ).
Modern graphics cards power hogs, especially compared to later generation Core series CPUs which continually dropped power requirements between generations. The amount of power connectors, reflect power requirements.
Chart of power supply delivery based on PCIe power pinouts
75 Watts
None150 Watts
One six-pin connector225 Watts
Two six-pin connectors (or one 8-pin)300 Watts
One eight-pin connector + one six-pin connector375 Watts
Two eight-pin connectors450 Watts
Two eight-pin connectors + one six-pin connectorSince the Mac Pros 2006-2008 do not have eight-pin outs, you’ll need a six to eight pin adapter which requires two sets of six-pin cables (hence where the Y pin comes into play). For most GTX 760s and 770s you’ll need three 6 Pin power cables, meaning at least one Y cable like the one linked above.
Next any off the shelf GeForce GTX760 or GTX770 or GTX780 will do. Personally I picked up a EVGA GeForce GTX760 SuperClocked as I’m only a moderate gamer, You certainly will see benefits by dropping more money on a higher end graphics card. I’d recommend more serious gamers getting one of the 4 GB cards as the newest games make use of the addition VRAM for high resolution textures. The 4 GB GTX770s run about $350 as of writing this, spendy but incredibly powerful for the dollar.
Some GeForce GTXes may require one or two 8 pin plugins. The graphics card I purchased required one eight-pin cable and came with a six to eight- pin adapter. This means I needed a grand total of three six-pin cables.
The Mac Pro 2008 shipped with the incredibly beefy 980w PSU. Even under full load according to Apple, the Mac Pro’s CPUs only draw 318w of power. Even with 4 bays filled 3.5 inch HDs, (under full loads 7200 drives only consume roughly 10w) and full ram load out (10w a stick under max load) would leave 450w (if it were feasible trigger full load on CPUs/RAM/HDDs) for motherboard/fans/PCIe cards. Needless to say, the Mac Pro has plenty of headroom (short of trying to run SLI).
Summary
The TL;DR: You’ll likely need additional power cables specifically designed for the mini-PCIe 6 pin power cables. You can get them here: PCIe PCI-e Dual 6 pin Power Cable for Mac G5 nVidia ATI Video Card (Disregard the G5 mislabeling). Unless you’re attempting an SLI configuration, your Mac Pro has plenty of wattage to spare.
Please read, September 1 2015 update: I’ve received a few e-mails about cabling. You will need to utilize both PCIe port ports on your Mac pro. This means you’ll likely need to purchase the PCIe PCI-e Dual 6 pin Power Cable. One of the Mac Pro’s 6 pin adapters should connect to the 6 pin power input on the graphics card, and the other port should connect to a 6 pin to 8 pin adapter. Many graphics cards come with 6 to 8 pin Y adapters. A reader reports that trying to connect a graphics 6 pin and 8 all to one PCIe power port does not work. Use both ports.
Step 2)
Plugging in your PCIe power cables.

The PCIe power cables are located near the front of the PCI chamber beneath the forward fans, right next to the Airport card (or airport card slot). Its a squeeze but I was able to do it with my bare hands.
Step 3)
You’ll want to have a secondary graphics card otherwise this can be a pain. Install the new graphics card and move your old graphics card to another slot. Leave a monitor connected to your old graphics card (if you have two displays, connect one to each graphics card) and boot up your Mac Pro. Download install the drivers from here. The drivers will require you to reboot. On reboot, plug in your monitor to your new graphics card. If you have a secondary display, leave one monitor plugged into your old display if you’d like to continue to be able to see your EFI boot screens.
If your new video card still isn’t outputting video, go the preferences and to the nVidia Driver Manager and make sure you’re using nVIdia’s Web drivers.

Installing on windows will require the usual process of downloading and installing the drivers from nVidia’s website.
Benchmarks and Comparisons
You’re probably wondering if its even worth sticking a GTX760 in a six year old computer vs a Hackintosh Core i7 3770k on a Quo Motherboard? The results may be surprising. All the benchmarks have been performed with the exact same install of OS X.
OS X 10.9 (Mavericks) benchmarks:
Settings:
OpenGL 1600x900 8xAA windowed, Quality: Ultra, Tessellation: Extreme
Mac Pro 2008 (Xeon E5462 2.8 Ghz) + GeForce GTX 760 + 14 GB RAM + Samsung 840 750 GB SSD
FPS: 32.7
Score: 825
Min FPS: 15.7
Max FPS: 68.9
Hackintosh (i7 3770k 3.5 GHz) + GeForce GTX 760 + 16 GB RAM + Samsung 840 750 GB SSD
FPS: 35.7
Score: 899
Min FPS: 7.4
Max FPS: 91.2
Hackintosh (i7 3770k 3.5 GHz) + GeForce GTX 770 + 16 GB RAM + Samsung 840 750 GB SSD
FPS: 43.0
Score: 1082
Min FPS: 10.3
Max FPS: 103.6
——————————————————————————
OpenGL 2560 x 1440 8xAA FullScreen Quality:Ultra Tessellation: Extreme
Mac Pro 2008 (Xeon E5462 2.8 Ghz) + GeForce GTX 760 + 14 GB RAM + Samsung 840 750 GB SSD
FPS: 16.1
Score: 405
Min FPS: 5.8
Max FPS: 37.4
Hackintosh (i7 3770k 3.5 GHz) + GeForce GTX 760 + 16 GB RAM + Samsung 840 750 GB SSD
FPS: 15.7
Score: 396
Min FPS: 6.9
Max FPS: 37.3
Hackintosh (i7 3770k 3.5 GHz) + GeForce GTX 770 + 16 GB RAM + Samsung 840 750 GB SSD
FPS: 18.8
Score: 474
Min FPS: 7.6
Max FPS: 47.5
The Core i7 has an advantage, especially for brief maximums but it shouldn’t come as a huge surprise that the Mac Pro holds its own. However, at the max resolution, the Mac Pro bests faster Core i7. Notably the GeForce 770GTX makes a difference but not quite as much as one might suspect under OS X. Surprising indeed. What’s clear is the GPU is the bigger bottleneck than the CPUs.
I’m left to purely speculate that this may be in part due to the fact the Mac Pro has 12MB of l2 cache per CPU vs 8 MB of L2 cache shared, and 32k L1 cache per CPU vs a single 32K of L1, and the Mac Pro has a 6.4 GT/s bus vs the 5 GT/s found in the Z77 Express Chipset. It also could be as simple a driver update. The big takeaway is that a 6 year old computer was able to compete with a CPU that’s a year old.
The Core i7’s beefier bus speed, newer instruction sets, higher clock speed and Turbo Boost technology 2.0 (CPU auto overclock) all aid in higher max frame rates, when the GPU isn’t under full load. The Unigine benchmark is a nice stress test of OpenGL but may not illustrate nearly as full a benchmark as windows only Benchmarks like 3Dmark. Also notably Unigine produces better OpenGL benchmarks in Windows, and even more so with DirectX.
I’d love to see 2014 5k iMac with the Radeon R9 M295X to throw into the mix. It’s likely my Mac Pro 2008 would be only a few FPS shy of the iMac, based on GPU Boss.
The short of it, if you want a gaming Mac, an older Mac Pro with a modern GPU is your best bet to this day. The new iMac 5k display is something to marvel, but the GPU (even if absurdly powerful for a mobile chipset) is not when pushing so many pixels. For about $600 you can score a 2008 Mac Pro, making it a bit of a steal
The Core i7 3770k was released on April 29, 2012 vs the E5462 in Nov 12, 2007.
Update January 19th, 2015
What About the GeForce GTX 9xxs / 10xx you may ask?
If you’re like myself, you may be wondering if you can jam a GeForce GTX 980, 970, 960 or GTX 1080, 1070, 1060 etc in your Mac Pro? The answer is: Yes, yes you can. You gotta love the Hackintosh community and nVidia. You can even watch youtubers jam the 970s into Mac Pros.
Update September 1st, 2015
Added more information about the Y adapter and GeForce GTX 9xx series. Also, the GeForce 760 was more than enough to play GTA V at nearly maxed at 2560 x 1440 and medium textures. To use the high resolution textures, you need a 4 GB card and the same goes for Shadows of Mordor In hindsight I probably should have stuck with the 770 4GB edition.
The Witcher 3 runs fantastically too. My 2013 Retina MacBook Pro with the dedicated GeForce GT 650m simply cannot play these games. The 2008 Mac pro can. Enough said.
Update January 3rd, 2016
Noticed that the driver information listed Mavericks or Yosemite, changed it to “Mavericks or Above”. Added a little more clarification after a reader asked about EFI boot screens. Also, I’ll probably end up making a sequel article when it comes time to get a GeForce GTX 970.
Update March 29th, 2018
Minor typo fixes and new intro, added info about the 1000 series.
-
The 4k buzzword and what it means for the web...
Today I gave presentation on the 4k web and what it means to our designers. Our designers are sharp but I figured I’d share my notes, I spent too much time on it, creating charts.
I wrote a blog post about the 4k web, go read it here.
What is 4k?
- 4k is an umbrella term for multiple screen resolutions, most commonly 3840 × 2160.
- The resolution bump started in Hollywood for digital work flows, for scanned film negatives and digital video shot at a resolution that was considered “Film” grade. Projectors and very large screen TVs soon followed, replacing the previous generation of “2k” digital projectors.
- Outside of cinema, 4k video content is relatively scarce due to bandwidth constraints. Currently YouTube offers experimental 4k content and Sony Pictures offers a digital-only movie store.
- Roughly a year and half ago, the cheapest 4k displays cost roughly $2000, making them almost exclusively a high-end luxury item.
- 4k displays recently dropped in price (and size) making them affordable to the common person. Computer monitors carrying a 4k resolution can be had for as little as $500.
Retina For Desktop
Time for a bunch of numbers
- Previously, the standard resolution for a 21-24 inch monitor has been 1920 x 1080 aka 1080p (or 1920 x 1200 depending on aspect ratio).
- Currently there are 24 inch - 30 inch 4k computer monitors on sale at different price points, carrying typically a resolution of 3840 × 2160, twice the resolution of 1080p and 4x as many pixels.
- TVs range from 32-105 inches, and typically carry the same 3840 × 2160 resolution and (16:9) aspect ratio. Extreme high end “5k” ultra wide screen TVs carrying a staggering 5120 x 2160 resolution have demoed at several press releases. 8k TVs also are in the works.
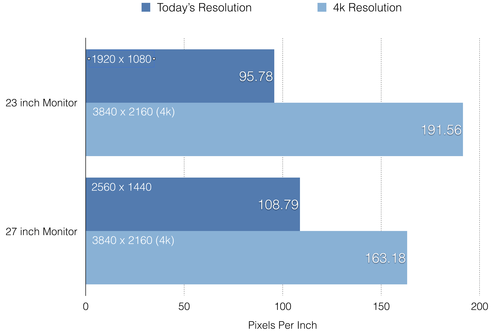
- 4k isn’t different than current “retina” display devices like the MacBook Retina, or mobile devices. It means that desktop displays will have roughly 1.5x - 2x as many pixels-per-inch (PPI) than current displays available today.
- However… 4k displays range from as small as 21 inch to as large 105 inches, meaning the that 4k doesn’t always mean retina.
- A 42 inch 4k monitor/TV has roughly 105 Pixels-per-inch, the same amount of pixels per inch that standard computer monitors have like the iMac 27” and iMac 21”.
Why is 4k special?
Desktop computers have been the last roadblock for adopting resolution independence strategies that include non-mobile devices, (phones/tablets).
In the near future, almost all computers, and most displays sold will feature high density displays, roughly 180+ PPI. This marks a drastic change in resolution as monitors from 1990-2012 have almost exclusively been 80-110 PPI.
Too many screen sizes
To address the massive increase in screen sizes and pixels-per-inch, designers have developed several strategies for resolution independence.
They are as follows:
- Responsive design
- High resolution images / resolution independent formats
- Content delivery methods
Designing for the Future
And other clichés….
- Some elements are naturally resolution independent such as anything rendered by pure CSS (effects rendered by a web browser like shadows, gradients, shapes), typography (fonts and icon fonts) and vector formats like SVG and AI (Adobe Illustrator).
- Regardless where these assets are displayed, they will be rendered in the highest resolution possible as the shapes are represented by math instead of pixels.
- Raster formats (things that contain pixels instead of maths) are not intuitively “resolution independent”. These are typically photographs, common formats include JPG, RAW, PNG, BMP, GIF etc.
Does this mean that formats like SVG are the future?
Not entirely. Simple graphics are easily represented by math. Photographs and complex images are not. For a full explanation of raster vs vector, go check out this article.
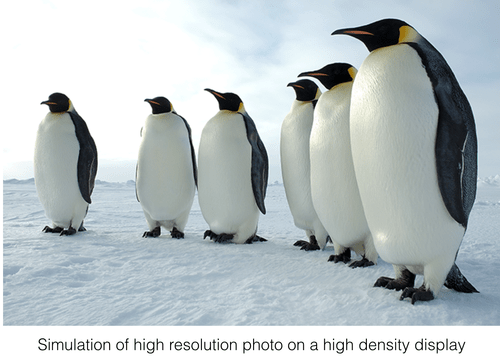
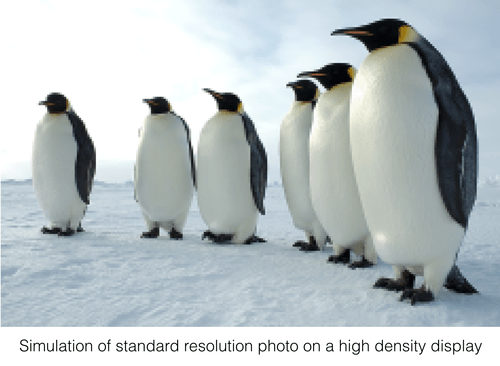
- Anything that is a photograph or complex image needs a higher resolution version for the screens.
- Photos, complex images and video (anything that is not vector based) are the Achilles’ heel of resolution independence.
- Upscaling raster assets beyond their native format results in blurry pixelated results for high density displays.
- Serving high resolution assets to users without high density displays gain no benefit.
- Larger images (videos/animation) result in much higher asset file sizes thus consumes more bandwidth, taxing users connections.
- Not all screens have the same PPI (some screens are sharper than others)
Designs today not only need to be responsive, they need to be include high resolution assets to appear sharp on high density displays.
Strategies for resolution independence during design phase:
- Use vector assets when possible.
- (including SVGs or formats that can converted into SVG).
- Make liberal use of Smart objects in Photoshop. Switch to designing in vector programs like Sketch and Illustrator
- They can contain much higher resolution photos and scaled down in the design while leaving the original image at its full resolution. It results in higher PSD file sizes but makes it possible for high density images to be extracted.
Content Delivery Methods
High resolution assets require more bandwidth and vector images require browser compatibility but fortunately we have many tools we can use!
1) Ability to detect high resolution displays via CSS and Javascript; use polyfills and picture elements
Scripts like retina.js are able to detect pixel density and serve up higher resolution versions of your assets. This means users will only see the retina versions of images if their device supports them.
2) PNG fallback for old browsers that do no support SVG
Scripts like modernizr.js are able to detect if a browser supports SVG and swap in PNGs for older browsers like IE8 and Android 2.2. SVGs even can support PNG fallbacks when hardcoded into a page without javascript. Icon fonts are supported in older browsers that do not support SVG, which works for simple icons.
3) Better compression
Tools like ImageOptim and ImageAlpha allow us to further compress images, often without affecting the image quality or reduce the quality without much perceptual damage. Also, high resolution assets can be served up more highly compressed.
4) Content Delivery Networks (CDNs)
Content delivery networks can delivery multiple quality scales based on compression + resolution and serve these up to fit scenarios based on resolution, screen pixel densities, and even bandwidth*.
5) Bandwidth Detection
Emerging technologies allow to detect if the user is on narrow band such as Edge or low 3G signal strength, slower DSL connections. High resolution assets can be served when user is has appropriate bandwidth.
-
FontPrep - Drag and drop webfont generator - A Mini-Review

7/13/2015 Update
I wrote this review in June 2013. Since writing this, FontPrep is now open source. It doesn’t work under Yosemite and Mavericks. I still use it today, but with a 10.7 Virtual Machine when FontSquirrel doesn’t suffice or I need to skirt around the copy-protection notices as FontSquirrel has no way to prove one’s license for a purchased font.
It’s still an essential tool that I lean on a few times a year.
Below is my original review:
Intro
Web fonts are a funny thing as there isn’t a universal format for all browsers. Most licensing is based on the honor system with each foundry arbitrarily picking different conditions (page views, domains, average visitors) and expecting one to pay based on it. Its a broken system, has really ushered in Google Fonts and Adobe Typekit for better or worse.
Fonts have zero copy-protection. Essentially, embedded fonts are a localized install. While OS X and Windows do not use woff or svg, they do use ttf. Simply loading a webpage with an embedded font means you can source the TTF file, download it and install it. This is problematic as high quality fonts take hundreds of hours to create and foundries are left cold.
Like many things, the internet has been a gift and curse for typographers, as they can distribute their work easily but have it stolen even more easily.
Now this isn’t meant to be a lecture on web fonts, but its important when discussing FontPrep
I ran across this app the other day, a drag and drop webfont generator. Web designers probably already know about FontSquirrel. FontSquirrel is a web service / font distributor that allows you to generate embeds of web fonts. This is awesome. Its free to use and it works wonderfully… except when it doesn’t.
I had a client who insisted on using Papyrus on their website (yes I know, Papyrus is the new Comic Sans). They purchased a license for it, which was very non-specific but seemed to include embedding privileges. However, I couldn’t create an embeddable version using Font Squirrel despite legally owning it because I was blacklisted. The license only included in the digital format a TrueType version. Eventually I used FontLab to strip the font data and created a new dummy Papyrus font, effectively removing the blacklist based on me liberally interpreting the license, which stated the font could be modified. I had entered a much more legal grey zone than had Font Squirrel let me embed the font.
FontPrep

FontPrep functions almost to the letter (font puns!) like Font Squirrel but with drag and drop functionality and (currently) no blacklisting. That will change but for now, any font can be converted to a webfont. Its a good and bad thing, but when so much falls in a legal grey area, its nice to have a backup
So how does it work?
FontPrep is essentially a bootstrapped Ruby project wrapped in an app container. Its far from the pinnacle of application design as it has zero OS menu integration. However, drag OS X fonts in, and it’ll spit out a CSS file, a simple HTML Preview and SVG, TTF, WOFF and EOT although in my tests, EOT was zero bytes :/

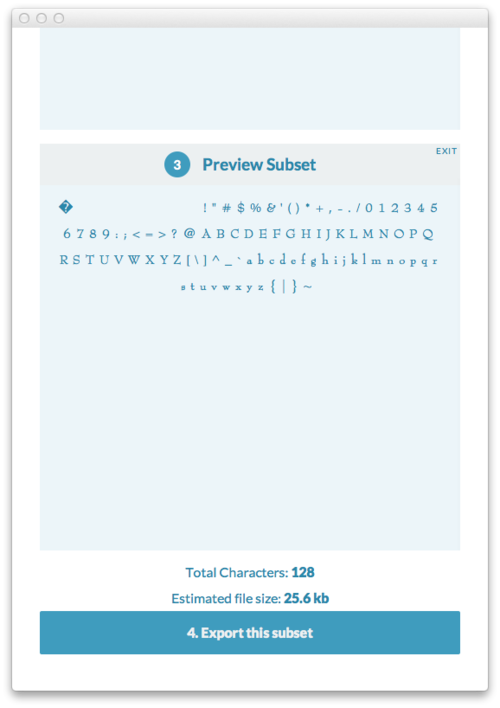
Where FontPrep shines is creating subsets. You can simply check and see in real time your results. This means disabling characters you won’t use. Reducing your glyph set will drastically reduce the sizes of your font. However, if you’re expecting the expert features of Font Squirrel, you may be a bit disappointed.
Font squirrel allows you to change the hinting, remove kerning and change rendering options.

Final Thoughts
At $5, its not too much to ask and worth it (if the bypass blacklisting feature is honored). I have legally purchased licenses only to be locked out of converting the fonts. I’m sure Adobe would have a field day over this, but I’m sure Adobe’s legal team is waiting to pounce on anyone dumb enough to try to embed Myraid Pro without a license.
FontPrep easy but doesn’t really offer too much to distance itself from Font Squirrel. I don’t blame the developers for not selling in the Mac App Store, but I imagine some users may be willing to pay $1 more to have the convenience of App Store updates and downloads.

This what the innards of the App look like, CSS, JS and Ruby
-
Susy - Undefined mixin ‘span-columns'
You may come across the following error in your web deving if you ever use the Susy math library:
“>Undefined mixin ‘span-columns’.)"Wondering how to fix this? If you’re opening a project that’s kicking out this error in Grunt or whatever task-manager you might be running, it means that your @import susy; is trying to call the most recent version of susy.
Simply change your whevever in your Sass you call
@import susy;to@import susyone;Took me longer than I’d care to solve that.
-
Cubase 7.5 video service is currently unresponsive

Pictured: “Video Service is currently not responding"with a hanging "Waiting for Video service” bar.
Seeing this a lot?
I figured as much. Fret not!
Cubase 7.5.30 update reads as follows:
The reliability of the video engine has been improved (MAC only). - Source: Cubase_7.5.30-Cubase Artist 7.5.30 Version History Known issues.pdf
Finally! I never use the video functions, so aborting never has affected any of the tracks I’ve been working on so your milage may vary but at the very least, you should be seeing the annoying error above a whole lot less.
(Mac really shouldn’t be all caps)
-
There is much to be said about the Apple Watch
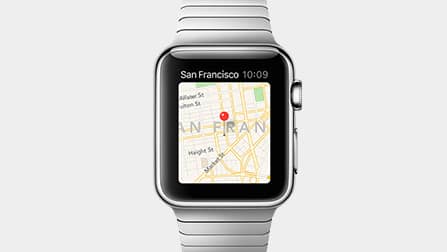
Source: Apple.com
Unsurprisingly, the Apple Watch is perfect for the person who uses their iPad to peck out an e-mail when sitting three feet from his/her laptop. There’ll be a lot to be said about the watch, and inevitably Apple’s entry into the watch territory means that the smart watch has arrived amidst host of caveats (phone dependency, limited battery life, limited functionality), making them more accurately “wrist terminals” than smart.
Wearables aren’t new (Nike+ shoes, Go Pros, Heart Rate/blood sugar monitors and GPS watches), just the modern implementation of the smart watch is. If the smart phone is now the hub if your portable network, the wearable movement has really paled to really adventure is thinking outside the screen (watches and Google Glass). There’s a world of smart things from pet collars, to car keys ready to be interfaced with. Inevitably, smart watches in future generations will become smaller, sport better battery life and perhaps more useful. That said…
Let’s hope we start looking further instead of smaller.
-
Wurfl + Modernizer for HTML5 background video
Modernizr is wonderful and pretty much becoming as prevalent as JQuery. I’m not going to further evangelize Modernizr as there’s so many resources that can summarize Modernizr better than me. We’ll skip the introductions and assume you’re familiar with Modernizr. If you aren’t, google it and you’re in for a treat :)
Modernizr isn’t quite enough for background video
I was working on a proof of concept codepen.io project and needed to do one of the most basic of things: Load a background video but only on desktop device. . Its pretty easy to craft a Modernizr script show/hide content on touch and video takes as such. However, Modernizr doesn’t make a distinction between mobile and non-mobile.
html
<video autoplay loop id="bgvid">
 <source src="video.mp4" type="video/mp4">
 </video>
Javscript
if( Modernizr.touch &|| !Modernizr.video){
var isMobile = true;
$("#html5-video").show();
}else{
var isMobile = false;
$("#html5-video").hide();
}Getting smarter
The problem with the above is the video is still being loaded into the DOM. Its not ideal as Modernzr alone isn’t quite enough to target just mobile devices where users are likely going to be on data plans.
We can leverage JQuery to make this smarter using the .html() attribute.
html
 <script type="text/html" id="video-tpl">
 <video autoplay loop id="bgvid">
 <source src="video.mp4" type="video/mp4">
 </video>
 </script>
<div="target></div>
Javascript
var $target = $("#target"),
videoTpl = $("#video-tpl").html();
if( Modernizr.touch || !Modernizr.video){
var isMobile = true;
$target.html(videoTpl);
}else{
var isMobile = false;
}The beauty of the above example is that the <video> tag will be completely ignored when we do not want it to be used. However, Some windows 8 devices despite running Windows 8 desktop may be eliminated because of our conditional statement, as Modernizr will detect the touch functionality.
WURFL to the rescue
Head.js is a viable option (its a cousin to Modernizr, tossing plenty of body classes onto the HTML) as it’ll put a .mobile class onto your body. However, you’re probably going to get more accurate device definitions from WURFL as it’s been around for several years uses a well established device database.
So with a single conditional change from modernizr for touch to WURFL.is_mobile, we can more accurately detect mobile only devices.
html
<script type="text/html" id="video-tpl">
<video autoplay loop id="bgvid">
<source src="video.mp4" type="video/mp4">
</video>
</script>
<div="target></div>
Javascript
var $target = $("#target"),
videoTpl = $("#video-tpl").html();
if( WURFL.is_mobile || !Modernizr.video){
var isMobile = true;
$target.html(videoTpl);
}else{
var isMobile = false;
}That’s it, now our background video will be ignored if the browser does NOT support <video> or is a mobile device.
-
Using the Korg padKontrol as a sustain pedal (or other functions)
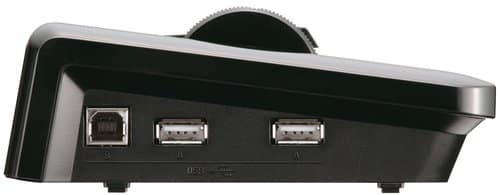
Pictured: Side view of Korg MicroKey 37, USB I/O but no ¼ input for a sustain pedal
Introduction
A lot of smaller Midi keyboards don’t sport sustain pedal inputs such as my much loved Korg MicroKey 37. Sadly, I’ve yet to see a simple USB midi pedal, (although there are standalone midi pedals that require a regular Midi I/O interface). There isn’t an easy fix but if you have a Korg padKontrol or another programmable device, here’s a workaround.
Seasoned vets may want to skip this but with a newer generation of Midi users: the solution might not be so obvious. Digital-Audio-Workstations (DAWs) such as Logic, Cubase, Protools all can accept multiple midi channels or devices at once and even route them to one single virtual instrument/synth. This means for a program, such as an organ like the Native Instruments’s B4 or the Logic’s internal Organ, you can use two keyboards at once to more accurately simulate an organ (as organs often have two sets of keys). However, this ability isn’t just limited to situations such as this. Midi instruments can be set to communicate on the same channel, so a keyboard and a set of midi faders could be linked to Native Instrument’s Massive to control the oscillators and parameters unique to that synth.
Midi is flexible if anything, but also cumbersome as a technology, having barely changed at its heart since its inception in the 80s, still rooted sending in 7-bit integer to various channels. To this day, many DAWs still allow you to view the raw midi data in channels + numerical values. With that said, modern applications make it pretty easy to use many midi devices at once.
Since at its root midi is still simply numbers being sent to various points, many midi controllers allow you to change this functionality to maintain maximum compatibility. A knob can be assigned to a particular Midi Control Channel, (commonly referred to as a Midi CC) to which software (or actual hardware) can determine how this data is used.
Example: a knob could be assigned to MIDI CC 13 which controls phasing on a synth. Twisting the knob, adjusts the phase sync accordingly.
While this all starts to get esoteric, its important to realize that this ability can be used for something simple, like adding Sustain Pedal functionality to a cheap midi keyboard that doesn’t have one.
What you will need:
- A midi device with the ability to send/receive or program its midi function with its proper software installed or which can be programmed via the device itself.
- A sustain pedal (if your midi controller supports a physical pedal. Midi pedals are generic and can be bought at many music shops. Rock band foot pedals work as well, as they are midi pedals).
For this example, I’m using a Korg PadKontrol to control my sustain pedal.
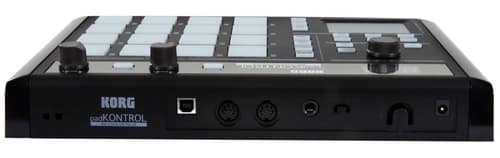
Pictured: back view of Korg padKontrol, the “headphone” like jack is actually a ¼ inch input for a sustain pedal.
Configuring your software can be pain, I can’t specifically include instructions for hardware that I do not own, but generally you will need to make sure in the preferences, the software is able to communicate with your device. Usually this requires setting the midi in and out. Often devices will have a control port when or channel.
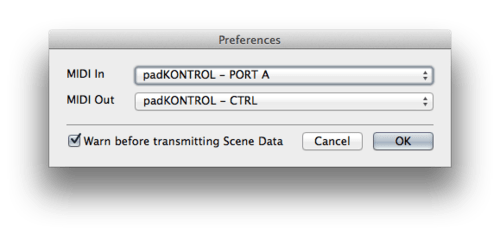
Pictured: A properly configured Korg padKonrol requires going to the preferences and setting the Midi In and the Midi Out to the padKontrol
Step 1: Program software.
Programmable midi devices with send receive usually allow you to program the device remotely. Below is the Korg PadKontrol’s software. Highlighted in red is the setting for the PadKontrol’s sustain pedal
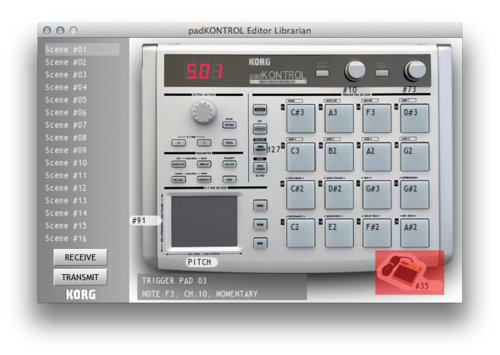
Step 2: Setting the up the pad or pedal
Double clicking the Pad in the Korg Padkontrol allows you to set up and change the Midi CC.
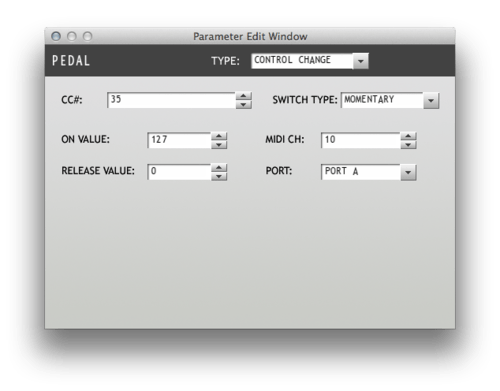
Setting up the Midi CC means setting the Midi CC to channel 64 as this is the general midi specification for sustain pedals. (A full list of common midi settings can be found at various websites such as the following website,
Step 3: Save your configuration to the device.
After the setting for the pedal has been configured, usually it requires transmitting the settings back to the device. The Korg padKontrol has the ability to store multiple “scenes” (separate midi configurations) so I set this to scene #1, which the device boots up to when plugged in.
Step 4: configure your DAW.
Once in your midi application of choice, you may need to configure the instrument input to accept all incoming midi channels from all available devices.
-
The 30 GB iPod Classic that grew up to 64 GB
Forward
I wrote this back in October, after buying an iPod classic replace my missing 120 GB iPod classic. I finally edited and posted it on December 4th, 2014, and since then there’s been a run on the used iPod market.
The hackable iPod
Ever since the iPod Minis, the iPods have been fairly hackable. After all, the iPod is essentially a portable hard drive that happens to have an ultra light weight operating system and screen attached to it.
What really prohibited most hackers was that the economics didn’t make much sense when CompactFlash card with only a quarter of the storage, cost more than an entire iPod. Most iPod hacking thus was limited to the iPod Mini faction, (where replacing 4 GB Hard drives with equal or greater sized CompactFlash cards was affordable) or loading custom firmware like Rockbox for Flac compatibility (before Apple offered its own lossless alternative).
The end of an era
Quietly, Apple killed the iPod classic after the iPhone 6 announcement and all the remaining inventory was liquidated at an alarming rate. Boxed iPod have shot up in price on Ebay and Amazon.com beyond their MSRP.
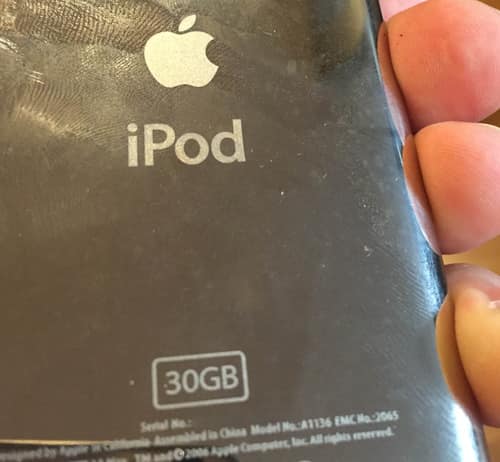
Wanting to get an iPod before they’re gone forever, I settled on a 3rd party refurbished iPod 30 GB on Amazon.com, sporting a new faceplate, backplate and battery for $100.
Why not get an iPod touch you ask?
Simple: Storage, Cost, and retro appeal. To this day, there isn’t a media player better at playing music. And iPod can be operated without even looking at the screen (Try skipping tracks or pausing a touch screen blinded folded if you don’t believe me). iTunes Match + Siri certainly works well but with data throttling and a frequency for driving places without 4G, means local storage still wins out.
Shopping list
Hacking an iPod doesn’t require much in the way of specialized tools, there’s a variety of tools out there. Years ago, I replaced a battery in a friend’s iPod, which came with a cheap plastic hook. Since then there’s been a small cottage economy of iPod replacement parts and tools.
The iPods 5G+ all use ZIF (Zero Insertion Force) based HDs, which is a quasi standard for ATA variants.
So in addition to my iPod, my parents list included
- Newer Technology iSesamo - Tool for easily opening iPod
- Micro SATA Cables - CF Card to 1.8 inch ZIF Adapter - An adapter suited for converting ZIF to CompactFlash
- SD-CF II: SD to CF Type II Adapter - A CompactFlash to SD card
- 64 GB SD Card to hold me until 256 GB cards drop in price.
CompactFlash cards for years have had SD card beat on storage and price but in the last two years, SD Cards have come a long ways, with the fastest cards at 250 MB/s write speeds. Impressive but it is still half the speed of a Lexar 3400x card with an incredible 500 MB/s write speed. However, the price differences between CF and SD are quite profound, with CF cards often costing 2x-3x as much as the SD card. Since I’m not recording 4k video, a moderate SD card will suffice.
Popping open the iPod is easily the most difficult part of the entire procedure (although my old 80 GB iPod, bless its little heart could be squeezed open by hand). Prying it open, I marred the case edge in a spot (barely noticeable). You may want to check out more expensive iPod opening tools if you’re concerned.
Once open, removing the HDD took a little more force than I expected from a “Zero Insertion Force” tool, but it only took a minute to connect the CF card.
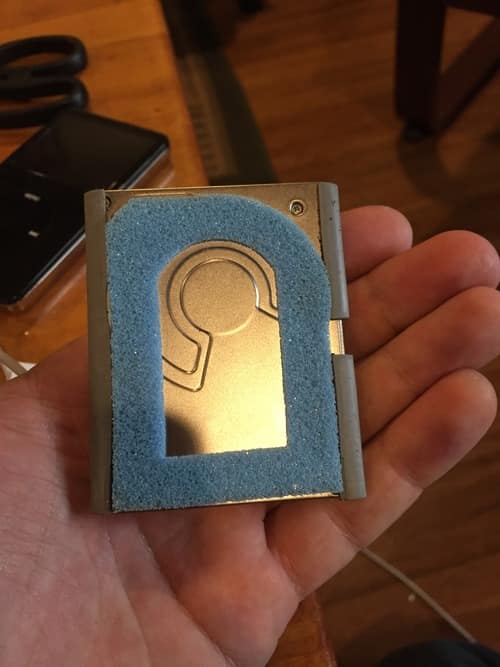
Yanking out the iPod HDD requires being careful not to wreck the ZIF connector. Once done its a matter of simply plugging in the ZIF adapter with CF Card + SD Card.
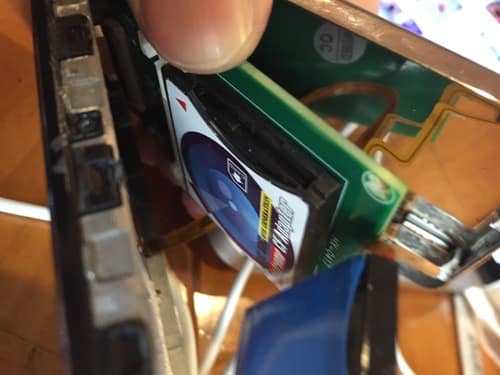
Snapping it back together is a little tricky as the battery free floats in the iPod.
Once all the parts are installed, I plugged my iPod into my computer and booted it up. The iPod went into factory restore mode, to which iTunes automatically reloaded the OS.

Now the waiting game begins. 128 GB cards as of writing this are floating below $50, whereas 256 GB are $100.
Things observed:
The battery life sucks but I didn’t test the iPod before swapping media types. I’m curious if the iPod battery wasn’t new.
There’s no speed increase between skipping songs. There may be a small speed penalty for using the CF to SD adapter negating much gains. Also the iPod uses massive caching to avoid skipping so its quite likely that the speed gains aren’t felt partly due to the OS trying to compensate for its spinning parts.
The iPod seems to run fine otherwise, it doesn’t have the days of charge than I’m used to so I may end up buying another battery.
-
Soon to be the most over used Emoji
As part of the proposed Emoji Unicode 7.0 update, comes “Reversed Hand With Middle Finger Extended”.
Enjoy your emoji…