-
Mostly Complete list of HEIF / HEIV (heic) on macOS in Q1 2019
HEIF (High efficiency image format) as known as H.265 and MPEG-H Part 2 was introduced to iOS 11, and to later macOS 10.13.4 on March 29, 2018. It's been less than a year and support has rolled out at a reasonable pace. I've elected not to list HEVC (High efficiency video codec) itself, as it is housed the .mov container format and most video applications using Mac OS's internal video engine will support it. Also, open source libraries like ffmpeg have added support for HEVC. The .heic (HEIF) file format is a much bigger grab bag from my experience. Many video applications now support HEIC such as Premiere / Final Cut Pro / Motion / DaVinci Resolve hence they are on this list.
I've tried to compile a complete list of known applications that handle HEIC. Undoubtedly I'm missing a few so if anyone has any others I'm not listing, feel free to let me know. Moving forward, .heic support is likely to be assumed. Notably, Affinity Photo on the desktop doesn't support HEIC (yet). I'll try to maintain this list at least until the one year anniversary if not a bit longer.
Openable
- Preview (macOS 10.13+)
- Lightroom CC 1.4+, LightRoom CC 7.4+ (macOS 10.13+)
- ImageMagick (macOS 10.13+)
- Graphics Converter 10.4.3+ (macOS 10.13+)
- Pixelmator/Pixelmator Pro (macOS 10.13+)
- Acorn 6+ (macOS 10.13+)
- Omnigraffle (macOS 10.13+)
- Sketch (macOS 10.13+)</
- Adobe Photoshop Elements 2019
- Adobe Photoshop CC 2018+
- Adobe Premiere Elements 2019
- Adobe Premiere CC 2018+
- Apple Pages (macOS 10.13+ warns about possible iPad support)</
- Apple Keynote (macOS 10.13+ warns about possible iPad support)</
- Apple Final Cut Pro (macOS 10.13+)
- Apple Motion (macOS 10.13+)
- Apple Compressor 4.4 (macOS 10.13+)
- DaVinci Resolve 15+ (macOS 10.13+)
Exportable
This list is incomplete
- Preview (macOS 10.13+)
- ImageMagick (macOS 10.13+)
- Graphics Converter 10.4.3+ (macOS 10.13+)
- Pixelmator/Pixelmator Pro (macOS 10.13+)
Browser Support
None!
HEIC surprisingly is not supported by Safari. Seeing as the HEIV/HEIF family is part of the MPEG group, the patents likely will likely limit its adoption. H.264 wasn't widely supported by holdouts like Mozilla until Cisco bought the patent and made it open.
HEIF still is mostly treated as an intermediate format. Transferring HEIF from iOS to macOS with a Mac running a compatible OS will transfer images as HEIF. HEIF has expanded quite a bit since landing on Mac OS. Windows users are left hanging with the Adobe suite outside of Lightroom. For avant-garde browser-supported formats, see Getting started with Webp, JPEG2000, and JPEG-XR.
-
Welcome to the Enshittening: where everything is bullshit.
Fake people with fake cookies and fake social-media accounts, fake-moving their fake cursors, fake-clicking on fake websites — the fraudsters had essentially created a simulacrum of the internet, where the only real things were the ads.
How much of the internet is fake? Studies generally suggest that, year after year, less than 60 percent of web traffic is human; some years, according to some researchers, a healthy majority of it is bot. For a period of time in 2013, the Times reported this year, a full half of YouTube traffic was “bots masquerading as people,” a portion so high that employees feared an inflection point after which YouTube’s systems for detecting fraudulent traffic would begin to regard bot traffic as real and human traffic as fake. They called this hypothetical event “the Inversion.”
Max Read, "How Much of the Internet Is Fake? Turns Out, a Lot of It, Actually.", NY Mag
This is a brilliant must-read linking some of my favorite articles recently like Rising Instagram Stars Are Posting Fake Sponsored Content (if that makes your soul hurt, then you're not alone). The article doesn't even account for some of the many fraudsters like BuzzFeed's investigative report "Apps Installed On Millions Of Android Phones Tracked User Behavior To Execute A Multimillion-Dollar Ad Fraud Scheme" or Fake Retail apps in the iOS app store. But if NYmag were to attempt to report on all the online scams not listed in this article from 2018, the entire tenor of the publication would need to shift into a security blog.
We're surfing on a river of bullshit while each of us contributes our own tiny tributary of turds. We are all to blame for what is happening. To borrow from Esquire's Magazine, it's the enshittening, the active participation in shittifying the web.
Amazon is a terrible place to shop, filled with fake reviews, counterfeits, fake products, stealth Amazon owned brands which they try and trick you into buying and we still shop at it.
FaceBook doesn't give two shits about it's effect on politics, be it hate-speech that lead to murders, enabling Russian meddling, anyone's well being, or the gazillion infractions against privacy and we still use it, continuing to enshitten ourselves. Then there's our Enshitter-In-Chief, a one-man colon catastrophe when it comes to bullshit. He's so full of bullshit that he managed to make 28 disprovable statements (lie) publically a day last month. Even his underlings are more than gitty to perpetuate bullshit.
To lazy to make up your own bullshit? Want to build an empire of bullshit? There's an entire bullshit industry you're probably not even familiar with, even if you've heard of low-rent bullshit like Fiver. There are full-on bullshit mills to generate bullshit on your behalf!
We don't need "Virtual Reality," we're already living in one. Everything is bullshit — Happy New Year.
01/31/23: This article was cited by Castlebridge's blog for the term Enshittening pertaining to the rise of Chat GPT. I wholeheartedly approve as Chat GPT gives us whole new avenues to shittify the web with generative bullshit. Chat GPT's impressive nature is that it produces confidently correct and incorrect information with impunity. We're likely on the precipice of new levels of bullshit when AI models are trained on content generated by AI. To use a dated reference, it'll be the "copy of a copy" effect as illustrated in Multiplicity. In a truly dystopian timeline, this limitation could lock AI to forever a pre-2022 mindset when content can be assumed to be predominantly created by actual meat bags, forever knee-capping human expression from evolving.
Let the enshittening of knowledge begin. We will make ourselves more delusional and stupid in the process.
-
Edge and Internet Explorer are dead - retrospective
I hate Internet Explorer. I say that present-tense as its zombie-corpse still haunts the internet, holding back front-end web development. It's not a surprise nor even controversial. It's quite banal, so much so that my contrarian tendency makes me want to point out that IE was better than Netscape, (which it was). Even then with it certainly was not better than the many browsers after it.
I used anything I could in the early days of Mac OS X to get away from IE 5.5: Mozilla Suite, Omniweb, Phoenix (later to become FireBird and finally FireFox), Chimera (Later renamed to Camino, a wonderful Cocoa/Objective-C port of FireFox).
My ire for IE grew as I progressed a developer, there were those painful moments when a simple console.log would stop IE from executing a javascript file dead in its tracks, or creating conditionals like
[if lte IE 7]. Internet Explorer often would take a design I slaved over in Safari and FireFox only to see a :last-child pseudo selector not work, and wonder why selectivizr.js wasn't working. So many polyfills and hacks...Edge was a different beast. Trident was revamped and renamed as EdgeHTML. It was fitting, rendering engine was modern (at least from a MS perspective). Things... worked. My opinion was suddenly, a nice lukewarm "It doesn't suck". I never thought I'd be sad to see Microsoft go.
So I ended up writing up a post fitting for Internet Explorer and Edge, titled: How Microsoft lost the Browser Wars, the long form article style I prefer. It covers the a brief history of the browser wars and my personal take on how IE faltered and Edge failed.
-
Making the cite tag sane: Announcing WebCites
I wrote about a codepen I wrote last week. I found that there are some great libraries for citations but most are wanton overkill for what I wanted, a wikipedia-like simple citation system.
I've since created a much smarter, dependency-free version and you can find the project on Web<cite>.
Project goals
- Generate a list from all the citations found within the article.
- Detect multiple instances of the same source.
- Number each
<cite>instance, if used before, use the previous instance's number. - Uses anchor tags to link to the source at the bottom of the page to a specified div
- No jQuery
- Very easy to use
Planned Features
- Code fixes and some basic error checking
- MORE DOCUMENTATION!
- Arguments passed in as object for better configuration
- Demo files
- ES5 & ES6 variants
- Source Title (optional)
- Date retrieved (optional)
- Author (optional)
- CSS attributes for each property so lists can easily customized
- Date Retrieved vs Article Date published
- Repository contains minified distribution ready code
- Multiple citation lists on the same page (multi-article support)
- Optional demo Scss/CSS stylings
- Generate as an ordered list instead of spans
Demo
See the Pen Simple Auto-generated citations using <cite&rt; and javascript no jQuery by Greg Gant (@fuzzywalrus) on CodePen.
Find this project at: https://github.com/fuzzywalrus/webcites
-
How to use CSS media queries for dark mode!
Dark mode is all the rage. Safari Technology Preview added support for Media Queries. Chrome has already announced it will soon support Dark mode. The requirements are (as of writing this):
- Safari Technology Preview 68 or higher
- macOS Mojave 10.14
I'm personally not a fan of using dark mode and I'm no more correct than the person who prefers it. The point is that preference matters. Some users find it either more pleasing or perhaps reduces eye strain. The best part though is its a fun and easy hack:
p { color: white;}
@media (prefers-color-scheme: dark) {
  p { color: black;}
}
Notably you can also detect light mode:
@media (prefers-color-scheme: light) {
  /* do stuff */
}
It's that easy. If you have a simple site, it's quick to retrofit. More complex sites (especially with image backgrounds or poorly written CSS) probably will require a lot more work. It took me about 10 minutes total to make a beta of dark mode. More info at developer.mozilla.org. One of the more promising features is eventually we will have media-queries for
inverted-colors,prefers-reduced-motion,prefers-reduced-transparencyandprefers-contrastwhich is a big win for both designers and accessibility. Apple OSes already have a bulk of these features (macOS has invert, reduce motion, dark mode and low contrast, whereas iOS has increase contrast, reduce motion and invert) You can see them all at drafts.csswg.org. Allowing web apps and sites to sport these features probably will become a small but important design trend as users can exert greater control for experience over their OS and content they consume for the best visual experience based on preference and requirements.If you visit this website now with dark mode enabled and the correct browser, you'll get to see dark mode in action! Now the real question: are we going to have a "dark mode first" movement? ;)
-
Making the cite tag sane
While writing a long-form retrospective on how Microsoft lost the browser wars, I realized managing a citation list is a royal pain the ass. With 50+ sources, I want a very simple light-weight way to manage a source list. The requirements were as follows for my auto-citation list generate:
- Generate a list from all the citations found within the article.
- Detect multiple instances of the same source.
- Number each
<cite>instance, if used before, use the correct number. - Use anchor tags to link to the source at the bottom of the page.
I opted to use jQuery although I might kill the dependency as the biggest thing I used it for was queries, each, appending and writing HTML. All easier to write with jQuery but in the era of wide support for
querySelectorAll()hardly necessary. If I go that far, I might just package it up into an ultra-lightweight javascript plugin with a few basic configuration options: a target for the list of citations, what information to collect, and maybe one or two citiation options. For now, it's a very simple citation script meant for non-academic purposes.The process was pretty easy, the script creates an array of objects based off of the jQuery object, iterates through the array each time a new item is added to make sure there isn't a duplicate URL, and if there isn't already a duplicate, it's that entry to the list. The assembled array is iterated through so its data can be written the DOM. Duplicates are detected using the source URL.
I styled it after Wikipedia and may add in the link to the instance of the citation in the article like Wikipedia. It'd be easy to add additional information to the citation if needed such as "data retrieved", but in the case of my blog post, that'd be the date written.
See the Pen Simple Auto-generated citations using <cite&rt; and javascript by Greg Gant (@fuzzywalrus) on CodePen.
-
Edge comes to the Mac... sorta
Today we’re announcing that we intend to adopt the Chromium open source project in the development of Microsoft Edge on the desktop to create better web compatibility for our customers and less fragmentation of the web for all web developers.
-----
Microsoft Edge will now be delivered and updated for all supported versions of Windows and on a more frequent cadence. We also expect this work to enable us to bring Microsoft Edge to other platforms like macOS. Improving the web-platform experience for both end users and developers requires that the web platform and the browser be consistently available to as many devices as possible. To accomplish this, we will evolve the browser code more broadly, so that our distribution model offers an updated Microsoft Edge experience + platform across all supported versions of Windows, while still maintaining the benefits of the browser’s close integration with Windows. - Joe Belfiore , Microsoft BlogIn a two-in-one announcement, MS is finally abandoning Trident (forked to EdgeHTML), the once iron-fist scourge of the web. Edge was too little, too late, and still too broken. Browser engines though come and go, with names like KTHML (Konqueror) and Presto (Opera), to be replaced with WebKit, Blink (once fork of WebKit), and the obscure like Goanna (a fork of Gecko). Granddaddy, Gecko still stands tall and gets the last laugh as Netscape's ghost did the unthinkable: outlast both Internet Explorer and Edge.
It's entirely unsurprising MS is bringing Edge to MacOS as its a pretty low-lift with Chromium but doubtfully will gain any market share, as it joins the hoards of Webkit/Chromium reskins: Opera, Vivaldi, Yandex, Brave, Comodo Dragon, Amazon Silk, Samsung Internet, Torch, Slimjet, Steam's internal browser and so on.
It makes my life easier but makes Edge effectively uninteresting and forgettable.
-
Right To Repair Law Should Be The Rally Call Every Mac / iPhone User
The CBC's report 'Complete control': Apple accused of overpricing, restricting device repairs is a must read/watch although imperfect as it's a sample size of 1. There's a few reads from my estimation and none of them are particularly good:
- Apple purposely recommends fixes that users do not need like a scandelous mechanic. I find this unlikely but it isn't implausible.
- Apple's genius techs have degraded in quality due to shortcomings with Apple as an employer and. I find this compelling, I emailed this story to Nick Heer of Pxlnv and he replied with this, so credit to him.
- Apple keeps a tight lease on it's repairs, and will only perform certain operations due to volume of repairs it makes and is uninterested in low hanging fixes. Apple has a paint-by-numbers repair shop that doesn't account for things like replacing a single cable, but rather an entire display as these are "known" fixes that reliably fix a host of problems, eliminating the guesswork and downplays the individual tech's required diagnosis. This acheives a few goals: problems are fixed with impunity. Techs are required to do little to no guesswork. Techs can be trained to do several big tasks instead of potentially hundreds of small tasks. Apple maintains a steap profit margin by selling the expensive-yet-effective service (or selling a new computer). This is personal theory (and probably corrolates with the above.).
- Lastly, the CBC encountered an edge-case/outlier, and the tech who proposed the fix was in error or a sub-standard tech. That said, the CBC isn't the first person to make this argument, plenty of bloggers/youtubers and techs have accused Apple of proposing ludicrous fixes.
This all compounded by the fact Apple purposely makes its devices and computers non-userserviceable, going as far as to engineer non-standard screws, using glue to seat components, not provide 3rd parties with any manuals and the clamping down on authorized Apple service locations, and making user hostile designs. While the complexity of the ever increasing desire to shrink designs has stressed component placement, Apple takes extra steps to discourage users from exerting control on their own devices. This is where the CBC's report picks up. Instead of a simple hit piece on only Apple, as the world's most profitable company and arguably the most popular electronics maker, they are used as the canary in a coalmine and a segue to the right to repair.
If you haven't heard of right-to-repair, I suspect it's going to be a larger movement it extends far beyond just consumers and their gadgets, look no further than John Deere's war against farmers and in 2014, a minor victory occurred when pledged to honor right to repair, although Tesla seems less inclined to do so.
I feel my stake as someone who's written an 11,000+ word guide on upgrading/fixing/maintaining Mac Pros and have often lamented planned obsolescence and the death of modular computing.
If you have a minute, I suggest taking up the cause. It's easy, the following three organizations all have comprehensive ways to take political action and links to legislation.
Right to Repair Action
-
Five years and change
I just had the epiphany that five years of blogging came and went without me noticing. I've only done one respective after two years of blogging, back when this blog was still on Tumblr.
On April 9th of 2013, I launched this blog on Tumblr of all places as a way to help obtain a better career. I was under the impression, all good developers have a social media presence but I never wanted to use Twitter, and in hindsight, I'm happy I never did. Instead, I decided to eschew social media for something more thoughtful, and somewhat impersonal as I like my privacy. I lived in a different city, had a different job, and was a homeowner. I suppose it helped, my initial blog posts mostly consisted of hot takes on tech news, inspired by Daringfireball and Pxlnv but it didn't benefit anyone.
In 2013, shortly after landing my current job, I realized that long-form posts mattered. I drastically reduced the frequency of blog posts, from near daily to only a few a week, and eventually trickled down roughly 1-4 a month post-2016. In 2016, I moved out of Tumblr to Jekyll as I didn't care for the Tumblr community and never interacted with it. Tumblr added bloat where I didn't need any, I already had customized my Tumblr theme to hide community interaction. With Jykell, I was able to more create an even more minimalist blog, hyper-focused on the reading experience, so much so as to avoid using images except when helpful.
Instead of creating a thoughtful retrospective and wax philosophical on this extended project, (one of the longest in my life), I'll cop out and make a few uninspired statements about the future: I'll probably change the fonts on this blog. The font stack is "ok" but its googlely font bs. I may add a dark mode. There will probably be more javascript posts in the future. I'll post a lot of opinions about Apple and the Mac Pro when the redesign happens (if it ever does). There will never be a comments section on this blog. I'll add a /rss and yet I still won't have a regular audience.
The Best of this blog...
Not all my blog posts are equal, some require hours upon hours of writing and effort. Below are just a few standouts, and posts that are representative of the evolution of this blog.
- The Future is a gated community - Not all my reactions are clever or insightful but this probably represents the pinnacle of my early era "hot take" style. The only thing that'd make it fully representative is if I made a few snide remarks about AppleInsider, which tended to sneak into my snark, examples here, here, here, and here.
- A Front-End Developer’s Guide To Reading Job Postings - One of the rare humorous posts, I thought it was clever.
- 9 months with CodeKit 2 - this was the turning point essay that became the lynchpin and archetype of my "write-for-everyone" long form essay style writing, often complete with glossaries and indexes, which lead to One week with Pixate, A week with the Focusrite Scarlett 6i6, Three months with Backblaze and even iOS Emulation, gamepads, Cydia, Xcode, builds.io - A Tutorial for iOS emus. My emulator post probably the most time I've spent for so few page views, this borrows heavily from the CodeKit 2 Review format and includes custom art, something I rarely do for this blog.
- 9 Weeks with CodeKit 3 - My favorite piece as it's the culmination of my long form blog posts and is now my template.
- The Definitive Classic Mac Pro (2006-2012) Upgrade Guide - Easily the longest (and most popular based on traffic predictions) article I've written. Also includes jabs at AppleInsider.
Top Ten Blog posts of the past five years (as per google analytics)
All page-views are cumulative from dated posted to Oct 18th, 2018. For a blog that's entire strategy is to toss web posts out into the ether, my blog now averages roughly 15k page-views a month as per google analytics (19k if you go by my server stats, + a fraction in RSS). It's surprising as I don't have any sort of compensation, or motivation to post as I haven't made a cent from this, and if you consider the web hosting fees, it's actually cost me money. I do not advertise this blog, nor post about it elsewhere, nor try and drum up traffic for it and my SEO strategy is limited to "put alt tags on images". I'm not part of any online community either thus the entirety of my audience is good ol' organic searches and other people linking my blog.
- Setting up MAME Arcade emulation & NeoGeo via OpenEmu on macOS (OS X) - 12/15/2016 - 25.5k page-views
- How to fix Far Cry 4 Common Glitches - Black Screen - Uplay stopped working - Save Game will not save - 2014/12/15 - 24.1k page-views
- Getting the PPP Username / Password for CenturyLink Zyxel C1000Z Modem - 10/7/15 - 20.7k page-views
- Installing PPSSPP on iOS 11 without a jailbreak - 10/16/17- 17.6k page-views
- Adding Ringtones - text tones to - iOS using iFile - 12/12/2014 - 15.2k page-views
- The Definitive Classic Mac Pro (2006-2012) Upgrade Guide - 05/07/2018 - 12.5k page-views
- Converting .bin .cue to ISO with OS X using free and commercial utilities - 01/03/16 - 11.2k page-views
- Recommended Mac Pro upgrades & hacks - 05/07/2018 - 11.7k page-views
- Mockup Prototyping - Wireframing Utility - App Roundup 2013 - 05/30/13 - 11.0k page-views
- Installing a GeForce GTX760 (GeForce GTX770/GTX780) into a 2006-2008 Mac Pro - 10/04/14 - 10.7k page-views
Gaming isn't a regular feature of this blog, three of the top ten (four if you count the GeForce post) dominate my top posts. I did my penance with gamers, having every pejorative to slander ones sexuality tossed at me when I ran a video game cheats site (as it paid the bills in college) and while I play video games occasionally, I'm not a gamer. That experience was LONG before, the rise of "gamergate" in the early 2000s and the only thing that's change is the toxicity has been weaponized. My gaming posts, generally tie into emulation, which is far removed from current events and holds a delicate balance of nostalgia and technical challenge.
Better, there are three posts related to the Mac Pro (four if you count the GeForce post). My blog is ostensibly about macOS, so I'm happy to see those in the mix. Notably, none of my web development posts crack the top ten, although my Pure Scss Circle Progress Bar is number 12 and rising.
So will this blog be around in 5 years? I don't know, but hopefully, I've helped people along the way with annoying problems. That's been the goal, and I seem to be reaching far more people than if I were to do this via social media. I'm proud of that.
-
Drawing an SVG line between multiple DOM objects
HTML offers the
<canvas>, but with some limitations, it's pixel based but can use SVGs but generally meant as "viewport" as opposed to DOM spanning. Rather than go into the "whys," Canvas doesn't quite fit what I'm after to create. SVGs can be positioned via absolute positioning anywhere on the viewport (just like any DOM object). Unlike other image types, the content inline SVGs can easily be altered via the DOM as they're XML data. This means I can easily change the color, or size, even shape of objects.Hopefully, this tutorial is understandable for novices, more seasoned devs may want to skip the bottom for the codepen example. I've written my tutorial using only ES5 syntax although my codepen has some ES6 syntax.
Our Goals
- Draw an SVG line between objects on the screen.
- On resize change the SVGs position in objects on the screen have changed.
- Allow to have lines between multiple objects, and do this dynamically.
SVGs can be quite complicated, and drawing them with javascript is quite an art. There are plenty of libraries designed simply for manipulating SVGs and animating them but drawing a line is pretty easy.
<svg>
  <line stroke-width="1px" stroke="#000000"  x1="0" y1="0" x2="100" y2="100" id="mySVG"/>
</svg>
The above will create a black line 1px wide that starts at 0 pixels and span 100 pixels to the right and 100 pixels down, to create a diagonal line.
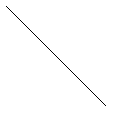
Pictured: simple SVG line using the above code
Offset
It's 2018, but jQuery still has its place,
offsetreliably can get us the absolute positioning of elements on the screen to the document as its base even if they aren't absolute positioned. This isn't a complete win for our goal of drawing a point between two objects as this only gets us the top-left corner of our a<div>. We need the center of that a<div>.So with a bit of simple math, we can figure out the center position of a
<div>by querying the width and height of the div and dividing by 2, then adding it to the offset position. This will measure diagonally to the center.
    var centerX = $("myPoint").offset().left + ($("myPoint").width()/2);
    var centerY = $("myPoint").offset().top + ($("myPoint").height()/2);
Now to draw an SVG, we need two sets of center coordinates. X1, Y1 and X2, Y2.
var x1 = $("myPoint").offset().left + ($("myPoint").width()/2);
var y1 = $("myPoint").offset().top + ($("myPoint").height()/2);
var x2 = $("myPoint2").offset().left + ($("myPoint2").width()/2);
var y2 = $("myPoint2").offset().top + ($("myPoint2").height()/2);
Now if we just apply this to
#mySVG, we can draw a line that goes between the center of these two hypothetical DOM objects. We want to place the SVG in our body tag and then give it some really basic styling in CSS so it can occupy any space on the viewport.#mySVG{ position: absolute; top: 0; left: 0; width: 100%; height: 100vh; }$("#mySVG").attr('x1',x1).attr('y1',y1).attr('x2',x2).attr('y2',y2); //svg attributesResizing Event
Not bad right? What happens if we resize? Our hypothetical DOM objects on the screen might move, thus we'd need a window resize event. We better make this a function now, and clean up the legibility first.
function drawSVG(target, div1, div2) {
  var x1 = div1.offset().left + (div1.width()/2);
  var y1 = div1.offset().top + (div1.height()/2);
  var x2 = div2.offset().left + (div2.width()/2);
  var y2 = div2.offset().top + (div2.height()/2);
  $(target).attr('x1',x1).attr('y1',y1).attr('x2',x2).attr('y2',y2);
}
drawSVG($("#mySVG"), $("myPoint"), $("myPoint2") )
Adding resizing is pretty easy now:
$(window).resize(function() {
  drawSVG( ($("#mySVG"), $("myPoint"), $("myPoint2") )
}
More objects!
Pretty nifty right? Now that we've covered the basics of drawing and redrawing the SVG, we can use jQuery's
cloneto duplicate our line within our SVG and call our drawSVG multiple times.function drawSVG(target, div1, div2) { var x1 = div1.offset().left + (div1.width()/2); var y1 = div1.offset().top + (div1.height()/2); var x2 = div2.offset().left + (div2.width()/2); var y2 = div2.offset().top + (div2.height()/2); $(target).attr('x1',x1).attr('y1',y1).attr('x2',x2).attr('y2',y2); } drawSVG($("#mySVG"), $("myPoint"), $("myPoint2") ) $("#mySVG").clone().addClass("clone").insertAfter(this); drawSVG($(".clone"), $("myPoint2"), $("myPoint3") ) $(window).resize(function() { drawSVG( ($("#mySVG"), $("myPoint"), $("myPoint2") ); drawSVG($(".clone"), $("myPoint2"), $("myPoint3") ); }This isn't very dynamic as we're assuming we always know that we want to draw a line between 3 things on our screen. We're getting close but this isn't dynamic. It's time to break out .each and convert what we have into an object to cut down on our mess. We're going to do a few changes. First let's simplify our SVG.
Refactoring
Now that we're going to copy and paste our SVG, we don't need any co-ordinates. In fact, we do not want them at all until. A line without the required
x1,x2,y1, andy2won't be rendered to the screen. This works for us as we want to use this as a template for future lines but do not want our original to display.<svg> <line stroke-width="1px" stroke="#000000" id="mySVG"/> </svg>Also, for legibility, we can turn the messy code above into something more readable and hopefully maintainable.
drawBetweenObjects = {
  drawSVG: function(target, div1, div2) {
    $("#mySVG").clone().addClass("clone").insertAfter(this);
    var x1 = div1.offset().left + (div1.width()/2);
    var y1 = div1.offset().top + (div1.height()/2);
    var x2 = div2.offset().left + (div2.width()/2);
    var y2 = div2.offset().top + (div2.height()/2);
    $(target).attr('x1',x1).attr('y1',y1).attr('x2',x2).attr('y2',y2);
  }
}
Let's also assume all our hypthetical myPoints use the class
..myPointand not IDs. We can now call our functiondrawBetweenObjects.drawSVG($(".myPoint"), more paramets)Each()
If you're not familiar with iterating over arrays, now would be a grand time to learn. There are far better people who can explain it than I can. The long and short is using jQuery, we can create a variable that contains an array of objects based on our query. This way we can apply our drawSVG function to each entry in our array. This is where for newer javascript developers some of the lines of code might look confusing.
drawBetweenObjects = { drawSVG: function(target, div1, div2) { $("#mySVG").clone().addClass("clone").insertAfter(this); var x1 = div1.offset().left + (div1.width()/2); var y1 = div1.offset().top + (div1.height()/2); var x2 = div2.offset().left + (div2.width()/2); var y2 = div2.offset().top + (div2.height()/2); $(target).attr('x1',x1).attr('y1',y1).attr('x2',x2).attr('y2',y2); }, iterateOverObject: function(object) { $(object).each(function(index, el){ drawBetweenObjects.drawSVG($("#mySVG"), $(this), object.eq(index + 1)); //args order - line, div1 and div2 - the next div. } } }iterateOverObjecthas some funky stuff, such as$(this)which you have probably seen before. jQuery's$(this)and javascript'sthisaren't quite the same, What's the difference between '$(this)' and 'this'? but in the array of objects, it will use the current entry. Next we will need to select the next item in our query,eqcreates a new a query to the specific entry on the array of objects. So if I ask forvar myLi = $("li"), and there are four<li>s on the page,myLi.eq(2)would only require the data for the second<li>. Using our index, we ask next in the list, usingindex + 1.Now we can update our script resizing.
  iterateOverObject($(".myPoint")); //init

  $(window).resize(function() {
    iterateOverObject($(".myPoint"));
  }
Removing old clones
If you run the code, you'll be able to redraw the points, but the problem is our old lines are still in the DOM. So the best place to remove them is before we re-iterate over the object. So before we create new lines, we delete the old ones. Time to add a simple jQuery remove to the
iterateOverObject.drawBetweenObjects = { drawSVG: function(target, div1, div2) { $("#mySVG").clone().addClass("clone").insertAfter(this); var x1 = div1.offset().left + (div1.width()/2); var y1 = div1.offset().top + (div1.height()/2); var x2 = div2.offset().left + (div2.width()/2); var y2 = div2.offset().top + (div2.height()/2); $(target).attr('x1',x1).attr('y1',y1).attr('x2',x2).attr('y2',y2); }, iterateOverObject: function(object) { $(".clone").remove(); //remove any clones $(object).each(function(index, el){ drawBetweenObjects.drawSVG($("#mySVG"), $(this), object.eq(index + 1)); //args order - line, div1 and div2 - the next div. } } iterateOverObject($(".myPoint")); //init $(window).resize(function() { iterateOverObject($(".myPoint")); } }Now we should have an SVG line that will draw between any DOM objects with the class of
.myPointand redraw the lines on a window resize.Below is the hyper spiffy version that has a config file and the ability to delay rerenders on resize. To make this work for pages larger than 100vh, the SVG height of the
#svgwould need to set the height as$(document).height();See the Pen SVG Line Between Divs (multi-point) by Greg Gant (@fuzzywalrus) on CodePen.
It'd be feasible to make this without jQuery, by replacing jQuery with
Document.querySelectorAll()and removing the offset with techniques such asoffsetLeftandoffsetTop.
-
Animating SVG path d attribute in late 2018
SMIL, CSS animation and a bag of hell
It's late 2018, and if you're like me, you've probably been tasked to animate an SVG and now left to wonder, "What's the state of SVG animation? Isn't SMIL dead? Does CSS work?"
Long ago, SVG was boxed with its OWN animation specification, called SMIL ( Synchronized Multimedia Integration Language) which origins date back to 1999 and was adopted by the W3C in 2001 with SVG 1.0. Despite its spec, it never was adopted by Microsoft in IE or Edge, and its continued support is in question. Google announced in 2015 it's intent to depreciate SMIL support. This has been the proverbial nail in the coffin, but SMIL still works in Chrome, Safari, and Firefox (for now). There's no timeline for when SMIL will be dropped.
Rather than recant all of SVG animation, I highly (and I stress) highly recommend CSS-Tricks's SMIL is Dead, long live SMIL, which outlines SMIL and alternatives. The cliff notes are as follows:
- CSS Motion paths are only supported by Chromium-based browsers - this means no Safari, FireFox, Edge
- Javascript is required for cross-browser motion paths, Greensock makes this very sane
- There's multiple libraries for morphing SVGs, including >Greensock, snapsvg and SVG Morpheus
- SMIL allows DOM events, but plain ol' vanilla JS works fine... and >Greensock.
- On animation complete works with SMIL, but also can be also be done via CSS by using simple CSS delay animations... and Greensock.
The SVG Path d and points attribute and CSS
CSS animations are the supposed heir to SVG animation. However, there's a lot of issues that arise. It's quite easy to use CSS to animate SVG fill properties, opacity, and even positions and basic shape using CSS transforms and using declarations such as:
    svg #mypath:hover {
      fill: #333333;
    }
See the Pen Basic SVG hover by Greg Gant (@fuzzywalrus) on CodePen.
CSS animations extend to many, (if not most) SVG properties except path "d", animations paths and points. This creates an issue; you can warp, move and filter your SVG to your heart's content but not actually manipulate the points with CSS. There's a bit of reasoning here, as it'd be easy to pollute a CSS file with 100 of kilobytes if not megabytes for animation frames but without SMIL, we're left to javascript to carry the burden.
Chris Coyer wrote a pretty interesting post Randomizing SVG Shapes, and the codepen demo is pretty nifty although he fails to mention one thing: it doesn't work in any browser other than Chrome.
So to tabulate the score: SMIL isn't supported in IE or Edge, and its fate isn't looking good. CSS doesn't a complete replacement as FireFox/Safari/Edge will not animate via CSS transition SVG point changes.
Greensock to the rescue
Greensock is pretty much the beginning and end to SVG animation (if you couldn't tell by the CSS tricks summary), there's SVG.js, Snap.svg (which seems to be mostly forgotten), Anime JS, and somewhat feature-limited Raphael (and a few one-off effects like Vivus, kute.js/SVG Morpheus) but none offer the power, flexibility, and ease of use of Greensock. Greensock makes cross-platform animation easy and compatible. It's also performant. Downside? It's a paid library.
Below is my hastily written test animation. Each point on the animation is given random values to move to, to create a jittering effect.
See the Pen Arrow test v2 by Greg Gant (@fuzzywalrus) on CodePen.
So here we are in 18, and the most reliable way to animate an SVG is via a paid library. I have to say though, Greensock's multiple SVG libraries are easy to use and impressive. I was hoping for a little more diversity, but with CSS motion paths and transitions only under consideration by other browsers, things aren't looking too great for SVG animation.
Recommended Reading
-
Removing inline Transforms from an SVG while preserving point positions and/or Install Inkscape Plugins on macOS
So you're probably here since there's not much info on the web on how to remove inline transforms from an SVG without wrecking it or perhaps you're unsure how to install Inkscape extensions on MacOS. Either way, hopefully this short tutorial should help. SVGs are a complex mish-mash of XML that can include CSS transform which can be undesirable for various reasons. Occasionally, converting formats like EPS to SVG in Illustrator will litter an SVG with transforms. Below is how to remove them.
Step 1: Download and install Inkscape
Go to Inkscape and download the release, macOS users will need to nab the OS X x11 release. If you haven't used an X11 app you may need to install xQuartz. XQuartz (x11) is a GUI library for cross-platform applications to run in macOS.
Step 2: Download and install the Apply Transforms plugin for Inkscape
Nab inkscape-applytransforms. You can download the .zip directly. Unzip the file once downloaded.
Next, go to Inkscape applications, and right click and "Show Package contents".
The plugin for is in Contents/Resources/share/inkscape/extensions, drag both the
.inxand.pyfiles into this directory.Step 3: Use Inkscape to apply the transforms
Launch Inkscape and open your SVG (Note X11 app UIs will look a little shoddy and the menus will be attached to the app window). Select all points. (Note: Inkscape will use windows/linux control key instead of command key).

This wasn't perfect for me, but was able to process and make my SVG 95% correct, just requiring me to move a few elements.
-
iPhone XS & iOS 12 impressions
Last time, I wrote an Initial Reactions to the iPhone 7. Something strange happened to me this go around. My iPhone 7 felt "good enough" for almost all my daily usage, and I nearly didn't buy my 2-year upgrade cycle on my iPhone that started with an iPhone 3G, then 4, 5, 6, and 7... what sold me was finally getting a dual camera on a smaller phone factor. I pulled the trigger.
iPhone XS
- The iPhone XS is the first time I didn't buy the maximum storage option. I use my camera a lot, but I also have a fair amount of my old photos on iCloud. My iPhone 7 had about 90 GB free when it came time to upgrade. It's the first phone I wasn't struggling with storage, and that includes my massive photo library and keeping about 20 GB of music locally on my device.
- I miss the headphone jack, and I found a case that offers one. I'll write a review as I have for the Incipio.
- I miss the home button, but I like FaceID. It allows for some futuristic features like not displaying text message contents before looking at the phone. It seems a little less finicky than TouchID, but I miss unlocking my phone without having to look at it.
- Not sure what the hell of having a glass-backed iPhone is. The iPhone 4 had it, and it was a mistake. Fortunately, I was able to replace the back with an aluminum back as the iPhone 4 was somewhat user serviceable. This is not. The glass is wonderful at picking up fingerprints but is less slippery that iPhone 6 or 7.
- Oleophobic tech hasn't drastically improved.
- The screen is amazing, and truetone is much less so. Going back to the iPhone 7 feels boxed in.
- Organizing folders in iOS is still as annoying as it was in iOS 5. It's slow and cumbersome. Even a desktop app for managing the phone would be preferable.
- The iPhone XS doesn't feel that much faster than an iPhone 7 out of the box.
- The camera is a massive upgrade. I want to default photos to 56mm instead of the wide angle lens. The low light performance is much improved.
- I'm not sure what sort of significant upgrades can be applied to the iPhone, you have gigabit LTE, 4 GB of RAM, optional 512 GB storage, Bluetooth 5.0, dual cameras, a 10 bit OLED screen, stereo speakers, much faster GPU, IPX68. The only display upgrade I can think of is 120 Hz like the iPad Pro, and possibly a 3rd camera lens. The other updates: CPU/RAM/GPU isn't going to wow consumers. Speed is great but at this point what I wouldn't give for LONG battery life and durability.
- Giant phones are here to stay. I really miss the iPhone 5 form factor. If I could have that with dual cameras, I'd eschew the iPhone XS form factor.
- The phone is heavy, like uncomfortably so for holding long periods.
- I haven't had any social media apps (unless you count untappd and goodreads) on my iPhone since my iPhone 6. I'll be curious to track my usage on Screentime. I've managed over the years to dial back my phone addiction, limiting my notifications, removing social media and such although its omnipresent. The downside of screen time is it counts non-interactive experiences like listening to audiobooks, NPR, podcasts and music all the same. I'm not looking at the screen and usually engaged in biking, driving, running, exercise, chores, shopping, cooking. I don't consider this as "usage" as its not interrupting my life, but rather complimenting it like my iPod did.
- I'm a bit worried about the durability of the iPhone XS. I'm active: I bike to work, go the gym 2-3 times a week, hike weekends, occassionally skateboard, cross country & downhill ski, kayak, paddleboard, and tried downhill mountain biking this summer. My iPhone 5 was the perfect size and I never used a case. I also went caseless with my iPhone 4, and managed to break it's voice attenna (but not wifi or even the screen) after a big longboarding crash that had me rolling on pavement. My iPhone 6 I broke twice, once with a case. My iPhone 7 I never broke but it felt delicate. I worry about the XS.
- Animojo and Memoji are gimmicks. Do people use these more than a few times? It's a lot of effort to make one for not much gain.
- Tranfering to my iPhone XS was pain free whereas my iPhone 6 to iPhone 7 was a nightmare. iOS 12 appeared to download recently apps first as apps like Gmail, Audible, Google Maps, Untappd, banking app, LA Fitness, HBO and a few recently played games downloaded first. That was pretty spiffy, especially when you have about 300 apps to download. You can read about my iOS upgrade issues with the iPhone 7 in Initial Reactions to the iPhone 7 .
- The iPhone 7 feels more premium without a case than the iPhone XS in hand, it's thinner and more importantly lighter.
- After a week, I kinda have a love/hate with the notch. the extended space for home screen and portrait apps looks fine but its pronounced as hell. It's an ugly concession.
- The camera bump. Where do I start? It's awful.
iOS 12
- Screentime is my new favorite feature.
- It felt zippy on my iPhone 7 and thus feels the same on my XS.
- Why can't I display battery percentage in the rabbit ears? What sort of Johnny Ive bullshit is this?
- ARkit could be big, but I still haven't found a daily or even weekly use for it.
- Siri suggestions seem nice but I really only use Siri to text while driving, sometimes change music while driving, and directions while driving. I don't use it in any other circumstance.
- I'd uninstall Animojo/Memoji if I could, its wasted space for me.
- I have so few notifications, (only I only allow Gmail and messages) that I didn't know notifications weren't grouped but that seems huge.
- Password management is nice but it ain't 1password.
- Apple's photo app is really an unsung hero,and its gradual improvements are fantastic. I love Highlights.
- iOS 12 isn't hyper exciting, but smartphones updates are pedestrian.
- I miss the iOS7 app switcher still.
Things I was wrong about
Looking back on my impressions of the 7, I figure it's fair I should self evaluate and self actualize. I'm hardly infalliable, and likely as wrong as I am right.
- Force Touch isn't the equivilent of the right click. It's unpredictable as its so under utilized and not the easiest.
- The Touch button the iPhone 7 was errie how well it simulated a click. I grew to love it, it wasn't really a gimmick.
-
Running Drupal (and other CMSes) Natively via Apache in macOS 10.13.x High Sierra
Coolestguideontheplanet.com always has been my go-to spot for macOS upgrades and I'll be borrowing for some of the steps as it'll get you about halfway to enabling localhosts.
You'll need to either use a CLI utility like Nano or BBEdit. If using BBEdit, you will need to click the "Show Everything" box to view invisible files.
Step 1: Modify the httpd.conf
Open the httpd.conf
sudo nano /etc/apache2/httpd.confUncomment the following lines by removing the
#in front of the lineInclude /private/etc/apache2/extra/httpd-vhosts.conf LoadModule vhost_alias_module libexec/apache2/mod_vhost_alias.so LoadModule rewrite_module libexec/apache2/mod_rewrite.so LoadModule php7_module libexec/apache2/libphp7.soStep 2: Modify the Vhosts.conf
Open the vhost.conf (Note if you've upgraded, macOS should have the httpd-vhosts.conf~previous in the same directy) configuration
sudo nano /etc/apache2/extra/httpd-vhosts.confEntries are added by using the following pattern.
  <VirtualHost *:80>
  ServerAdmin webmaster@dummy-host2.example.com
  DocumentRoot "/usr/docs/dummy-host2.example.com"
  ServerName dummy-host2.example.com
  ErrorLog "/private/var/log/apache2/dummy-host2.example.com-error_log"
  CustomLog "/private/var/log/apache2/dummy-host2.example.com-access_log" common
  </VirtualHost>
Here's an example of a working entry ported from macOS (OS X) 10.12.x
  <VirtualHost *:80>
        DocumentRoot "/Users/MYUSER/Development/website"
        ServerName mysite.lvh.me

    <Directory  "/Users/MYUSER/Development/website">
                AllowOverride All
                Require all granted
    </Directory>
      </VirtualHost>
Step 3: Map Localhost to hosts
Open the hosts file:
sudo nano /etc/hostsImportant, this next step can vary quite a bit based on how you've mapped your vhosts URLs. I decided I want all instances of localhost AND lvh.me (lvh being the acrnynom many developers use for local virtual host and the dot me suffix to reinforce that it is local). This is super common.
    127.0.0.1	localhost
    127.0.0.1 lvh.me
Step 4: Restart Apache
Regardless if you were using a GUI editor like BBEdit, you'll need to restart Apache via the command line
sudo apachectl restart
-
Safari and FireFox to block trackers
I've seen a few sources calling trackers the new "pop-up", although I find it's more insidious than that, considering the plethora of privacy implications that tracking can have.
Mozilla announced it'd be blocking trackers and 3rd party cookies by default and Adweek reports that Apple is moving to block 3rd party trackers. Unsurprisingly, Google has not.