-
Fixing Phoronix Test Suite for Apple Silicon
So..... This is the sort of post that won't mean much to most people, but I think about three people who will be thankful. Right now, Phoronix Test Suite seems to be hard-coded for Intel. This means running many dependencies using x86 binaries and having Homebrew installed as x86 as well as arm64. The jump-off point for me was Phoronix Test Suite #110993 .
For a quick summary,
brewinstalls to/usr/local/on x86 and/opt/homebrew/on macOS. However, if you run, say, the pts/webp on an ARM64 Mac, regardless if you have already installedlibjpeg, it will complain:% phoronix-test-suite debug-run webp Evaluating External Test Dependencies ........................... The following dependencies are needed and will be installed: - jpeg This process may take several minutes. Warning: jpeg 9f is already installed and up-to-date. To reinstall 9f, run: brew reinstall jpeg There are dependencies still missing from the system: - JPEG Library 1: Ignore missing dependencies and proceed with installation. 2: Skip installing the tests with missing dependencies. 3: Re-attempt to install the missing dependencies. 4: Quit the current Phoronix Test Suite process. Missing dependencies action: 3 The following dependencies are needed and will be installed: - jpegThis error message gives you the option to reinstall the missing dependencies. Seems great, until you try to use it. If you select option 3, if you already have the dependency installed, it'll report it as installed
 his process may take several minutes.
Warning: jpeg 9f is already installed and up-to-date.
To reinstall 9f, run:
 brew reinstall jpeg

Phoronix Test Suite v10.8.4

 Installed:     pts/webp-1.4.0
After the test attempts to run, we can se that the dependency for jpeg is reporting as not compiled, and thus the test file for jpeg cannot to be read.
Test Run Directory: /Users/greg/.phoronix-test-suite/installed-tests/pts/webp-1.4.0/

Test Run Command: ./webp -v -mt

JPEG support not compiled. Please install the libjpeg development package before building.
Error! Could not process file sample-photo-6000x4000.JPG
Error! Cannot read input picture file 'sample-photo-6000x4000.JPG'
You'll need to go into
/opt/homebrew/opt/phoronix-test-suite/, the version number,10.8.4then open/share/phoronix-test-suite/pts-core/objects/client/pts_external_dependencies.phpand locate the$possible_pathsdeclarations (there should be two in all), and add to the array the following,'/opt/homebrew/opt/', '/opt/homebrew/include/', '/opt/homebrew/',.This will now enable Phoronix to search for the ARM64 binaries.
You may still encounter issues, I found that I needed to declare in the terminal session the following to run the webp test as libjpeg:
export LDFLAGS="-L/opt/homebrew/opt/jpeg/lib"
export CPPFLAGS="-I/opt/homebrew/opt/jpeg/include"
export PKG_CONFIG_PATH="/opt/homebrew/opt/jpeg/lib/pkgconfig"
-
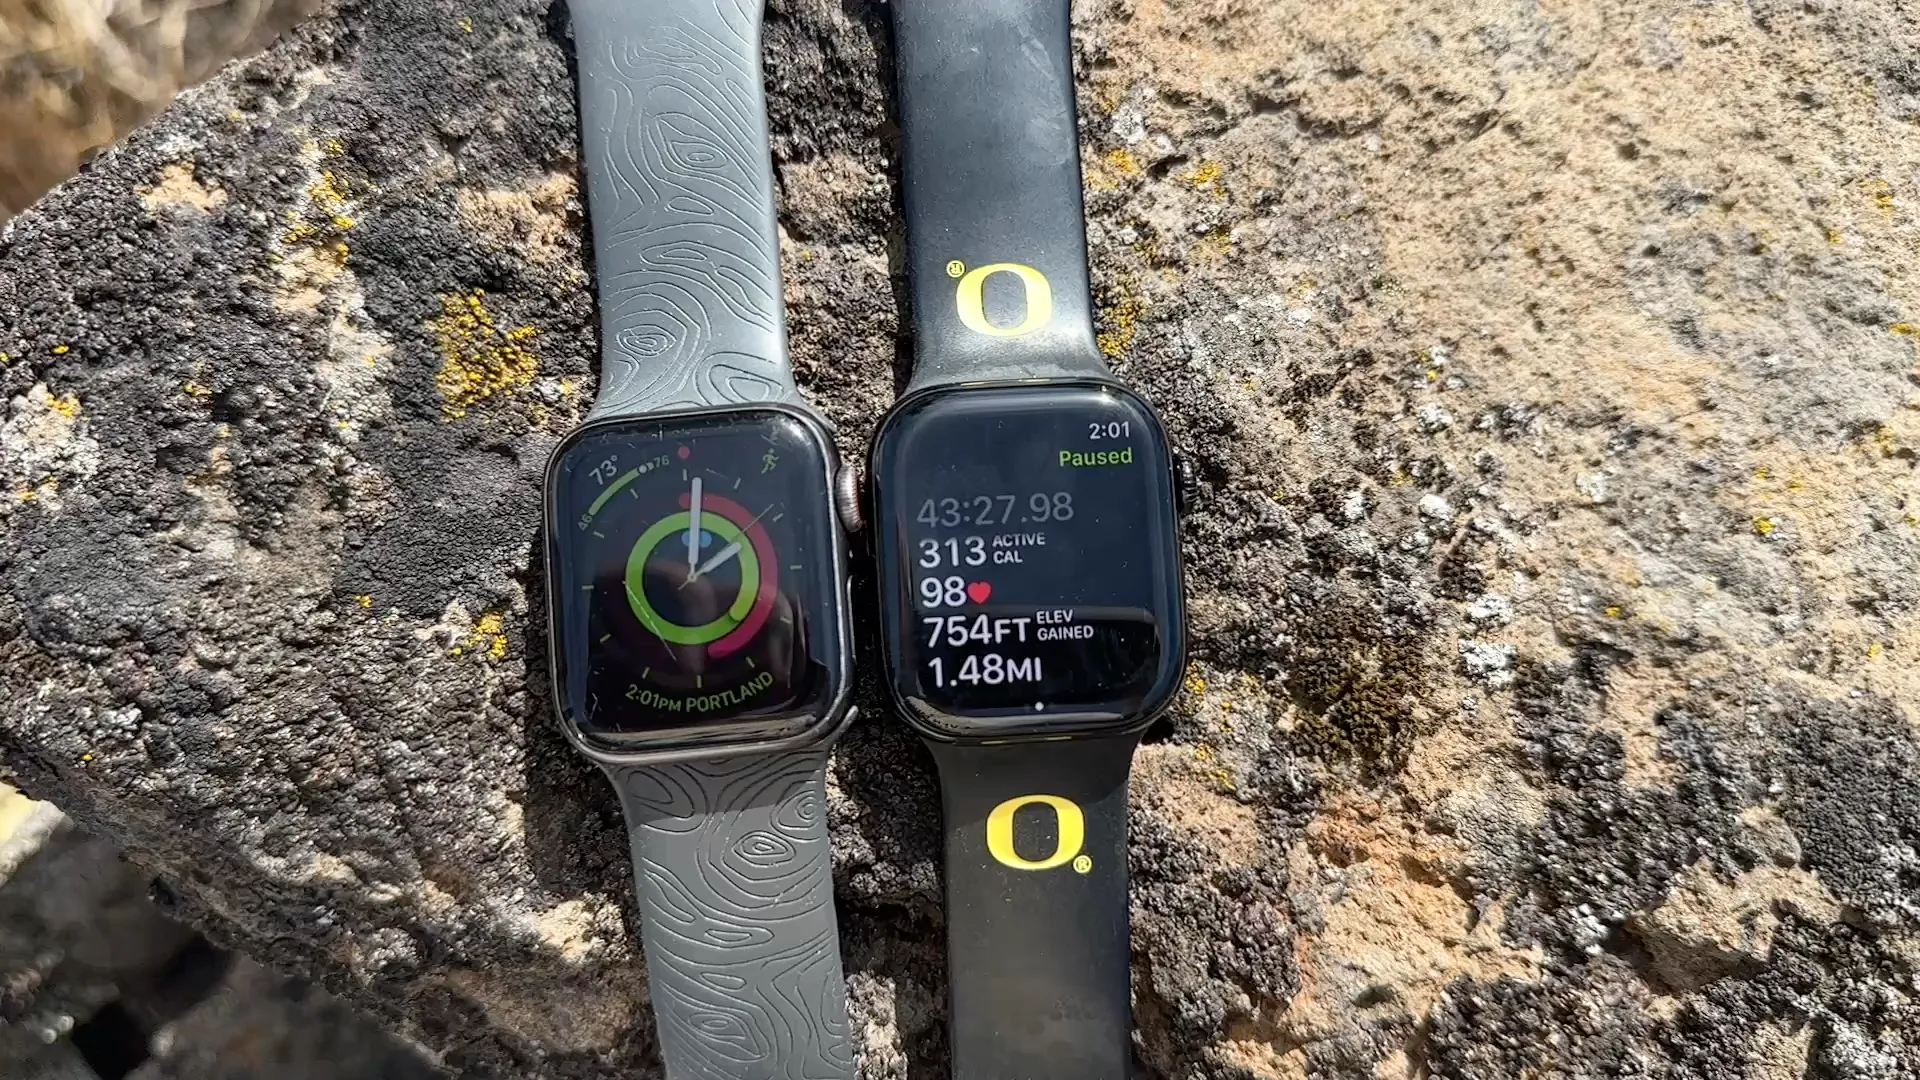
Apple Watch 5 to 10 Impressions
Years ago, I purchased the first and only Apple Watch, the 5th edition featuring the always-on display. I picked up once covid shut down the world as a way to track my physical activity as I was no longer biking to work and no longer able to go to the gym. It largely worked; I set my workout goals at 820 calories a day and since then have averaged about 80% of the time hitting my workout goals.
I am not a watch power user; the only watch notifications I allow are text messaging/phone calls, exercise reminders, and navigation cues. Otherwise, my watch stays silent; in fact, it almost always is in silent mode. My Apple Watch 5 did what I wanted and what I needed well enough that I didn't bother even considering any of the later models. As the first "Always-on" display, there have certainly been improvements, but few things of interest beyond the blood oxygen monitor (more on that later)
What finally pushed me over the edge to upgrade was battery life. Apple, of course, tactfully prices its battery replacements in such a way that you might as well upgrade. Did I really want to spend $79 to replace the battery? I'd been living with a rapidly decreasing battery for nearly a year, and I made it work by buying an extra charger for my car to charge it before a hike or after, and I became used to mid-day charging. Finally, I decided it was time to either replace the battery or upgrade. I chose to upgrade.
The Upgrade
Over the five years since the release of the Apple 5, there's been a steady stream of upgrades: Apple has tacked on faster SoCs, moving from the 7nm node Dual-core Tempest to a newer 4nm node Dual Core Sawtooth, with more L1d and L2 cache, as well as added a more powerful neural engine. They also reduced the bezels, improved the screen brightness, improved the screen viewing angles, improved the optical heart rate sensor, improved the accelerator, included U1, better wifi, removed force touch, increased the faster charging capabilities, improved the screen hardness, made the speaker louder, changes the sizing fractionally (thinner and larger) and added a blood oxygen sensor that has been disabled due to legal disputes around the patent.
Year over year, the Apple Watch generational change is not terribly meaningful, but stacked over a five-year window, they add up. This is the new normal as the space for meaningful upgrades closes. That said, do any of these matter?
Yes. Overall, I've been rather impressed with how much better the screen is and how much smoother the animations are. In broad daylight, the screen is simply more visible. Also, the 42mm vs the old small 40mm is noticeable. As an active person, I don't like big watches, which is why I feel like the Apple Watch Ultra misses the mark. When hiking, exercising, biking, skateboarding, skiing, and the rare times I'm in a kayak, I want to be free of as many burdens as possible, and that includes my wrist. As an average-sized man, I could get the bigger watch, but I don't want the watch to be bigger. That said, I do appreciate the extra line of text it now can present. Apple tweaked the UI to display just a bit more information, which makes a world of difference.
I've yet to really notice much difference in the heart rate monitoring, but I'm also not obsessively checking it. I look at my activity points and check my heart rate during a run or hike, and that's about it, but there is comfort in that it's more accurate.
The speaker is noticeably better, to the point of seeming like it's a cheap laptop speaker from 20 years ago instead of a buzzing pest. Is it amazing? Absolutely not, but it is more viable to take a call on your wrist without smashing your ear to your watch if it's moderately noisy.
Is it worth the upgrade from the Apple Watch 5 to 10? Mostly. If none of the features sound terribly exciting, just replace the battery and hold out for another year. Perhaps Apple will improve the battery life which has been the achilles heel of the Watch or maybe another nice small quality-of-life upgrade.
There in lies the issue with the Apple Watch. If you've used one, there's not much to say; it does the Apple Watch things, like unlocking your computer, answering phone calls, sleep tracking, exercise monitoring, environmental noise monitoring, ECGs, functioning as a remote, finding your misplaced phone, and so on. These are all things my previous Apple watch did and did well. It's just that everything now has a bit more polish. I suppose that's the sign of a very mature product. I like it, but unless Apple has a breakthrough in health tracking, such as blood sugar monitoring and/or body temperature monitoring, there won't be a compelling reason to upgrade for years to come, and that's ok.
-
Play Dune 2, Command and Conquer: Tiberian Dawn, Dune 2000, and Command and Conquer: Red Alert on macOS
Updated for 2024!
Every now and again, I get a hankering for retro gaming, and it ends up on this blog. I never played Dune II: The Building of a Dynasty on a PC, only the Sega Genesis port Dune: The Battle for Arrakis, so it was news to me that you could play Dune II on MacOS. I assume anyone who is reading this probably knows the place that Dune plays in gaming history. Still, it's largely considered the title that defined the genre of the real-time strategy (RTS) or the first real-time strategy (even if not entirely correct). Also, Sim Ant is the real first RTS ;)
I can't say I have a special affinity for the genre, as pretty much the only other RTSes I've played are the original Command and Conquer and Warcraft 2, but I always liked Dune: The Battle for Arrakis. I've revisited via emulation a few times. I hoped Dune 2 or Dune 2000 would end up on a service like GOG.com, but sadly, it hasn't. Thanks to open source, both Dune II: The Building of a Dynasty and its sequel, Dune 2000, can be played on Mac OS, natively and with some modern improvements.
Disclaimer: By the letter-of-the-law, abandonware isn't 100% legal, but there's no real legal vector to obtain these games, each over 2 decades old. I don't see a moral quandary here, but you can always obtain the original game disks if you see fit.
Dune II using Dune Legacy
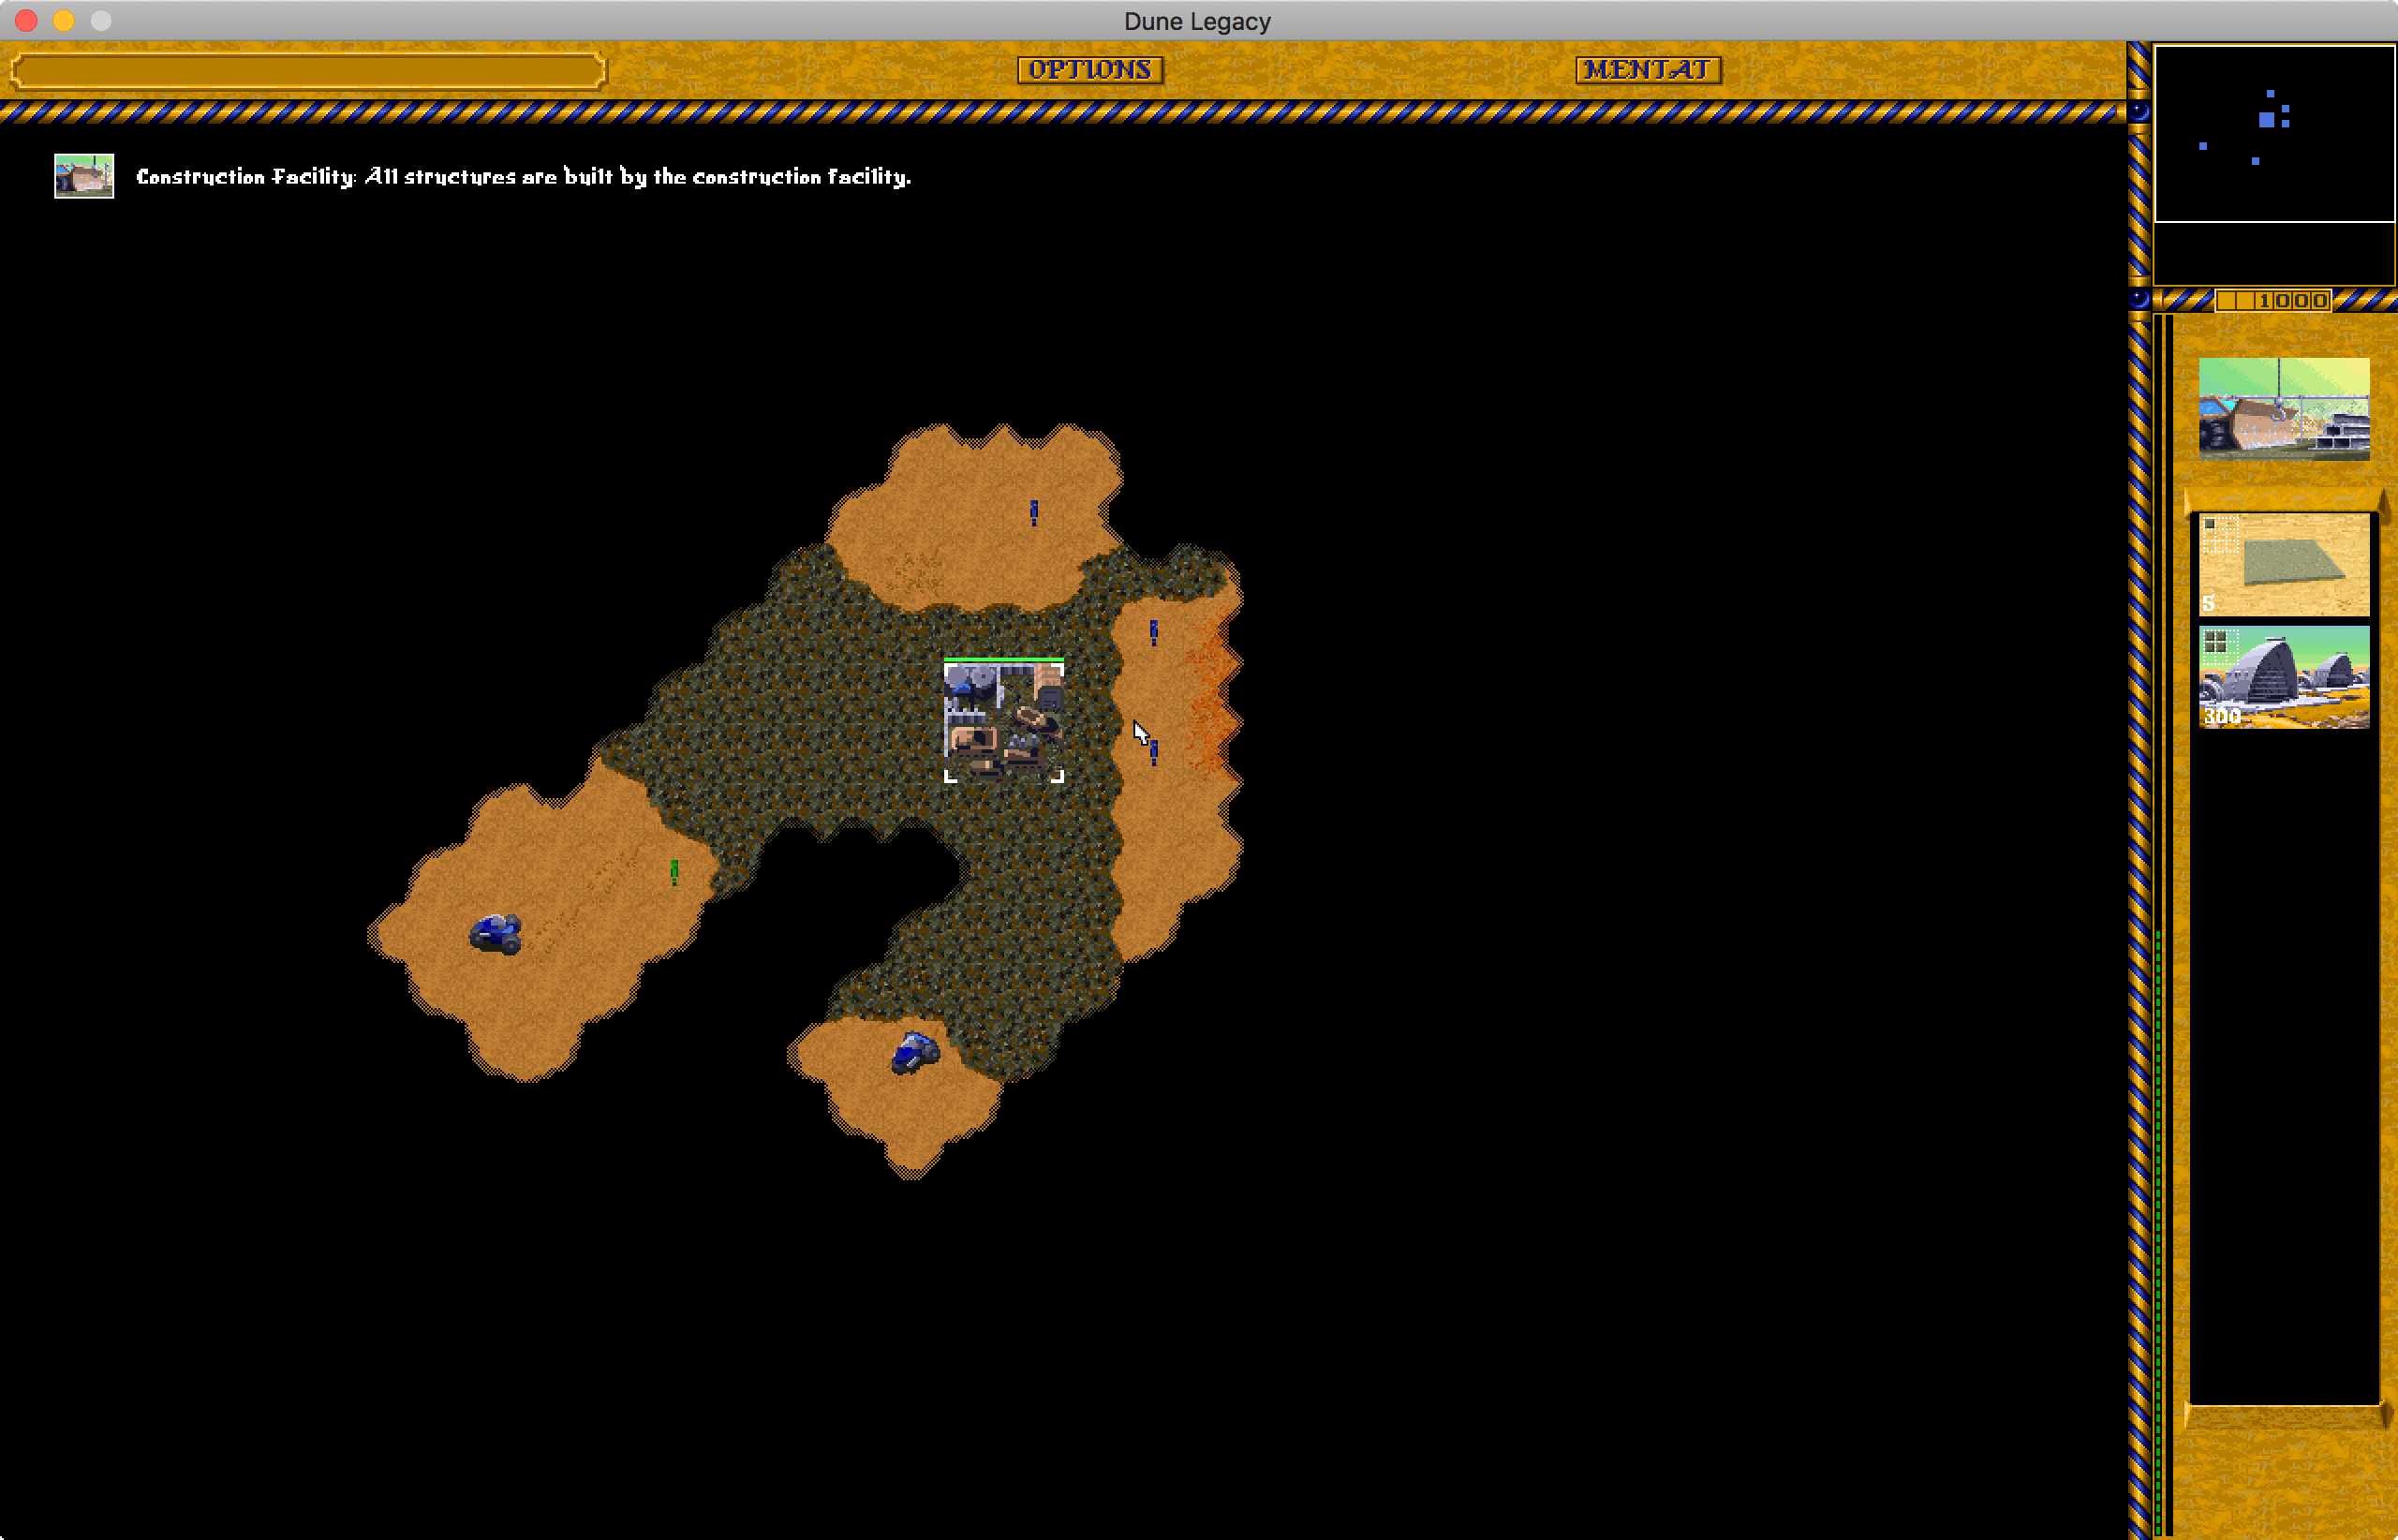
Dune Legacy gives a nice modern twist to the original shortcomings of Dune II, including better AI, head-to-head, ability to group select units, more hotkeys, modern resolutions, HD graphics, and so on.
- Search "Dune II Abandonware" or use archive.org. Download it.
- Download Dune Legacy
- Open the DMG, and drag the Dune Legacy app to your Applications folder. Also, decompress the PC copy of the abandonware Dune II
- Right-click the Dune Legacy App, and click Show Contents. Open within the app, Contents -> Resources
- Drag all the .PAK files from decompressed Dune II into the Dune Legacy -> Contents -> Resources
- Double-click to start. You will most likely see a security message. Instead, right-click the application and select open. You'll then see a message with an "Open" option. Select open. On older macOS versions, Go to system preferences -> Security and Privacy.
The security message relates to the signed code. The developers of Dune Legacy do not pay for an Apple dev license; thus, the code is unsigned.
Dune 2000 and/or Command and Conquer using Open RA
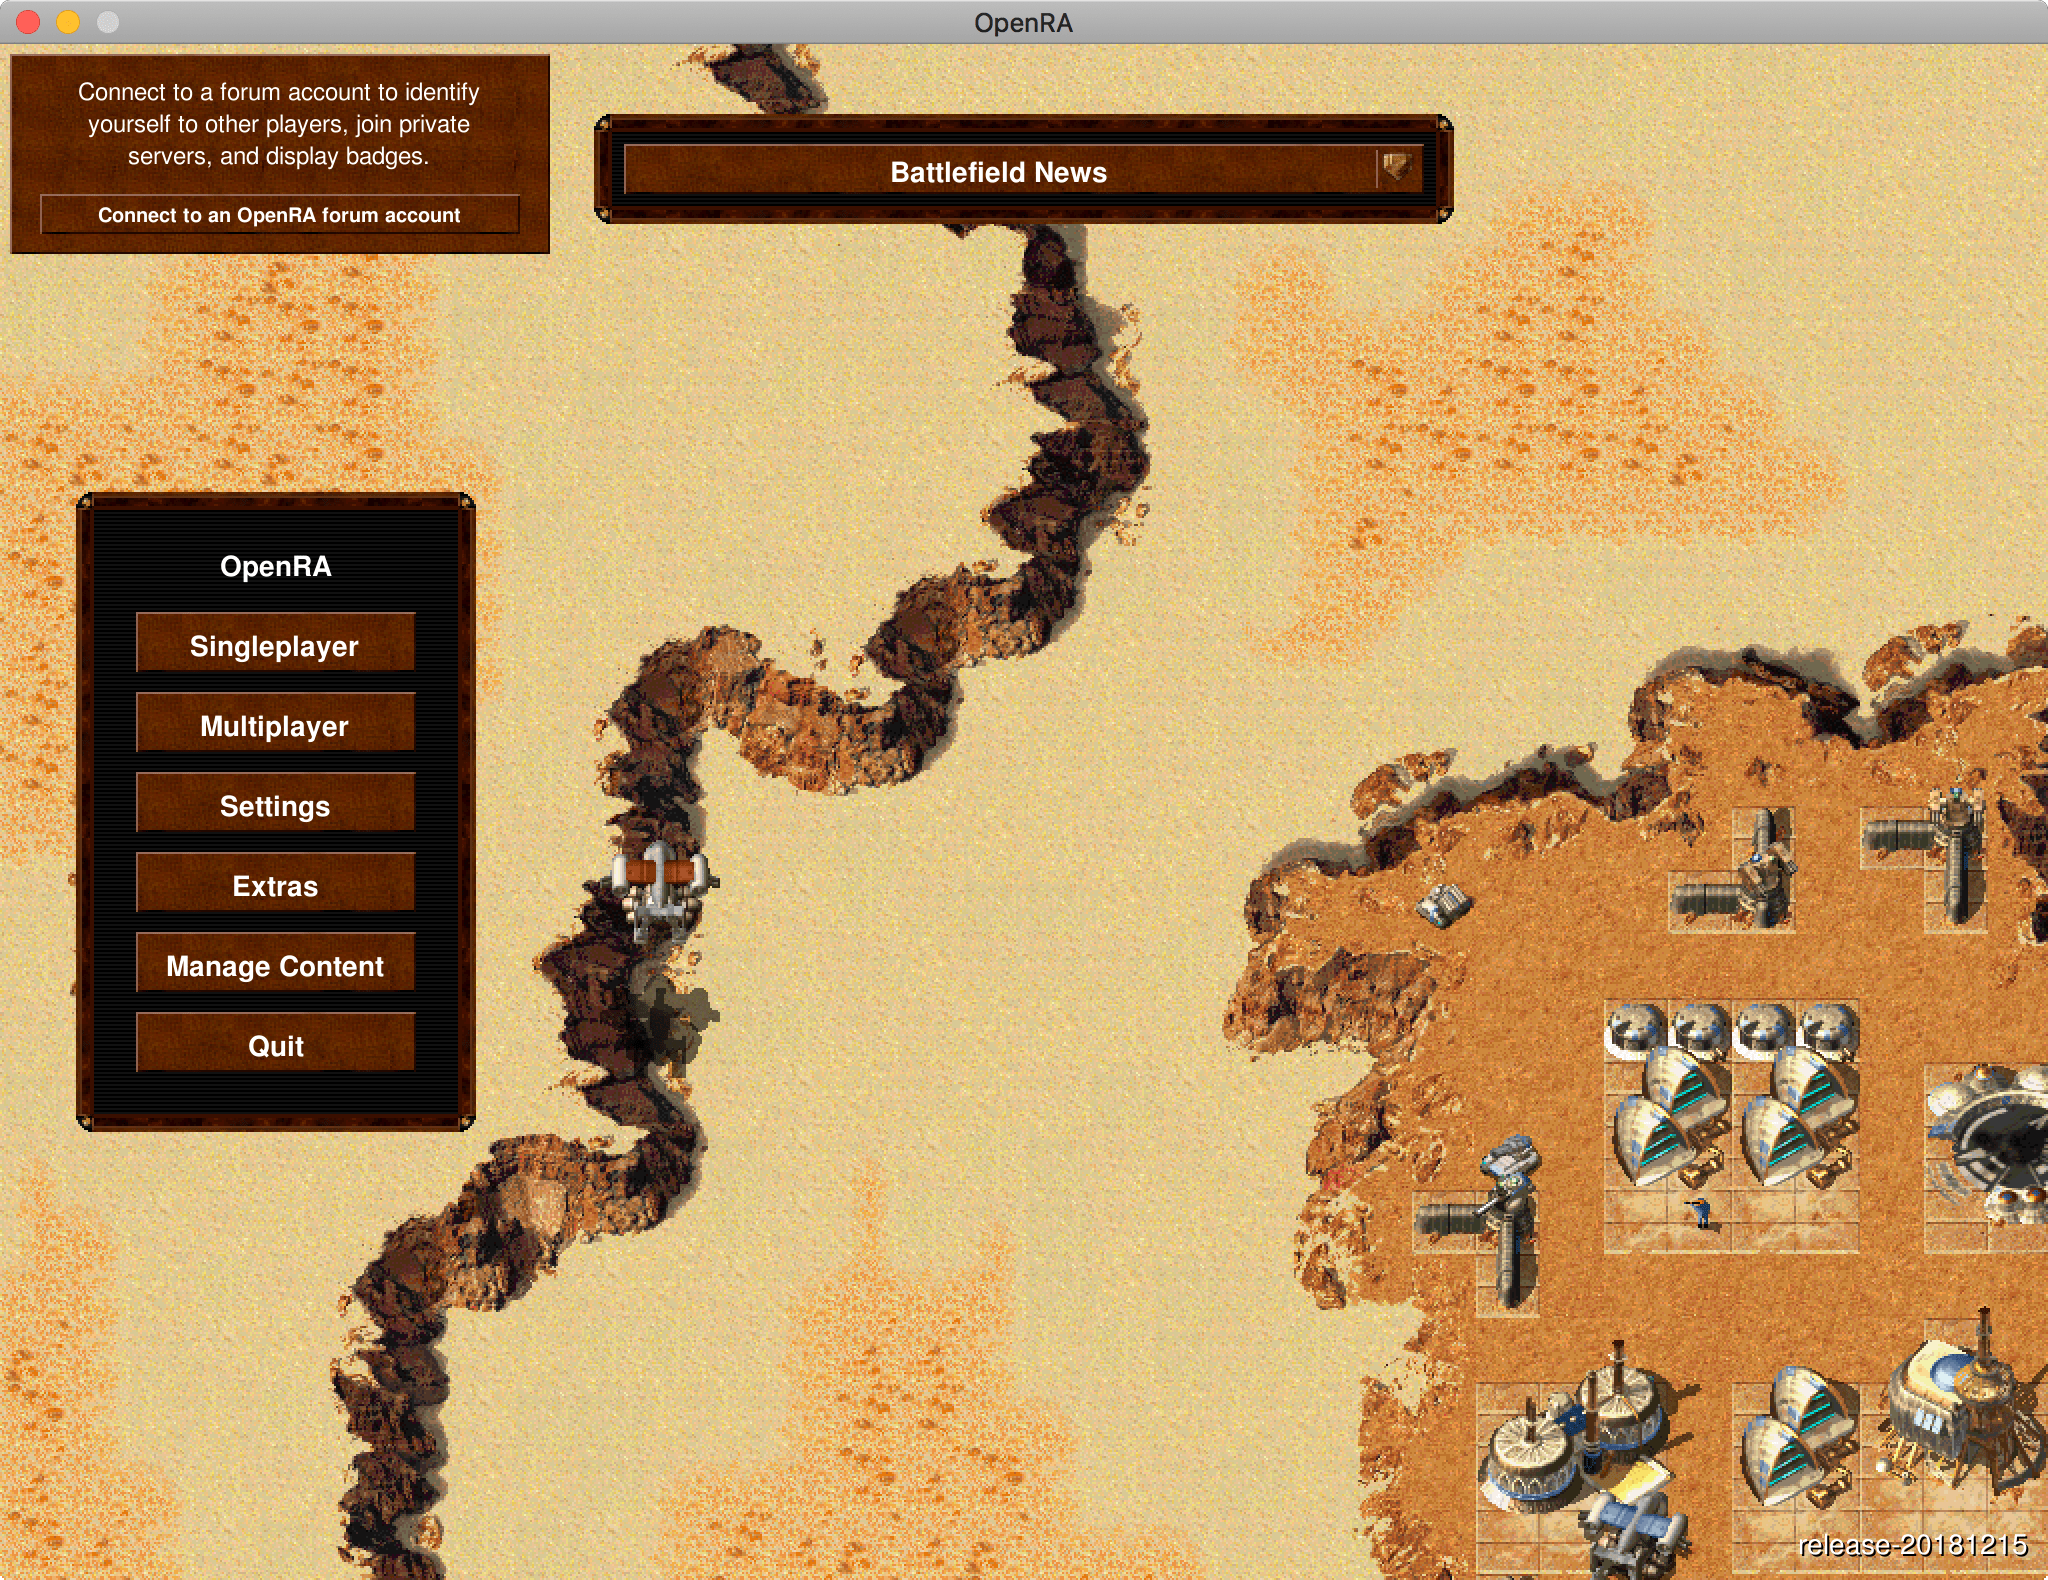
Open RA stands for "Open Red Alert" but also includes Dune 2000 and Tiberian Dawn support with features that are much like Dune Legacy's modern screen resolutions and minor tweaks. Unlike some of the other ports, OpenRA Dune focuses on delivering re-creation rather than improvements and online play. OpenRA has been progressively improving over the years. It used to require installing Mono, an opensource framework for .NET functionality but no longer requires independently installing it. Also, at some point in the future, it'll support Tiberian Sun.
- Optional: Nab the Dune II ISO for Windows from a site like myabandonware or archive.org.
- Download OpenRA. Each game comes with an independent app. Install to your applications folder
- Launch the game and either select "Quick Install" or if you have the original game discs, mount the ISO and select advanced install.
- Also, see d2kplus for mods, some are supported in OpenRA.
Game assets are installed in
/Library/Application Support/OpenRA. If you delete OpenRA games, be sure to delete this folder as well to completely delete OpenRA. (This may also delete your game saves).
-
Winning the war on Spam bots through stupidity
It finally happened, a spambot defeated my super simple email obfuscation. I've been using a simple JavaScript function to encode my email address for a month. It's not bot-proof, as anything that renders out the page and performs interactions creates a barrier that the page requires rendering out in full and an interaction, making it far more costly.
Here's the email that defeated my spam protection:
Hi Greggant Team,
I trust this message finds you in good spirits. Your finance platform stood out to me – your content is both informative and engaging.
Given our mutual interest in finance, I believe there's potential for collaboration between our platforms. Would you be interested in discussing this further?
Looking forward to your response.
-- Sara Evans
Creative Writer
itsevanssaraaaaa@gmail.comThese emails are nothing new to anyone who runs a blog, usually some sort of backlinking scheme or scam to improve SEO. Obviously, this is pretty low effort as my blog is not related to finance in any way. It's a spray-and-pray approach. It must sometimes work as I used to get several a week, and it's been happening for years.
My stupid solution
I've added a simple question to the contact page. It's a simple math problem that requires a human to solve, adding up 3 + 5.
That's it! Well.... actually, it's a little more complicated, I'm using crypto-js to obfuscate the email to make it more costly for a would be spammer. The logic of my code looks like the following:
    function decryptEmail(encryptedEmail, key) {
        const bytes = CryptoJS.AES.decrypt(encryptedEmail, key);
        return bytes.toString(CryptoJS.enc.Utf8);
    }
    // Prompt the user with a challenge
    const userAnswer = prompt("To reveal the email, please solve: 3 + 5");
    if (userAnswer === "8") {
        const decryptedEmail = decryptEmail(encryptedEmail, secretKey);
        const emailElement = document.getElementById("email");
        emailElement.href = "mailto:" + decryptedEmail;
        emailElement.textContent = decryptedEmail;
        emailElement.classList.remove('not-active')
    } else {
        alert("Incorrect answer. Please try again.");
    }
The hilarious part is I have the key and encrypted email in the source code. It's not secure, but it's not meant to be. It's meant to be a barrier that requires a human to interact or at least a bot to load the entire DOM, including crypto-js. From my observation, this has been more effective than using Recaptcha.
The basic principal of rolling your own email obfuscation is to make it so it requires a sophisticated bot, that consumes resources, a proof-of-work. It's trivial for a single user but costly for a macro operation. The issue with popular off-the-shelf solutions is they can be specifically targeted. This isn't a forever solution as eventually the bots with improve and the cost will fall further but I imagine this will be a workable solution for quite some time.
-
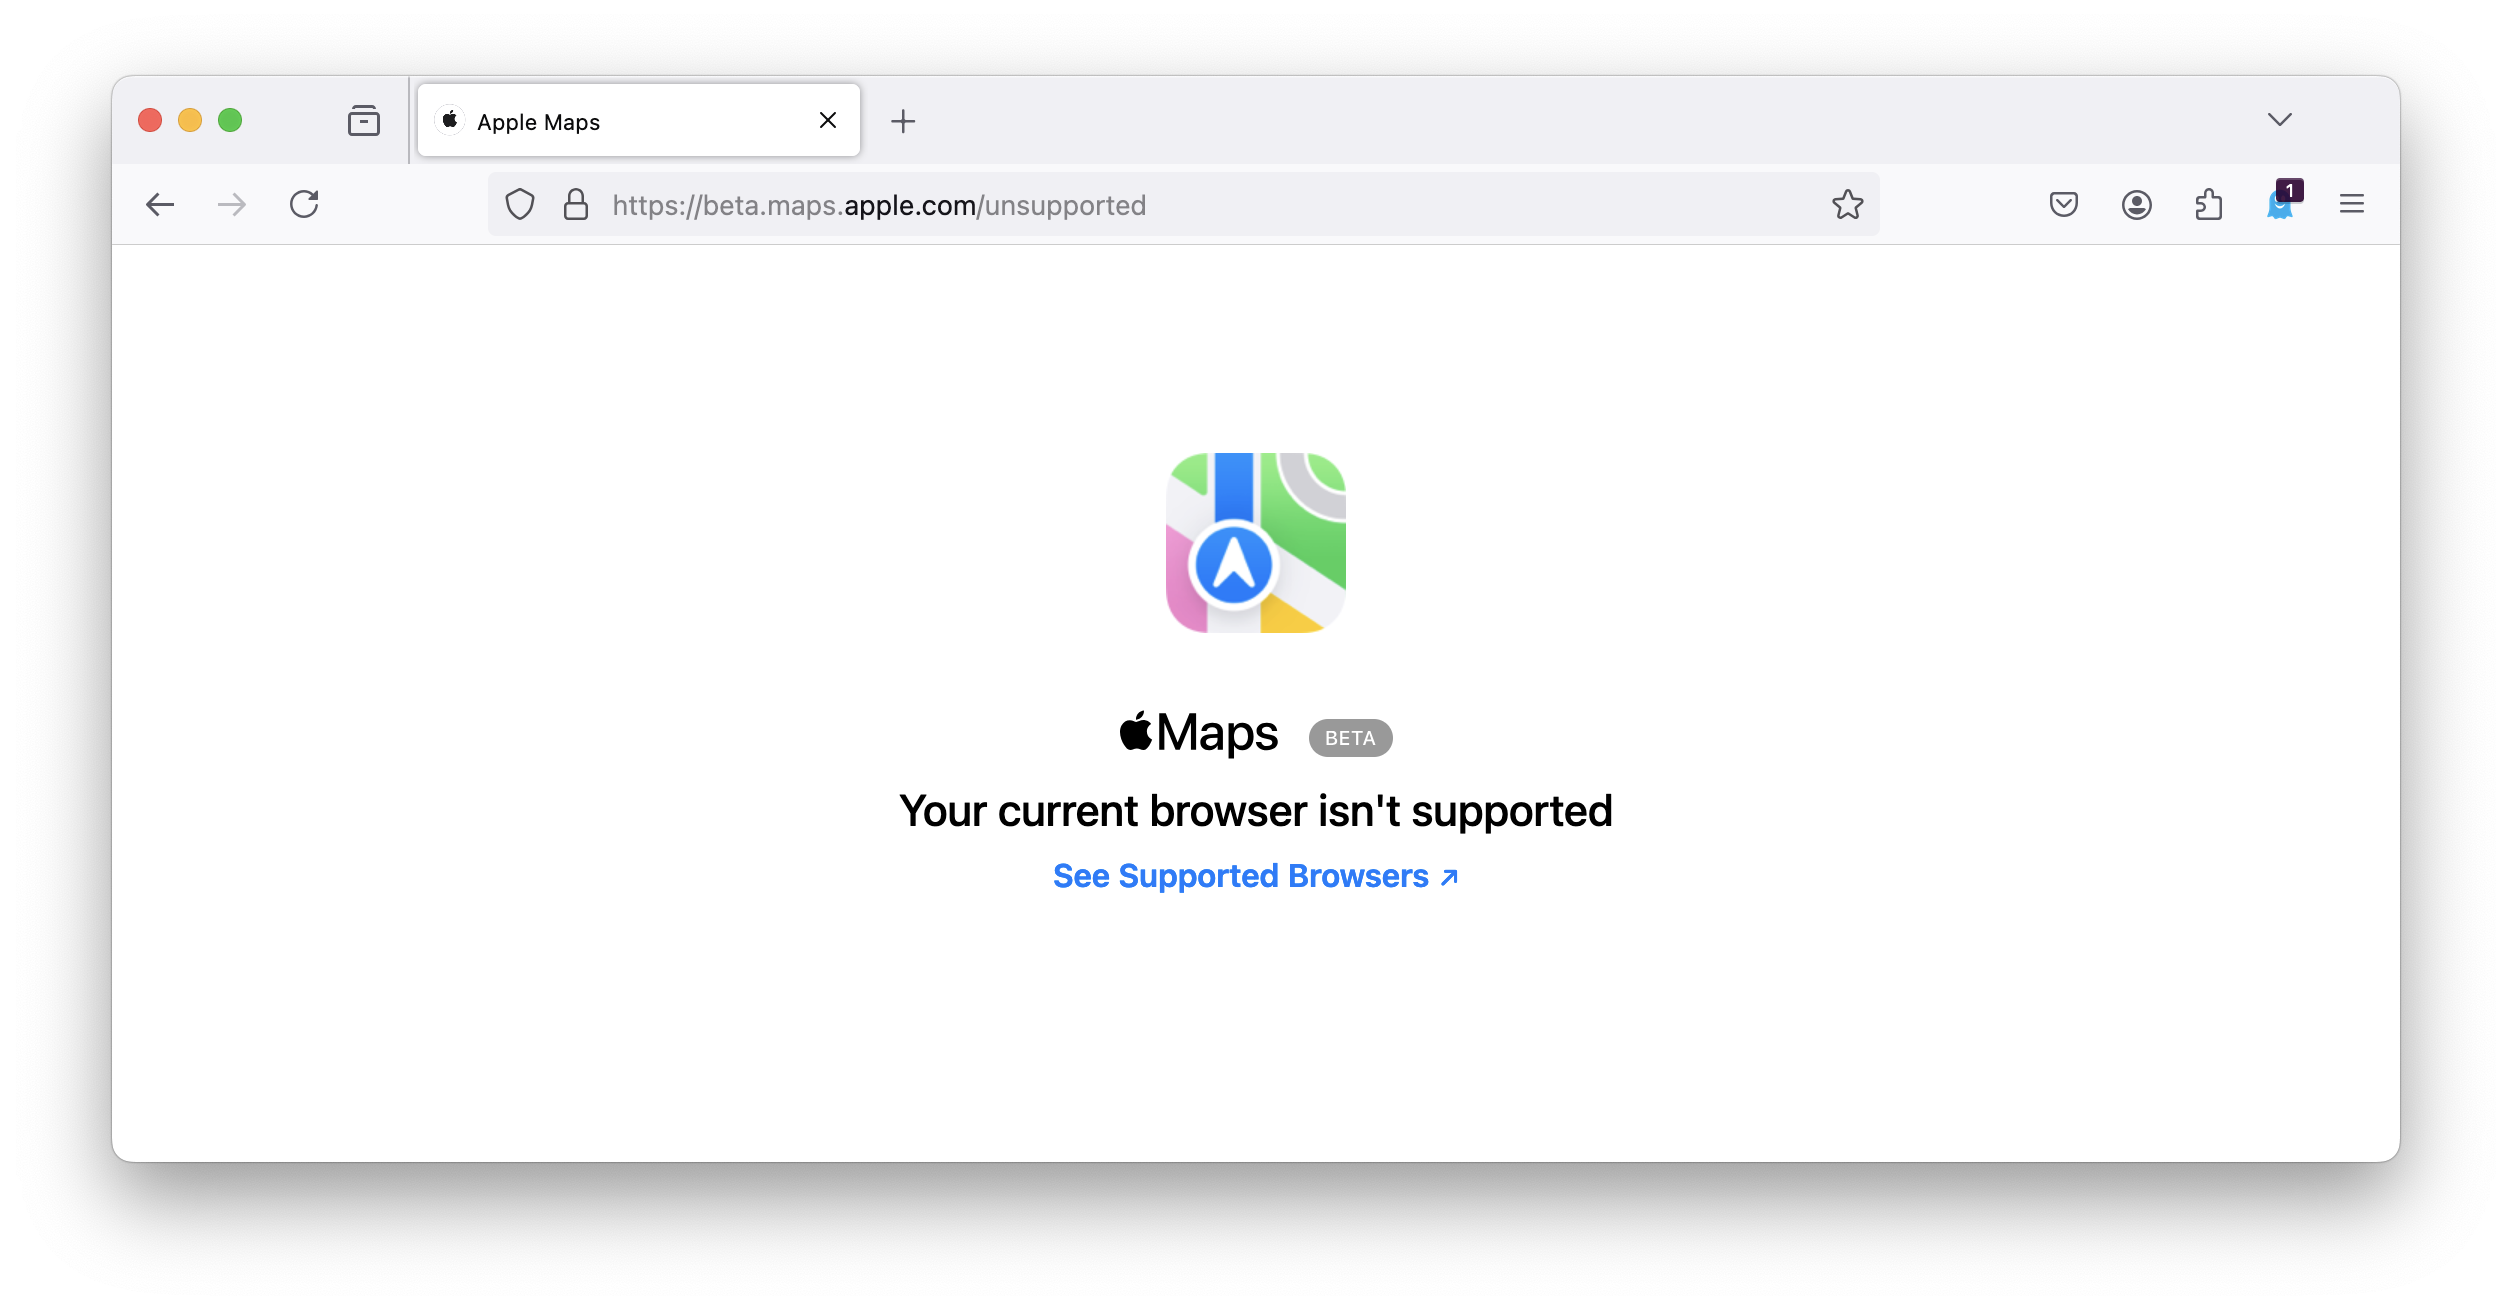
Apple Maps web beta doesn't support FireFox but you can still use it
It's been a long time in the making, but Apple Maps finally has a web version. This is significant as Apple, for years, has allowed iOS app devs to use MapKit for free. For those unaware, Google charges for its Google Maps API, meaning for larger web apps or more complex ones, developers are on the hook for footing the bill for maps behaviors, generally to the tune of $5 per 1000 requests. However, depending on the interactions this can be more.
I don't think I need to explain why this is a big deal. The downside has always been that there isn't a web analog for Apple Maps, meaning apps that extend to web versions would require entirely different ecosystems. Apple hasn't said if or when it'll offer web integrations or at what price point, but any competition is healthy.... except when it doesn't support the open web.
Perhaps this will change but according to Apple, the only supported browsers are Chromium or Webkit. If you visit it, you'll see the above message. The bigger irony is that Apple Maps works in Firefox. Simply faking the User-Agent to Safari and Firefox can access Apple Maps.
I'm guessing this will certainly change in the future, but it's still strange to see Firefox blacklisted. The irony is that because of the release channels for FireFox and Chrome not being tied to the operating system updates, generally they remain more up-to-date than Safari.
-
Blogging in the age of AI
There's an air of futility in writing blog posts in the age of "Artificial Intelligence," as anything you write can and will be stolen without recourse. There's absolutely nothing I can do to stop billion-dollar corporations from hoovering up over a decade's worth of blog posts made in good faith to provide information freely to the open internet. Estimates are world-wide traffic will fall roughly 30% as features like Google's A.I. overviews cobble together broken synopsises of information.
Videos aren't safe either, as YouTube's transcriptions are easily stolen for A.I. data. Everything is a race to the bottom.... or is it? It's pretty easy to go full doomer in the face of A.I. but there are a few things worth calling out.
Probably the biggest roadblock working against our current large-language models; the first is "good" data. All data pre-2021 can be assumed to be non-LLM trained, and we're running out of it. To use >Multiplicity as a reference point, "You know how when you make a copy of a copy, it's not as sharp as... well... the original." Well, we're fast entering the age of the copy-of-a-copy. We've moved well past the enshittening to the dead internet. Bots on bots.
The other great hope is the cost of A.I. Right now it's assumed OpenAI is losing a staggering $700,000 to run ChatGPT. Make no mistake, this cost can and will come down, and local large language models can be paired down with quantization to lower bit-depths for models palatable for personal computing but for now we may be at the limits of LLMs and the solution seems to be more LLMs which isn't bringing down the cost of compute.
Finally, there's legislative and legal, which I hold less hope for. As much as ChatGPT has reduced the friction of my job, I'd trade it in a second for stability.
If I were to shake a magic 8-Ball, it's read "uncertain, ask again." but here are my few predictions:
- A.I. will continue lower the barrier even further for low-effort spam content, farm content like Apple Daily and iLounge.
- A cat-and-mouse game will arise from Google vs Dead Internet content farms and zombie sites.
- A new value will be placed on social proof content, such as YouTubers who show their faces and demonstrate they are indeed human, as it'll be a long time for purely A.I. convincingly recreate the difficulties of long-form video without errors, especially in changing/complex environments. For written word, SubStacks from authors who have established presences that extend to the real world will function as the social proof. Musicians have live performances. Graphic artists have physical media. If you're purely digital, expect a diminished return in the future.
- We are fast approaching the law of diminished returns. GPT3 was the great leap forward but the differences between 3.5 and 4 vs 3 are much less mind blowing. Other models, like Claude, are impressive, but none have been game-changing.
- Future breakthroughs are likely to be task-specific. We've seen voice, text/coding, music, images, and video. Now comes more particular. We're likely to see say, in music software, a scored section of midi translated more accurately to a strings section, mimicking how a musician might actually play the score. We may see LLMs and machines applied to spreadsheet management. There are almost certainly companies looking at these two examples.
- Snowcrash, Deamon/Freedom 2.0, and hyper derivative young-adult lesser work, Ready Player One all had the idea of AR/VR wrong. While metaverses have, do and will exist into the future, the backlash is happening as schools are starting to experiment with removing cellphones from schools and states are pushing back against social media. The federal government continues to flirt with banning TikTok. Instead we'll see divisions. People may consume A.I. tailored bullshit entertainment for cheap hits of dopamine, but we will also see a pressure for the measurably human, akin to the DIY and right-to-repair movements.
Now the fun part: To see if I'm totally off base in roughly 2-3 years time....
-
House keeping a blog, a decade later
This blog is fairly static by design, minimalistic, and simple, but it's not immune to changes that affect the end user: I've added printing, dark mode, topics, and so on.
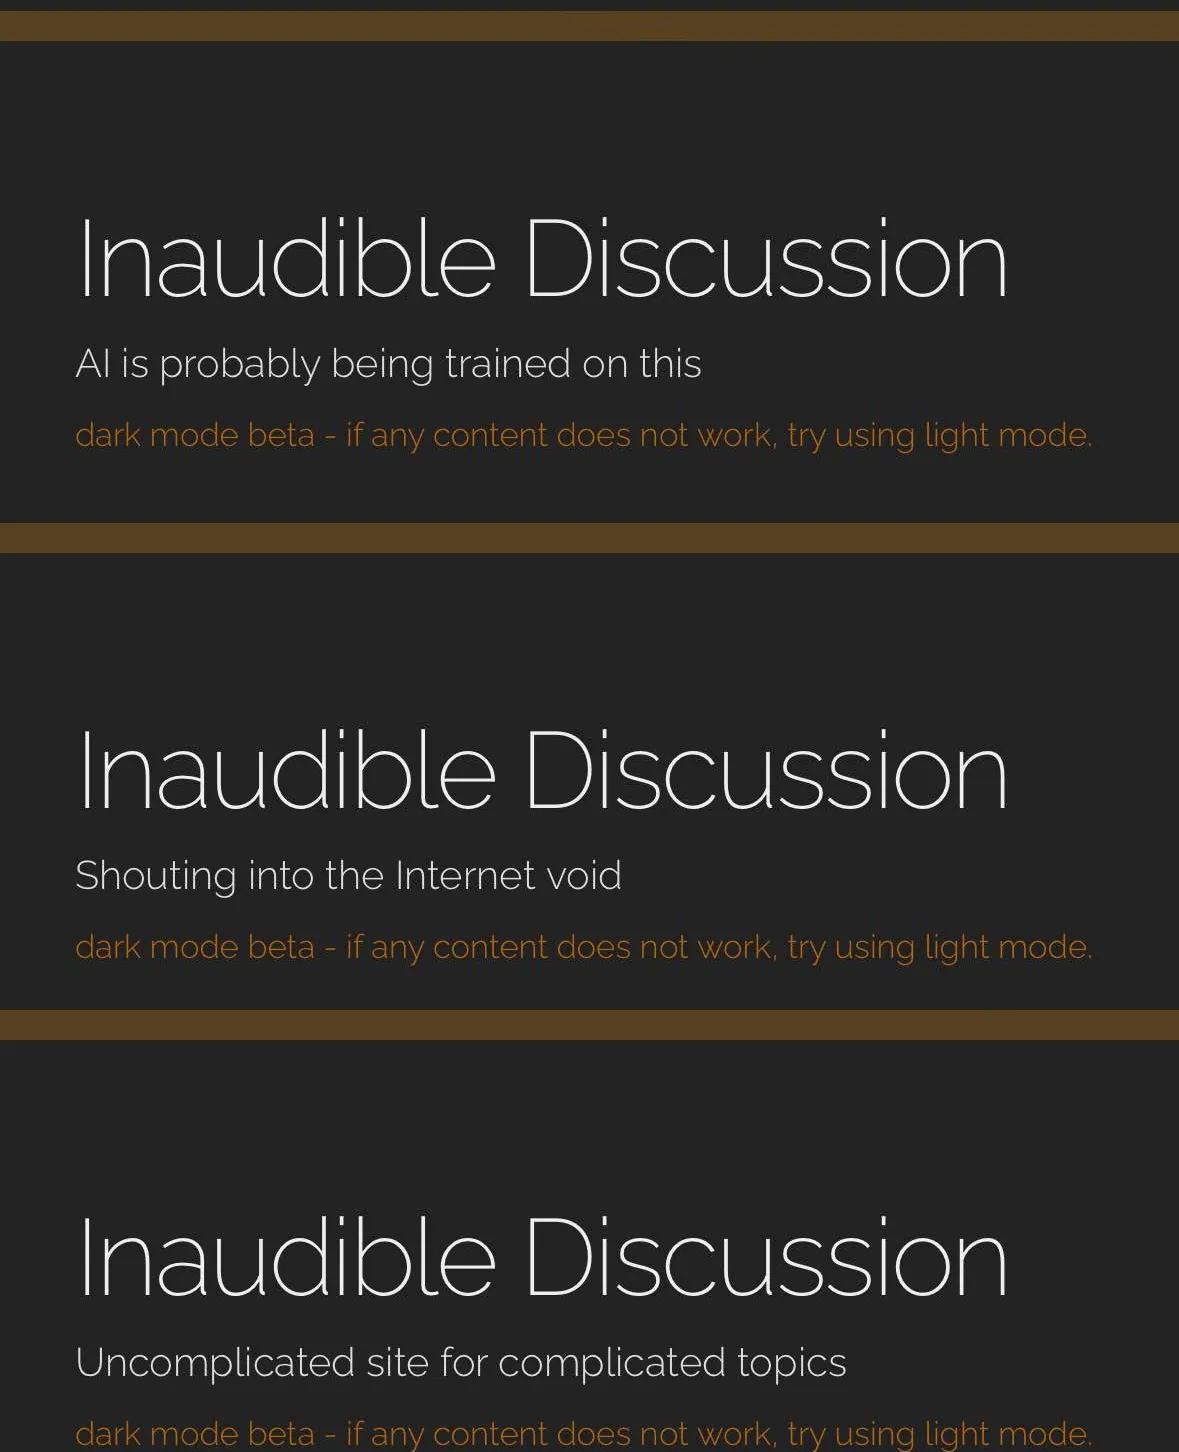
Pictured: Examples of the random taglines
- My contacts page uses cryptography to encode the email address, and a simple problem now reveals it. This has already resulted in a dramatic reduction in spam. It's not bot-proof, as anything that renders out the page could defeat my solution, but it creates a barrier that the page requires rendering out in full and an interaction, making it far more costly.
- I've updated to jQuery Slim. Sadly, the fitVid.js used for YouTube embeds requires jQuery. At some point, I'll rewrite it to pure JS and completely abandon jQuery. jQuery Slim shaves off about 20k of a page load.
- The tagline now changes randomly. It's brain-dead simple JavaScript, but it should inject a bit more whimsy into the site. There are about 50 slogans in total. My long-standing tagline, "Adventures of a Front End Architect," was something I punched in nearly a decade ago. At the time, it seemed fine, but I grew to find it a bit "cringe," as the kids say.
- My last several posts have been adapted from YouTube videos. This trend is sure to continue, as it makes sense to double-dip on my content. People can engage with my content however they prefer, whether via video or blog.
I missed an important milestone, but my blog crossed a remarkable anniversary in early 2023, ten years. I backed off posting in late 2022, realizing how my content would only be mined, stolen, and regurgitated by AI without attribution. Ironically, YouTube is what brought me back to the blog, realizing a small but not insignificant amount of my traffic could be attributed to my blog. Google might be eating its own tail with AI content, but it's still directing people to this blog. Plus, this blog is an expression and love letter to the internet as it once was. By 2013, before I even typed my first character into this blog, the internet had already become aggregated by social media, as lay people could now participate in content creation.
When I first started this blog, I was living in a different city for a failing company and realized that I didn't have a social media presence. I started this blog with the ambition of writing about web dev, to create a footprint that potential employers could find. It sort of worked; I ended up being laid off, selling my house, and packing for a much better job as I worked for a cool hipster agency in PDX. (RIP Emerge). This blog took an unexpected turn, first documenting my experiences (for the first time) in an empty city during the pandemic and later launching a YouTube presence.
Originally, I launched this blog on Tumblr, of all places, misunderstanding it as a platform for actual blogging. I quickly learned that Tumblr was Imgur with a feed for sad teenagers, not grown-ass adults, blogging about development. I went to great lengths to create my own minimalist theme (removing many Tumblr interactions) and was one of only a handful of people with a custom domain for their Tumblr blog. It's been a throwback since its inception, and the final straw was in 2016 when I abandoned Tumblr. While there is more friction in self-hosting, I've been happier with the results. Even if YouTube implodes tomorrow, the tutorials I've created will live on.
-
Running OS X 10.6 Snow Leopard in 2024
This blog post is an adapted script from a YouTube video I wrote in 2023 for one of my more popular videos. The video is the superior version and outlines the entire process of downgrading a Mac Pro 2008 to run Snow Leopard and demonstrates running 10.6. This is a companion piece, that serves as a general outline as opposed to a comprehensive overview, think of it as the TLDR or cliff notes. I highly recommend checking out the video.
OS X Snow Leopard remains to this day the most loved version of macOS. I made a video about which version of macOS is the "best," and I felt I may have been a bit harsh as, like most people, I absolutely adored Snow Leopard.
The question is, can you use OS X 10.6 from 2009 to 2024? The answer is... yes but with a lot of asterisks.
- Snow Leopard is only supported by Intel Macs from 2005 - 2010
- Modern software will not work on it. Generally, software releases dropped support for it in the early 2010s.
- Upgraded Macs like a Mac Pro 3,1/4,1/5,1 may need to be downgraded to hardware that was originally supported.
- High resolutions beyond 1440p likely are not supported, and 10.6 does not have resolution scaling.
For example, in the video, I had to install the original GPU on my Mac Pro 2008, downgrading from a GeForce 760 to an ATI Radeon 2600 XT. I also could not use Wi-Fi, as I'd upgraded the AirPort card to 802.11 AC/Bluetooth 4.x.
Performance
Snow Leopard was loved for feeling snappy, and it does live up to the hype, although this shouldn't come as much of a surprise running this with a Mac Pro 8-Core 2.8 GHz 2008, off an SSD and 8 GB RAM, which was well specced for 2009. Ironically, at the time of 10.6, my Mac Pro 2008 had more RAM sitting at 12 GB in 2009.
Snow Leopard's speed, however, is a bit skin deep as in Lion. CNet in 2011 found that Lion had a mild performance uplift over Snow Leopard. If you're looking for speed, most of it likely existed in simpler software of the era than any magic elixir, and it lacks the modern 6. management that was introduced in Mavericks, such as virtual memory compression. 10.7 also has more modern browser support.
Internet
The biggest barrier to using Snow Leopard is the internet. Apple's high release cadence and constant API library changes mean there isn't a lot of long tail support. More modern CSS3 and especially JavaScript ES6 are not supported Safari and it also lacks TLS 1.2 and TLS 1.3, Fetch API, WebSockets, IndexedDB, Content Security Policy (CSP) and Subresource Integrity (SRI). For the truly nerdy, the Safari JavaScript engine was still using "SquirrelFish", instead of the current engine, JavaScriptCore. This means a large portion of the internet is not accessible out-of-the-box with Safari 5.
The last officially supported browser for 10.6 was Firefox ESR 45 ESR from August 2016, which is now eight years old, an eternity in internet years, making for limited capability. While it supports many more features, trying to surf the internet is a very broken experience. The web is semi-usable, but viewing websites like Apple's homepage is a mess.
However, there are some much more modern browsers. They are as follows:
Whatever "newness" Roccat 8 had didn't extend to better support. Unless future releases radically improve, this one is best avoided. The others were much more interesting.
SpiderWeb vs InnerWeb vs ArticFox
Historically, both Firefox Legacy was the legacy browser of choice, but it was sunsetted years ago. Fortunately, a new crop of browsers has risen up, although none can be considered a cutting-edge browser. Each of these is a Firefox hack, and all are fairly similar in ability, with the last active development stopping around 2022/23~. This means they're mostly able to surf the modern web... for now.
SpiderWeb is a bit janky. It requires a polyfill XPI, Palefill (which is included with the browser but must be manually installed). A polyfill is a small JavaScript code snippet or library that allows modern web features and APIs to be used in older browsers that lack native support for those features and an XPI file, FireFox's plugin format.
Innerweb is a simple double-click experience that doesn't require manual installation or hacking.
ArticFox is yet another Firefox spin-off, but with the caveat that it's still being actively developed. Installing it takes a bit more work; there weren't any instructions included, so it took me a minute to figure it out. When you download ArticFox for 10.6, you need to download its lib files in the format of two Libc++ dylib files. These must be installed manually `usr/lib`. To do this, you need to first enable invisible files, which requires the terminal command on the screen, and then restart the finder.
None of these browsers are truly modern as they're hacks at best, relying on stacks of work-arounds like polyfills, and shims to extend the functionality. Snow Leopard is 15 year old operating system and thus few users (if any) are daily driving a Snow Leopard.
Creative Software
While I did not test CS6, Adobe CS5.5 works great in Snow Leopard, but this places it massively behind. Connect my iPhone 14 Pro to my Mac, use image capture to import a DNG (RAW) image, and edit in Photoshop. However, DNG is an established format, unlike "RAW," which is on a per-camera maker basis. Modern cameras shooting in various manufactured RAW variants probably will not work.
This sort of behavior extends to all creative software. It's possible to do real creative work well; however, you'll be locked to the tools of the 2010s. Editing video in Final Cut Pro is certainly possible, but the lack of the modern conveniences and more modern codec support like AVC mean either shooting in supported formats like MPEG4 and ProRes, and the hardware of that era is generally illsuited for 4k. This shouldn't come as a surprise but a Mac Mini M1 with only 8 GB of RAM with Final Cut Pro X would dog walk a Mac Pro 5,1 with 64 GB of RAM and Final Cut Pro 7 in Snow Leopard.
Networking
I haven't spent much time with 10.6 Snow Leopard in the domain of networking beyond the absence of support with my newer AirPort card but I did notice a quirk that it was not able to connect to my Synology NAS via SMB. If I get around to exploring this, I'll certainly update this section. Networking between other Macs worked without hitches. I was also able to connect via Apple's Screenshare to Snow Leopard and operate the computer from other modern Macs.
Legacy Support and Rosetta
Snow Leopard is the last version of macOS that supports Rosetta for PowerPC emulation. Early OS X games are unlikely to work or work well, but many have worked with Rosetta, whereas general software has a greater chance of working.
CNET has an article on Rosetta's compatibility and the supported applications are fairly mixed. It's great for reminding us how smooth the transition to Apple Silicon has been compared to the PowerPC to x86 transition.
Should you run Snow Leopard?
No, you should absolutely not run 10.6 as a daily driver. It's woefully out of date for security. However, if you're looking for a bit of nostalgia, it's entertaining.
-
How Memory Works in macOS (why Apple can get away with shipping computers with 8 GB of RAM)"
This blog post is adapted from a YouTube video script. The video can be found below.
When Apple Silicon first launched, you'd hear goofy statements from Apple and various publications regarding RAM and Apple Silicon. One of the most common assertions Apple made was that 8 GB of RAM on Apple Silicon was equivalent to 16 GB of RAM on an Intel Mac. I'd argue today, the majority of users understand 8 GB of RAM is not 16 GB, regardless of the process type. What makes 8 GB still usable in 2024, even if not ideal, is the memory management in macOS. This will be a high-level overview of how macOS manages memory, so you better understand your own Mac.
Understanding Memory Usage in Activity Monitor

First, open Activity Monitor on your macOS and click on the Memory tab. Here, you'll see a list of all the applications and processes currently running.
To quote Apple:
"The Memory pane displays how much memory your Mac is using, how often it is swapping memory between RAM and your startup disk, the amount of memory provided for an app, and how much of it is compressed memory."
Apple SupportThe Memory Pressure Graph

The most important thing to understand is the memory pressure graph at its most basic:
- Green: Your Mac is using memory efficiently.
- Yellow: You might need to free up RAM as performance could be reduced.
- Red: Your Mac needs more RAM, and performance is suffering.
This is also reflected in the graph itself. Freeing up RAM is generally accomplished by quitting applications and processes or by rebooting.
Memory Usage Columns
To the right of Memory Pressure are two columns that provide an overview of your Mac's memory usage. Starting with the first column:
- Physical Memory: This shows how much RAM is installed in your system. Note that on Apple Silicon Macs, this cannot be upgraded.
- Memory Used: This details how much RAM is currently being used, broken down into several categories:
Breaking Down Memory Categories
- App Memory: The amount of RAM being used by applications.
- Wired Memory: The RAM required by the operating system to function, which cannot be cached.
- Compressed Memory: RAM that has been compressed to free up space for other processes.
The Role of Cached Files and Swap Used
Cached Files: These are stored in unused memory to speed up performance. With modern macOS, unused RAM is wasted RAM, so it's uncommon to see macOS with a lot of free RAM. This is important to understand for long-time Mac users who remember checking for the amount of unused memory to gauge system performance. This no longer applies to macOS.
Swap Used: This indicates the space used on your startup drive for memory page outs, functioning as a memory extension when the physical RAM is fully utilized.
Virtual Memory Management
macOS uses a technique called virtual memory management. Here, each application thinks it has access to a large block of memory, which is actually a combination of physical RAM and swap space managed dynamically by the OS.
If you have less physical RAM, your system will rely more on swap space. Modern SSDs, which are very fast, make this process generally transparent to the user. Over usage or reliance on swap space can cause wear and tear on the SSD over time. A larger SSD will have more memory cells to rotate, thus will have a longer life. It's not uncommon to see SSDs advertise terrabytes written (TBW), a common metric for advertising longevity of an SSD, radically increase as the size increases. Apple gets a lot of well-deserved criticism for selling RAM-starved computers with small SSDs that aren't user-serviceable. While SSDs generally are considered more stable than their spinning disk counter parts, they have a finite shelf life.
Unified Memory in Apple Silicon
Apple Silicon uses unified memory for both its CPU and GPU. This means both can access the same memory, reducing redundancy and improving efficiency. While Intel's iGPUs used unified memory, this is a significant upgrade, which required separate memory pools. The downside, when compared to a dedicated GPU, is that the RAM pulls double duty as video operations are now in the RAM. This means that data such as frame buffers, shaders, textures, vertex data, geometry buffers, render targets and so on, are no longer stored within VRAM, rather RAM, thus the RAM is now pulling double-duty as the RAM and VRAM. For lower memory configured devices, this can tax the RAM further. At more extreme configurations like a Mac Studio with 192 GB of RAM, this means access to far more video memory than a traditional GPU would have.
Advanced Memory Management Features
- Virtual Memory Compression: Introduced in macOS Mavericks (10.9), this feature compresses inactive processes to free up more RAM.
- App Nap: This reduces the priority of inactive applications, saving memory and battery life.
- Application Save States: Allows apps to be quit and relaunched to their previous state, freeing up memory.

Some of Apple's energy saving and performance techniques also affect memory management such as App Napping. App napping works by detecting inactive applications, reducing their priority to minimize the amount of resources they consume. If an app meets certain criteria such as the app isn't visible to the user, isn't playing audio, or is performing a service like downloading a file, it can be put to sleep. This has memory implications, as napped applications are generally prioritized for memory swaps and memory compression.
If we go to the CPU section in the activity monitor, we can add the column App Nap and see the apps that are actively in a nap state.
Command Line Utilities
For those who want to get geekier, macOS offers several CLI utilities out of the box. These can be accessed from the terminal by running the following commands:
vm_stat: Shows virtual memory stats.memory_pressure: Provides detailed memory pressure information.top: An terminal-based activity monitor. If you'd like an even more powerful activity monitor consider usinghtopvia Homebrew for a more user-friendly experience).
Final Thoughts
Switching from Mac OS 9 to OS X brought many improvements, including protected memory, which enhances security and reliability. While modern macOS has made significant strides in memory management, it's always a good idea to keep your system optimized and understand how it uses resources.
For a deep dive, check out the Developer Documentation and this Informit Article.
-
How to play Sony PlayStation Games (PSX / PSone) on your Mac
Emulating the PlayStation, also known as the original PlayStation, PS1, PSOne, or PSX, is straightforward and can give you a better experience than the native hardware with features like widescreen support, 4k rendering, and texture enhancements. If you've used PCSX2 or RPSC3, it will feel very similar. This tutorial is adapted from the video below. If you're interested in PlayStation 2 emulation, you can check out my guide here.
There are multiple options to emulate the PlayStation on a Mac, including even on PowerPC Macs with Connectix Virtual Game Station.
While emulators like OpenEmu do a reasonable job of emulating the PlayStation, they don't have the advanced graphical features of DuckStation. You can experience PlayStation at 4k in widescreen, with texture smoothing and faster load times. This tutorial explores the many features of DuckStation.
Step 1: Download the Emulator
First, go to the official website duckstation.org. The Mac port is listed under "Other Platforms" alternately, click here to go to the latest releases. This will take you to the GitHub page for the latest release. Scroll to the bottom and grab the Mac release. If for some reason you're experienccing issues, try downloading a different release.
Decompress the .zip file (if it does not do this automatically), then drag the application into your "Applications" folder.
Step 2: BIOS
If you double-click the app, you'll probably see "DuckStation," which cannot be opened because the developer cannot be verified. This is common for open-source software as the developer has not paid for an Apple account. Instead, right-click the application and click "Open" to whitelist the application.
You'll be presented with language and theme options. Make your selections and click "Next."
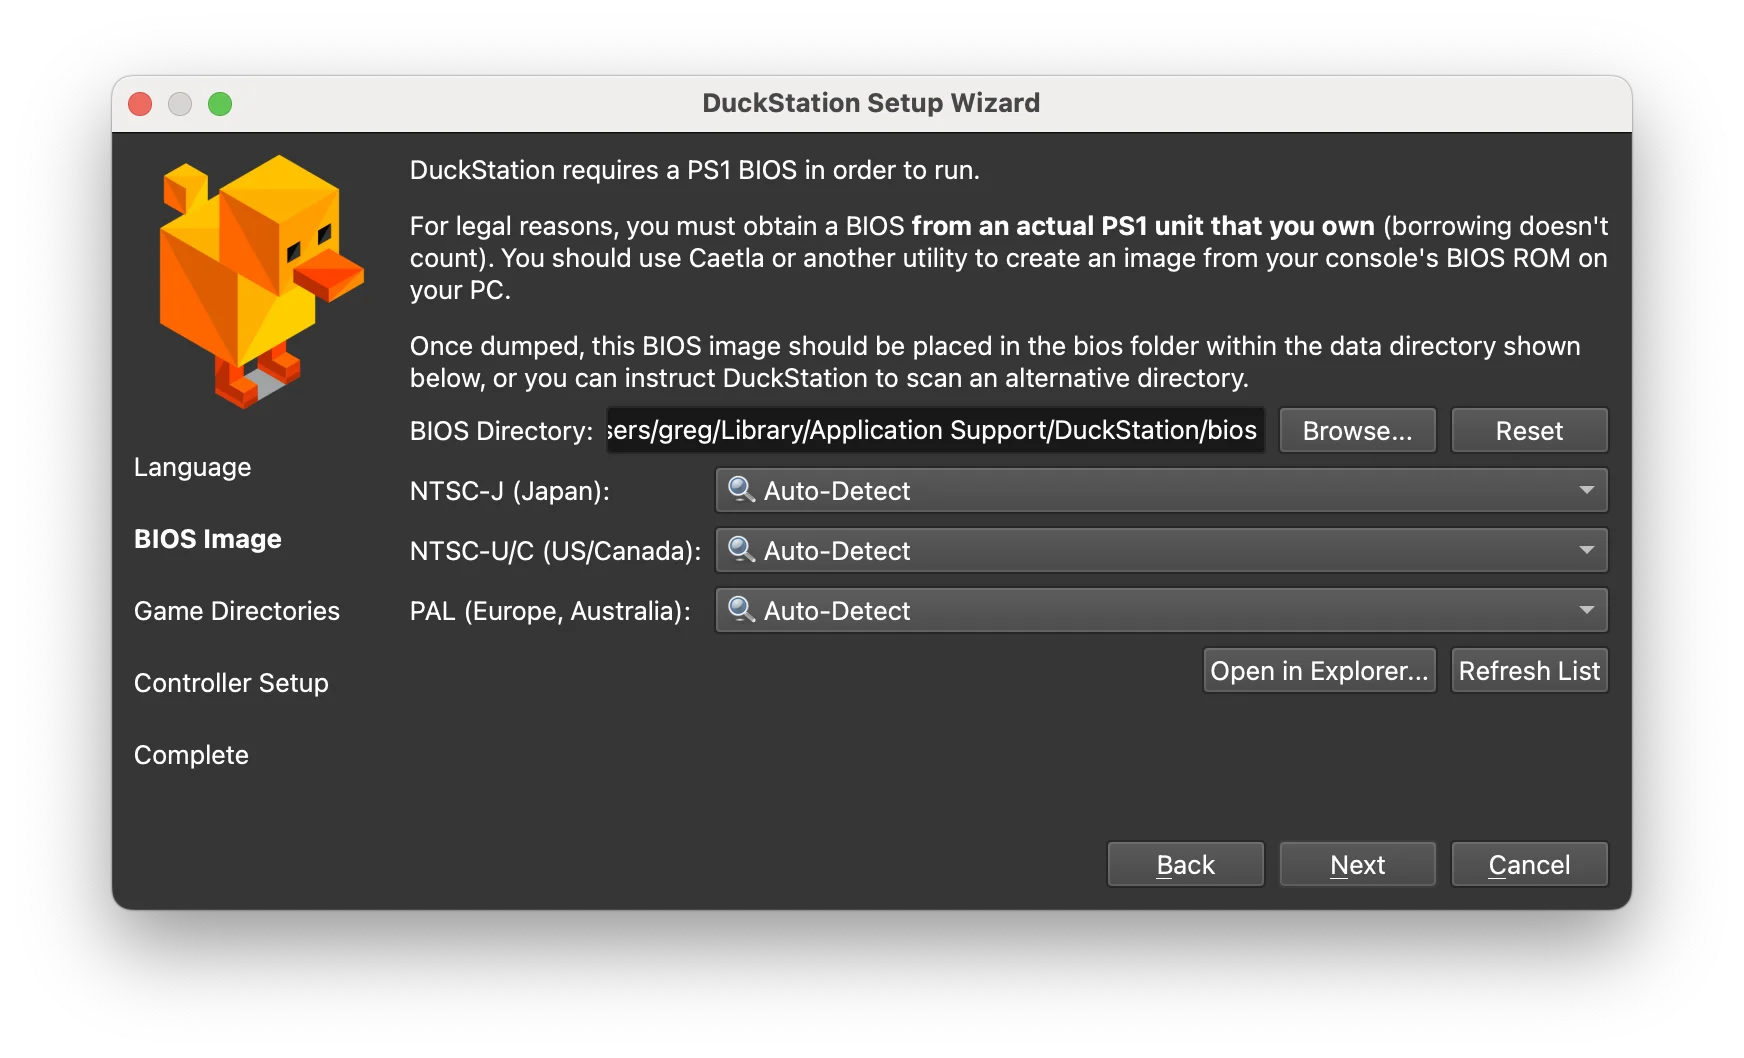
The next screen is for the BIOS. The PlayStation BIOS is firmware built into the console that initializes and manages hardware components and provides runtime services for games and programs. These are copyrighted, so I won't be linking them directly. Use your own moral judgment here. I personally own a PlayStation, so that's my vindication. Places like Archive.org are a good place to look for them. DuckStation requires multiple BIOS: Japan, US/Canada, and Europe/Australia. This enables compatibility with all regions.
You can install these whenever you'd like. If you move them, then you will need to relink them.In DuckStation, click "Browse" and navigate to where you placed your BIOS files.
Click "Next."
Step 3: Adding games
Games can be distributed in multiple formats, and it is possible to rip your own games into ISOs. Games are often ripped in bin/cue, .ecm, and iso formats, and all are compatible with DuckStation. Distributing games over the internet isn't legal, so I will not be linking any sources.
I have a folder with a collection of games in it, so I will add this to my games directory library. Since this directory has folders inside it, I want to say "Yes" to scan recursively.
Step 4: Setting up a controller
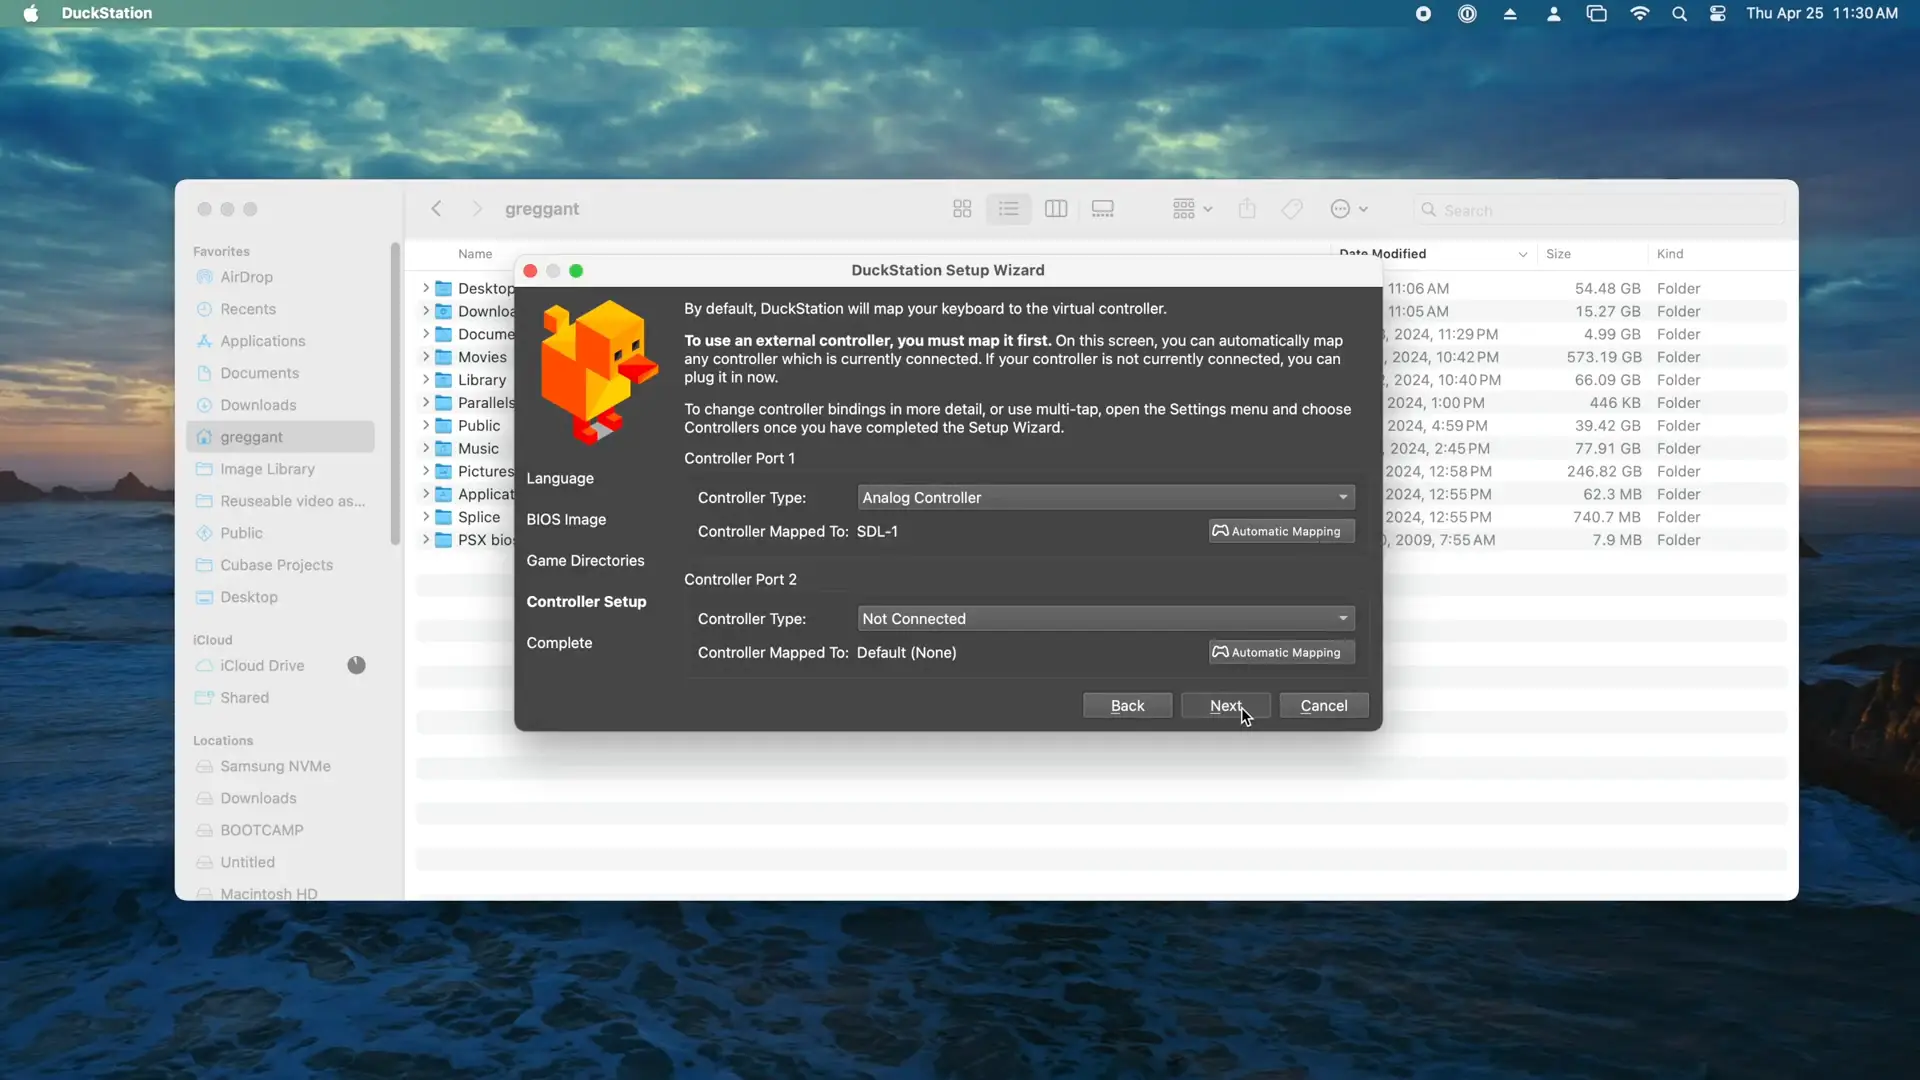
The next thing we'll want to do is set up a controller. The PlayStation had several controllers. Since my controller is a PlayStation 4 controller, I will be using the Analog controller. Using Ventura or later makes Gamepads a little easier to manage. There are tutorials on how to connect a controller wirelessly; I'm using the easiest method, which is USB. Plug it in, and it works. It is also possible to use wireless.
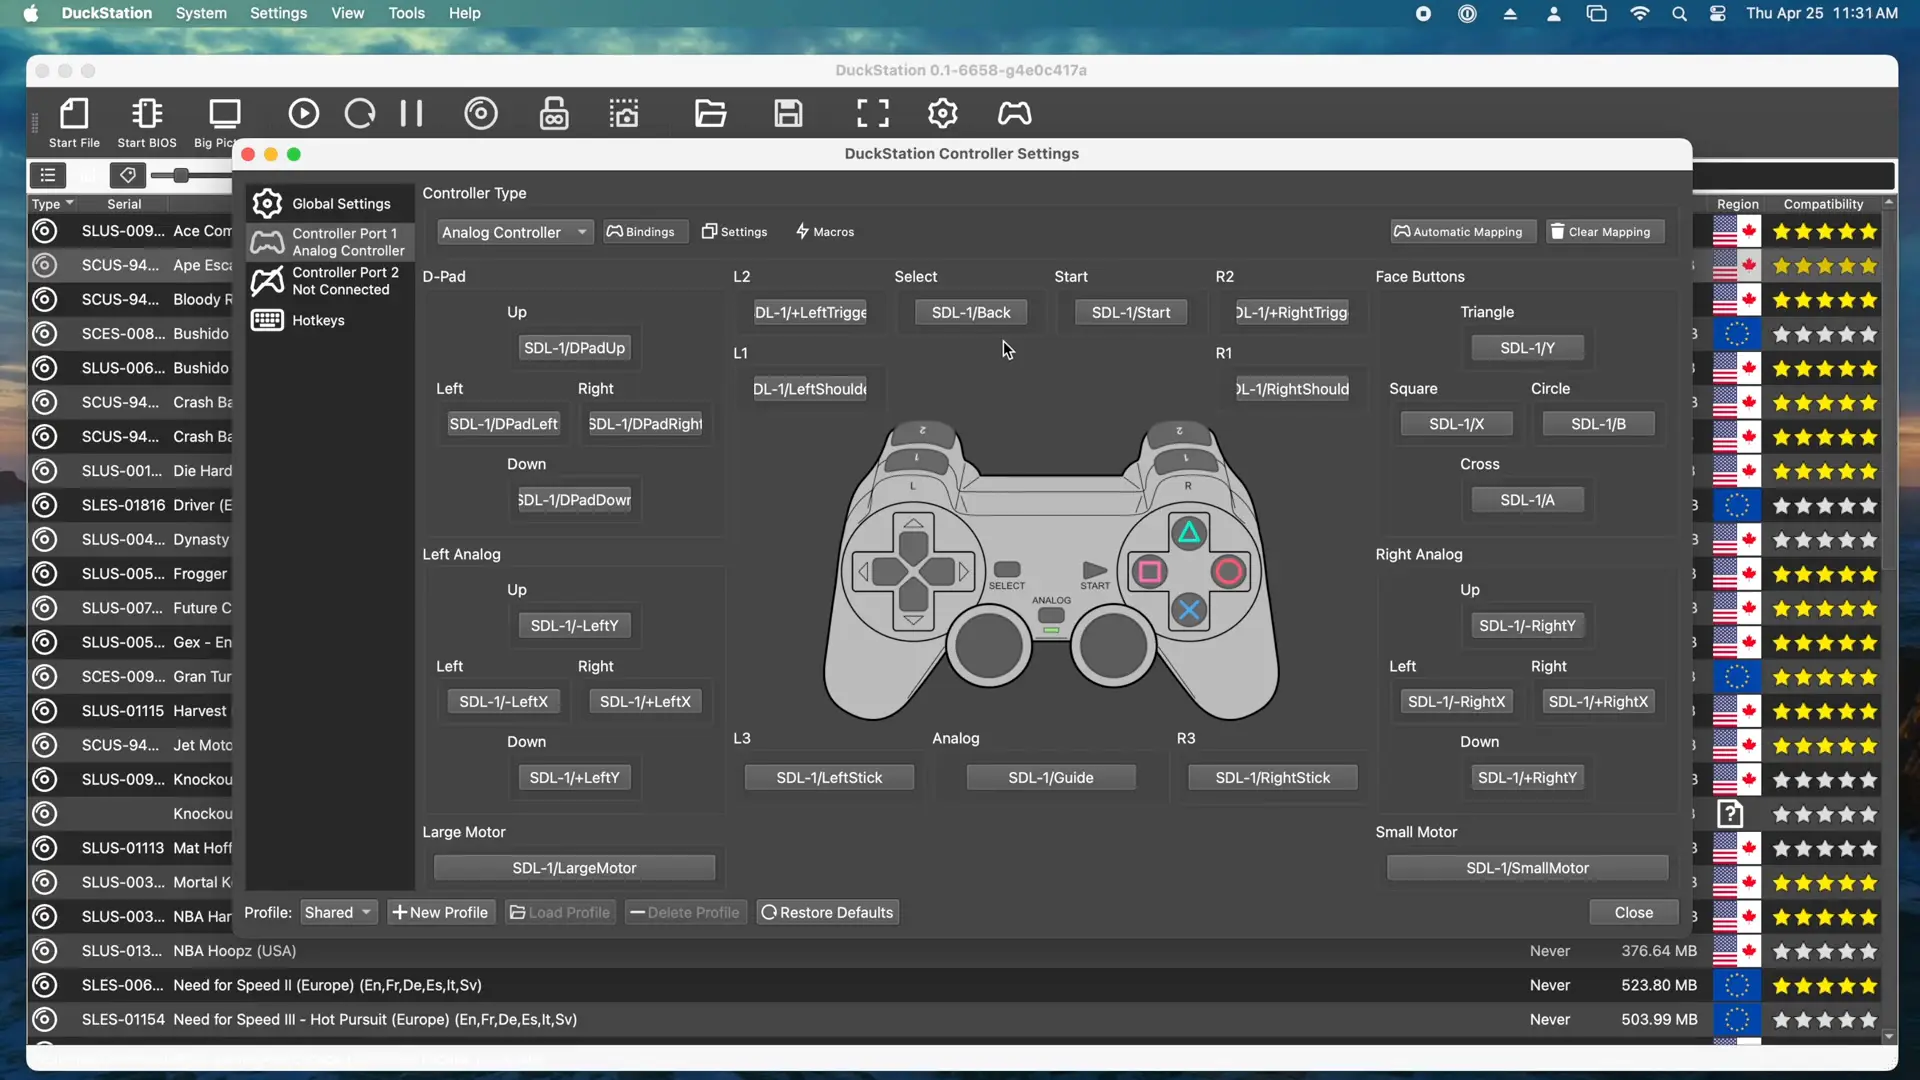
Using the automatic mapping, you can automatically bind the controller buttons. If, for some reason, you cannot use automatic mapping or wish to change a button layout, you can manually map the controller buttons by double-clicking the setting and then pressing the correlating button. It is recommended to use a Dual-Shock style controller as some later games, such as Ape Escape, require them.
Step 5: Improving the Graphics
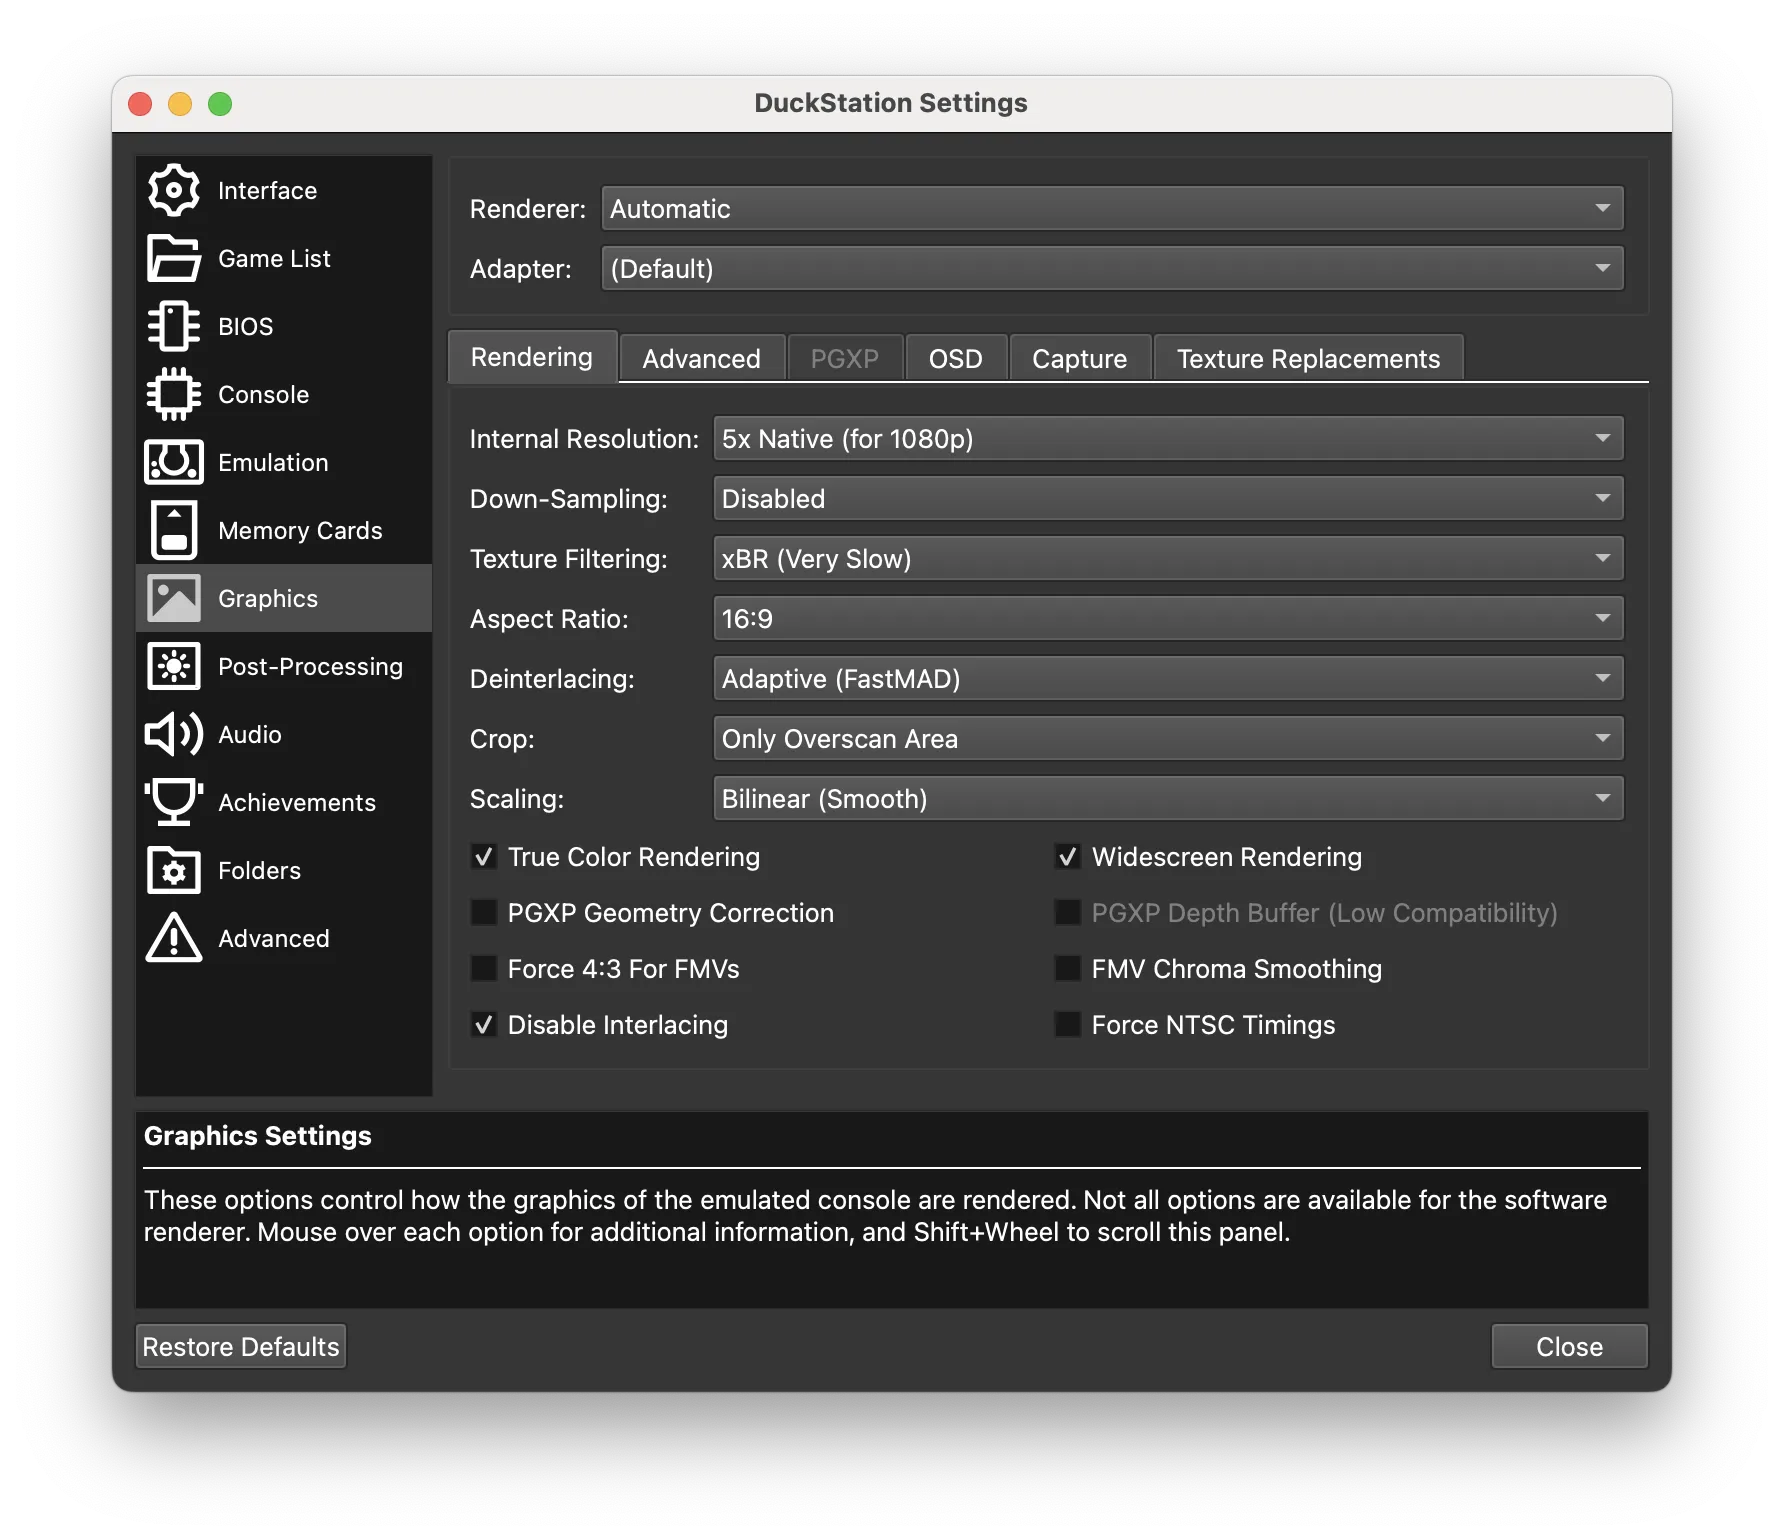
At this point, DuckStation is ready to play games. However, some additional configurations can still be performed.Next, let's go back to the preferences to configure our graphics. Before we get started, go to "Interact" and make sure you have "Apply per-game settings" enabled; that way, you can tweak graphics settings on a game-by-game basis. One of the advantages of the DuckStation emulator is the ability to play games at MUCH higher resolutions. Your mileage will vary; newer Macs with dedicated GPUs or Apple Silicon-era Macs should be able to handle higher resolutions. The video version demostrates the effects of changing these graphical options.
- Internal Resolution: Determines the internal resolution of the rendered image. Higher values increase quality but require more processing power.
- Down Sampling: Downscales the rendered image to fit the screen resolution, reducing aliasing. Disabled means no down-sampling is applied. Used for 2D games
- Texture Filtering: Enhances the appearance of textures by smoothing them. xBR is a specific filter that improves quality but is computationally expensive.
- Aspect Ratio: Adjusts the width to height ratio of the display. 16:9 is widescreen format.
- Deinterlacing: Reduces flickering and artifacts in interlaced video. Adaptive FastMAD is a specific method of deinterlacing. This will be ignored if disable interacing is enabled.
- Crop: Crops the image to remove the overscan area, which is the part of the picture that might be outside the viewable area of older TVs.
- Scaling: The method used to scale the image to the desired resolution.
- True Color Rendering: Enables rendering in true color, providing better color accuracy.
- PGXP Geometry Correction: Corrects geometry errors in PlayStation games. Checking this will unlock advanced PGXP correction options. Recommended if seeking to enhance visual quality. It is not compatible with all games.
- Force 4:3 For FMVs: Forces full-motion video sequences to display in a 4:3 aspect ratio.
- Disable Interlacing: Disables interlacing to reduce flickering in some games. Recommended.
- Widescreen Rendering: Forces games to render in widescreen, potentially expanding the field of view. Compatible with most games.
- PGXP Depth Buffer (Low Compatibility): Improves depth perception in games but may have compatibility issues.
- FMV Chroma Smoothing: Smooths the chroma (color) in full-motion videos to reduce blockiness.
- Force NTSC Timings: Forces the game to use NTSC video timings, which can affect the speed and synchronization of video playback.
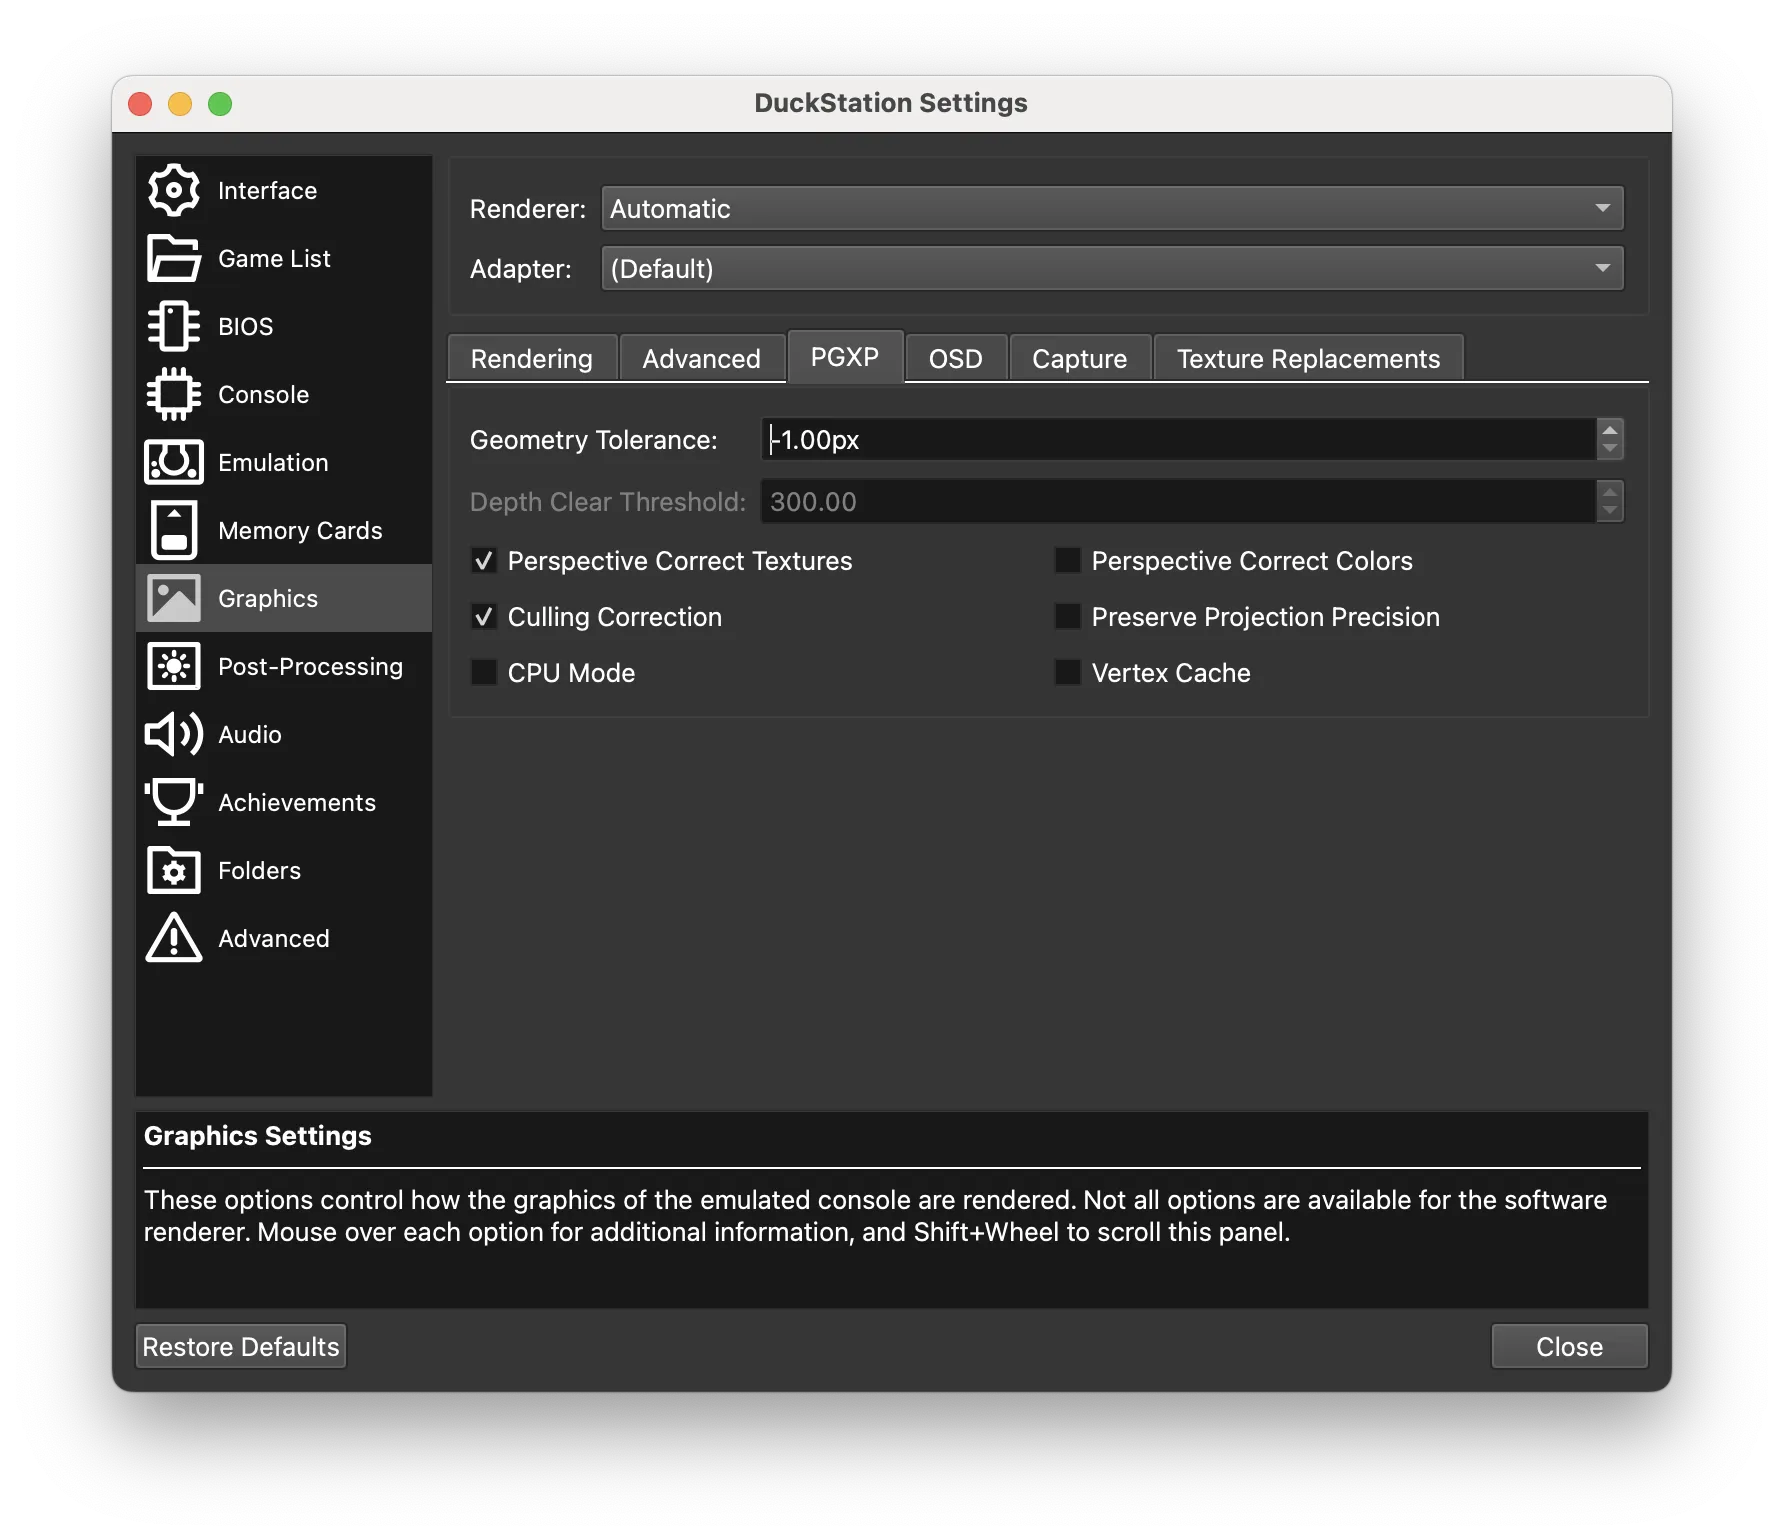
The PGXP tab also adds several options of interest providing a more authentic and visually pleasing experience. Below is a description of options.
- Geometry Tolerance: Sets the tolerance for geometry corrections. Lower values can increase accuracy but may reduce performance.
- Depth Clear Threshold: Threshold for clearing the depth buffer to improve rendering accuracy and reduce artifacts.
- Perspective Correct Textures: Ensures textures are rendered with correct perspective, improving visual fidelity.
- Culling Correction: Corrects issues with object culling, ensuring that objects are not improperly hidden.
- Perspective Correct Colors: Ensures colors are rendered correctly with respect to perspective, improving visual quality.
- Preserve Projection Precision: Maintains higher precision in projection calculations, improving the accuracy of the rendered scene.
- Vertex Cache: Utilizes a vertex cache to improve performance by reusing vertex data.
- CPU Mode: Forces the emulator to use the CPU for certain graphical calculations, which might be slower but can improve compatibility with some games.
DuckStation also provides various post-processing options that allow you to emulate various effects such as simulating a CRT found in the post processing tab. You can mix and match effects.
Step 6: Memory cards
Open up the Memory cards in the preferences. The default option is a separate card per game title, and this is the recommended setting, as you'll never need to think about memory cards. When you launch a game for the first time, you'll need to initialize it. This will not delete game saves for other titles.
Step 7: Emulation settings
You can change the emulation speed, and it does exactly what you'd expect—games play speeds can be altered to the user's preference. The other interesting thing here is Vsync, which prevents screen tearing.
Step 8: Save States
Save states are one of the best things about emulation, as you can literally save a game at any point at an exact moment. Simply go to Save State, and it'll save the game state. Now you can resume back to that point without having to boot the game.
More Emulation Stuff
I've made more than a few blog posts and videos on emulation, related to emulating semi-recent game consoles such as my Sony Playstation 2 Guide.
And finally, my Xbox emulation guide which has a written and video version.
-
Half-Life and it's failed OS 9 port
Half-Life should have existed on the Mac. To be fair, it does, and it did, but it could have much sooner. This an adapted script to a blog post. Below is the original video. This written version includes entire quotes whereas the video version includes more interview clips and actual captured gameplay footage of Half Life.
Half-Life has a strange relationship between OS X and macOS. During the hey of Mac Gaming, popular franchises routinely were ported to the Mac, and of course, Half-Life should be one of those games. In gaming, there are few PC games as critically acclaimed as Half-Life. While it may not have been revolutionary, it certainly represented the evolution as it exhibited a level of polish games rare for the games of its era, where cutscenes were largely integrated into the game through scripted segments, environmental storytelling, subtle cues to enhance immersion and featured fully voiced characters. It even considered pacing as it featured puzzle breaks between action sequences. While it wasn't the first story-driven first-person shooter or the first cinematic game, it encapsulated the best game design of 1998.
It was natural for the game to be ported to Mac OS and OS X, as other high-profile first-person shooters from the era, like the Doom series, Hexen series, Quake series, Dark Forces, Deus Ex, Duke Nukem, and Unreal series, were all ported to the Mac.
Announcement and Cancellation
In April 1999, Logicware under Sierra Studios announced that a Mac OS version was in the works, but by October it was completely canceled. The official reason why the port was axed was given by Gabe Newell, president of Valve, citing the lack of Team Fortress Classic and multiplayer with PC users and fear of releasing an inferior product.
Gabe said the following:
There's been a lot of speculation about Half-Life for the Macintosh - its feature set, its compatibility with the PC version, and so on. Andrew Meggs at Logicware has been doing a good job on the port, and it's mostly done. At this point we've spent a bunch of money on the Mac product and have spent a lot of time thinking about what we need to do to make sure Macintosh users are happy with it when it ships.
Which is why we are canceling the Macintosh version of Half-Life.
When we started Mac Half-Life, there was a lot of optimism about the opportunity for Macintosh games. As someone who worked on Macintosh software starting in 1983 before the 128K Mac had shipped, it was pretty exciting to think that there was going to be a resurgence in the Mac gaming market.
However, as we got closer to shipping the product and reality set in, it was increasingly obvious that in order for us to break even on the Mac version, much less be profitable, we were going to have to cut some corners. OK - I guess we won't have Team Fortress Classic available at shipment. Maybe people will accept it if we update them with TFC later. OK - I guess I understand why we don't have an automatic update facility. Maybe people will accept that they have to manually update. OK - I guess I understand why we might carve out a separate multiplayer space for Mac users from PC users because of the on-going interoperability issues. Maybe that won't be the disaster I think it will be.
But the more I thought about it, the more I felt that this was nonsense. Our existing Half-Life customers are really happy with us. They were happy with the original game, they were happy when we released TFC, they were happy with our on-going investment in Half-Life, and there's even more coming for them in the next couple of months. They are happy because we do our best for them, and that's what they expect from us in the future. Given the realities of the Mac gaming market, our Mac customers were always going to be mad at us. They were always going to be second-class customers where we couldn't invest to the same degree in the Mac version as we did elsewhere. I don't want to be in that business. I would much rather we just eat the money we've spent so far than take money from Mac customers and short-change them.
It's disappointing to me on a personal basis that we won't ship Half-Life for the Mac. Everyone here, and I'm sure the people at Logicware are disappointed. The Mac gamers who were looking forward to Half-Life are undoubtedly disappointed as well. However that's a lot less disappointment than what would have happened if we had tried to get Mac gamers to accept second-class treatment on an on-going basis.
Source: Mac Half-Life Cancelled!
Logicware did shed some light on the situtation the next day. I understand that previous names can be a sensitive topic but I need to clarify in the sources to avoid confusion, the quotes are attributed to Bill are Rebecca. Rebecca of Logicware briefly spoke on the issue, releasing the following statement:
Sigh. Yes, Half-Life for MacOS is cancelled. I'm very disappointed that all the work that was done will not see the light of day or the Mac communities screen across the globe.
Sierra was a pleasure to work with. They have been very helpful and supportive through the entire project and I look forward to doing work for them in the near future.
I still have a glimmer of hope that Half-Life will eventually be on Macs, but for today that hope does not exist.
Please don't ask us for a copy of Half-Life. Please don't ask us to "finish" it. The game belongs to Sierra, not us.
I want to thank Jeff Pobst at Sierra for all the work he did in this project, and Andrew Meggs for all the tireless hours he put into this project to make Half-Life a true Mac experience.
We are still on track for Aliens vs. Predator and this does not affect the project in any way.And after that:
Then I'll say it -- the game was nearly done. Sierra had labeled the most recent build as beta. Single player had been done for some time. We played on a PC server some weeks ago, and had been playing on a Mac server (with both Mac and PC clients) for the last week. The only things left to do were to add some UI screens in the launcher, get the memory usage under control so it could play on a 32MB iMac, and fix outstanding bugs.
Obviously, I can't release the code. It belongs to Sierra and to Valve. If you want to get together a petition to send to them, that's your business, but knowing the full situation I think they would respond mostly with annoyance.Source: Logicware Staff on Half-Life Cancellation, Part II, Inside Mac Games
The Real Reason for Cancellation
For years, this was the accepted narrative. The port was nearly complete but didn't live up to Valve's high standards... that is, until recently, when Rebecca Heineman spoke on the Retro Tea Breaks podcast, covering the ill-fated original port of Half-Life. Below is a transcript of Rebecca speaking about Half-Life.
Apple pissed off Valve. That's the long story short. Because we did such a great job on Quake II, Sierra approached us. Valve was interested in porting Half-Life to the Mac because they had a conversation with someone at Apple, a games evangelist, who said they would sell 500,000 copies on the Mac. Valve thought it was a great market opportunity and decided to commission the port.
They came to us, we looked at the code, gave them a price, and they agreed. They even threw in an early completion bonus: if we finished the game by a certain date, we'd get an extra 20K. So, I dedicated three people to the project. We were all excited about working on one of the top franchises ever and getting it onto the Mac.
Then, three weeks from shipping, when the game was done and we were just fixing bugs, I got a phone call from Sierra. They told me they were canceling Half-Life for the Mac. I was shocked and wanted to know why. They said they couldn't sell the rights at any price but appreciated our work and would pay us in full, including the early completion bonus, on one condition: our silence.
I recommend watching the entire interview with Rebecca as she was formerly the lead developer for Interplay, and worked on games such Wasteland, The Bard's Tale, Out of This World, Wolfenstein 3D ports to the Mac, 3DO and even Apple IIGs. She also was responsible for the Linux port of Doom Legacy and Apple IIGs port of Sim City.
Valve didn't want the bad publicity and preferred letting people think the port was bad rather than revealing the real reason. The truth was that an Apple representative had initially told Valve they would sell 500,000 copies. But as the game neared completion, the actual pre-order numbers from retailers were only 50,000. The Mac gaming market wasn't healthy, and 50,000 copies were considered good.
Valve felt misled by Apple, especially since the original representative had moved to another company. The new Apple rep denied ever quoting potential sales numbers. This angered Valve, leading to an internal policy that no Valve title would ever be ported to the Mac.
We didn't know about this policy and neither did other Mac game companies like MacPlay and Aspyr. They tried to negotiate with Valve, but Valve demanded nothing less than a million dollars, effectively pricing their games out of the Mac market.
We archived everything, and there's a disc in my archives labeled "verboten." If someone finds it, they'll see familiar files and an executable for the 1999 version of Half-Life for Mac. Maybe one day it will see the light of day.So, if you take Rebecca at her word, Valve canceled Half-Life on the Mac over sales figures quoted by Apple, a misrepresentation by a factor of 10x. You can watch the entire interview above. Rebecca's career is impressive as she was also formerly the lead programmer for Interplay, and very much worth the watch.
Other Canceled Ports and Later Developments
Interestingly, it was not the only canceled port of Half-Life as the Sega Dreamcast also faced similar treatment, except unlike the Mac version, it leaked online.

The reason given for its cancellation was changing market conditions, but it had already been delayed more than once. The near-complete versions of the port featured inconsistent frame rates and long load times.
It featured a sub-campaign, Blue Shift, that would be folded into future releases of Half-Life.
However, Half-Life wouldn't stay away from the Macintosh platform forever, as in 2013, Valve finally released Half-Life for the Mac.
Valve and Apple: A Rocky Relationship
A few years later, Valve again soured on Apple. Famously, Valve originally intended to release Proton for macOS. For those who aren't familiar with Proton, it is a compatibility layer that translates Microsoft's DirectX graphics library to Vulkan instructions, allowing Windows games to be played on Linux. It powers the SteamDeck and has ushered in a new era of Linux gaming.
Andrew Tsai has an entire video on the subject, in the description. Apple and Valve went as far as to feature SteamVR in the WWDC 2017 keynote, but then the relationship soured again due to Apple's moving goalposts. Apple dropped OpenGL and 32-bit support and did not adopt Vulkan graphics API. Valve wasn't alone in this complaint, as Apple has never been able to amass a library of games due to constant breaking changes in OS X and macOS.
Playing Half-Life on the Mac Today
You can experience Half-Life on the Mac today using Mac Source Ports - Xash3D FWGS. However, it requires a copy of the "valve" folder from a PC install of Half-Life to be placed into "~/Library/Application Support/Xash3D". This will work on modern macOSes.
- Intel Mac owners running 10.9 - 10.14 can install the official port of Half-Life on Steam.
- Intel Mac owners running 10.5 - 10.8 can install the legacy Xash3d port on Macintosh Garden. However, this port will not work under modern macOS.
- PowerPC Mac users can install the Xash 3D alpha on 10.4 - 10.5. It has a few asterisks as there are some texture issues and it requires an OpenGL 2.0 compatible card.

Xash3D isn't the only way to experience Half-Life on the Mac. With Crossover, you can play Half-Life and it's less picky about which version you use.
Conclusion
It's unlikely we will ever see the official port of Half-Life that was done by Rebecca and her team, which is sad. Due to the relationship between Apple and Valve, I wouldn't count on Valve making official Half-Life ports again.
If you're into retro Mac gaming, I've made a video about a cursed port of Grand Theft Auto 3 for PowerPC Macs and one about the history of Connectix Virtual Game Station, embedded below.
Additional Mac Gaming stories
-
What the Hell is a Neural Engine?
This following article is an adapted script from my YouTube Video: "What the Hell is a Neural Engine?"
If you've purchased an iPhone or iPad after 2017 or an Apple Silicon Mac, it has the Apple Neural Engine. The short answer to my rhetorical question is that the ANE was initially designed for machine learning features like FaceID and Memoji on iOS and debuted on the iPhone X with the A11 chipset.
Machine Learning uses the power of algorithms and statistical models that enable computers to perform tasks without explicit instructions. Machine Learning learns to make predictions or decisions based on data, known as training. The learning process generally involves feeding large amounts of data into the algorithm, allowing it to learn and improve its accuracy over time. It varies a lot, and training can take on many forms, such as using tagged data and/or unsupervised learning or Neural Networks. For example, Large-Language models use a mixture of unsupervised and supervised fine-tuning and, later, human reinforcement when stealing the collective works of humanity.
Machine learning is used in mundane tasks like email filtering to catch spam or more exciting things like computer vision, such as the ability to identify objects in photos. With the AI choo-choo express hype train, many machine learning and neural networks are being rebranded as AI.
Machine learning requires a lot of computing power, and CPUs are not the most efficient at training and executing machine learning. For example, GPUs are parallel processors that can quickly execute millions of certain math operations in a single clock cycle; thus, they are much better suited for the needs of machine learning.
Apple designed the Apple Neural Engine (ANE) to supplement certain types of machine learning tasks, both in training and executing, using CoreML.
It's essential to understand Core ML, Apple's machine learning API, doesn't exclusively utilize the ANE; it leverages the CPU and GPU and, if present, the ANE. To quote Apple,
"Core ML then seamlessly blends CPU, GPU, and ANE (if available) to create the most effective hybrid execution plan exploiting all available engines on a given device. It lets a wide range of implementations of the same model architecture benefit from the ANE even if the entire execution cannot take place there due to idiosyncrasies of different implementations." Apple.com - Deploying Transformers on the Apple Neural Engine
This means when using CoreML, it will automagically use all the tools it has available. The advantage of this approach is that developers do not have to worry about programming for various hardware configurations. If you use Core ML, you're likely getting the best performance, regardless of the device the tasks are being executed on.
Unlike, say, a GPU, there is no public framework for directly programming on the ANE. There are some esoteric projects designed to measure the Neural Engine performance, and so are not-so-esoteric ones like Geekbench ML, which does not seem to properly isolate the Neural Engine.
Apple has provided some graphs and has stated that the M1's Neural Engine could perform up to 11 trillion FP16 operations per second, the M2 and M3 neural engine process up to 15.8 trillion operations per second, and the M4 can do 38 trillion operations per second.
The ANE isn't just an accelerator for floating point math; it's better thought of as a low power consumption optimizer as it can be leveraged for certain types of ML tasks. It's faster and uses much less memory, less power allowing for on-device execution of machine learning tasks.
NPUs
The ANE is not unique to Apple as it is generally considered a neural processing unit, or AI accelerator, or NPU. Neural processors can be found in the AI engine of Qualcomm Snapdragons, the NPU of Samsung's Exynos, and the Da Vinci NPU of Huawei's Kirin. There's a common thread that many readers probably noticed with the aforementioned chipsets: they are all ARM-based. The lack of NPUs for x86 has to do with several factors, the first of which is that x86 hasn't been found in extremely low-power devices like phones and wearables, where every watt counts. The second reason is the existence of exceptionally powerful dedicated GPUs in high-end computers. GPUs can perform the same operations as an NPU and perform more operations, making them more useful for both training and executing machine learning tasks at the cost of a higher TDP. The M4 ANE has 38 Trillion operations per second, but high end Nvidia GPU can hit 1,300 Trillion operations per second.
Another reason why NPUs aren't typically found on x86 are the type of AI tasks that NPUs really excel at, like facial recognition and computation photography, which doesn't really exist on desktop computers. Lastly, for serious AI tasks like model training, buying expensive GPUs or leasing computer time on cloud services with hardware acceleration would be more effective than designing NPUs for x86.
However, we're seeing a shift in the role of machine learning on desktops with the rise of "AI" and more and more demand for the raw compute power required for AI. Windows 11's questionable Copilot + requires 40 trillion operations per second.
What is an NPU exactly used for?
Let's use a real-world example. Core ML is a foundation for Apple's computational photography. As everyone hopefully is aware today, when one snaps a photo, there is no longer anything such as "no filters," and billions of operations are performed to process the image, including everything from face detection to color balancing, noise reduction, smart HDR, video stabilization, emulating depth of focus in cinema mode, and scene analysis. This requires millions of operations to happen, in real-time or near instantaneously. Rather than send the matrices of floating-point operations to the CPU and GPU, the Neural Engine can take on heavy lifting.
These are incredibly dense operations, like scene analysis, which might sound simple, but Apple has developed an entire ecosystem called Apple Neural Scene Analyzer or ANSA. This is the backbone of many features like the Photo app's Memories, where images are tagged, aesthetics are evaluated, detection is done for duplicates or near duplicates of photos, objects detected, and locations are grouped. This is all done on the devices using another principle Apple calls differential privacy , where Photos learns about significant people, places, and events to create memories while protecting the anonymity of the users. Exploring how Apple's memories work probably should be an article in itself. While this feature makes extensive use of machine learning, it's not dependent on the ANE alone; instead, it assists in performing the analytics.
However, it's hard to evaluate how much of this chain occurs on the ANE. That's due to the lack of information Apple has published. One can find frustrated developers complaining about the lack of info. One of the main sources for information is The Neural Engine — what do we know about it?
The TLDR is that the neural engine is an on-device Neural Processing Unit part of Apple Silicon that is leveraged for machine learning along with the CPU and GPU. It's very good for certain math operations and is partially a power-saving mechanism designed to assist low power computing, rather than utilizing a more power-hungry GPU.
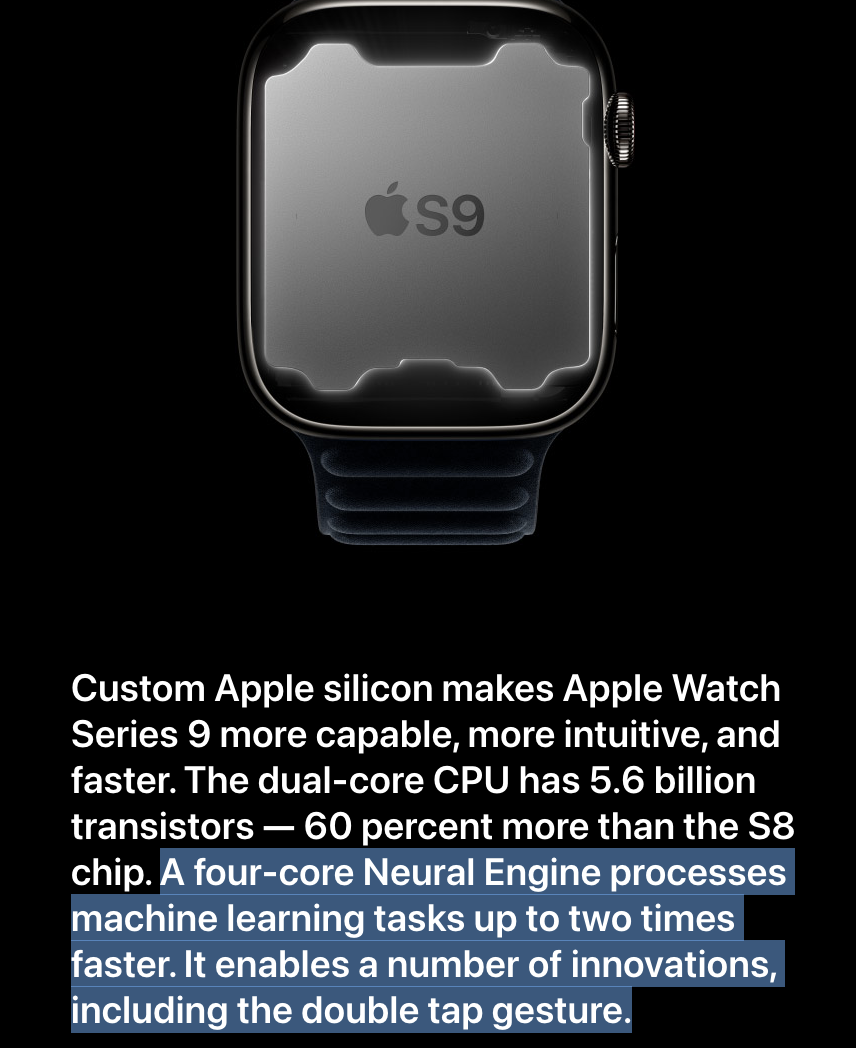
This is especially the case with the Apple Watch, which needs to be ultra-efficient. Since the series 4, the Apple Watch line has included a stripped neural engine to assist with faster on-device processing of inputs. In Apple's marketing material for the series 9 Apple Watch, Apple suggests that the Apple neural engine is even used for the double tap gesture.
It will be interesting to see how Apple leverages it in the future. It seems increasingly likely that Apple will be doing some of its AI using cloud services. Also, AI functions are very RAM intensive. In a recent video, I demonstrated the limitations of 8 GB of RAM when a Mac mini m1 was bested by a Mac Pro 2013. Apple may regret shipping low RAM configurations.
This year's WWDC was very focused on Apple Intelligence, Apple's branding on AI, a term that gets increasingly obfuscated day by day. Apple plans to bring AI on multiple fronts, running local AI models and upchaining requests to the cloud when local isn't enough. There are a lot of questions to be answered on how well this strategy will work, and perhaps when you read this, many of them will be answered. One minor reveal is that only M series Macs and the A17 Pro, as of recording, are confirmed to support Apple's AI strategy.
There are plenty of posts and videos breaking down the features of Apple Intelligence. Still, just as a refresher, they included generative text editing, generative AI for uninspired images and emojis, with one truly dystopian example on the iPad where a stylish sketch is turned into a soulless rendering, some very impressive natural language interactions, and personalized notifications. It's very unclear when and which interactions are on-device, but on-device services likely include dictation and personal contexts, and some of the textual generation; by that, I mean Siri responses. This, of course, will be revealed in the upcoming months. If executed well, it will be the most cohesive and useful AI strategy we've seen by any major company for everyday people, but I expect growing pains.
We should fully expect more emphasis on the NPUs moving forward, but companies haven't managed to communicate effectively the value of NPUs or what they do to consumers and are often cagey even towards developers. This is certainly not the first time a coprocessor was nebulous to its potential buyers, be it early GPUs or math coprocessors, and if anyone remembers the failed attempt at selling Physics processing units for gaming.
Training and FP16
In Apple's AI page, the Neural Engine isn't mentioned as part of the chain used for do-on-device training. This is likely because the ANE is primarily optimized for the execution (inference) of machine learning. This is evidenced by it only supporting FP16, GPUs and CPUs can execute FP32 which is higher precision, which is needed for many small adjustments from the gradients calculated during backpropagation. CPUs and GPUs can do mixed precision training, where FP16 data can be converted FP32 when more precision is needed.
To translate that back to human, NPUs in consumer devices are targeted for running existing models as opposed to creating new ones. The ANE is not for AI model creation for developers.
None of this should be a surprise. As I stated earlier in this article, typically if one was performing serious ML training, one have a very expensive GPU step-up or lease cloud computer time.
Without going too deep into computer science, 1 bit can store two values, 2 bits can store 4 values, 3 bits can store 8 and so on. 16 Bits can store 65,536, and 32-bit can store 4,294,967,296.
For non-whole numbers, such as those with decimal points, one would need to express where the decimal is. For example, 1245678 could be 12.345678 or 123456.78. A floating point format is used to handle this by specifying the decimal's position. This involves components like the mantissa and exponent, but in essence, it allows the number to 'float' to where the decimal is needed.
In machine learning, different bit depths are used, and a 16-bit floating point (FP16) is popular because it offers a reasonable balance of accuracy, memory usage, and processing power. Models can be quantized from 32-bit to 16-bit, trading some accuracy for performance. This process is similar to downsampling a 24-bit image to 8-bit rather than simple rounding.
Apple now provides developers with the App Intents framework, which opens up applications for interactions performed by Siri using the personal context awareness and action capabilities of Apple Intelligence. This allows developers to integrate features based on predefined trained models without having to create their own. How useful and widely adopted this is remains to be seen.
-
Become an art legend with your Mac, iPad or iPhone
This blog post is adapted from a video version of my Draw Things Tutorial, a stable diffusion application avaliable on the Mac, iPhone and iPad via the App Store.Using any of these devices, you can follow this tutorial. Draw Things is a frontend, or a graphical user interface, for Stable Diffusion.
AI art generation is pretty CPU and GPU intensive, so for anyone using older devices, this may or may not work. The screen captures are from an iPad M2 but the Mac version looks exceptionally similar.
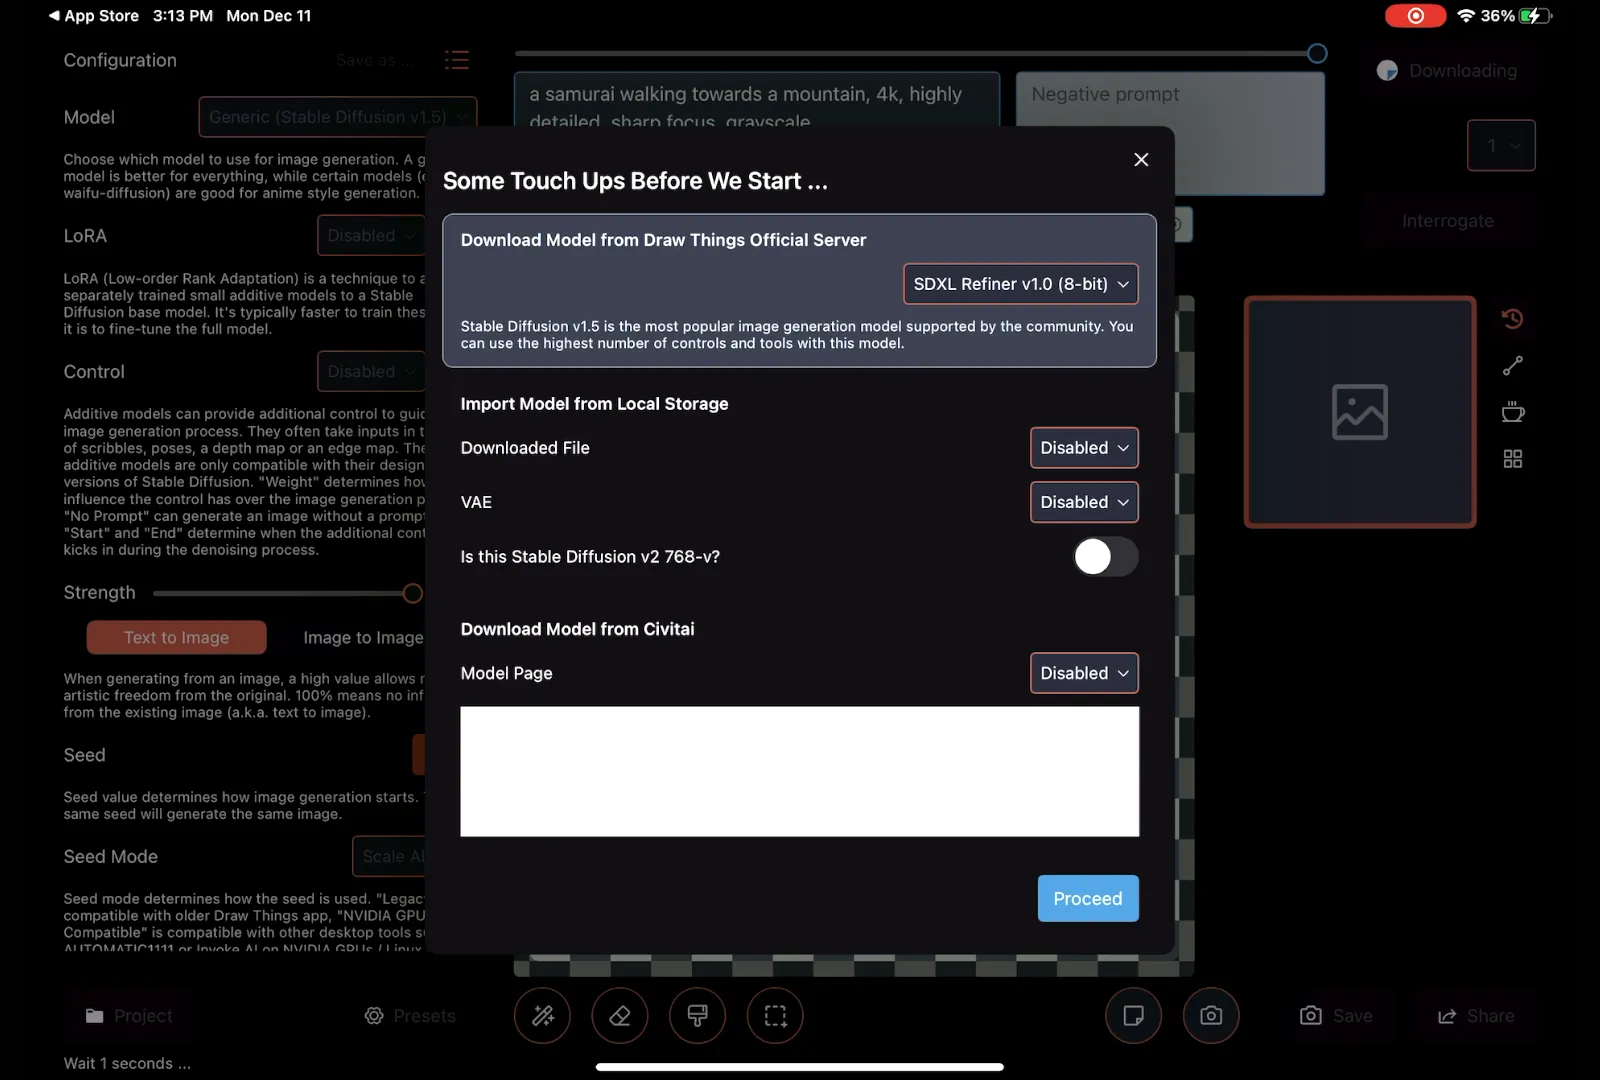
When you first launch the application, you will need to download what is known as a model. A model in machine learning, such as Stable Diffusion, is a trained neural network that has learned to generate images by analyzing extensive sets of images and text. To translate this back into human-peak, each model uses different sources for images and text. This radically changes the sort of images that a model can generate based on prompts. Some people create different models based on art styles or content. Some of them are really good at people, some are general-purpose, some are really good at meme-making, different styles of illustrations, and some are photorealistic. They also vary quite a bit in quality.</p
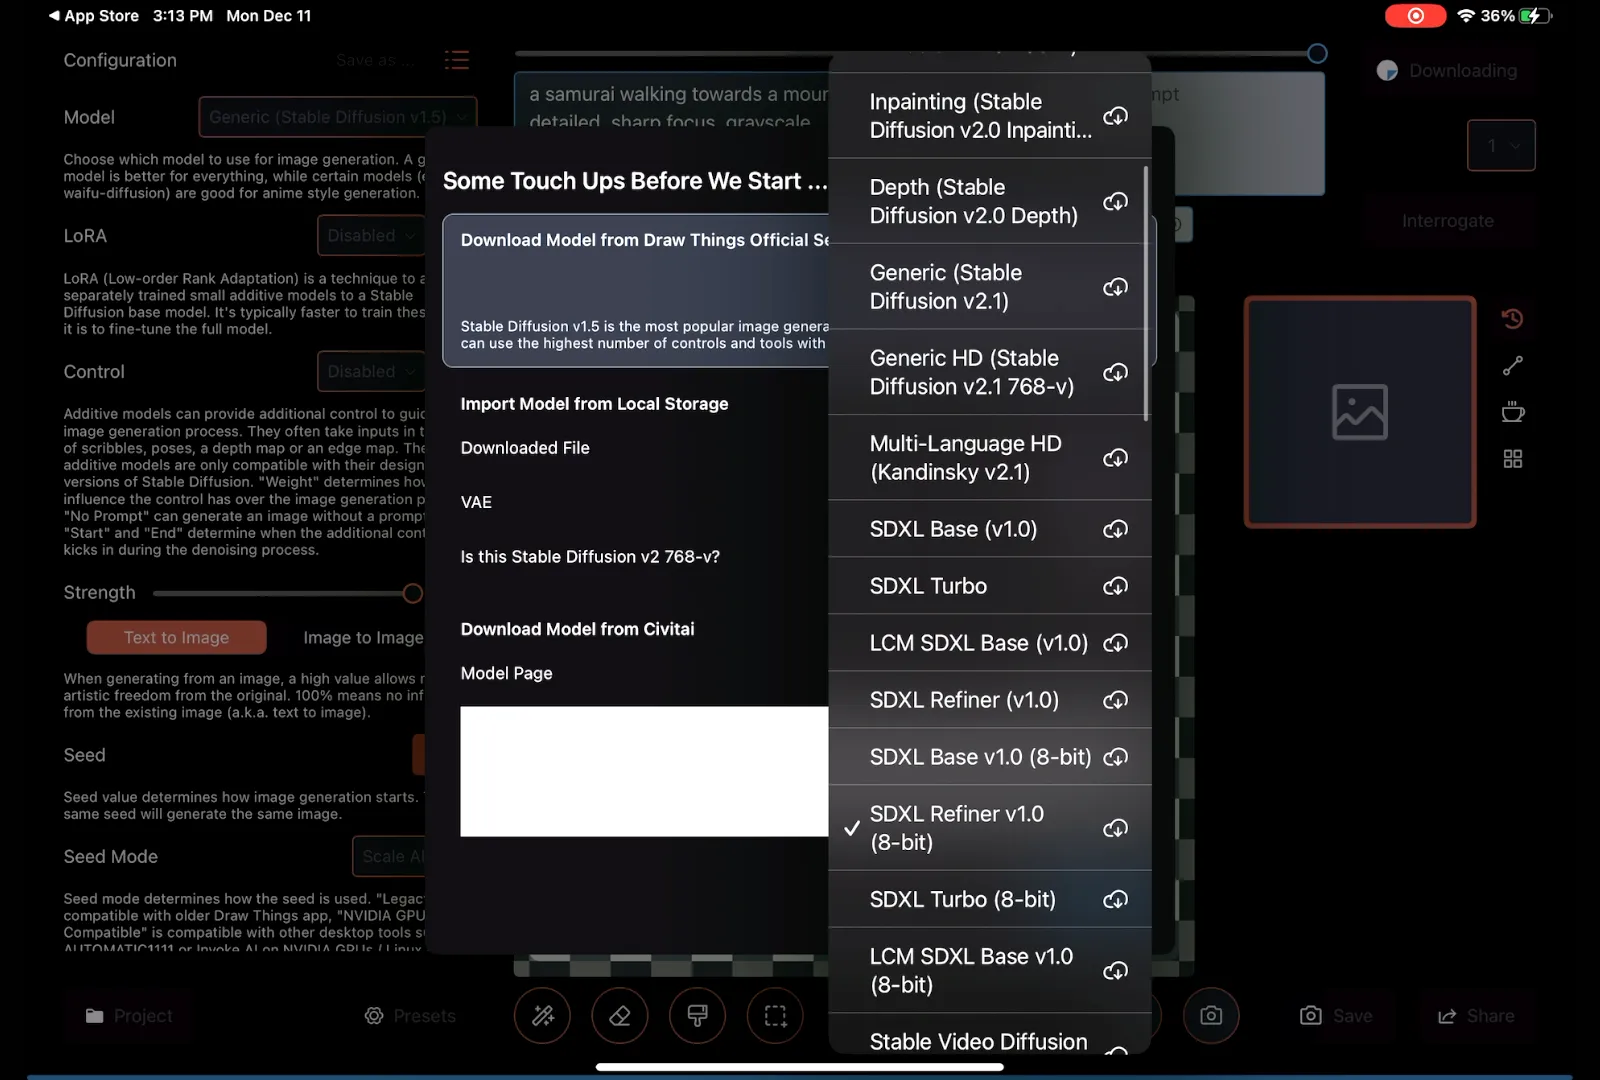
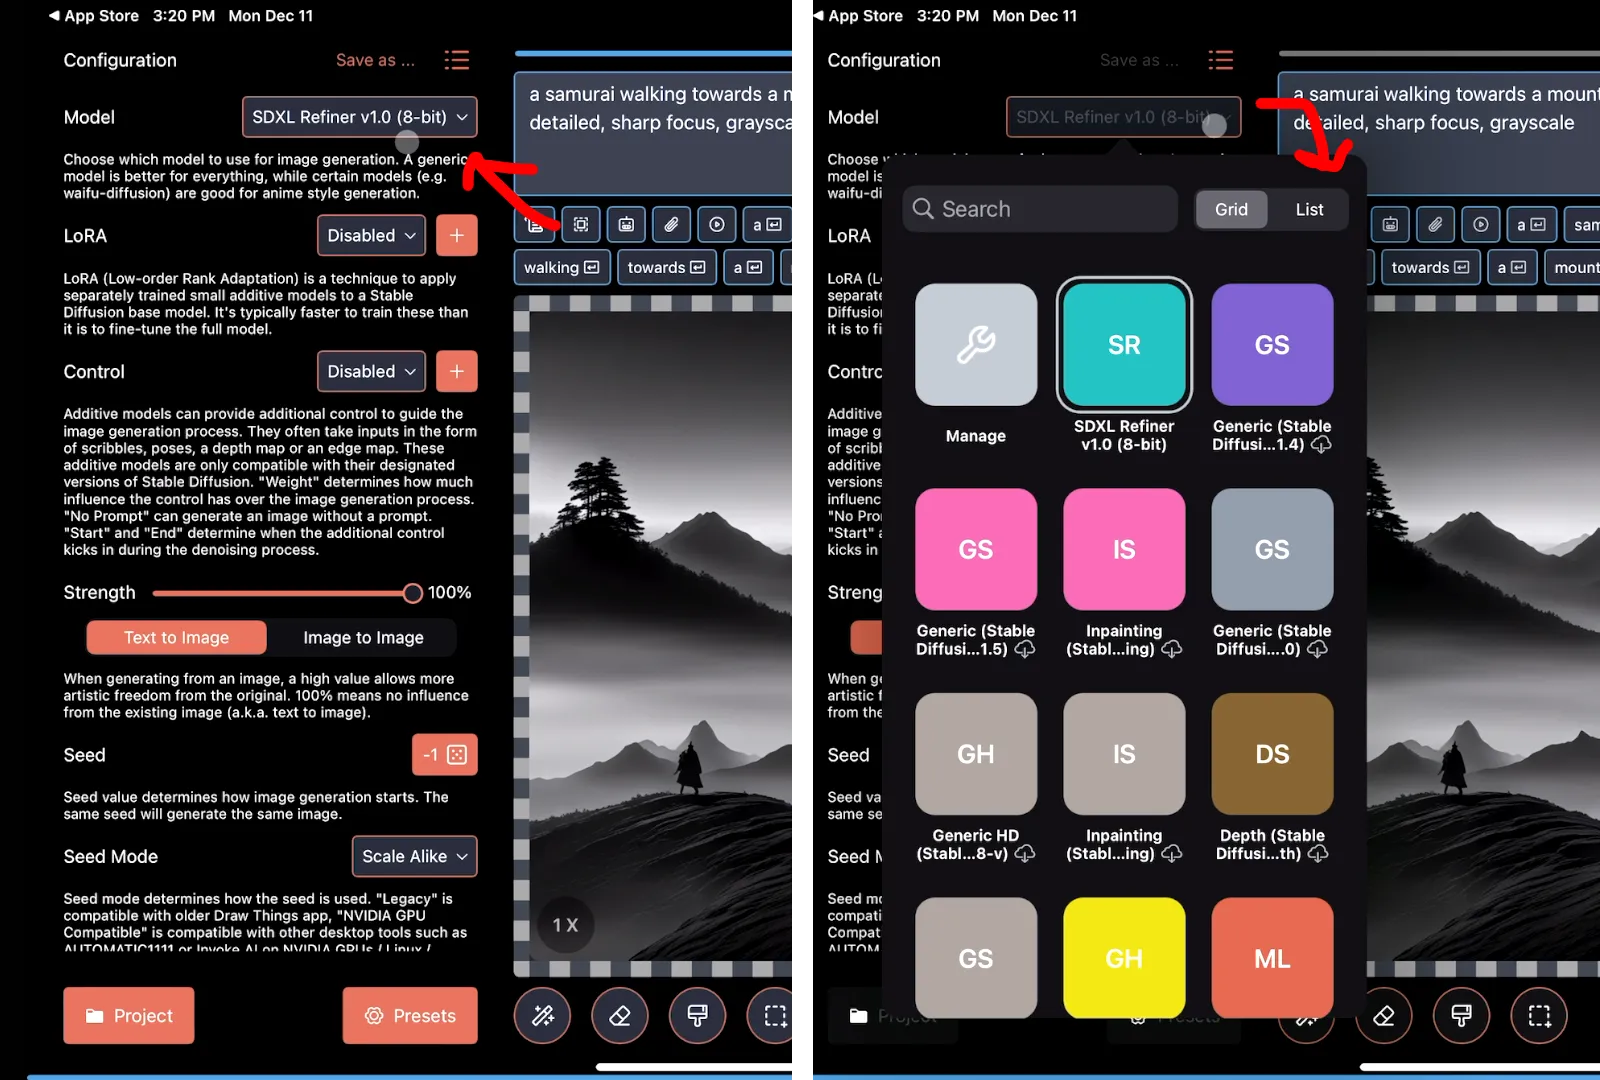
> If you click on the model, you'll see quite a few models available, but what we want is to start with SDXL Refiner. SDXL Refiners is by Stability AI, the people who created Stable Diffusion, and it's very general-purpose and generally pretty high quality.
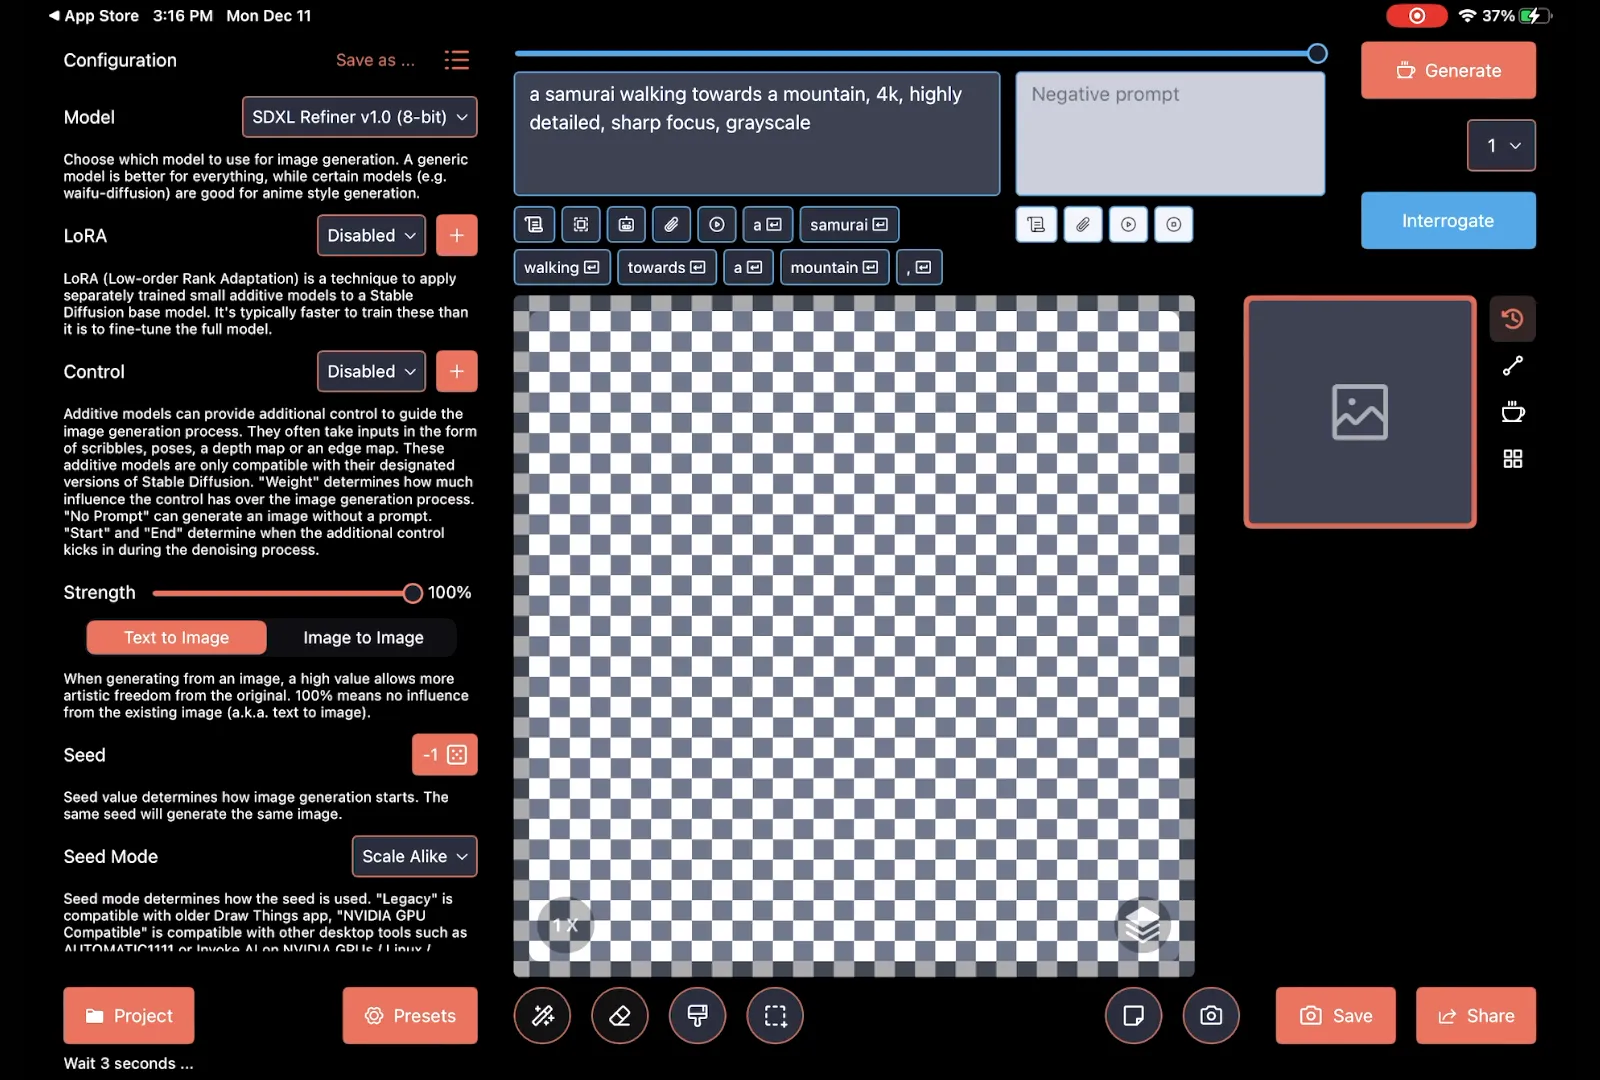
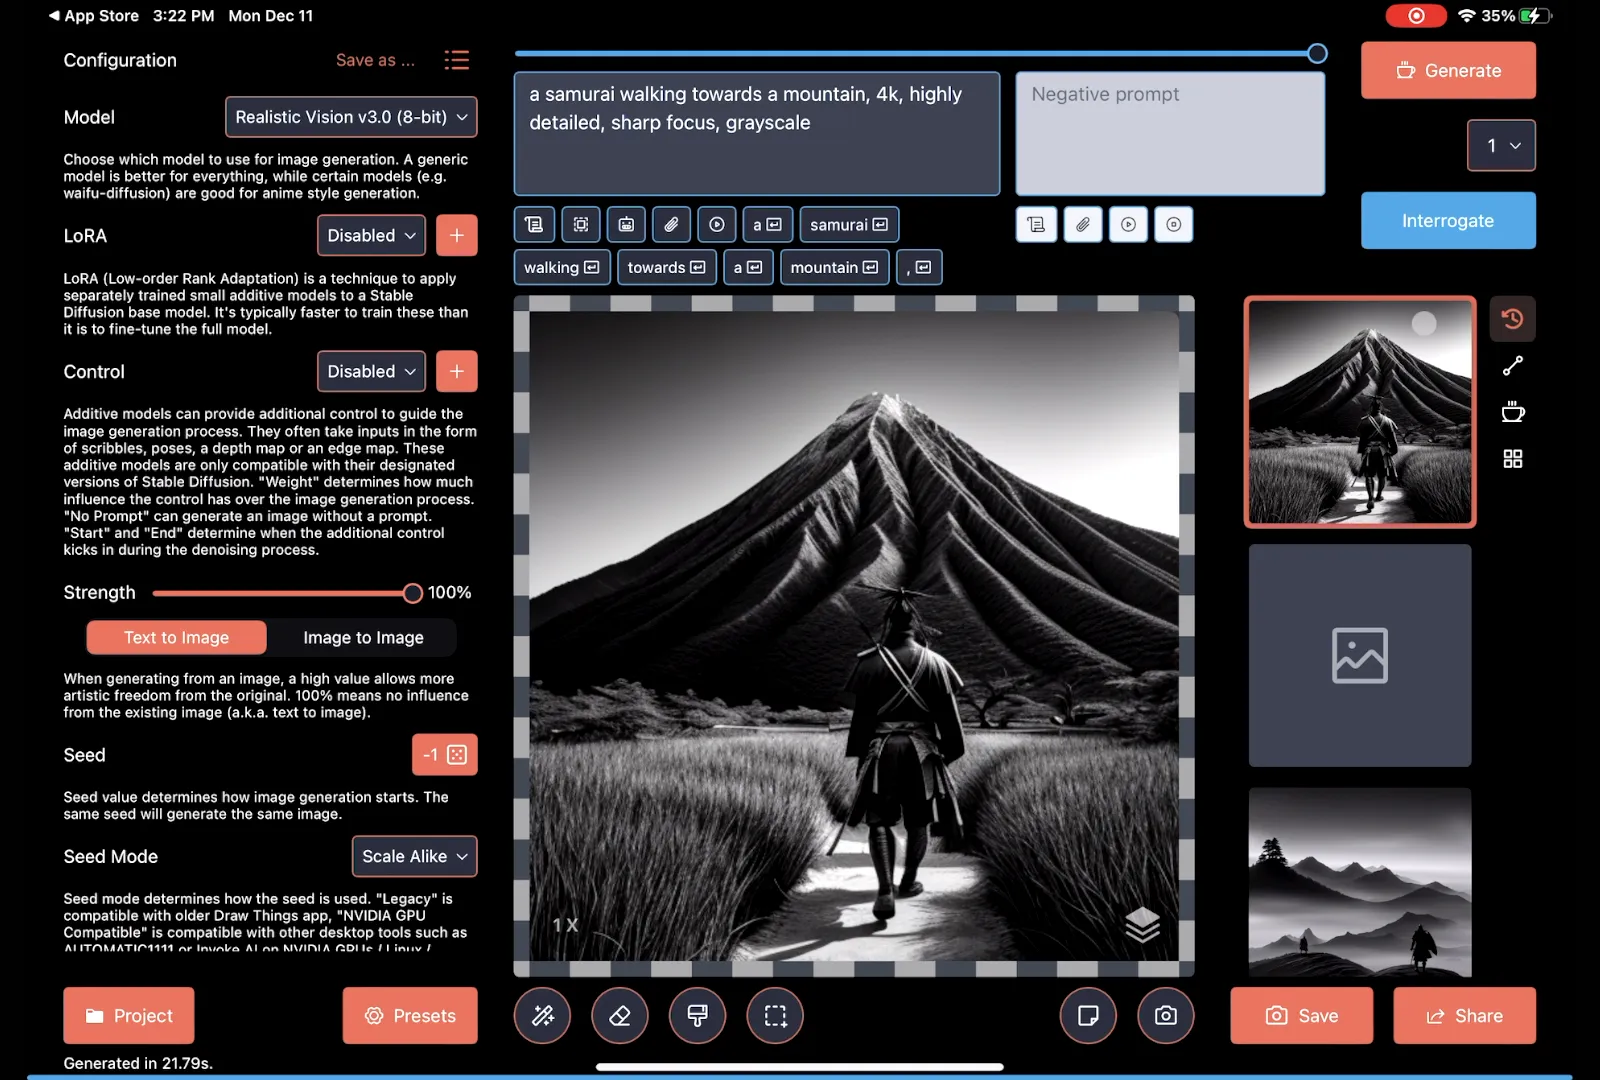
The interface looks kind of confusing, but we can see that there's a default prompt. The text on the screen, the prompt, is the thing we'd like to see. Right now, the default prompt says, "A samurai walking towards a mountain, 4K, highly detailed, sharp focus, grayscale.". If I click generate, I will see the following:
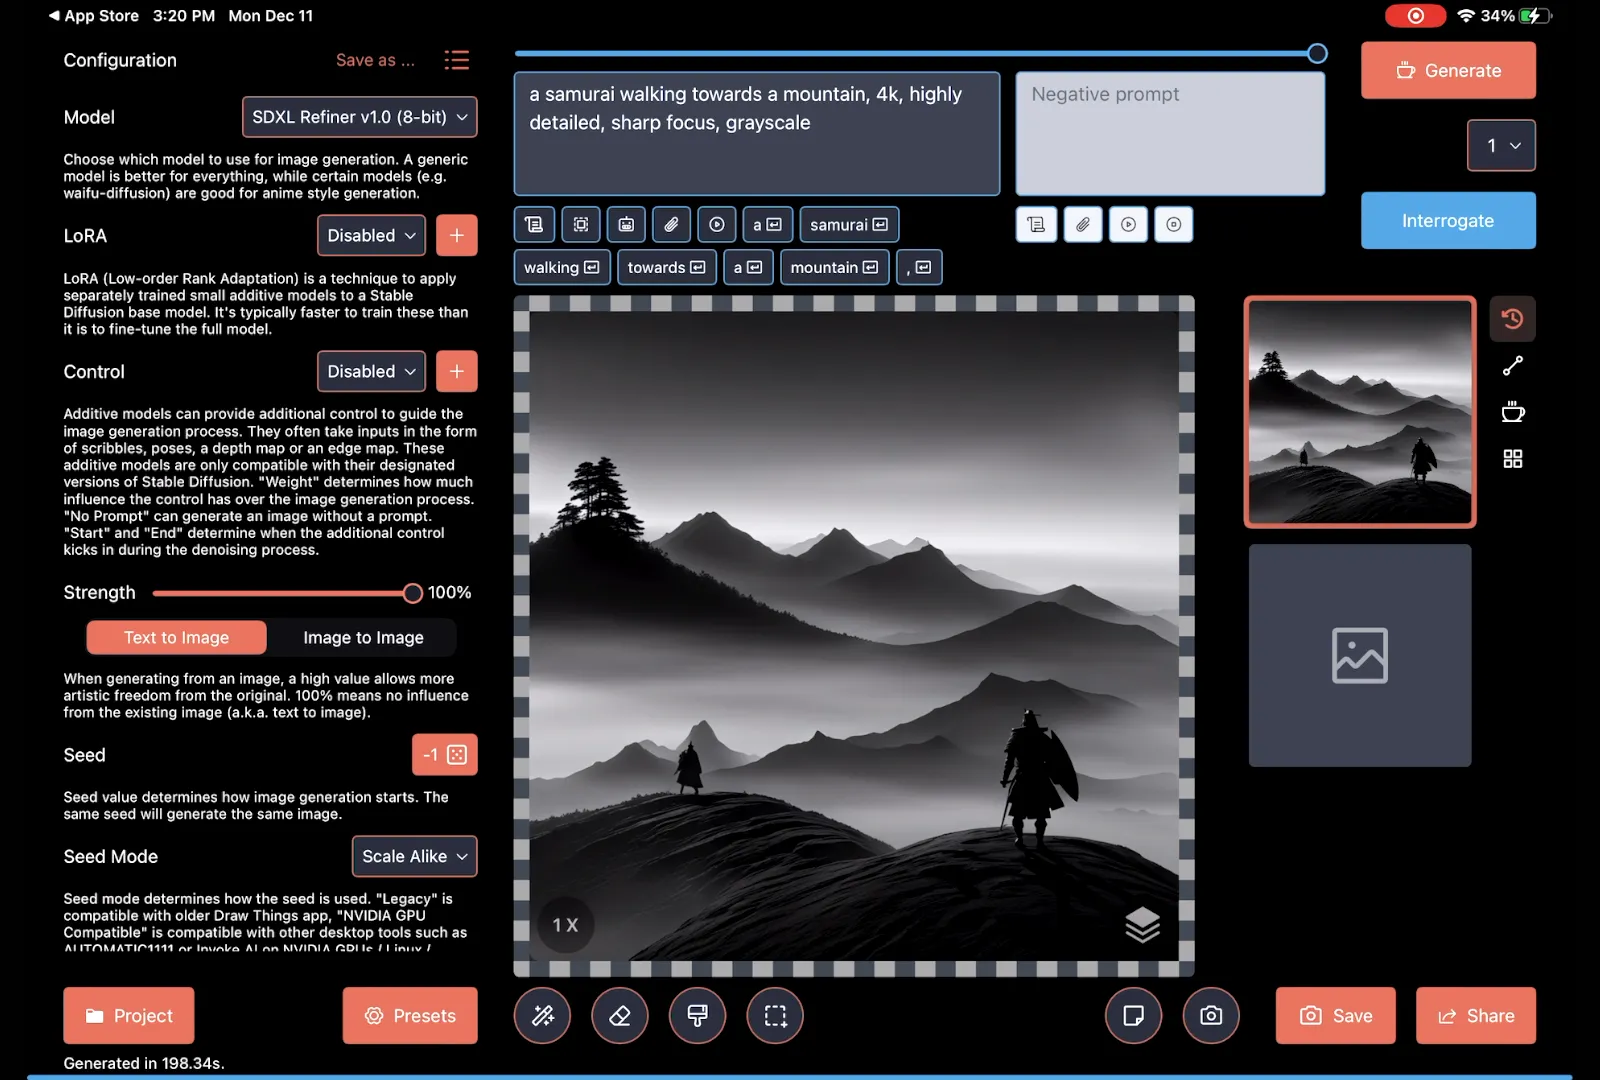
We could continue to use this same prompt and generate more images that would be similar in nature. If we were to change the prompt, it would change the content of the images that it's rendering. To reiterate that, if you type something in and hit generate, it'll spit out an image. That's pretty simple, so let's do something a lot more advanced. Since we are just talking about models, let's download a different one. This is done by tapping the model name to bring up the menu.
I can switch the model and download a new one. For my example, I'll use "Realistic Vision version 3." Realistic Vision focuses on rendering images of humans. Then I'll generate an image with the same prompt again.
The results again are fairly interesting.
Now, let's try altering the prompt and adding a negative prompt. Prompts are the results you want to see, and negative prompts are the results you don't want to see.
Inpainting lets us fill in missing pieces to an image. However, you need an inpainting model, so let's download one. I hope they change this in future versions of Draw Things, but right now, the grid layout is worthless. I can't read the full file names, so let's switch to list view and search for the inpainting. This is still not perfect, but at least now we can see 1.5 versus 2.0. By the time you watch this, some of these version numbers may have changed, so just keep that in mind. Usually, the newest version is the best, so I'm going to download the 2.0 version.
Draw Things has a few basic image editing options, and one of them is the erase tool. Click on it and let's erase this guy's face. Now that I've completely erased his face, it's time to adjust the strength. I could put this at 100%, and it'd probably do a reasonable job of filling in this guy's head. I am going to adjust this to 90% because I want it to look somewhat like our samurai. One last step, I'm going to adjust the text guidance. The on-screen description is a very good explanation. The higher the text guidance value, the more it will try to follow your prompt. If you want to know more about it, there's a fantastic article on GetIMG.
It can't always do a perfect job. Some models have inpainting versions, so you can download the matching inpainting version and have much better results. In this next section, we're going to try to incorporate real-world photos that we've already taken. I have a picture of my cat, Jeff, in Pixelmator on my iPad, and I'm going to remove some unwanted stuff from this image. Now that I've saved it, let's import it into Draw Things.
First, let's click the new page to create a new canvas, then click the camera icon so we can import Jeff's photo from our photo library. I'm going to speed through switching the model, typing up a description, resizing the image, and then setting the strength to 70%. Now it's time to finally talk about steps.
Get img.src: Time over time, Stable Diffusion improves the image, but there is a law of diminishing returns. This interactive graphic explains this better than I can do with words. Get IMG recommends roughly 25 steps. This number of steps is generally a good balance between quality and time. Each step is essentially a refinement of the image. The more steps, the more refined the image becomes. However, after a certain point, the improvements become less noticeable, and you reach a point where additional steps may not significantly enhance the image. It's important to experiment with the number of steps to find the sweet spot for your specific image and desired outcome.
I'm going to lower mine to 28. Let's speed through a few more last-second updates, and now we're ready to generate. While it's not Jeff, it definitely took some inspiration from him. Now, I like this image, but I wish it just wasn't square. Well, we can fix that. If you notice, when we zoom out, there's still the carpet background from the previous image. I could use the eraser tool, but it's just easier if I save this image and start a new canvas.
So, let's re-import the generated image. As we previously explored with the samurai, the inpainting will paint in the missing pieces of the image. Let's resize the image and move back to inpaint as our model. On second thought, I think I'm going to change the image size just a bit. I decided to off-center this image slightly so it would render more to the left of the cat. The final step is to change the strength back to 100%, which might seem counterintuitive, but watch the results. The results are actually pretty good, except for there's a line in both the images. I've zoomed in so you can really see it.
Since I'm rendering all my images to my iPad, I can go into a program like Pixelmator, open up the image, and start touching it. In Pixelmator, I can use tools like the heal tool to remove the line, use the sharpen tool to give the face a little more detail, and then even go through with the warp tool and give the cat a bit of a tummy tuck, since this is kind of a weird render. The end result is impressive, although the cat only has three toes now.
Let's revisit models once again, but this time, we're going to download models that aren't included in Draw Things off the internet. If we click the models, we can then click manage. Realistic Vision 3.0, I know for a fact, has a later version. I'm going to delete the Realistic Vision 3.0 by clicking the trash can. There are a lot of options when importing models into Draw Things, and that's unfortunately just a quirk of Stable Diffusion. I'm not going to go into all of these because it gets really complicated, but just be aware, some models do require tweaking these settings. The thing we're most interested in is "Downloaded File." If we click it, we can enter a URL to a model.
Let's cancel out of this and go to Safari. Probably the most popular host of AI models is Hugging Face's Model Hub or another similar platform. I'm not sure how it's said. From this website, we will search for Realistic Vision. This particular model is right now version 6.0 beta 1, and if you notice, it also has an inpainting version, but for this video, we're just going to download version 6.
We will do this by clicking the download icon and then copying the link. For the Mac users, you can just download this file. Now, let's switch back to Draw Things. We will click "Enter URL," paste the URL, click continue, and it'll start downloading. Depending on the model, Draw Things might download supporting files. Realistic Vision is pretty good for people, so let's just do a quick one of a woman reading a book in a coffee shop at night, and it's peaceful. The results are pretty good until you look at the cursed AI hands; it's just a thing with AI.
Speaking of cursed, let me draw a not-so-good picture of my cat, Jeff, very quickly on my iPad. To my defense, I purposely wanted a bad drawing for this demo. If I go back to Draw Things, I can import this image and then use one of the models I already have downloaded; I can then use this as a source image to generate a new image. After refining my prompt just a little bit and changing the strength to 80%, I got a pretty good result. There are some striking similarities here because it mimics the pose on a flat background.
iOS, macOS, and iPadOS all have the ability to lift objects out of photos. I've already imported my cat Jeff, and we're using the inpainting model. Apple's ability to lift objects out of photos is impressive, but it's not perfect; it has some weird edges. So, to correct for this, I'm going to do something that might seem counterintuitive. I'm going to erase the entire image, then I'm going to scroll down and set the strength to about 25%. The Inpainting 2.0 model isn't that great, but we could always download a different one and see if we could find one that would produce better results. Maybe we could put the cat in a better sci-fi background, and probably we'd tweak this strength to be even lower.
Now for our final main topic, and that's LORA or Low Order Rank Adaptation. Think of these as expansion packs for Stable Diffusion. LORAs can contain quite a bit of different stuff like characters, poses, or visual effects. Also, generally speaking, they are a lot smaller than models. I know of one that's really cool that works with Realistic Vision, and we already have version 6.0 downloaded. The process is pretty much exactly the same as importing a model. We are going to go back to the website CivitAI, search for Vector illustration, and go to that LORA. I'm going to copy the URL and then go back to Draw Things and import it by clicking manage next to the LORA. Mac users again get off easy; they just click download and then can import the downloaded file. Once it has been downloaded, we will click import. Often LORAs need trigger words. This one is a vector illustration, but if for some reason we forget it, we can go back to the website. If I click the info button, I can see the prompts used to generate this really sweet monster truck. Note the use of the word Vector illustration. I'd like to see a vector illustration of a palm tree, so we're going to use the prompts for vector illustration and palm tree. Note that I have the LORA weight set to 100%. When using LORAs, you have to pay attention to the documentation. Some will recommend settings of like 60% for the best results. Some have multiple trigger words to produce different types of images. Some were designed to work really well with a certain model, like this one, which was trained on Realistic Vision. The results are pretty cool.
There is a lot of trial and error. I tried to generate pictures of the Oregon coast in Vector art style. Some still came out as photos, and some did not. There are some topics I didn't touch on, like Samplers, and there's an amazing article all about Samplers and how they affect the image quality at stable diffusion art. If you haven't put it together by now, a lot of those scammy apps on the Mac App Store, iOS Store, and iPad Store that let you generate AI images are just using Stable Diffusion. I'm debating making a full-fledged course on this, but it wouldn't fit under this channel. I do have my Patreon, and I could also put it on Udemy or something. That way, people could really dive in with me because there are a lot of topics I didn't cover, like Control Nets or even making your own LORAs and training, because this program goes deep. If that's of interest, just let me know in the comments. And I think that's it.
-
The best games for late PowerPC G4/G5 Macs - OS 9 and OS X (100+ games)
Once upon a time, I wrote articles for InsideMacgames.com during the heyday (if there was ever such a thing) for Mac gaming in the very early 2000s. Despite the relatively small audience, the landscape was much healthier as companies were more willing to port games to the Mac, which is a topic in itself. I never considered myself much of a gamer, but I enjoy them now and again and remember many of the major releases for the Mac.
This is a list of what I'd consider largely the best releases for games compatible with Mac OS 9 - OS X, ideally for G4 and G5s, although I'm sure G3s can play a chunk of the titles. Mac users often learned to give some times a second glance that PC enthusiasts may skipped as they had a much larger library to pick from. Also, I'm sure there are some classics or loved titles I skipped or forgot. This is by no means a complete list, but rather a list of games worth taking the time to install.
If you're looking for a list of recommended games on a nostalgia kick or new to retro Mac gaming, then scroll on down. There are roughly 100 games in this list and also at the bottom a list of modern PowerPC apps
4x4 Evolution, 4x4 Evolution 2 - A slightly lesser known off-road racing title ported to the Mac
4x4 Evolution - OS 8 - OS 9
4x4 evo 2 - OS 9 - OS XAge of Empires II: Gold Edition, Age of Empires III - The classic isometric nation building RTS by Microsoft, but it made it to the Mac.
AoE II - OS 8 - OS X
AoE III - OS XAmerican McGee's Alice - The horror sequel to Alice in Wonderland making clever use of the Quake 3 engine.
OS 9 - OS XBaldur's Gate II: Shadows of Amn - Honestly, I haven't played this but it's so well loved that it clearly belongs.
OS 8 - OS 9Black & White (Platinum Pack) - A god simulator, I don't think I'd call this great or even good game but it's interesting for its oddness. This same description could be applied to its chief creator, Peter Molyneux
OS XCall of Duty (Deluxe), Call of Duty 2 - Before modern warfare, it was humble World War 2 first-person shooter series.
Sid Meier's Civilization III - I installed this game once in college and lost 25 hours in a single week and deleted it, never to play it again. You have been warned.
OS 8 - OS XCommand and Conquer: Generals - It wouldn't be a computer gaming list without the C&C franchise on the list.
OS XDescent, Descent II, Descent 3 - A vehicular combat game that is usually considered a 1st person shooter, with a fully 3D environment before Quake.
System 7 - OS 9 (Descent III, OS 8 - OS 9)Diablo, Diablo II - The original looter, an RPG where you click on the thing you want to die.
System 7 - OS XDoom, Doom II, Final Doom - "...But can it run Doom?" Yes, it can.
System 7 - OS 9Doom 3 - It's very dark.
OS XDungeon Siege - A diablo-like dungeon crawler that seems somewhat forgotten and had a few popular mods.
OS XDuke Nukem 3D, Duke Nukem 3D (OS X) - It was a different time. We used to think this game was really cool.
System 7 - OS XDeus EX - Videogames started to grow up, and Deus Ex helped lead the charge where actions mattered in quasi-cyberpunk RPG/FPS fusion.
OS 8 - OS 9Escape from Monkey Island - The humorous LucasArts adventure series returns to the Mac again.
OS 8 - OS 9Escape Velocity, Escape Velocity Override, Escape Velocity: Nova - the top down space exploration trilogy from Ambrosia Software.
System 7 - OS XFallout, Fallout 2 - An isometric odd-ball post-apocalyptic RPG and spiritual successor to Wasteland after battles for IP ensued. EA's failure is our gain.
OS XFuture Cop: LAPD - a solid and often overlooked title that may not have aged beautifully but still worth a look
System 7 - OS 9Glider Pro - The final evolution of a classic Mac series, where the user controls a paper airplane through houses loaded with obstacles and the ability to create your own maps.
System 7 - OS X
Grand Theft Auto PowerP (alpha) - Not a serious game that was ever release but a small taste of what could have been...
Halo: Combat Evolved - It's impossible for a Mac gamer who was around not feeling some sort of way about this title, or not to mention "It was originally a Mac game."
OS X
Half-Life - the original port will never see the light of day (See above) but it lives on in a PPC alpha fan port.
Homeworld 2 - a classic space ship RTS
OS XIndiana Jones and the Emperor's Tomb - It's sad that Indiana Jones as an IP hasn't had the same level of quality as Tomb Raider. The game was just ok, but PC gamer seems to think it aged alright.
OS XKelly Slater's Pro Surfer - from the same team of Tony Hawk's Pro Skater comes the underrated surfing game,
OS XMadden 2000 - The Mac rarely got love from EA Sports, and Madden 2000 is an outlier where EA tepidly dipped its toes in the Mac gaming market. It was an admirable port by Aspyr.
System 7 - OS 9Maelstrom GPL (OS X) - an opensource version of popular game, Maelstrom with better OS 9 and OS X compatibility
OS 9 - OS XMarathon Trilogy Box Set - "They're everywhere!" The most iconic Mac gaming series of all time. Also, check the AlephOne Project for OS X 10.2+.
System 7 - OS 9Max Payne - A trope fueled romp of non-stop bullet time gun fights in a much loved 3rd person shooter,
OS 9 - OS XMechWarrior 2: 31st Century Combat, Mechwarrior 2 (RAVE aka ATI) - customize giant tank-like robots, and battle other Mechs in a simulation/FPS style.
System 7 - OS 9Medal of Honor: Allied Assault, Medal of Honor: Allied Assault - Spearhead, Medal of Honor: Allied Assault - Breakthrough - In the 2000s, World War II was very much in the mind of gamers and gamers universally agreed the Nazis were still bad guys.
OS 9 - OS XMyth: The Total Codex (Myth: The Fallen Lords, Myth II: Soulblighter + Chimera), Myth III: The Wolf Age - Bungie's 3D real-time strategy, with its quirky brand of chaotic battles.
System 7 - OS 9 for Myth 1 & 2, OS X for Myth 3.No One Lives Forever (The Operative), No One Lives Forever 2: A Spy in H.A.R.M.'s Way - fairly forgotten FPS that had good Mac ports.
OS X.Oni - A somewhat unfinished game but still a fun 3rd person combat game from Bungie.
OS 8.5 - OS XQuake, Quake II, Quake II (OS X unofficial), Quake III Team Arena, Quake III Team Arena (OS X) - Each game is wildly different to the point where I could have written a word or two about each game, but let's be realistic, you already know the Quake series.
Quake - System 7 - OS 9
Quake II System 7 - OS X
Quake III - OS 9 - OS XRed Faction - A sci-fi FPS with destructible environments and vehicles.
OS XReturn to Castle Wolfenstein - A solid remake even if occasionally thematically silly and a lot of fun. Make sure to check out the massive amount of add-ons.
OS 9 - OS XRollercoaster Tycoon 3 - Probably the strongest of the sim games under the Tycoon umbrella.
OS XShadow Warrior - From the makers of Duke Nukem.... Again, it was a different time, but even at the time, it received negative reactions for its (charitably speaking) humor, which relied on stereotypes. This is more of a "We've come far from here" when it comes to the portrayal of various groups in games.
System 7 - OS 9Sim Ant - Greatest game of all time. It's one of the earliest RTSes and a game that really needs a sequel. You manage an ant colony, which, unlike most Maxis games, has a clear endgame: To clear the map of both the red ants and humans. Silly mode is a must.
System 7 - OS 9Sim City 2000 - Absolutely one of the best sequels ever made, with its surprisingly melancholy jazzy soundtrack and irreverent humor
System 7 - OS 9.Sim City 3000 - Another winner for Maxis in its city simulator series,
System 7 - OS 9SimCity 4 + Rush Hour Expansion - The famed city simulator goes 3D,
OS XStarCraft - Blizzard's groundbreaking Sci-Fi RTS.
System 7 - OS XStar Wars: Dark Forces - It's very much a Doom rip-off mechanically speaking, but it's still a classic.
System 7 - OS 9.Star Wars Episode I: Racer - Not every game is classic on this list, but being a Mac gamer often meant sometimes stooping to mediocrity,
OS 8 - OS 9Star Wars: TIE Fighter - A flight sim but as the evil empire,
System 7 - OS 9The Sims + The Sims: Livin’ Large - Maxis's quirky materialistic life simulator but on your Mac.
OS 8 - OS XThe Sims 2 - The life simulation continues, and with so many expansions to download.
OS XTiger Woods PGA Tour 2003, Tiger Woods 2005 - Surprisingly, Tiger Woods PGA tour made it to the Mac a few times over the years, last seen in 2008. Tiger Woods 2008 OS 9 - OS X, Tiger Woods 2005, OS X
Tom Clancy's Ghost Recon - Despite having the Tom Clancy name, not based on any books. A tactical shooter.
Mac OS 9 - OS XTom Clancy's Rainbow Six: Rogue Spear, Tom Clancy's Rainbow Six 3: Raven Shield - a popular tactical shooter series aiming for realism compared to other first-person shooters of the time. Rogue Spear OS 8 - OS 9, Raven Shield, OS X
Splinter Cell - The 3rd person stealth 3rd person action/shooter made it's way to the Mac.
OS XTomb Raider (Gold), Tomb Raider II, Tomb Raider III, Tomb Raider Chronicles, Tomb Raider: The Angel of Darkness - Laura Croft made many appearances on the Mac made by the legendary Aspyr who's still working on Tomb Raider to this day.
Tomb Raider 1 -3 System 7 - OS 9
Chronicles/Darkness OS XTony Hawk's Pro Skater 2, Tony Hawk's Pro Skater 3, Tony Hawk's Pro Skater 4 - The legendary series made it to the Mac, THPS2 (OS 9 - OS X), THPS3 (OS X), THPS4 (OS X)
Tropico, Tropico 2: Pirate Cove - The fantastic dictatorial Sim-City-Esq Simulator. Tropico OS 8 - OS X, Tropico 2 - OS X
Unreal - This qualified for jaw dropping graphics in 1998. I played it in 800 x 600 with a Voodoo II, probably pushing 30 FPS in 16-bit color. It was great.
System 7 - OS XUnreal Tournament, Unreal Tournament 2003, Unreal Tournament 2004 - Unreal got past its pretense for a story, much like Quake for a fun multiplayer shooter series.
Unreal Tournament - System 7 - OS X
Unreal 2003, Unreal 2004 - OS XVirtual Pool - A simple pool game by today's standards, but 1996 was impressive, and while only System 7 - OS 8, can be run in OS X with the last update.
System 7 - OS XWarcraft II: Tides of Darkness - Blizzard's wildly successful sequel to a game almost no one ever played, classic 2D RTS.
System 7 - OS 8Warcraft III: The Frozen Throne - The massively overhauled sequel to Blizzard's breakout RTS hit, Warcraft II. Entire genres of videogames like Tower Defense started as mods for this game.
OS 9 - OS XWingNuts 2: Raina's Revenge - A small-studio indie Mac game developer made overhead World War 2ish shooter.
OS XWipeout 2097, Wipeout Rewrite (unofficial OS X) - A futuristic racer more known as a Playstation series,
OS 9 - OS XWolfenstein 3D - The game you know and love slightly upgraded, with two new weapons, 128 x 128 textures, a blaring dramatic soundtrack, and altered storyline.
System 7 - OS 9X-Plane 7, X-Plane 8 - takes a special type of person to want to play non-combat flight sims but if that's your bag, then X-Plane is pretty much the beginning and end for the Mac.
OS 9 - OS XWorld of Goo - A classic indie puzzler and it works on PowerPC.
OS XZoop - fun little puzzler that was a bit of a flop despite being a good way to kill 5 minutes.
System 7 - OS 9You'll notice that Nanosaur, Bugdom, and Cro-Mag Rally are not on this list. That is because they're not good. Seriously. They are trash. The only reason you have fond memories of these is you likely were a kid who didn't know better. They're Mac originals but if you want to play Mac originals that were actually fun, try Ambrosia Software's games like Maelstrom and Escape Velocity or Wing Nuts 2.
Modern PowerPC Apps
There are a few modern apps that are worth mentioning that are still being developed for PowerPC Macs. These are not games but you'll probably want to explore these. This video has a breakdown comparing web browsers. You can surf the modern web.... kinda!
- Discord Lite - A lightweight Discord client for PowerPC Macs
- Legacy AI - A modern AI for PowerPC Macs
- PPCAppStore - A app store for PowerPC Macs
- TigerBrew - A package manager for PowerPC Macs
- TenFourFox - A semi-modern web browser for PowerPC Macs
- InterWebPPC - A fork of TenFourFox
- AquaFox - fork of TenFourFox, incorporating tweaks from InterWebPPC and TenFourFoxPEP
-
How to Play Blu-Ray Movies on a Mac Using VLC (Apple Silicon and Intel)
Since macOS does not natively support Blu-Ray playback, the best solution is VLC, an open-source video player that has been around for nearly 25 years. However, you cannot simply insert a disc and expect it to play. Video playback relies on libaacs, for Advanced Access Content System, the digital rights management system used by Blu-Ray and the now-defunct HD-DVD format.
Tutorial starts at the 5 minute mark
However, libaacs does not offer any keys or certificates to decode encrypted media, leading us into a legally grey area. So, let's walk through the process.
Step 1: Download and Install VLC
Go to the VLC media player's website and download and install VLC.
Step 2: Install HomeBrew & Libaacs
Homebrew is a command-line interface package manager utility. Think of it as an app store for open-source command-line software. Go to brew.sh and run the curl command by copying and pasting it into your macOS terminal. Once it's installed, you can test to see if it's working by typing
brewinto the terminal.After installing Homebrew, run
brew install libaacsto install libaacs.Step 3: Download the keydb.cfg
This step's legality is uncertain, but you can go to the FindVUK Online Database and download the keydb.cfg file (decompress it if it doesn't automatically). You'll need to search for it yourself, but it's easily accessible.
Open ~/Library/Preferences (navigate to your user directory, open Library, and then Preferences). If you do not see your library, you may need to unhide it; Lifewire has a good tutorial.
Create a new folder in the Preferences folder called aacs (all lowercase) and drag the keydb.cfg file into it.
Nerd shortcut:
mkdir ~/Library/Preferences/aacsand use the cp command to move the keydb.cfg to this directory.Step 4: Copying Over Libaacs' Alias for VLC
The last step varies depending on whether you have an Apple Silicon or an Intel Mac. In the terminal, you can type
brew --prefixto find where Homebrew is installed on your Mac.Navigate to the root of your boot drive and press Command-Shift-Period to display hidden files.
Go to the directory specified from
brew --prefix. If your Mac shows theoptdirectory, open the Homebrew folder.Next, open
Cellar, thenlibaacs. In this folder, there should be a version number like0.11. Open thelibdirectory and find the libaacs.dylib file and copy it.For Apple Silicon Macs, you will need to go to
/opt/homebrew/cellar/libaacs, and for Intel Macs, go to/usr/local/homebrew/cellar/libaacs.Paste (or copy) the libaacs.dylib file into
/usr/local/lib.Step 5: Open VLC and Play the Disc
That's it! You're now ready to enjoy your Blu-Ray movies on your Mac.