-
Thanks for the Korg NK2 setup
Hi Greg, Not a question. I just wanted to say thank you for having gone to the bother of making the walkthrough for Korg NK2 and Cubase. It was helpful and therefore much appreciated. Anonymous
 Thank you random Internet Person! I was a bit miffed that there weren’t any directions. I don’t replies to post so its good to know humans visit blogs posts on occasion.
-
Once upon a time we were all green
This spontaneous anti-green-bubble brigade is an interesting example of how sometimes very subtle product decisions in technology influence the way culture works. Apple uses a soothing, on-brand blue for messages in its own texting platform, and a green akin to that of the Android robot logo for people texting from outside its ecosystem (as people have pointed out on Twitter, iPhone texts were default green in days before iMessage—but it was shaded and more pleasant to the eye; somewhere along the line things got flat and mean).
There are all sorts of reasons for them to use different colors. (iMessage texts are seen as data, not charged on a per-text basis, and so the different colors allow people to register how much a given conversation will cost—useful!) However, one result of that decision is that a goofy class war is playing out over digital bubble colors. Their decision has observable social consequences. - It’s Kind of Cheesy Being GreenIt’s Kind of Cheesy Being Green has been making the rounds, accusing Apple of purposely signifying non-iOS users. It’s an interesting take but completely wholly disingenuous. Apple has had some slights before, (Get a Mac?) but this isn’t one of them.
This unintentionally has lead to “Green Bubbles”, the UI convention of using Green vs Blue has been a quick methodology to let users know if the other recipient is using Messages. The author does understand that Messages has practical application and is important as any “iMessage” isn’t counted as a text or SMS, and host of other reasons: videos shared between iOS users are higher bit rate, and know that their text messages use encryption, thus can’t be snooped easily. However, not all iOS users use Messages hence not all iOS users are “blue”, and if a user is not connected to the internet in a low service area where only basic service is available he or she will only be able to send/receive SMS, hence “not blue”.
It didn’t start with blue
There’s one fact I’ve yet to see called out. Back in iPhone OS days before Messages (formerly iMessage) all texts were green. I know this as I still have my iPhone 3G.
Don’t take my word for it…. Here’s a screenshot from Google images, source unknown.
Check out iOS 4.x reviews. iMore. Ars Technica. CNET. Or go back to iPhone OS 3.0. You won’t find “blue bubbles” as iMessage wasn’t introduced until iOS 5.
Had green been introduced to to denote specifically non-iMessage, the author may have been onto something.
-
BrewLab - A different type of tech startup
Rarely do I have the inside scoop on anything, but I’ve been watching the progression of one of my long time friends going back to University of Oregon, launch her own technology company, and its exciting.

Dana Garves, former head chemist of Ninkasi, has started her own tech startup, but of a different variety. You won’t find it on ValleyWag, TechCrunch or HackerNews.
It isn’t an app, it isn’t another internet device, but instead its a service for home brewers and small breweries, outsourcing the common chemistry tests at modest prices. Home brewers can concentrate on brewing, while BrewLab handles part of the science. Simply mail samples and you’ll get your results one business day later.
Dana already has been making a splash weeks into her business, appearing on NPR and appearing at KLCC Brewfest, Eugene’s largest brewfest (by extension making KLCC Brewfest one of the largest in the Oregon), BrewPublic, and even BeerAdvocate’s Print Magazine.
There’s a few cool things going for her: tech startup, cool industry, female in a male dominated industry and in Oregon. She’s already lining up another potential employee #2, another woman. Why? because she’s the best qualified person.
Check ‘em out, and follow BrewLab’s blog for the inside on the beer industry, and drop them a line.
Updated: 7/29/15 with links to BrewPublic and BeerAdvocate
-
A lot of programming skill
“They don’t tell you that a lot of programming skill is about developing a knack for asking the right questions on Google and knowing which code is best to copy-paste. And they don’t let you in on a big secret: that there is no mastery, there is no final level. The anxiety of feeling lost and stupid is not something you learn to conquer, but something you learn to live with. - http://techcrunch.com/2014/05/24/dont-believe-anyone-who-tells-you-learning-to-code-is-easy/” —One of the toughest things to do when I’m teaching Processing is convincing the students who “just don’t get it ” to stick it out a little longer and persist in their efforts. I don’t expect all of my art students to become professional programmers. In fact I’m not sure if I have the mettle to do that myself. I do think that one of the many values of programming is that it “isn’t easy” and direct experience can cure the false perception.
(via notational)
I don’t think I’ve ever had an “A-ha!” moment where everything fell into place, rather when I look back, its a stack of minor victories. Its easy to downplay success as its so incremental, then I have to ask, “Where was I last year at this time?” That’s when things are really put into perspective. It’s only then that string of small victories turns into sizable accomplishments.
(via notational)
-
Intelligent Word Breaks
I recently was posed with the problem that CSS word-wrap: break-word was leading to not-so-intelligent results. Word wrapping will break up words but without any real regard to the word.
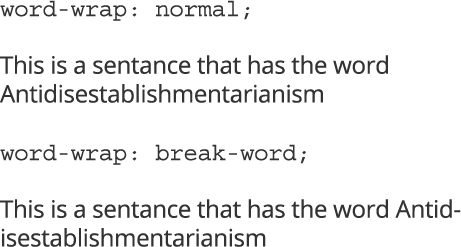
Usually this means slightly awkward word breaks but there can be all sorts of unintended results if say, the word Therapist was broken up between e and r, making for a bad Arrested Development joke.
However there’s a little used property, CSS-hypens that will break word at the hyphen if it ends up at the end of a line.
Using the CSS property of CSS hyphens, combined with invisible hyphens ( ­ ), you can create your own intelligent word breaks. I’ve attached the below codepen. I’d recommend visiting it at CodePen so you can resize the window.
-
ColorSnapper Review - The $5 utility that every interface designer - web designer should have

Quite some time ago I wrote a short review of ColorSnapper. Not long after I purchased SnapRuler.
Once upon a time, I used to use the screen shots (command-shift-4) as both as a way to grab colors from various images and as a ruler. This required using Photoshop to glean the necessary information.
It was cumbersome, but it worked. In fact, I continued use this method from my first forays in web design in my Mac OS 9 days (yes, even OS 9 had command-shift-4 or command-control-shift-4 which went directly to the clipboard) all the way up until about 2 years ago. So for 15 years, or roughly for half my life, I’ve been using screenshots as my preferred method to measure on screen elements or grab the color values.
An Onscreen ruler…
SnapRuler is one of those tools that I use on a near daily basis. Like Colorsnapper, when you press a combination of keys (command-shift-u) , you’re presented with an onscreen magnifying glass that allows you to draw on the screen.
Pictured: Taking a screenshot of a screenshot app was annoying.
You’re given several options to copy and paste the measurement to your clipboard in common formats, which can be configured to your preferences.

Also SnapRuler contains the ability to save screenshots to a specified folder and conveniently names the files by: date-time-size, useful if you need to make several quick measurements but need to keep them for later.
In retrospect, it seems so painfully obvious that I’m surprised this isn’t part of OS X screen shots.
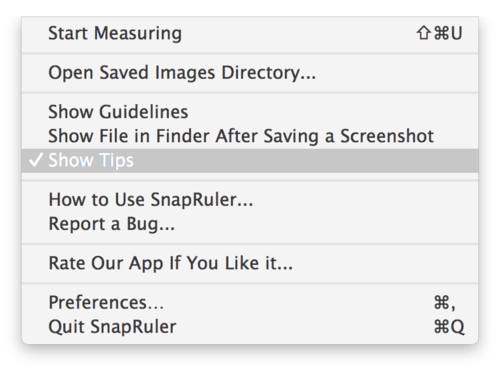
Pictured: Menu bar icon reveals a few simple menu items.
At $10, SnapRuler isn’t cheap for the limited functionality but it does its job admirably well. I’ve been using it for years now, through several OS X updates and on two computers, my MacBook Retina (with a combination of external displays) and my Mac Pro.
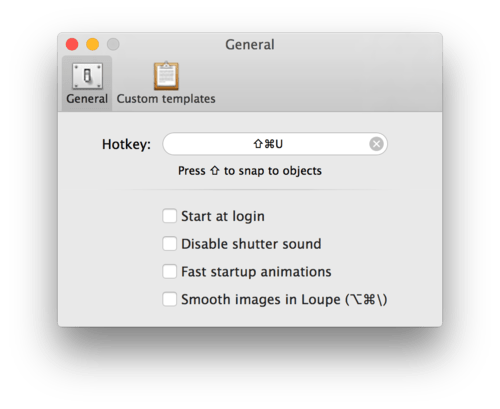
Pictured: Preferences panel
The only caveat I’ve found is when dealing with Retina. It treats all measurements as the scaled resolution, meaning its not using the 2880px x 1800px resolution in measurements but rather resolution that the OS is rendering. However, using the scaled resolution is the more correct of the two but a toggle would be nice for UI geeks such as myself.
Conclusion
Between the double whammy of ColorSnapper and SnapRuler (both of which play nicely with each other) I’ve updated my screen capture workflow and its been for the better.
Versions Reviewed: 1.1.2 - 1.3.3
Price: $10
-
On Concept Videos and the Hololens...
So the internet is ablaze with MS’s new HoloLens, and Polygon has a sober reaction. Famed Apple blogger, John Gruber reposted his fantastic 2011 critique of Microsoft.
But the exact same criticism I have for Microsoft today applies to 1987 Apple. “Knowledge Navigator” encapsulates everything that was wrong with Apple in 1987. Their coolest products were imaginary futuristic bullshit. The mindset and priorities of Apple’s executive leadership in 1987 led the company to lose what was then an enormous usability and user experience lead over the rest of the industry, and eventually drove the company to the precipice of bankruptcy. That 1987 Apple was a broken company is so painfully obvious from today’s vantage point that I didn’t think it needed to be mentioned.
“Knowledge Navigator” didn’t help Apple in any way. Apple never made such a product. It didn’t bring Siri to us any sooner than if that video had never been made. It only served to distract from and diminish Apple’s then-current actual products.
Futuristic bullshit indeed.
Anyone remember the Nokia Morph? No? In February of 2008, Nokia decided that it was time to showcase the future of nanotechnology, touting that its features could be seen as early as 2015 on high end devices. It was a shot across the bow at Apple, who was widely seen as the most innovative company in the world.
Mind you, this was 5 years before the 2013-2014 hypegasm over wearables, and only a few short months before the second revision of the iPhone, the 3G. Smartphones were the new “it” product.
So here we are in 2015 almost none of the Morph’s features are available in the real world on a device of its type, other than the an ability to accept phone calls on your wrist (mostly aided by a cellphone). A short list of things that don’t exist: solar charging, completely transparent, raisable face, completely bendable surface, and so on.
Worst yet, Nokia isn’t even making smart watches, and its a backseat in the smart phone market, nearly forgotten.
So what ends did Morph gain Nokia? Arguably nothing, other than being likeminded to its new MS overlords for a willingness to create concept videos.
The moral of the story is ideas are cheap, execution is not. Simply unveiling the Hololens probably would have been enough and letting the technology speak for itself. Its damn impressive, but wholly dishonest when the concept video is compared to the actual product.
/edit:
Having spent more time pondering, I think its important to draw a line between distinctions of vaporware and prototype hype videos. The Morph and Knowledge Finder was purely science-fiction, the HoloLens is real and has a strong possibility of shipping.
What Microsoft is trying to do is illustrate the potential of the HoloLens but set expectations beyond what the first few generations will be able to accomplish (assuming it ships and lasts long enough to mature).
In the case of the Surface, we’ve seen a natural progression and evolution through the magic of product cycles. Despite the misstep of the Surface RT, by all accounts the Surface Pro lineup has matured into a polished product.
There’s no reason to create fanciful fiction for the HoloLens, its already the anti-Google Glass and counter Oculus Rift/Sony Project Morpheus. Instead an omnipresent face computer meant to overtake your life or blot out the world you live in, the HoloLens looks to compliment it.
/edit #2 Jan 23 2015:
“It did remind me of [Kinect]. You kind of want to scream ‘don’t over promise these things’…My fear is that when you actually put the device on you’re not as blown away as you should be”
…
Molyneux commented, “The bizarre thing is a huge amount of effort and time and money goes into researching the tech, like the Kinect tech and scanning the bodies, and there’s always this one line that hardware manufacturers - whether it be Microsoft or anyone else - say and that’s 'we can’t wait to see what happens when it gets into the hands of developers.’ Now if Apple had said that when they introduced the iPhone, I don’t think we’d ever end up with the iPhone! What really should happen is that they put a similar amount of money into researching just awesome real world applications that you’ll really use and that work robustly and smoothly and delightfully.
Indeed. Creating a product and hoping people find uses for it is the wrong way to go.
-
9 months with Codekit - A Codekit 2 Review
CodeKit 3 Review is live! Below is the full review of Codekit 2.

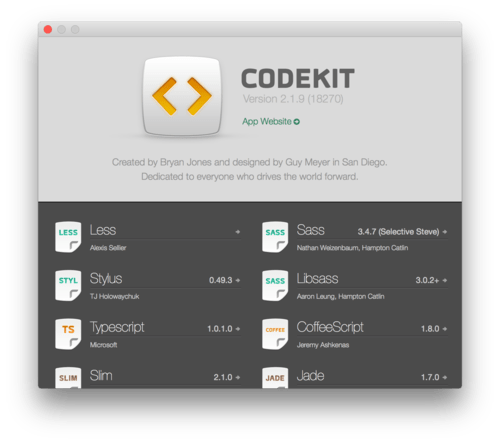
Quite some time ago I wrote a mini-review of Codekit 1.0 and then another review of Prepros. Admittedly I had only been using pre-compilers for several months at that time (what a difference a year makes). Now that its been over two years down the chasm of Sass and a more varied workflow, I feel that I can expound in ways I couldn’t before. I’ve blogged about Codekit 2 error resolutions which have been referenced on Stackoverflow.com by people who aren’t me. While I may not be the foremost expert, I believe that I have some credentials to speak with some authority on pre-compilers and CodeKit specifically.
I haven’t seen any massive reviews on CodeKit 2 either, since its a niche market so I’ll try and make this the most definitive review written to date on CodeKit 2. I’ve also continually added thoughts and notes at the end of this review. Its been over 21 months with Codekit since the original review, which is still accurate thus almost untouched.
Now, that we’ve gotten that out of the way, let’s get to the heart of the matter at hand, shall we?
Depending on your comfort level, there’s a few items I’ll be discussing at great length, if you’re a grizzled vet, you may want to skip to the review part, otherwise keep reading. :)
Quick Glossary
Preprocessor - a utility that converts one type of data into another type of data that another program can use. This is often used as a blanket term for programming languages that require a preprocessor. Sass and Less are often referred to as preprocessors.
Compiling - converting code into data that a program or OS or web browser can understand. In regards to web development, preprocessors are used for languages that when compiled (processed) export a file in a common language such as Sass to CSS or Markup to HTML. There are many types of compilers and interpreters that differ wildly depending what platform and programming language are used. When I am discussing compiling for the sake of this article, I am strictly talking about compiling code with a preprocessor in order to spit out code in common web languages that are read by a web browser.
Task Manager - a program that automatically performs common tasks, usually when triggered. Task managers can “listen” and automatically run a series of instructions based on an event. For web development, this usually means when a file is saved or project structure is altered, then it will trigger a preprocessor to compile code, reload a page and other common tasks. Popular preprocessors include:
- Codekit - A Mac only utility with a graphical user interface
- Prepros - A cross platform utility with a graphical user interface
- Grunt - A command line utility built on node.js
- Gulp - a command line utility
Package Manager - a package manager is a way to automate the process of installing, upgrading, configuring, and removing software. Bower is the most popular package manager for front end developers.
Minification - Every keystroke takes up minuscule amounts of data, measured in bytes. Minification takes out unnecessary keystrokes from HTML/CSS/JS and creates a “minified” version of your code, With Javascript, even variable names are replaced with short names to save data known as uglification. Since HTML/CSS/JS are the instructions that your browser needs to render the page, this will help aid page load speeds considerably.
Concatenation - Concatenation (concat for short ) when programming means combining to two variables’ stored values. When applied to file management, concatting means combining multiple files into one file. This allows for example, many javascript files to be combined into one JS file for distribution. This reduces the amount of requests a web browser must make, and thus (usually) speeds up the data transaction from the web server.
Why do we need Sass and Less?
CSS as it turns out is missing some very powerful features such as using variables, the ability to create things programmatically or the ability to nest attribute. Clever developers created Sass and LESS as CSS-like programming languages to add these sort of functions to CSS. Both languages when compiled output plain ol’ CSS. It just makes writing very complicated CSS faster. Other developers have attempted to do this same thing with Javascript with CoffeeScript and Typescript, and even HTML.
There’s plenty of places other than here that can better explain what Sass and Less are and chances are if you’re reading this review, you probably already know.
What is CodeKit?
Simply put, CodeKit is a task manager that allows you to automate code compiling for popular preprocessor languages.
CodeKit for all intents and purposes manages projects akin to Grunt.js and Gulp.js and works with Bower, so you can easily deploy code.
CodeKit takes the place of using esoteric software packages like Grunt and Gulp and attempts to make it much easier to use. It comes out of the box with support for several very popular Sass libraries like Compass and Susy, which allow you to execute functions from these libraries without installing them manually.
The advantage of CodeKit is a much more familiar drag and drop approach which is more comfortable to many users.
Setting up a project requires simply drag and dropping a folder onto Codekit. CodeKit will automatically detect the languages in the project and then allow additional configuration.
CodeKit can take the place of several utilities depending on how it is set up and even be used to assist project setup.
About my workflow and technologies
Workflows are everything in web development, everyone has their favorites. Take for instance an IDE: you have the VIM purists, Textmate lovers, oldschool BBEdit fans, Coda junkies, the large swath of Sublime Text users, the alternative Espresso crowd and the Github Atom fanboys. That’s just for a text editor, so I’ll try and keep this short as I believe its important to disclose so others can compare and contrast.
At my current job, our tech stacks vary a lot. In the last year I’ve worked on projects that use Django, Drupal, Wordpress, Expression Engine, internal PHP, Python, Angular, Jekyll and even an ASP.net project and a few old Coldfusion legacy sites. 95% of our sites are Sass, although there a few LESS projects and even one plain ol’ CSS site.
Internally, we have staging servers managed by Jenkins. Most of the time work off of a localhost using Apache (or Python’s server).
On an average day I’m bouncing between Sublime Text, Tower (Git), Photoshop, ImageAlpha+ImageOptim, Sketch, VMware/simulators and a host of small utilities (Colorsnapper, Rulers, GhostLab) along with whatever tech stack I’m working with that day.
Now to the review part
CodeKit does what it advertises, and does it well. All the options you’d expect are represented in the settings panels, including settings for a few popular frameworks such as Zurb Foundation, Burbon, Compass and Susy.
It takes me usually less time to configure CodKit properly than it takes to set up a grunt or gulp file.
CodeKit also creates a CodeKit config file based on each project, which makes projects sharable with other users for minimal configuration. This is great for working with other developers using CodeKit, or a single developer working with multiple computers.
Image Optimization
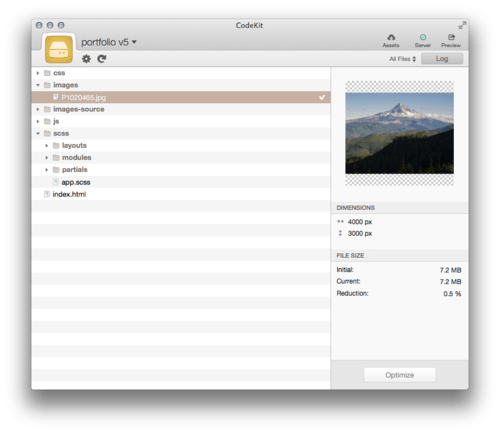
CodeKit offers image optimization akin to ImageOptim or a grunt task. Its the low hanging fruit of image optimization and will losslessly reduce jpgs and pngs. File size savings vary based on images.
It provides a baseline optimization, but users looking for better image size reduction will want to use specialized utilities like Fireworks or ImageAlpha.
I found myself almost never using CodeKit’s image optimization, as I tend to process all my PNGs using ImageAlpha.
Code Compiling
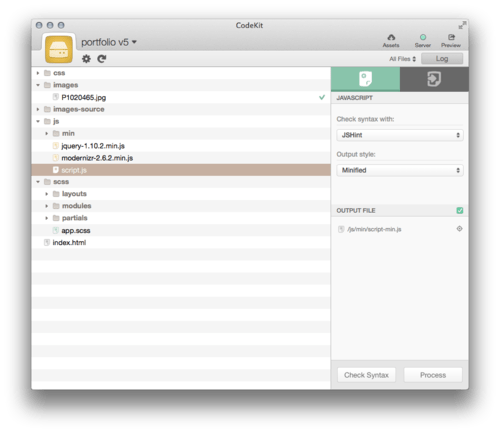
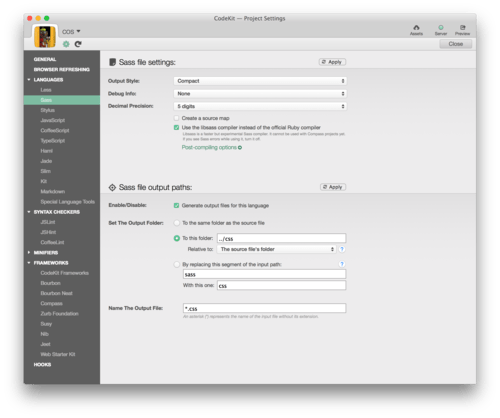
The heart of CodeKit is it allows you to automatically compile and concatenate a plethora of languages: Less, Sass, Stylus, Javascript, CoffeScript, TypeScript, Haml, Jade, Slim, TypeKit and Markdown. Languages can also be minified and include features like auto-prefixing and blessing, and even supported now in Compass projects as version 2.1.9.
Code compiling requires minimal set up, CodeKit will analyze your project on drag on drop but you may need to specify where compiled code ends up.
Once connected to CodeLit’s internal server wrapper, simply hit save, and CodeKit will inject your CSS changes to any web browser or reload the page on Javascript/HTML/PHP/Python changes.
CodeKit’s code compiling is reliable and when you’re in a bind, you can specify external compilers. External compilers are Ruby gems installed usually for the CLI. It means if Compass (for example) is updated, you don’t have to wait for CodeKit 2 to be updated.
CodeKit’s error log is fantastic. However, when specifying external Sass compilers, I noticed sometimes the error logs displayed generic errors, which weren’t very helpful.
Internal Servers
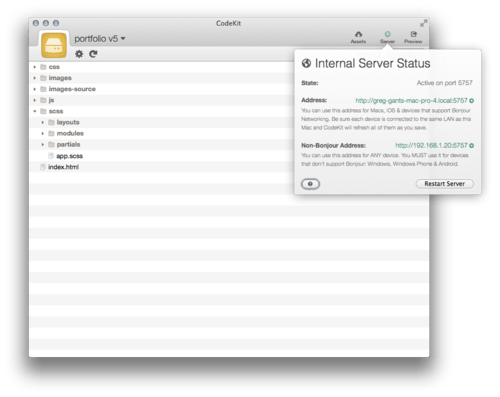
Codekit 2 also does a fantastic job with external servers (locally hosted or external) which can be accessed by other devices on the network: be it a virtual machine, another computer, a mobile device and so on. Any changes to the CSS are injected without needing a browser refresh. Editing PHP/Python/HTML/JS (or other defined files) will trigger any browsers to refresh.
CodeKit however, lacks an external inspect element like Prepros has, or address following like GhostLab. Its good but not as robust as other solutions. Any injected CSS changes are animated. Its gimmicky to see colors fade into the new value or objects change in shape or size but it also is useful as you can track all the elements that are changed.
Its fantastically useful, especially on locally hosted projects as it allows you to easily connect from an external device or virtual machine. While I’m a fan of GhostLab, I found myself eschewing it for a leaner setup of simply CodeKit on day to day operations.
Currently, IE10 and IE11 give JS errors when connected to the server, other than that live refreshing mostly works. Hopefully the bug will be resolved.
Package Management

Package management is one of my least used features of codekit… It has to do a lot with my work flow, and the way our staging servers are configured and my general laziness towards concating bower packages into my tasks, and my bad habit to often trim down popular front end Sass libs. When I do, I use Bower from a CLI.
I’ve tested CodeKit’s Bower Package Manager, and it works but it saves almost no time if you’re creating a json file for bower. The GUI makes finding projects easy and simple.
Source Maps
Source maps are a fantastic innovation for development, as source maps cite original source code for compiled code, allowing you to easily debug and troubleshoot. CodeKit offers source map support which is crucial.
In terms of Grunt…
It’s impossible to describe CodeKit without comparing it directly to Grunt, its free CLI alternative. However, the utility of a such program like CodeKit is called into question as Grunt can be configured to do everything that Codekit does: image optimization, compiling code, injecting CSS changes and minification. In fact, grunt can do a few things Codekit can’t such as SVG optimization, which begins to beg the question why use Codekit in the first place?
CodeKit’s biggest advantage and disadvantage is that it lets easily create projects and workflows without Grunt. It takes admittedly a lot less time to start in on a CodeKit project. The interface lets you plug in all your defaults in a nice handy GUI without having to go through the steps of writing JSON in a gruntfile.js.
This is exceptionally empowering but somewhat limiting, everyone in your team will need a copy of CodeKit or will need to create separate task manger (grunt/gulp) to compile the Sass.
Since CodeKit has a GUI, it makes bouncing between projects quicker and faster than starting/stop Grunt watches. You can switch projects quickly by clicking the project you want to bounce into and it’ll automatically start watching the project files in that project, and swap your server. Codekit also tends to eat less CPU cycles than a Grunt Watch task, its better for battery life than a complex grunt task.
CodeKit also lets you use Libsass, a Sass compiler written in C instead of Javascript. Since the code is native to the operating system, it compiles code much faster. It greatly speeds up build times, but also may not be compatible with some Sass libraries. It’s simpler than installing and configuring libsass for Grunt.
Libsass still has its limitations, Libsass currently is incompatible with Compass and still has yet to catch with Sass 3.3 features. CodeKit automatically defaults to a non-libsass compiler for Compass projects. Its one less thing to configure properly when using CodeKit.
Lastly, CodeKit has hooks and allows you execute Bash or Applescript after CodeKit compiles. Using hooks, you could potentially upload your changed CSS after a compile to an FTP. Hook functionality allows beyond some of Grunt’s capabilities. To be fair, since Grunt at root is a task manager, it can be configured to execute commands like SVG or HTML minifying which CodeKit currently cannot.
Codekit 1 vs Codekit 2
Codekit 1.0 never quite fit my workflow in the way I wanted it to. A short list of complaints:
- it had maximum file watch limitation
- it wasn’t as fast as libsass
- the interface wasn’t as straightforward
- it didn’t support the latest compass
- its CSS change injection was severely limited (it’d reload Safari/Chrome’s front-most tab), not the tab with actual website..
- it’s internal server didn’t support external URLs
CodeKit 2 fixed every last one of these complaints. It’s nice to see an application evolve so elegantly. I’d still like it to borrow a few features from Prepros, mostly in the server department. More on that later…
So who is CodeKit for and is it worth it?
CodeKit is the everyman’s task manager. Its much easier to use than grunt and a great way to get introduced to the world of preprossing as you can concentrate on learning the language instead of writing esoteric grunt and gulp commands. This alone makes it worth $29. Anyone looking to start using Sass or Less probably should start with CodeKit as they can focus on coding and not setup.
When I started using preprocessing, I barely understood what Grunt was doing and found configuring it frustrating. I’m not afraid of a CLI but I find GUIs more intuitive. Codekit 1.0 was my introduction to preprocessing but working in a team environment developing websites, I ended up simply using grunt files that I was given, or using Prepros.
Later, when I was lead on a few projects, I ended up having to configure grunt files in case we needed to bring in other developers. When CodeKit 2 was released, I was comfortable with grunt configuration.
CodeKit 2 feels like a different tool. Its polished and powerful. Its fun and quick to use… but unnecessary. To use it on projects, requires me to configure Grunt first then CodeKit. I’ve found myself recently starting to favor Grunt again. Its more flexible, and has sped up in recent versions.
CodeKit vs Prepros
In my review of Prepros 4, CodeKit 2 had been release the same week as I was finishing up my writing. Ironically, Prepros 5 was released while writing this particular review. Codekit 2 has a leg up for speed and compatibility, and distributability (thanks to its pref files stored in projects).
I abandoned Prepros 4 entirely for CodeKit 2 and didn’t look back. Prepross still has a few things CodeKit doesn’t, mostly the ability to inspect element on external devices, automatically detects VPNs and displays internal and external IPs for its internal server, and the ability to serve many projects without having to switch projects. Lastly, Prepros is cross platform, which is a big deal.
Running Grunt on Windows is painful on Windows. It makes more sense to want a GUI task manager on Windows as you’re not in a *nix environment where you can natively run many common command line utilities.
CodeKit really could take a page from Prepros’s (and GhostLab’s) more powerful server. The ability to remotely use Inspect Element without any configuration can be insanely great on older devices and browsers. Plus the VPN detection is a nice touch. Prepros 5 boasts browser click syncing and following, akin to GhostLab and BrowserSync, FTP support, and now boasts Libsass and ability to use external compilers putting it in the running with CodeKit for speed. I’ve yet to use Prepros 5’s browser syncing but if it works anything like GhostLab, it’s a killer feature.
Prepros 4 was a better product that CodeKit 1.0. CodeKit 2.0 is better than Prepros 4. The question now is if Prepros 5 is better than CodeKit 2.0?
Based on toying with Prepros 5, its a tie or at least fairly close.Update: Codekit 2.0 is the better product.The biggest differences are:
- CodeKit’s per project config files (correction: Propros does have per project config files that can be distributed) make CodeKit more compelling for teams, ability for hooks, external compilers support, has built in package management, Syntax Checking, and framework support.
- Prepros has a more robust external server with remote inspect element and scroll/click syncing, and FTP.
After using CodeKit 2 and managing to resolve some major errors using external compilers, and the ability use JS syntax checking, CodeKit 2 is the better task manager.
Final Thoughts
Pros
- CodeKit 2 feels like brand new product compared 1.0
- Fast. Libsass is super fast Sass compiling!
- Massively improved server.
- Cleaner user interface.
- Bower Package Management
- Animated CSS injection
- Easy project configuration
- No more file watch limit
- Compass is built in and can be manually configured
- Codekit Config files can be distributed with project
- Very low learning curve!
- Faster than Codekit 1 or Prepros 4
- External encoders
- Less resource intensive when idling than Grunt
- Easy to read Error Log
Cons
- Must make current project active
- Server isn’t as robust as Prepross or GhostLab
- Grunt is free and once you get over the configuration hump, more flexible and powerful.
- Trouble shooting esoteric errors will probably land you at my blog
- No built in FTP support
I highly recommend CodeKit 2, especially for people looking to get serious about web development.
CodeKit doesn’t offer anything other than convenience and speed for seasoned developers comfortable with grunt. My days are limited for CodeKit 2 professionally, but I got my money’s worth and then some. Depending on your tech needs, you may not outgrow CodeKit as fast or at all.
It’s worth noting CodeKit 1.0 had rather robust support after version 1.0, two years of free updates, more frequently than its competitor, Prepros (although version 5 was a free upgrade).
Troubleshooting CodeKit is a bit of a crapshoot. Since I’ve become much more technically competent, I’ve taken it upon myself to blog every time I encounter a CodeKit 2 error and how I personally resolved it. Even the day this review went live, I found myself queuing up another CodeKit 2 troubleshooting post. CodeKit takes a lot of the sting out of front end development but it really helps to have some CLI chops and a deeper understand of task managers. If you’re looking to avoid Bash (the terminal app) in OS X, CodeKit is only a band-aid as even CodeKit users such as myself benefit from having a basic understanding of what’s happening. To CodeKit’s defense, the errors are dependent on the technology CodeKit is built on and rarely CodeKit 2 itself. CodeKit 1.x had a habit of crashing, CodeKit 2.0 almost never does.
Lastly, the author of CodeKit, Bryan Jones has a pretty good sense of humor. It’s a weird thing to note, but sprinkled through out his website for CodeKit and anything pertaining to CodeKit are some gems. Its the sort of humor that’s pretty fantastic when you spend all day developing websites and probably not so funny if you do just about anything else.
I have a short wish list of features for CodeKit, a few are pipe dreams and a few are likely:
- Optional Remote Inspect Element (FireBug’s JS beta or otherwise would do nicely).
- Remote server tuning (I get JS errors in IE10 and IE11)
- SVG minification
- Ability read Grunt or Gulp tasks and pair them to CodeKit’s functionality (A man can dream…)
- Ability read Bower configurations and automatically install missing libraries
I happen to have wildly changing tech stacks and projects that ship after only a month of development and service agreements to maintain. Milage may vary but if the worst thing you do is outgrow CodeKit, you won’t regret your time spent with it. I haven’t.
/edit: CodeKit 2.1.9 was released a day before this review went live, suggesting a trajectory away from Ruby configs, in favor of a more centralized preferences to enable things like Bless and auto-prefixing for compass projects. CodeKit continues to evolve and make life simpler. I’ll eventually review Propros, but writing 3500+ words is time consuming.
Codekit 2
Version(s) reviewed: 2.0 - 2.1.9
Price: $29
Update - December 1st, 2014:
CodeKit 2 still has use even in my post CodeKit 2 workflow.
I was working on a Wordpress + Grunt with Browser sync. It had already gone to our QA process and thus I was fixing IE8 errors, using a standard workflow: local machine to git push to staging server.
However, I had disabled browser sync as I was nearing production (BrowserSync requires pasting in a JS file into the footer of the site) and needed to quickly test on my IE8 virtual machine off my local wordpress install.
GhostLab refused to play nice with IE8, severely borking the site. CodeKit 2’s internal server came to the rescue, easily serving up the site to my VM.
Update - April 8th, 2015:
I’ve all but stopped using CodeKit except when dealing with IE8 since GhostLab doesn’t play nicely with it. CodeKit is a fantastic app but moving forward as I’ve gotten deeper into grunt with grunt, all future projects probably won’t include CodeKit 2.
This isn’t to say that CodeKit is beneath me or a lesser product but with the technical demands of my job I’ve moved outside its scope. CodeKit works reliably enough to be used in a professional setting, and I can say that with sincerity as I did for the company I work for. We’re a little more tech heavy as a do-it-all digital agency.
If you aren’t using Sass or LESS, and reading this, buy CodeKit 2 now. Sass isn’t the future of front end development, it IS front end development.
Update - August 24 2015 - Prepros:
I finally posted my Prepros 5 review. Writing 2500 per review is exhausting but forcing myself to review a product that I haven’t had time for is more so. There’s still things I’d of liked to say but scrapped for timeliness. The big spoiler? CodeKit 2 is a better product more suited for a professional environment.
CodeKit 2 still is being updated, mostly with the latest precompilers. Reading my last update makes me think: “Ghostwhat?” I haven’t fired that up probably since writing the post now with BrowserSync arriving. Gulp and Grunt are just too damn powerful.
Update - late December something 2015:
I finally got around to working on redoing greggant.com, still a work in progress. I could have used Gulp or Grunt but as a single developer, with only a local Git repo, I ended up firing up Codekit and enjoyed the braindead simplicity of just writing code without all the usual leg work.
It reminded me of using Reason after years of using Cubase. Instead of spending time configuring, I was simply composing. It wasn’t the best tool but it was the right tool just beat out a melody. That’s Codekit.
Update - March 3rd, 2016:
Ported this post to my new blog on Jekyll. I've fixed a broken link or two.
Update - May 19, 2016 - There's codekit 3 on the horizon. I'll be sure to write a review after it drops and I'm able to use it on a production website. I just fired up CodeKit 2 again for a single page website pertaining to an accessibility app for my company. This post is like a trip down memory lane as I've grown up as a developer as much as CodeKit has as task manager. These days I've finally been moving in the world of Gulp and even toyed with PostCSS.
So where do I stand on Codekit 2 nearly 2 years later? I recommend it for anyone looking to get into front end development. Task managers are great and a tool to be learned but writing good Javascript and Sass is far more important to focus on when you're starting out.
Update - December 5th, 2016:
I'm working on a CodeKit 3 review, it's not going to take 9 months but I doubt I'll have it done before January as there's a lot of ground to cover.
Update - December 21st, 2016: - CodeKit 3 Review is live! Consider it a beta!
-
CinemaGraph Pro Review

Months ago I acquired CinemaGraph Pro as part of a bundle but I hadn’t taken it for test run until earlier this week. As a hobbyist motion graphics designer (who’s done contract work for three TV shows) and photographer, it intrigued me but I found many of the demos creepy or kinda cheesy.
Recently, I was asked to create a background for video project. Having written a few reviews, including an exhaustive examination of CodeKit, I figured I’d roll two projects into one by reviewing CinemaGraph.
An under hand pitch
CinemaGraph is unusually simple. It’s a one trick pony that allows you to create animated “stills” from a video. The end result is a picture that has selected elements animated, an effect increasingly seen on video billboards in movie theaters and kiosks in malls.
Due to the extreme simplicity of the program, videos thus need to be captured with Flixel in mind: stationary and via tripod. Any other serious processing, such as stabilization or color correction will need to be performed by another video editing or video compositing program. Quite simply, if you do not plan ahead, you probably won’t be able to create meaningful results.
It’s also an effect that can be recreated in Apple’s (extremely more powerful which can be bought for half the price) Motion, Adobe Affect Effects, and even video editing programs such as Final Cut Pro, Adobe Premiere, and Avid Media Composer. Within these programs, it requires a few more steps: a still frame, a masked video layer and then manually looping the video with fade transitions, the last step being the most tedious.
To be fair, Flixel makes achieving this effect much easier than using any of the aforementioned programs.
In action…
For my experiment, I used a time lapse I captured with HyperLapse on my iPhone 6 during a recent wind storm in the Pacific Northwest.
Flixel’s program is incredibly simple, open up a video, trim your loop and then start masking. Your results are revealed in real time. Its fast and its easy.
There’s no keyframes, no animated masks, no video steady cam. The only controls beyond masking are repeat, playback speeds and crossfade duration. The only features are Instagram-like Filters and basic color management.
Anyone familiar with motion graphics or video compositing…. hell, even just Photoshop can pick up and start using Cinemagraph Pro, and that’s a good thing. Flixel deserves kudos for a simple, fun and easy to use application. Without so much as a tutorial, I was able to produce instant usable results first try for a professional project.
Pro though, it is not.
While I’m a proponent of app developers charging sustainable pricing, $99 is stiff. Compare it to other programs in the same price range: Panic Studio’s Coda or Bohemian Coding’s Sketch or Black Pixel’s Kaleidoscope, all less expensive and fully featured seriously pro-applications by written small studios. While none of these programs are video related, each offers an interface design of the same caliber and are for serious creative professionals.
Most telling is that Apple’s Motion, a full blown graphics compositing application costs HALF the money, and is capable of delivering the same results (albeit not quite as easily) and a ridiculous-to-the-point-of-absurdity more features. I just cannot emphasize this part enough.
Flixel does offer some unique features such as the ability capture video and hand off functionality from iOS to OS X. Its nice but not $50-more-than-Motion-nice.

While Flixel allows GIF export, I found it was extremely advantageous to export to video and use GifBrewery to generate my GIFs.
Final Thoughts:
CinemaGraph Pro is fun, but gimmicky. Its a great way to create infinitely looping stills, suited mostly to nature scenes or creepy statue humans. As an avid hiker, I may find mild use for it, and as a front end web developer, it’s yet-another-tool in my expansive arsenal of media apps. While Apple’s Motion can recreate the effect, it’s much more cumbersome. Motion however, can create animated masks, and use vector and raster masks. Even at creating animated “still”, Motion has the upper-hand.
The real problem with Cinemagraph is entirely its price.
Easily the most telling part is the app was temporarily on sale for $15 on the App store after being slashed from $200.
At $99, I cannot in good conscience recommend it to anyone other than working professional who has a seriously need for it. Apple’s Motion is insanely good deal these days. It certainly has a higher learning curve but its fantastically more powerful.
Flixel’s application at somewhere between $15-$25 seems like the correct price. At $99, is a steal, and not for you. Its far too limited. The saddest part is I actually really like CinemaGraph. It’s fast. It’s fun. It works nicely in a motion graphics work flow. I was able to get stellar results first try.
Version reviewed: 1.5
-
How to fix Far Cry 4 Common Glitches - Black Screen - Uplay stopped working - Save Game will not save

The iconic “Scumbag Steve” hat is certainly overused but also eloquently summarizes Uplay.
Common PC / Windows Far Cry 4 Fixes
Gaming and Windows are two things I usually don’t blog about. That said I spent several hours battling THREE separate problems with Uplay, I figured i’d spread the knowledge. Hopefully someone will find this useful. Ubisoft has some great games, so its unfortunate to see them marred so badly by the problematic Uplay service.
GameSpot even has written that users are complaining the game marred with bugs and glitches. It looks as if Ubisoft is aware of plenty of other problems, with a new patch 1.6 arriving on December 30th, 2014.
For those experiencing random crashes, 1.6 patch (weighing in at a hefty 577.4 MB) includes RAM leak fixes among other tweaks. Make sure you’re running the latest version of Far Cry.
Problem #1: I downloaded Far Cry 4 via Steam but I can’t launch the game
Apparently downloading the game from steam doesn’t install everything you need, nor does the game appear to alert you that need additional software. To remedy this problem, You’ll need to download and install uPlay, at the uPlay Website.
Problem #2: Far Cry 4 stopped saving game / Far Cry 4 won’t save game.
In my case, I was able to play Far Cry 4 for several hours before it stopped saving games. If I went to the pause menu and hit Save game, the yellow save icon flashed normally, but my mouse pointer disappeared and my keyboard stopped working. The game acted like it was still running properly, as the menu sfx continued to play and the menu background animations continued to run.
I couldn’t find a straight answer for this but I figured out a solution. It appears to be that the Uplay service (responsible for managing game saves) no longer has the correct permissions to save the game. Essentially, the Uplay service has become locked out of its own directory. To remedy this, do the following:
- Locate the Uplay service, it should be under Program Files/Ubisoft/. Drag it to a safe location, such as the desktop. (We’ll need it for later).
- Download the Uplay installer and run the installer.
- Drag from your old Uplay folder the Save Games folder into the newly installed one.
- Open up data, drag over all the missing files into the Ubisoft/data folder. Do not overwrite any folders.
- Launch the Uplay application. It should take a few moments to sync up.
I highly recommend preemptively following The Honest Canadian’s fix (see below) to prevent any future problems from happening.
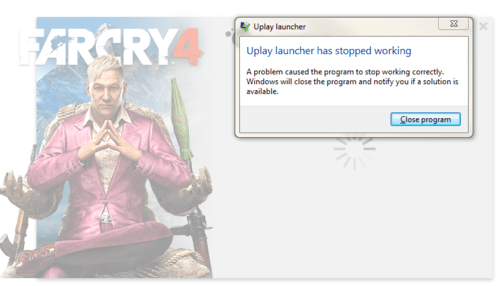
Problem #3: Uplay launcher has stopped working. A problem caused the program to stop working correctly.
Part 1 - The Honest Canadian’s fix
Another studious blogger (The Honest Canadian) posted a fix guide here, complete with pictures. However it didn’t quite work for me. First try Honest Canadian’s fix, (if it doesn’t work, you won’t harm anything).
- Locate your Uplay Folder, under Program Files/Ubisoft/
- Right click the folder and choose Properties.
- Click the ‘Security’ Tab and click ‘Edit’.
- Select your User profile (the one that reads YOUR\Users and set the Allow column of check marks to ‘Full Control’. Click Ok.
- Launch the Uplay application to verify it is working.
However, this didn’t work. I attempted to declare ownership of the folder only to find the permissions had been set in such a way that all the files and folders couldn’t be changed by me or any other user.
You may find that you cannot alter any of the settings in the Uplay folder.
Verify that you are signed in as an admin. If you aren’t signed in an admin, first try the Honest Canadian’s fix.
Part 2 - The Honest Canadian’s Fix didn’t work :(
Assuming you are signed in as an admin and the Honest Canadian’s fix did not work, you’ll need to combine double whammy of my Save Game fix and the Honest Canadian Fix.
- Locate the Uplay service, it should be under Program Files/Ubisoft/. Drag it to a safe location, such as the desktop. (We’ll need it for later).
- Download the Uplay installer and run the installer.
- Drag from your old Uplay folder the Save Games folder into the newly installed one.
- Open up data, drag over all the missing files into the Ubisoft/data folder. Do not overwrite any folders.
- Launch the Uplay application. It should take a few moments to sync up.
- Right click the Uplay and choose Properties.
- Click the ‘Security’ Tab and click ‘Edit’. Select your User profile (the one that reads YOUR\Users and set the Allow column of check marks to ‘Full Control’. Click Ok.
- Launch the Uplay application to verify it is working
Problem #4: MSVCR100.dll Missing Error
I haven’t encountered this but during my searching for answers I saw this fix. If you see this, you need to Install the redistributables
- Go to
<path-to-game>\Support\Software\ - Install all items in this folder.
Problem #5: Crashing at Start Screen
Again, this is an issue I haven’t experienced but other players report some success doing the following:
- Turn uplay to offline mode and play offline campaign.
- Rebooting if problem continues.
Nerd Stuff:
I probably won’t be able to help anyone troubleshoot their Far Cry problems as I’m Mac-using, unix-loving, web developer. Windows is the operating system that I boot to play games and to test Internet Explorer. I’m not a hardcore gamer, but I do enjoy games. Chances are if you’ve been gaming for a half-decade on Windows, you know as much as I do if not more.
Windows users may not understand this, but the permissions issue frustrated me immensely without the ability to just jump the terminal and type: sudo chmod -R 777 /Program Files/Ubisoft/Uplay. However, permissions are permissions and can be a pain on any OS.
Also, shout out to the Honest Canadian, whoever you are, you magnificent bastard. His/her/their(whatever preferred pronoun)’s post lead me to pin-point the save game issue as a permissions issue.
Thanks for reading! I’m all ears for feedback, and happy to respond.
Edit: Dec 4th, 2014
Added MSVCR100.dll + Start Screen fix.
Edit: Dec 30th, 2014
Added info about the Far Cry 4 1.6 patch
-
Adding Ringtones - text tones to - iOS using iFile
Before we get started…
Disclaimer: This tutorial is for for jailbroken iOS 7.x / iOS 8.x phones with iFile, available via Cydia. iFile is a utility that allows you to access your phone’s file structure. This will NOT work with non-Jailbroken iOS devices. You can add custom ringtones and text tones using non-jailbroken devices.

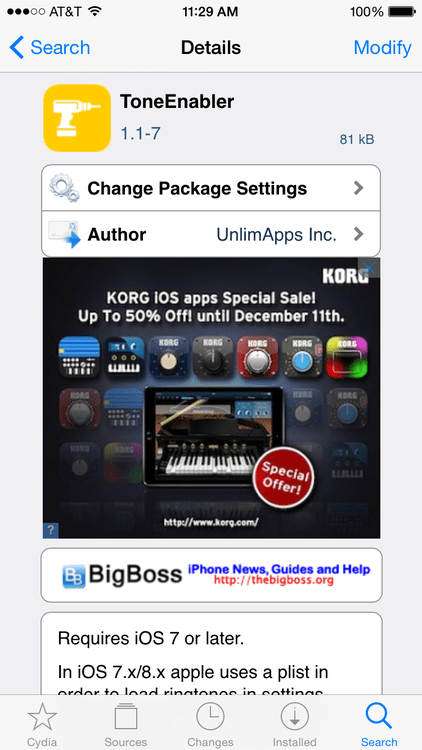
Image: iFile logo. iFile is easily one the best jailbreak mods money can buy
I decided recently I’d like to add the Mac OS Classic sounds from OS 7, OS 8 and OS 9 on my iPhone, however I was at work and couldn’t sync my phone to my work computer. Besides, who doesn’t love the Wild Eep, Sosumi or Quack?
You can download classic error sounds here. Edit: this url now no longer seems to work, see for more details. The Mac OS classic sound pack even comes with .m4r versions of each file, iOS’s native ringtone/text tone format.
Not one to be deterred so easily, I decided to do it manually.
Step 1:
First connect your iPhone and computer to the same WAP (wifi network).
Step 2:
Next, fire up iFile and click the web server (the globe icon).

Step 3:
Plug the IP address into your web browser on your desktop computer (In this example its 192.168.0:103:10000).
Step 4:
Locate the Ringtones folder, in will located in var -> /stash -> _.somefilename -> Ringtones.
Note: You should have several folders in /var/stash/ so you’ll have manually locate it.

Upload your .m4r sounds in the Ringtone folder, they should be in the .m4r format. There are several utilities that can do this for you or you can use iTunes.
Step 5:
iOS 7 & 8 use a .plist to list your ringtones. In theory, you could manually alter so your new sounds show, but its much easier to use a Cydia tweak.
Connect to Cydia and search for ToneEnabler. Its free, tiny and open source and will allow iOS to find your new ringtones without using a plist. Once installed, any manually installed ringtones will show up in the Preferences -> Sounds lists.
Install the tweak, (it’ll require you to Restart Springboard).
Step 6
Enable your sounds on your iPhone from Preferences -> Sounds

And that concludes manually adding custom ringtones and text tones to iOS via iFile.
More iFile Tutorials:
-
Speed up Modern.ie virtual machines in VMware
If you haven’t been to Modern.ie and you’re a web developer, you really should. Microsoft provides free VMs (Virtual Machines) for pretty much every Internet Explorer configuration imaginable for every major VM platform: Parallels, VMware, VirtualBox etc.
Strangely the VMs come pre-configured with below the recommended settings for VMware. It only takes a minute or two reconfigure the virtual machines properly.
Step #1:
Shut down your virtual machine
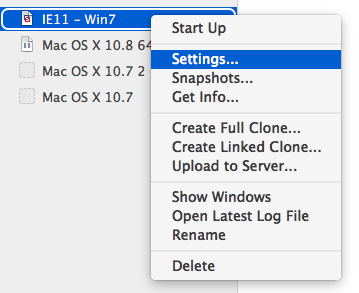
Step #2:
Right click your VM and click settings
Step #3:
Under settings, click “Processor’s and Memory”. First you’ll want to give your VM access to at least 2 processor cores if you’re on an i5 or i7 or Core2Quad..

Secondly, you’ll want to allow the VMware machine access to at least the recommended amount of RAM. If you’re a a computer with an ample amount of RAM (16GB) you may want to give double the recommended amount of RAM for increased performance.
You may note the “Enable Hypervisor applications in this virtual machine” which may benefit speed for Windows XP, Windows Vista and Windows 7 configurations and Parallels recommends it for speed.
To quote StackOverflow poster David Pokluda
The main difference is that Hyper-V doesn’t run on top of the OS but instead along with the system it runs on top of a thin layer called hypervisor. Hypervisor is a computer hardware platform virtualization software that allows multiple operating systems to run on a host computer concurrently.
Sounds good right? However for Windows 8 it requires additional configuration and so does Windows 8.1. You’ll want to enable Hypervisor for Windows 8 if you intend to use Visual Studio or the Windows Phone SDK. Note: If you do not properly configure it will decrease performance for Windows 8 since Windows 8 has drivers for Intel Vt engine built in.
So should you or shouldn’t you use it? For Windows XP, Vista and 7, yes, otherwise for Windows 8, check the links above. If you have any doubts, you can safely skip enabling hypervisor as it only provides modest gains for VM performance when running one VM for browser testing.
Step #5
Boot your VM, VMware may ask you to upgrade, click yes. Once booted Windows will install new drivers and need to reboot. Reboot one last time, and enjoy.
-
Gaming services are the new shovelware
On Tuesday, November 25th, I posted fixes for the video-game, Far Cry 4. It was the most read blog post I made in November despite only being up for 5 days.
While writing the post, I could barely contain my absolute disdain I had for the new gaming services / digital distributions and digital rights mechanisms.
Gaming services are the new shovelware.
In the past few years, after watching the rise of Valve’s Steam and Apple’s App Store, in an effort to successfully monetize intellectual property, we’ve seen an explosion in gaming services…. mostly forced upon users.
The idea is simple, if you design a game that requires a service/distribution platform service, then buyer is converted into that service’s user base. However, these same companies still need Steam in order to reach customers and thus you have services that replicate (often poorly) features that Steam has perfected over the course of a decade.
The offenders are many: Rockstar Social. Uplay. Windows Live. Origin. Yet, none of these services incentivize users to love them. Instead of buy -> install -> play, the wonderful three step process that Valve introduced and Apple took and ran away with. Now, when you buy a game on Steam, you have to buy -> install -> register for service -> verify registration -> sign into service -> play.
These would be a minor annoyance if they always worked smoothly but often they don’t.
Some services are only quasi-evil MyCrysis by CryTek and WB Play is nagware at best. A very small handful of services are good, Gearbox’s SHiFT is completely optional and nag-free. You can chose to sign in, get some nice bonuses and it doesn’t try to replicate the functions that Steam does. The WB gaming service with Shadows of Mordor I’ve successfully avoided. I’m not sure what it does (it replicates some social functions that Steam does) but I don’t care. I don’t play games online (besides Borderlands).
In the past two years, I’ve had three separate games rendered unplayable entirely thanks to their services: Max Payne 3, Fable 3 and Far Cry 4. I am not hardcore gamer. I don’t even call myself a gamer, nor do I play a lot of games. I play games occasionally in Windows on my Mac Pro. With Max Payne 3, I could not play the game until I signed into service and unfortunately under OS X would not let me sign in. I had to download the 30 GB game in Windows, sign up in a web browser (sign ups within the game were broken) and then sign into the game, save my game, reboot and copy my game save to Max Payne in OS X. Fable 3 defeated me. The save game corrupted so I stopped playing. Not long after, Windows 7 borked and I had to reinstall (I kept all my data). I forgot all about Windows Live. Fast forward to months later, I was ready to try my hand at Fable 3 again. Sadly, since I don’t know what email address I registered the game to I can’t sign in to play it despite having a legit key tied to my Steam account. Most recently Far Cry 4 had not one but three separate glitches that broke the game, all entirely thanks to Uplay. After hours of work, I managed to fix it and even documented how in a blog post. I’m privileged class of user, who’s been who’s had been using computers since 1992, had internet connection since 1997, has a technology degree, and works as a web developer. When I play games, I’m not out to replicate my job.
We’ve seen some entirely terrible schemes, such as Ubisoft’s Uplay scheme the required an active internet connection AT ALL TIMES, Window’s Live’s geo-regioning (akin to a DVD or Blu-Ray) which can render a game unplayable. Origin has been accused of spyware, so much so that it’s EULA violates German law.. WB Play has yet to fully materialize but I fear we’ll see something akin to UltraViolet. I’ve gone as far as to use hacks to remove said services on games I’ve legally owned.
I was thinking I may eventually pick up Assassin’s Creed: Black Flag, but now I won’t. This is plea that’ll land on def ears but please stop using proprietary systems to manage games. If they offer enhanced functionality, let me choose to opt in. Gearbox’s SHiFT should be the gold standard: Optionally enhance your game, and do not replicate functionality that Steam already provides (and does a better job of).
Ubisoft Uplay, Electronic Arts Origin, and Microsoft Windows Live as a paying customer please stop, don’t turn me into a pirate. I love Steam and I hate your service(s).
-
Tumblr likes vs Page Views
On September 2, 2013, I wrote a post entitled “When learning to code always type it, do not copy and paste…“ It’s a clever anecdotal bit of advice that I read once on someone else’s blog. I’ve tried to track down the original source but have never been able to do so.
As of writing this, it has been liked 18 times and reblogged 8 times. That’s just a tiny ripple on Tumblr but its easily my biggest success in the Tumblr-verse.
The Tumblr platform
Tumblr’s biggest draw is its ability to easily reblog content from other sources. t is a novel idea as it allows content to be reshared on someone's own blog easily. The end result is usually a user’s collection of images and quotes that a user finds interesting or fits a theme. Combined with the ability to follow other bloggers, Tumblr has lead to the creation of range of large and diverse communities.
That said, I originally selected Tumblr as my blogging platform since it provided the right amount of customization, ease-of-use, and external management. Having set up more than a few Word Press blogs, I wanted to avoid maintenance as much as possible. The community aspect of Tumblr is a bonus, but I almost never participate in it, and almost never reblog or reshare content.
Statistically speaking, reblogging is an interesting proposition. Any time content is reblogged or found via the Tumblr hashtag search; it cannot be tracked by Google Analytics as the GA-code isn’t embedded within posts. However, I can track how many referrals I get from other blogs, as my posts are attributed to me and reblogged posts may create enough agency to drive someone to visit my blog.
How does this stack up against likes?
To better understand how likes translate to page views, it's important to understand what is normal traffic for my blog.

Weekly sessions (unique visitors) from September 2nd, 2013 to November 15th, 2014.
My blog gets roughly 600 sessions per week according to Google Analytics, meaning that it it gets roughly 600 separate visitors a week. A single session is defined by Google as a single visitor to the same website within a half hour period. If a repeat visitor comes to my blog twice within a half hour or clicks another page, this is counted as a single session. If a visitor revisits my blog 2 hours later, it is counted as a new session. Google Analytics also lets you track how many repeat visitor your web property receives.

Top 10 pages by Pageviews
One might expect my most liked post to show up in my top ten pages, since September 2nd, 2013, but it is plainly absent and doesn’t even appear within the top 100 posts on my blog. One might also expect that my top posts are nearly as successful on Tumblr as my most reblogged post.
My top post accounts for 22.56% of my traffic but only has 4 tumblr likes and 2 tumblr reblogs. In fact, none of the top five posts have more than 2 reblogs or 4 likes.

My most reblogged post has a grand total of 8 pageviews. The spikes in the above graphic represent a single page view.
As we can see, there’s almost no correlation between likes/reblogs and pageviews on a post. Perhaps, instead of driving pageviews to the reblogged/liked article, one again might assume Tumblr is driving more visitors to the first page of my blog, which isn’t the case.

Social media makes up for less than 1% of all the traffic to my blog and of that, Tumblr only accounts for 24.49% of social media traffic, meaning that Tumblr accounts for less than 0.25% of my entire traffic, tallying for a grand total of 60 visitors.
Processing the data…
What we can infer from this is that Tumblr rarely results in traffic acquisition for my blog. While I may get additional exposure from reblogs, it rarely results in anyone visiting my blog directly. Google Analytics reveals that there’s little correlation, if any, between likes/reblogs and pageviews. Tumblr also obfuscates traffic through reblogging and its own internal “follow” news feed. While I can see how many followers I have, its impossible to know how many people are reading my posts through Tumblr. My hunch is that it isn’t many.
Depending on the nature of the Tumblr blog, it is possible to be far more successful within the Tumblr-sphere than it is via web searches. People creating popular image macros/gifs/photos that aren’t easily indexed by search engines possibly see far more reblogs than pageviews.
While my case study can really only can accurately reflect what is true of my own blog, I’d be willing to bet in the case of technical blogs featuring long posts probably do not fair nearly as well on Tumblr. When gauging success, Google Analytics is a far better metric for this instance.
-
64 Bit Google Chrome Available Today
The Chrome team is delighted to announce the promotion of Chrome 39 to the stable channel for Windows, Mac and Linux. Chrome 39.0.2171.65 contains a number of fixes and improvements, including:
- 64-bit support for Mac
- A number of new apps/extension APIs
- Lots of under the hood changes for stability and performance
Now we can use 4GB+ for a single tab in Chrome.