Occasionally in your adventures on the internet, you’re bound to encounter cue/bin disk images. For this example, I’m using an old PSX game, Crash Team Racing and converting it for use with pcsxr, OS X/Windows Playstation emulator, however, this isn’t the only reason for converting to ISOs as Parallels / VMWare and VirtualBox all use ISOs.
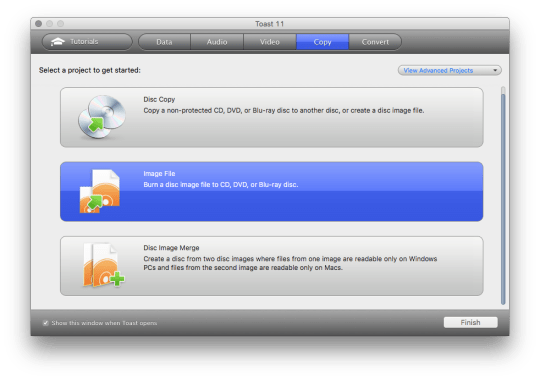
Method 1) Roxio Toast
In the era of disk burning, Toast was THE utility to own and still is, if you happen to still use optical media. If you happen to have a copy, it’ll convert BIN/CUEs to ISOs without much trouble.
Step 1) Launch toast, select image file
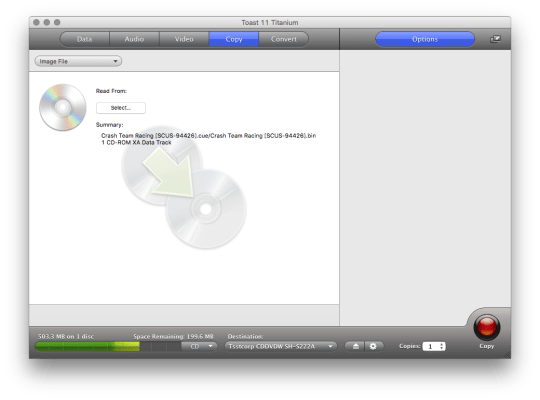
Step 2) Drag the bin file to Toast
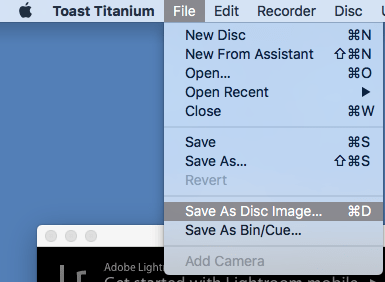
Step 3) Select from the file menu, “Save Disk Image…”
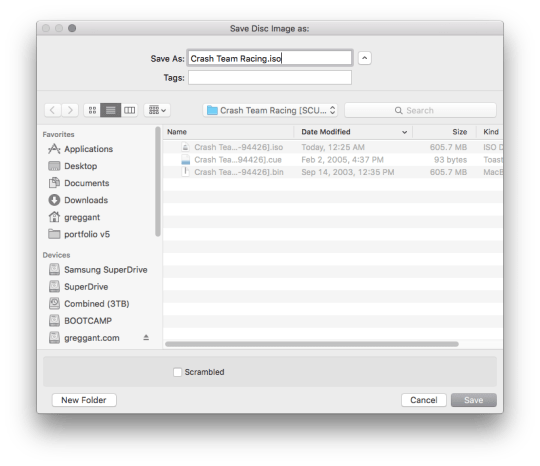
Step 4) Save ISO
You may get an error prompt on naming the disk, type in a name and proceed. At the actual save dialog to be sure to change .toast to .iso and save. Congrats, you’re done!
Method 2) Binchunker
Binchunker is a CLI utility, meaning it’ll take a few terminal commands to operate. Its pretty easy once its set up as you simply need to run a single command to spit out an ISO. Most guides for using Binchunker are pre-10.11 (El Capitan) and suggest installing Binchunker to /usr/bin. OS 10.11 really wants you to avoid using this so we’ll be using the “rootless” method. Users running old versions OS X may be able to use the now defunct GUI wrapper BChunkerFE, but I was unable to, despite my damnest to make it work. To my knowledge, the only freebie utility for OS X that’ll convert ISOs is Binchunker, fortunately, its fast, free and easy to use. Users with even basic terminal familiarity shouldn’t have any problems.
Step 1)
Install MacPorts; the full instructions are here including the download links. MacPorts is package manager and compiler for open source software.
Step 2)
Open a terminal and type:
sudo port install chunk
Now you’re able to run binchuncker
Step 3)
Binchunker requires the paths to the bin and cue files and always follows the following pattern:
or the less terminal savvy, dragging files to the terminal window will automatically type the path to the file. In the terminal type (with a trailing space) and do not hit return:
bchunk -v
Drag the bin file to the terminal window, it should read:
bchunk -v path-to-file/my.bin
Make sure there’s a trailing space after bin and drag the cue file. It should now read:
bchunk -v path-to-file/my.bin path-to-file.cue
Now name your file by typing in your desired name. Note: You do not need to type .iso as the file will be given the .iso suffix.
Hit return and binchucker will do its magic; the completed .iso will end up in the root of your user/home directory. Congrats, you should now have an ISO file.
If you’ve recently updated to OpenEMU, you may have a problem importing newly supported consoles (PSX, N64, etc.) or are having problems playing games after the update.
Note: If your update didn’t take, you'd still see the 1.x light grey menu bar, the 2.x theme is now dark. See step 3 for example.
Step 1)
Go to /Users/<your-user-name>/Library/Application Support/ and locate the OpenEMU folder and drag it to a temporary spot, such as the desktop.
Launch OpenEMU, it’ll take a second to launch. Then run check for updates. Likely your update didn’t fully take, and you’ll see the pop up for OpenEMU 2.0.1. Install your update.
Note: You may need to manually install the OpenEMU drag and drop if you do not see the update.
Step 3)
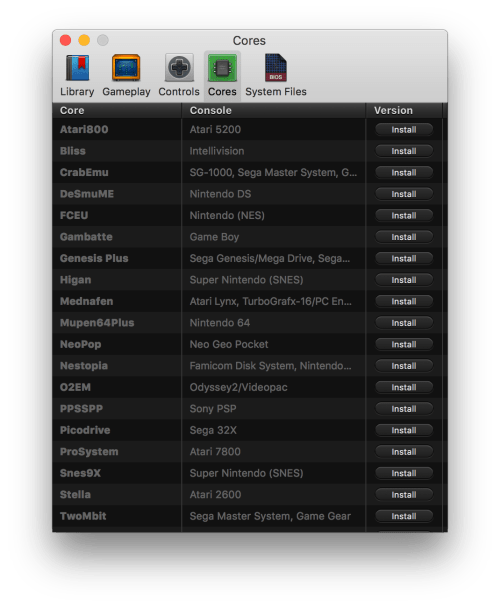
Relaunch the application. You should now see more console options. Quit.
Next, you’re going to need to go to /Users/<your-user-name>/Library/Application Support/OpenEMU and your old OpenEMU folder.
Drag your old Games Library folder into the /Application Support/OpenEMU folder.
Step 3.5) Optional
Recovering your Game Saves requires more work. There should be several more folders with names of the emulation cores like PicoDrive, SNES9x, GenesisPlus, etc. and Save States folder. Drag all these folders (excluding the Cores, Bindings, Bindings Configurations and openvgdb.sqlite file).
Step 4)
Relaunch go to your preferences. Reinstall your cores. Congrats! You should have a working OpenEMU.
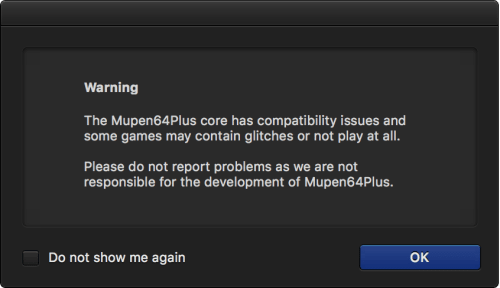
Note:, Mupen64Plus won’t play all games. Super Mario 64 is a good test.
As the lead front end dev for on a redesign of a Fortune 100 company’s corporate site, I was told the client loves gifs... so much so they want to have the ability to post animated gifs for their Hero image.
Their Hero image is size is supposed to be 1440 x 700… and double density. So much for Google Site Speed.
Some will burn me for saying this but I think shutting down Apple’s pro software line is not such a bad idea. The problem of the OSX platform is not the software.
There’s a reason why my blog posts about Mac Pro drive the majority of traffic to my blog and echos my own reaction to the abysmal Mac Pro 2013. In the nexi-verse of 2016, creative pros are switching to Windows.
If hackintoshes were more viable, I’d of ditched Apple hardware ages ago. I tried. I really did.
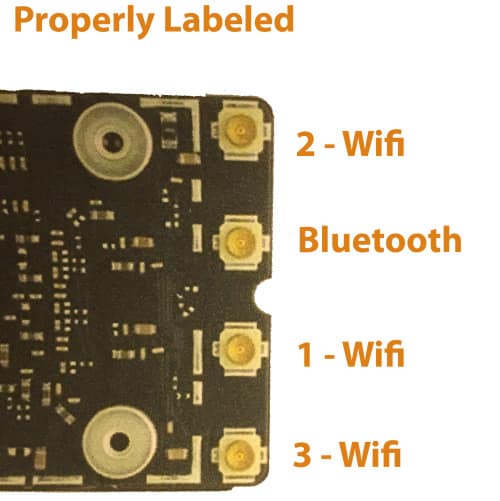
I recently purchased a BROADCOM BCM94360CD from OSXwifi.com, a site carrying Airport replacements for a variety of Macs with the latest and greatest in wifi. For 2008 Mac Pros, this means adding not only 802.11 AC, but Bluetooth 4.x for features like Airdrop and handoff/continuity support.
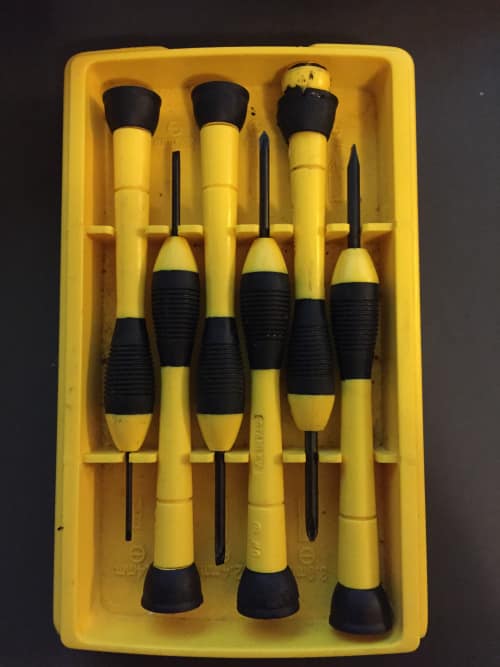
However, the instructions included were a bit thin so I decided I’d post a walk through for sanity’s sake. You’ll need a set of precision Phillips screwdrivers, I picked up a set years and years ago from Fred Meyer.
Step 1) Remove your 3rd Drive Bay
Open on the case and remove the 3rd drive bay, you may need to remove PCIe cards depending on if they’re impeding you.
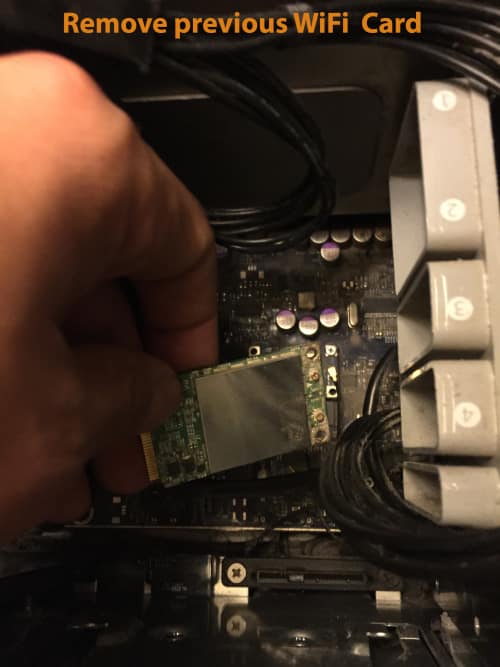
Step 2) Remove your Wifi Card (if it is present)
The Wifi card should be located need to the interior of the PCIe chamber. You’ll need to pop off the antenna cables, it doesn’t take much force. Unscrew the single screw.
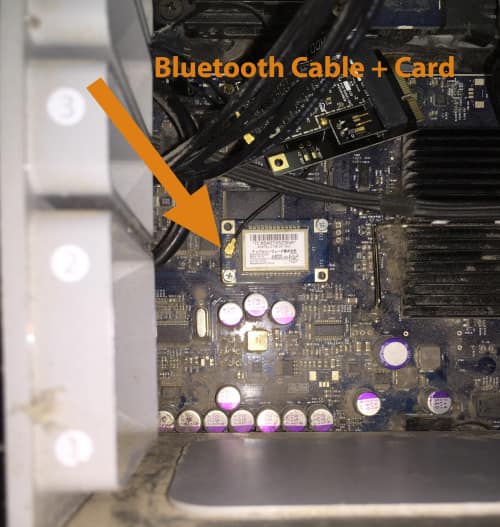
Step 3) Remove the Bluetooth card
To unseat the factory bluetooth card, you’ll need to unscrew two screws, and the antenna. I managed to strip on of the screws and gave up and removed it by brute force.
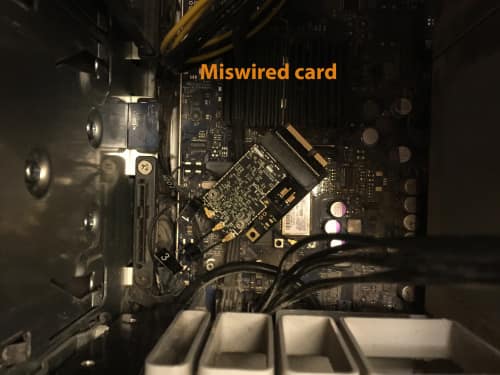
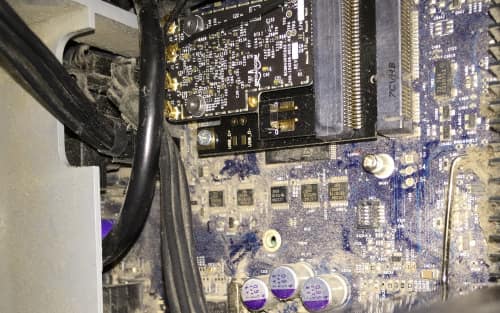
Step 4) Wiring it up
The instructions that came with my card are scant at best, and mislabeled for the antenna cables. There’s an additional 12 pin DIN cable (with only two wires) that connects to the two pin DIN on the card, similar to a USB internal connector. I assume this is needed for other Mac models, but the Mac Pro 2008 doesn’t have any matching pin outs and I didn’t use it. You can safely ignore the cable.
After unsucessfully wiring it up, I found the reviews posted on OSXwifi card helpful. Special thanks to J3$T3R, whoever you are, you magnificent semi-anonymous bastard.
It took a little trial and error to get my wifi card working.
So here’s the corrected version so you can avoid my trial and error.
Fair warning, it can be a bit of a pain to pop on the antenna cables, and the label flags can be jammed down. Its MUCH easier if you plug in the cables before you seat the card into the slot. You’ll have potentially two hands to work with instead of one. I learned this the hard way the first time I install a wiifi card in a Mac Pro.
The card will require the screw to seat properly so try not to lose it (the card will function even if not buckled down).
Finish up shop and boot on up!
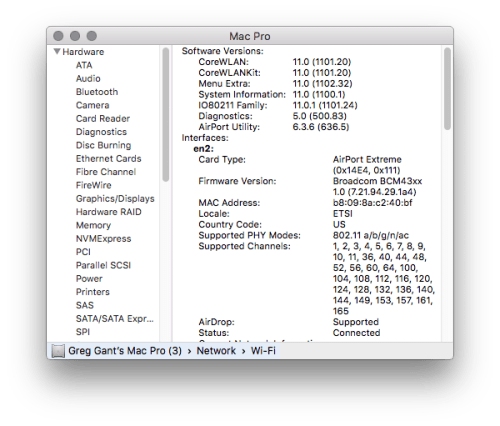
OS X 10.11 recognized my card out of the box. I tested Airdrop, bluetooth and the 5 GHz ac band on my wifi. Everything works like it should. Note: If handoff/continuity isn’t working after installation, sign out of iCloud and sign back in.
OS X reports Bluetooth 4.4.2f1 16391, same as my MacBook Pro Retina The software versions match later version MacBooks.
Happy Mac Pro-ing!
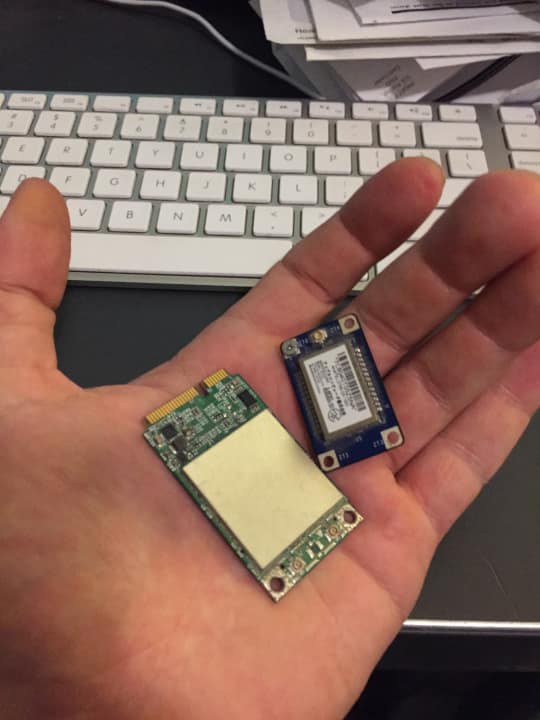
Holding both the 802.11 b/g/n + bluetooth cards for a Mac Pro.
In your OS X adventuring you may come across this message:
“Application Name” is damaged and can’t be opened. You should move it to the Trash.
Fortunately, there’s a giveaway. The icon shown is the Security & Privacy icon. Go to your prefs, to Security and Privacy and in the “Allow apps downloaded from:” set to Anywhere.
Now try relaunching the application. It should launch now.
Then go back to your security and privacy and set it back to “Mac App Store and identified Developers” (if it wasn’t set there before, you really should. Some of the best apps aren’t in the Mac App Store)
“Not only that, a good front end developer also needs to have an understanding of marketing. That means knowing the psychology of the consumer, prioritizing the accessibility and usability of the product, and maintaining strong SEO. It also means having a basic understanding of design theory, and occasionally, working with graphic designs that are nearly impossible to implement.”
Medium almost puts their finger on the pulse that makes front end development flow: tacit skills.
I’m a bit curious how we will ramp up Front End Developers in the future. A room full of Front End Developers tends to be a group of 30 to 40 somethings: mostly from various walks of life that fell into it. There’s the once-musicians, designers who dabbled in code, the former “webmasters”, the-lady-who-was-the-only-one-who-knew-how-to-update-her-once-employers-website and even the lone ex-flash developer. The unifying trait between all these people is experience. Experience from mistakes. Experience from edge cases. Experience from simply engaging.
Most of us had the benefit of learning when the internet was young and simple. We grew as the internet did. A lot of us went from frames, to tables, to css, to css grids, to responsive, and to HTML5/CSS3. We remember the curse of IE6, and know without looking at a chart that SVGs won’t render in IE8. We all remember the days before stackoverflow, and codepen, the days before angular, ember, backbone and react…. and that’s the problem. You can’t replicate a decade of experience and we haven’t figured out a way to teach it either.
The only answer I see is a fracturing of front end development into multiple trades based on specialization as a front end developer that is a master of all is becoming as much of a unicorn as a full stack developer.
I followed the instructions and found that Apache still was giving me Internal Server errors and Internal Server error 500s. It turned out for whatever reason; the mystery was my vhosts needed error logs.
Previously my vhost entries looked like this:
 <VirtualHost *:80>
        DocumentRoot "/Users/emerge/Development/site/"
        ServerName site.lvh.me
        <Directory  "/Users/emerge/Development/site">
                 AllowOverride All
                 Require all granted
         </Directory> </VirtualHost>
Once I added both the error log and custom log, I stopped getting the errors.
<VirtualHost *:80> DocumentRoot "/Users/emerge/Development/site/" ServerName site.lvh.me ErrorLog "/private/var/log/apache2/site-error_log" CustomLog "/private/var/log/apache2/site-access_log" common <Directory "/Users/emerge/Development/klarquist/_html-cuts"> AllowOverride All Require all granted </Directory>
Considering that highest end iMac best all but the highest end Mac Pros, its a safe bet that the Mac Pro is due for an upgrade. Pike’s Universum found evidence of a likely new Mac Pro model with 10 USB 3.0 ports.
Call me a cynic, but if the hypothetical Mac Pro returned to one with 4 PCIe slots, one could add as many USB 3.0 ports as one so desire.
11/3/2017 update: It's happened again, this time it wasn't encryption on my boot drive but rather my Time Machine Hard drive. After PRAM reset it showed up. Fortunately I was able to login using my Time Machine's password, not my admin password. I did this after trying (unsuccessfully) to boot Time Machine. When I typed in my Time Machine password, and booted off the Time Machine drive. Once done booting, I set my boot drive to my normal drive in my recovery menu. I was able to boot again, problem free. The problem went away this time without all the steps below.
I recently updated to OS X 10.11 El Capitan and received an “Update Needed” login screen, that looked like the following, but without a guest user.
After a bit of digging, it was apparent that FileVault was the culprit (encryption). I booted up my copy of Mountain Lion and was able to access my drive with my encrypted password. However, it was apparent I needed a newer OS to decrypt it as the option was greyed out.
I pulled my drive and stuck it in an external enclosure and fired up my MacBook Pro.
1) Access the drive from another copy of OS X
Boot your problematic Mac in Target disk mode or plug the drive into an external enclosure or simply boot another copy of your OS or recovery partition, the requirement is Yosemite or El Capitan (and perhaps Mavericks) to decrypt Yosemite/El Capitan drives,
2) Launch Disk Utility
If you’ve booted from your recovery partition, disk utility is available on the menu> Otherwise, Disk Utility can be found in its normal location: /Applications/Utilities
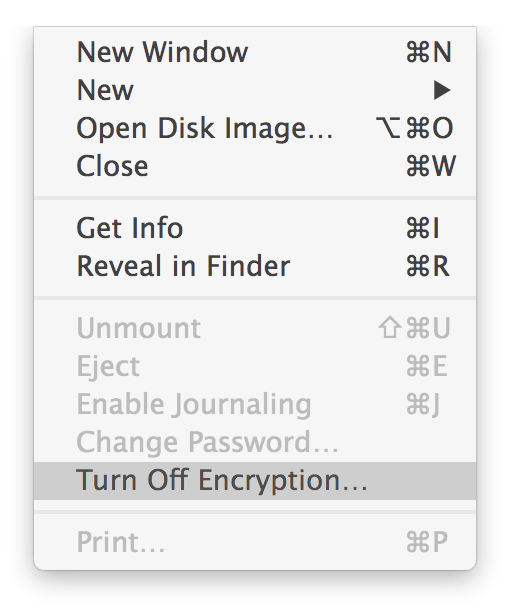
3) Find the drive in question, and select Turn off Encryption under the File menu.
Turn off encryption, maybe elsewhere depending on your OS version. See the previous link for more details.
4) Check status
You can check the status using from the terminal:
diskutil cs list
Look for the"Conversion Progress," note if you run this right after enabling the task you may see that your conversion progress is -none-, wait for a few as the drive is still unlocking.
It took me several hours to decrypt a 750 GB SSD through USB 2.0. Now my drive is bootable. No need to reinstall. You can re-encrypt the drive using FileVault in the background.
If this happens to a decrypted drive, try option booting. If that doesn’t work, run disk utility on the offending drive then option boot.
A break from web development thanks to Roxanne, Christa’s English bulldog. Video from Monday at my office, Emerge Interactive. Roxanne understands the game “Keep the balloon from touching the floor.”
Today I was faced with a taxing problem; I’ve been left without any way to use the database credentials for my local copy of a drupal website I’m working on. The only person who knew the server info is out of town, so I was left to get creative.
After several battles trying everything from rewrite rules to middleware; I arrived at the stupidest and best solution. Without needing to modify a single line in my grunt task, I included a link in my footer to my local version of my CSS file, a simple <link href=“local.lvh.me/path/to/app.css”>
BrowserSync refreshes the local CSS file for CSS injection, meanwhile staging server still works. So much for the “correct” solution.
Anyone googling some variety browsersync remote server injection or something to that effect may save some time by just using the stop-gap measure until a better workflow can be established. It’s not a proud moment, but at least I’ll be able to work more smoothly for the remainder of the week.
The problem isn’t BrowserSync but Apache. You’ll need to configure your local server. Following the guide, “Getting CORS to work with Apache” here’s what you need to do. Users using MAMP will have to translate these instructions, to use the MAMP files associated instead of the /etc files in the system.
Step 1) Make sure you have httpd.conf mod_headers.so enabled.
Go to /etc/apache2/ and use your favorite text editor to open httpd.conf, you’ll need to use admin access to edit the file. For non-terminal users, Its easiest done through the terminal.
cd /etc/apache2
sudo nano httpd.conf
Locate
#LoadModule headers_module modules/mod_headers.so
(for me it was roughly about line 120) and uncomment it if it hasn’t been already. (Delete the #).
Save and exit (control x)
Step 2)
from the /etc/apache2/ go to the extra director
cd extra
Step 3) Modify your Vhosts
use your favorite text editor to open httpd.conf, you’ll need to use admin access to edit the file. For non-terminal users, Its easiest done through the terminal.
Hello, I read your post about installing GeForce GTX760 in MacPro. I want to do the same thing and I have some problems. I do not understand why you say that "I needed a grand total of three six-pin cables". The motherboard of mac has two six-pin connectors, the graphic card has one six-pin and one 8-pin connectors. So you (I) need one six-to-six and one eight-to-six cables. Is this not right ? Thank you for you answer. Best,
Anonymous
The Mac Pros have the funky micro 6 pin adapters (same as the Mac G5s from yesteryear), the trick is utilizing both the 6 pin adapters. So one port will connect to the 6 pin, and the other port will need a Y adapter for 6 to 8 pin, and then back to the graphics card. My graphics card came with a Y adapter for 6 to 8 pin adapter so I only had to get another micro 6 pin to regular 6 PCIe adapter.
The nVidia model is the exact one I used since it has a built-in Y adapter, which is required for any 8 pin to 6 adapters are all are Y too.
 Note: If your update didn’t take, you'd still see the 1.x light grey menu bar, the 2.x theme is now dark. See step 3 for example.
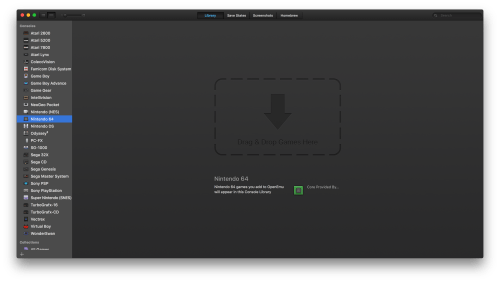

 Holding both the 802.11 b/g/n + bluetooth cards for a Mac Pro.


 Anonymous