-
To use Migration Assistant or not to use Migration Assistant
You've got a new Mac. The box is open, the screen is pristine, and you're staring at the setup screen, wondering: Should I use Migration Assistant?
Whether to use Migration Assistant is a constant debate on Mac communities. Before I answer whether you should use it, we need to take a peek under macOS's hood.
The APFS Architecture: Why Your System Stays Safe
Modern Macs use APFS (Apple File System), which creates a container structure with multiple volumes. I highly recommend for an in-depth breakdown , and it has downstream reprocussions for Migration Assistant.
The
/Systemvolume is a read-only sub-partition that's sealed and cryptographically hashed. Your macOS installation files are signed, and the system volume cannot be modified by Migration Assistant, or by anything else, for that matter, outside of Apple-distributed updates. Even if Migration Assistant wanted to alter your OS, System Integrity Protection (SIP) prevents it. Even if SIP is disabled, and system file are modified, updating macOS will replace any modified files with the Apple-hashed versions.The operating system you get on your new Mac stays exactly as Apple installed it. Migration Assistant can't touch it, and that's a feature, not a limitation.
For the nerds out there, in older versions of macOS (Dating back to OS X),to bring more recent versions of OS X/macOS to older hardware or Hackintoshes, people would build scripts. Popular ones in include Pike's Script and DosDUDE1's scripts. However, due to Apple's shifting focus towards a non-modifiable core operating system, scripts became an impediment, as any update would render the computer unbootable by replacing key modified system files with non-modified versions. As this avenue became more precarious, the strategy shifted to bootloaders like Clover and later OpenCore. Prior to booting macOS, the bootloader would launch and perform active memory modifications, load in kernel extensions (Kexts) to bring driver support for unsupported hardware, bypass the Don't steal macOS protection, among other things. This had the benefit of never modifying physical files in macOS, only altering or replacing them in active memory.
In short, it's safe to use Migration Assistant on Macs running OpenCore as none of the modifications are transferrable as they only exist on the EFI partition, something that Migration Assistant is unaware of, and does not exist on Apple Silicon Mcas/
What Migration Assistant Actually Moves
So what does Migration Assistant actually transfer? Here's the complete list:
- User Home folders: Everything in
~/, including documents, desktop, downloads, and all your personal files - ~/Library: User-level settings, preferences, application support files, caches, and all the hidden configuration that makes your Mac feel like your Mac
- /Library: System-wide support files, preferences, and application data (non-system files)
- /Applications: Third-party applications (Apple's system apps are already on the new Mac, so they don't get migrated)
- Documents and user data: All user-created content across your home directories, anything that exists in ~/
- Root-level user-created folders.
Migration Assistant also identifies incompatible files during the process. Intel-only apps on Apple Silicon Macs will be flagged, though they may still run via Rosetta. Apple will likely flag them as incompatible in future macOS versions, but for now, they'll transfer and you'll get a heads-up about potential issues.
What Migration Assistant Doesn't Do: The Housekeeping Problem
Here's where things get interesting: Migration Assistant is not a janitorial service. It's a wholesale transfer tool. Everything moves over, including years of digital clutter, old preferences, cached data, and files you probably forgot existed.
You're still on the hook for cleanup in these areas:
- /Library: System-level caches, old preference files, duplicate support files from applications you've long since deleted
- ~/Library: User caches, old application preferences, obsolete support files, and remnants from apps you uninstalled years ago
- /usr: Third-party binaries and libraries that may no longer be needed or compatible
- Invisible files in ~/: Dotfiles like
.bashrc,.zshrc,.gitconfig, and other hidden configuration files that accumulate over time
The burden of decluttering falls on you. Migration Assistant preserves your data, not your good decisions. Years of accumulated files, old preferences, and cached data come along for the ride, and you'll need to clean house afterward if you want a truly optimized Mac. Tools like Onyx can assist in dumping caches for orphaned utilities.
When Migration Assistant Works Best
Migration Assistant works best under certain conditions:
- Migrating during initial setup: Running Migration Assistant at first boot is ideal, though you can also run it later from
/Applications/Utilities/Migration Assistant.app - Update macOS first: It's recommended to update macOS on the new Mac before migrating, though it's not strictly required to match versions between the two Macs
- Clean source Mac: A source Mac with no disk errors or corrupted files will migrate more reliably. Boot into recovery mode and run the disk utility.
- Reasonable file count: Hundreds of thousands of files to even millions is fine, but many millions may cause the process to struggle. Doing a bit of house cleaning is a wise move.
When to Reconsider Using It
Migration Assistant isn't always the right choice:
- Years of accumulated cruft: If your old Mac has become a digital hoarder's paradise, you might want a fresh start with selective migration instead
- Selective control: When you want to cherry-pick what comes over rather than transferring everything wholesale
- When your new Mac's volume is smaller than the source drive.
One thing that's not a blocker: architecture differences. Intel apps still run via Rosetta on Apple Silicon Macs, and Apple will flag incompatible apps in future versions. Migration Assistant handles this gracefully by flagging potential issues rather than blocking the migration.
Practical Tips for Success
If you decide to use Migration Assistant, here's how to set yourself up for success:
Before Migrating
- Update macOS on the new Mac first and the old Mac (recommended)
- Disable antivirus, firewall, and VPN software temporarily during the transfer
- Ensure both Macs are on the same network and have Wi-Fi enabled
- Have a Time Machine backup as a safety net.
During Migration
- Keep both Macs on the same network
- Close all applications on both Macs
- Be patient, large migrations can take hours
After Migrating
- Plan time for cleanup of
/Library,~/Library,/usr, and hidden files - Check for flagged incompatible files and decide what to do with them
- Test your applications to ensure everything works as expected
Alternatives
Migration Assistant isn't your only option:
- Time Machine restoration: You can use a Time Machine backup as the source for Migration Assistant, which gives you more control over timing.
- Selective manual transfer: Fresh install plus cherry-picking what you need gives you the cleanest start
- Third-party cloning tools: Tools like Carbon Copy Cloner or SuperDuper can create complete duplicates, though they come with the same housekeeping challenges
Wait, you didn't tell me if I should use Migration Assistant!
I'd argue that for most users, most of the time, you should use Migration Assistant. It's a transfer tool, but the rest of the data is your responsibility to manage. It isn't a cleaning tool, thus years of digital baggage will be along for the ride.
For more technical deep-dives on macOS migration, check out The Eclectic Light Company's excellent article on the subject, or Apple's official Migration Assistant guide.
For a tutorial on how to tame your System Data, check out my guide Reclaiming storage/space from 'System Data' in macOS: A tutorial on understanding the System Data usage.
- User Home folders: Everything in
-
Using X11 to run a modern web browser on a PowerPC Mac
The closest thing to a modern browser a PowerMac can run is ancient forks of Firefox from roughly 2014. The forked browsers like TenFourFox, InterWeb PPC, and AquaFox all ship with band-aid fixes to attempt to cobble together more modern features. Modern browsers, these are not. While a PowerPC Mac can't run a modern browser in OS X, it can display one.
This isn't OS X specific even, as X11 exists on multiple Unix-like systems and these instructions should be adaptable to other Unix-like systems as well, like SunOS.
The trick: let another computer do the heavy lifting (Firefox + modern TLS + modern JS), and have the PowerMac act like a dumb terminal that just draws windows and sends keyboard/mouse input. For this example, I'll be using a Raspberry Pi 5 with an NVMe expansion (aka Hat), but any Linux computer will do. If you don't have an always on Linxu box, the Raspberry Pi 5s are fast enough and can be had for about $100~ for the 8 GB version (recommended for this project), consume only about 4 watts idling and NVMe is entirely optional, if you're looking to do this on the cheap, just get a 32+ GB MicroSD card. Plus, you'll be able to do plenty more with a Pi 5 like PiHole for DNS level adblocking, hosting docker etc.
This project uses old-school X11 remote display technology, not VNC which largely streams pixels. The way X11 works is it sends commands like "create a window, draw text here, render this image, handle this click." The results in real-time window updates on the PowerMac, and functionality that feels like an application running (almost) natively on the Mac.
What you need
- Linux computer on the same local network as your Mac
- A PowerPC Mac running OS X (I'm on 10.5 Leopard but this should work in 10.4 Tiger)
- XQuartz installed on the Mac (Leopard's built-in X11 is old and may not behave)
- SSH access to the Pi
Step 1: Install X11 + Firefox on the Raspberry Pi
On the Pi:
sudo apt update sudo apt install -y firefox-esr x11-apps x11-utilsx11-appsgives you quick sanity-test tools likexclock.x11-utilsas well asxdpyinfoso you can confirm you're actually communicating with the Mac's X server.
Step 2: Install XQuartz on the PowerPC Mac
Leopard shipped with X11, but it's old. When I tried to use it, it didn't play nice with the Pi. Install XQuartz's X11 instead.
Grab XQuartz 2.6.1 (this appears to be the last release for Leopard):
https://www.xquartz.org/releases/XQuartz-2.6.1.html
If on Tiger, you'll probably need to experiment with older XQuartz versions; See the archive
Install it, then launch X11. You'll get an xterm window (this is NOT the same as the Mac Terminal). If it doesn't launch with a terminal open, from the menu select New Xterm window.
Step 3: Allow network clients
We'll have to make some security concessions during setup to eliminate any possible complications due to network restrictions.
In the OS X preferences, open System Preferences > Security & Privacy > Firewall, then click the lock to make changes. Click Firewall Options... and disable it.
In X11:
- Open X11 Preferences
- Go to the Security tab
- Check Allow connections from network clients
Then restart X11 (quit and re-open it). This setting often doesn't fully take effect until you relaunch.
Next, in the X11 xterm, run:
xhost +That basically says "anyone on my LAN can open windows on my X server." You can be more strict, but for a retro Mac on a home LAN, this shouldn't be too much of an issue. Once you've set up X11 you can always return to the security settings and tighten things back up.
Step 4: Confirm what X11 port you're listening on
X11 uses port 6000 + display number.
:0= port6000:1= port6001- etc.
From the X11 xterm on the Mac:
netstat -an | egrep '\.600[0-9] ' | egrep 'LISTEN|listen'If you see
6000, you're on display:0. If you see6001, that's display:1.If you see a higher than 6001, often this will create issues; reboot the Mac and try again.
Step 5: From the Pi, confirm you can reach the Mac's X11 port
On the Pi, test the port (replace with your Mac's IP and the port you saw above):
nc -vz 192.168.50.134 6001If it connects (doesn't time out), you're almost done.
Now confirm X11 is really responding:
DISPLAY=192.168.50.134:1 xdpyinfo | headYou should get output that looks similar to:
name of display:    192.168.50.134:1
version number:    11.0
vendor string:    The X.Org Foundation
...
Step 6: Test a simple X app (the victory lap)
On the Pi:
DISPLAY=192.168.50.134:1 xclockIf a little clock window pops up on the PowerMac, congrats — you've got remote X working.
Step 7: Launch Firefox ESR on the Pi, display it on the Mac
On the Pi:
DISPLAY=192.168.50.134:0 \
GDK_BACKEND=x11 \
MOZ_DISABLE_WAYLAND=1 \
MOZ_DBUS_REMOTE=0 \
firefox-esr --new-instance --no-remote
A quick breakdown of the flags:
DISPLAY=...tells the Pi where to draw the GUI (your Mac's XQuartz display), the:0specifies the display number, which we confirmed earlier. 0 = port 6000, 1 = port 6001, etc.GDK_BACKEND=x11forces GTK onto X11MOZ_DISABLE_WAYLAND=1avoids Wayland paths on the PiMOZ_DBUS_REMOTE=0+--new-instance --no-remoteprevents Firefox from trying to "reuse" an existing local GUI instance
If you do not see anything, try flipping between
:0and:1based on what your Mac is actually listening on (remember::0=> 6000,:1=> 6001).Troubleshooting
While AI is a bit of scourge, the recent models of Claude and Chat GPT are excellent at debugging terminal scripts. Even as an advanced technical user, I used it quickly debug my issues when working on this project as I'm new to X11, as I was able to display xclock but not Firefox ESR.
OS X is a bit janky, I'd highly recommend 10.5 as it's supported by xQuartz officially, but I've heard that it can be hacked to work on Tiger. Ports can get "occupied" and cause issues, so a reboot can sometimes help.
Bonus: Launching Firefoxwith X11 from the PowerMac with a script
To make life more convenient, it's pretty easy to make a script to launch FireFox X11 from your PowerPC Mac. One gotcha: Leopard's built-in SSH can be too old to communicate to modern OpenSSH a modern system. You can lower your security settings on said system but the smarter move is to update SSH to a newer version. I'm using a homebrew OpenSSH binary. To install OpenSSH, install TigerBrew onto your 10.4/10.5 Mac.
#!/bin/sh
# Assumes XQuartz is already running on the Mac.
# Allows the Pi to open X11 windows, then SSH into the Pi and launch firefox-esr.

set -eu

PI_HOST="192.168.50.224"
PI_USER="me"

detect_mac_ip() {
 ip="$(ipconfig getifaddr en0 2>/dev/null || true)"
 [ -n "${ip:-}" ] && { echo "$ip"; return; }
 ip="$(ipconfig getifaddr en1 2>/dev/null || true)"
 [ -n "${ip:-}" ] && { echo "$ip"; return; }
 echo ""
}

MAC_X11_HOST_IP="$(detect_mac_ip)"
if [ -z "${MAC_X11_HOST_IP:-}" ]; then
 echo "ERROR: Could not detect this Mac's LAN IP."
 exit 1
fi

BREW_PREFIX="$(brew --prefix)"
SSH_BIN="${BREW_PREFIX}/opt/openssh/bin/ssh"

if [ ! -x "$SSH_BIN" ]; then
 echo "ERROR: Expected brewed ssh at: $SSH_BIN"
 exit 1
fi

# Wide open version (matches the blog post steps):
# DISPLAY=:0 xhost +
#
# Slightly less wild: allow only the Pi:
DISPLAY=:0 xhost +"$PI_HOST" >/dev/null 2>&1

"$SSH_BIN" -t "${PI_USER}@${PI_HOST}" "
 export DISPLAY='${MAC_X11_HOST_IP}:0'
 export GDK_BACKEND='x11'
 export MOZ_DISABLE_WAYLAND=1
 export MOZ_DBUS_REMOTE=0
 exec firefox-esr --new-instance --no-remote
"
Then run it:
chmod +x launch-x11-firefox.sh
./launch-x11-firefox.sh
You can take this even further by enabling AFP on your Raspberry Pi and serving up the downloads as a network volume for your Mac.
That's it
Your 2003 PowerMac is now "running" a modern browser… in the same way a monitor is "running" Photoshop. It's stupid, it's fun, it's absolutely not efficient, and it works way better than it has any right to.
Updates
2026-01-03: Cleaned up language and syntax highlighting, added troubleshooting tips and added links to retro browsers.
-
The easiest way to install Windows 11 on an Unsupported Mac (Bypassing TPM 2.0)
What You'll Need
- A Mac or PC Windows 10 already installed via Boot Camp or other means
- Windows 11 ISO from Microsoft
- A USB thumb drive
Credit Where It's Due
These instructions are based on a post by Darall on Reddit, so credit to them for figuring this out.
The Process
You'll need to be already booted into Windows 10 for this to work. Here's the step-by-step:
- Go to microsoft.com and download the Windows 11 ISO.
- Copy the ISO onto your USB drive.
- Disconnect from the internet. For me, that meant unplugging Ethernet and disconnecting from Wi-Fi.
- Double-click the ISO you copied onto your USB drive to mount it. Make note of the drive letter it mounts as. For me, it mounted as I. Yours will probably be different.
- Open Run from the Start menu (or press Windows + R).
The Command That Makes It Work
In Run, enter:
X:\sources\setupprep.exe /product serverReplace
Xwith your ISO's drive letter.setupprep.exeis a Windows setup helper used to start an in-place upgrade from inside an existing Windows session. When you run it against a Windows 11 ISO, it still installs Windows 11 — but this mode is commonly used because it bypasses (or relaxes) some of Windows 11's hardware checks, like TPM, Secure Boot, and CPU checks. Those checks are what normally block installs on unsupported hardware.Installing
This will launch the installer. It'll take a bit. Then click Install and let it do its thing. It'll reboot a few times, and that's basically it.
Important Notes
As always, if you have important data, back it up before you start.
This doesn't just apply to Macs, it'll work on any unsupported computer. But I'm a Mac guy, so that's what I went with.
-
Hosting a Hotline server with a VPS and WireGuard to a Raspberry Pi
Time for a massive info dump.
Hotline is dated, and that complicates things as servers are very public. It was designed in a very different era of the internet. Hosting a server means exposing an IP. This isn't a huge deal, but I wanted to be able to host my files on my NAS without exposing said NAS to the internet. This is where a VPS comes in. The Mobius binary is happy on a small VPS, but storage costs money, and besides, I already have a Raspberry Pi 4 on a VLAN with my NAS as my data warehouse. The issue is I need to connect my VPS to my Raspberry Pi, which has limited access to NAS.
The trick: WireGuard stitches the two together, SSHFS mounts the Pi storage onto the VPS, and Mobius thinks everything is local. Trackers see the VPS IP, my LAN stays closed, and if the VPS dies, I can swap in a new one without touching the files, as the configuration lives on my home network. It's incredible how useful AI is when it comes to a project like this, as AI pretty much stepped me through setting up Wireguard and SSHFS.
My original plan was to use Cloudflare tunnels, as you get all the benefits of Cloudflare, and I could have skipped the VPS and hosted the server on my Raspberry Pi, but Hotline requires multiple TCP ports, which makes the tunneling more or less impossible unless you throw a lot of money at the problem. I'm not paying $10k a year to host a hotline server. But I am willing to pay $10 a year. That's where the VPS comes into play.
What this setup does
Time for the bullet points:
- Public address like
hotline.example.com:5500/5501. - All Mobius config, users, and files live on a Raspberry Pi at home.
- VPS is only the front door; it reaches the Pi over WireGuard.
- Mobius on the VPS reads/writes through an SSHFS mount.
Result: clients and trackers only see the VPS IP, while the Pi keeps the actual data tucked away on its own VLAN. For the remainder of these instructions, I'm going to skip the VLAN setup details as it's noise that doesn't matter for this guide. You can always add your own VLAN if you want. Also, to avoid over-complicating something that's already complicated, I'm writing the instructions as if you have an external HDD connected to your Pi.
1. High-level architecture
VPS: Ubuntu (I used 24.04) running Mobius, I found that CloudServer.net charged all of $10 a year for a tiny VPS (1 Core, a few gigs of RAM, 10 GB of storage)
Domain Name: I use Cloudflare to manage my DNS, but it doesn't matter who you use, though. You can find my server at Hotline.semihosted.xyz, it points to my VPS.
File Server: This is really up to you. I use a Raspberry Pi 4 with Raspberry Pi OS and have mounted my Synology NAS. My Raspberry Pi is on a VLAN, thus safer to expose it than my NAS itself.2. WireGuard: connect VPS ↔ Pi
First, we need to set up WireGuard so the VPS and Pi can see each other on a private subnet. You'll need to SSH into both machines.
2.1 Install WireGuard
On the VPS:
sudo apt-get update
sudo apt-get install -y wireguard
On the Pi:
sudo apt-get update
sudo apt-get install -y wireguard
2.2 Generate keys
We need a public/private key pair for both the VPS and the Pi to make Wireguard work.
On the VPS:
sudo umask 077
sudo wg genkey | sudo tee /etc/wireguard/server.key | sudo wg pubkey > /etc/wireguard/server.pub

echo "SERVER PRIVATE:"
sudo cat /etc/wireguard/server.key
echo "SERVER PUBLIC:"
sudo cat /etc/wireguard/server.pub
On the Pi:
sudo umask 077
sudo wg genkey | sudo tee /etc/wireguard/pi.key | sudo wg pubkey > /etc/wireguard/pi.pub

echo "PI PRIVATE:"
sudo cat /etc/wireguard/pi.key
echo "PI PUBLIC:"
sudo cat /etc/wireguard/pi.pub
Keep these four values handy:
SERVER_PRIVATE,SERVER_PUBLIC,PI_PRIVATE,PI_PUBLIC.2.3 Configure VPS
Now it's time to configure WireGuard on our VPS.
Create
/etc/wireguard/wg0.conf:[Interface] Address = 10.44.0.1/24 ListenPort = 51820 PrivateKey = SERVER_PRIVATE # NAT traffic from the tunnel out via VPS NIC PostUp = iptables -t nat -A POSTROUTING -s 10.44.0.0/24 -o eth0 -j MASQUERADE PostDown = iptables -t nat -D POSTROUTING -s 10.44.0.0/24 -o eth0 -j MASQUERADE [Peer] PublicKey = PI_PUBLIC AllowedIPs = 10.44.0.2/32, 192.168.1.0/24Swap in your keys and LAN subnet. Then allow forwarding:
echo "net.ipv4.ip_forward=1" | sudo tee /etc/sysctl.d/99-ip-forward.conf
sudo sysctl --system
2.4 Configure Wirguard on the Pi
Create
/etc/wireguard/wg0.conf:[Interface] Address = 10.44.0.2/24 PrivateKey = PI_PRIVATE ListenPort = 45519 [Peer] PublicKey = SERVER_PUBLIC Endpoint = VPS_PUBLIC_IP:51820 AllowedIPs = 10.44.0.0/24 PersistentKeepalive = 25Replace the keys and VPS IP. Optional but handy if you ever route more:
echo "net.ipv4.ip_forward=1" | sudo tee /etc/sysctl.d/99-ip-forward.conf
sudo sysctl --system
2.5 Bring the tunnel up
Time to stich the two together by turning the tunnel on.
On the VPS:
sudo systemctl enable --now wg-quick@wg0
sudo wg show
On the Pi:
sudo systemctl enable --now wg-quick@wg0
sudo wg show
From VPS, confirm both the tunnel and LAN reach the Pi:
ping -c 3 10.44.0.2
ping -c 3 PI_LAN_IP   # e.g. 192.168.1.50
3. Prepare Mobius config on the Pi
3.1 Pick a storage spot
On the Pi, pick a spot for Mobius config and files. For this example, I'm using an external drive
/mnt/storage/mobius-config. This could be entirely hosted on the Pi's intenral drive or an external NAS.sudo mkdir -p /mnt/storage/mobius-config sudo chown -R $USER:$USER /mnt/storage # or sudo chown -R piuser:piuser /mnt/storage3.2 Download and init Mobius (ARM)
We are not going to run Mobius on the Pi, just use it for storage. However, we want all the configuration files that come with Mobius. You can copy between the two machines but I was lazy and found this to be easier.
mkdir -p ~/mobius
cd ~/mobius

curl -L https://github.com/jhalter/mobius/releases/download/v0.20.1/mobius_server_Linux_arm64.tar.gz -o mobius_server_Linux_arm64.tar.gz

tar xzf mobius_server_Linux_arm64.tar.gz
chmod +x mobius-hotline-server  # adjust if the binary name differs

./mobius-hotline-server -init -config /mnt/storage/mobius-config
You should now see
Agreement.txt,config.yaml,Users/,Files/, etc. on the Pi’s storage. This is your Mobius configuration and data directory, aka where your files live.4. SSH key auth from VPS → Pi
To make SSHFS work without a password prompt, we need to set up SSH key authentication from the VPS to the Pi. This is necessary so we can automatically connect to our Mobius storage on the Pi.
ssh-keygen -t ed25519 -f ~/.ssh/id_ed25519 -C "vps-to-pi"
ssh-copy-id -i ~/.ssh/id_ed25519.pub piuser@10.44.0.2
ssh piuser@10.44.0.2
Replace
piuserwith your actual user. If login works without a password, you are set for sshfs.5. Mount the Pi's Mobius config on the VPS via SSHFS
Now the moment of truth: mount the Mobius config directory from the Pi onto the VPS using SSHFS.
sudo apt-get update
sudo apt-get install -y sshfs

sudo mkdir -p /mnt/mobius-config
sudo sshfs -o IdentityFile=/root/.ssh/id_ed25519,StrictHostKeyChecking=accept-new \
 piuser@10.44.0.2:/mnt/storage/mobius-config /mnt/mobius-config

ls -la /mnt/mobius-config
If you see
config.yamland friends, the mount worked. You can formalize this with systemd or/etc/fstablater.6. Install Mobius on the VPS
Finally, we install Mobius on the VPS itself. This is where the server will run.
cd /opt
sudo mkdir -p /opt/mobius
sudo chown root:root /opt/mobius
cd /opt/mobius

curl -L https://github.com/jhalter/mobius/releases/download/v0.20.1/mobius_server_Linux_x86_64.tar.gz -o mobius_server_Linux_x86_64.tar.gz

tar xzf mobius_server_Linux_x86_64.tar.gz
chmod +x mobius-hotline-server  # adjust binary name if needed

./mobius-hotline-server --help
7. systemd unit on the VPS
Almost done, now we need to create a systemd unit to run Mobius as a service on the VPS. Systemd will manage starting, stopping, and restarting Mobius as needed.
Create
/etc/systemd/system/mobius.service:[Unit] Description=Mobius Hotline Server (VPS using Pi storage via SSHFS) After=network.target After=wg-quick@wg0.service [Service] Type=simple WorkingDirectory=/opt/mobius ExecStart=/opt/mobius/mobius-hotline-server -config /mnt/mobius-config Restart=on-failure [Install] WantedBy=multi-user.targetReload and start:
sudo systemctl daemon-reload
sudo systemctl enable mobius
sudo systemctl start mobius
sudo systemctl status mobius --no-pager -n 20
8. Verify Hotline ports
sudo ss -tlnp | grep 550You should see listeners on 5500 and 5501. From outside, test:
nc -vz -w 3 hotline.example.com 5500
nc -vz -w 3 hotline.example.com 5501
Watch logs as clients connect:
sudo journalctl -u mobius --no-pager -n 509. Configure trackers and metadata
Edit
/mnt/storage/mobius-config/config.yaml(from the Pi or via the VPS mount):server: name: "The Apple Media Archive by DMG" description: "A Hotline server filled with Apple events and commercials from the 80s to today." banner: "banner.jpg" messageBoard: "MessageBoard.txt" tracker: enabled: true servers: - "hltracker.com:5499" - "tracker.preterhuman.net:5499" - "saddle.dyndns.org:5499" - "hotline.kicks-ass.net:5499"Restart to apply changes:
sudo systemctl restart mobius10. Optional: helper script for pushing new Mobius builds to the Pi
If you ever run Mobius directly on the Pi, a quick-update script helps:
#!/usr/bin/env bash
set -euo pipefail

MOBIUS_SRC="/home/piuser/Desktop/mobius-server-linux-arm64"
MOBIUS_DST="/opt/mobius/mobius-hotline-server"

echo "Stopping Mobius..."
sudo systemctl stop mobius || true

echo "Updating binary..."
sudo cp "$MOBIUS_SRC" "$MOBIUS_DST"
sudo chmod 755 "$MOBIUS_DST"

echo "Starting Mobius..."
sudo systemctl start mobius
sudo systemctl status mobius --no-pager -n 10
Make it executable:
chmod +x ~/update-mobius.sh. Run it when you drop in a new build.Wrap-up
I know that was quite a bit, but that's how you can host Mobius (Hotline server) on a VPS and have it SSH tunnel back to your home network for file storage and not expose your home network to the internet.
- WireGuard links the VPS and Pi on a private subnet.
- The Pi holds config and files on roomy storage.
- SSHFS makes that storage feel local on the VPS.
- Mobius runs on the VPS, shows the VPS IP to the world, and keeps your home network dark.
If the VPS gets nuked, you can rebuild it, remount the Pi, and be back on the Hotline trackers in minutes.
- Public address like
-
Flying Toasters Lives On - Releasing an updated version of the classic screensaver
Back in the "classic" days of Mac OS, one of the most iconic and beloved screensavers was the Flying Toasters. Originally developed by Berkeley Systems and released in the early 1990s as part of the After Dark screensaver collection. Later versions featured animations, and music. Personally speaking, this has always been one of my absolute favorite screensavers so I did something totally off-the-cuff, I recreated it in for modern macOS.
My idea wasn't to make a 1:1 recreation but a spiritual successor that captures the essence of the original while taking advantage of modern hardware for effects like z-depth and particle generated clouds. The end result is a delightfully retro screensaver that let's users control the experience.
Development Challenges
]Developing a ScreenSaver in modern macOS is tedious, mostly due to the fact Apple in it's infinite wisdom caches the screensaver in a system process which seems to be largely undocumented. This meant hours wondering why my changes weren't taking only to discover. I needed to force quit several tasks. This resulted in an sh script that looked like the following:
# Kill the legacyScreenSaver process to force refresh
echo "🔄 Killing legacyScreenSaver process..."
pkill -f "legacyScreenSaver" 2>/dev/null || echo "   (process not running)"

# Kill any wallpaper engine processes that might cache screensavers
echo "🔄 Killing Wallpaper Engine processes..."
pkill -f "WallpaperAgent" 2>/dev/null || echo "   (WallpaperAgent not running)"
pkill -f "ScreenSaverEngine" 2>/dev/null || echo "   (ScreenSaverEngine not running)"
A Retro Port
Part of the silliness of recreating the old screen saver was creating a back port for older OS X, particularly for OS X 10.4 and 10.5. This wasn't nearly as tedious as I expected. I scaled back the screensaver removing the particle generated clouds as they were heavy even on modern hardware for pure CPU. Getting v0.1 build was easy. Creating the v0.2 that supports OpenGL was much less so due to the antiquated graphics API. After a lot of brute forcing, and smashing my head against the wall, I managed to get OpenGL 2.0 running properly for OpenGL 2.0 supported Macs.
Download Links
The downloads exist on my patreon, but they are free-to-all, and you don't need to sign up. Free tier members will get access to the latest updates and versions if you subscribe.
Official Website: Ode to the Flying Toaster
-
Wordpress Rate Limiter - A free plugin limit login attempts and block bad bots
Obstensibly, this blog has always been a developer's blog of a
front-end developer,UX developer, I mean, a full-stack developer's personal blog, even if 95% is Mac-related nonsense. However, now that I'm a lead developer, I've accidentally been writing about development projects more frequently as I've wrote a GUI wrapper for an Xbox Utility, How to install Pihole via Docker, wrote a plugin for auth0 for all, created a secure self hosted http based file sharing site and such.Sadly, I'm behaving like an actual developer. Anyhow, disappointing as that is, I've written a WordPress plugin for Rate limiting.
Stop bad requests from mucking up your WordPress

My current company has one hell of a knot to untangle as we look to decouple 140+ wordpress websites in a single multi-site. It's a major curse, and it means that if one of your sites within the Multi-site gets hammered with stupid bot requests, it can affect all the other sites. This is where the WordPress Rate Limiter plugin comes in handy.
What this plugin actually does
Network Rate Limiter watches a few high-risk WordPress endpoints and slows or blocks abusive clients per IP. It’s designed for multisite networks, but it works on single sites too. The idea is clamp down on bad traffic while allowing legitimate users to access the site without interruption. It's not sophisticated, for rotating IP spam but really stops a lot of the agent based behavior that can cause issues. This is more of an issue thanks to AI.
- Protected endpoints:
/wp-login.php,/xmlrpc.php,/wp-admin/admin-ajax.php, and anything under/wp-json/. - Safe by default: logged-in admins, WP-Cron, Site Health, and HTTP
OPTIONS/HEADrequests are skipped. - Time-aware: you choose a “daytime” window with stricter limits; outside of it, limits relax automatically.
- Progressive: repeat violators get longer blocks (exponential backoff) that decay after a probation period.
- Multisite-friendly: network-wide defaults with per-site overrides.
How rate limiting is counted (no hand-waving)
Instead of a brittle “one counter per minute,” the plugin uses a two-bucket approximation of a sliding window:
- One bucket counts requests in the current minute.
- Another holds the previous minute’s count.
- The final score is current + a time-weighted slice of the previous bucket (the part that still overlaps the last 60s).
Result: spikes right after a reset still count, and legitimate traffic isn’t penalized by harsh window edges. This keeps easy interval detection at bay from a bot's perspective.
What triggers a block
- Per-endpoint thresholds: each endpoint/method has a soft and hard limit per minute. At night, thresholds double.
- Soft limit: returns
429and starts exponential backoff for that IP. - Hard limit: immediate block (longer backoff).
- Global clamp: if an IP is hammering any mix of protected endpoints overall, it’s blocked even if no single endpoint trips.
Backoff math: blocks start short (e.g., 2 minutes) and double on each violation, up to a max (e.g., 60 minutes). The “violation score” auto-expires after your configured probation window, so well-behaved IPs cool off. I imagine people will fork this and change this behavior on their own.
Legit traffic stays legit
- Verified search engines: Google/Bing are allowed only if both checks pass:
- User-Agent hints it’s the right bot (e.g.,
Googlebot,bingbot), and - Reverse DNS ends with an expected domain (
.googlebot.com,.search.msn.com) and forward DNS resolves back to the same IP.
- User-Agent hints it’s the right bot (e.g.,
- Allowlists you control:
- IP or CIDR (IPv4/IPv6)
- Reverse-DNS suffixes with forward confirmation
- User-Agent substrings (use with care; UAs are spoofable)
- Specific REST prefixes (under
/wp-json/) - Specific
admin-ajaxactions (e.g.,heartbeat)
- Secret header bypass: give your monitors a header like
X-NetRL-Bypass: your-long-random-tokenand they’ll skip the limiter.
It comes prepopulated with commonly "good" bots whitelisted, like Google, Bing, various SEO tools and so on.
What clients see (headers)
Every protected response includes standard rate-limit hints:
X-RateLimit-Limit– the current hard limitX-RateLimit-Remaining– how many requests are left in the windowX-RateLimit-Window– window duration in seconds (60)- On block:
Retry-AfterandX-RateLimit-Reset(epoch timestamp)
Multisite behavior
- Network Defaults: set once in Network Admin; good baseline for all sites.
- Per-site Settings: each site can override (or inherit where left blank).
- Per-IP scope: counters and blocks are tracked per site; the “global clamp” is per IP within a site’s protected endpoints.
Operational notes
Nerd stuff, you can skip this unless you really care.
- Atomic counters with object cache: Redis/Memcached make increments race-safe. Without them, the plugin falls back to transients (fine for “soft” protection).
- Logging: optional JSON lines go to the PHP error log (blocks, and optionally bypasses) and a
netrl_log_eventaction fires for shipping to APM/log pipelines. - Timezones: daytime hours use the site’s timezone. If none is set, it defaults to
America/Los_Angeles. - Security of client IP: the plugin prefers
CF-Connecting-IP,X-Real-IP, thenX-Forwarded-For(left-most public), thenREMOTE_ADDR. Ensure your proxy/CDN is trusted before honoring headers.
Why this approach?
There are a zillion ways to do rate limiting. This plugin aims for a practical balance of effectiveness, simplicity, and low friction for legitimate users. It’s not perfect, but it works well in practice and stopped an outage that seemed to be occuring weekly. While our AppDex scores are still terrible, they're remarkably less terrible.
- Resilient under bursts: the two-bucket window smooths edge cases without heavy math.
- Fair to humans and APIs: daytime/night profiles match your traffic patterns.
- Practical ops: easy allowlists, real bot verification, headers for observability, and simple logs/hooks.
- Safe defaults, sane overrides: works out-of-the-box; tune it as you learn your traffic.
- Protected endpoints:
-
XISO GUI - A graphical interface for extract-xiso on macOS for Xbox ISOs
So... roughly two years ago I made an Xbox emulation tutorial. The bulk of the tutorial involved dealing with Extract XISO. It's not a difficult utility use but it required a lot of steps for a non-developer like running CMAKE to build the binary, which requires homebrew to install. Writing a GUI wrapper has been on my "to-dos" ever since made the tutorial.
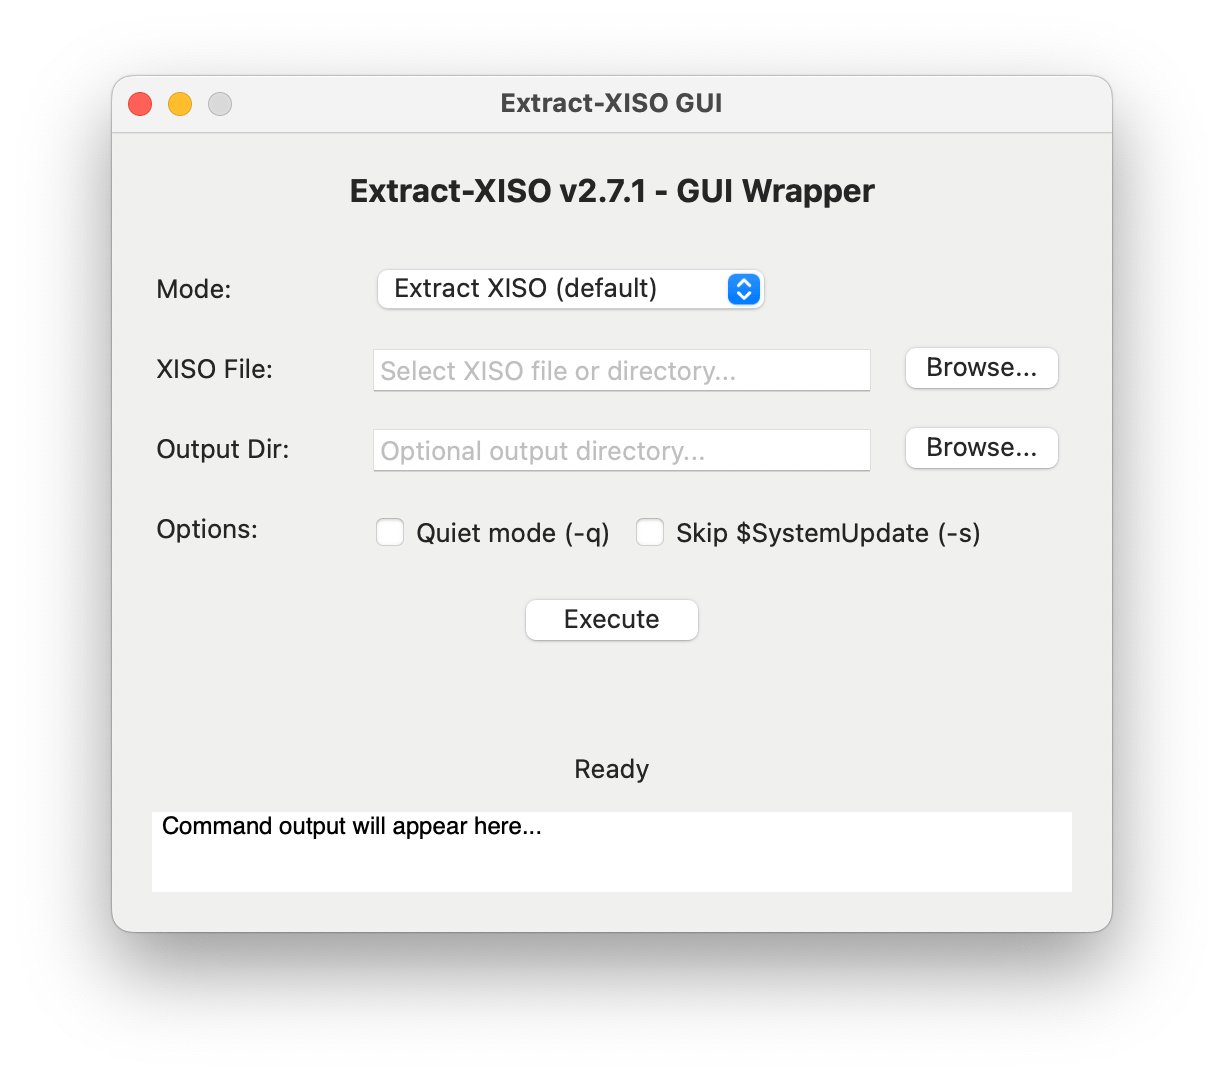
What in the hell is Extract XISO?
The Xbox ISO format is a proprietary disc image format used by the original Xbox console. It is based on the ISO 9660 file system but includes additional metadata and encryption specific to the Xbox. Emulators, like XEMU, on the other hand, expect standard ISOs. Extract XISO is a tool that helps to extract the contents of Xbox ISOs and convert them into standard ISO that can be used by these emulators.
Extract ISO works like the CLI utility, with a simple input and output. You can grab the release here. Right now it's not packaged completely, but it should work.
-
OpenCore is Dead and Apple Killed It
OpenCore is Dead and Apple Killed It
OpenCore is dead, or rather, it's going to be. The end of Intel support for macOS means the end of the line for OpenCore, OpenCore Legacy Patcher (OCLP), and Hackintoshes.
Most people intrinsically understand that removing Intel support removes Intel binaries-the code the computer executes and Apple will only ship ARM. However, I've seen some people hopeful that genius developers will somehow save the day. This will never happen, but I figured this is a good chance to explain how macOS and OpenCore work at a technical level.
How OpenCore Works on Intel Macs
Intel Macs use EFI or UEFI for their firmware (Unified Extensible Firmware Interface). When you power up your Mac, it follows this boot sequence: Boot ROM → UEFI firmware → boot.efi → Operating System kernel.
OpenCore is a UEFI application that intercepts this standard boot process. It uses EFI Protocol Hooking to modify memory management, ACPI tables, and SMBIOS data before handing control to macOS boot.efi. Think of these as translators that are crucial for setting up proper memory management and kernel patching.
OpenCore doesn't modify the system directly. Instead, it performs real-time modifications to the XNU kernel using find-and-replace operations. This enables CPU feature patches, memory management corrections, and security bypassing for System Integrity Protection (SIP) while maintaining other security services and code signing validation.
The key mechanisms include manipulating the ACPI table (a list of hardware and associated drivers) and SMBIOS spoofing (basically a hardware profile that tells macOS it's running on supported hardware). OpenCore also handles things like the DSMOS.kext (Don't Steal Mac OS kext).
This is how OpenCore hacks unsupported hardware: it modifies the boot process and injects changes without actually modifying the boot volume.
Apple Silicon Changes Everything
Apple Silicon uses iBoot. It's basically a giant iPhone when it comes to booting. Instead of Boot ROM → UEFI firmware → kernel, we now have: Boot ROM → Low-Level Bootloader (LLB) → iBoot → kernel.
iBoot only understands APFS and eliminates UEFI middleware entirely. Since OpenCore depends entirely on UEFI interfaces for boot entry, it has no way to function.
It gets worse. Apple uses hardware-enforced cryptographic verification at every boot stage through personalized signatures tied to specific hardware. While this is anti-right-to-repair (as Louis Rossmann often discusses), Apple calls it security. It is more secure-useful against nation-state-level attacks like hardware replacementbut less useful for regular users.
The system uses Secure Enclave-signed LocalPolicy files for security configuration, replacing user-controllable UEFI Secure Boot certificates. Apple Silicon has a dedicated sub-OS called SepOS that runs on the Secure Enclave, storing data that cannot be directly accessed by the user or operating system-only through an API. This creates a hardware enforcement mechanism that requires a specialized chipset running a specialized operating system.
Apple Silicon eliminates traditional firmware concepts by implementing direct hardware-to-OS transitions through iBoot. What makes OpenCore work is simply gone. No insertion points exist for third-party bootloaders.
Additionally, T2 Macs dropped in macOS Sequoia have fundamental T2 communication failures when using OpenCore. Developers currently have no leads on why this breaks, demonstrating the increasing difficulty of hardware-software integration.
Even a Magic Jailbreak Wouldn't Help
Let's assume someone developed a hypothetical jailbreak that bypassed Apple Silicon's security. The real issue becomes the entire operating system. The XNU kernel in macOS 27+ will contain Apple Silicon-specific updates and no x86 code whatsoever.
Here's what would need to be reverse-engineered and rebuilt from scratch:
- XNU kernel: CPU architecture abstraction, memory management, interrupt handling, system calls
- I/O Kit drivers: PCIe, USB, SATA/NVMe, network, audio, graphics, Thunderbolt
- Power management: Thermal management, Turbo Boost, battery management, sleep/wake
- Graphics drivers and shaders: Intel graphics support, Metal compilation, hardware video decode
- Media frameworks: Hardware-accelerated video, audio processing
- Compiler toolchains: Development tools for x86_64
- Runtime libraries: libc, Objective-C runtime, Swift runtime
- Application frameworks: AppKit, Core Foundation, Core Data, etc.
Conservative estimates for lines of code:
- XNU kernel: ~2 million lines
- I/O Kit drivers: ~500,000 lines
- Graphics subsystem: ~1 million lines
- Core frameworks: ~3-5 million lines
- Development tools: ~1 million lines
Without source code access, this is fundamentally impossible. Even if it were technically feasible, software makers will eventually stop compiling binaries for Intel Macs, so popular software would end support regardless.
Many modern macOS features implement hardware-specific requirements that cannot be implemented in software. iPhone Mirroring requires T2 chip attestation, Apple Intelligence requires Neural Processing Unit hardware only found in Apple Silicon, and newer features will continue this trend.
The Community Reality Check
Still not convinced? Consider these examples:
- Why isn't Windows 11 ARM edition working natively on Apple Silicon? Shouldn't the community have figured this out by now?
- Why is Asahi Linux only working on M1 and M2 computers and still missing hardware support features?
There are only so many qualified people on this planet willing to work on such projects for free in their spare time. Even if Apple released its source code for Apple Silicon-only macOS, it would be unlikely to find enough individuals to port it back to Intel Macs.
The End of an Era
This is truly the end of the line for Intel Macs running modern macOS and Hackintoshes. macOS 26 "Tahoe" will be the final version to support Intel hardware, with macOS 27 in 2026 being Apple Silicon-exclusive.
However, this doesn't mean the OpenCore community has given up. They're still hard at work with fixes and optimizations for Intel macOS versions. There are still roughly two decades worth of software that can run on these computers across various versions of macOS.
The technical barriers aren't just challengin. They represent a fundamental shift in computer architecture that makes Intel Mac support impossible rather than merely difficult. OpenCore had a remarkable run, but Apple's transition to Apple Silicon marks the definitive end of the hackintosh era.
-
AI is Killing My Blog Traffic
I wish I had answers but I don't. I have been blogging for over a decade now and I've seen my blog grow in traffic but year over year but since 2023, my traffic has declined, roughly 25% year-over-year. It's disheartening to see AI hoover up the open web, driving people away from content made by humans to shit
-
Install Pi-hole on your Mac in 5 minutes
Adblockers: I assume a majority of my audience uses them, such as Ublock Origin, 1blocker, Ghostery, and so on. The problem is that these require browser extensions, but how will I block ads on my Sony TV or make sure my Hue lights aren't spying on me?
Well, we have an answer: Pi-hole. As the name implies, Pi-hole is a web utility originally designed to run on a Raspberry Pi, although we can run it almost anywhere. I'll cover first on a Mac and then a few other devices, and it's really set up. Like, we are talking about 5 minutes.
Pi-hole blocks pesky advertisements and data harvesting by replacing your domain name server with your own self-hosted option that intercepts DNS requests before passing them to another DNS server. To break that down into plain speak, when you type in "YouTube.com," a domain name server functions like a phone book for every name and returns a number, something I now realize my younger audience probably hasn't ever seen before... I think I have a better analogy: it's like a digital map. Ask it where Jacksonville, Oregon is, and it returns coordinates as a long and lat from a database of all the cities in the world. The same thing happens with a DNS. It contains a list of all the IPs associated with every domain name worldwide.
Pi-hole maintains lists of known hosts for advertisements. If a request asks for a domain on the blocklist, it returns a null or fake address, thus preventing an advertisement or tracking script from loading.
This approach is awesome because it's platform agnostic. It requires manually configuring your devices or home network to use the Pihole instead of a regular DNS.
Pi-hole has a nice, easy-to-use interface that is also easy to adjust so you can whitelist potential sites.
The Tutorial
I have a MacBook 2017, and like all Intel Macs, it'll soon be unable to run modern macOS, even with OpenCore. The MacBook 2017 is an oddball model. I love this machine, but it's pretty underpowered, so there's not really a huge use case for it. It has one thing that makes it exceptionally attractive: a power draw. This guy can only draw 29w max but generally draws more than 10w even with the display on. Plus, its CPU is positively monstrous compared to the CPUs found in Raspberry Pis.
If you don't have an old Mac, I suggest getting a Raspberry Pi Zero 2 W as they're under $25, and the official Raspbery Pi website has an excellent tutorial/
Step 1: We need docker. Grab it from the official site Docker is a utility that lets you run containers and think of micro virtual machines. Download it and install it. Docker has Linux and Windows versions as well and I'll touch on the Linux using two different NAS systems.
Step 2: Run the following command below, also on github gist and embedded at the bottom.
docker run -d --name pihole \
 -e TZ=America/Los_Angeles \
 -e FTLCONF_webserver_api_password=MakeSureYouChangeThis \
 -e FTLCONF_dns_upstreams='1.1.1.1;1.0.0.1' \
 -e FTLCONF_dns_listeningMode=all \
 -p 80:80 -p 53:53/tcp -p 53:53/udp -p 443:443 \
 -v ~/pihole/:/etc/pihole/ \
 --dns=127.0.0.1 --dns=1.1.1.1 \
 --cap-add=NET_ADMIN \
 --restart=unless-stopped \
 pihole/pihole:latest
What each Docker setting does:
-d- Runs the container in detached mode (in the background)--name pihole- Names the container "pihole" for easy reference-e TZ=America/Los_Angeles- Sets the timezone. Other examples:America/New_York,Europe/London,Asia/Tokyo,Australia/Sydney. Find your timezone on Wikipedia's TZ database list-e FTLCONF_webserver_api_password=MakeSureYouChangeThis- Sets the admin password for the web interface (change this!)-e FTLCONF_dns_upstreams='1.1.1.1;1.0.0.1'- Sets upstream DNS servers (Cloudflare in this case)-e FTLCONF_dns_listeningMode=all- Allows Pi-hole to listen on all network interfaces-p 80:80 -p 53:53/tcp -p 53:53/udp -p 443:443- Maps ports from host to container (web interface on 80/443, DNS on 53)-v ~/pihole/:/etc/pihole/- Mounts a local directory to store Pi-hole configuration and data--dns=127.0.0.1 --dns=1.1.1.1- Sets DNS servers for the container itself--cap-add=NET_ADMIN- Gives the container network administration capabilities--restart=unless-stopped- Automatically restarts the container unless manually stoppedpihole/pihole:latest- The Docker image to use (Pi-hole's official image)
This will go fast, as this project is very lean.
Step 3: Go to http://127.0.0.1/ and use the password to confirm it's working. We can also see our application in the Docker.
Step 4: On your Mac, change your DNS to 127.0.0.1.
This is done in the system settings, see Apple's documentation as it covers how to, from High Sierra to current.
Step 5: Get your Mac's local IP. Select your network, and then click on details. Click TCP/IP and make a note of your IP address. This is your Mac's IP address. Alternatively you can grab it via the terminal, for most Macs this will be the wifi interface,
ipconfig getifaddr en0however if you have wired internet and wifi, your internet connection could be different. Useifconfig | grep "inet " | grep -v 127.0.0.1and make note of the inet addresses.You can assign this as your DNS server to any device on your internal network, be it a Roku, Smart appliance, or another computer. However, you can set the DNS server to your Mac's IP address if you have a router. This way, all devices on your network will use the Pi-hole as their DNS server.
From my router, I can configure my DNS to use the PiHole. Just point the DNS setting to the Mac. Now, if you're on DHCP, which almost everyone is, your router likely has a setting to reserve an IP for a device. DHCP leases out IPs so they can change. That means a computer might one day be 192.168.10.105 and, after reconnecting or a router reboot, assigned a different IP, 192.168.10.124. If your DNS is set to the old address, this would be a problem, as you wouldn't have a DNS server until it was manually changed. Reserving an IP prevents a device from ever getting a different IP on the local network.
By pointing your home network at your Mac’s Pi-hole, you’ll enjoy ad-free browsing on any device. Go ahead—reserve that Mac’s IP in your router, and reclaim your bandwidth today.
You don't need a Mac
Pi-hole can be run almost anywhere due to it's lightweight nature, and being designed for a Raspberry Pi. This means you can set it up on any Linux machine, Windows, NAS or even in a virtual machine on your existing hardware.
For example, if you have a Synology or Ugreen NAS, you can run Pi-hole in Docker. The process is similar to the Mac setup, but you'll need to use the Synology Docker interface to create and manage your containers.
Instead of using the docker command, you'll want to create a container using a docker-compose file. This is a YAML file that defines the services, networks, and volumes for your application. Here's an example of a docker-compose file for Pi-hole:
version: '3.8'

services:
  pihole:
    container_name: pihole
    image: pihole/pihole:latest
    ports:
      # DNS Ports (using alternative ports to avoid conflicts)
      - "1053:53/tcp"
      - "1053:53/udp"
      # HTTP Port (using alternative port to avoid DSM conflict)
      - "8080:80/tcp"
      # HTTPS Port (using alternative port to avoid DSM conflict)
      - "8443:443/tcp"
    environment:
      # Timezone
      TZ: 'America/Los_Angeles'
      # Web interface password from your original command
      FTLCONF_webserver_api_password: 'MakeSureYouChangeThis'
      # DNS upstreams (DNS servers you'd like to use)
      FTLCONF_dns_upstreams: '1.1.1.1;1.0.0.1'
      # DNS listening mode
      FTLCONF_dns_listeningMode: 'all'
    volumes:
      # Volume mapping - using full NAS path
      - '/volume1/docker/pihole:/etc/pihole'
    dns:
      # DNS settings from your original command
      - 127.0.0.1
      - 1.1.1.1
    cap_add:
      # Capabilities for network administration
      - NET_ADMIN
    restart: unless-stopped
This is a basic example, and you may need to adjust the configuration based on your specific setup and requirements. Once you have your docker-compose file ready, you can use the Docker interface on your NAS to deploy the Pi-hole container. As a pro-tip, AI is excellent for interpreting and diagnosing issues, bew it Claude, ChatGPT, or Gemini.
GitHub Gist versions
-
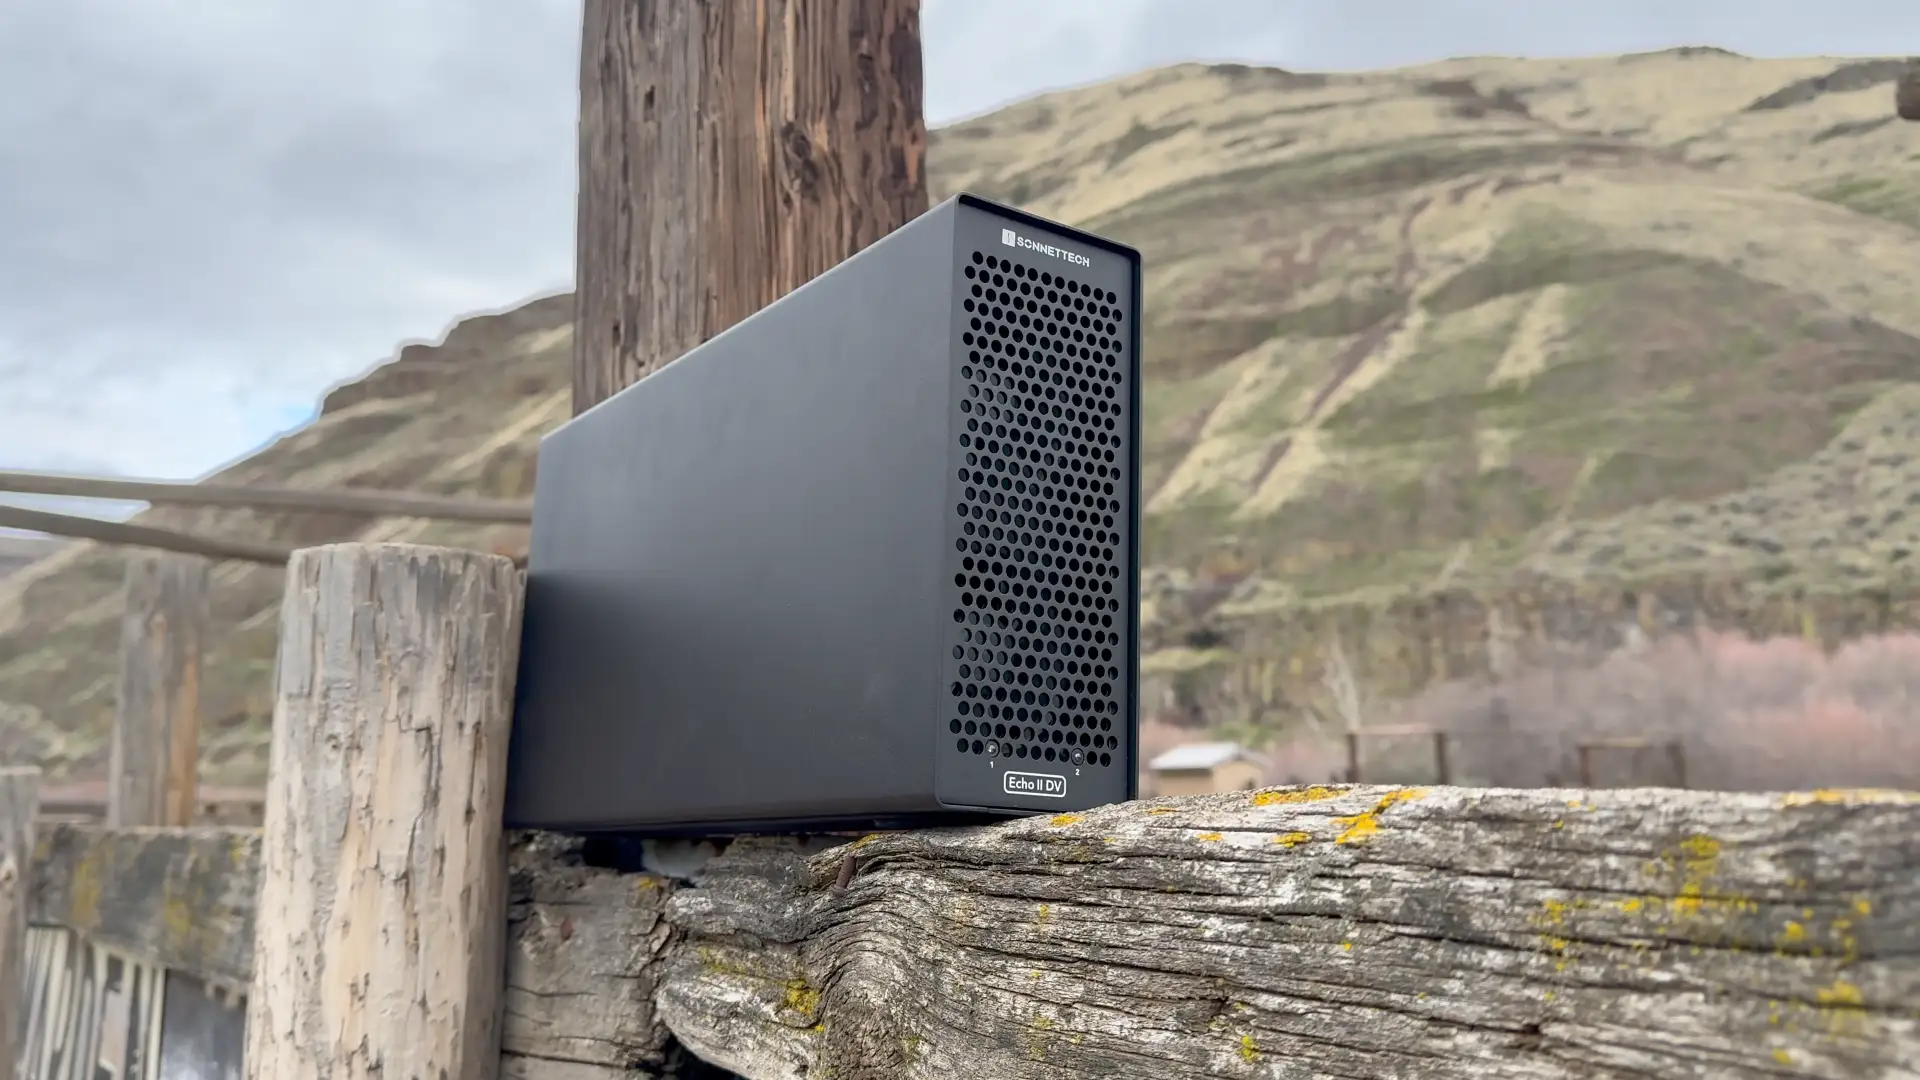
Moving away from the Mac Pro: Sonnet Echo II DV Review
In the evolving landscape of professional computing, the traditional workstation is radically transforming. For years, the Mac Pro represented the pinnacle of expandability in Apple's ecosystem—a tower of power where professionals could add specialized PCIe cards for everything from video capture to audio processing. Yet Apple Silicon has rewritten the rules, delivering astonishing performance in smaller packages while leaving professional users with a critical question: what about expansion?
For the past several years, I've dedicated much of my content to the Mac Pro lineup—writing guides and producing videos. However, after my 2019 Mac Pro, I'm likely not buying another Mac Pro. The single Mac Pro entry in the Apple Silicon era has been woefully underwhelming, offering PCIe slots for a $3,000 premium that can only be used for expansion cards. YouTuber Luke Miani aptly described it as "Expandable, not upgradeable.
But what if there was a way to bring true PCIe expansion to any Mac? The advent of Thunderbolt 5 now enables 4x PCIe 4.0 speeds through external connections. For professionals in video production, audio engineering, and scientific computing who rely on specialized PCIe hardware, this opens intriguing possibilities: Could a Mac Studio or even a Mac mini paired with the right expansion chassis replace a Mac Pro?
This is where the Sonnet Echo II DV enters the picture—a dual-slot Thunderbolt PCIe expansion chassis with a unique twist: each PCIe slot gets its own dedicated Thunderbolt bus. This approach promises to eliminate the bandwidth bottlenecks that have historically plagued external expansion solutions. This design could be a game-changer for professionals who need to run bandwidth-intensive cards like BlackMagic DeckLink 8K Pro or AJA KONA 5 capture cards alongside high-speed storage.
Sonnet Echo II DV
Disclosure: Sonnet provided a review unit, but I was not compensated or sponsored, and I maintain complete editorial control.
Feature list
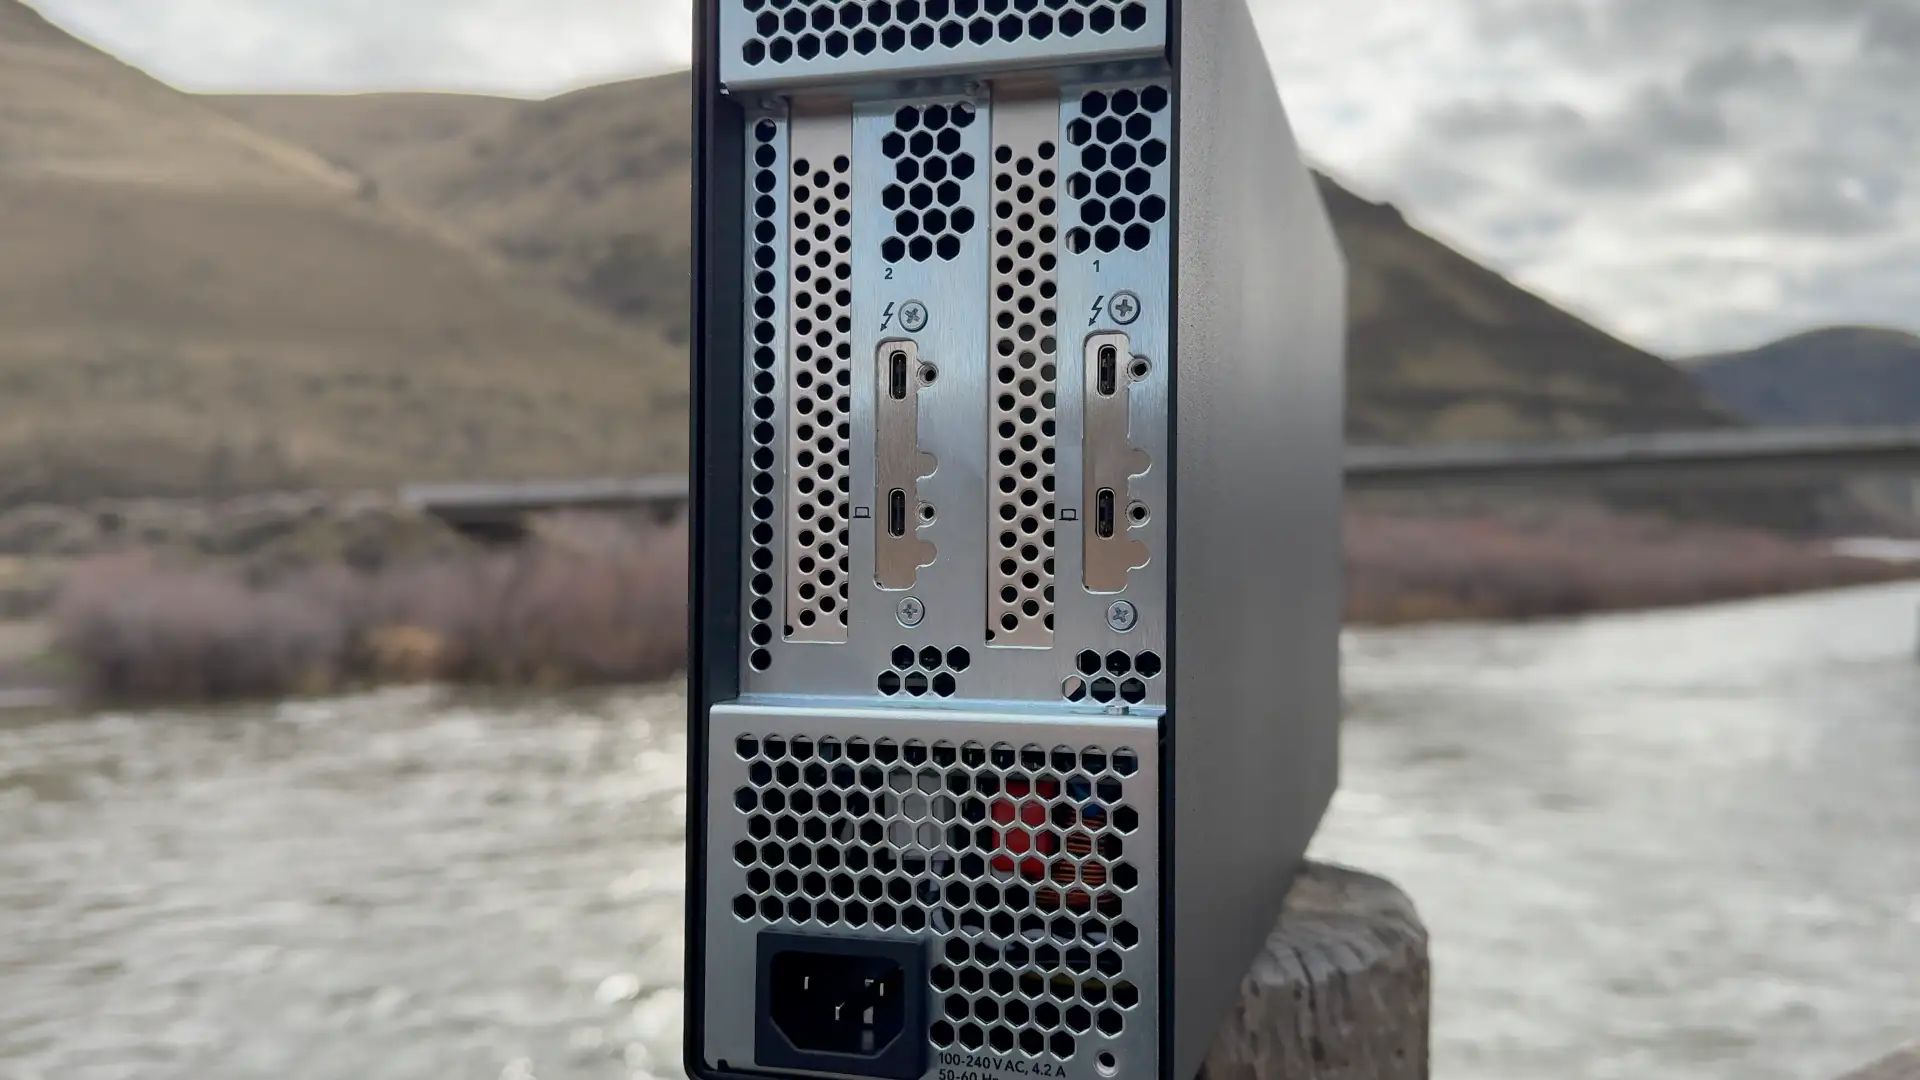
- Dual PCIe slots with dedicated Thunderbolt buses
- Each slot supports Thunderbolt pass-through for daisy-chaining
- No power switch needed—it powers up/down automatically when Thunderbolt cables are connected
- Built-in 400-watt power supply with two auxiliary power cables (75 watts each)
- Can charge power-hungry laptops like my 16-inch MacBook M4 Pro via Thunderbolt
- Features dual Noctua fans—the top shelf of PC cooling—rated at just 17 dBA
- All-metal construction with no cheap plastic feel
The Sonnet Echo dv2 is a dual PCIe Thunderbolt enclosure with a unique advantage—each PCIe slot has its own dedicated Thunderbolt port. This means you get the full bandwidth of a complete Thunderbolt channel per card. Despite Sonnet explicitly stating that this case is not for GPUs, I still managed to wedge a single-slot GPU into it. It's not pretty, but it worked. You can also dongle the PCIe slots if you'd like a single cable experience, and it can deliver 100w to charge a laptop. Conversely you can also connect two computers to the Sonnet II DV allowing each computer to access a single PCIe slot.
Thunderbolt technology offers PCIe connectivity over a cable, but with limitations. A single Thunderbolt 4 connection provides approximately 2,880 MB/s of PCIe bandwidth. When multiple PCIe cards share a single Thunderbolt bus (as in most expansion chassis), they must compete for this bandwidth, potentially creating bottlenecks.
By providing each slot with its own dedicated Thunderbolt bus, the Echo II DV ensures that both cards can simultaneously utilize full bandwidth—provided your computer has Thunderbolt ports on separate buses. All Apple Silicon Macs meet this requirement, with each Thunderbolt port getting its own PCIe lanes.
The Echo II DV is Thunderbolt 3/4 and not 5. However, it does feature a modular Thunderbolt design, which represents perhaps its most forward-thinking feature. The Thunderbolt interfaces are implemented as daughtercards, which Sonnet refers to as "Thunderbolt upgrade cards" on their website. When I contacted Sonnet about potential Thunderbolt 5 upgrades, they confirmed that it would indeed be possible to swap the card and avoid buying a whole new enclosure. Ironically, this makes the Thunderbolt enclosure more upgradeable than Apple Silicon Macs—a critical consideration for professionals making long-term investment decisions.
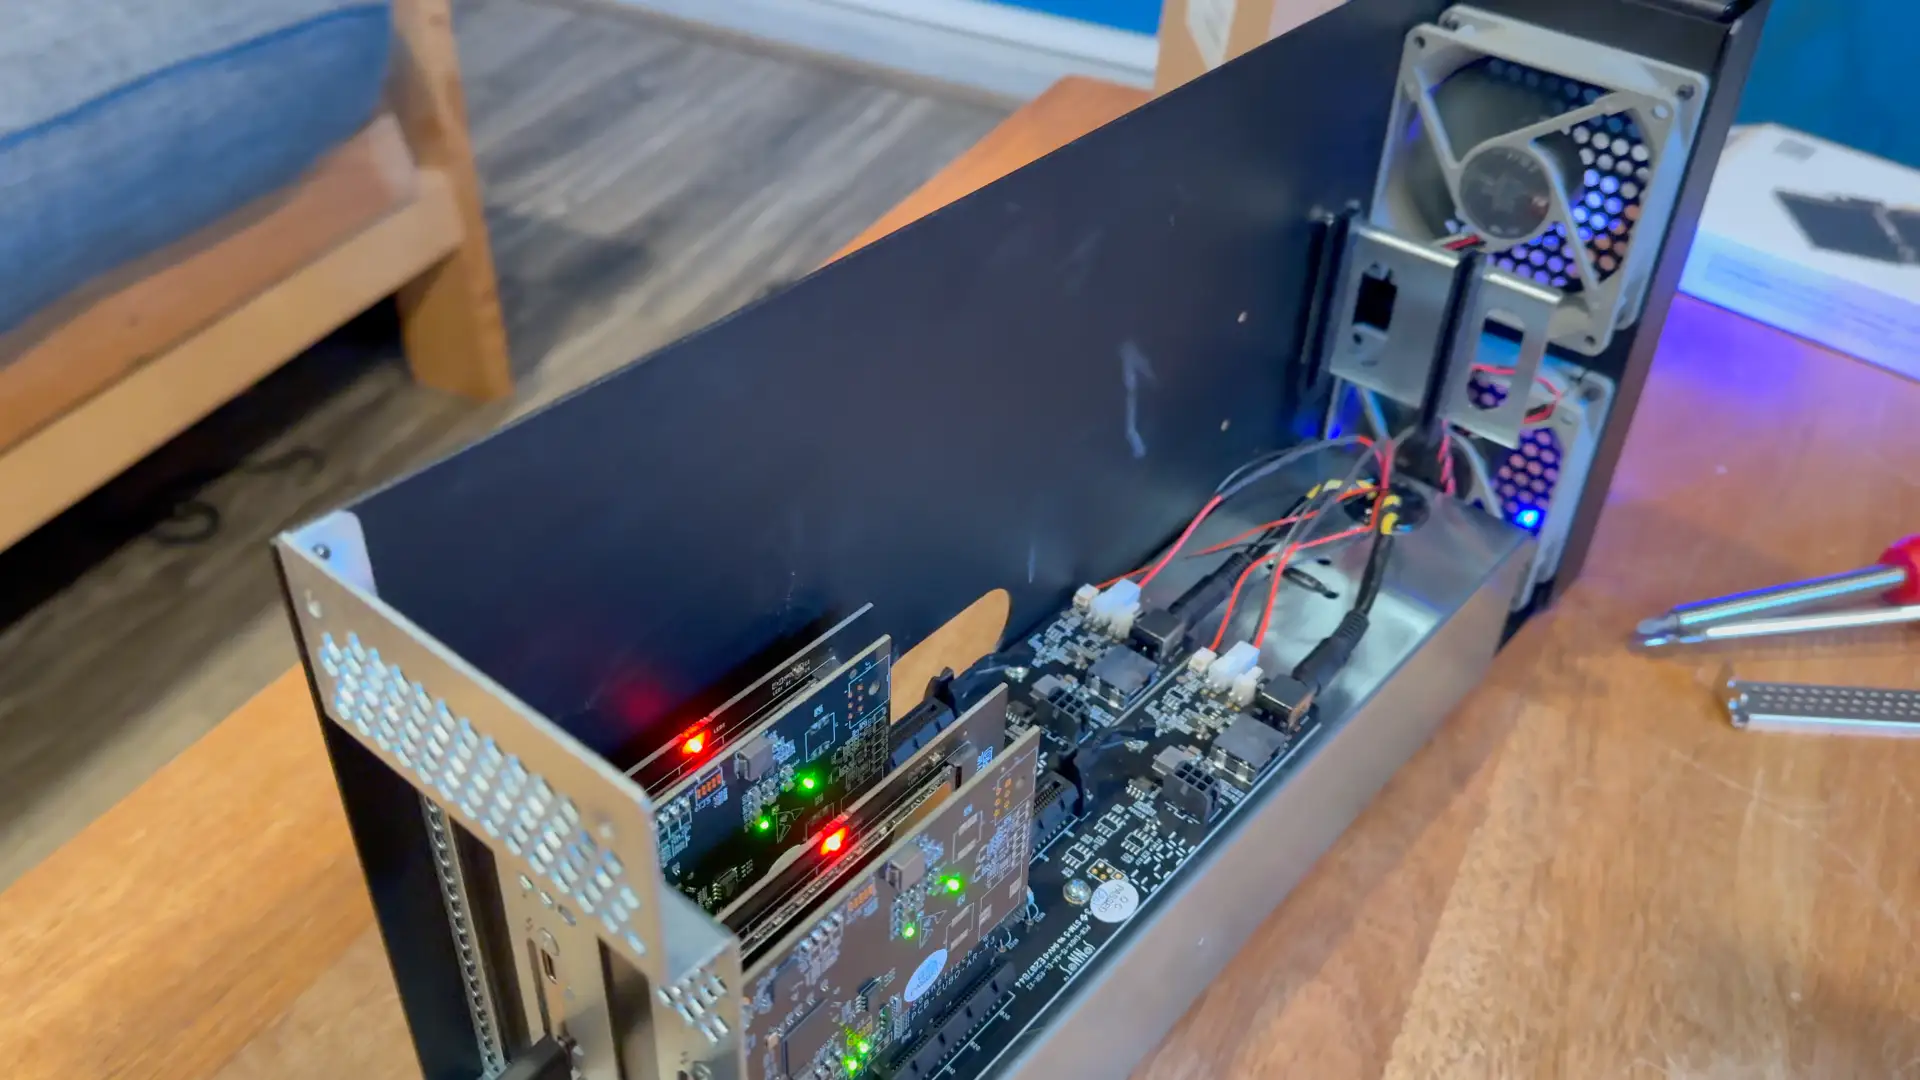
Inside is a modular design with two PCIe slots plus Cubo AR X3 Thunderbolt daughter cards. Interestingly, Sonnet refers to these as "Thunderbolt upgrade cards" on their website—suggesting potential future upgrades.
Thunderbolt 5 is not PCIe 5.0 based, instead PCIe 4.0. A single thunderbolt port represents roughly a 4x PCIe slot. While PCIe 5.0 offers double the theoretical bandwidth of PCIe 4.0, real-world storage performance gains are much smaller. The Samsung 990 Pro (PCIe 5.0) vs. 980 Pro (PCIe 4.0) shows only about a 17% improvement in IOPS (47,419 vs. 40,580) according to Tom's Hardware metrics. Of course, NVMe storage will improve and be able to saturate PCIe 5.0 more over time; as of writing this, there are few practical applications where PCIe 4.0 speeds are prohibitive, let alone 3.0. All of this is a very roundabout way to say I don't see the Thunderbolt 4.0 speeds as much of an issue. I hope that a Thunderbolt 5.0 upgrade is around the corner, but for most users, it won't be a game changer.
Thunderbolt 3 vs. Thunderbolt 4
Thunderbolt 3 and Thunderbolt 4 are both high-speed connectivity standards developed by Intel, but they have some key differences. Thunderbolt 3 was introduced in 2015 and supports data transfer speeds of up to 40 Gbps, while Thunderbolt 4, introduced in 2020, maintains the same maximum speed but adds several enhancements.
One of the main differences is that Thunderbolt 4 requires support for USB4, which means it can work with a wider range of devices and peripherals. Thunderbolt 4 also mandates support for daisy-chaining up to six devices, while Thunderbolt 3 does not have this requirement. Additionally, Thunderbolt 4 includes improved power delivery capabilities, allowing for charging devices at higher wattages.
Feature Thunderbolt 3 Thunderbolt 4 Maximum Bandwidth 40 Gbps 40 Gbps Display Support Minimum: Single 4K display
Maximum: Can support dual 4K @ 60Hz or single 5KMinimum: Dual 4K displays @ 60Hz or single 8K @ 30Hz PCIe Data Transfer 16 Gbps minimum 32 Gbps minimum Power Delivery Optional 100W charging Required 100W charging on at least one computer port Security DMA protection optional Intel VT-d-based DMA protection required Wake from Sleep Not guaranteed Required (PC can wake from sleep via connected Thunderbolt accessories) Dock/Hub Support Limited downstream ports Support for docks with up to 4 Thunderbolt ports USB4 Compatibility Compatible Compatible Cable Length Limited certified length options Universal 40Gbps cables up to 2 meters Connector Type USB-C USB-C For all intents and purposes, the Sonnet Echo II DV is a Thunderbolt 4 device, as most of the action for Thunderbolt 4 exists on the controller side of things. It supports daisy chaining and power delivery.
Performance: Real-World Testing

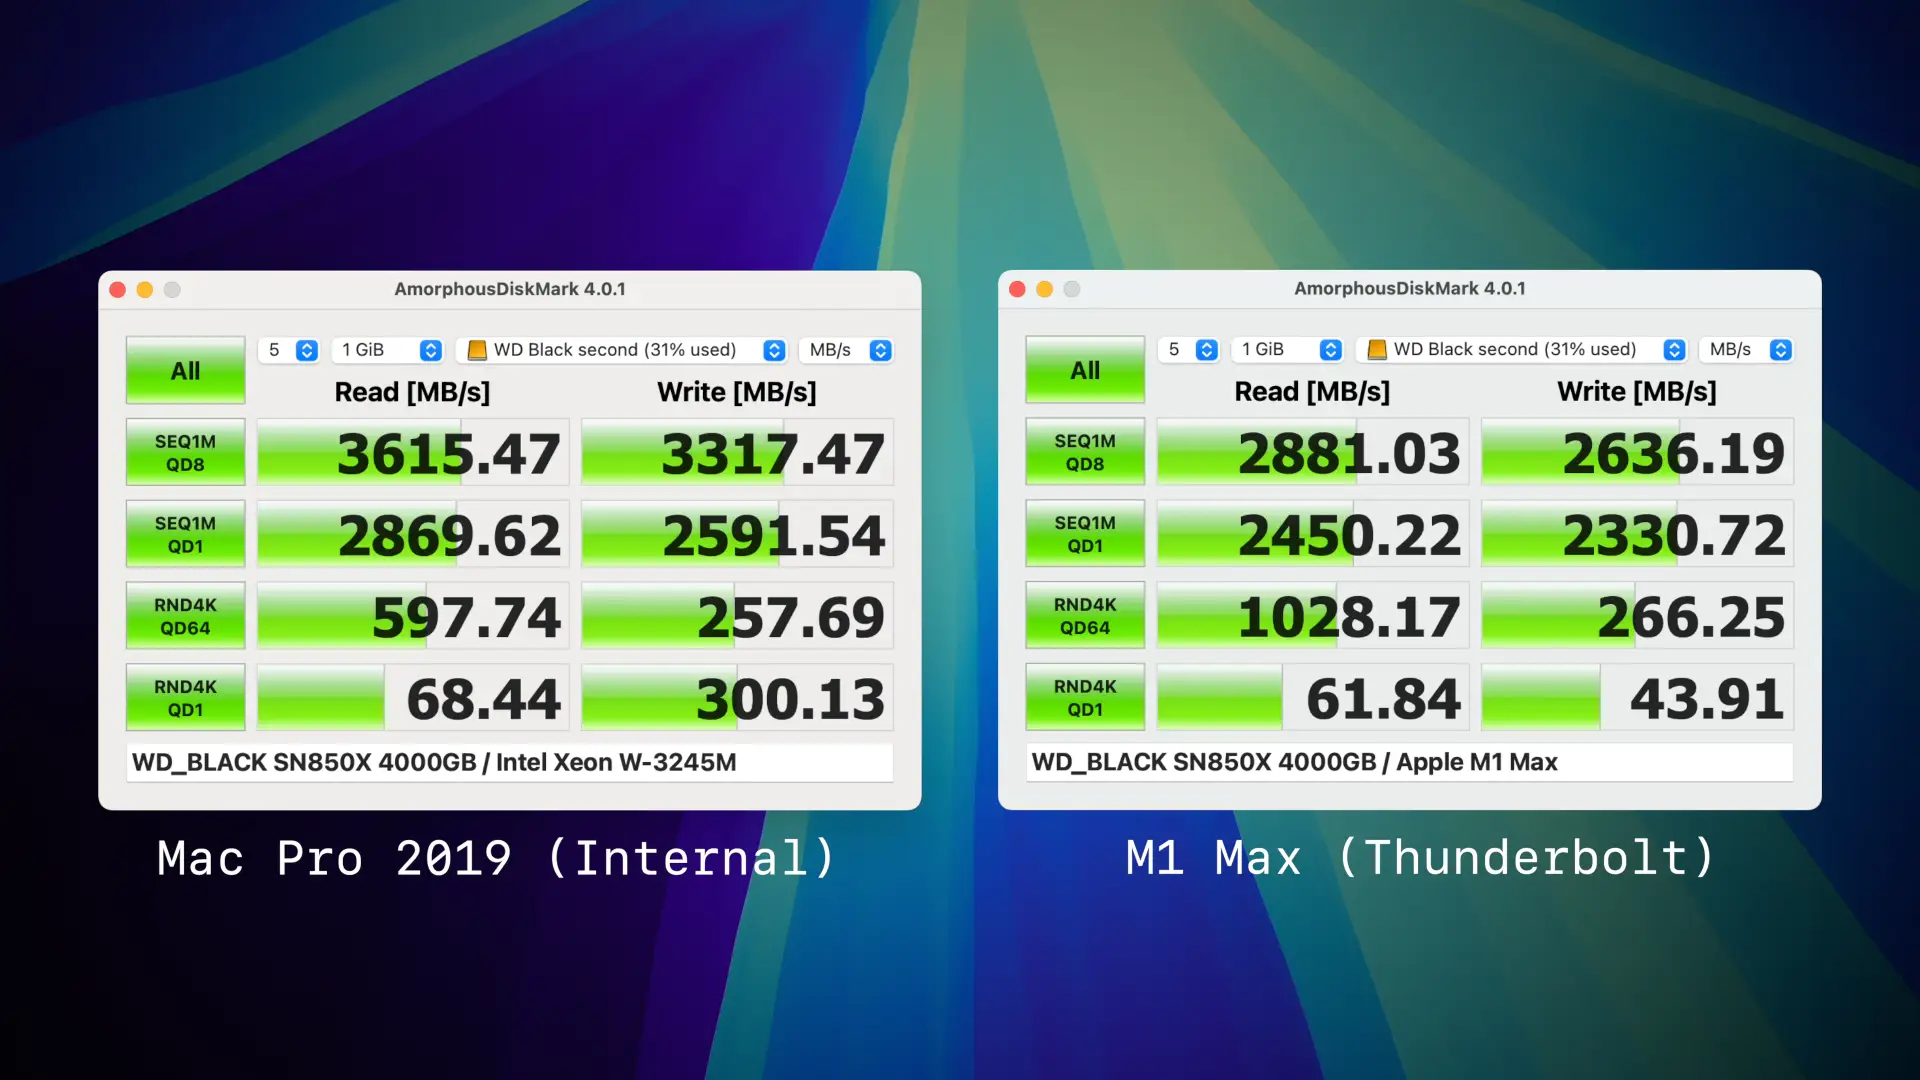
There's not a massive story when it comes to performance. Internal is faster than external, and that should not come as a surprise. Thunderbolt does have a higher protocol overhead; there is signal conversion between PCIe to Thunderbolt and latency due to distance. That said, it's in the ballpark of "close enough".

Comparing against the Thunderbolt 5 M4 Pro and Thunderbolt 4 M1 Max yeilded virtually no performance differences, with the M1 Max performing fractionally better. Amorphous tends to deliver inconsistent random tests and thus shouldn't be taken as exact but rather a rough estimate.
Being a Thunderbolt device, it's plug-and-play like USB. When I plugged it into my M1 Max, System Preferences showed six PCIe devices: four NVMe drives, two USB ports, and Ethernet from the McFiver card. For a secondary real-world test, for gigabit ethernet, I was able to achieve 450 MB/s read/writes to my Synology D923+ via the McFiver, identical to my Mac Pro 2019. The limitation is the NAS and not the card. 10 GBe is only 1250 MB/s max, something that was achievable even on Thunderbolt 2.
As previously mentioned, one of the wackier use cases that the Sonnet Echo II DV supports is the ability to connect two computers. This is feasible as literally each PCIe slot is an independent Thunderbolt device, complete with it's own thunderbolt controller. This is a feature that I don't think many people will use, but it does work. You can connect two computers to the Sonnet Echo II DV and have each computer access a single PCIe slot. This could be useful for certain workflows.
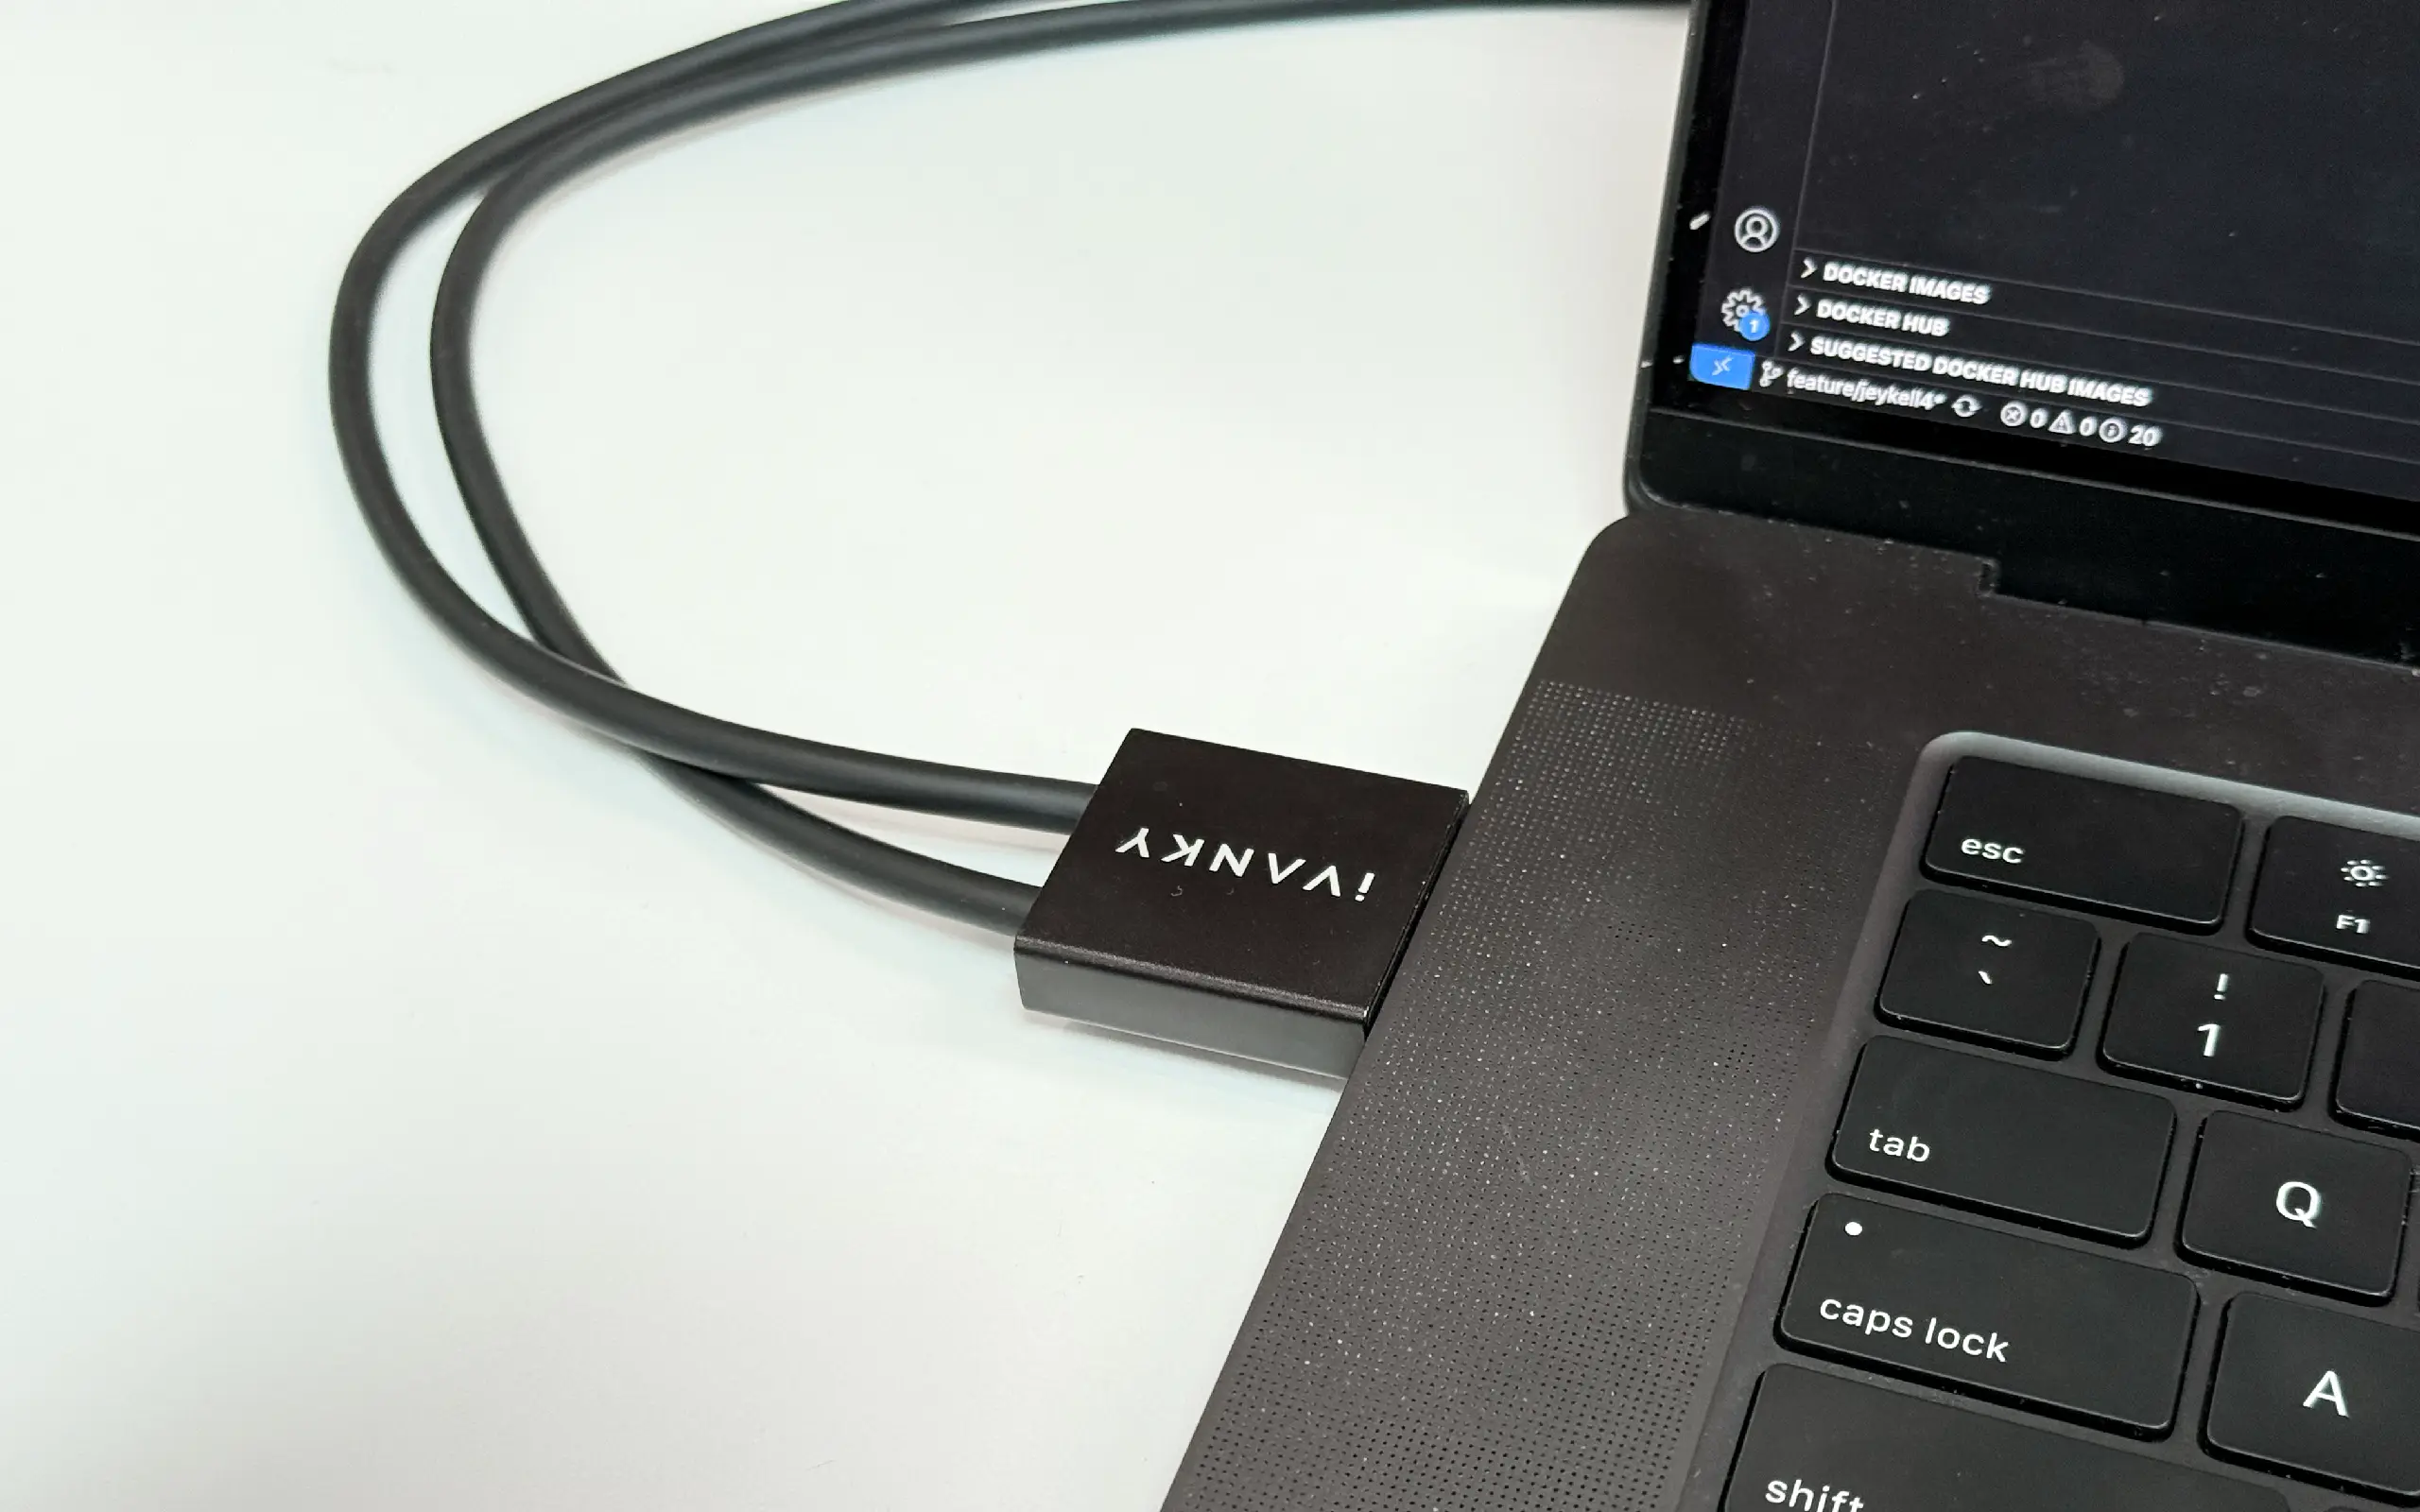
One minor complaint I have is that the cabling extenrally doesn't doesn't include a fused cable akin to the Ivnaky Thunderbolt dock, that makes connecting and disconnecting easier, as it's simple as plugging in a singular cable. That said, Apple does not keep it's orientation and spacing of Thunderbolt ports uniform between laptops and desktops. It's an insignificant gripe but it's something as a laptop user I've become pretty spoiled by.
Not an eGPU case
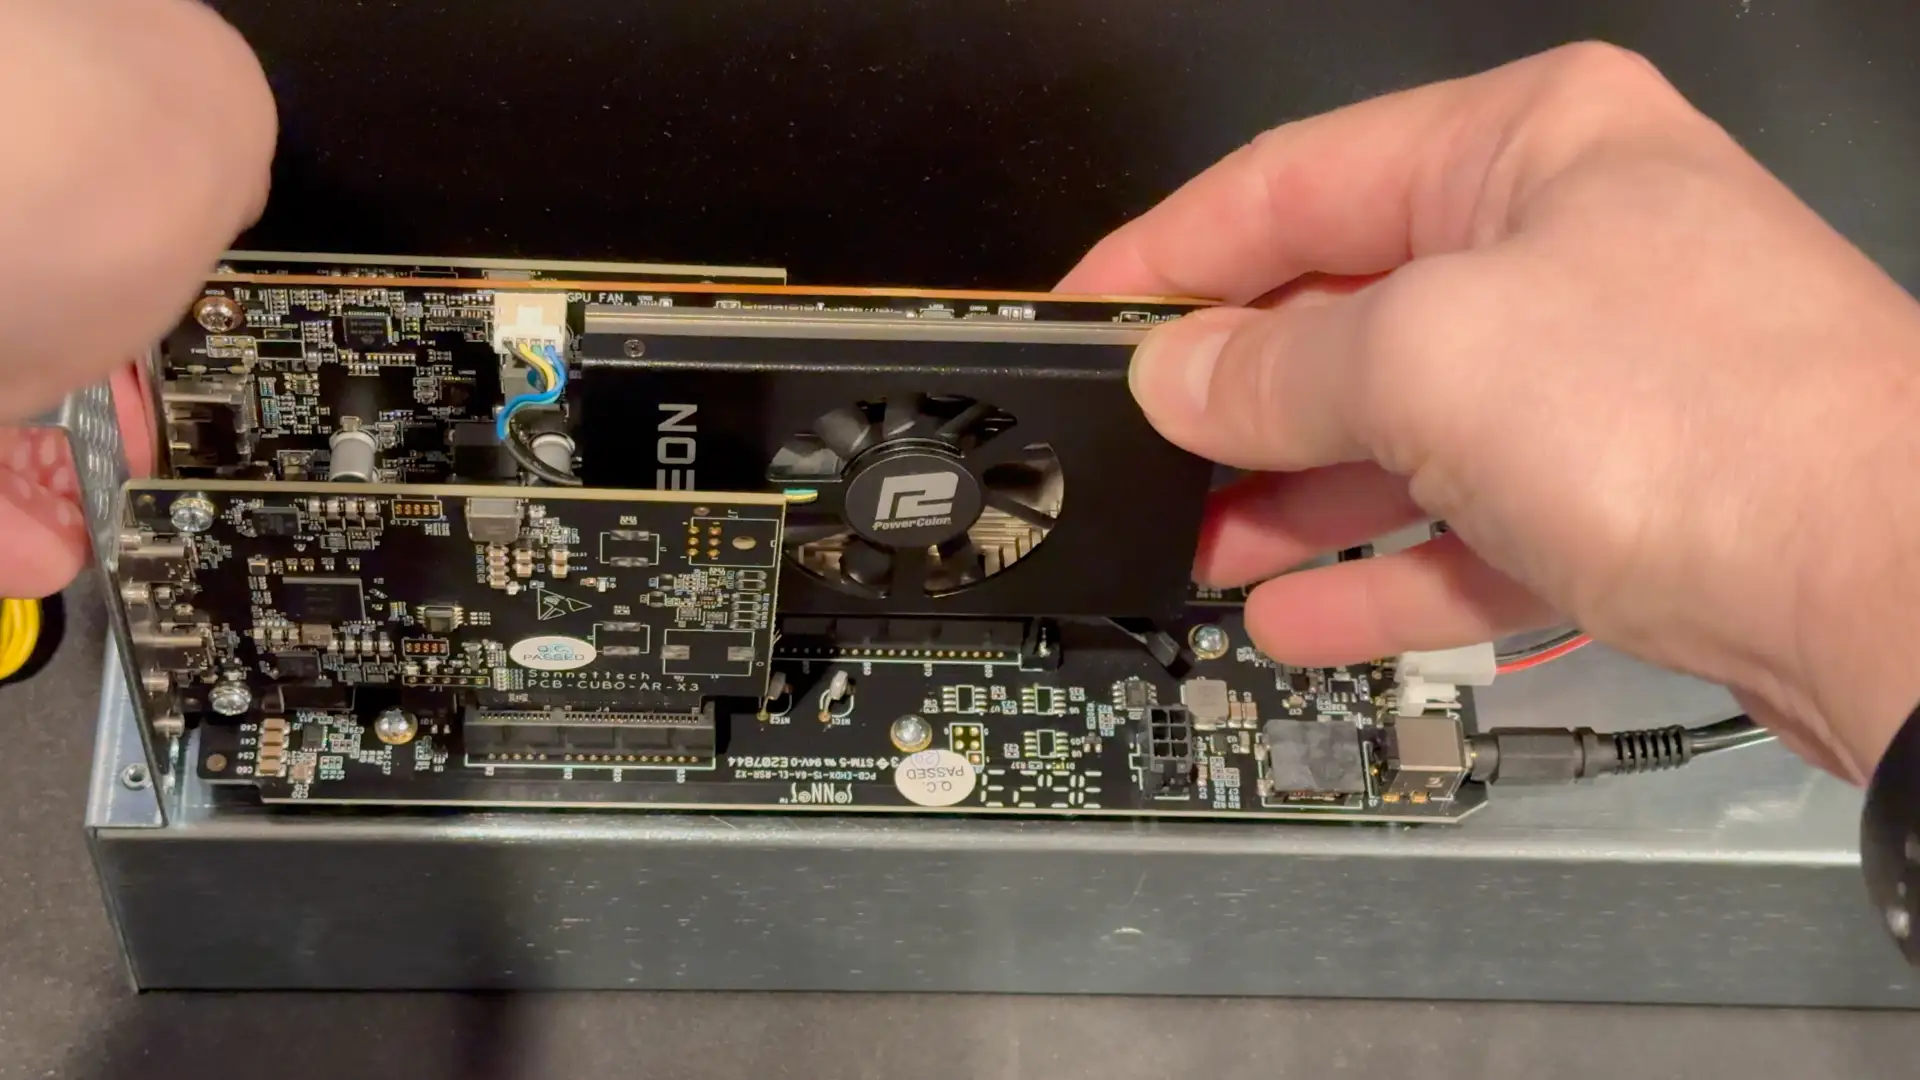
It should be abundantly clear that the II DV is not a GPU case, with its single slot design, limited power capability, and cooling focus on low noise instead of maximum heat dissipation. However, this didn't stop me from trying. I was able to find a modern-ish single-slot GPU in the form of the AMD Radeon RX 6400. The card's specs are pretty abysmal, only 4 GB of VRAM, based on RNDA2 with the processor and RAM clocked at 2 GHz, a tiny 64-bit bus, 7 TFLOPs for FP16, making it performance wise roughly that of a GeForce 770 from 2013. However, it is bus-powered and is a single slot.
macOS does not have drivers for this GPU, so I was limited to Windows testing. It was moderately better than my Geekom MiniPC's very poor Intel Iris Xe

So yes, you can jam a very shoddy GPU into this enclosure, but the sort of GPUs you can use are pretty abysmal. I wouldn't recommend it.
Market Alternatives: How the Echo II DV Compares
With several Thunderbolt expansion options available, it's important to understand how the Sonnet Echo II DV stacks up against alternatives. Here's a comparison of available solutions.
Sonnet's Own Product Line:
The Echo II DV positions itself as a premium offering in Sonnet's lineup. The price jump from the Echo Express III-D to the Echo II DV ($700 to $900) buys you dedicated Thunderbolt buses for each slot—a substantial advantage for bandwidth-intensive applications even though you get one fewer slot.
Sonnet Technologies
- Sonnet Echo Express (three-slot with shared bus): $700
- Advantages: Three PCIe slots, lower price point
- Disadvantages: All slots share a single Thunderbolt bus, limiting combined bandwidth
- Sonnet Echo Express SEL (single PCIe port): $300
- Advantages: Single slot
- Disadvantages: Single slot
OWC Solutions:
OWC's offerings tend to focus on storage expansion, with PCIe capabilities added as a secondary feature. None offer the dual Thunderbolt bus architecture that sets the Echo II DV apart.
- OWC Mercury Helios 3S ($399)
- Advantages: Lower price, includes a PCIe slot plus storage expansion bay
- Disadvantages: Single thunderbolt bus
- OWC Flex 8 ($649)
- Advantages:Combines PCIe expansion with 8 storage bays
- Disadvantages: Single Thunderbolt bus, shared bandwidth
Razer
- Razer Core X ($399)
- Advantages: Designed for GPUs, includes 650W power supply
- Disadvantages: Single Thunderbolt bus, optimized for GPUs
This is by no means a comprehensive list, but alternatives exist ready to meet the consumers' needs at various price points. The Echo II DV is slotted at the upper echelon of external enclosures. It's not a cheap solution by any stretch. Its stiffest competition is from Sonnet itself, as I imagine for the majority of users; the Sonnet Echo Express probably represents the best value if they're looking to port over as much flexibility as possible. It brings a 3rd PCIe slot but relies on a shared bus. Most users rarely push more than one PCIe device at a time, and probably the only times users would feel the limits would be when transferring large files between SSDs (assuming both were in the enclosure).
Apple Mac Pro
Apple's Mac Pro starts at $6,999 and includes seven PCIe slots. However, these advantages come with significant caveats:
- The base model uses the M2 Ultra, which is now outdated compared to the M4 Pro/Max and M3 Ultra
- Internal slots don't support user-upgradable GPUs or CPU upgrades
- Total cost is significantly higher than a Mac Studio ($3,999) plus Echo II DV ($900)
Beyond the cost savings, the Mac Studio + Echo II DV route offers greater flexibility, as you can take your expansion cards to a future computer—something impossible with the Mac Pro's internal slots once the system is obsolete.
As of writing this, due to Apple's very odd market positioning of a M4 Max and M3 Ultra, for many users the M4 Max Mac Studio represents the better value, as the CPU is faster in single and low threaded tasks. In fact the M4 Max, only about 15% faster, granted the M3 Ultra offers a much more powerful GPU, and the ability to toss gobs of RAM into the system.
The $2k price jump probably isn't worth it for the majority of buyers, and the extra money could be spent on accessories like the Echo II DV to expand the storage well beyond Apple's meager offerings.
Conclusion: Rethinking Professional Mac Setups
After extensively testing the Sonnet Echo II DV, I've come to a conclusion that might have seemed heretical just a few years ago: for many professionals, the Mac Pro is no longer necessary.
The combination of Apple Silicon performance and external PCIe expansion creates a compelling alternative to the traditional workstation model. A Mac Studio, MacBook Pro, or even a Mac mini or MacBook Air paired with the Echo II DV, and you're getting most of the benefits of the Apple Silicon Mac Pro 2023 at a steep savings. Sadly, outside of a few exotic PCIe cards, there isn't much point to PCIe now that dGPUs have been sunsetted by Apple. Their switch to shared memory has yielded some impressive results for applications like AI, as VRAM can be dynamically assigned. However, in terms of raw performance, it hasn't materialized and plays deeply into Apple's hands for planned obsolescence.
-
Blog Updates
For personal record, I like to keep a running log of what few updates I do under-the-hood with this site on the rare chance someone actually is a regular reader. This time I added JSON-LD and limited the index pages now to 15 posts as I have a habit of writing VERY long blog posts that can be extremely brutal on the homepage.
removing jQuery, stupid spam bot solution, complianing about AI, adding dark mode, or general changes
-
It's time to jailbreak your audible library
Libation: Free Your Audiobooks from DRM Protection
If you're an audiobook enthusiast who uses Audible, you've likely encountered the frustration of being unable to access your purchased content outside of Audible's ecosystem or have had content removed. While Audible offers a convenient service, their DRM protection limits how and where you can enjoy your audiobooks. Enter Libation, a powerful, open-source tool that allows you to download and decrypt your Audible library, giving you true ownership of your purchases.
What is Libation?
Libation is a free, open-source application that helps you manage your Audible library and liberate your audiobooks from DRM restrictions. With Libation, you can download, decrypt, and convert your Audible content into standard formats like MP3 or M4B, allowing you to listen on any device or player of your choice.
Key Features of Libation
- Complete Library Management: View and organize your entire Audible library
- Batch Processing: Download and decrypt multiple books at once
- Format Options: Convert to MP3 or M4B with chapter information preserved
- Metadata Handling: Maintain all book details including cover art
- Cross-Platform: Available for Windows, macOS, and Linux
Installation Guide
Getting started with Libation is straightforward:
- Visit the Libation GitHub repository
- Download the latest release for your operating system
- Extract the downloaded file to a location of your choice
- Run the Libation executable
Note: Libation does not require installation in the traditional sense. It's a portable application that runs directly from the extracted folder.
Setting Up Libation
When you first launch Libation, you'll need to authenticate with your Audible account:
- Click on the "Login" button
- Enter your Audible/Amazon credentials
- Complete any verification steps if prompted
- Upon successful login, Libation will scan and display your Audible library
Privacy Note: Libation connects directly to Audible's servers using your credentials. Your login information is stored locally and securely on your device.
Using Libation to Liberate Your Audiobooks
Basic Usage
Once your library is loaded, you can:
- Select one or multiple books from your library
- Right-click and choose "Download and Decrypt" or click the dedicated button in the toolbar
- Specify your preferred output format (MP3 or M4B)
- Choose the destination folder for your decrypted audiobooks
- Click "Start" to begin the process
Advanced Options
Libation offers several customization options to fine-tune your experience:
- Audio Quality: Adjust bitrate settings for the output files
- Metadata Customization: Edit book details before conversion
- File Naming: Configure naming patterns for your decrypted files
- Chapter Handling: Choose how chapter information is preserved
To access these settings, navigate to the "Settings" tab within Libation.
Managing Your Liberated Collection
After decrypting your audiobooks, you can:
- Play them with any standard audio player (VLC, iTunes, Windows Media Player, etc.)
- Transfer them to portable devices, including MP3 players, smartphones, and tablets
- Create backups to ensure you never lose access to your purchases
- Use them with audiobook-specific apps like Listen Audiobook Player (Android) or Bookmobile (iOS)
Troubleshooting Common Issues
Authentication Problems
If you encounter difficulties logging in:
- Ensure your Audible/Amazon credentials are correct
- Try clearing cached credentials in Libation (Settings → Account → Clear Saved Credentials)
- Check if your account requires two-factor authentication
Download Failures
If downloads are failing:
- Verify your internet connection is stable
- Ensure you have sufficient disk space
- Try downloading one book at a time
- Check if your antivirus or firewall is blocking Libation
Conversion Issues
For problems with the decryption or conversion process:
- Update to the latest version of Libation
- Try a different output format
- Check the application logs for specific error messages
- Visit the Libation community forum for assistance
Alternatives
While not covered in this post, there are other tools available for managing your Audible library, such as openaudible which is available for macOS/Windows/Linux as well.
Legal Considerations
It's important to understand that Libation is designed for personal use with audiobooks you've legally purchased. The tool allows you to exercise your fair use rights by removing DRM for personal backup and format-shifting purposes. Always respect copyright law and use your decrypted audiobooks responsibly.
Recommended Audiobook Players
macOS
- Books - macOS comes pre-bundled with Books, which will playback audiobooks, supports chapters and will resume where last left off.
- BookPlayer - A wonder application that is pay-optional, core features are all free to use.
iOS
- Books - iOS comes pre-bundled with Books, which will playback audiobooks, supports chapters and will resume where last left off.
- BookPlayer - A wonder application that is pay-optional, core features are all free to use.
Android
- Smart Audiobook Player - A very loved and popular audibook application
- Voice - A free and open-source audiobook player that supports chapters and bookmarks.
Windows
- Windows Media Player - A built-in media player that can handle various audio formats, including MP3 and M4B.
- Audiobook shelf - Open source player that is working on syncing to Android and iOS.
- VLC Media Player - A versatile media player that can handle various audio formats, including MP3 and M4B.
Linux
- Cozy - Modern, dedicated audiobook player for Linux
- VLC Media Player - A versatile media player that can handle various audio formats, including MP3 and M4B.
Conclusion
Libation empowers you to take full control of your audiobook collection, freeing you from the limitations of Audible's ecosystem. By decrypting your purchases, you ensure long-term access to content you've paid for, regardless of changes to Audible's policies or services.
Whether you're concerned about preserving your library, want the flexibility to use different playback devices, or simply prefer to have true ownership of your purchases, Libation provides a straightforward solution that respects both your rights as a consumer and the intellectual property of content creators.
-
Fake Legal Threats for SEO Backlinking scam
I get a lot of spam as I have a public email address on my blog. I ignore 99.99%, but here's one that's found in my inbox a few times and ticks me off. The first time it happened, I took enough time to actually look at the image in question. Within seconds, I realized it was an absolute farce as the image they linked was AI slop. I figured I should sound the alarm on this scam as my blog has solid domain authority and gets a surprising amount of traffic. Another blogger, Mark Carrigan has seen this exact template, jabardasti on Twitter and variations have been seen on Reddit.
Here's how it works:
- They find a blog post with an image that they claim is theirs and use AI slop that has a similar-ish image. It always seems to be linked to Imgur and not another website. I imagine in time, they'll bot it to steal your image and upload it to Imgur as 'proof.' Don't fall for it.
- They send a legal threat to the blog owner, demanding a backlink to their site.
- If you don't comply, they threaten legal action.

Pictured: This is the slop iamge that I received and I stole so that I'm actually now committing IP theft and defaced it.How can I confidently say it's a scam? I've ignored this at least three times now and its been over a year. Absolutely nothing has happened. It's a variation of the old "You have a broken link on your blog. You should link X instead" backlinking scheme.
Here's the email I received, complete with spelling errors and grammar mistakes:
James Harris | Citi Legal Services <james@clexperts.org>
3:45 AM (5 hours ago)
Dear owner of https://blog.greggant.com/posts/2021/09/24/mac-osx-snow-leopard-nature-desktop-backgrounds-in-5k.html,
We're reaching out on behalf of the Intellectual Property Division of a notable entity in relation to an image connected to our associated client: Big Cat Snow Leopard.
Image Reference: https://i.imgur.com/wid2Pil.png
Image Placement: https://blog.greggant.com/posts/2021/09/24/mac-osx-snow-leopard-nature-desktop-backgrounds-in-5k.html
We've observed the above image being used at the above specified placement. We are emailing you to insist our client is correctly credited. A visible link to [fake link removed some big cat facts website, I don't even want to acknowledge them in print as I don't want to give them any benefit] is necessary, placed either below the image or in the page's footer. The anchor text should be "Big Cat Snow Leapard". This needs to be addressed within the next five business days.
We're sure you recognize the urgency of this request. Kindly understand that simply removing the image does not rectify the issue. Should we not see appropriate action within the given timeframe, we will reference case No. 82831 and implement legal proceedings as outlined in DMCA Section 512(c).
For your convenience, past usage records can be reviewed using the Wayback Machine at https://web.archive.org, the main recognized digital web archive.
Take this communication as a formal notice. We value your swift action and expect your cooperation.
Regards
James Harris
Trademark Attorney
Citi Legal Services
1 Beacon St 12th floor
Boston, MA 02108
james@clexperts.org
www.clexperts.org
James I assume is not a real person. The website impressively has multiple pages, a few blog posts, and even a phone number and office location. That said, I know multiple real-life lawyers and real estate lawyers would not be dabbling in intellectual property law on the side.
If you receive emails from clexperts.org, clexperts.site, clexperts.info etc, it's a bullshit law firm. Ignore it. Move on. Don't take my word for it, you can google what real DMCA take down notices look like.
-
You probably don't want to stick an Intel GPU into a Mac Pro 2019...
I tend to do silly stuff with my Mac Pros. This time, I jammed an Intel Sparkle OC ROC A770 into my Mac Pro 2019. It worked well enough in Windows until it caused issues with macOS. The video contains the entire adventure.
As expected, the Arc A770 wouldn't work in macOS - the system recognized it only as a generic display adapter with no ability to output even unaccelerated video. This isn't surprising since Apple hasn't allowed third-party GPU drivers since macOS 10.13.
The card performed reasonably well in Windows 10, though benchmarks showed it lagging about 70% behind my Radeon 6900 XT. That performance gap makes sense given the price difference, but the Arc does have some impressive encoding capabilities that make it interesting for certain workflows.
Things went south when the A770 would enter full leaf blower mode whenever Windows went to sleep. Even worse, after my Windows testing, the Mac wouldn't boot into macOS at all. I don't know if the Intel Arc drivers somehow corrupted my EFI partitions, but when iBoot attempted to load, it failed completely.
Another thing learned from this experiment is that out of the box, the Mac Pro 2019 does not support Rebar (Resizable bar). Resizable BAR (Base Address Register) is a PCIe feature that enhances how CPUs access GPU memory by allowing them to view the entire GPU VRAM at once instead of in limited 256MB chunks. This technology enables faster data transfers between the CPU and GPU, potentially improving gaming and graphics performance, especially in memory-intensive tasks. AMD markets their implementation as Smart Access Memory (SAM) while Intel and NVIDIA simply call it Resizable BAR, but all function similarly by removing memory addressing limitations in the PCIe interface. There might be ways to enable it, but that's a battle for another day.