The Definitive Mac Pro 2019 7,1 Upgrade Guide

This is a public beta :)
People don't realize how many hours writing/researching my Mac Pro guides takes, and my previous guides all started somewhere, too. The information should be accurate but expanding and formatted. If it isn't, please reach out to me. For information about changes and future plans, check the bottom of this blog post.
Thank you for understanding.
Supporters Thank you
After years of maintaining this guide for free, I now am accepting patreon supporters
Contents
- Introduction
- Glossary
- Know your Mac Pro 2019
- PCIe
- Power Supply
- Case
- Networking
- Apple T2 Security chipset
- Afterburner
- Firmware And OS
- CPU Upgrades
- GPU upgrades
- I/O Upgrades
- Storages Upgrades
- Hard Disk Drives
- PCIe SATA + SSD Sleds
- The M.2 format and Apple NGFF
- The M.2 format and host PCIe cards
- Can I use a card that isn't listed above that host's multiple NVMe drives?
- Which M.2 host is the best?
- M.2 and Heatsinks
- PCIe AHCI (Advanced Host Controller Interface) SSDs
- PCIe NVMe
- Not all SSDs are equal
- Benchmarking SSDs
- RAID and APFS and performance
- Soft RAID
- RAM upgrades
- Display Upgrades
- Audio upgrades
- Error Codes
- Windows 10 & 11
- iPhone as a webcam
- Multi-OS USB Bootable Flash Drives
- Communities & Blogs
- Apple Silicon and the Mac Pro's fate (and additional observations)
- Updates & Author Notes
Introduction
Upgrading a Mac Pro 2019 isn't hard. The information is out there, but knowing what is possible, what questions to ask, and where to find it isn't nearly as easy. This is less a how-to guide/manual than a roadmap to primary sources by other brilliant people, written to be accessible to both new and advanced users.
This is the 3rd edition of the Definitive Mac Pro Upgrade series, as I've written guides for the classic Mac Pros 1,1-5,1 (2006 - 2012) and the Mac Pro 6,1 (2013), and now the Mac Pro 7,1 (2019). The original had its roots in 2013 when I wrote up a list of Mac Pro upgrades and graphic card update articles. In 2018, I went to update the guide for recommended updates, which morphed into a complete rewrite. The result became the Definitive Mac Pro Upgrade Guide.
The 2019 Mac Pro represents the best and worst of Apple's intentions. By every measurable standard, it is the most upgraded Mac, brilliantly engineered with the loftiest "Apple tax" of any Mac ($699 wheels). Instead of embracing the rugged utility that the previous Mac Pros represented, Apple made it an aspirational device over an everyman's professional computer. Its entire design is striking, and its internals are artful. Regardless of its overpricing, it harkens back to a nearly bygone era of modular computing, which may end with Apple Silicon. While we live in a world of planned obsolescence, the Mac Pro 2019 feels even more important. There's likely one more iteration of the 2019 Mac Pro (2022? 8,1?), and then we can only speculate as to the future of the Mac Pro and the Macintosh platform.
This guide borrows heavily from my other guides and does include some direct paragraphs lifted from my other guides when appropriate.
Getting Started / Glossary
Jumping into the world of macOS can be daunting as there's a lot of assumed tribal knowledge and history, but it isn't insurmountable. I try to avoid unnecessary shorthand, but there are a few unavoidable terms. I like to write for as many people as possible and to remain accessible as my guides are read by novice and technical-minded native-English speakers to people using translation software.
There is a base assumption for understanding for sanity's sake, but hopefully, a low enough bar that novice users can follow along and learn. We all start somewhere, and no one should ever feel bad for asking questions. Examples of assumed knowledge would be the fundamental difference between an SSD and Hard Disk Drive or the basic concept of CPU cores. Many other sources can educate users on these topics and do a better job than I would. I try to explain core concepts or provide links when necessary to help educate a user. This means this guide is long but informative. The initial inclination will be to skip sections. However, some key information may often be discussed in intros and other sections. I've tried to mitigate this, but there's a lot of information to digest. If you feel that something is unclear or never adequately explained, please reach out to me and let me know as my readers are a global audience and of all walks of life and a wide variety of skillsets. I've often been humbled by people who are much more knowledgeable than me, and I appreciate anyone who points out errors or novices who feel something is confusing. Please see the Changelog for more details on how to reach out to me. We all start somewhere, and I frequently question my aptitude when I see how much heavy lifting others have done to realize this guide. For my more technical users, I depend on you for accuracy. This is truly a community effort.
Apple Silicon - There's a lot to unpack on this topic. Still, the short answer is that Apple is transitioning away from using Intel CPUs to CPUs of its own design, manufactured by TSMC using the ARM CPU instruction set, a form of RISC. There's a bit greater irony as Apple once used RISC CPUs in its Macs in the 1990s, known as PowerPC. No one knows how long Apple will continue to support Intel Macs. See 86x.
APFS - Short for Apple File System, a proprietary file system used on Mac OS and iOS. File systems define how data is stored and retrieved in an operating system. File Systems, like all software, have limitations, and APFS was used to fix many of the shortcomings of HFS+. The transition to APFS was (relatively) smooth. APFS has limitations, such as a lack of native support for RAID0 boot volumes.
Bits vs. Bytes - You probably know this one by heart: There are 8-bits to every byte. For this guide to avoid confusion, I use bytes instead of bits when discussing all things bandwidth-related, even though networking favors bits and local storage favors bytes. It's pretty easy to mistake bits for bytes as it hinges on capitalization. 10 gigabits-per-sec is written in shorthand as 10 Gbps. 10 Gigabytes-per-second is written as 10 GBps or 10 GB/s. Converting bits to bytes means dividing by eight. 10 Gbps = 1.25 GB/s (or 1.25 GBps). Download speeds are expressed by operating systems in bytes per second, which confuses consumers as internet connections are not. For example: A 100 Mbps network connection has a maximum bandwidth of 12.5 MB/s.
cMP - shorthand for classic Mac Pro. It refers to any Mac Pro released between 2006-2012. The phrase "Classic Mac Pro" only refers to these models and not the similar-looking PowerMac G5 or the 2013 Mac Pro.
UEFI - Short for Universal Extensible Firmware Interface, a specification designed by Intel to replace BIOS as the method to interface between an operating system and the platform firmware. This former isn't essential to understand beyond that it is a computer's firmware, designed to replace BIOS. This interface allows selecting a boot drive before OS X begins booting (by holding down the option), among other pre-OS loading functionality. I use the term EFI loosely to refer to the pre-boot functionality. The previous classic Mac Pros used a non-standard EFI as Apple built its earlier Intel Macs before UEFI. The Mac Pro 2019 uses UEFI. Thus, any GPU supporting UEFI (all of the current AMD GPUs) will output a boot screen.
Firmware - a term you probably have heard and already possess some understanding of, the standard definition is a program that is written into Read-Only Memory (ROMs) and requires a specialized process to change (if it can be changed at all) called Flashing.
Flash/Flashing - The act of writing over data that exists in an otherwise in Read-Only Memory (ROM) or space (Firmware).
Hackintosh - Any non-Apple hardware that is running any version of Mac OS, generally standard PCs using a lot of software workarounds and particular hardware.
HomeBrew - long-time computer users are probably familiar with the term "homebrew" regarding user/hobbyist applications written for systems that generally were closed architecture, like a videogame console. However, regarding the Macintosh platform, HomeBrew is a package manager for macOS for (mostly) command-line utilities. Package managers function, in principle, like an app store for open-source software, as you can quickly install, update, and uninstall the software from your command line. For developers, Homebrew occupies a very important space as it's one of the most preferred ways to install nodejs, python, git, MySQL, as well as utilities like youtube-dl, FFmpeg, ImageMagick, and MonitorControl.
Kext - With OS X, the architecture for drivers uses kernel extensions called .kext files. Kexts are supremely powerful and the backbone for the Hackintosh community to enable unsupported hardware. However, Apple has deprecated kexts in 10.15 Catalina for security reasons, replacing them with EndpointSecurity, SystemExtensions, and DriverKit. How this affects unsupported hardware remains to be seen. Kexts are located within /System/Library/Extension and /Library/Extensions.
OS X / macOS- Mac OS X is Apple's XNU kernel-based operating system evolved from NeXTstep. Mac OS X was rebranded to macOS in 2016. I use these interchangeably as I have a tough time accepting macOS, as it is still OS X to me. The difference is superficial. Mac OS is not to be confused with Mac OS classic (Mac OS 7.x - 9.x). Today, all of Apple's OSes share the XNU kernel and are all descendants of NeXTStep.
Metal - Previously, Apple's default graphics library for graphics acceleration was OpenGL (Open Graphics Library), used on iOS and Mac OS. Over time, OpenGL fell behind in performance and features when compared to a library like Microsoft's DirectX. Without an ideal candidate to replace it (OpenGL's successor, Vulkan, would not be released until 2016), Apple created its own graphics library called Metal and shipped it in 2014 on iOS 8 first. Later, Apple ported Metal to OSX. Mac OS 10.14 Mojave uses Metal to now power Mac OS. The new API does not support many old GPUs, as their drivers were not updated. This isn't much of a concern for 2019 Mac Pro owners.
NVRAM/PRAM - Non-volatile random-access memory (previously Parameter RAM) is a space reserved for various low-level settings found on Macs pertaining to the pre-boot settings. These settings contain data such as default boot volume, backup boot volumes, default audio output, audio levels, computer's name, Keyboard language, backlight level (for laptops), whether Bluetooth is enabled, default GPU, and so forth. The contents of the NVRAM can be viewed via the terminal using nvram -xp. The difference between NVRAM vs. PRAM is transparent to the user. NVRAM uses a small storage space using flash-based storage, whereas the PRAM uses a battery to keep the settings buffered in the RAM. Occasionally, problems can arise (generally associated with hardware upgrades) that can cause problems. Resetting the NVRAM is still referred to as "zapping the PRAM ."This is performed by holding down the Command + option + p + r keys during boot before the system chime, which will cause the computer to reboot immediately and chime again. This will clear out the NVRAM. Alternatively, the NVRAM ram can reset via the terminal using NVRAM -c, which will require restarting manually for the changes to take effect.
SIP - System integrity protection, a feature of later Mac OS introduced in OS X El Capitan, that walls off portions of low-level features of Mac OS to protect it from malware. Prior to this, any application with root-level access could read/edit/modify system files. However, sometimes, when performing certain hacks, it requires disabling during installation and then re-enabling. There are legitimate reasons why users may want to leave it disabled. See Disable System integrity protection for instructions. See About System Integrity Protection on your Mac on Apple.com for more details.
Terminal/shell - OS X is famously built on NeXTStep, which was a *nix-based operating system that gave it access to a new (old) feature, a command-line shell. This allowed Mac users to interact with the OS akin to Unix/Linux. Many advanced Mac OS operations can only be performed via the terminal, such as disabling SIP or enabling TRIM for an SSD. Users unfamiliar with the terminal world should always exercise due diligence before copying and pasting random snippets of code found on the web for the terminal. Any Mac user looking to become a power user should make an effort to learn terminal basics. The ability to operate the terminal unlocks a feature set outside of the GUI and can do many of the GUI's functions. An additional perk is that terminal skills translate to Linux and Unix, which is good for server management/networking or web development. Many utilities are command-line only, like the ever-power ImageMagick, which can batch-process images much faster than GUI applications. Prior to 10.15, Apple used Bash for its terminal but now has pivoted to ZSH.
X86 - This is shorthand for "Intel" as the Intel CPU family has its roots in the 8086 family, which would evolve to the Intel 80286 in 1982, a CPU that was not initially designed for personal computers but would become one of the foundations for the PC revolution. The CPUs would be reduced from the long "80286" moniker to shorter names like the popular "i386" successor. The CPU family eventually would land on "x86" to describe the set of instructions the CPU could execute. Apple would abandon in 2006 the IBM PowerPC (PPC) family for the Intel family, marking the 3rd time it had switched CPUs, as it originally started on the Motorola 68k instruction set.
Know your Mac Pro 2019
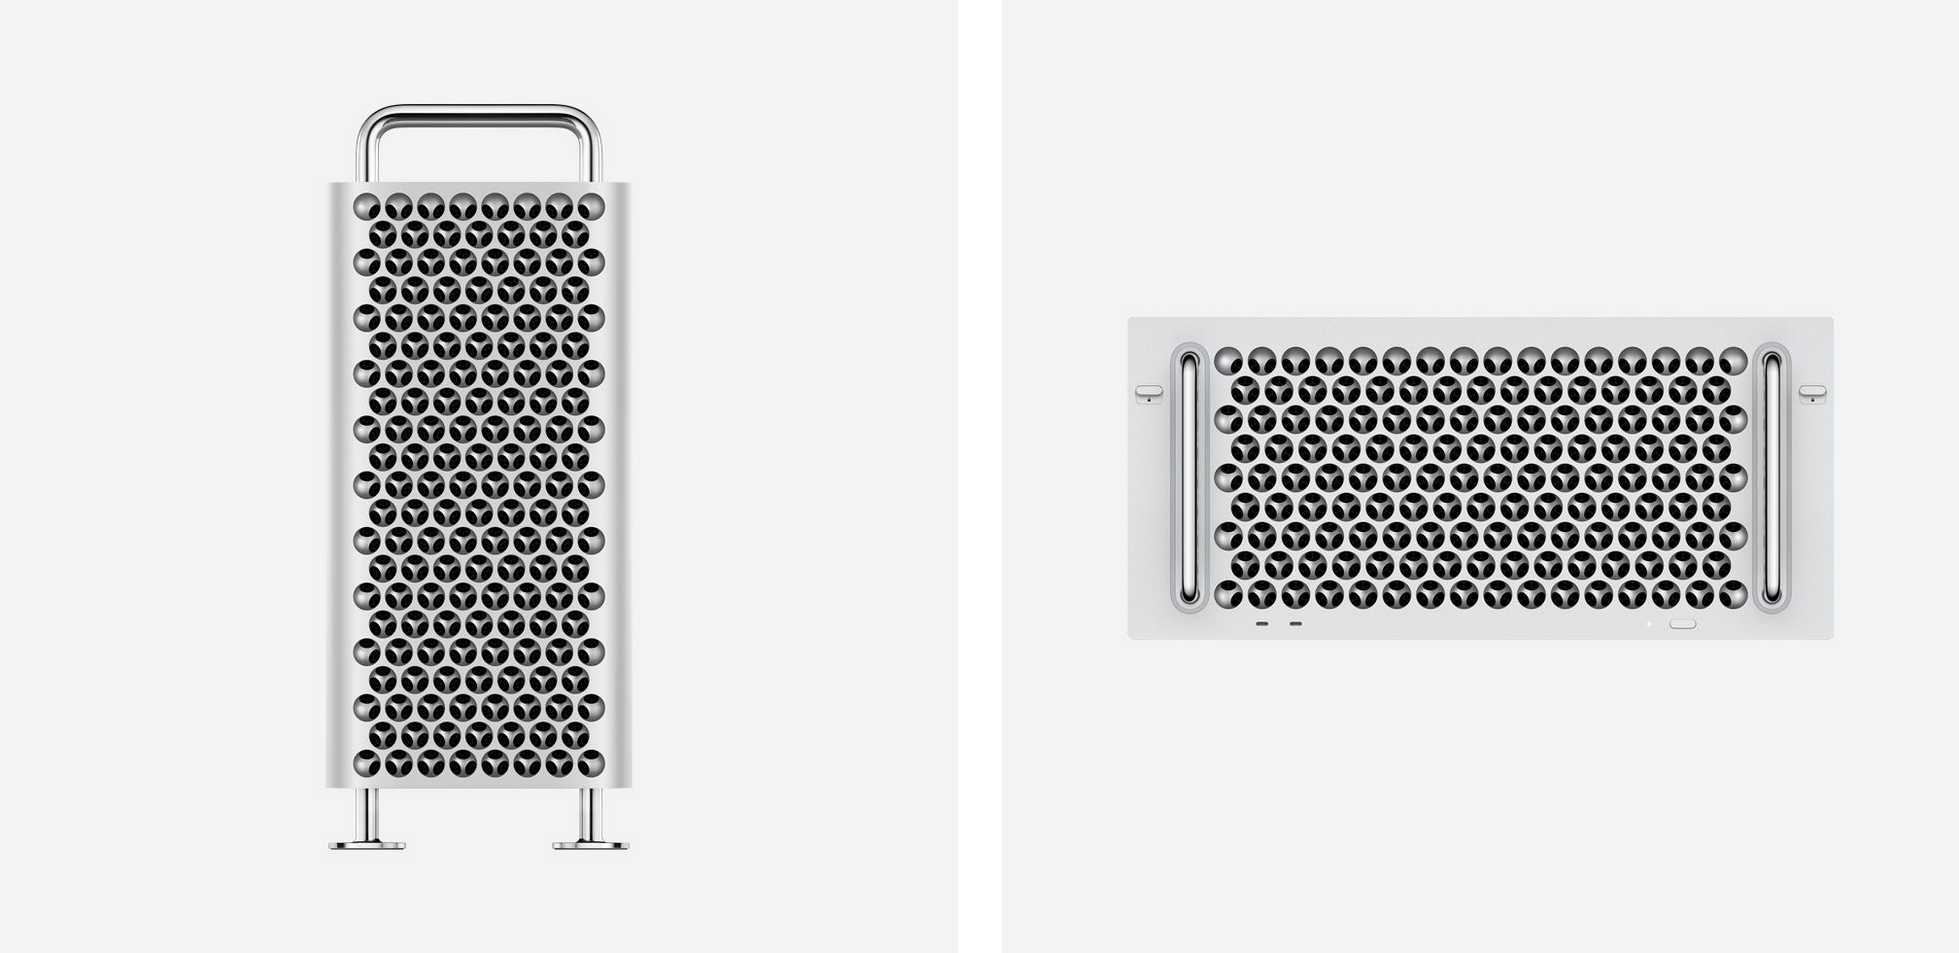
Pictured: Apple Mac Pro 2019 only comes in two form factors: tower and rack mount. Both are listed as a Mac Pro 7,1.
Photo credit: Apple.com
You can find out a Mac Pro's version by going to "About this Mac" -> System Report under the Apple menu. Currently, there is only one iteration of the 2019 Mac Pro, with the only meaningful difference being a rack mount vs. a standard case. This may change if Apple releases an updated Mac Pro.
The Mac Pro desktop can be outfitted with Apple's comically overpriced $699 wheels. OWC, never one to miss an opportunity to overcharge, offers its $249 Rover Wheels. Apple has instructions on how to remove the feet / install the wheels.

Pictured: The infamous Mac Pro wheels
Photo credit: Apple.com
Installation required. A 1/4-inch to 4 mm hex bit is included, but additional tools are necessary. Replacing the Mac Pro wheels with feet reduces approximately one inch to the height of the frame.
Specs overview
- CPU LGA 3647 (Socket P). It is removable (upgradable)
- Eight PCIe Slots (Four PCIe slots accommodate two MPX modules)
- Two SATA-3 internal Ports
- One internal USB 3.2 port
- Two USB 3 ports (on a pre-installed Apple I/O card)
- four Thunderbolt 3 ports (two on the Apple I/O card and two on the top of the case
- two 10Gb Ethernet ports
- 3.5 mm headphone jack with headset support
- 802.11ac/Bluetooth
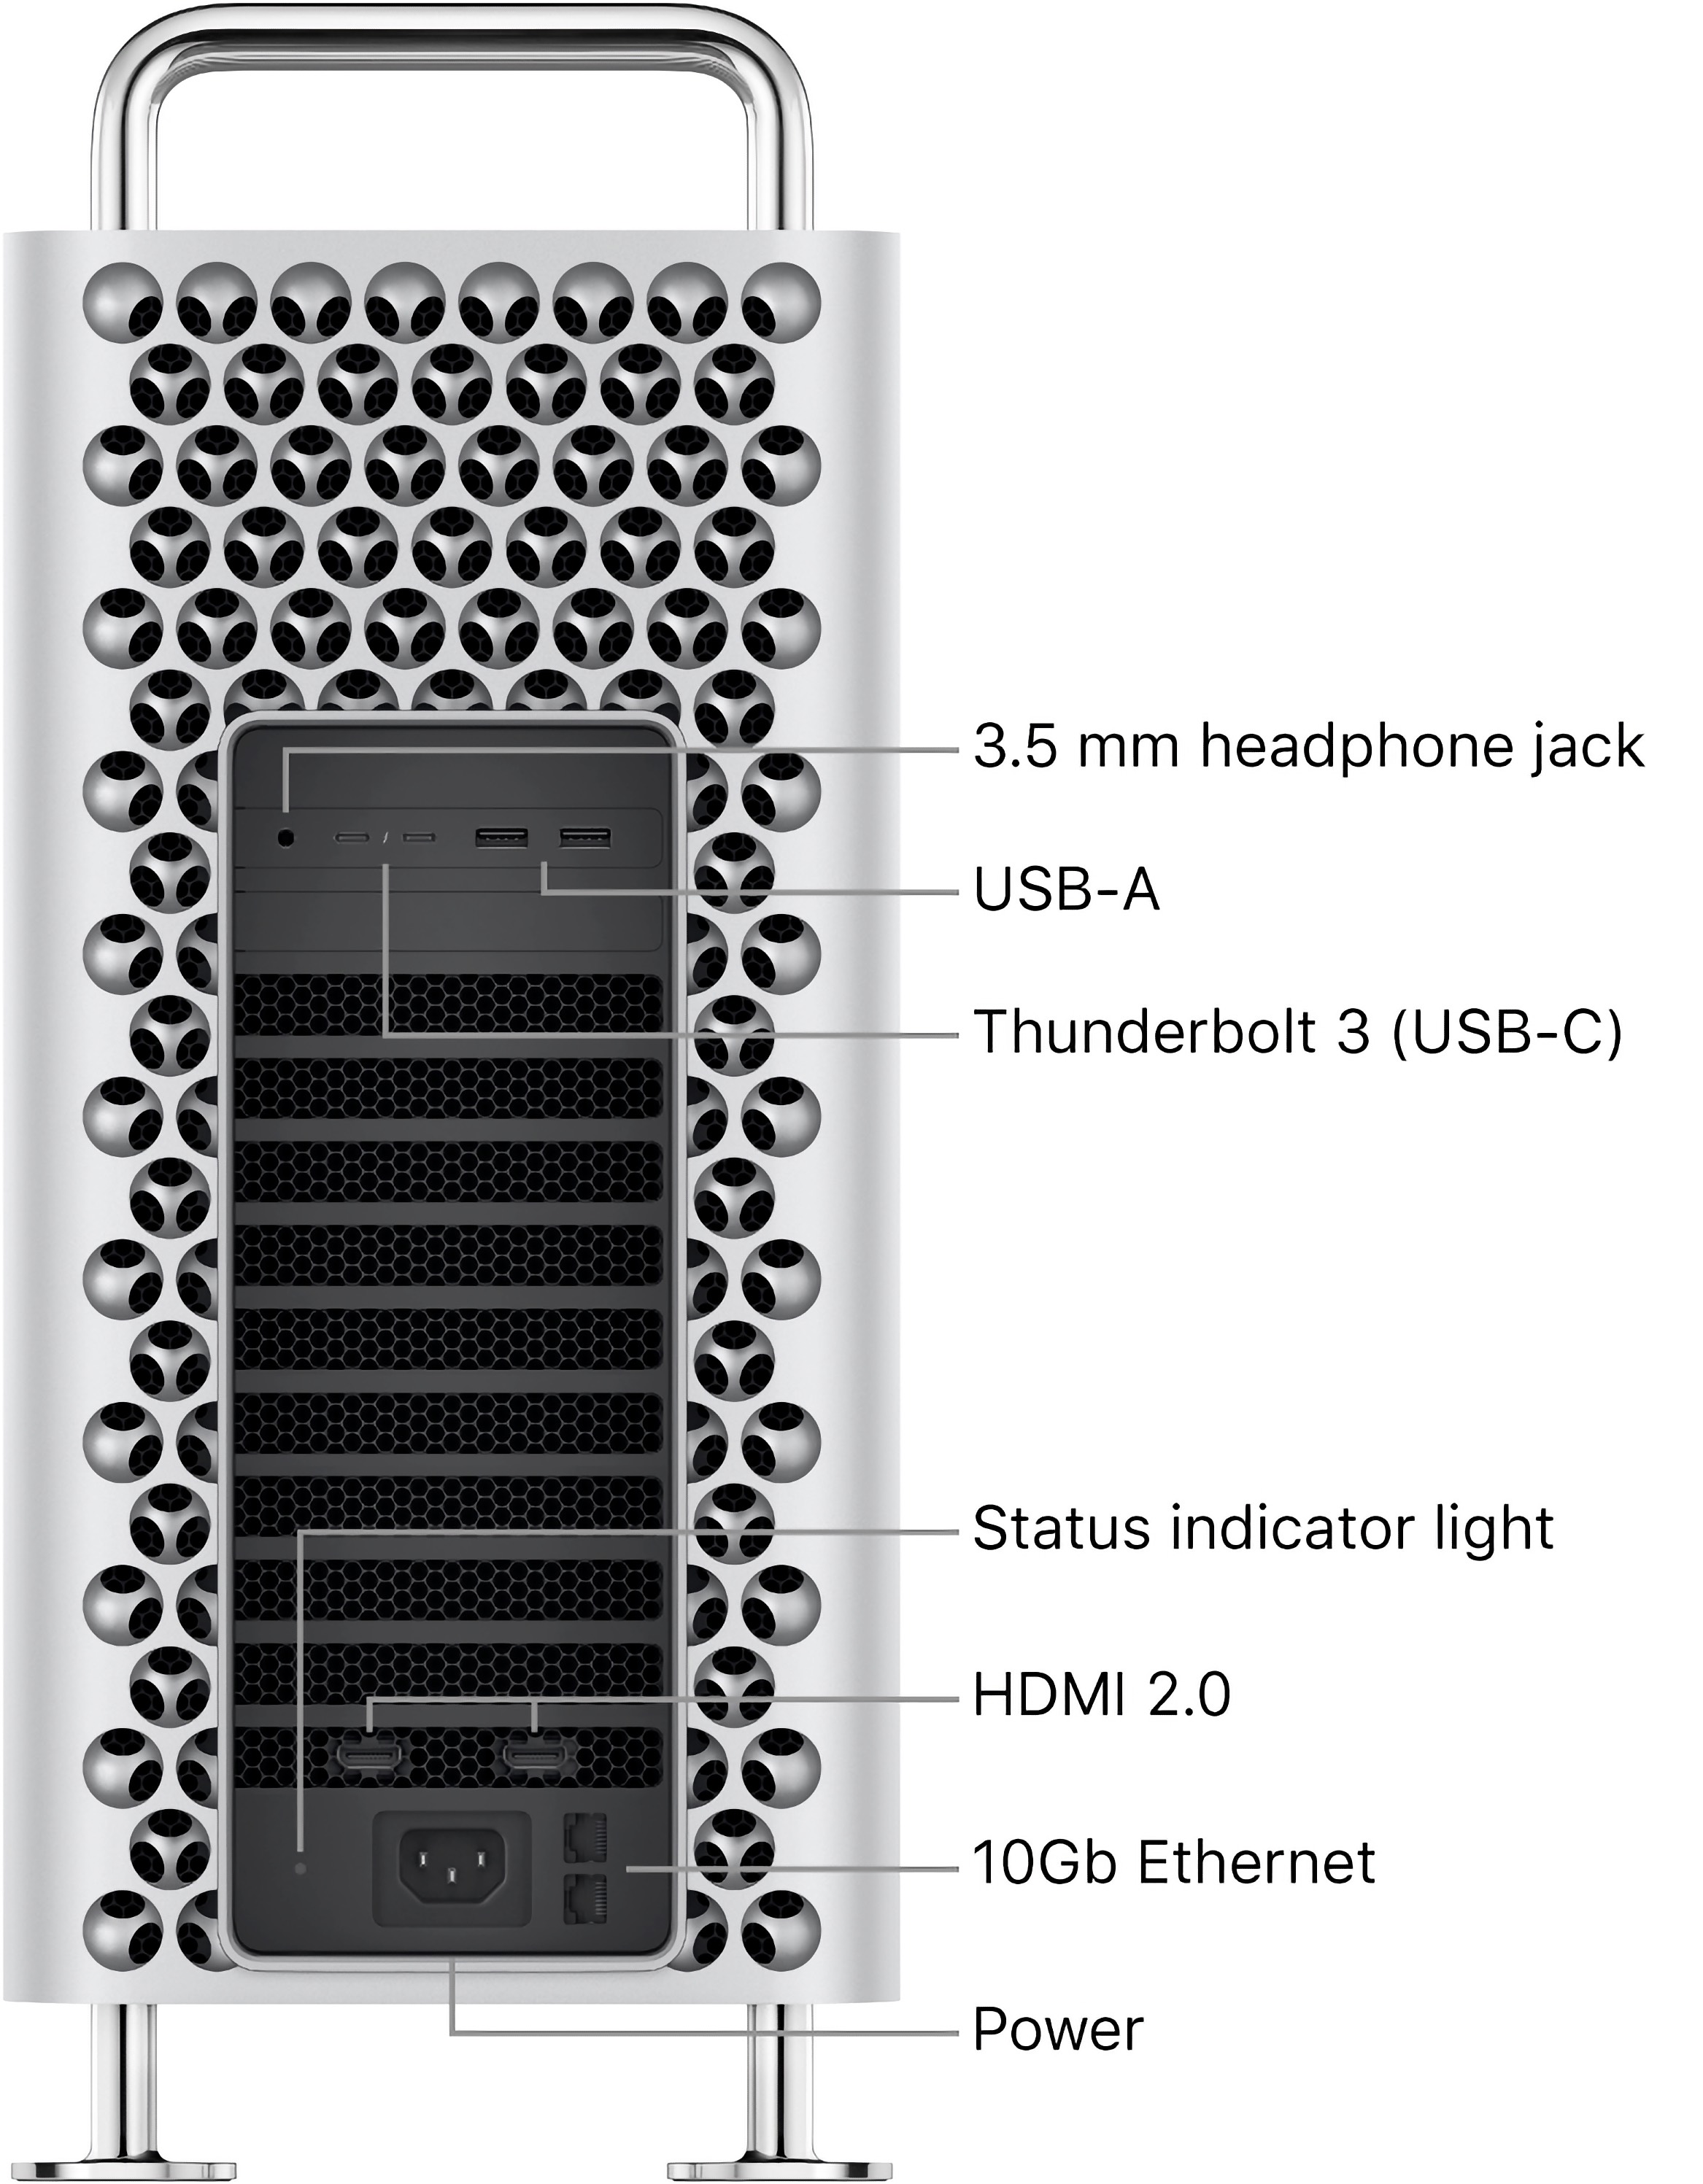
Pictured: Mac Pro 7,1 default ports
Photo credit: Apple.com
Apple reports that each of the two MPX bays "provides x16 Gen 3 bandwidth for graphics, x8 Gen 3 bandwidth for Thunderbolt, DisplayPort video routing, and up to 500W power for an MPX module. Mac Pro has three full-length PCIe Gen 3 slots (one x16 slot; two x8 slots) with 75W of auxiliary power available; and one half-length x4 PCIe Gen 3 slot with an Apple I/O card installed by default.
Also, see: How do you upgrade the processor in the "2019" Mac Pro? How is the processor mounted? Is it even possible to upgrade the processor?
The only difference is the 8-Core CPU that ships with the base model down-clocks RAM, but upgrading the CPU will unlock the ability to use higher-clocked RAM.
PCIe
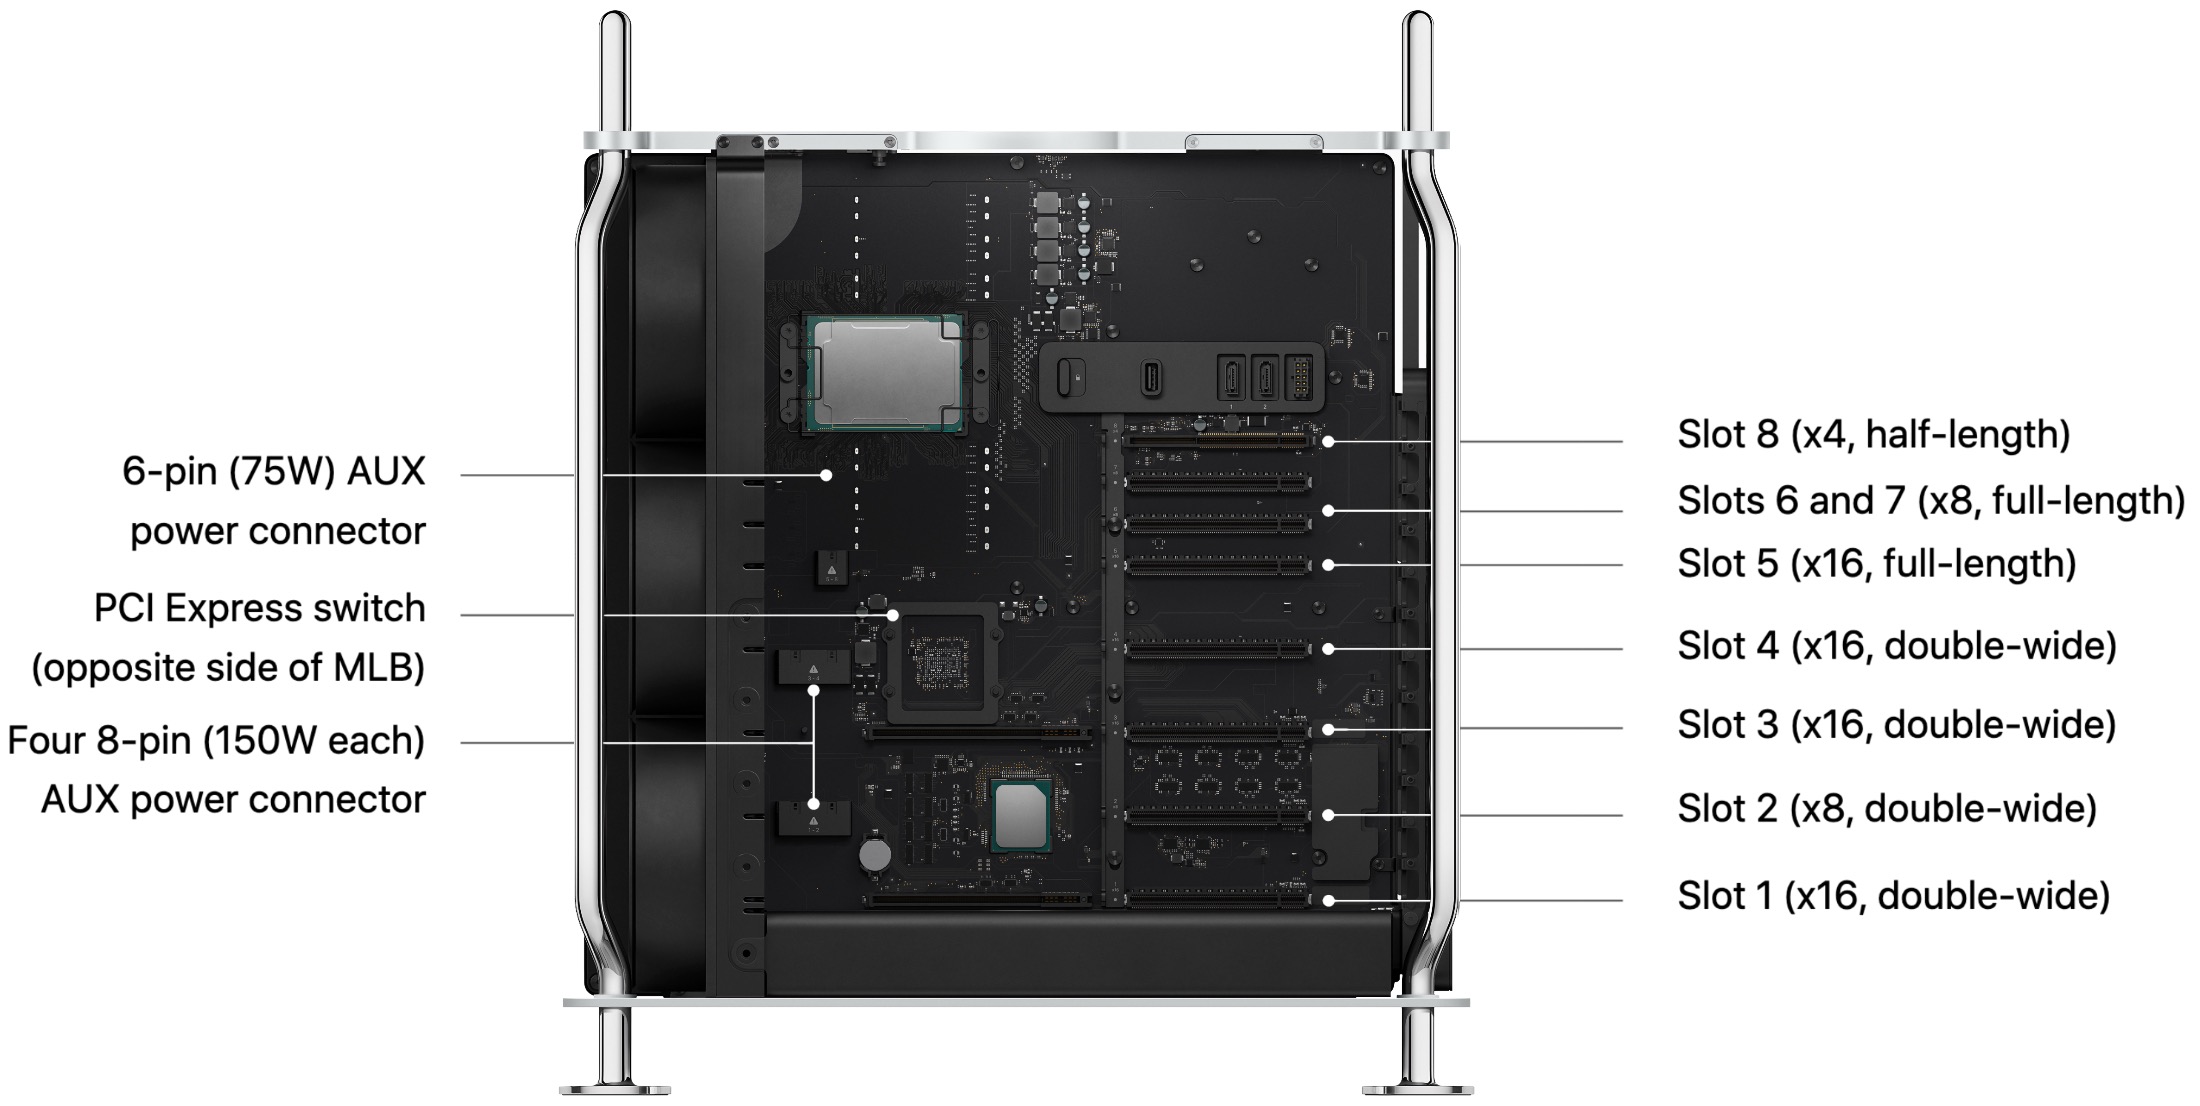
Pictured: Mac Pro 7,1 PCIe layout
Photo credit: Apple.com
Peripheral Component Interconnect Express (PCIe or PCI-E) is the evolution of PCI, which migrated from a parallel bus system (where all cards in a computer competed for the same bandwidth ) to discrete connections. The Mac Pro has a total of 64 lanes that can be managed via a utility that allows the user to define what ports receive more bandwidth, defined in "lanes". PCIe has become the backbone of computers since its first iteration in 2003 and continues to be used, even on laptops for high-speed storage. Apple Silicon computers for NVMe storage do not use PCIe.
Each iteration of PCIe radically increases the speed by doubling the available bandwidth. Also, to add a minor bit of confusion, different chipsets have different amounts of total "lanes," measuring speed for a PCIe slot. PCIe slots are not all equal speed; thus, the total lanes are distributed across the PCIe slots.
Not all PCIe slots are the same. The amount of lanes a PCIe slot has access to is expressed numerically: 1x (1 lane), 2x (2 lanes), 4x (4 lanes), 8x (8 lanes), and 16x (16 lanes). The maximum speed of each lane depends on the version of PCIe a computer has. A 1.x PCIe 1x slot has access to 250 MB/s. Thus a 4x has a maximum of 1 GB/s, and 8x has a maximum of 2 GB/s, and so on. Each generation of PCIe effectively doubles the speed of a lane. A PCIe 2.0 lane is 500 MB/s and PCIe 3.0 lane is 1 GB/s. Generally, PCIe speeds are expressed in bytes, not bits. A PCIe 3.0 16x speed (16 GB/s) would be 128 Gbps (128000 Mbps). In this guide, I will use MB/s and GB/s instead of Gbps and Mbps, as transfer speeds are generally expressed in bytes, not bits.
To reiterate the dramatic speed increases of PCIe based on generation: A 16x port in PCIe 1.x has a maximum of 4 GB/s, whereas a 2.x 16x port can handle 8 GB/s, 3.x is almost 16 GB/s. All PCIe slots are backward compatible; however, the caveat is that PCIe cards may not be backward compatible (this is not common). Also, not all PCIe cards will operate at the maximum port speed, as the card's chipset may limit them. Conversely, a PCIe card may support much faster speeds but will work in any PCIe slot but will be limited by the port's maximum speed.
The Mac Pro 2019 also uses "MPX" (Mac Pro Expansion Module), a double-height PCIe slot used for Apple-branded GPUs, and the Promise Pegasus R4i 32TB RAID MPX Module for Mac Pro. Apple lists one of its reasons for MPX, citing that modern GPUs were not designed with the entire thermal design of a PC, complicated to install because of power requirements, and they do not enable video-over-thunderbolt without taxing the PCIe bus additionally.
The MPX slots have two independent Thunderbolt 3 ports with four total slots on the card. The Thunderbolt 3 controllers are on extra 8x lanes, hence having independent buses from the GPUs, leaving the entirety of the 16x slot bandwidth for the GPU.
The advantages MPX offers are more power delivery, which means not needing to run additional cabling and Thunderbolt 3 passthrough and video support. There haven't been any 3rd party MPX modules. These have entirely been GPUs. MPX is not a requirement for GPUs.
- PCIe 3.0
- 64 Total PCIe Lanes
- 8 Total PCIe SLot
- Four double-wide slots
- Three single-wide slots
- One half-length slot preconfigured with the Apple I/O card
- PCIe slots 1 and 3 direct CPU access
- PCI Express switch fabric for other PCIe lanes
PCIe lanes aren't always what they seem either, as some PCIe lanes have priority over others. The Mac Pro uses a 96-lane PEX8796 PCIe switch (PCI Express switch fabric) to manage PCIe lanes outside of the MPX slots. The MPX slots have direct CPU access. The end effect is that the direct access lanes are more performant. The end effect is that the direct access lanes are more performant. The lanes that are direct access are DMI or Direct Media Interface, which exist behind the Intel Direct Media Interface 3.0 bus MacRumors: Tsialex's about PCIe SSDs - NVMe & AHCI.
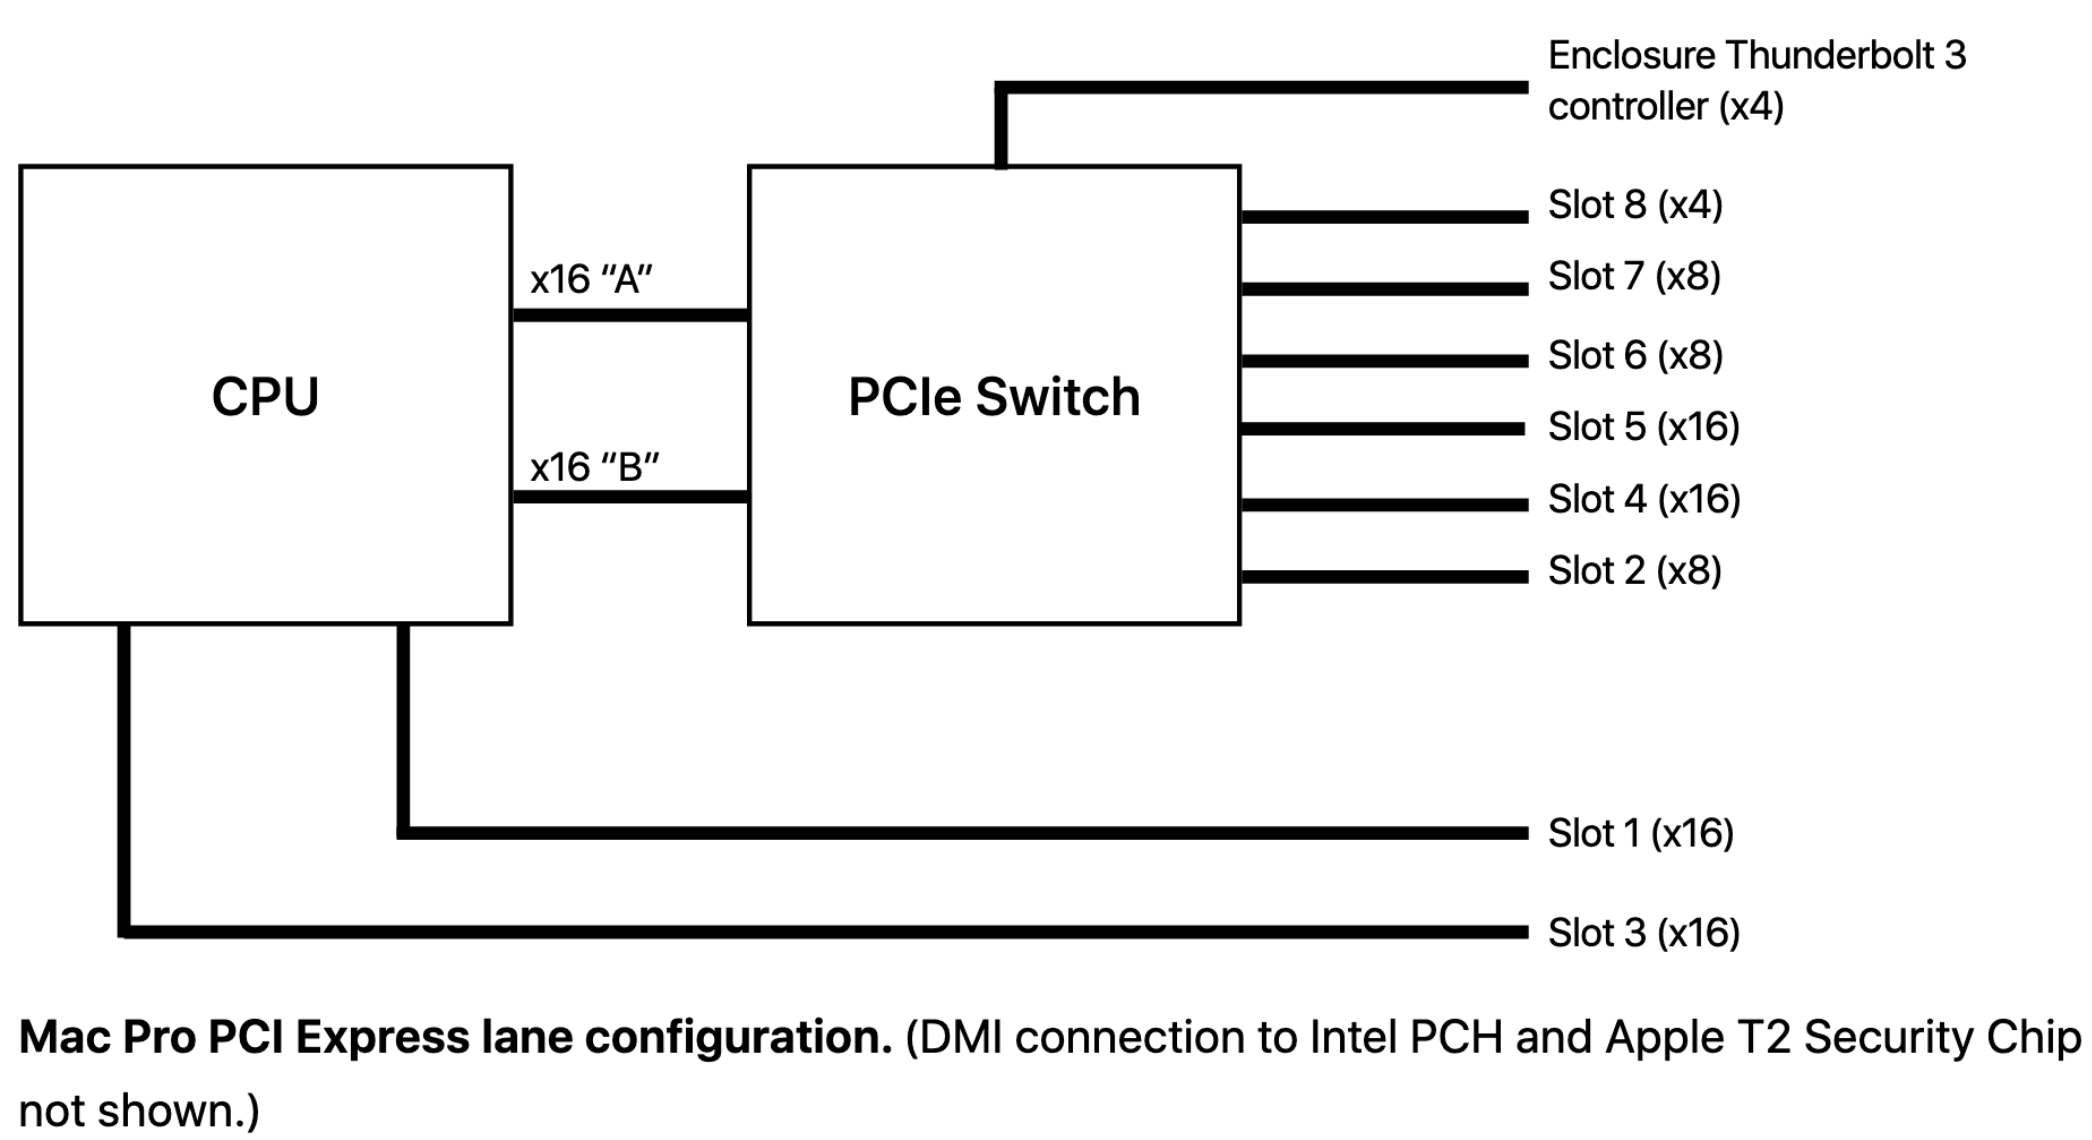
Pictured: Mac Pro 7,1 PCIe controller layout
Photo credit: Apple.com
Bifurcation
Motherboards, starting with PCIe 3.0, commonly support bifurcation, which allows a PCIe port to be split in half: One 16x port becomes two 8x or in quarters (16x -> four 4x slots). An 8x PCIe lane card thus can interface by splitting it into two sets of 4x lanes. This is almost exclusively used for NVMe SSDs as a single PCIe slot can connect to multiple NVMe SSDs. Bifurcation is mostly used for SSDs, allowing a single PCIe card to host two SSDs. Due to the majority of the PCIe bus being behind a controller, bifurcation isn't possible.
While the Mac Pro can use PCIe expanders (a separate technology for external PCIe slots by harassing the bandwidth of a single PCIe slot), it doesn't support bifurcation.
PCIe cards can host more than two M.2 NVMe SSDs without bifurcation, but they require specialized controller chipsets. The result is that multi-drive M.2 PCIe cards, which are Mac Pro compatible, cost more. This is also discussed in the PCIe NVMe sleds/blades section.
For a list of M. 2 cards that support multiple NVMe drives, see the M.2 SSD hosts (sleds) section.
PCIe Power Delivery
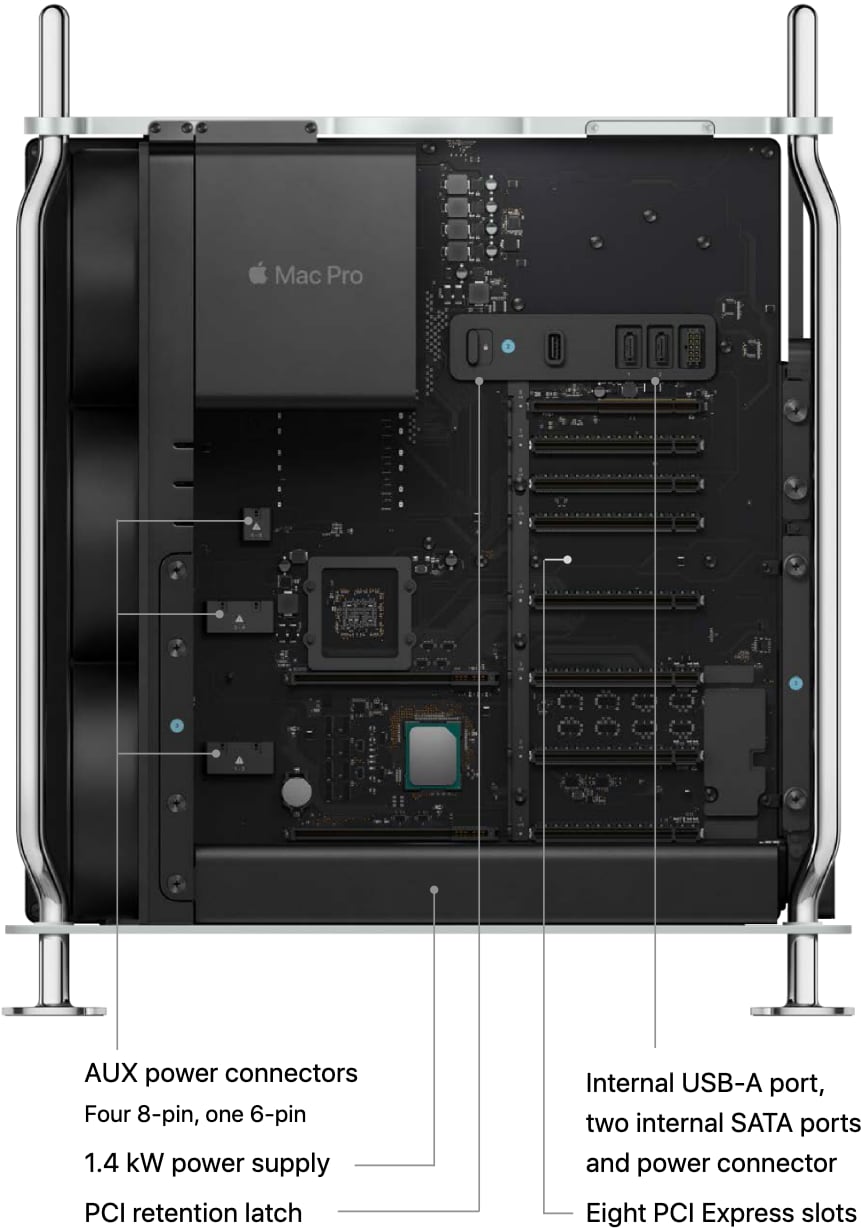
Pictured: PCIe card layout and power
Photo credit: apple.com
By default, PCIe provides power via motherboard PCIe slot, up to 75w via the port itself. The power requirements have increased for high-performance GPUs, going past PCIe's initial design. PCIe cards started coming with additional power ports and increased pins to carry more power to combat the power delivery problem. Generally, additional power is drawn directly from 12v taps off the power supply that the user can configure in PCs. The Mac Pro uses an uncommon passthrough where the PCIe power is delivered via pass-throughs on the motherboard rather than directly to the power supply and these use the mini-PCIe power cables format akin to it's older sibling, the classic Mac Pro. There are two power ports on the Mac Pros on the motherboard that can be tapped for additional power.
The Mac Pro 7,1 features:
- Four 8-pin PCIe Aux power connector (mini-PCIe)
- One 6-pin PCIe Aux power connector (mini-PCIe)
- Custom SATA power connector (see j-w.co's article on Mac Pro 2019 pin-outs)
The mini PCIe power cables are custom. Apple sells the Belkin Belkin AUX Power Cable Kit for Mac Pro but theOWC PCIe AUX Power Cables Kit is than half the price of Apple.
The MPX modules can provide up to 300w of power.
Apple I/O Card

Pictured: Apple I/O Card
Photo credit: iFixit.com
The Mac Pro 2019 comes preinstalled with a specialized card in slot 8, which features a headphone jack, two USB 3.0 Ports (5 Gb/s), and two Thunderbolt 3. The card sports a specialized routing connection that allows for routing display output from MPX modules to these two Thunderbolt 3 ports.
Due to the customized nature of the card, you cannot install a second Apple I/O Card.
PCIe 4.0 and the Mac Pro
When users complain about the lack of PCIe 4.0 on the 2019 Mac Pro, there are certainly practical reasons to want PCIe 4.0 today, but its effects depend on the device. There are a few modern PCIe 4.0 GPUs, most run at PCIe 8x 4.0, which effectively places them at the same speed as a 16x PCIe 3.0 slot. This is because GPUs do not use the amount of bandwidth most people assume they do. Puget Systems tested running an Nvidia Titan X in a PCIe 3.0 8x and 16x slot, and differences were really minor, and we can go much more modern with TechSpot.com testing out an RTX 3080 FE in a PCIe 4.0 and 3.0 computer and a smaller YouTube channel, SkuezTech tested out RX 5700 XT on PCIe 4.0 and 3.0. Again, the results barely changed. When we move to PugetSystem's test to Machine Learning Training, there's little difference between 8x and 16x PCIe slots. At least for the near future, GPUs, despite their huge power draws, aren't massive PCIe bandwidth hogs.
However, SSDs are much more capable of saturating the PCIe bus than GPUs. NVMe is based on the 4x standard. The Samsung 980 Pro can hit 6500 MB/s on a PCIe 4.0 computer and is capped at 3500 MB/s on a PCIe 3.0. Mac Pro 2019 users looking to obtain PCIe 4.0 speeds can buy specialty M.2 Host cards that negotiate more lanes for PCIe 3.0 to get the full speed. This was a common upgrade path for classic Mac Pro owners as they could use a PCIe 16x slot to get PCIe 3.0 speeds to their full potential.
Power Supply
The Mac Pro uses a non-standard PSU that does not follow the ATX convention. The power supply provides a 1.4 kW power supply capable of delivering 1280W to the system at 108–125V or 220–240V and 1180W at 100–107V. Thus far, the PSU's pin-outs have not been mapped.
The Mac Pro features internal power connectors from the motherboard:
- Four 8-pin PCIe Aux power connector
- One 8-pin PCIe Aux power connector
- Custom SATA power connector (see j-w.co's article on Mac Pro 2019 pin-outs)
See Apple.com - Mac Pro: Power consumption and thermal output (BTU/h) information.
ATX Power Supplies?
To my knowledge, no one has bothered to attempt replacing the Mac Pro's PSU with a non-Apple PSU. Few users will tax their PSU to the point of worrying about damaging it or triggering an auto-shutoff. Apple designed the PSU to handle extreme configurations such as a 2.5GHz 28-core Intel Xeon W processor, two Radeon Pro Vega II Duo MPX Modules with Infinity Fabric Link, 1.5TB RAM (twelve 128GB 2933MHz DDR4 ECC DIMMs), Afterburner card, 4TB SSD, which Apple boasts on its official documentation.
Case
Apple's aluminum lattice design allows for a passthrough from front to back. Apple claims that the lattice design "two-dimensional open area for a high-airflow, low-impedance design that allows the system to be cooled efficiently while operating very quietly compared to competitive tower workstation systems."
While that may be up for debate if the lattice design is superior to other forced-air passthrough cases on the market, the Mac Pro 2019 is very quiet and unique.
Opening the case requires using the handle latch on the top and rotating it 180 degrees to unlock it. Due to the sliding mechanism, all the cabling must be unplugged to open the case. Snazzy Labs demonstrated in a video that you could modify the case so this isn't required.
Once the outer aluminum chassis is removed, you can the Mac Pro from multiple angles, making it very easy to work on.
To my knowledge, absolutely no one has bothered to try and replace the case, and for a good reason: I haven't used any better design cases, as the Mac Pro 2019 is incredibly easy to work on. Case mods are unlikely to be popular.
Fans
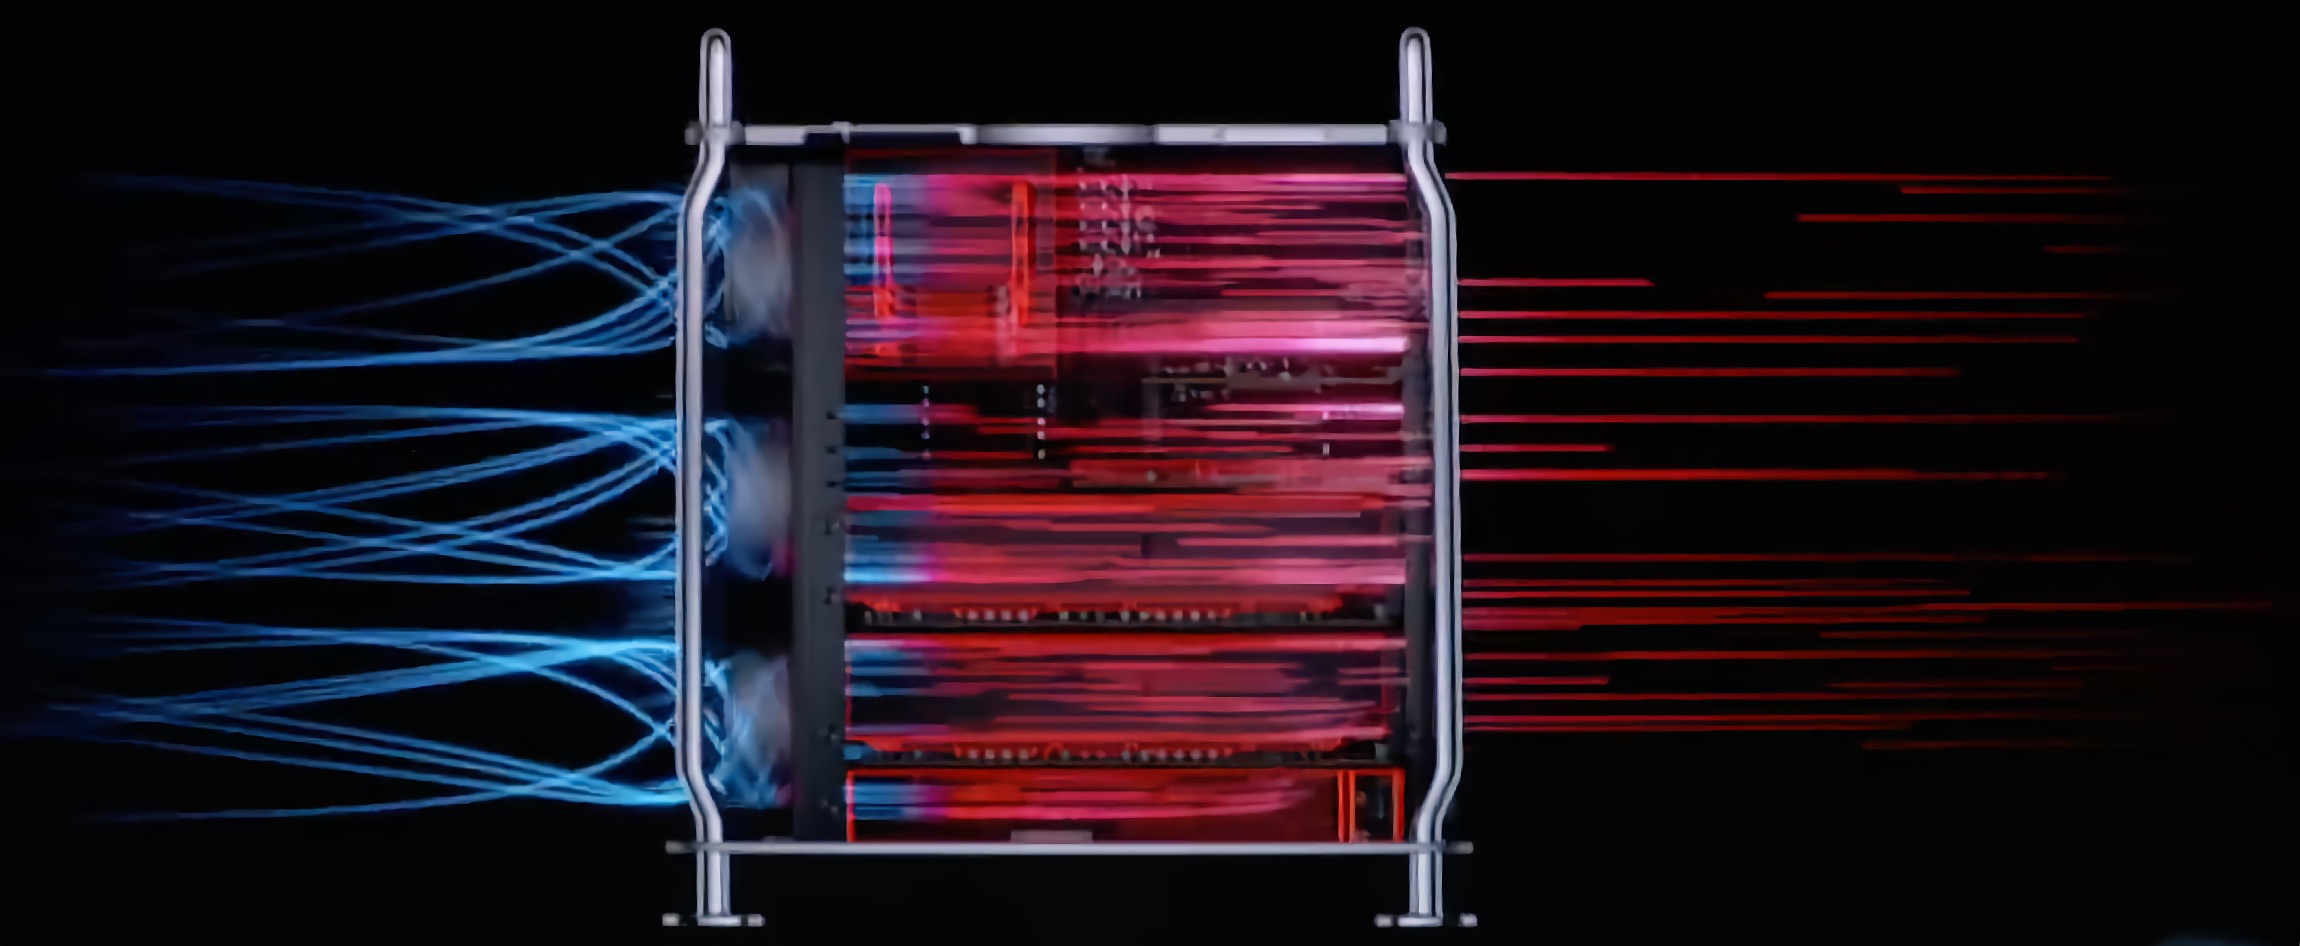
Pictured: Apple Mac Pro
Image Credit: Apple WWDC 2019 Keynote
"Years ago, we started redistributing the blades," he says. "They're still dynamically balanced, but they're actually randomized in terms of their BPF [blade pass frequency]. So you don't get huge harmonics that tend to be super annoying." Popular Mechanics "The Thermodynamics Behind the Mac Pro, the Hypercar of Computers"
Thus far, no one has replaced the fans on a Mac Pro 2019, and for a good reason, the cooling design of the Mac Pro 2019 and near silence is one of the biggest selling points of the computer. At best, any fan replacement with a non-OEM model would be a lateral move.
Something loud but pleasantly pitched can be more tolerable than something quiet but irritating. "You can have something at a certain SPL [sound pressure level] that sounds really good, but you can have something that's actually at a lower SPL that grates on your nerves and sounds really awful," says John Ternus, VP of Hardware Engineering at Apple and head of the Pro and Pro Display's development. "We want to get really great performance where you either can't hear it, or if you can hear it, it's kind of a pleasant noise. A ton of analysis goes into figuring out how to optimize for that." - Chris Ligtenberg, Senior Director of Product Design, Popular Mechanics "The Thermodynamics Behind the Mac Pro, the Hypercar of Computers"
Apple's previous Macs have used non-standard fan controls and unique cooling solutions. The classic Mac Pro requires a custom PCB to be wired to interface correctly with standard PC fans. The Mac Pro 2019 is unlikely to be any easier.
Onboard networking
The Mac Pro 2019 features dual 10Gb Ethernet with independent controllers for each ethernet port.
- NBASE-T standard RJ45
- 1Gb, 2.5Gb, 5Gb, or 10Gb/s
The Mac Pro features onboard wireless networking 802.11ac Wi-Fi, IEEE 802.11a/b/g/n compatible, and Bluetooth 5.0.
Apple T2 "Security" chip
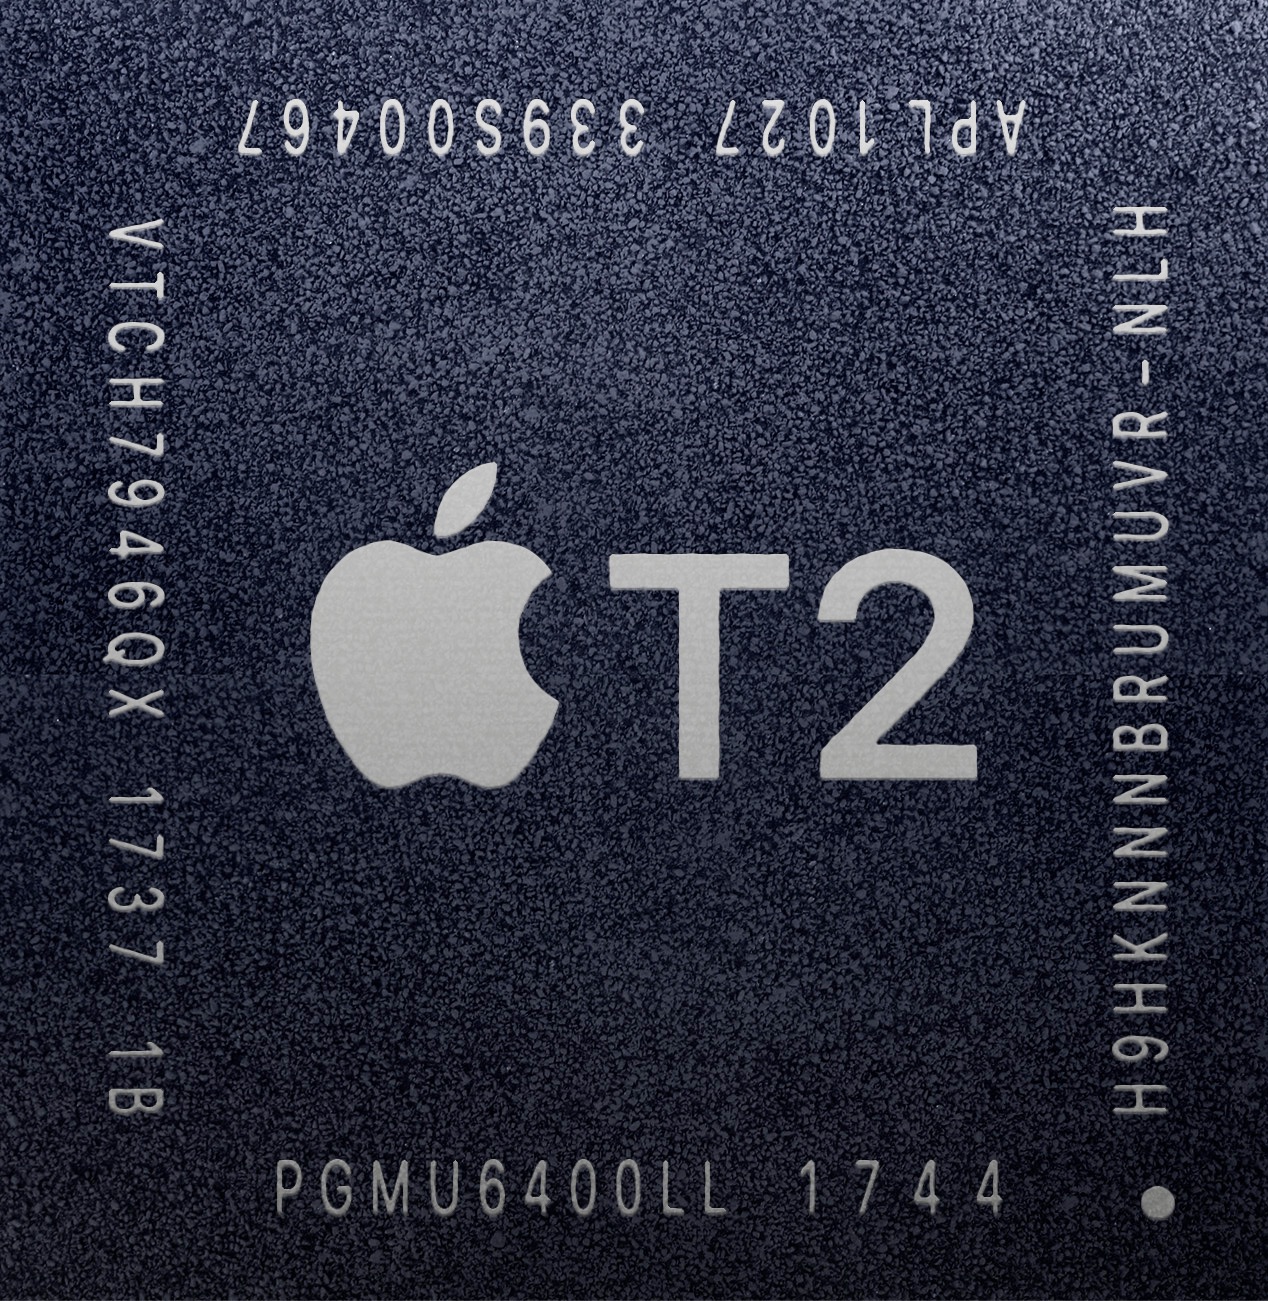
Pictured: Apple T2 Security chip
Image Credit: wikipedia.org
One of the "features" of the Mac Pro 2019 is the Apple T2, which is a SOC designed exclusively for Apple's Intel-based Macs and is essentially a computer within a computer as it has its own RAM and CPU. The T2 integrates discrete controllers like the System Management Controller (SMC), audio, and SSD controllers, the latter used for Secure Enclave. Apple has a dedicated coprocessor for Secure Enclave called the Secure Enclave Procesor (SEP) running its own OS called sepOS, which allows for hardware-accelerated and validated encrypted boot and storage. It features its own random number generator (apart from Intel's) and provides the cryptographic operations for key management (FileVault, macOS keychain, UEFI firmware passwords, and machine's UID/GID.). The secure boot uses components that are cryptographically signed by Apple and verified by T2 during the boot sequence for boot loaders, firmware, kernel, and kernel extensions. This ensures the OS is software trusted by Apple will load. However, it has since had several security flaws found.
"Apple uses SecureROM in the early stages of boot. ROM cannot be altered after fabrication, and this is done to prevent modifications. This usually prevents an attacker from placing malware at the beginning of the boot chain, but in this case, it also prevents Apple from fixing the SecureROM. The net effect is Apple cannot fix this problem without replacing the T2 chip, but as long as a machine is bootable into DFU, it can be "repaired" by a trustworthy second machine." - Rick Mark, blog.Rickmark.me
The known T2 security compromises require physical access to the computer, which of course, any digital system is greatly compromised. An attacker has direct physical access to the system and doesn't appear to compromise FileVault.
The T2 is a variant of the Apple 10, a 16 nm 64-Bit ARMv8.1. The T2 chipset also provides an Image coprocessor, which is used for Facetime cameras on Intel Macs. The Mac Pro 2019 does not have an internal webcam, so it is unclear if the Image coprocessor is used. It also has a video codec accelerator for encoding/decoding h264/h265, speech recognition for "hey Siri," and for TouchBar Macs, runs the Touchbar.
Afterburner

Pictured: Afterburner
Image Credit: Apple.com
The Afterburner card is a curiosity by Apple. It is a PCI Express hardware accelerator for decoding only ProRes and ProRes RAW video (ProRes 422HQ, ProRes 4444, ProRes XQ, and ProRes RAW) except interleaved video (1080i). It also does not accelerate encoding.
The Afterburner card is an FPGA (field-programmable gate array) chipset. Retro game enthusiasts might be familiar with FPGAs as they've become quite popular as a hardware-level way to re-create retro game consoles without full emulation for unparalleled accuracy while allowing for modern features. The Afterburner can handle 6.3 billion pixels per second.
Apple boasts:
"It uses a secure firmware loading process that ensures it can only run Apple-authorized code and can be reprogrammed on the order of 50 milliseconds. The driver that manages the Afterburner card will load-balance ProRes decode tasks across multiple Afterburner cards if installed. With application support, Afterburner and CPU can be utilized together, enabling even higher stream counts and more demanding projects on a Mac Pro."
| Codec | stream type | 28-Core Xeon | CPU + Afterburner |
| ProRes 422 | 4k 30FPS | 15 streams | 16 streams |
| ProRes Raw | 4k 30FPS | 2 streams | 23 streams |
| ProRes Raw | 8k 30FPS | 2 streams | 6 streams |
It works within applications that use Apple's VideoToolbox APIs, such as Final Cut Pro, Blackmagic DaVinci Resolve, Adobe Premiere Pro, QuickTime Player, and other media applications.
The AfterBurner card has been since replaced in Apple Silicon with the "Media Engine," which is much more effective. The M1 Pro is able to outperform a Mac Pro equipped with the $1999 Afterburner card.
Firmware And OS
The Mac Pro 2019 is a T2-equipped Mac. The T2 chipset uses a different mechanism than previous Mac Pros to update the firmware and are unable to run "eficheck".
You can check the firmware version by going to "About this Mac".
OS upgrades
The Mac Pro 2019s were first supported in Catalina 10.15.1, which is the earliest OS they can run. If you are looking for pre-Catalina support, macOS can be virtualized with popular software like VMware Fusion, Parallels, or Virtual Box. This may or may not work for your needs.
The Mac Pro 2019 is natively supported by macOS and will likely be so for years to come.
It can also dual boot Windows or other alternative OSes, but this requires disabling SIP to allow non-Apple SSD booting.
The Mac Pro, using emulation such as QEMU, can run PowerPC versions of Mac OS with varying degrees of success.
Downloading old versions of macOS
While the earlier version of macOS that can be booted on the Mac Pro 2019 is 10.15.1, there's a wide variety of virtual machine software available. The Mac Pro's ability to have massive amounts of RAM and many CPU cores makes it ideal for virtual machines, docker setups, and QEMU.
Apple has finally wised up and allowed direct downloads of (some) DMGs, which can be found here going back as far as macOS 10.10. Apple does still sell CDs of 10.7 and 10.8 and finally offers them as a direct download. Mac OS X 10.7 Lion and Mac OS X 10.8 Mountain Lion. Below is a list of download links (and source) for previous macOS versions.
- 10.6 - Snow Leopard (Archive.org)
- 10.7 - Lion (Apple)
- 10.8 - Mountain Lion (Apple)
- 10.9 - Mavericks (Archive.org)
- 10.10 - Yosemite (Apple)
- 10.11 - El Captian (Apple)
- 10.12 - Sierra (Apple)
- 10.13 - High Sierra (Apple App Store), Achive.org
- 10.14 - Mojave (Apple App Store), (Archive.org)
- 10.15 - Catalina (Apple App Store), (Archive.org)
Disabling System Integrity Protection
As mentioned in the glossary, SIP functions as a method of system protection. Apple describes it as follows:
" (A) security technology in OS X El Capitan and later that's designed to help prevent potentially malicious software from modifying protected files and folders on your Mac. System Integrity Protection restricts the root user account and limits the actions that the root user can perform on protected parts of the Mac operating system."
Before Apple implemented SIP, any software that was granted root access (by the user entering her/his password) could modify/edit system files. Generally, a user shouldn't disable SIP unless there's a specific reason. That said, there are plenty of reasons to disable SIP, such as certain boot managers or for unsupported hardware cases. SIP can always be re-enabled.
Disabling Secure Boot
Disabling Secure Boot on the 2019 Mac Pros is generally a common behavior as the only volume the Mac Pro will boot off of is the factory SSD if you do not enable the SSD. You cannot remove the Apple-provided SSD(s) and still boot regardless if Secure boot is on or off.
Running Apps from unidentified developers
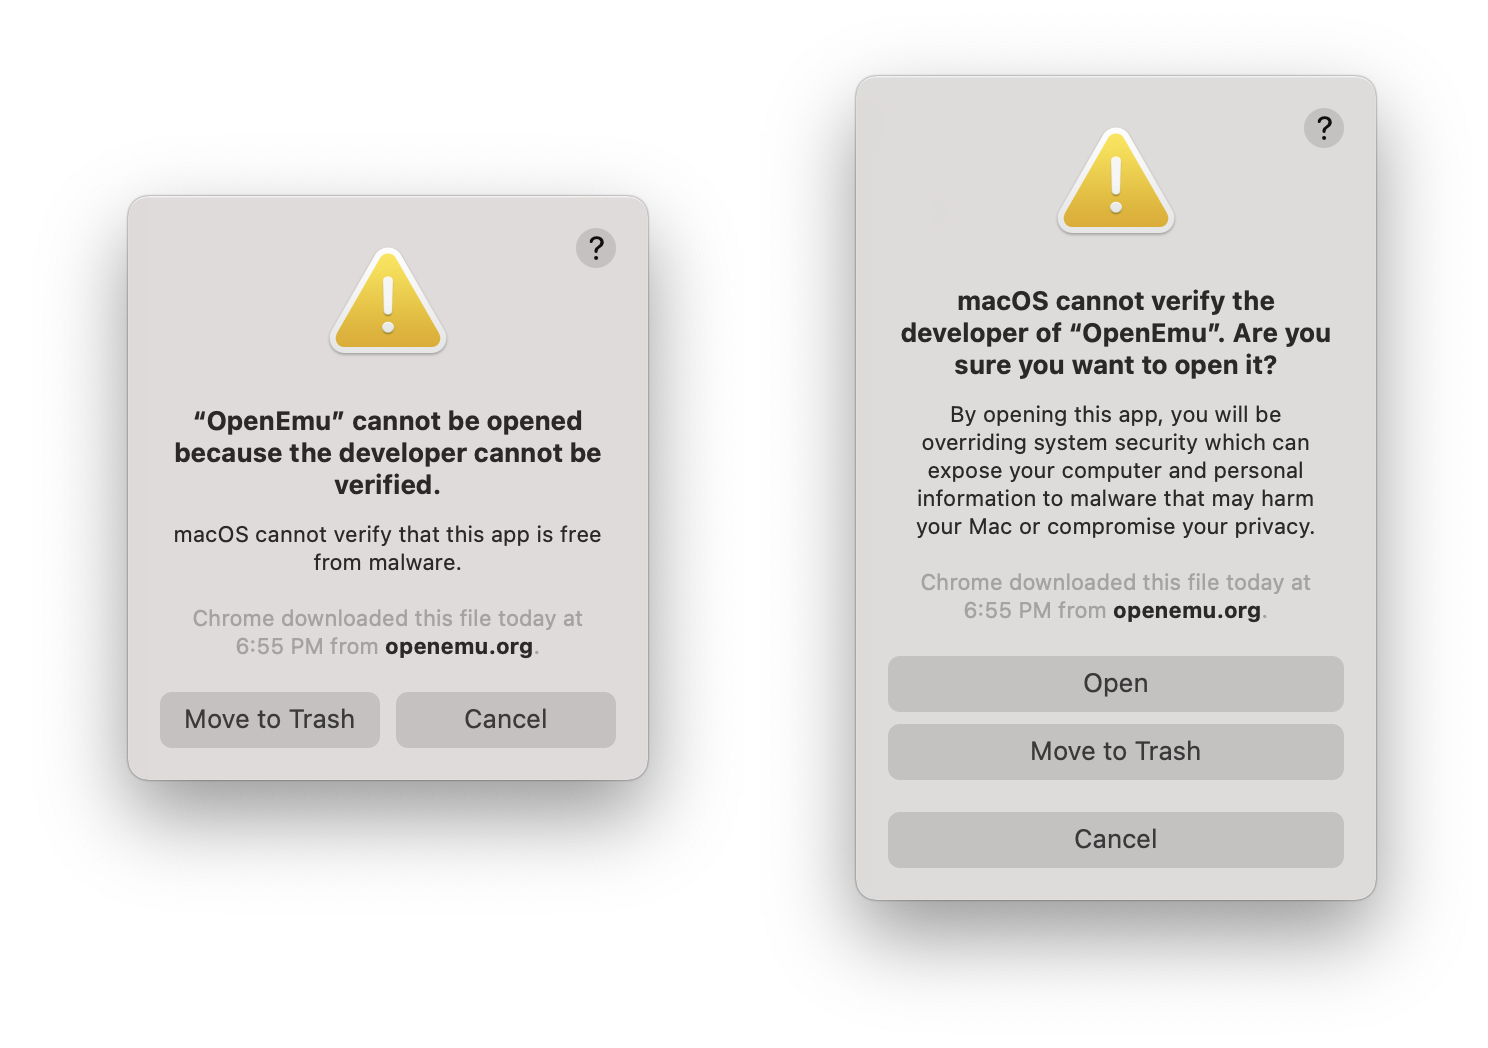
Left: the warning users will receive without right-clicking open. Right: warning message when right-clicking/option clicking bypass
Gatekeeper no longer has a "allow apps downloaded from anywhere," but it is still possible to bypass and whitelist applications by right-clicking and selecting open.
CPU Upgrades
The Xeons are built on the same architecture as its desktop-grade siblings. Every Mac Pro made (including the 2013s) has sported multicore, interchangeable Xeon series CPUs. The Xeon CPUs' main benefit has been more CPU cores, the ability to support multi-CPU motherboards, larger cache memory, more PCIe lanes, much higher maximum RAM, and Error-correcting code memory (ECC). These benefits come with a trade-off as the Xeon line had much higher price points, doesn't have built-in support for overclocking, and generally operates at (slightly) lower-clock speeds.
As a computer is the sum of many parts (not just the CPU), CPUs are not interchangeable between Xeon generations.
The Mac Pro Xeon Ws feature Turbo Boost (dynamic frequency scaling, allowing the CPU "overclock" when demanding tasks are running), Hyper-threading (Intel's proprietary simultaneous multithreading that allows for a single core to be addressed as two cores to share workloads when possible), dual AVX-512 Vector units with FMA (fused multiply-add) support and six DDR4 memory channels. AVX (Advanced Vector Extensions) are additional instruction sets for x86 that were proposed by Intel and AMD in 2008 and later adopted in CPU designs. The latest is AVX-512. Due to long-tail support and slow adoption of AVX changes by AMD, AVX requirements for applications have been slow to roll out on both macOS and Windows. Rosetta, under Apple Silicon, does not support AVX translation, also further reducing adoption by programmers to use AVX under macOS.
AMD's Ryzen 4000 series are 7-nm. Apple's A14 CPUs are 5-nm. This is one of the main drivers for Apple's switch to Apple Silicon. The original Mac Pro 1,1 shipped with a 65-nm CPU, and the 3,1-5,1 with 45 nm CPUs, with the 6,1s coming in at 22-nm. Intel hit 14 nm in 2014 with the Intel Core-M series. It wasn't until Alder Lake in late 2021 Intel moved beyond 14 nm.
Complete compatible CPU list
Note: The Apple listed maximum RAM is below what MacRumors.com Forum posters discovered.
| Architecture | Cores | Grade | CPU-Model | GHz | Turbo | RAM | Watt | Max RAM |
|---|---|---|---|---|---|---|---|---|
| Cascade Lake | 28 core | Xeon W | W-3275M | 2.5 | 4.4 | 2933 | 205W | 2TB |
| Cascade Lake | 28 core | Xeon W | W-3275 | 2.5 | 4.4 | 2933 | 205W | 1TB |
| Cascade Lake | 24 core | Xeon W | W-3265M | 2.7 | 4.4 | 2933 | 205W | 2TB |
| Cascade Lake | 24 core | Xeon W | W-3265 | 2.7 | 4.4 | 2933 | 205W | 1TB |
| Cascade Lake | 16 core | Xeon W | W-3245M | 3.2 | 4.4 | 2933 | 205W | 2TB |
| Cascade Lake | 16 core | Xeon W | W-3245 | 3.2 | 4.4 | 2933 | 205W | 1TB |
| Cascade Lake | 12 core | Xeon W | W-3235 | 3.3 | 4.4 | 2933 | 180W | 1TB |
| Cascade Lake | 8 core | Xeon W | W-3225 | 3.7 | 4.3 | 2666 | 160W | 1TB |
| Cascade Lake | 8 core | Xeon W | W-3223 | 3.5 | 4.0 | 2666 | 160W | 1TB |
GPU upgrades
Likely for most users, the most attractive upgrade for the Mac Pro 2019 is the ability to upgrade the GPU thanks to PCIe.
The Mac Pro 2019 GPU landscape can be divided up into two classes of GPUs: MPX and standard PCIe.
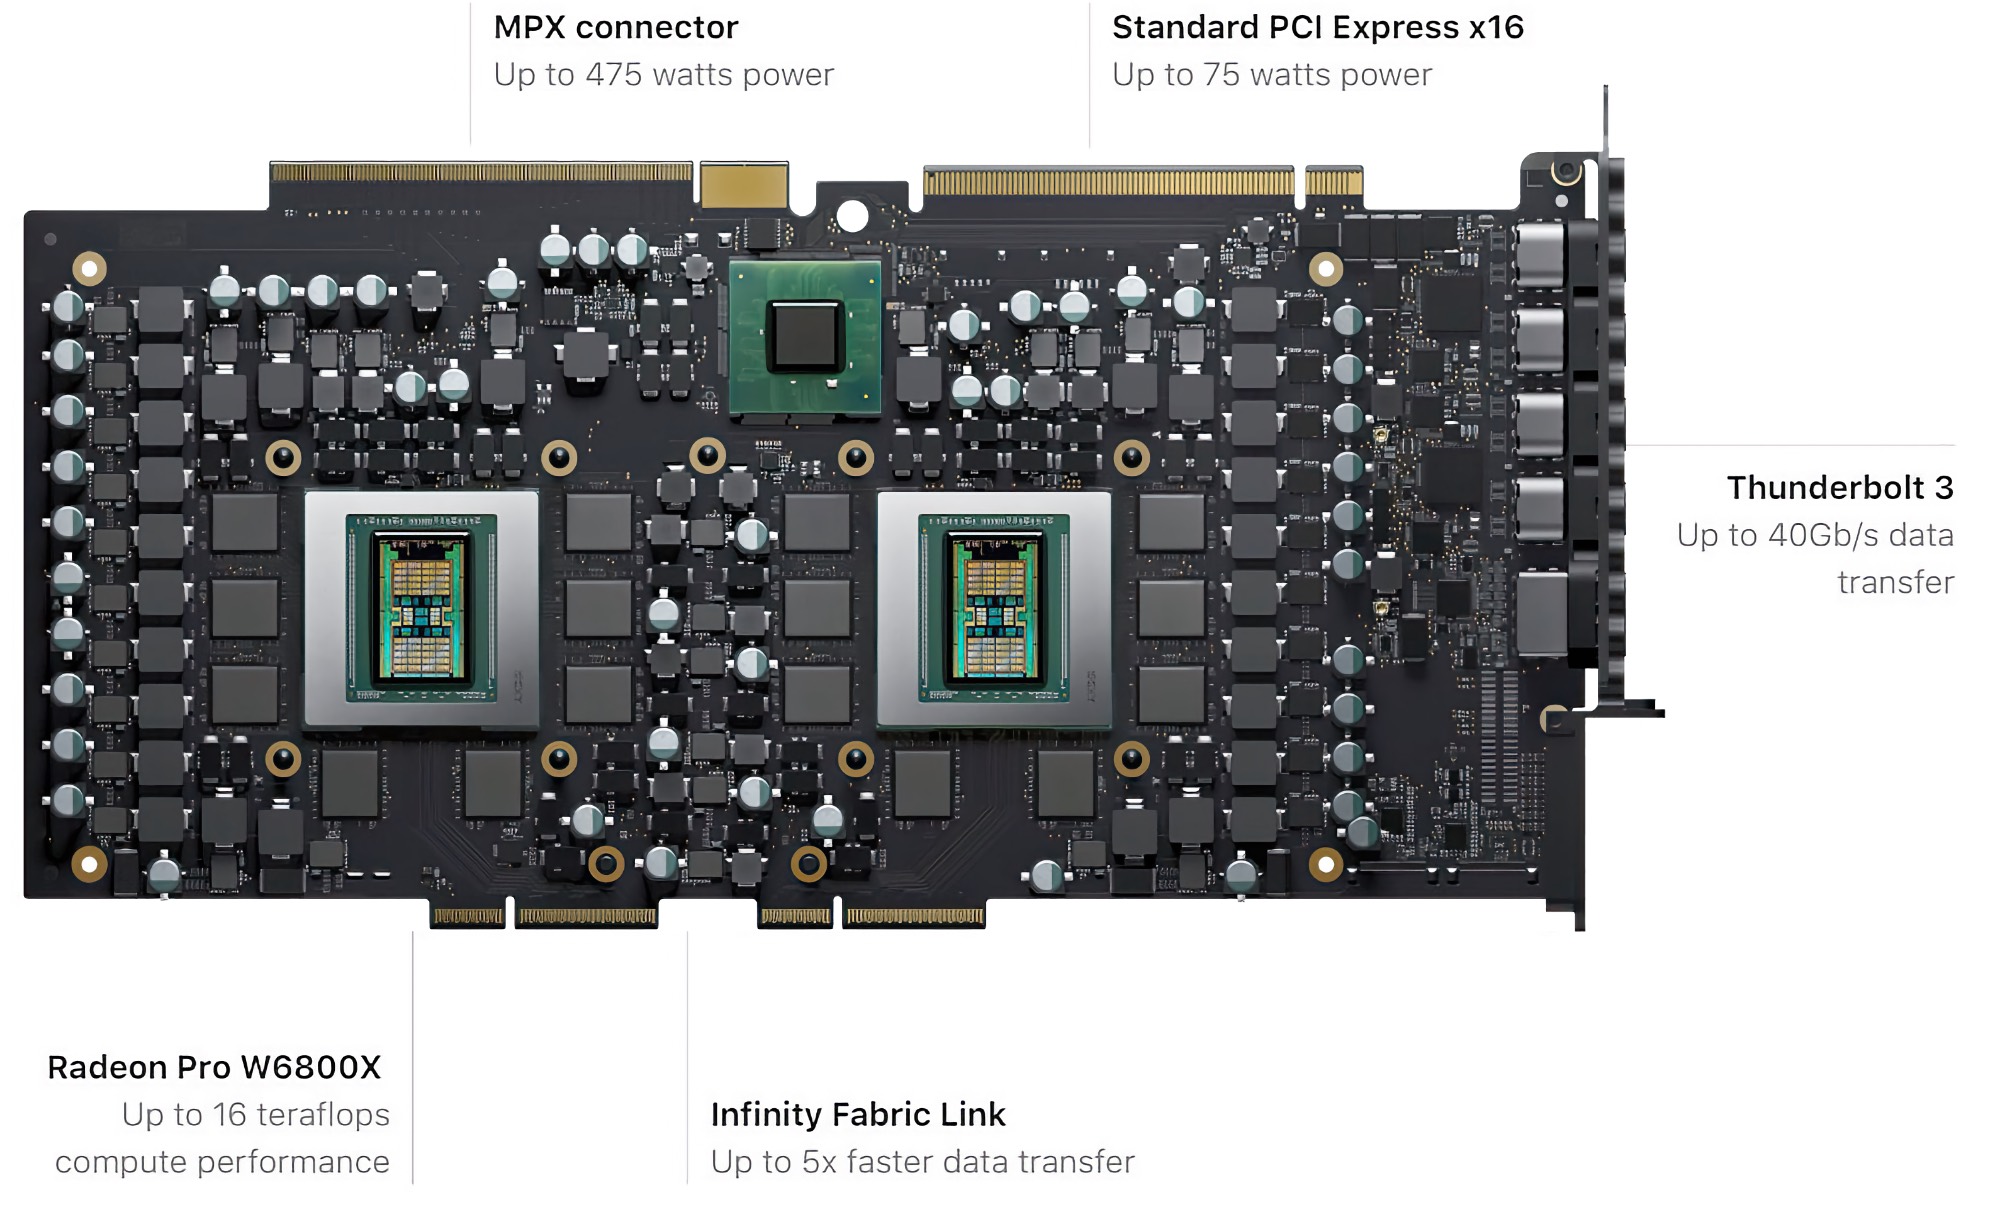
Pictured: W6800x Pro Duo MPX Module
Image Credit: Apple.com
Apple's MPX standard is a modified PCIe GPU that has a secondary interface to provide Thunderbolt 3 video passthrough / Thunderbolt 3 ports and additional power delivery (removing the requirement for PCIe 6 / 8 pin power cables).
The standard PCIe GPUs are non-MPX and do not have the ability to pass video through Thunderbolt 3.
Users familiar with the classic Mac Pros needn't worry about EFI boot screen support as the Mac Pro 2019s use UEFI, and thus off the shelf supported AMD GPUs can out.
NVidia and Apple
The Apple vs. Nvidia squabble easily could form a novel based on rumors, accusations, and half-truths. The hard facts are as follows:
Apple and Nvidia had a falling out after including Nvidia GPUs in their MacBooks resulting in Apple switching to AMD. For years, Nvidia was able to write 3rd party drivers for its GPUs known as web drivers. This supported Nvidia GPUs that Apple never supported and lasted years until Apple decided to revoke Nvidia's developer license at the end of 10.13 High Sierra, drastically harming Apple's most dedicated user-base. The only usable GPUs in Mojave and beyond are a handful of older Nvidia GPUs based on the Kepler architecture. The best Kepler Nvidia GPU doesn't outperform the lowest MPX GPU Apple ships. These GPUs have been omitted from this guide.
Mac Pro 2019 owners can still install Nvidia GPUs and use them in Windows or other OSes, but they are unsupported in macOS.
If you'd like to learn more about the history, I've written Apple vs. Nvidia: What happened? to try and contextualize Apple and Nvidia's relationship.
GPU lengths: Buyer Beware
The Mac Pro 2019 can only accomendate GPUs that are no longer than 305mm or 12 inchses in length. See iSwitcher.com (on archive.org) for old post. Sadly the images are lost to time.
The Compatible GPU list
As mentioned in the Nvidia section, I've elected to omit the lower tier AMD GPUs even though you can use an AMD RX 560 in 2019. If you'd like to see them, go to The Definitive classic Mac Pro Upgrade Guide, the complete aftermarket GPU List.
| AMD GPU | VRAM | Ports |
| Radeon Pro 580X MPX Module | 8GB of GDDR5 | Two HDMI 2.0 ports |
| Radeon Pro W5500X MPX Module | 8GB of GDDR5 | Two HDMI 2.0 ports |
| Radeon Pro W5700X MPX Module | 16GB of GDDR6 | four Thunderbolt 3 ports, and one HDMI 2.0 port |
| Radeon Pro Vega II MPX Module | 32 GB of HBM2 | four Thunderbolt 3 ports, and one HDMI 2.0 port |
| Radeon Pro W6800X MPX Module | 32GB of GDDR6 | four Thunderbolt 3 ports, and one HDMI 2.0 port |
| Radeon Pro W6900X MPX Module | 2GB of GDDR6 | four Thunderbolt 3 ports, and one HDMI 2.0 port |
| Radeon Pro Vega II Duo MPX Module | 32GB of HBM2 | four Thunderbolt 3 ports, and one HDMI 2.0 port |
| Radeon Pro W6800X Duo MPX Module | 32GB of GDDR6 | four Thunderbolt 3 ports, and one HDMI 2.0 port |
Non-MPX GPUs
Aftermarket GPUs do not have the Thunderbolt 3 passthrough. If an MPX module isn't present, the Thunderbolt 3 ports on the Mac will not output video. Displays will need to be attached directly to the GPU. All aftermarket GPUs will output a boot screen as the Mac Pro 2019s use UEFI. The Mac Pro 2019s cannot boot below Mac Pro 10.15.1. GPUs that perform below the RX 580 are not listed as the lowest GPU. Any Mac Pro 2019 is likely to have at the very worst, the Pro RX 580 MPX module.
The aftermarket GPUs will need PCIe power delivery, via the power ports on the Mac pro that are non-standard, see The PCIe power delivery section for more details.
Apple has elected to ignore any future GPU upgrades thus the Mac Pro 2019s are locked to 6000 series AMD GPUs, but can use other GPUs in other OSes.
| AMD GPU | Min OS Support |
| Radeon RX 580 | 10.12.6 - Curr |
| Radeon RX 580x | 10.12.6 - Curr |
| Radeon Pro WX 7100 | 10.13? - Curr |
| Radeon Pro WX 8100 | 10.13? - Curr |
| Radeon Pro WX 9100 | 10.13? - Curr |
| Radeon Pro Duo 32GB GDDR5 512-Bit | 10.13? - Curr |
| Vega 56 | 10.13.x - Curr |
| Vega 64 | 10.13.x - Curr |
| Vega Frontier Edition | 10.13 - Curr |
| Radeon VII | 10.14.5 - Curr |
| Radeon 5500 XT | 10.15.2 - Curr |
| Radeon 5600 XT | 10.15.3 - Curr |
| Radeon 5700 | 10.15.2 - Curr |
| Radeon 5700 XT | 10.15.2 - Curr |
| Radeon 6600 | Unsupported |
| Radeon 6600 XT | 12.1 - Curr |
| Radeon 6700 | Unsupported |
| Radeon 6700 XT | Unsupported |
| Radeon 6800 | 11.4 - Curr |
| Radeon 6800 XT | 11.4 - Curr |
| Radeon 6800 XT | *unsupported (can be used with OpenCore in 11.4+) |
| Radeon 6900 XT | 11.4 - Curr |
| Radeon 6950 XT | *unsupported (can be used with OpenCore in 11.4+) |
Windows and GPUs
The MPX GPUs are compatible with Windows and will output Thunderbolt 3 over the MPX ports found in the upper-tier MPX modules. Mac Pro 2019s can boot with Nvidia GPUs or more modern AMD GPUs, but they will be only usable in non-macOS operating systems like Windows 10 or 11.
Resizable Bar?
The Mac Pro 2019 does not support Rebar (Resizable bar). Resizable BAR (Base Address Register) is a PCIe feature that enhances how CPUs access GPU memory by allowing them to view the entire GPU VRAM at once instead of in limited 256MB chunks. This technology enables faster data transfers between the CPU and GPU, potentially improving gaming and graphics performance, especially in memory-intensive tasks. AMD markets their implementation as Smart Access Memory (SAM) while Intel and NVIDIA simply call it Resizable BAR, but all function similarly by removing memory addressing limitations in the PCIe interface.
Above is a video where I both discover the lack of Resizable Bar and how installing an Intel Arc A770 isn't the best idea.
I/O Upgrades
The Mac Pro 7,1 can use a host of upgrades. The I/O (Input/Output) is a catch-all umbrella term I'm using for anything that doesn't fall under GPU, SSD interfaces, or audio PCIe cards. I/O Upgrades include networking and peripherals interfaces (USB/Firewire/SATA). This isn't a complete list of all possible I/O cards, but instead, a list of common significant I/O cards, and I'm always looking to extend the list.
USB 3.1 / USB 3.2 Gen 1 / Gen 2
The USB 3.x standard has had a few rebrandings, and the language on devices can often be confusing, as due to the recent rebranding, some devices might be labeled as "USB 3.0" or "USB 3.1 Gen 1" or "USB 3.2 Gen 1" which is entirely the same. Cynically, device makers lobbied for this change so that they wouldn't potentially lose out on sales moving forward.
Below is a small chart of names for each tier of USB.
| Original Name | 2013 Rebrand | 2019 Rebrand | Bandwidth |
| USB 3.0 | USB 3.1 Gen 1 | USB 3.2 Gen 1 | 5 Gbps (625 MB/s) |
| USB 3.1 | USB 3.1 Gen 2 | USB 3.2 Gen 2 | 10 Gbps (1250 MB/s) |
| USB 3.2 | - | USB 3.2 Gen 2x2 | 20 Gbps (2500 MB/s) |
If the above is confusing, I do not blame you as I find it too.
USB Cards and Performance
USB 3.x cards with type-A are one of the most common upgrades for a Mac Pro. Still, it is important to understand that there is a great deal of performance difference between cheap USB cards vs. high-end ones (such as Sonnet's Allegro Pro), and this comes down to three factors: How many controllers per port, USB generation, and how much bandwidth.
Generally, inexpensive USB cards will feature one controller and 4-ports and be listed as USB 3.0 or USB 3.2 Gen 1. This means 625 MB/s is divided roughly 4 by 4 (although not exactly). A user should expect to see only roughly 150-250 MB/s on a singular port regardless of whether anything else is plugged into a card.
A USB 3.2 Gen 2 or USB 3.1 card with four ports and two controllers will likely see 625-800 MB/s per port.
USB 3.0
- Sonnet Allegro USB 3.0 / Sonnet Allegro Pro
- Inateck KT4004
- RocketU 1144D / HighPoint RocketU 1144C
- HighPoint RocketU 1144E
- CalDigit FASTA-6GU3 Pro (Discontinued)
- HighPoint RocketU 1144CM -
- Inateck PCI-E to USB 3.0 - (Caused Reboot loop in 2008 Mac Pro)
- Sonnet Technologies Tempo Duo PCIe (2x eSATA / 2x USB 3.0) - (discontinued)
- Newer Technology MAXPower 2 port eSATA 6/GBs & 2 Port USB 3.0
USB 3.x
Any card using the ASMedia ASM3142 should be macOS 10.11.x+ compatible as this controller is supported by macOS as long as it doesn't require external power. One of the most popular ASM3142 import cards (often a black PCIe card with names like Tuneway Usb3.1 Type-C, WEI-LUONG USB 3.1 to Type-C, YISUNF USB 3.1 to Type-C 2 Port, Camisin USB 3.1 to Type-C 2) is not macOS compatible due to the power requirements.
- MAXPower 4-Port USB 3.1 Gen 1
- Sonnet Technologies Allegro USB-C
- StarTech 4-Port USB 3.1 (10Gbps) Card PEXUSB314A2V
- CalDigit FASTA-6GU3 Plus (USB 3.1 / 2x eSATA)
- Sonnet Technologies Allegro™ Pro USB 3.1 PCIe
- Sonnet Technologies Allegro USB-C 4-Port PCIe
- Rosewill RC-20002 USB 3.2 Gen 2 Type-C, 2 x USB 3.2 Gen 2 Type-A ports
- FebSmart 1X USB-A & 1X USB-C 10Gbps Ports PCIE USB 3.1 Gen 2 Card
- FebSmart 2X 10Gbps USB-C Ports PCIE USB 3.1 Gen 2
- FebSmart USB 3.1 Gen 2 2X 10Gbps USB-A
- FebSmart 2X USB-C & 3X USB-A 10Gbps Ports PCIE USB 3.2 Gen 2 Card
- FebSmart 5X 10Gbps USB-A Ports PCIE USB 3.2 Gen 2
- BEYIMEI PCI-E 4X to USB 3.1 Gen 2
- LTERIVER PCI Express to 2 USB 3.1 Gen2 Type A 10Gbps Ports Expansion Card
- LTERIVER PCI Express to 2X USB 3.1 Gen2 Type C 10Gbps
- Ableconn PEX-UB158 USB 3.1 5-Port PCIe 3.0 Card (1x USB-C & 2X USB-A & 1x 2-Port Internal USB Header
SATA/eSATA
Note: Not all SATA cards are bootable on macOS. Known bootable cards will be listed as such.
- NewerTech MAXPower PCIe eSATA 6G Controller - Bootable
- MAXPower 4-port eSATA 6G PCIe 2.0 - (bootable)
- MAXPowereSATA 6G PCIe 2.0 RAID 0/1/5/10
- MAXPower RAID mini-SAS 6G-2e2i
- Sonnet Technologies Tempo SATA Pro - Bootable
- Sonnet Technologies Tempo SATA E2P
- Sonnet Technologies Tempo SATA 6Gb/s PCIe 2.0 - (discontinued)
- Sonnet Technologies Tempo SATA Pro 6Gb PCIe 2.0 - (discontinued)
- SYBA SY-PEX40039 SATA III
- HighPoint Rocket 620 2 SATA
- ORICO PFU3-4P 3 Port
- ATTO ExpressSAS H680 Low-Profile x8-External Port
- ATTO ExpressSAS H644 Low-Profile 4-Internal/4-External Port
- ATTO ExpressSAS H6F0 16-External
Ethernet (10 Gigabit +)
If I'm missing cards or any are no longer supported in macOS, please let me know.
- Sonnet Technologies Presto 10GbE 10GBASE-T
- Sonnet Technologies Presto 10GbE SFP+
- Sonnet Technologies Presto 10GbE 2-Port - (discontinued)
- Small Tree P2E10G-1-T, P2E10G-2-T, P2E10G-4-T 10GbE One-Port / Twp- Port/ Four-Port 10GBase-T
- Small Tree P2E10G-2-XR, P3E10G-4-XR, P3E10G-6-XR Two-Port / Four-Port/ Six-Port 10GbE 10G-SFP+
- Small Tree P2E10G-1-SR, P2E10G-2-SR, P3E10G-4-SR, P3E10G-6-SR One-Port/ Two-Port / Four-Port / Six-Port 10G-SFP+
- Solarflare / Solarstorm Cards (drivers last updated in 2013) - see release notes for supported devices
- Chelsio- See Release notes on drivers for supported devices
- Solarflare - See Release notes on driers for supported devices
Storage Upgrades
The Mac Pro 2019 can use a variety of storage options, including SATA Hard disk Drives, SATA SSDs, AHCI SSDs, and NVMe SSDs, and Apple's proprietary NGFF SSDs.
Hard Disk Drives / SATA connections
Like many data interfaces, SATA (aka Serial ATA) has gone through multiple iterations: SATA1 (max transfer speed of 150 MB/s), SATA2 (max transfer speed of 300 MB/s), and finally, its last incarnation, SATA3 (max transfer speed of 600 MB/s). The Mac Pro 2019s sport two internal SATA3 ports and a USB 3.0 port, allowing them to use three internal drives without any additional controller cards.
The Mac Pro 2019 does not come with any internal drive mounts, and thus, the internal drive bays must be purchased / 3D printed/manufactured. Even in the high-speed era of NVMe SSDs, SATA is still useful as the price-per-gigabyte price still favors mechanical (Spinning disk) hard disk drives.
</p>The Mac Pro 2019 uses a custom power connector to provide power to SATA3 devices. This makes adding in internal SSDs even more of a hassle beyond lacking standard mounting. (see j-w.co's article on Mac Pro 2019 pin-outs)</p>Thanks to their price-per-gigabyte, mechanical hard drives are still a place in the SSD world, especially for backup. The Mac Pro can use any SATA Hard disk drive, including 2.5-inch drives with 2.5-inch to 3.5-inch mounting brackets for the 4 drive bays. This extends to eSATA as well, although an eSATA PCIe card must be present to make use of eSATA drives.
Not all HDDs are equal, and more goes into HDDs than cache sizes and RPMs. Many of the inexpensive HDDs use Shingled Magnetic Recording (SMR), which lowers the cost per gigabyte by allowing more data on a platter but with a performance penalty. It's important to do research, depending on the application.
Any external HDD should be presumed to be compatible with Mac OS (outside of extreme edge cases).
PCIe SATA + SSD Sleds
Once very popular with classic Mac Pro owners, PCIe sleds are PCIe cards that are a SATA3 controller with one to two mounts for 2.5 SATA drives. Users can still use PCIe SATA 3 cards + SATA SSD drives. These are compatible with the Mac Pro 7,1 but generally represent a legacy vector for Mac users transitioning from a classic Mac Pro to the 7,1 as it provides two SATA 3 ports or users with a collection of SATA SSDs.
There are numerous makes, including Sonnet Technologies (Tempo SSD (2x 2.5 SSD), OWC (Accelsior), and Newer Technology.
The M.2 format and Apple NGFF
M.2 (also known as NGFF, Next Generation Form Factor) is the latest common format for high-speed SSDs. M.2 is the interconnect, and modern motherboards often have M.2 card slots built-in, especially in the laptop market. M.2 itself doesn't dictate the underlying technology. The M.2 format has a standard set of pin-outs, whereas Apple's variant uses a non-standard pin-out.
M.2 has two main variants, AHCI and NVMe, which are discussed in the AHCI SSD and NVMe SSD sections. Apple's variant is no different and supports AHCI or NVMe. In the 2019 Mac Pros, these are exclusively NVMe.
By default, the Mac Pro comes equipped with internal SSD(s) using proprietary Apple SSDs. These are managed by Apple's T2 chipset and are required for booting. These are user-replaceable but require Apple-certified SSDs (you cannot use NGFF to NVMe adapter) as they require T2 compatibility. Once the SSD has been replaced, you'll boot into restore using the Apple configurator 2. Apple lists the process here and also has a support document on its website about Apple Configurator 2 and Intel Macs. Apple sells its internal SSDs at its website for incredibly poor pricing, at $600 for 1 TB. Most users will elect to boot off NVMe SSDs as the single drive performance of the Apple SSD is underwhelming and wantonly overpriced for lower storage configurations.
One of the quirks of the Mac Pro 2019s is if you remove the Apple SSDs, even if Secure Boot is disabled, the computer will fail to boot.
The M.2 format and host PCIe cards
One half of the NVMe puzzle
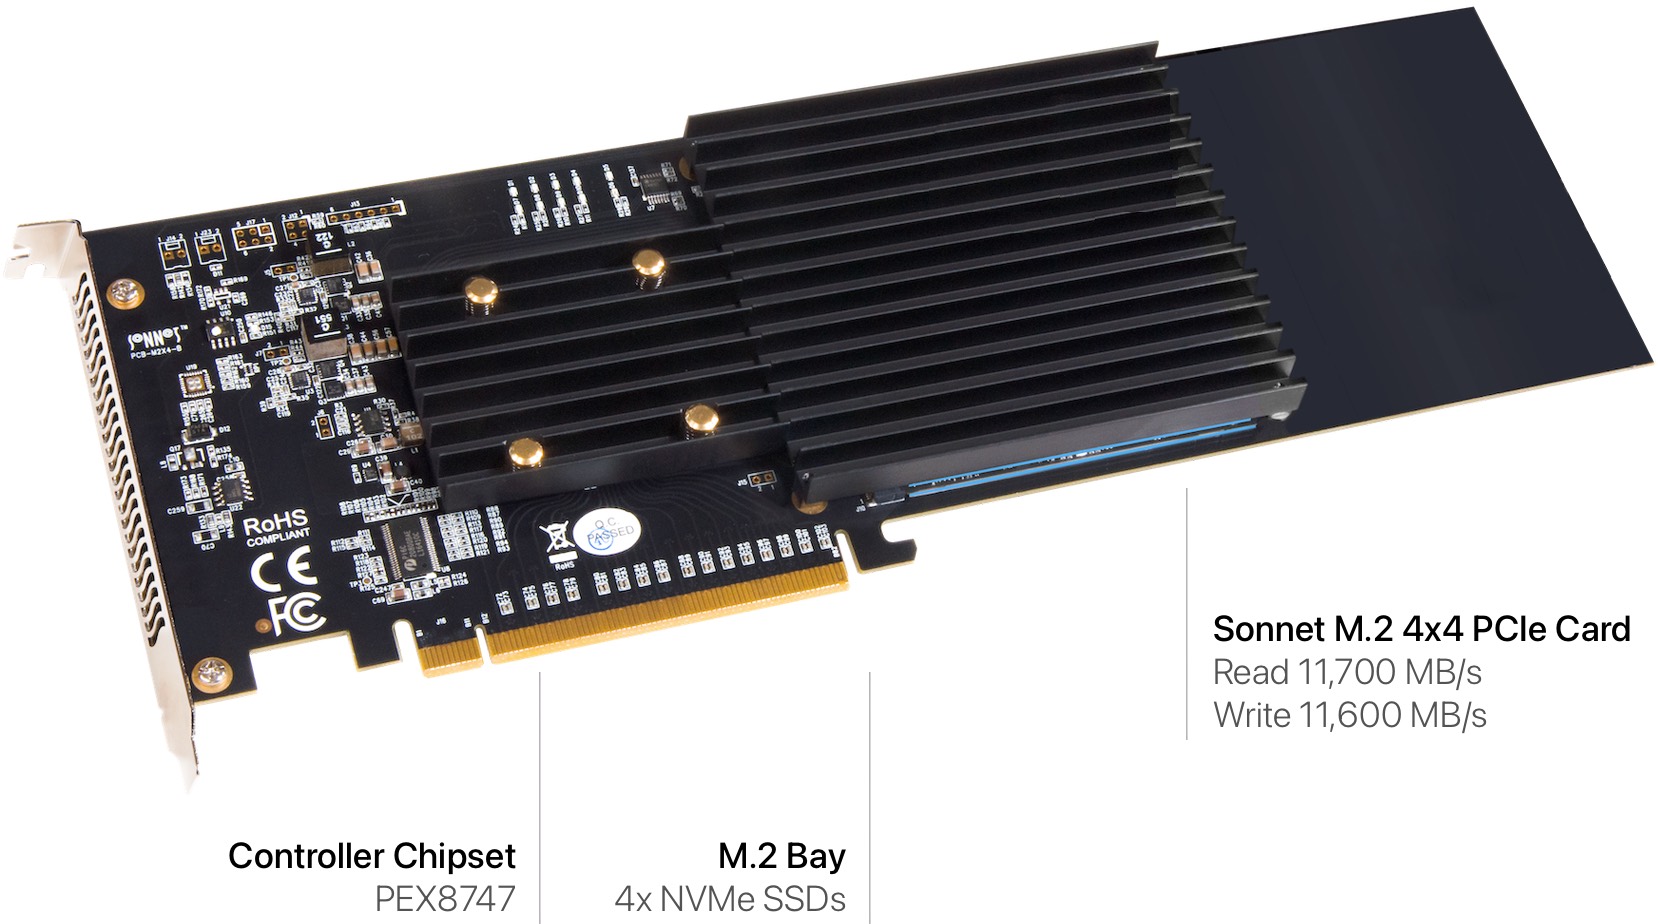
Pictured: Sonnet M.2 4x4 PCIe Card (with controller chipset for multiple NVMe SSDs)
Pre-edit Image Credit: Sonnet.com
Apple's Macs with removable SSDs all use non-standard slots for NVMe Apple's semi-proprietary NGFF variant, which doesn't have an official name. For example, previous-generation Macs like the Mac Pro 2013 or MacBook Pros 2013-2015 allowed NGFF key adapters to convert to standard M.2 pin-outs. Apple introduced the first upgradable storage with the T2 chipset on the iMac Pro, which only accepts Apple-OEM drives. To my knowledge, no third-party makers sell Apple NGFF SSDs.
Using M.2 SSDs requires a host PCIe card, as the Mac Pro 7,1 does not have any standard M.2 slots. The Mac Pro 2019 doesn't quite have the PC field's options for host card options because it does not support bifurcation, the ability to split high-speed PCIe port into two lower speed ports (see the PCIe portion of this guide for more info). Instead, the Mac Pros must use cards with controller chipsets specifically for computers that do not support bifurcation, hence making them more expensive. Also, it is important to note that some M.2 cards' physical sizes can pose problems for certain host cards, so go to the MacRumors thread for more info.
Multi-drive cards use a controller chipset such as the ASMedia ASM2824 and PLX8747. Users can search for cards that use the ASM2824 or generic PLX8747, as they are usually compatible with MacOS.
TThe ASM2824 chipset is currently the most popular NVMe chipset for multiple NVMe drives as it's less expensive and able to achieve faster speed caps in single-drive performance, although the PLX8747 is the performance crown used in the Sonnet and Highpoint 16x cards.
Classic Mac Pro owners will be happy to learn that with the PCIe 3.0 bus comes a lot more performance for SSDs, but PC users might be disappointed to learn that the Mac Pro's performance is capped to PCIe 3.0.
Multi-drive cards with a single drive can sometimes have issues, specifically the lesser ASM2824 cards, requiring both slots to be filled to prevent crashes.
Generally, many users opt to boot off a single SSD and use RAID as a storage/scratch disk.
Below is a list of known-good adapters. Most generic NVMe single-slot hosts are compatible with Mac Pro 2019.
- lesniakrafal: How to Install Mac OS Catalina on a soft RAID Volume
- Appletalk Australia: HOW TO: Install MacOS Mojave onto a RAID0 volume with APFS that is Bootable
| Model | NVMe M.2 slots |
| Kingston HyperX Predator (AHCI only) | 1 |
| NGFF M key M.2 This is a generic card with multiple variants by various importers | 1 |
| Lycom DT-120 | 1 |
| ULANSEN M.2 to PCIe | 1 |
| Angelbirds Wings PX1 | 1 |
| Aqua Computer kryoM.2 | 1 |
| Aqua Computer kryoM.2 Evo | 1 |
| Wolftech pulsecard | 1 |
| RIITOP M.2 NVMe/DIEWU TXB122 (This particular card has multiple variants by various importers) | 2 |
| Syba I/O Crest SI-PEX40129 (ASM2824) (This particular card has multiple variants by various importers (ASM2824)) Warning: New versions of this card appear to require two drives present | 2 |
| Ableconn PEXM2-130 / StarTech PEX8M2E2 / Lycom DT-130 / etc (This particular card has multiple variants by various importers (ASM2824)) | 2 |
| Accelsior 4M2 (PLX8747) | 4 |
| Amfeltec Squid series Some are PLX8747 | 4 |
| PLX8747 Generic | 4 |
| Highpoint 7101A (PLX8747) | 4 |
| HighPoint Technologies SSD7540 | 4 |
| ASM2824 Quad M.2 NVMe SSD (aliexpress generic card) confirmed working by MacProUpgrade (requires FaceBook Membership). This card is also available from many no-name white-label vendors: Add On/ADWITS/RIITOP/BGNing, etc. | 4 |
| Sonnet MacFiver* | 2 |
| Sonnet M.2 4x4 PCIe Card FUS-SSD-4X4-E3: | 4 |
| Sonnet M.2 4x4 PCIe Card (Silent) | 4 |
| Sonnet M.2 8x4 Silent Gen4 | 8 |
*The Sonnet MacFiver is a unique card that has 2 NVMe slots + USBc + 10 GBe.
Can I use a card that isn't listed above that host's multiple NVMe drives?
Almost 95% of the time, no, but other cards are floating out there that might. Most M.2 hosts rely on bifurcation. The Mac Pro does not support bifurcation. See the bifurcation section for details. Many cards that support bifurcation can be used for a single drive, giving users the illusion it might work with multiple cards. Popular cards like the ASUS Hyper M.2 x16 Card v2 4 x M.2 Socket 3 will not host multiple drives in a Mac Pro. However, if the card uses the ASM2824, PEX8732, or PLX8747 chipset, you can use it. An easy way to tell if a card doesn't have a chipset is if it is significantly cheaper than the Ableconn PEXM2-130 / StarTech PEX8M2E2 / Lycom DT-130 / etc. (this card has many importers) in your area of the world. If it is, it most likely doesn't have a controller.
Which card is the best?
Inevitably, this question will be asked. It's complicated to recommend a single card because of the price. From a pure performance standpoint and hassle-free experience, the four-port cards from Highpoint and Sonnet are the most desirable. Each company has a high reputation with Mac users.
M.2 and Heatsinks
When looking at SSD options, you'll probably notice some hosts include heat sinks and others do not.
It's easy to find conflicting info on AHCI and NVMe SSDs and heat sinks. The short answer is that SSDs are intelligent enough to self-throttle if they get too hot. Thus, it is extremely unlikely heat will damage them. NVMes run warm, but it takes quite a bit to heat them. The NAND memory itself doesn't require any cooling and is generally supposed to be warm to the touch. The controller chipset is the portion of the SSD that heatsinks benefit the most from cooling. There have been debates about whether cooling could be detrimental, but the current consensus is that a passive heatsink, at worst, doesn't do much and likely keeps the SSD running at optimal speeds, so it doesn't have to use thermal throttle. Even a cheap generic SSD heatsink often causes a drop of 10-15C (roughly 50 degrees Fahrenheit).
For most users, self-included, the heatsink won't change day-to-day operation. Only when you get to cards that can operate four drives, it tends to be the general consensus that a heatsink is advisable as there are multiple NVMes in close proximity that could lead to thermal throttling. Also, PCIe 4.0 and especially 5.0 drives operate hot thus recommended to add passive heat sinks.
Aftermarket heatsinks can be bought and attached to SSDs. Still, if you do go this route, some experts recommend removing the label, as many labels function as heat distribution/heat dissipation, like those found on Samsung drives. Multi-drive M.2 cards require a heatsink over the PCIe switch/controller chipset as the popular ASMedia 2824, or the PLX8747, runs warm. Often, this is folded into the entire chassis, like in the Highpoint and Sonnet designs, which provide a large heatsink that works for both the PCIe card itself and the drives.
PCIe AHCI (Advanced Host Controller Interface) SSDs
AHCI is the technology behind the SATA standard.
Mac Pros can boot AHCI SSDs faster than the standard SATA drives, offering significantly faster speeds, often double that of 2.5-inch SATA-connected SSDs. These are not nearly as strong performers as NVMe as they tend to cap out at 1500 MB/s (usually more roughly in the 1 GB/s mark). Most NVMe adapters also accept AHCI. However, due to the speed limitations and age, few models are on the market. The price per GB tends to be high, as the industry has largely pivoted to NVMe for its huge performance advantages.
Generally, most people and manufacturers only reserve the term AHCI SSD for M.2 sized drives, although some places will list SATA SSDs as AHCI.
PCIe NVMe
NVMe (Non-Volatile Memory Express) is currently the pinnacle of storage due to its extreme performance. NVMe is roughly triple to quadruple the read/writes of SATA (and often nearly double of AHCI M.2 SSDs), clocking in at transfer speeds over 3 GB/s in PCIe 3.0 and for the latest PCs, 5 GB/s with PCIe 4.0 drives. Also, due to the improvements in SSDs, NVMe tends to sport faster 4k Random read/write times, which also greatly affects the "zippiness" of a computer. NVMe was constructed to work only via the PCIe standard; thus, it has a speed advantage over AHCI.
Some cards can host multiple NVMe SSDs, but many or most PCIe NVMe multi-SSD adapters require bifurcation, which is a technology not supported on the Mac Pro, which allows a PCIe slot to be split. For example: One 16x port becomes two 8x ports (see the PCIe portion of this guide for more info). Multi-drive NVMe cards that support the Mac Pro are more expensive as they have a controller that handles the PCIe IC and registers, and some are more powerful than others.
The Mac Pro is limited to PCIe 3.0 outside of ultra specialty cards like Highpoint SSD7540, which addresses more PCIe lanes to compensate for the speed of PCIe 4.0 NVMes. The PCIe switch lets the user toggle the PCIe maximum speed.
To summarize. NVMe speed is a function of three factors: the NVMe sled, the NVMe itself, and the PCIe port's maximum speed.
Not all NVMes are Mac OS compatible. Rather than list all that are compatible, here's a short list of incompatible or ones that need firmware update models, as they are few and far between.
- Samsung 950 PRO
- Samsung 970 EVO Plus*
- Samsung PM981
* The Evo and Evo Pro variants of the 970 are Mac-compatible. There is a firmware update for the Evo Plus that fixes issues. Most drives at this point should have the new firmware preinstalled at this point in time, but it should be noted.
Not all SSDs are equal
While this guide will not explain the finer points of SSDs, it is important to understand that SSDs come in multiple variants based on their storage capacity and even sometimes different controllers and memory cell technology with the same model (more on this later). Data density in mechanical hard drives has greatly improved read/write speeds as more data can be read by a drive-head on a hard drive each time the platter rotates. More data per square millimeter = more data read per second. This is one of the main reasons why HDD performance has steadily increased over time. However, the same cannot be said for SSDs. Each storage unit in an SSD is represented as a cell. The first SSDs could store a single bit per cell, positive or negative. This is referred to as a single-layer cell. Shortly after came the introduction of the Multi-Layer Cell (MLC), which allowed for 2 bits per cell. Then came Triple Level Cell (TLC), which allowed for 3 bits of data per cell, and finally, Quad Level Cell (QLC), which can store 4 bits per cell. The doubling of data per cell comes at a price: speed and reliability. This additional data load per bit increases stress on each cell and takes more time to access the data, which is fractional, but 3 bits vs. 4 bits means 8 vs. 16 possible values stored in an individual cell and more time to retrieve and write.
SLC is the fastest/most reliable but also the most expensive. QLC drives have certainly dropped the price floor in the SSD market but are hard to recommend with their reliability being untested, with only roughly 1000 read/write cycles (the data can be overwritten roughly 1000 times before that cell becomes unstable and is retired). Worse, in huge file transfers, QLC can occasionally dip below HDD speeds. TLC offers roughly 3000-5000 read/write cycles, making it three to five times as reliable as QLC, and it's much faster. Samsung estimates 114 years for 1 TB TLC. Although this is entirely unproven, Windows utilities provide entirely-hypothetical guestimates of your SSDs life. Does a QLC have 1/5 the reliability of a TLC SSD? Is it worse? Does it compare to a mechanical HDD? There are better sources on the internet, but it is somewhat speculative. The best estimates are using Mean Time to Failure vs. Terabytes, which is written from large data centers, and we simply do not have the data. My bet is that QLC would easily outlast an HDD, but I would pay the extra money for a TLC drive.
Memory density isn't the only factor, the very first SSDs didn't use a controller with a DRAM cache, and thus performance would "stutter. In an effort to harness the power of SSDs, controllers started packing DRAM to store the data map as DRAM is much faster than NAND and alleviated a common choke point in the SSD design. Many inexpensive SSDs are now also switching to DRAMless configurations, which generally result in lesser performance and lesser longevity due to the lack of a buffer to quickly read/write to before going to the SSD. Tomshardware's has an excellent summary of DRAMless SSDs.
Lastly, larger SSDs (of the exact same model) tend to be faster as they have more channels than the controllers on the NVMe itself.
Some makers, especially during the pandemic due to shortages, have quietly altered the specs of their SSDs without making it clear to their customers. Linus Tech Tips has a great video demonstrating this, and publications have even revised their ratings after component swapTom's Hardware dropped its rating of Crucial's P2 after discovering they moved from TLC to QLC memory.
Benchmarking SSDs
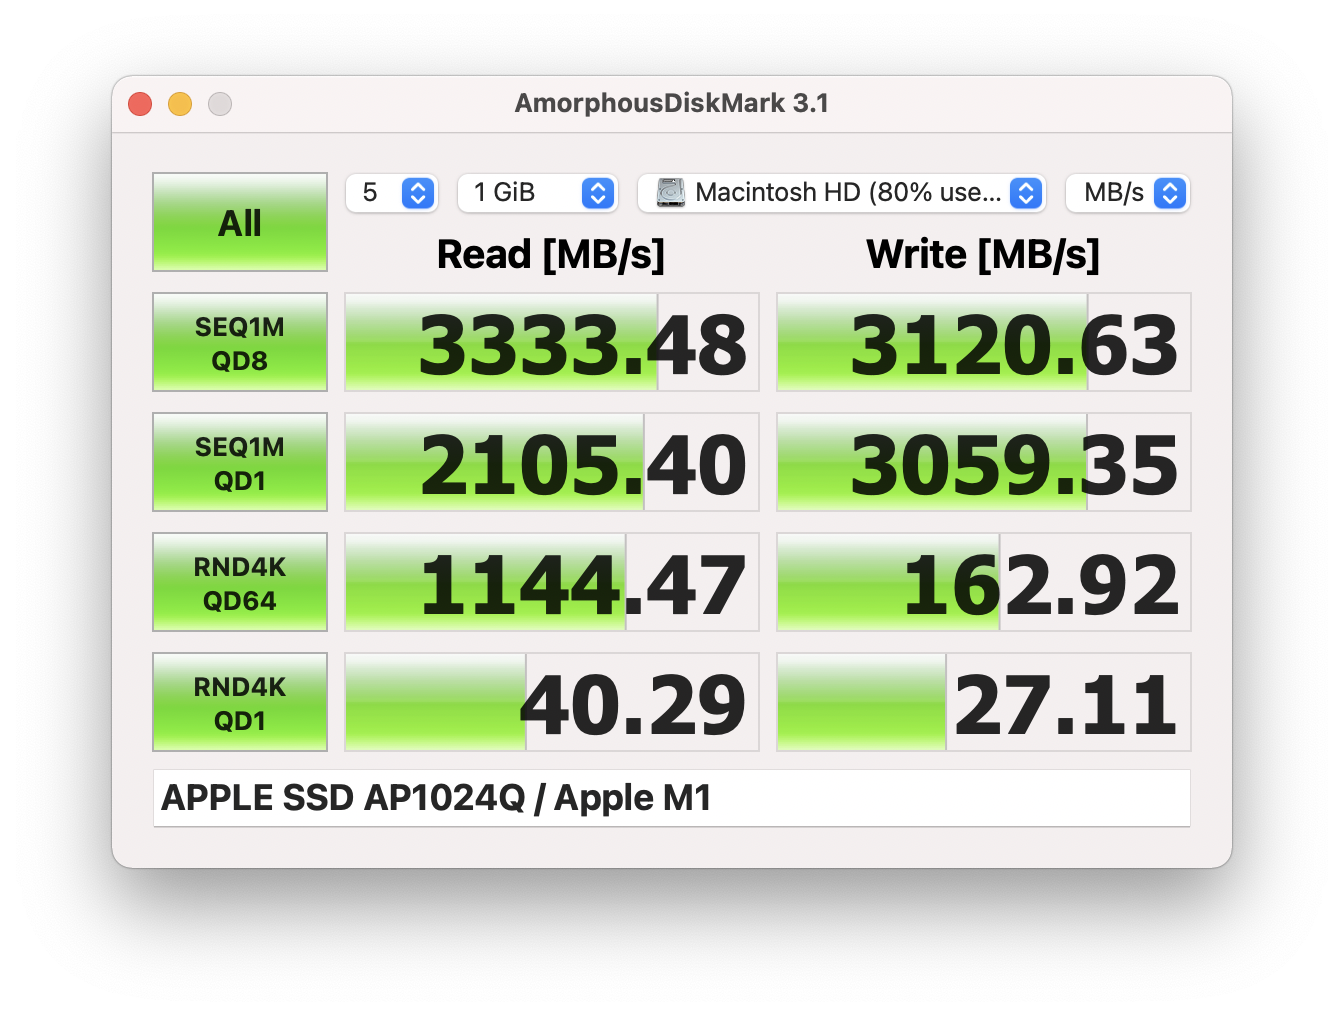
Pictured: AmorphousDiskMark
The best benchmarking software for SSDs is on Windows, as there are a plethora of utilities, whereas the Mac landscape is limited. Mac Pro 2019 owners can boot Windows to benchmark SSDs (assuming it is formatted in NTFS or a file system that Windows supports), but it isn't ideal. Previously, users would use utilities like AJA Disk Speed or Blackmagic disk speed, which are, quite frankly, bad as they only test continuous read/write speeds. The popular Windows utility, CrystalMark now has a Mac clone called AmorphousDiskMark. It tests more aspects of an SSD, such as random read/writes, and can use IOPS (Input/output operations per second ) instead of MB/s. I've written more about it in a blog post, AmorphousDiskMark is CrystalDiskMark for macOS; let's all stop using BlackMagic Disk Speed Test and AJA Disk Test.
RAID and APFS and performance
As previously mentioned, RAID after AFPS is very ugly for booting. The process involves cloning your boot disk to a single disk drive and cloning the updates back to the RAID array. This remains unchanged from 10.14 - 12.x I recommend reading Catalina on RAID with APFS on MacPro 5,1.
RAID0 may be "worth it" for users looking for maximum performance. A 16x NVMe RAID0 can hit 12000+ MB/s read and write speeds, but far more important is that it improves the latency, giving a perceptual "snappiness" that is noticeable, as demonstrated in this old but good article by PCPER.com, Triple M.2 Samsung 950 Pro Z170 PCIe NVMe RAID Tested – Why So Snappy?.
Soft RAID
RAID (Redundant Array of Inexpensive Disks) comes in management styles, hardware controllers that handle the RAID volume's setup and presents the RAID cluster as a single volume to the OS and RAID that relies on OS drivers to manage the RAID cluster. macOS supports soft raid for those looking to make use of multi-volume drives for both RAID 0 (striping, no data mirror) and RAID 1 (Data mirroring, no parity/striping). If you need help remembering the RAID axiom, it goes, "RAID 0 means you'll get zero files back if a drive fails in a RAID 0 cluster". Mac OS also supports RAID 1 + 0 (often incorrectly referred to as RAID10), allowing for the benefit of mirroring the parity/striping drives. RAID 1+0 requires a minimum of 4 drives at the cost of 1/2 the array's storage.
However, with the switch to APFS, Apple no longer supports APFS for soft RAID for bootable volumes. Hardware RAID is still supported with APFS as the OS is unaware of the RAID Cluster. NVMe cards like the Western Digital Black AIC will work under macOS despite being a raid array, thanks to the hardware controller. This is how the internal SSDs on the Mac Pro 2019
Making APFS bootable requires first having a bootable drive, then creating an APFS RAID array, and then cloning the boot drive to the RAID array. Any updates to the OS will require first updating the boot drive and then copying over to the RAID array, as you cannot update the RAID volume's OS. This is usually done using Carbon Copy Cloner but means users will spend a non-trivial amount syncing amount of syncing data as the usual update flow is: sync APFS RAID to single drive APFS, then boot single drive APFS, update, then sync to APFS RAID array, finally booting back to the APFS RAID array.
Ram Upgrades
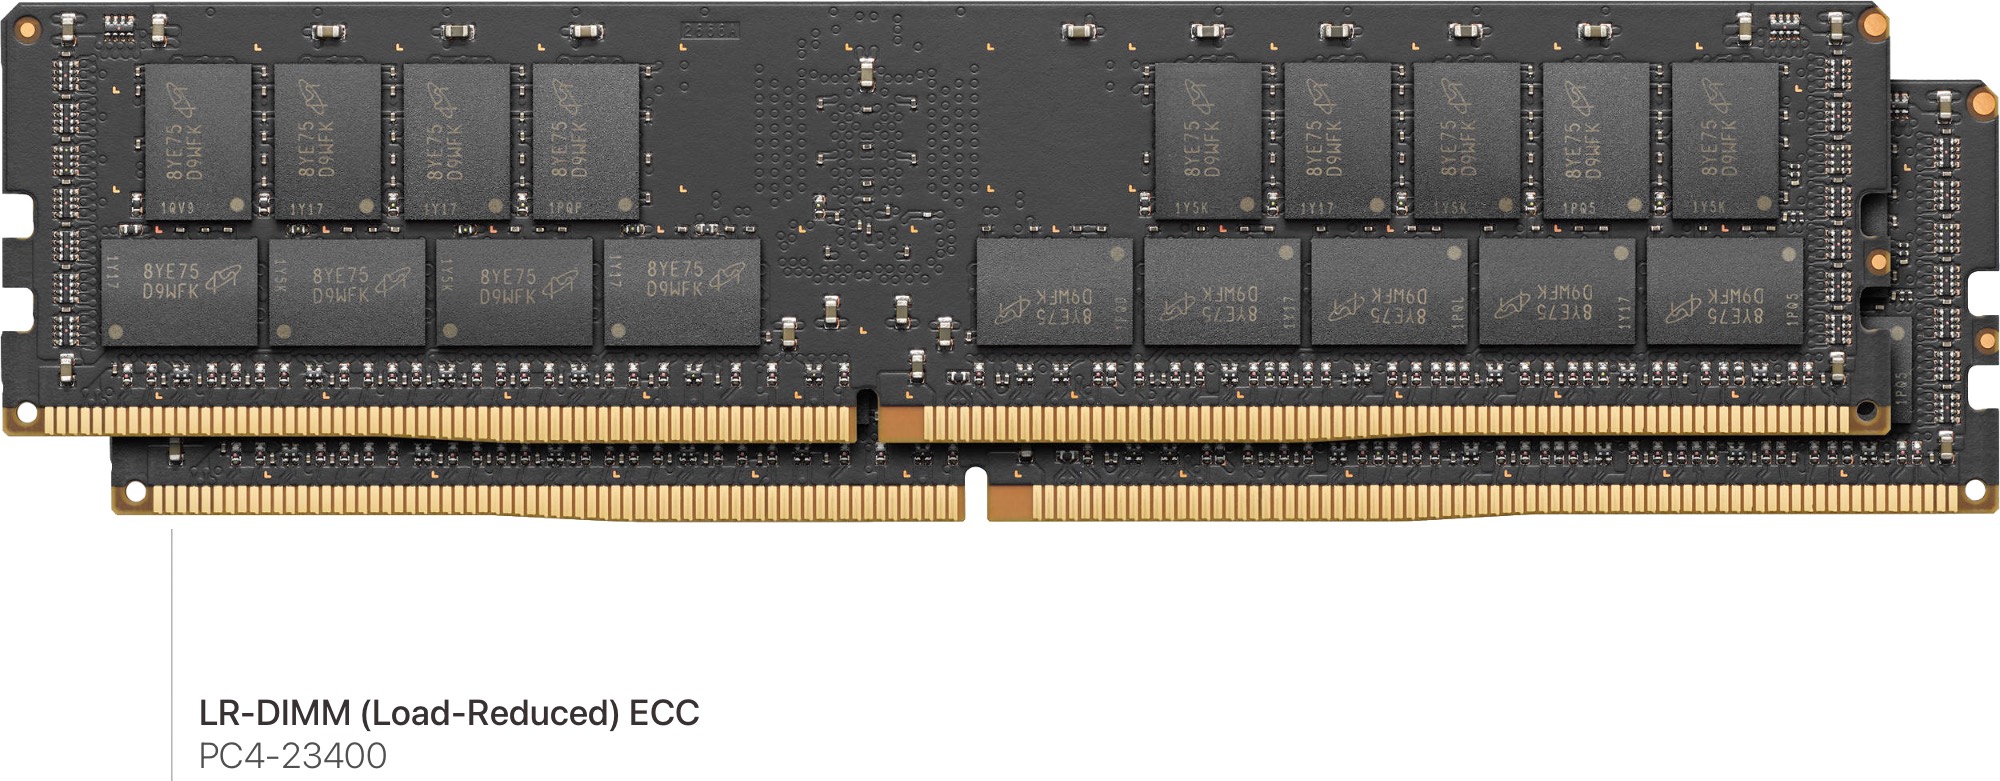
Pictured: LR-DIMM
Photo credit: Apple.com
The Mac Pro 2019's RAM capabilities depend on what CPU you have installed, although the RAMs on either CPU are so high that the vast majority of users needn't be concerned. Apple.com: official documentation lists the top memory specs as 768 GB/1.5TB depending on the CPU configuration, but MacRumors forum members have discovered this is 1 TB / 2TB.
While RAM is fairly straightforward, users should read the following section closely as there are some gotchas concerning configurations.
| Mac Pro model | Max RAM | Unofficial Max RAM | Speed | Type |
|---|---|---|---|---|
| 8-core | 768GB | 1TB | 2666MHz DDR4 ECC | LR-DIMM or R-DIMM |
| 12-core | 768GB | 1TB | 2933MHz DDR4 ECC | LR-DIMM or R-DIMM |
| 16-core | 768GB | 1TB | 2933MHz DDR4 ECC | LR-DIMM or R-DIMM |
| 24-core | 1.5TB | 2TB | 2933MHz DDR4 ECC | LR-DIMM or R-DIMM |
| 28-core | 1.5TB | 2TB | 2933MHz DDR4 ECC | LR-DIMM or R-DIMM |
RAM speed and R-DIMM vs LR-RDIMMs
The Mac Pro uses 2933MHz DDR4 ECC RAM R-DIMMs or LR-DIMMs, although the 8-Core version uses 2666 MHz DDR4 ECC RAM (Apple ships these with 2933 Mhz RAM, which is automatically downclocked by the CPU). Apple ships its factory RAM type depending on RAM configuration. Users with the 8-Core Model shouldn't buy 2666 MHz RAM if they have ANY intention of upgrading in the future.
The following is from Apple.com Mac Pro (2019) memory specifications, so if you acquire a Mac Pro from a third party, you will want to check what type of DIMMs you have or ask the seller what type it has before purchasing more RAM.
- R-DIMMs for configurations up to 192GB (6x32GB).
- LR-DIMMs for configurations of 384GB (6x64GB) or more.
- 2933MHz DDR4 full-length DIMM. Mixing memory speeds is not recommended.
- Error-correcting code (ECC)
- 8GB, 16GB, 32GB, 64GB, or 128GB DIMMs
- Registered (R-DIMM) or Load-Reduced DIMM (LR-DIMM). Do not mix R-DIMMs and LR-DIMMs.
- 288-pin
- Use the same size memory modules across all slots to maximize performance.
- DIMMs with heatsinks are not supported and may damage the DIMM mechanism.
The general rule is if you're using below 32GB modules, you should use R-DIMM, and if you plan to use more than 32GB Modules, you should use LR-DIMMs I recommend reading Server Memory: RDIMM vs. LRDIMM and When to Use Them for further reading.
The W-3223 / W-3235 / W-3245 have a listed maximum of 768 GB of RAM, and the W-3265M / W-3275M have a listed 1.5 TB Maximum. Users have observed 1TB and 2 TB, respectively.
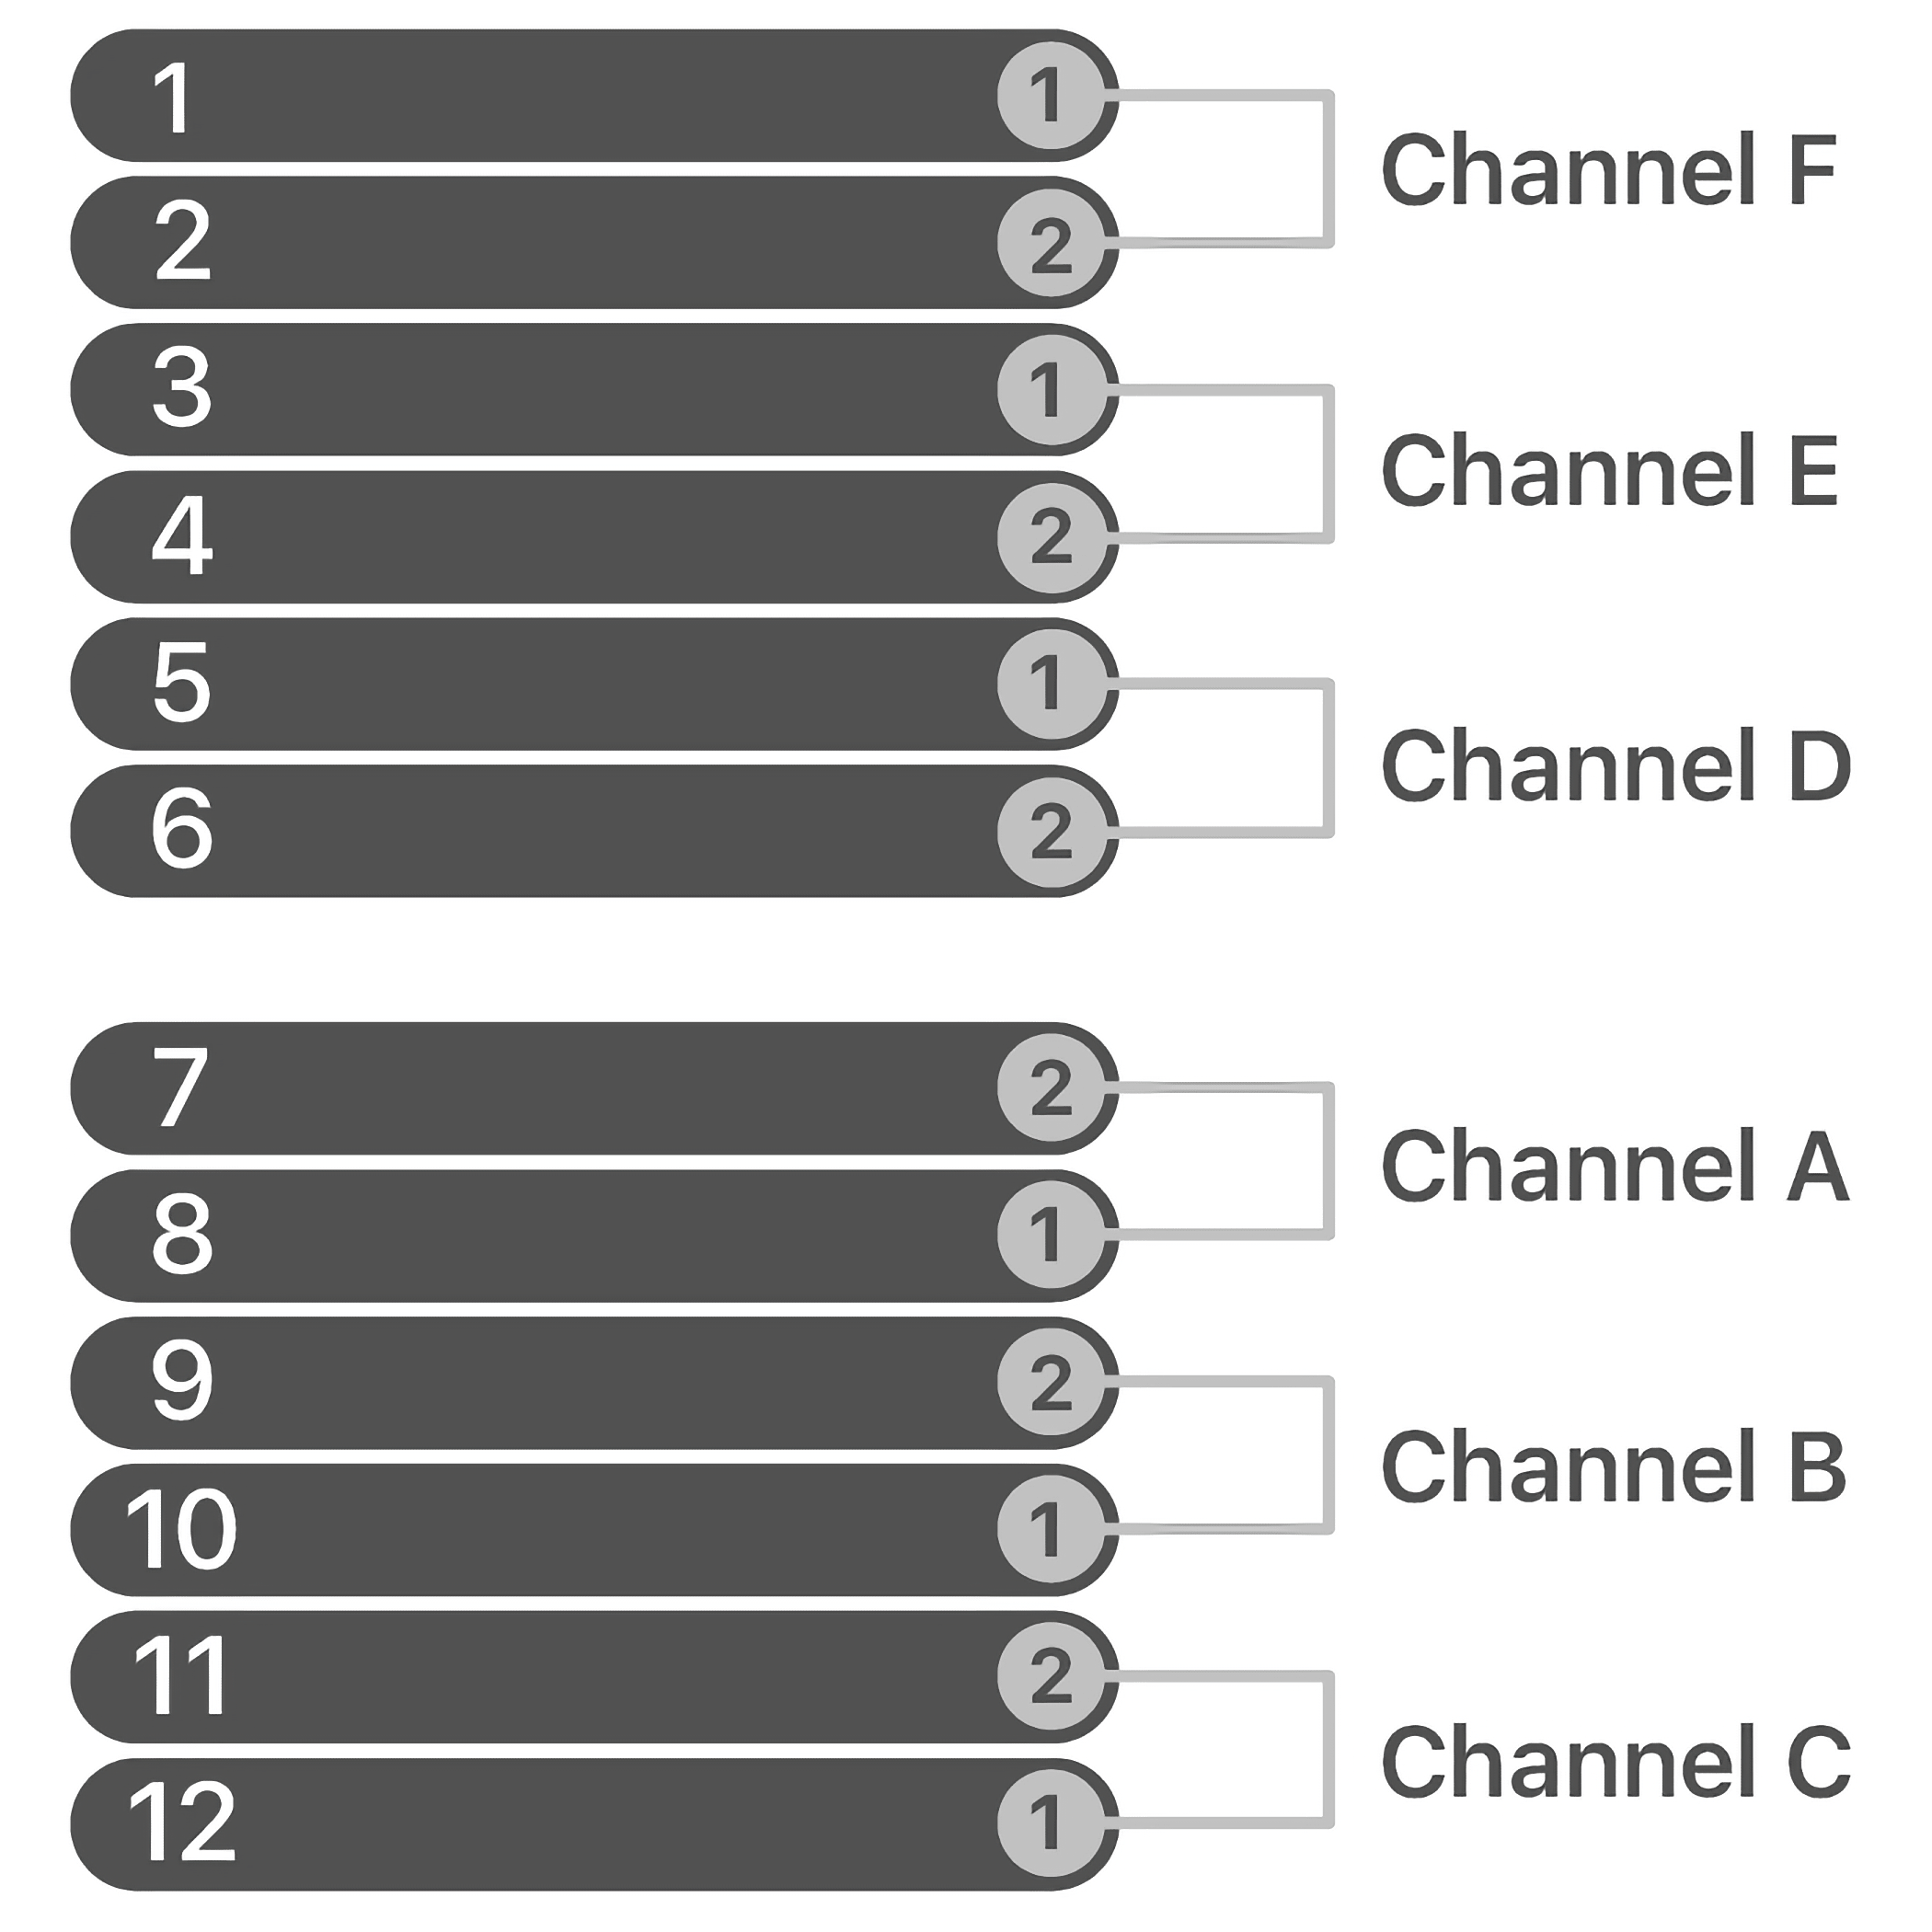
Pictured: Apple RAM Configuration
Image Credit: Apple.com
RAM is bought in pairs and installed on the backside of the Mac Pro. The case over the RAM slots also has a pictorial guide to display the proper RAM configurations, and this can be checked in the "About this Mac." The RAM utility in this Mac can also detect faulty ECC DIMMs.
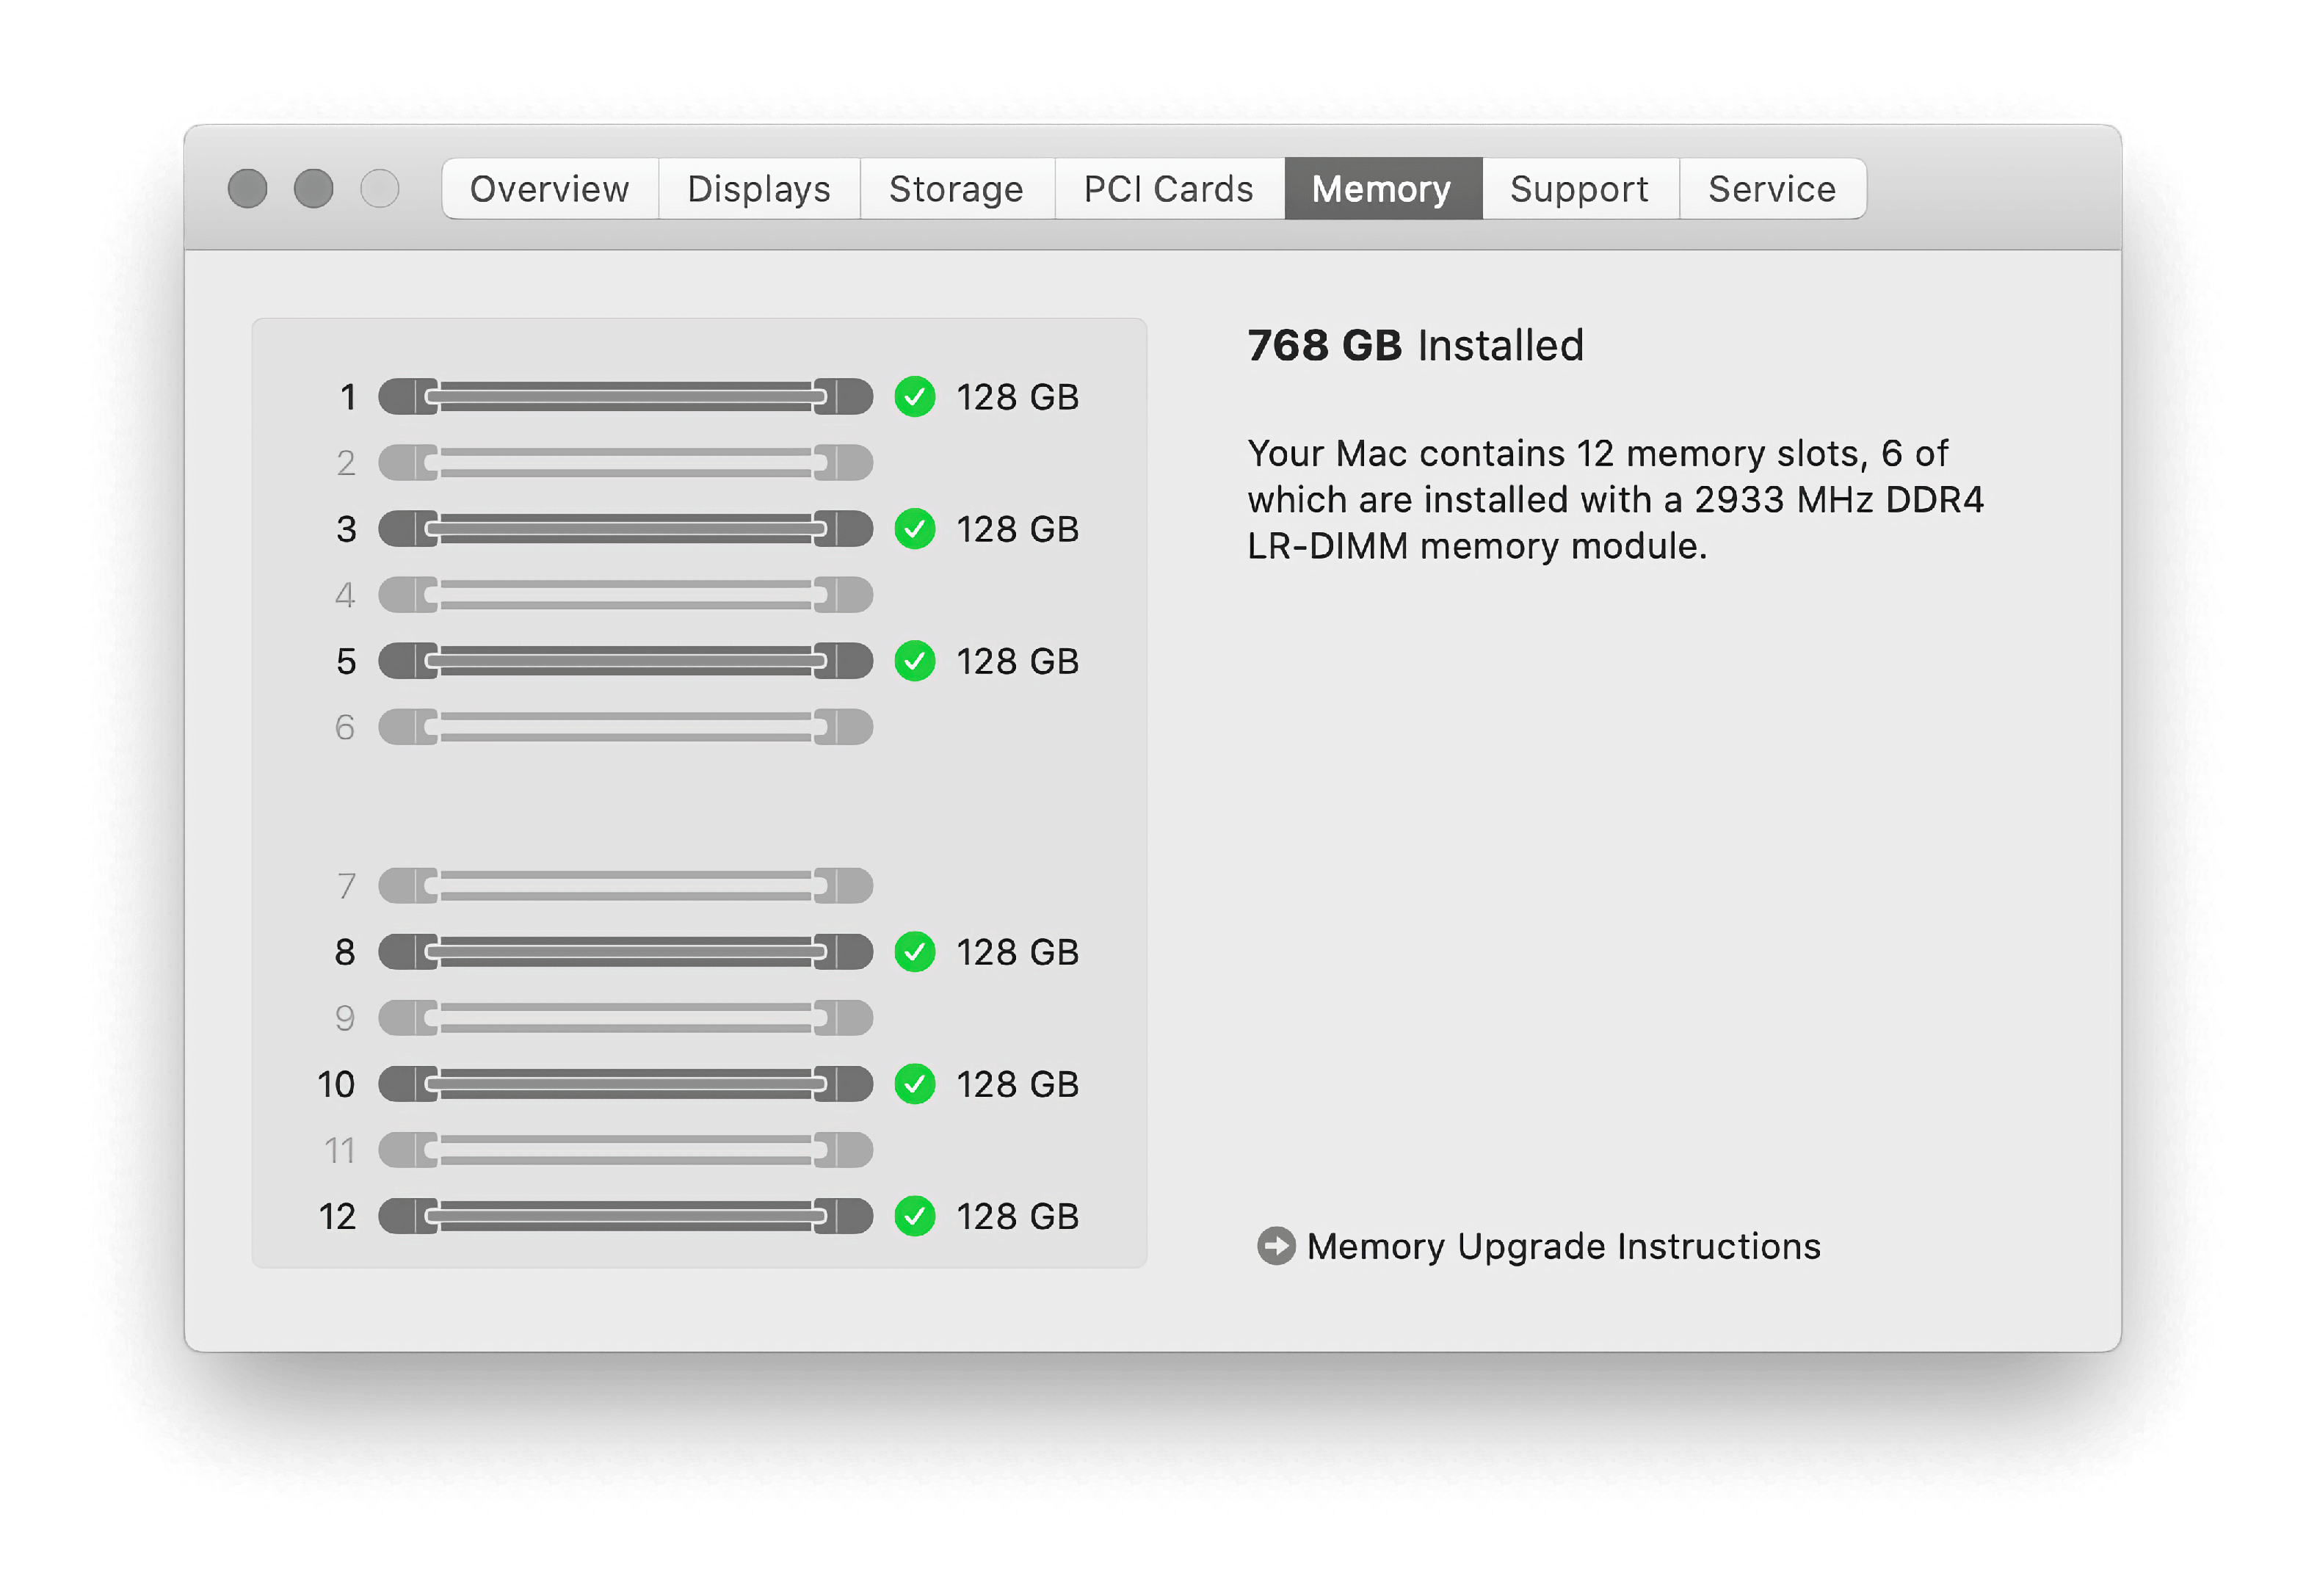
For top performance, the Mac Pro 2019 is installed with 6 or 12 DIMMs to run in 6-Channel mode. Otherwise, the memory controller will be operating in 2 or 4 modes. The performance is fairly negligibly.
Display Upgrades
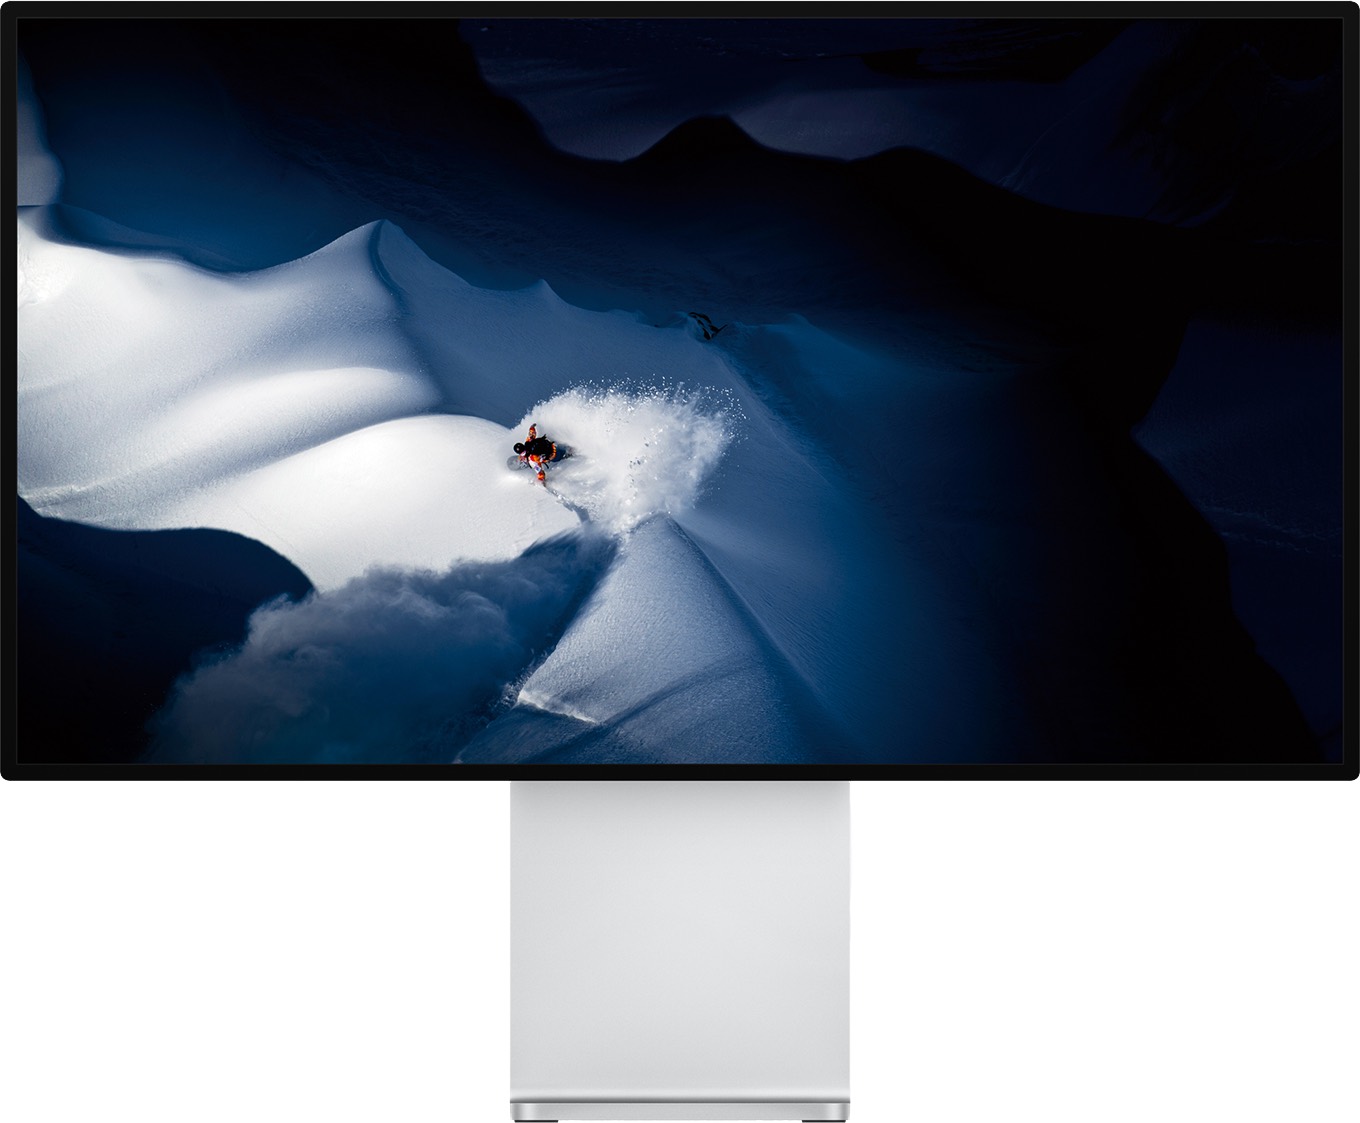
Pictured: Pro Display XDR
Photo credit: Apple.com
The Mac Pro's display limitations are a factor of graphics cards, what OS you are running, and whatever monitor you can afford or are willing to pay for. The Mac Pros running 10.9 or later can use resolution scaling akin to Macs that ship with "retina" (high-density pixel-per-inch displays).
8k and macOS?
While the Mac Pro 2019 certainly can support hardware capable of 8k, thus far, the OS appears to be the limiting factor even in macOS 12 Monterey, MacRumor.com forums have an in-depth look into trying to get single cable 8k displays working, and thus far, it hasn't gone well until very recently. macOS does not support 8k out-of-the-box but clever MacRumors.com user ZombiePhysicist have found a working solution. It isn't perfect, and it remains to be seen how effective this strategy is with other hardware configs, but the workaround requires:
- Monterey 12.1
- 8k capable GPU
- DisplayPort 1.4 to HDMI 2.1 cable
- SwitchRez
Unfortunately, we do not have native support as 8k displays continue to drop rapidly in price. 6k seems to be the highest supported resolution currently. Displays that use dual inputs like Dell UP3218K 8k (or '8k4k') display support in macOS? are a bust as well. I suggest reading MacRumors MacRumors.com: SOLVED: 8k Displays Running on Mac Pro? Any? What Video cards would work that support 8k HDMI 2.1/Displayport 1.4/2.0 displays on Mac Pro? YES, you can.
High refresh rates and macOS?
The Hz of a display measures how many times a second the screen is refreshed, which defines the maximum frames-per-second (FPS) a display can render. A 120 Hz display can render a maximum of 120 FPS. 60 Hz is generally considered the minimum refresh rate for "smooth" user interfaces, like mouse tracking, dragging windows, scrolling, etc. As computer hardware has improved, so have refresh rates. FreeSync and G-Sync are technologies that allow for variable refresh rates to improve the visual experience (prevent effects like "tearing"), especially in the realm of gaming. Mac OS currently does not support Freesync/G-Sync. Both tonymacx86 and MacRumors forum members have experienced the same sort of issues. The workaround is to disable the G-sync and Freesync if the monitor does not produce any video output. Under Windows 10, FreeSync/G-Sync is supported as the limitation is tied to Mac OS.
Using a 4k TV as a display
The short answer is: yes, you can do it. TVs generally require some minor tweaking of the picture, such as enabling overscan correction in macOS. Those looking to use a TV as a full-time monitor should keep a few things in mind. Not all TVs use Chroma 4:4:4 subsampling. Video editors probably are familiar with this concept as not all cameras are 4:4:4 but may not realize nor are all displays. Chroma subsampling refers to pixel clusters and data representation. The Human eye is much more receptive to changes in luminance than color. Thus, video data can be compressed easily by tracking clusters of chroma values and mapping them over pixels of chroma value. This works great for video codecs when the data is at an endpoint where precision isn't as important (a streaming video, for example). TVs, in an effort to cut corners, often use this in the panels to both improve response times and lower cost, whereas PC displays are almost always 4:4:4 outside of extremely odd-ball instances. With lower Chroma Subsampling, things like text look blurry due to the decreased chroma resolution. Rtings has a great running list of The 6 Best 4k TVs For PC Monitors and pictorial examples of Chroma subsampling. A 60 Hz 4:4:4 Chroma Subsampled 4k 43-inch display suitable for a PC can be had for as low as $230 USD, making them popular for many users. Mac OS supports audio over HDMI as well. See the GPU section for details.
Notably, with the increase in size comes a decrease in sharpness. For a monitor, one intends to sit at a normal desk distance. 43 inches is appropriate as its Pixels Per Inch (PPI) is approximately 102 PPI. For comparison, Apple's 30-inch Cinema display was roughly 101 PPI, and its 27-inch Cinema Display was 109 PPI. Apple's laptops pre-retina generally had around 110 PPI, and its retina laptops had 220 PPI. A 4k 42-inch TV is roughly 105 PPI, making it appropriate as a very large standard-definition display. I suggest the PPI calculator for calculating a display's PPI quickly.
HDMI 2.1 is stupid like USB
Regardless of your Mac Pro's configuration, congrats, it's HDMI 2.1 as of December 14th, 2021.
The new features of HDMI 2.1 are impressive, like eARC (for comms), higher refresh rates/resolutions (10k@120Hz max), Dynamic HDR, auto-Gaming mode to trigger low-latency modes, etc. Your expensive Mac Pro 2019 probably doesn't support any of these new features, but it is HDMI 2.1. How could that be?
HDMI has decided to take the same messy route as USB and renamed all previous HDMI 2.0 devices to 2.1 regardless if they only support 2.0 features. In fact, manufacturers moving forward are only allowed to apply to have devices certified as HDMI 2.1. This means that, effectively, to be an HDMI 2.1 cable/device, all it has to do is support HDMI 2.0. What features the device in question supports, fortunately, isn't entirely a mystery. There is a requirement that HDMI 2.1 devices need to call list what exact HDMI 2.1 features they use.
This effectively means every GPU that the Mac Pro 2019 supports with HDMI 2.0 also is "HDMI 2.1," regardless of whether they support any new HDMI features. Expect to have a lot of confusion, just like USBc and the wacky world of USBc cables and devices. While I try not to editorialize a lot in this guide, this is a terrible move by the HDMI standards board that'll confuse buyers, and this is likely because the partners on the HDMI board do not want to list "HDMI 2.0" devices for fear of missing out on sales. Welcome to modern consumer electronics.
Pro Display XDR
Apple launched the Pro Display XDR with the Mac Pro, its first stand-alone monitor since the Apple Thunderbolt Display. The 32" Pro XDR sports a true 10-bit display, mini-LED backlit with a resolution of 6016 x 3384, aimed at professionals, although it received flak for a $4999 display that charged $999 for the stand and not even including a power button. While accurate for color, it is not as accurate as professional displays targeted at color grading.
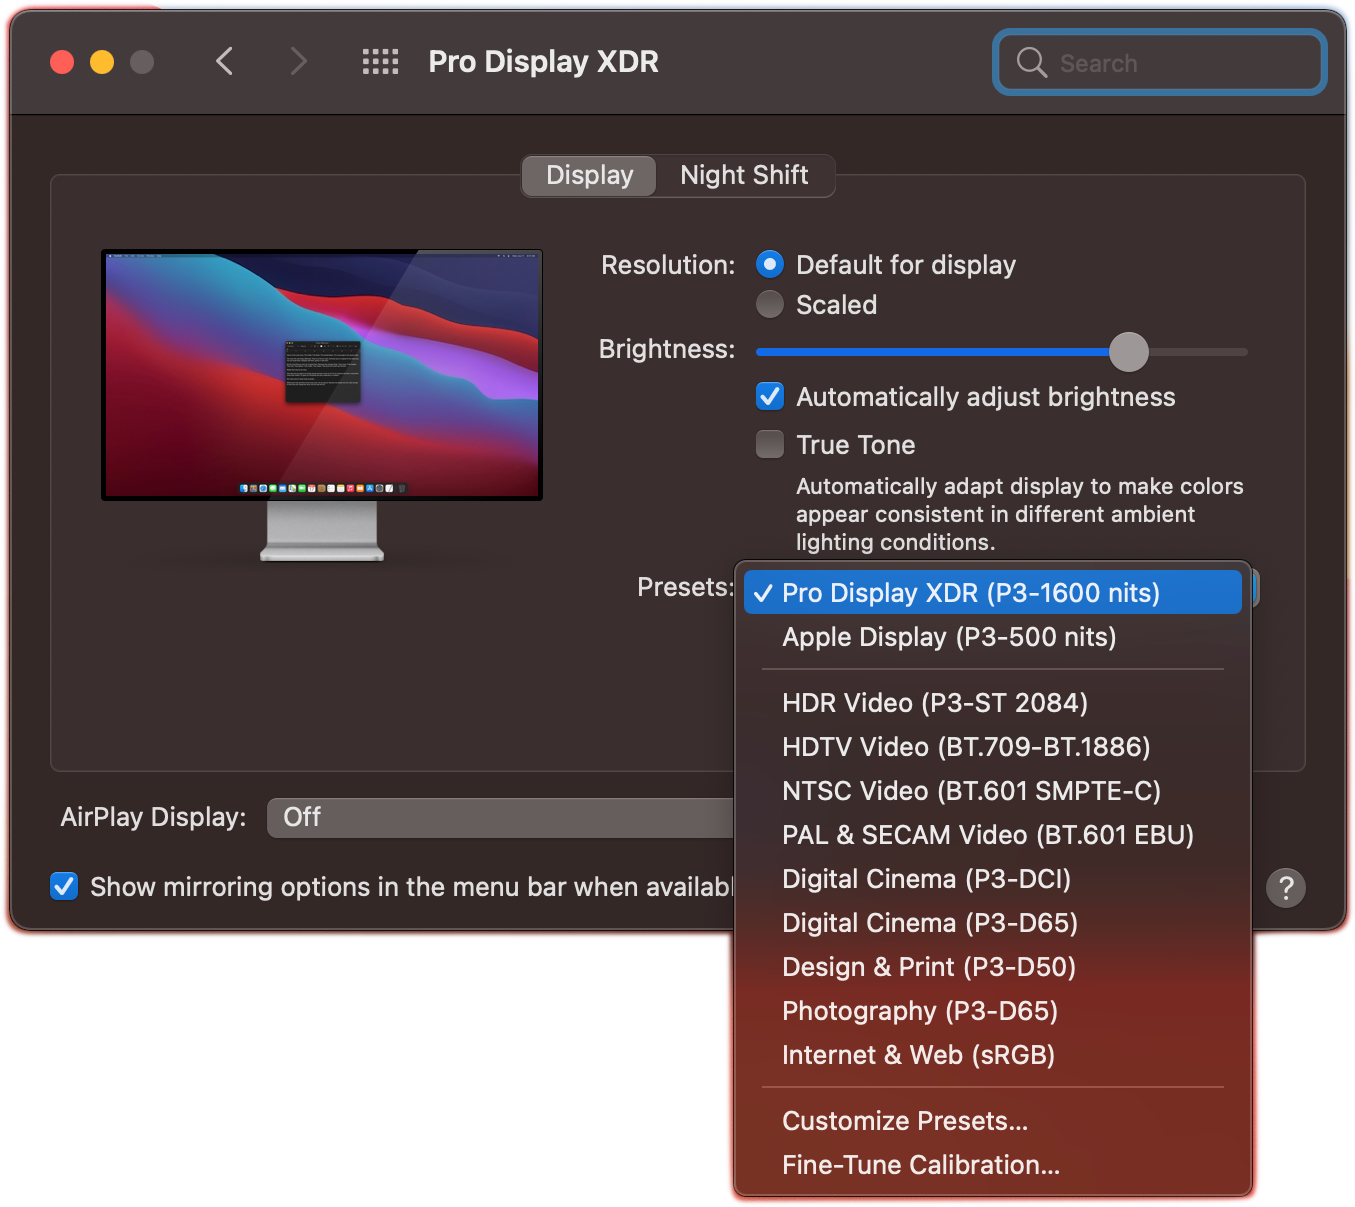
Pictured: Pro Display XDR Settings
Photo credit: PetaPixel.com
- P3 wide color gamut (99% coverage), 10-bit color depth
- IPS LCD panel
- Anti-reflective coating, optional Nano-texture glass
- 576 full-array local dimming zones
- Timing Controller (TCON) for parity between LED backlight/LCD display
- 1600 Nits 39% of the screen area at once
- sustains 1000 nits across the whole display indefinitely
- 16 dBA fans for near silence in "typical" room conditions
- Three USBc Ports
- VESA Mount
The XDR only accepts video via a single Thunderbolt 3 port. The full white paper can be found Apple.com: Pro Display white paper.
Recommended Places to Go for Monitor Recommendations
The wonderful thing about monitors is the large variety, but it can make it daunting to select one. I'm personally a fan of the following sites: Rtings, PCmag, Wirecutter, Consumer Reports, Tomshardware, Digital Trends, as all sites do actual hands-on reviews as opposed to listicles of dubious rapport.
Audio
The Mac Pro 2019 sports a single 3.5 mm jack for audio output and can output audio over HDMI, USB, or Thunderbolt. It doesn't feature audio input.
Prosumer/Professional Audio
Professional hardware is less of a grab bag than consumer audio as Mac OS has a very long and proud history as the defacto choice for studios, audio engineers, and musicians. CoreAudio supports low-latency multichannel audio interfaces without any specialized drivers. For most audio interfaces, the basic functionality works out of the box. That said, audio interfaces come in various formats, like PCIe Cards, USB, Firewire, and Thunderbolt, and additional functionality can be tied to both the drivers and compatible software.
CoreAudio allows device aggregation, which will map multiple pieces of hardware to appear to software applications as a single device, making it easier to assign inputs and outputs to a software application. Listing compatible hardware would be a losing game for this guide, as there are decades worth of compatible gear. Most USB audio interfaces are HID-compliant, meaning even inexpensive USB audio boxes designed for Windows are generally compatible on a fundamental level with Mac OS. However, if they rely on additional drivers, they may not work with Mac OS. It's best to do your research. Hardware makers like Ableton, AKIA, Apogee, Behringer, Focusrite, IK, Korg, Line, M-Audio, MOTU, Native Instruments, Numark, Presonus, RME, Steinberg Tascam, Universal Audio, and Yamaha make almost exclusively hardware compatible for both Mac OS and Windows (not one or the other). There's plenty more I didn't list. Again, I must stress about doing your homework. Most likely, the piece of PC audio gear you have your eyes on is Mac-compatible.
Overall, the Mac Pro is an extremely audio-capable workstation.
Mac Pro 2019 Error Codes
The 7,1s has one of the more ingenious design choices: placing light error codes on the top of the case. The following information is from Apple.com: Mac Pro (2019) status indicator light behavior. The Rack Mount error lights appear on the front panel, whereas the tower is on the top.
Memory Error (Memory Data Error)
The status indicator light is solid amber for 0.2 seconds and repeats every second.

Housing unlocked or top cover removed while the computer is on
The status indicator light is solid amber for 0.3 seconds and repeats until the housing is locked or the top cover or access door is reinstalled.

Power button pressed while housing is unlocked or top cover is removed
Status indicator light is solid amber for half a second after the button press.

PCIe card error (System Resource Overload)
Light flashes amber twice and repeats until the computer is turned off.

Firmware recovery mode (iBoot Recovery Mode)
The light rapidly flashes amber three times, briefly flashes amber three times, then rapidly flashes amber three times. This repeats until the computer is turned off.

Windows 10/11
While Apple offers Bootcamp, the community and this guide recommend installing Windows on a separate drive from your OS. Windows can be installed by booting off a USB installer or using the Bootcamp assistant. I personally used the native Windows installer and used the brigadier utility to install Windows 10.
Installing Windows 11 is very easy using the Install Windows Utility, see Mac Sound Solutions video demostrating the process.
iPhone as a webcam
Since many people are virtually these days, webcams are in short supply. This isn't Mac Pro specific, but the iPhone's cameras are higher quality than pretty much all dedicated webcams and have decent audio to boot. I wrote a short guide on How to use Zoom with external webcams, iPhones / Android Phone, and/or Snap Camera on MacOS.
This isn't the only vector, as you can use NDI HX, but it requires more setup. OBS-NDI also interfaces with professional cameras, so it is possible to use studio cameras in video conferencing, too.
Multi-OS USB Bootable Flash Drives
On various sites, you can find "Five in one" USB solutions that include five versions of macOS on a single USB. These can be easily created by users following the directions from Apple, How to create a bootable installer for macOS. The only difference is that the user first must divide the USB flash drive into multiple partitions (large enough for the Mac OS installers) Partition a physical disk using Disk Utility on Mac.
The Mac Pro 2019 can only boot Catalina and up.
Communities & Blogs
Due to the nature of the Mac Pro and its upgradability, it's formed some of the most dedicated communities to any piece of Apple hardware. It's hard to overstate how crucial community support is for the Mac Pro's reputation as Apple's finest line of computers ever produced, the fierce loyalty users feel towards the hardware, and surprisingly open and welcoming to users of all backgrounds and walks of life. This guide is a reflection of said communities. Let me know if there's a group you feel I have missed.
- MacRumors Mac Pro Forum - The center of the Mac Pro universe, if it's happening, it's probably here. My go-to for sourcing information, as one can gather by reading this guide.
- MacProUpgrade - The premier Facebook group, very international with Mac Pro users across the globe. It requires requesting access, but they let anyone in. I'm there. Also, it is a strangely friendly and nice community. They are always willing to answer questions from the obscure to novice and have a lot of high-tier creative professionals who can answer your questions about AVID, Premier, FCPX (etc.) related to your Mac Pro.
- Mac Pro Users - Another major FaceBook group for Mac Pro users, smaller but still helpful, and it has the benefit of being public too (no signup process and can be browsed without a Facebook account). It is a helpful and friendly community with a lot of creative professionals, too.
- Reddit.com/r/macpro - Not as large as the Facebook group but active, friendly, helpful, and of course, has the benefit of not being under the regrettable Facebook umbrella.
- Reddit.com/r/mac - Mostly useful for Apple news and general questions, one of the essentials of the Mac world.
- blog.greggant.com/topics/#macpro - I've written for six years now semi-frequent Mac Pro-related blog posts.
Apple Silicon and the Mac Pro's fate (and additional observations)
The biggest burning question is, "How long will Apple support X86?". The short answer is no one knows how long Apple intends to support Intel Macs. We have two statements from Apple: they will offer Intel Macs until 2022, and they pledged to support x86 for years.
Apple has transitioned its Mac lineup two times now, from 68k to PPC and from PPC to x86. To assist the previous transition, Apple offered Rosetta a real-time translation layer to run PPC binaries on x86, which included both PPC and x86 libraries for applications to access. Apple has Rosetta 2, which works similarly this time, translating x86 to ARM. In an ironic twist, ARM is the second time Apple has switched to a RISC-based CPU.
Apple transitioned to x86 quickly, starting with offering in late 2005 Intel iMacs and laptops using the Core Duo, which quickly jumped to the 64-bit Core 2 Duos mere months later and, in 2006, refreshed its entire lineup with stark and drastic performance increases. Apple supported PPC Macs until 2009 when Mac OS X 10.6 Snow Leopard dropped support. Apple supported PPC for roughly three years.
However, the lay of the land is different today. In 2005, Apple sold 4.5 million Macs. Today, Apple sells roughly 20 million Macs. Roughly, Apple has 140-150 million still supported Intel Macs in Big Sur, vs. Apple, the 15 million PowerPC Macs that were capable of running OS X when Apple switched to x86. Apple is also no longer the same company and now faces increased scrutiny as it finds itself the most valuable tech company and often the world's most valuable company. We can safely assume that Intel Macs will be supported until 2025, as Apple has supported PPC Macs for almost three years. My guess would be 2026-2027. It's also worth noting that in May of 2020, Microsoft stopped distributing the 32-bit version of Windows 10 ( even owners of 20-year-old Pentium 4 desktops could run Windows 10 ). Windows will undoubtedly support old Intel Macs for many years. For comparison, Apple dropped 32-bit CPUs in 2011, axing support for the first 2005 Macs featuring Core Duo CPUs.
Updates & Author Notes
This guide is the 3rd iteration of the Definitive Mac Pro Upgrade Guide. This guide will be more media-centric than previous guides to accommodate more styles of information gathering. The goal is to have more imagery and video to assist in learning the many concepts in this guide. Also, as the information is "fresh", it's much easier to cite official documentation.
Stylistically, I was never a fan of my "Useful links" found in the Definitive Mac Pro Upgrade as they often lacked context.
04/20/25 - Added that Resizable bar isn't supported.
03/26/25 - Lots of copy editing! Added Windows 11 quick install. Added more recent videos and removed the ancient SSD one. Added info about the Sonnet MacFiver and Sonnet 8 port card.</li>
08/14/24 - Broken link fixed to iSwitch blog.
10/11/22 - Added open core info about 6850/6950 XTs, added power cable info for PCIe power cables. Added links to OWC's Belkin alternative.
01/10/22 - Added Mini PCIe power cable spec,
01/03/22 - Image Width fix for mobile
12/29/21 - Minor copy editing, SATA 3 power information, PCIe power information, more up-to-date 8k info
12/28/21 - Added links and info about Apple wheels.
12/27/21 - Added Apple I/O Card, T2 section, and networking section, added 6600 XT.
12/25/21 - Added contents for easier navigation, added info about HDMI 2.1, first editing pass with a lot of typos, spellings, and poorly worded passages fixed.
12/24/21 - Added Windows info, ports image, cleaned up I/O section somewhat, added communities section, extras, Added displays section
12/23/21 - images added to RAM, SSD, Afterburner, cooling, quotes added about cooling, moved raid info below SSDs, more info in PCIe section
12/21/21 - SSD section info added, RAM info extended, error codes added
12/20/21 - SSD section started
12/19/21 - init
</small>