How to play Sony PlayStation Games (PSX / PSone) on your Mac
Emulating the PlayStation, also known as the original PlayStation, PS1, PSOne, or PSX, is straightforward and can give you a better experience than the native hardware with features like widescreen support, 4k rendering, and texture enhancements. If you've used PCSX2 or RPSC3, it will feel very similar. This tutorial is adapted from the video below. If you're interested in PlayStation 2 emulation, you can check out my guide here.
There are multiple options to emulate the PlayStation on a Mac, including even on PowerPC Macs with Connectix Virtual Game Station.
While emulators like OpenEmu do a reasonable job of emulating the PlayStation, they don't have the advanced graphical features of DuckStation. You can experience PlayStation at 4k in widescreen, with texture smoothing and faster load times. This tutorial explores the many features of DuckStation.
Step 1: Download the Emulator
First, go to the official website duckstation.org. The Mac port is listed under "Other Platforms" alternately, click here to go to the latest releases. This will take you to the GitHub page for the latest release. Scroll to the bottom and grab the Mac release. If for some reason you're experienccing issues, try downloading a different release.
Decompress the .zip file (if it does not do this automatically), then drag the application into your "Applications" folder.
Step 2: BIOS
If you double-click the app, you'll probably see "DuckStation," which cannot be opened because the developer cannot be verified. This is common for open-source software as the developer has not paid for an Apple account. Instead, right-click the application and click "Open" to whitelist the application.
You'll be presented with language and theme options. Make your selections and click "Next."
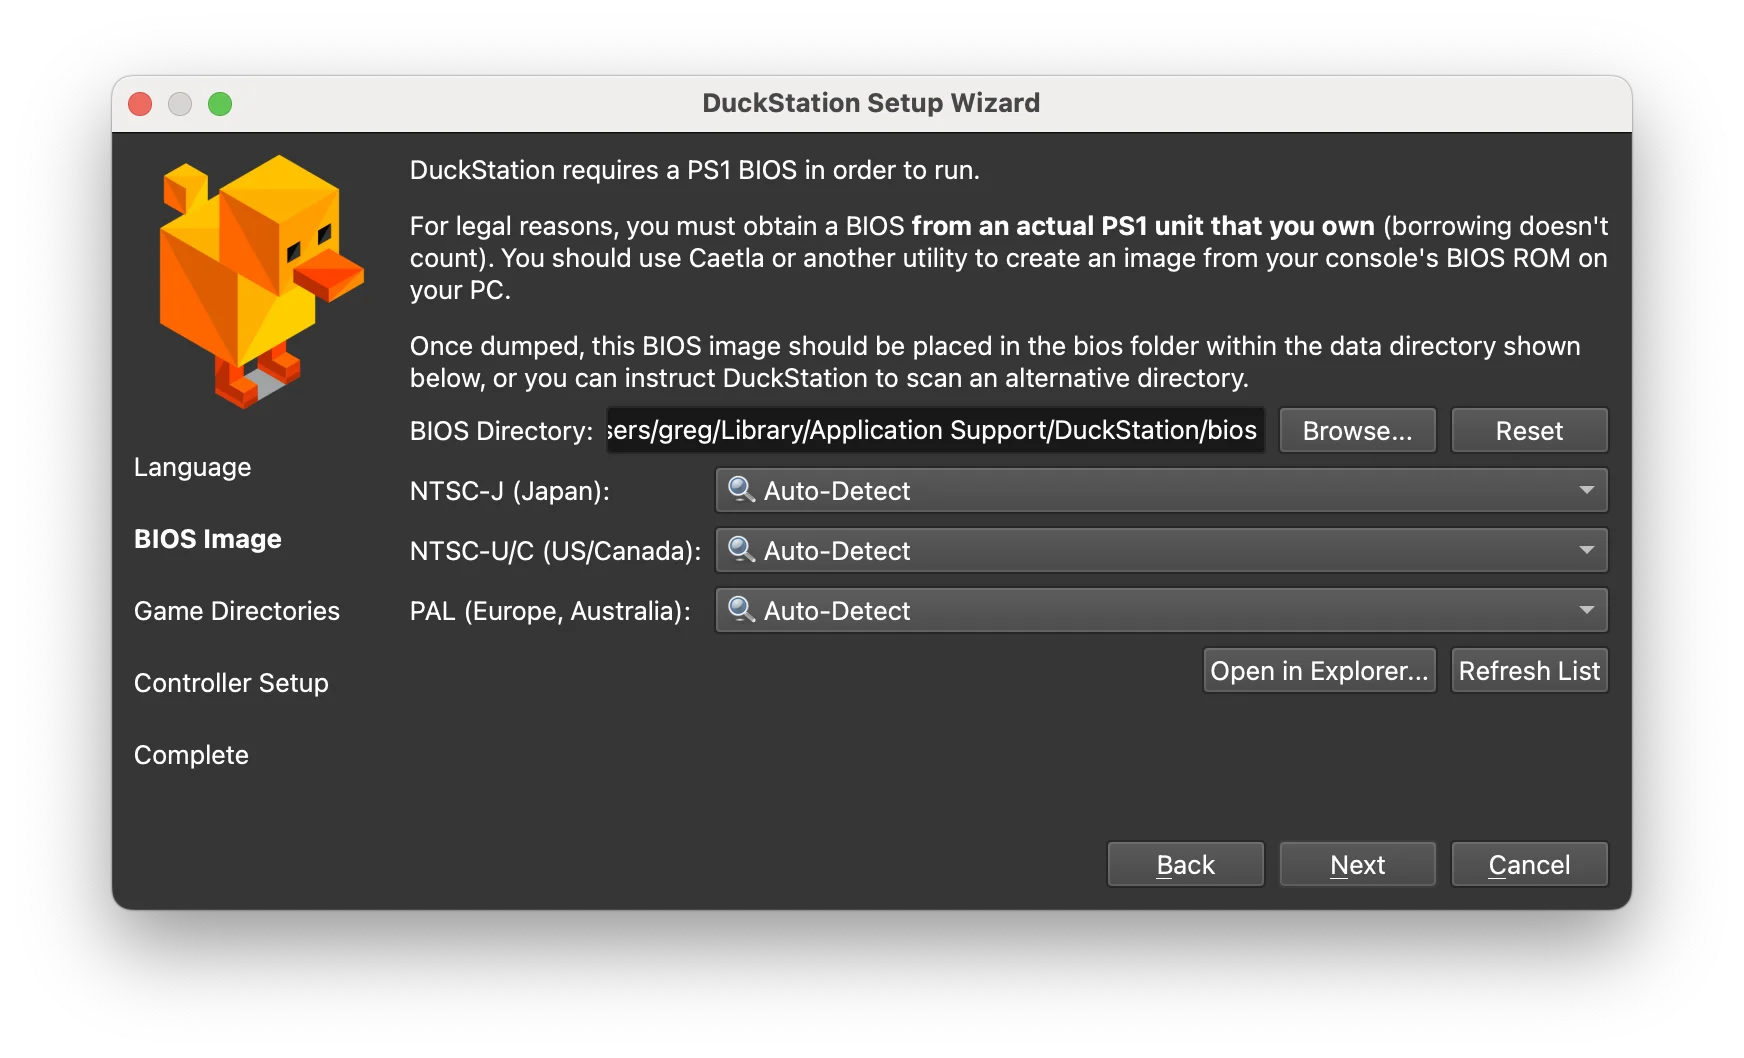
The next screen is for the BIOS. The PlayStation BIOS is firmware built into the console that initializes and manages hardware components and provides runtime services for games and programs. These are copyrighted, so I won't be linking them directly. Use your own moral judgment here. I personally own a PlayStation, so that's my vindication. Places like Archive.org are a good place to look for them. DuckStation requires multiple BIOS: Japan, US/Canada, and Europe/Australia. This enables compatibility with all regions.
You can install these whenever you'd like. If you move them, then you will need to relink them.In DuckStation, click "Browse" and navigate to where you placed your BIOS files.
Click "Next."
Step 3: Adding games
Games can be distributed in multiple formats, and it is possible to rip your own games into ISOs. Games are often ripped in bin/cue, .ecm, and iso formats, and all are compatible with DuckStation. Distributing games over the internet isn't legal, so I will not be linking any sources.
I have a folder with a collection of games in it, so I will add this to my games directory library. Since this directory has folders inside it, I want to say "Yes" to scan recursively.
Step 4: Setting up a controller
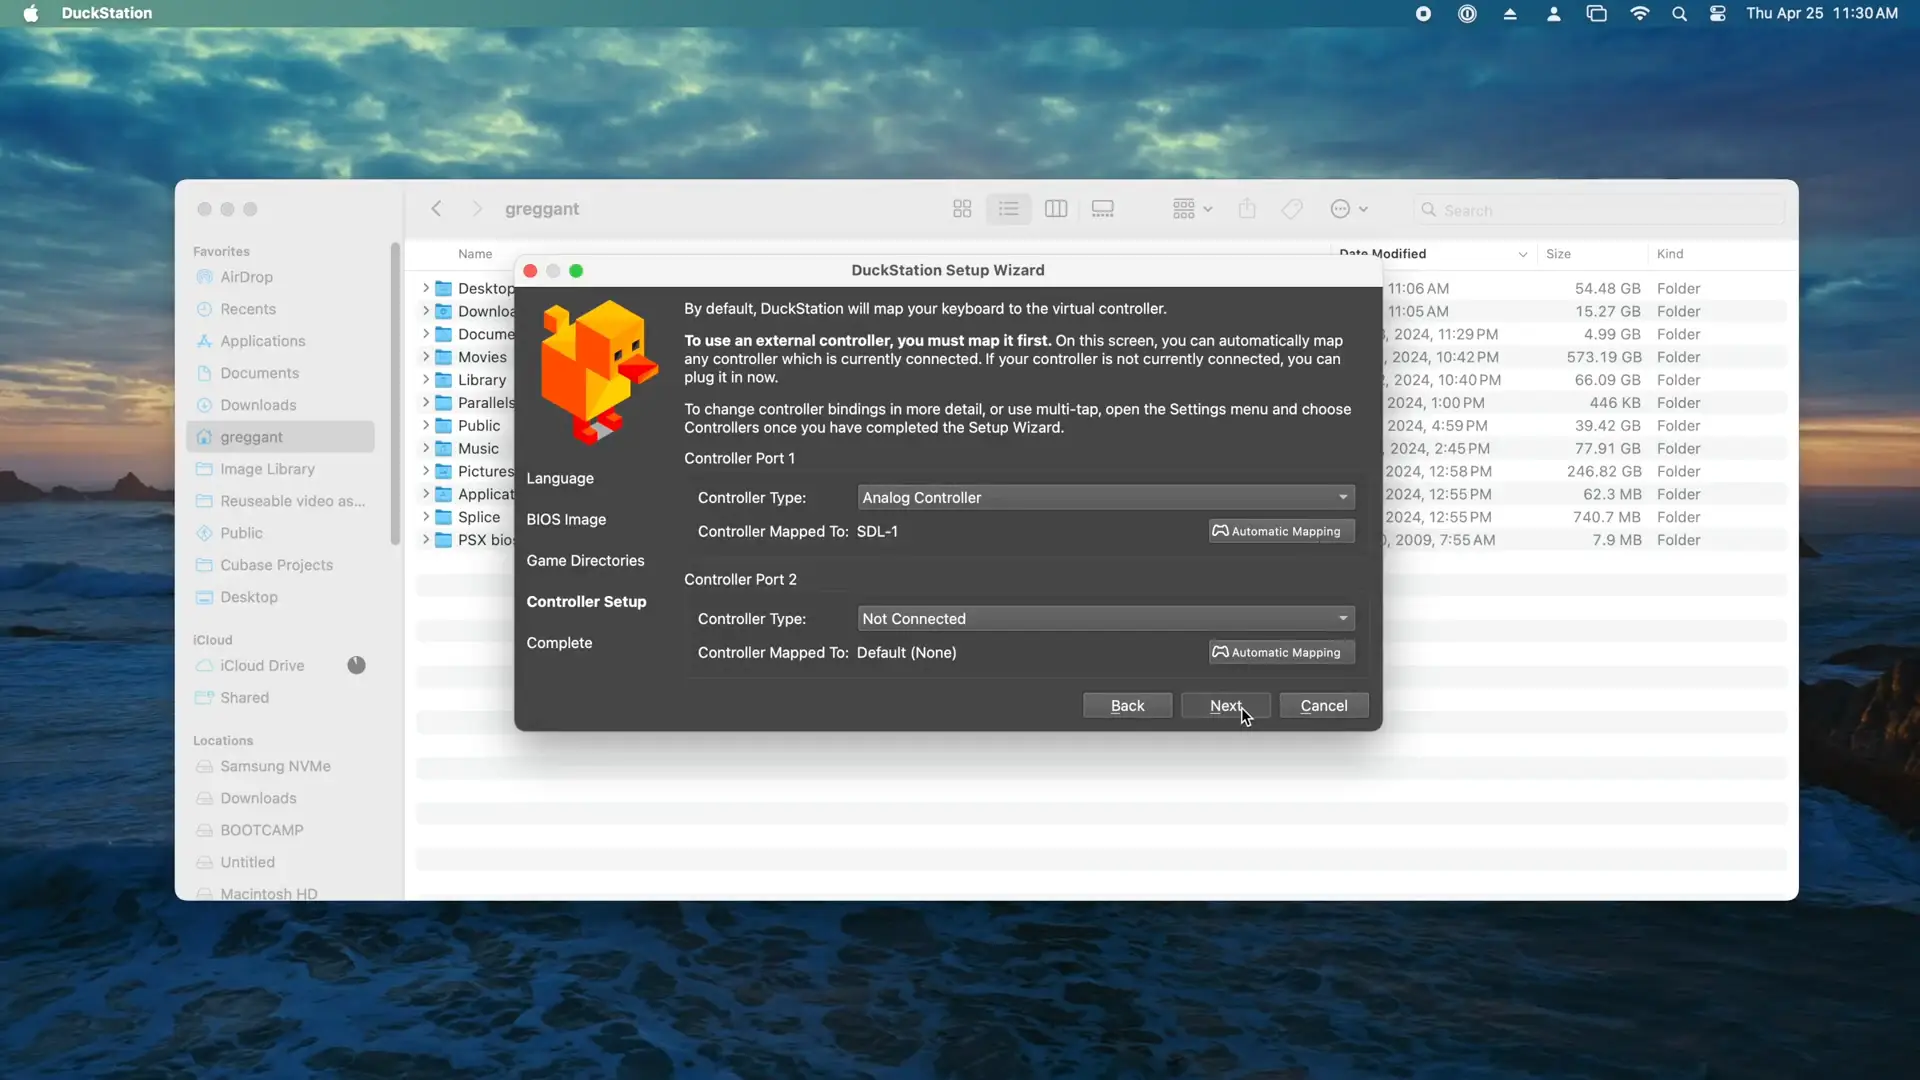
The next thing we'll want to do is set up a controller. The PlayStation had several controllers. Since my controller is a PlayStation 4 controller, I will be using the Analog controller. Using Ventura or later makes Gamepads a little easier to manage. There are tutorials on how to connect a controller wirelessly; I'm using the easiest method, which is USB. Plug it in, and it works. It is also possible to use wireless.
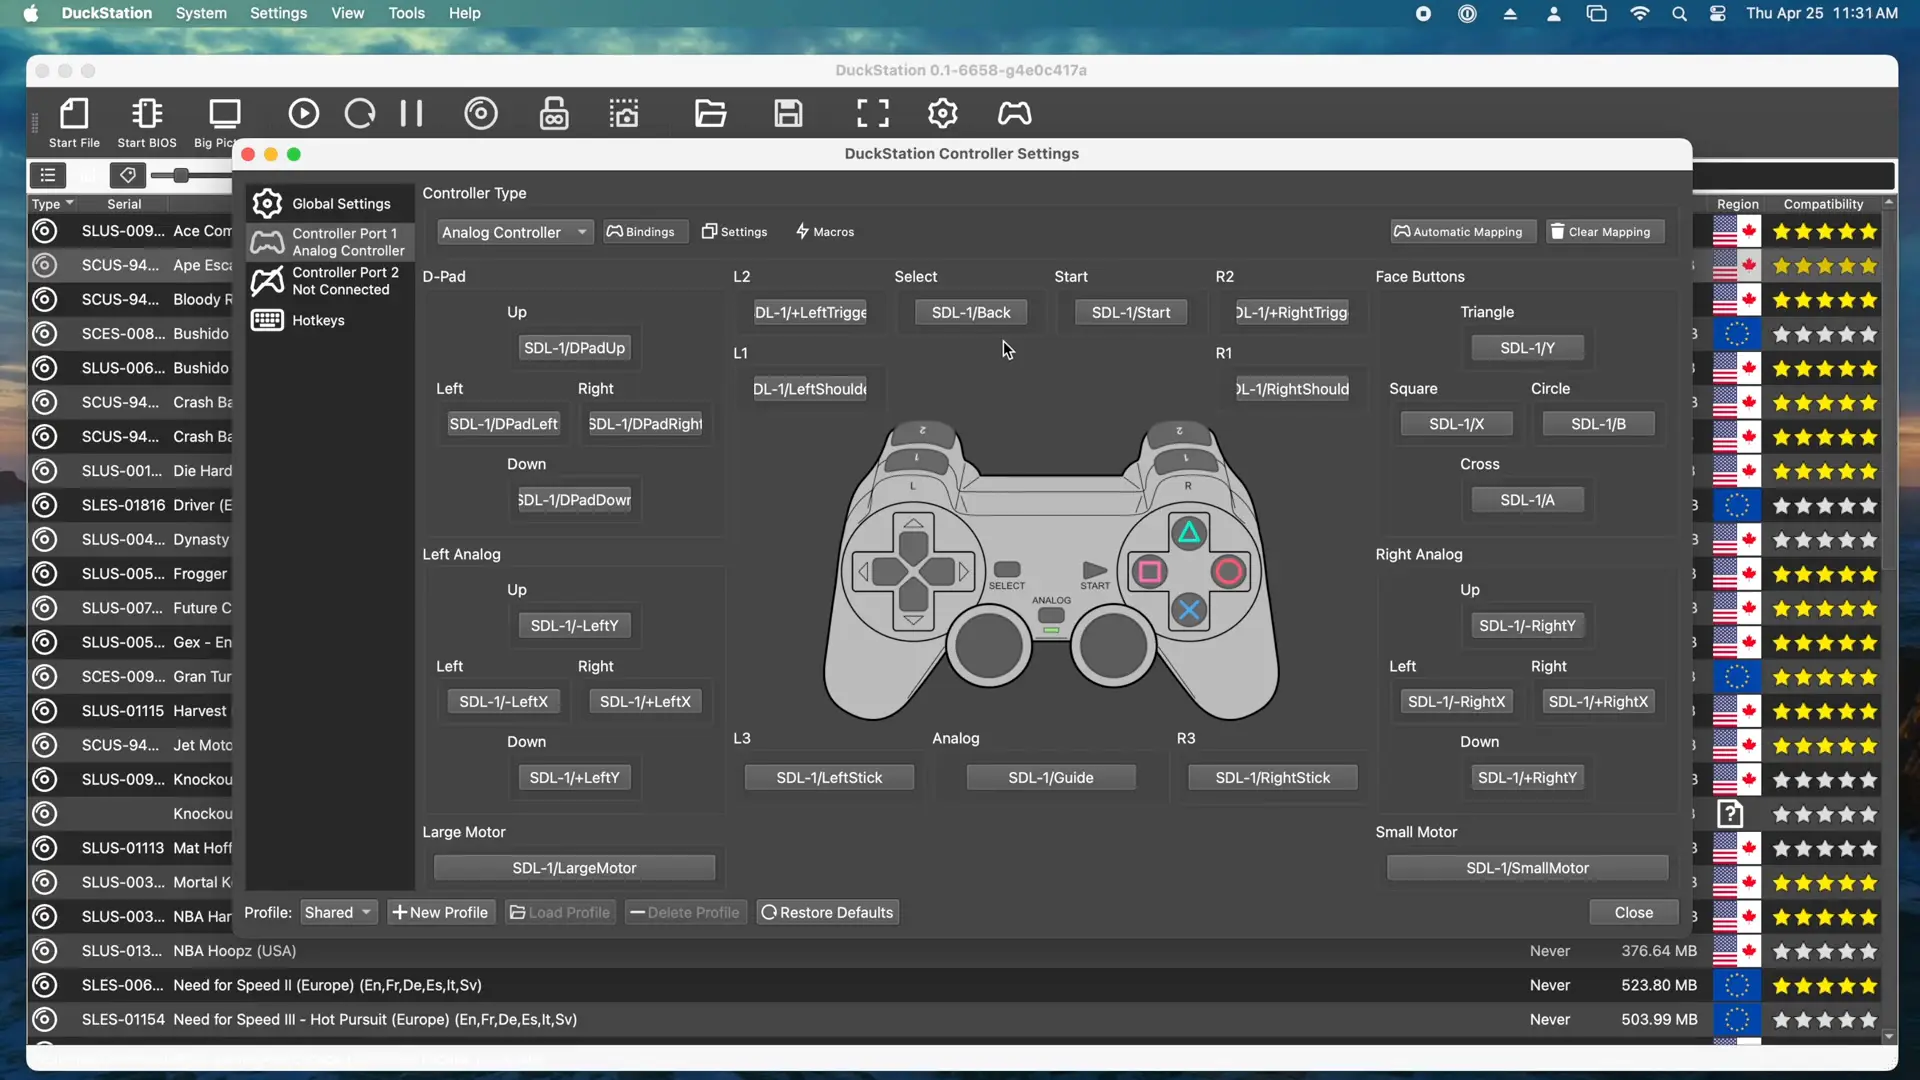
Using the automatic mapping, you can automatically bind the controller buttons. If, for some reason, you cannot use automatic mapping or wish to change a button layout, you can manually map the controller buttons by double-clicking the setting and then pressing the correlating button. It is recommended to use a Dual-Shock style controller as some later games, such as Ape Escape, require them.
Step 5: Improving the Graphics
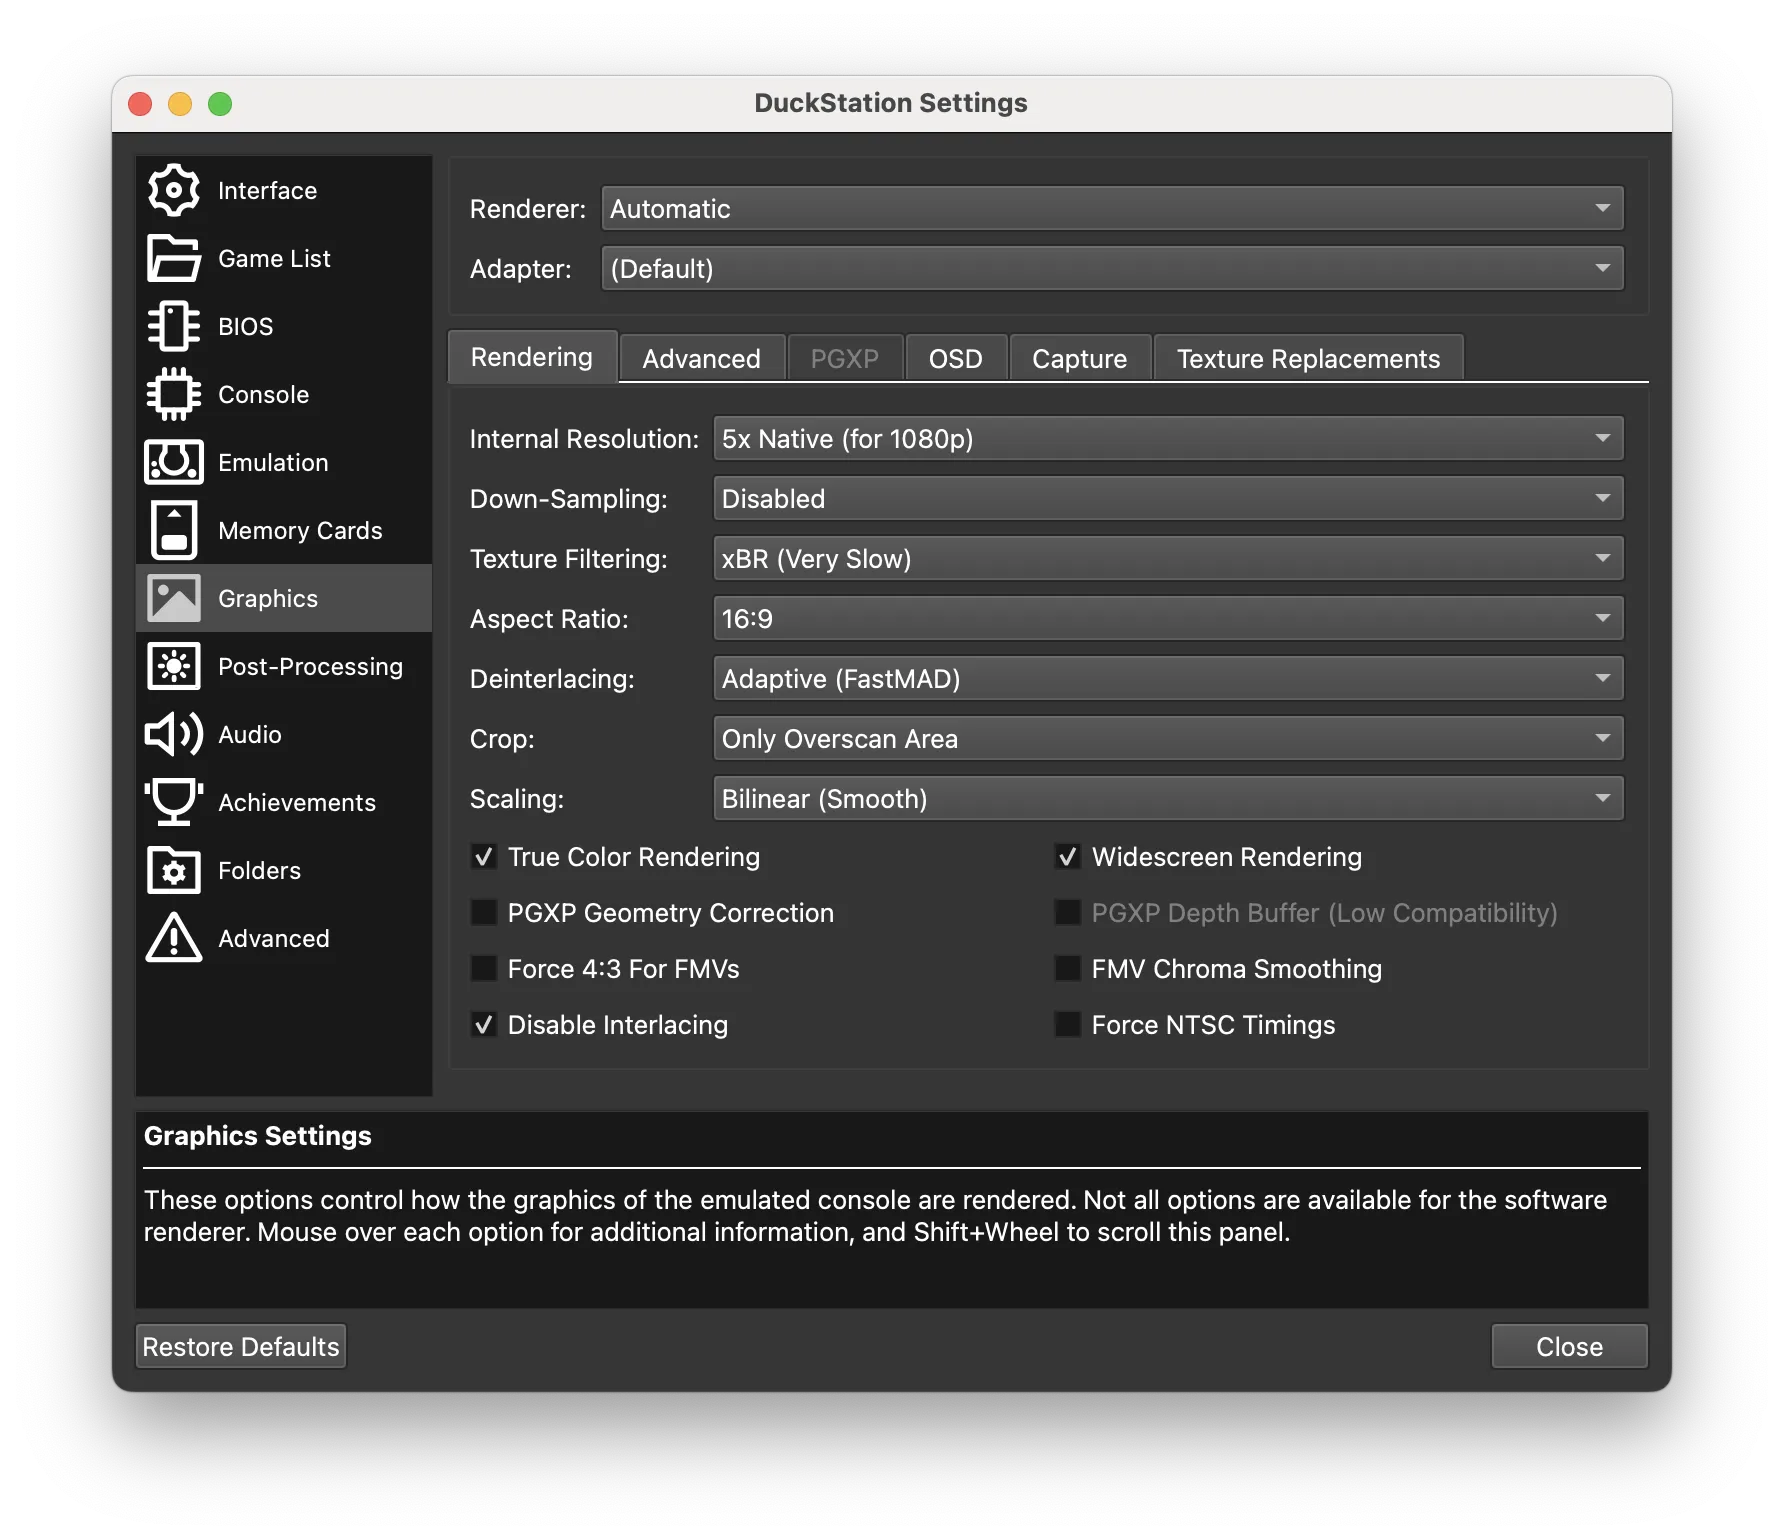
At this point, DuckStation is ready to play games. However, some additional configurations can still be performed.Next, let's go back to the preferences to configure our graphics. Before we get started, go to "Interact" and make sure you have "Apply per-game settings" enabled; that way, you can tweak graphics settings on a game-by-game basis. One of the advantages of the DuckStation emulator is the ability to play games at MUCH higher resolutions. Your mileage will vary; newer Macs with dedicated GPUs or Apple Silicon-era Macs should be able to handle higher resolutions. The video version demostrates the effects of changing these graphical options.
- Internal Resolution: Determines the internal resolution of the rendered image. Higher values increase quality but require more processing power.
- Down Sampling: Downscales the rendered image to fit the screen resolution, reducing aliasing. Disabled means no down-sampling is applied. Used for 2D games
- Texture Filtering: Enhances the appearance of textures by smoothing them. xBR is a specific filter that improves quality but is computationally expensive.
- Aspect Ratio: Adjusts the width to height ratio of the display. 16:9 is widescreen format.
- Deinterlacing: Reduces flickering and artifacts in interlaced video. Adaptive FastMAD is a specific method of deinterlacing. This will be ignored if disable interacing is enabled.
- Crop: Crops the image to remove the overscan area, which is the part of the picture that might be outside the viewable area of older TVs.
- Scaling: The method used to scale the image to the desired resolution.
- True Color Rendering: Enables rendering in true color, providing better color accuracy.
- PGXP Geometry Correction: Corrects geometry errors in PlayStation games. Checking this will unlock advanced PGXP correction options. Recommended if seeking to enhance visual quality. It is not compatible with all games.
- Force 4:3 For FMVs: Forces full-motion video sequences to display in a 4:3 aspect ratio.
- Disable Interlacing: Disables interlacing to reduce flickering in some games. Recommended.
- Widescreen Rendering: Forces games to render in widescreen, potentially expanding the field of view. Compatible with most games.
- PGXP Depth Buffer (Low Compatibility): Improves depth perception in games but may have compatibility issues.
- FMV Chroma Smoothing: Smooths the chroma (color) in full-motion videos to reduce blockiness.
- Force NTSC Timings: Forces the game to use NTSC video timings, which can affect the speed and synchronization of video playback.
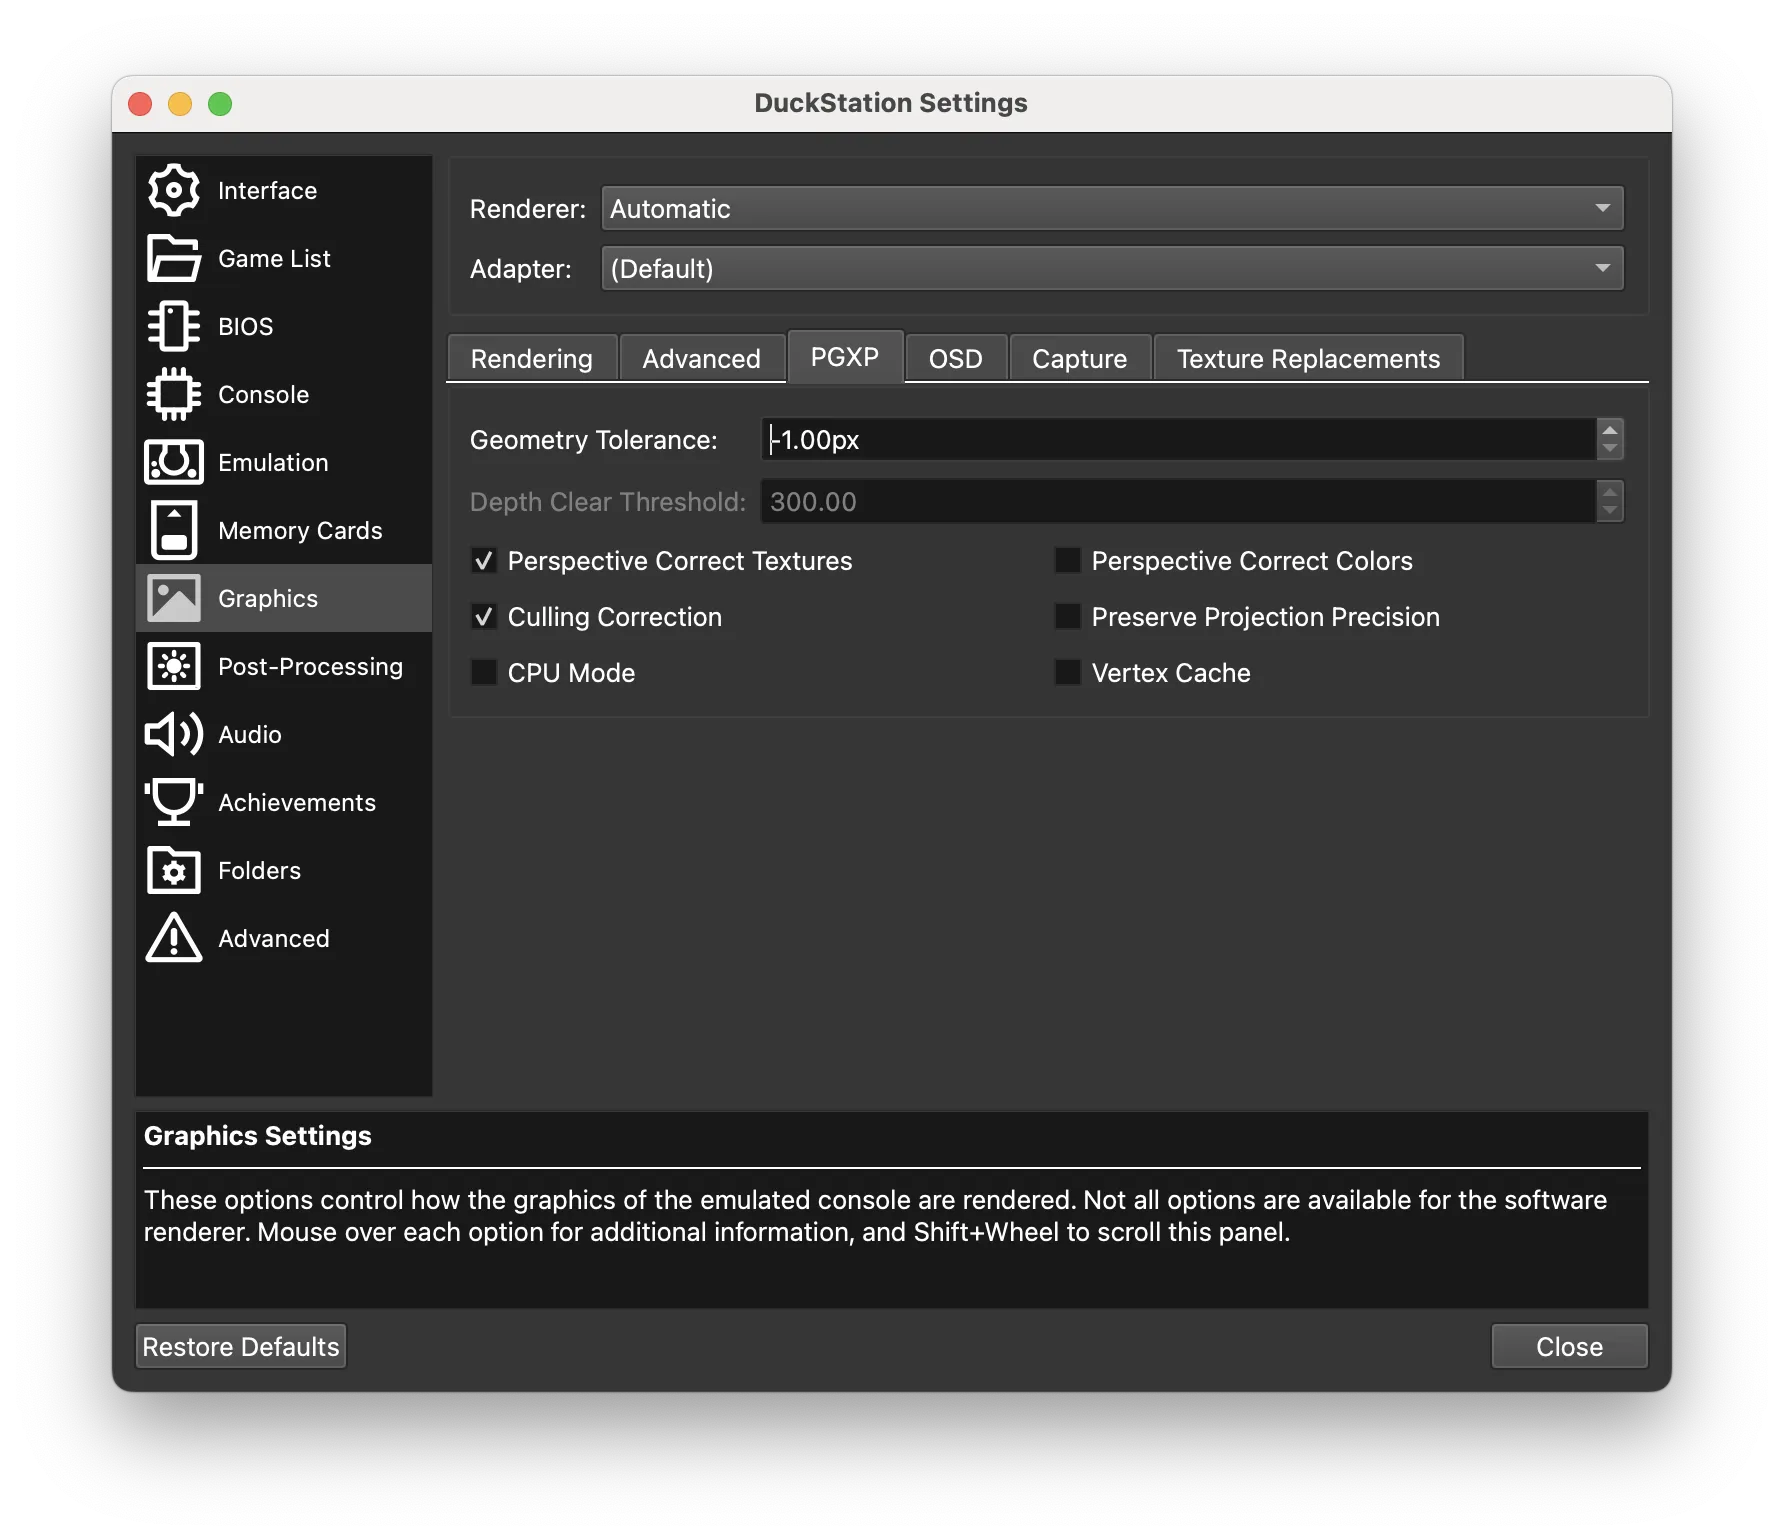
The PGXP tab also adds several options of interest providing a more authentic and visually pleasing experience. Below is a description of options.
- Geometry Tolerance: Sets the tolerance for geometry corrections. Lower values can increase accuracy but may reduce performance.
- Depth Clear Threshold: Threshold for clearing the depth buffer to improve rendering accuracy and reduce artifacts.
- Perspective Correct Textures: Ensures textures are rendered with correct perspective, improving visual fidelity.
- Culling Correction: Corrects issues with object culling, ensuring that objects are not improperly hidden.
- Perspective Correct Colors: Ensures colors are rendered correctly with respect to perspective, improving visual quality.
- Preserve Projection Precision: Maintains higher precision in projection calculations, improving the accuracy of the rendered scene.
- Vertex Cache: Utilizes a vertex cache to improve performance by reusing vertex data.
- CPU Mode: Forces the emulator to use the CPU for certain graphical calculations, which might be slower but can improve compatibility with some games.
DuckStation also provides various post-processing options that allow you to emulate various effects such as simulating a CRT found in the post processing tab. You can mix and match effects.
Step 6: Memory cards
Open up the Memory cards in the preferences. The default option is a separate card per game title, and this is the recommended setting, as you'll never need to think about memory cards. When you launch a game for the first time, you'll need to initialize it. This will not delete game saves for other titles.
Step 7: Emulation settings
You can change the emulation speed, and it does exactly what you'd expect—games play speeds can be altered to the user's preference. The other interesting thing here is Vsync, which prevents screen tearing.
Step 8: Save States
Save states are one of the best things about emulation, as you can literally save a game at any point at an exact moment. Simply go to Save State, and it'll save the game state. Now you can resume back to that point without having to boot the game.
More Emulation Stuff
I've made more than a few blog posts and videos on emulation, related to emulating semi-recent game consoles such as my Sony Playstation 2 Guide.
And finally, my Xbox emulation guide which has a written and video version.