The Definitive Classic Mac Pro (2006-2012) Upgrade Guide
Supporters Thank you
After years of maintaining this guide for free, I now am accepting patreon supporters. There's content for non-members as well so be sure to check it out.
I'd like to thank Quin's Tech Corner as my first supporter, if you're into retro Macs, especially the PowerPC era Macs, check out his content on YouTube.
Contents
- The Cheese Grater's last stand & Big Sur
- Now on YouTube!
- Special Announcements
- The community tip jars
- Mini-Glossary
- Know your Mac Pro's Model
- Firmware Upgrades
- OS Upgrades
- Monterey vs Big Sur vs Catalina vs. Mojave
- macOS 15 Sequoia?
- Downloading old versions of macOS
- OS Installer is Damaged error
- 10.15+ - Known Issues
- Upgrading beyond 10.14 Mojave: OpenCore vs DosDude1
- Running DosDude1 Patcher Successfully
- OpenCore: Codec acceleration, boot selection, and unpatched OS updates
- Running DosDude1 Patcher Successfully
- Disabling SIP
- Stop the "Upgrade to MacOS..." banners
- Running Apps from unidentified developers
- Mac Pro 1,1/2,1 and Pike's Script
- CPU Upgrades
- GPU Upgrades
- Dividing Up The GPU landscape
- Complete Aftermarket GPUs List
- Radeon Navi 21 GPUs (Radeon 6800 - 6900 XT)
- Unsupported by Metal GPUs
- Mac Pro 3.1s and AMD GPUs
- NVidia GPU and Mac OS
- Which card should I buy?
- I want a GPU that has a boot screen and is Metal (Mojave 10.14+) compatible...
- Installing a GPU
- Installing a 2.5x height GPU (such as a Radeon 590x)
- HDMI (and Display Port) Audio
- Mixing and Matching GPUs
- The Most Powerful GPU
- I/O Upgrades
- Thunderbolt
- Storage Upgrades
- Time Machine
- Soft RAID and post 10.13
- SATA SSDs
- M.2 SSD hosts (sleds)
- Can I use a card that isn't listed that hosts multiple NVMe drives?
- M.2 and Heat sinks
- AHCI SSDs
- NVMe SSDs
- Not All SSDs are equal
- Enabling TRIM
- The Fastest Boot
- Enabling NVMe on the Mac Pro 3.1
- Making PCIe drives appear as internal Drives
- Summary: Getting the most out of your SSD
- Benchmarking SSDs
- Fusion Drives
- Display Upgrades
- 5k and Beyond
- The Current State of 8k
- 10-Bit Color / Color Spacing
- Refresh rates: 60 Hz (and above) 4k
- Dual-Link DVI Displays & Modern GPUs (and the 30-inch Cinema Display)
- Why you can go HDMI to DisplayPort but not the inverse
- Using a 4k TV as a display
- UI scaling
- Does my GPU support 4k?
- Control Brightness on a 3rd Party Display
- Apple Thunderbolt 27-Inch Cinema Display (and the LED 27-inch Display)
- Recommended Places to go for Monitor Recommendations
- Bluetooth / Wireless Upgrades
- RAM Upgrades
- Audio
- Other Upgrades/hacks
- Blu Ray / Blu Ray Writer
- Fan Control
- Hidden SATA ports (1,1 - 3,1)
- PCIe expansion
- Mac Pro Pixlas PSU Mod
- External Power Supplies
- Replacing the Battery
- NorthBridge High-Temperature fix
- 3D Printed Replacement Hard Drive Trays / 2.5-inch Adapters
- Fan / Heat Sink / other case part Replacement, Liquid Cooling
- Custom Front USB 3.0 PCB
- iPhone as a webcam
- Custom Cases
- Bootmanagers
- Look up Serial Number
- Linux on 2006 Mac Pros
- Windows 10 on Mac Pros
- Enabling Handoff
- Update Recovery Partition on Unsupported Macs
- Enabling Nightshift on Mac Pros
- Enabling Apple Watch Auto Unlock with the Mac Pro
- Sidecar and the classic Mac Pro
- Multi-OS USB Bootable Flash Drives
- Upgrading from a single CPU to dual CPU on a 2009 - 2012
- Oculus Quest/Quest 2 (and VR Headsets)
- Diagnosing/Troubleshooting problems
- User Manuals/Service Manuals
- Buying Used Mac Pros on eBay
- Collected Articles on classic Mac Pro and the 2019 Mac Pro
- Communities
- 2013 Mac Pro Upgrade Guide!
- 2019 Mac Pro Upgrade Guide?
- Changelog
Upgrading a classic Mac Pro isn't hard. The information is out there, but knowing what is possible, what questions to ask, and where to find it isn't nearly as easy. This is less a how-to guide/manual than it is a roadmap to primary sources by other brilliant people, written to be accessible to both new and advanced users. It has been continuously updated for over four years and will continue to be updated as long as there is a community to make new discoveries. I hope you find this guide useful.
The Cheese Grater's last stand
This guide's intro has changed multiple times over the years as the landscape has radically altered for the Mac, and after seven years, my perspective has changed. The Mac Pro 2006 - 2012 represents a high watermark for Apple, an era unburdened by the preoccupation of iOS and the trappings of planned obsolescence or its self-indulgence of $1000 monitor stands or $10,000 smartwatches. Apple still offered a practical, user-serviceable that was as beautiful on the inside as the outside. The dedication to these computers is as much of a testament to their success as much as it was to Apple's misteps and inability to offer an affordable heir. Apple Silicon's future is bright but under the shadow of right-to-repair.
Now, with the era of the Intel Mac coming to a close, there's a slightly poetic quality that the classic Mac Pro, the pinnacle of modular computing, will be there to see its end. Apple Silicon is very impressive, and Apple's offerings in the portable space, be it iPhones, iPads, or even laptops, are unmatched. I'm not sure if I'd extend the same courtesy to their desktops.
If you'd like to read the old intro, click the show old intro below.
Like many, I had quite a few thoughts about the Mac Pro 2019. If you want my personal take, you can read it here.
A hearty thanks to all the communities and websites where Mac power users still exist: MacRumors, Netkas, XL8yourmac, TonyMacx86, EveryMac, Ars Technica, Reddit, and to The Mac Pro Upgrade group on FB (users Martin L, Jay V, Gianluca M, Jean-Paul R. John C, Brennan F, Peter K, Antonio A, Adam S and many others) and Mac Pro Users on FB, (Eric Z.) for providing feedback, the guys who do a lot of heavy lifting in the community like Martin (h9826790), tsialex, Jay Fac and many users who've taken the time to email me to correct any errors. Even MacVidCards chimed in to correct this guide. I've learned as much as anyone writing and refining this guide.
YouTube Channel
This guide is now expanding into video. The goal is to create videos related to Mac upgrades, specifically the Mac Pro, Youtube.com: Mac Pro Upgrade Guide. Videos will be added to this guide as they are created to the relevant, but there'll be content exclusive to the channel, too, so please do subscribe.
Think of the guide as a companion to this guide, as the latest info will be here and this guide will remain the focus as, quite frankly writing is easier than video.
Special Announcements
The Radeon 6000 series is now flashable to work with the classic Mac Pros.
Here we go again, The Definitive Mac Pro 2019 7,1 Upgrade Guide beta is now public, 100% ad-free and open to the world.
Community Tip Jars
There's been a lot of tireless work put in by the community at large, all the resources are freely available. A few members have tip jars as a way of saying thank-you.
- Syncretic aka Piquant Innovation - Creator of Latebloom/SurPlus enabling Mac Pros to boot beyond macOS 11.2. Direct link to tip jar.
- House of Moth - (blog featured frequently in this guide), featuring the Pixlas mod tutorial and video tutorial. He also has a Patreon located on his blog.
- MartinLO - Maintainer of the most popular preconfiguration of OpenCore for the Mac Pros and tireless advocate for the Mac Pros.
- If you want to thank me, check me out on YouTube or visit my patreon.
Getting Started
Running a classic Mac Pro today means using workarounds. This guide is long and sometimes a bit hectic as there's quite a bit of onboarding jumping into the world of classic Mac Pros, as they are aging hardware and thus not always straightforward. Here's a short list of considerations before taking the plunge
- Mac Pros require workarounds to run the latest OSes. The 1,1/2,1 cannot run the latest OSes.
- Apple switched from OpenGL/OpenCL to Metal as its graphics API. This switch meant dropping support for many old GPUs. Thus, generally, you will need to replace the GPU to run macOS Mojave or above.
- Most modern GPUs will not support the pre-boot screen, meaning you will not see a picture until the OS has loaded the full graphics drivers.
- Apple's feud with NVidia means that no modern NVidia GPUs are supported in macOS. It's effectively AMD-only GPUs.
- A few high-end GPUs draw more power than the Mac Pro PCIe power leads, thus requiring modifying the power supply pin-outs.
- GPU drivers are tied to the OS release, meaning if you want to use a newer GPU like the 5700 XT, it will only work in 10.15 or later.
- OpenCore allows the Mac Pros to run the latest OSes with minimal workarounds and enables the boot screen by loading the correct pre-boot drivers. OpenCore pairs with various tweaks like SurPlus to enable support for macOS 11.3 and above.
- Depending on the wifi chipset, you may upgrade your Mac Pro for wifi support in the latest operating systems.
- The Mac Pros can run Windows 10 but require different installs depending if you are using OpenCore or not. The Mac Pro 1,1 can run Windows 10.
- The 4,1s/5,1s have native NVMe support but require a firmware update in order to do so. Due to PCIe bus limitations, getting full NVMe speeds requires expensive M.2 hosts with special chipsets.
Going through the process of updating and maintaining a Mac Pro is a crash course in both macOS/OS X's underpinnings and modular computing. For users looking for a painless experience, I recommend buying a used iMac 27-inch 2014 and above as they are fast, can be found for relatively cheap, and run the latest OSes without upgrades or workarounds. For those who are interested in the path of becoming a power user or already are, the Mac Pro is a great place to start.
Mini-Glossary of Terms / About this guide
Jumping into the world of Mac OS can be daunting as there's a lot of assumed tribal knowledge and history. I try to avoid unnecessary shorthand, but there are a few unavoidable terms. I like to write for as many people as possible and to remain accessible. For sanity's sake, there is a base assumption for understanding but hopefully a low-enough bar that novice users can follow along and learn. We all start somewhere, and no one should ever feel bad for asking questions. Examples of assumed knowledge would be the fundamental difference between an SSD and Hard Drive or what CPU cores are. . Many other sources can educate users on these topics and do a better job than I would. Even then, I try to explain core concepts or provide links when necessary to help educate a user. This means this guide is long but informative. The initial inclination will be to skip sections. However, some key information may often be discussed in intros and other sections. I've tried to mitigate this, but in the GPU and storage sections, there's a lot of information to digest. If you feel that something is unclear or never adequately explained, please reach out to me and let me know, as my readers are a global audience from all walks of life and have a wide variety of skill sets. I've often been humbled by people who are much more knowledgeable than me, and I appreciate anyone who points out errors or novices who feel something is confusing. Please see the Changelog for more details on how to reach out to me. We all start somewhere, and I frequently question my own aptitude when I see how much heavy lifting others have done to make this guide a reality. For my more technical users, I depend on you for accuracy. This is truly a community effort.
Lastly, one regrettable note for my international readers: I list prices in USD, dates Month/Day/Year, and measurements in imperial as I live on the mainland of the United States and thus also incur some of the bias of an American English speaker. Prices differ vastly in foreign markets, and unfortunately, generally, the US is remarkably cheaper for Apple products and some hardware upgrades. Any buying advice will reflect the bias that is implicit to someone living in the US. As far as measurements, I apologize for our measurement system based on ambiguous associations with tangible objects like a child would use. I fully admit the metric system is superior. Temperatures in this guide are expressed in Celsius as computer thermals sensor default to Celsius.
APFS - Short for Apple File System, a proprietary file system used on Mac OS and iOS. File systems define how data is stored and retrieved in an operating system. Like all software, file systems has limitations, and APFS was used to fix many of the shortcomings of HFS+. The transition to APFS was (relatively) smooth, but Apple chose not to support certain older hardware when it moved to APFS.
Bits vs. Bytes - You probably know this one by heart: There are 8-bits to every byte. For this guide to avoid confusion, I use bytes instead of bits when discussing all things bandwidth-related, even though networking favors bits and local storage favors bytes. It's easy to mistake bits for bytes as it hinges on capitalization. 10 gigabits-per-sec is written in shorthand as 10 Gbps. 10 Gigabytes-per-second is written as 10 GBps or 10 GB/s. Converting bits to bytes means dividing by eight. 10 Gbps = 1.25 GB/s (or 1.25 GBps). Operating systems express download speeds in bytes per second, which confuses consumers as internet connections are not. For example, A 100 Mbps network connection has a maximum bandwidth of 12.5 MB/s.
cMP - shorthand for classic Mac Pro. It is used to refer to any Mac Pro released between 2006-2012. The phrase "Classic Mac Pro" only refers to these models and not the similar-looking PowerMac G5 or the 2013 Mac Pro.
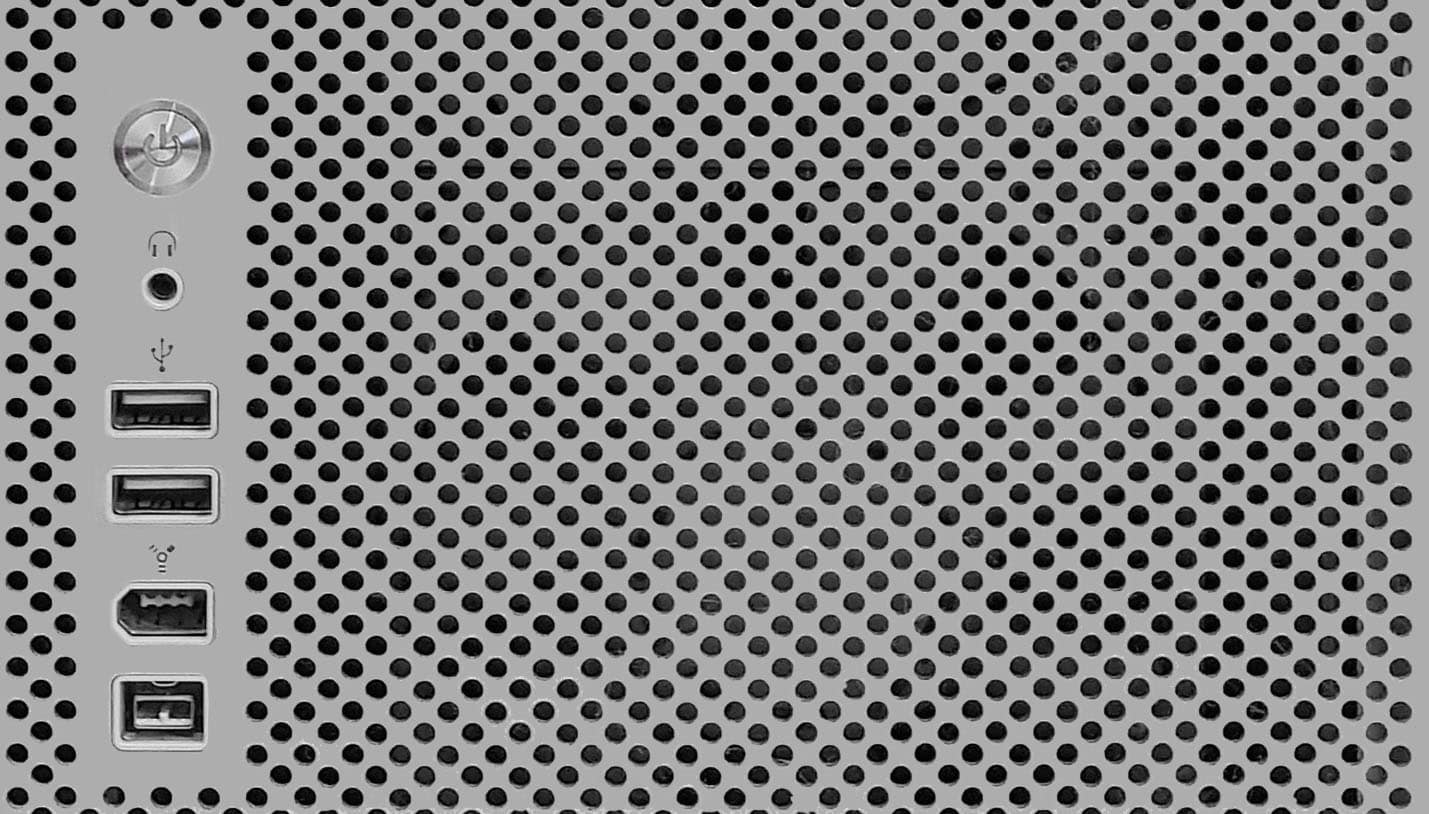
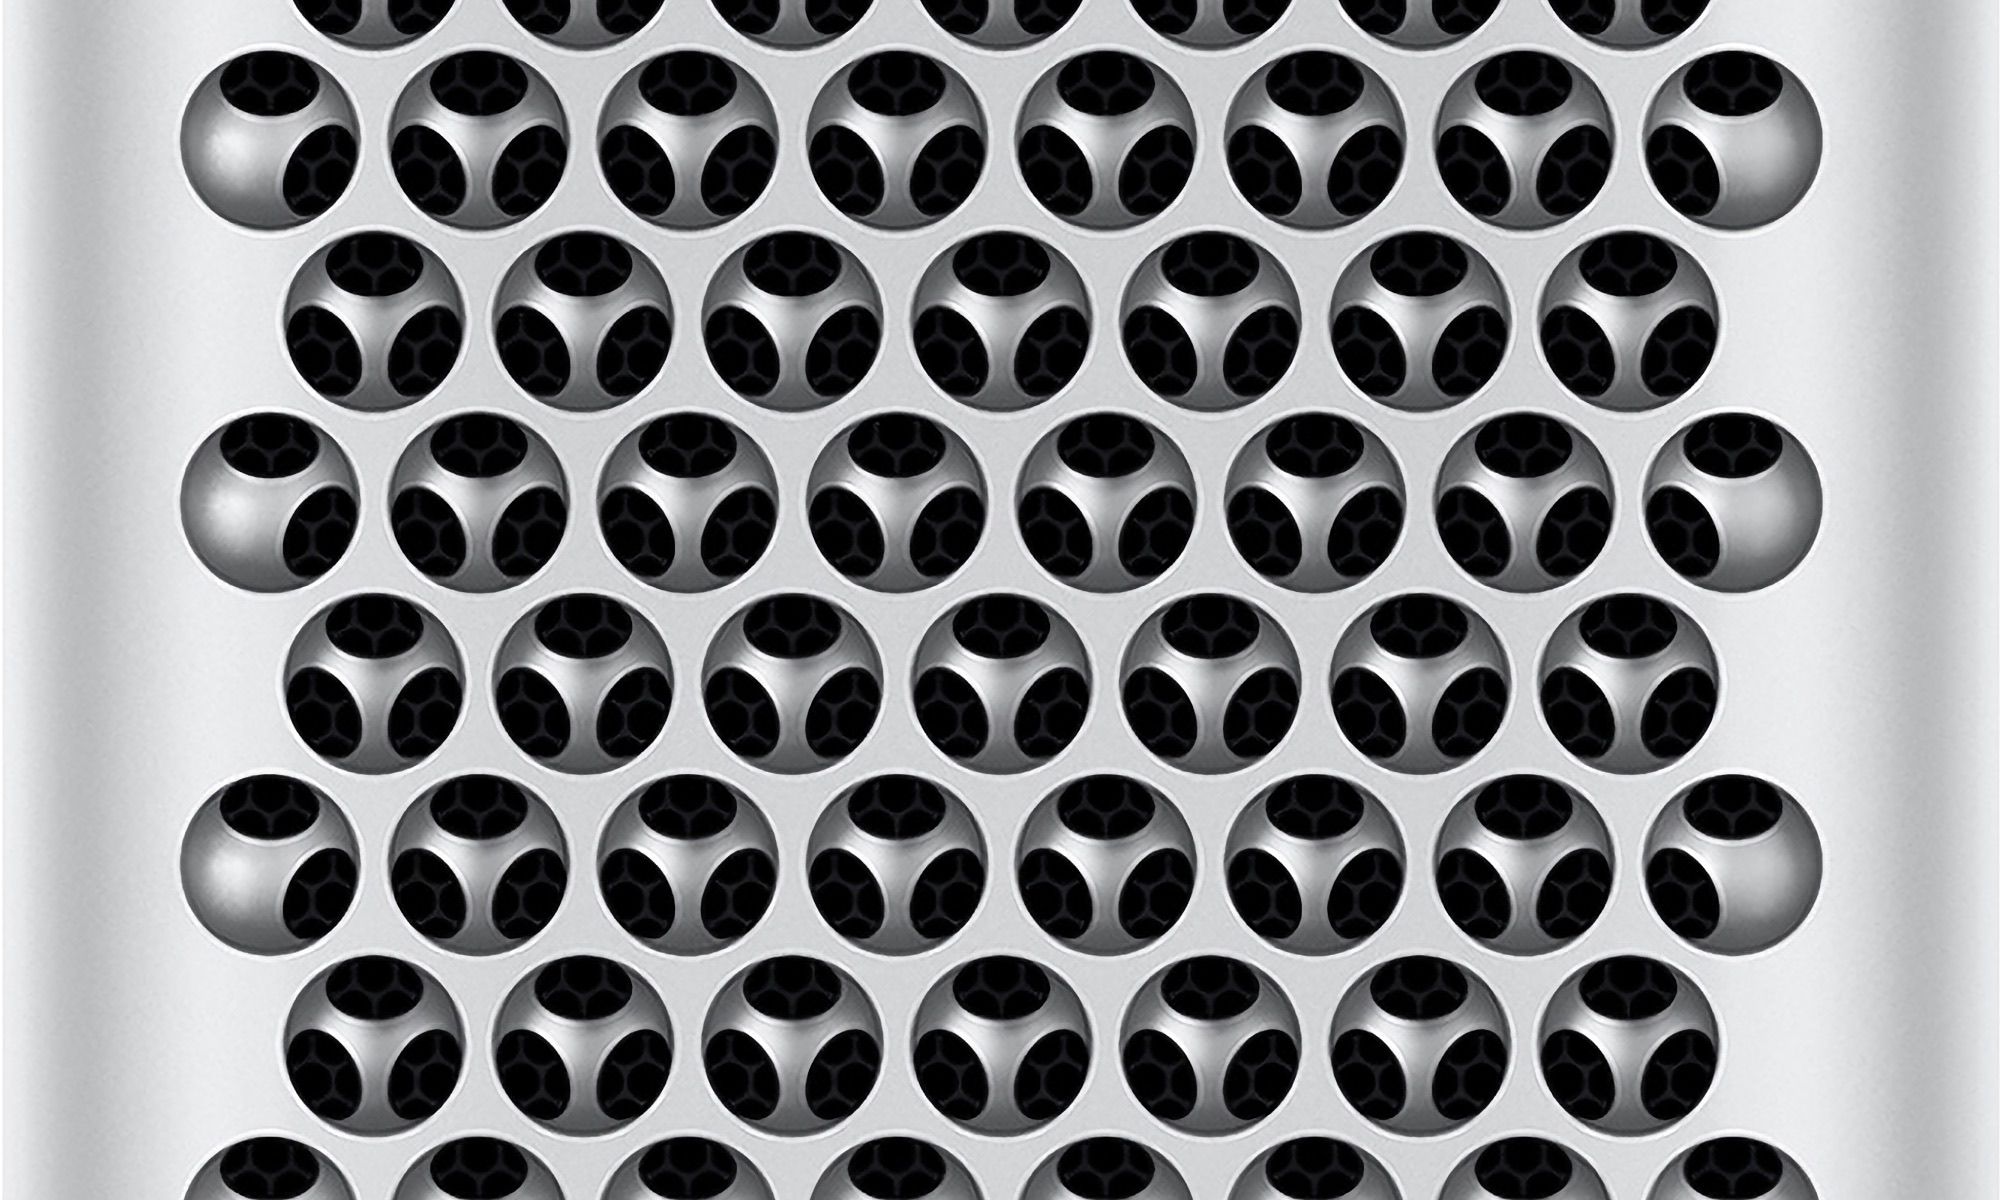
Cheesegrater - Slang for the classic Mac Pros. I did not invent this term. This term arose to describe the billet metal on the front/back of the Mac Pros that resembles a "cheesegrater," although functionally, it'd be more appropriate to use it as a pasta press.
EFI - Short for Extensible Firmware Interface, a specification designed by Intel to replace BIOS as the method to interface between an operating system and the platform firmware. This former isn't essential to understand beyond that it is a computer's firmware. Apple adopted EFI on Intel Macs, which is the interface that allows selecting a boot drive before OS X begins booting (by holding down the option), among other pre-OS loading functionality. I use the term EFI slightly loosely as I'll refer to the boot screen as the EFI, even though it isn't all that EFI provides for the Mac. It is also important to understand that the UEFI (Universal Extensible Firmware Interface), now the industry standard for PCs, isn't the same as Apple's EFI on computers from 2013 before. They are similar, but Apple's implementation varies partly due to age (predating UEFI by a few years) and partly due to the closed nature of Mac OS. Apple has since begun adopting (at least portions of it) UEFI, so the implications for the 2019 Mac Pro and GPUs are better. In order for a GPU to display a pre-boot screen, Universal Graphics Adapter Protocol (UGA) support on the GPU for the Mac Pro 1,1/5,1s. The more modern UEFI replaced UGA with Graphics Output Protocol (GOP), which is not used on the classic Mac Pros. Most aftermarket cards only support GOP and not UGA. This means without using OpenCore. Aftermarket GPU upgrades will not output video before the drivers are loaded. The lack of UEFI also has implications for other OSes like Windows, where MBR (Master Boot Record) needs to be used instead of UEFI if you are not using OpenCore.
32-Bit EFI - When used in this guide, bits are pretty much limited to discussion of a CPU architecture or color depth. 64-bit CPUs can execute binaries that use 64-bit virtual memory spaces. A 32-bit CPU was limited to 4 GB of memory space, whereas a 64-bit CPU can address roughly 18.4 exabytes. 64-bit CPUs are not faster at executing 32-bit code unless the memory thresholds prohibit functionality. (It's a common mistake on the internet to refer to certain Macs as "32-bit," as almost all Intel Macs (sans the Core Duo Models) have had 64-bit CPUs. However, some of the older Macs, like the 2006-2007 Mac Pros, used 32 Bit EFI. Apple dropped support for 32-bit EFI and Macs that do not support SSE4.1 with Mac OS 10.12. 10.15 Catalina dropped support for 32-bit applications.
DosDude1 - the handle of a prodigious Mac OS scripter who makes Mac OS installable on a large swath of older Macintoshes, under the same name, generally referred to as some variation of DosDude1 Patcher Tool for Unsupported Macs. In this guide, I refer to DosDude1 not as the person but as the scripts he has written. See his personal website. I encourage users to donate to him for his hard work.
Firmware - a term you probably have heard and already possess some understanding of, the standard definition is a program that is written into Read-Only Memory (ROMs) and requires a specialized process to change (if it can be changed at all) called Flashing.
Flash/Flashing - The act of writing over data that exists in an otherwise in Read-Only Memory (ROM) or space (Firmware).
Hackintosh - Any non-Apple hardware that is running any version of Mac OS, generally standard PCs using a lot of workarounds.
HFS+ - Short for Hierarchical File System and also referred to as "Mac OS Extended," a proprietary file system used on Mac OS, released with Mac OS 8.1 in 1998. It remained the default file system for Apple for nearly two decades, used on Mac OS 8/9, OS X, the iPod, and early versions of iOS, but lacked some core features found on file systems developed later.
HomeBrew - long-time computer users are probably familiar with the term "homebrew" in regards to user/hobbyist applications written for systems that generally were closed architecture, like a videogame console. However, with regards to the Macintosh platform, HomeBrew is a package manager for macOS for (mostly) command-line utilities. Package managers function, in principle, like an app store for open source software, as you can quickly install, update, and uninstall the software from your command line. For developers, Homebrew occupies a very important space as it's one of the most preferred ways to install nodejs, python, git, MySQL, as well as utilities like youtube-dl, FFmpeg, imagemagick, and MonitorControl.
Kext - With OS X, the architecture for drivers uses kernel extensions called .kext files. Kexts are supremely powerful and the backbone for the Hackintosh community to enable unsupported hardware. However, Apple has deprecated kexts in 10.15 Catalina for security reasons, replacing them with EndpointSecurity, SystemExtensions, and DriverKit. How this affects unsupported hardware remains to be seen. Kexts are located within /System/Library/Extension and /Library/Extensions.
Mac OS / OS X / macOS - Mac OS X is Apple's XNU kernel-based operating system that evolved from NeXTstep. Mac OS X was rebranded to macOS in 2016. I use these interchangeably as I have a tough time accepting macOS, which is still OS X. The difference is superficial. Generally, Apple writes macOS, but I find this annoying, so you'll see Mac OS littered through this guide. Mac OS is not to be confused with Mac OS classic (Mac OS 7.x - 9.x). Today, all of Apple's OSes share the XNU kernel and are all descendants of NeXTStep.
Metal - Previously, Apple's default graphics library for graphics acceleration was OpenGL (Open Graphics Library), used on iOS and Mac OS. Over time, OpenGL fell behind in performance and features when compared to a library like Microsoft's DirectX. Without an ideal candidate to replace it (OpenGL's successor, Vulkan, would not be released until 2016), Apple created its own graphics library called Metal and shipped it in 2014 on iOS 8 first. Later, Apple ported Metal to OSX. Mac OS 10.14 Mojave uses Metal to now power Mac OS. The new API does not support many old GPUs, as their drivers were not updated. Metal often draws ire from users as it dropped support for many older GPUs that OpenGL drivers had. Regardless, had Apple used Vulkan, there'd been a day of reckoning with older hardware and support that Apple was unlikely to support.
NVRAM/PRAM - Non-volatile random-access memory (previously Parameter RAM) is a space reserved for various low-level settings found on Macs pertaining to the pre-boot settings. These settings contain data such as default boot volume, backup boot volumes, default audio output, audio levels, computer's name, Keyboard language, backlight level (for laptops), whether Bluetooth is enabled, default GPU, etc. The contents of the NVRAM can be viewed via the terminal using nvram -xp. The difference between NVRAM vs. PRAM is transparent to the user. NVRAM uses a small storage space using flash-based storage, whereas the PRAM uses a battery to keep the settings buffered in the RAM. Occasionally, problems can arise (generally associated with hardware upgrades) that can cause problems. Resetting the NVRAM is still referred to as "zapping the PRAM." This is performed by holding down the Command + option + p + r keys during boot prior to the system chime, which will cause the computer to reboot immediately and chime again. This will clear out the NVRAM. Alternatively, the NVRAM ram can reset via the terminal using nvram -c, which will require restarting manually for the changes to take effect.
OpenCore - In the Hackintosh world, utilities are usually required to facilitate booting macOS on unsupported hardware, commonly referred to as "boot loaders" like Clover. OpenCore is the latest iteration of the boot loader, designed to be more modular, stable, and useful to non-Hackintosh Macs. It can emulate EFIs, allowing for additional functionality. For the Mac Pros, OpenCore can enable a pre-boot screen to pick a bootable drive, and its UEFI emulation can be used in 10.14 to enable hardware encoding of MPEG (.h264), among other things. It can be paired with other fixes like SurPlus to extend support to even macOS 12.
OpenCore Legacy Project (OCLP) - a subset of OpenCore specifically for legacy Mac support that makes installation for old Macs (not just Mac Pros) a two-click process, greatly simplifying the initial process.
SIP - System integrity protection, a feature of later Mac OS introduced in OS X El Capitan, that walls off portions of low-level features of Mac OS to protect it from malware. Before this, any application with root-level access could read/edit/modify system files. However, sometimes, when performing certain hacks, it requires disabling during installation and then re-enabling. There are legitimate reasons why users may want to leave it disabled. See Disable System integrity protection for instructions. See About System Integrity Protection on your Mac on Apple.com for more details.
Terminal/shell - OS X is famously built on NeXTStep, which was a *nix-based operating system that gave it access to a new (old) feature, a command-line shell. This allowed Mac users to interact with the OS akin to Unix/Linux. Many advanced Mac OS operations can only be performed via the terminal, such as disabling SIP or enabling TRIM for an SSD. Users unfamiliar with the world of the terminal should always exercise due diligence before copy and pasting random snippets of code found on the web for the terminal. Any Mac user looking to become a power user should make an effort to learn terminal basics. The ability to operate the terminal unlocks a feature set outside of the GUI and can do many of the functions that the GUI can do. An additional perk is that terminal skills translate to Linux and Unix, good for server management/networking or web development. Many utilities are command-line only, like the ever-power ImageMagick, which can batch-process images much faster than GUI applications. Prior to 10.15, Apple used Bash for its terminal but now has pivoted to ZSH.
Trashcan - While Mac OS has a trash can for deleting files, in the context of this guide, this used to poke fun at the Mac Pro 2013 for its looks and lack of functionality compared to the almighty classic Mac Pro. Despite its shortcomings, I wrote The Definitive Trashcan Mac Pro (2013) Upgrade Guide.
Know your Mac Pro's Model
A good portion of this guide (and others) uses terminology such as "Mac Pro 2008" or Mac Pro 4,1 or Mac Pro 6,1 when referring to what upgrades are feasible. The classic Mac Pros come in five iterations, and the Mac Pro family currently has seven different iterations.
You can find out a Mac Pro's version by going to "About this Mac" under the Apple menu. All classic Mac Pros share a base level of specifications: Four full-length PCIe Slots, 1 mini PCIe slot for an Airport/Bluetooth card, four SATA2 3.5 drive bays, two 5.25 inch Optical drive bays (ATA on 3,1 and lower Mac Pros, SATA2 on Mac Pro 4.1+) dual Gigabit Ethernet, five USB 2.0 ports, two Firewire 400 ports, two Firewire 800 ports, and optical digital audio in/out. The differences pertain to the bus/RAM/CPUs and tray designs for RAM and CPUs. Visually, from the exterior, these computers are the same and difficult to identify from each other without opening them up. Internally, the 1,1/2,1s and 4,1/5,1s are nearly identical. A 1,1 Mac Pro can be firmware flashed to a 2,1 Mac Pro, and a 4,1 can be flashed to a 5,1 Mac Pro. The best way to verify the original computer's version is via its model number (or serial number). For more info, see EveryMac's Mac Pro specification section and EveryMac.com's Ultimate Mac Lookup.
| Mac Pro Model Name/Year | CPUs | Max OS | Description |
| Mac Pro 1.,1 / 2006 | Woodcrest | 10.11.6 with Pike's Script | The first iteration of Mac Pros. The firmware can be upgraded to 2,1 using 32-bit EFI. PCIe 1.0. Lacks SSE4 (aka SSE4.1) |
| Mac Pro 2,1 / 2007 | Clovertown | 10.11.6 with Dosdude1 | The 2,1s were released only in dual quad-core CPU configurations. 2006 dual 2x Core Mac Pros sold used the 1,1 firmware, whereas the 2.1s use a slightly updated firmware. Like the 1,1 before, it uses 32-bit EFI. PCIe 1.0 + ATA for optical bays. Lacks SSE4 (aka SSE4.1) |
| Mac Pro 3,1 / 2008 | Harpertown / Penryn | macOS 32 with OpenCore (Sequoia is semi suported) | The Mac Pro 2008s are the odd man out as there are few CPU options compared to the 1,1/2,1 Mac Pros and 4.1/ 5,1 Mac Pros, 64-bit EFI can use modern macOS with minimal hacking. The 2008 Mac Pros lack SSE 4.2 instruction set on the CPUs as well as EPT/VT-x support, which aids greatly in virtual machine-related tasks. For the most part, neither is required, although the SSE 4.2 support means using modified drivers for modern AMD GPUs. The lack of later CPU instructions means some software isn't as performant. PCIe 2.0 + ATA for optical bays. Optional SATA ports for the optical bay. The Mac Pro dual 4-core 3,1s performance is less than a single CPU 6 Core Mac Pro 5,1. |
| Mac Pro 4,1 / 2009 | Nehalem | macOS 13 with OpenCore (Sequoia is suported) | The firmware can be upgraded to 5.1 and uses 64-bit EFI. When flashed, they are natively supported for Mojave 10.14, depending on the GPU. 4.1s tend to be the budget upgrader's choice (as historically, they can be had for cheaper than a 5,1 Mac Pro). There is no performance difference between a flashed 4,1 -> 5,1 and a computer that shipped with the 5,1 firmware. However, the Mac Pro 4,1 requires delidded CPUs for dual CPU trays (see the CPU section). PCIe 2.0, no legacy ATA. |
| Mac Pro 5,1 / 2010/2012 | Westermere | macOS 13 with OpenCore (Sequoia is suported) | The 5.1s are natively supported for Mojave 10.14, depending on GPU. The Westermere CPUs are the highest-end CPUs supported by LGA 1366 Sockets. *Note, there were 2012 Mac Pros sold with a single Nehalem CPU, although somewhat uncommon. There is no difference between the 2010 and 2012 Mac Pros beyond the CPUs and GPU options Apple offered at the time of the sale. The Mac Pro 5.1s (or 4.1s flashed to 5.1s) has enjoyed several major firmware updates for Mojave, enabling the ability to boot NVMe, which previously required workarounds/hacks. PCIe 2.0, no legacy ATA. |
| Mac Pro 6.1 / 2013 | Ivy-Bridge | macOS 13 with OpenCore (Sequoia is suported) | Also known as the "Cylinder" or "Trash can." These are radically different than the classic Mac Pro models and will not be covered in this guide. For information about this model, please visit The Definitive Trashcan Mac Pro (2013) Upgrade Guide. |
| Mac Pro 7.1 / 2019 | Xeon-W | Current | also known as the xMP. The Mac Pro 2019 marks a triumphant return to modularity with plenty of PCIe slots and a massive price hike. It features PCIe 3.0, with up to 28 cores and 1.5 TB of RAM. It is in a true workstation-class of computing, doubling its predecessors' entry price. |
| Mac Pro 8.1 / 2022 | Apple Silicon M2 Ultra | Current | Apple's first Apple Silicon Mac Pro offers PCIe 4.0 that cannot be used for GPUs, only storage and IO. It has been referred to as expandable but not upgradable. |
Mac Pro 5,1 2010 vs 2012
Everymac has a good rundown of the minor differences of the 2012 vs. 2010 Mac Pros. The short answer is there is no real difference beyond the CPU/RAM/GPU configurations Apple offered and the manufacturing date. Unlike the Mac Pro 4,1s, every piece of hardware found in a 5,1, regardless of year, is interchangeable. Whereas the 4,1 and 5,1 share most of the components, with exceptions for the backplane and CPU tray. Apple identifies both 2010 and 2012 models as the Mac Pro 5,1.
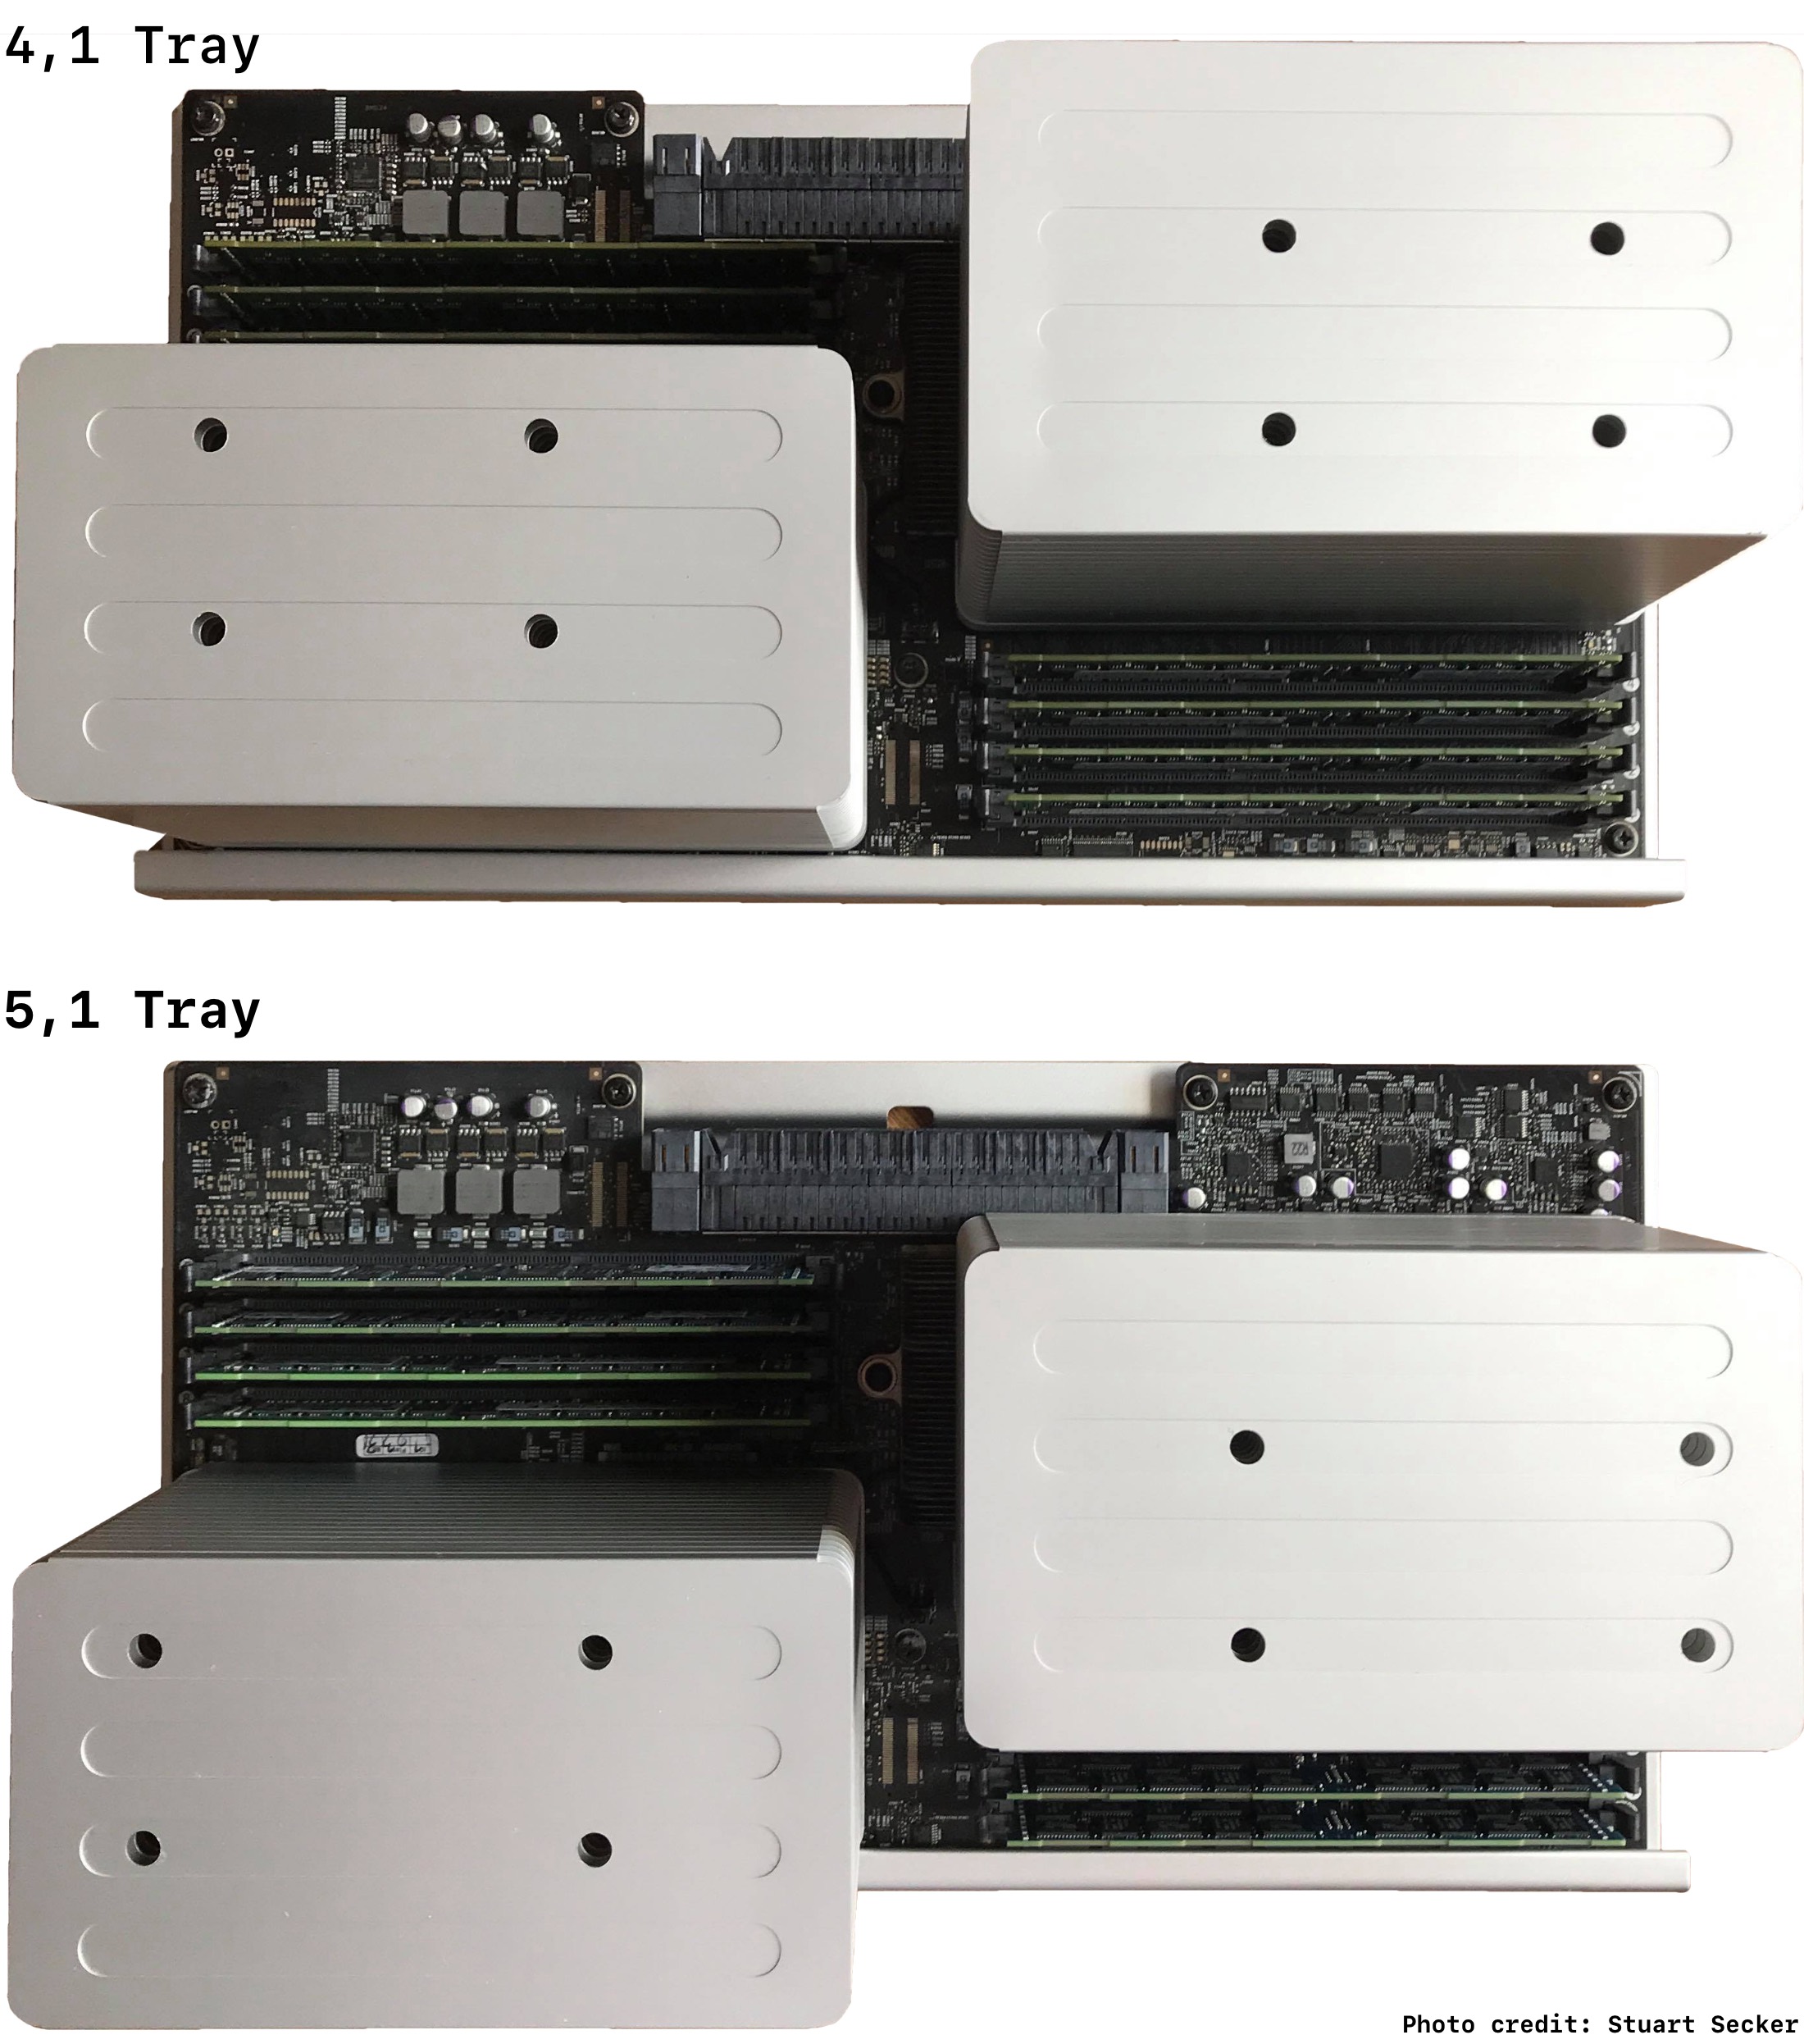
There are minor physical differences between the CPU trays, most notably, the 4,1 CPUs require delidded CPUs in the dual tray, and the CPU trays are incompatible between 4,1s and 5,1s, causing fan revving errors. You can see in the above photo that the heat sink screw hole positions on the 5,1s are positioned further.
Due to the lack of any meaningful differences, this guide (and the community at large) treat the Mac Pro 2010 and 2012 as one-in-the-same. I owned both a 2010 and a 2012, and the only difference was in the "About this computer" from all my observations.
Identifying a Mac Pro Visually
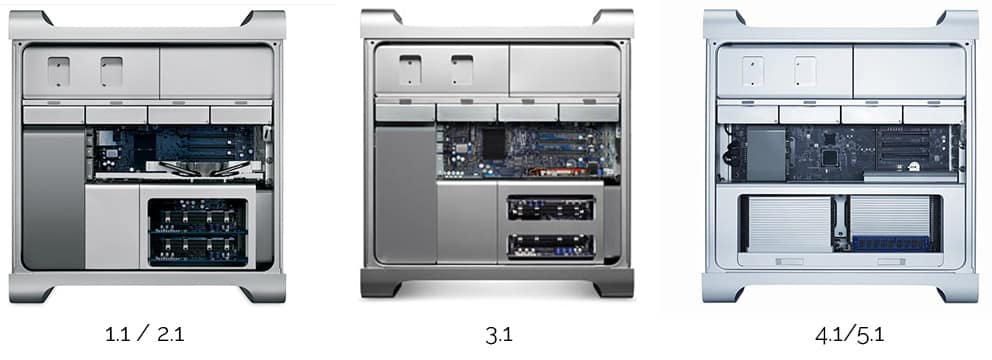
Mac Pro 1,1 - 3,1s sport FW400 ports, whereas the Mac Pro 4,1/5,1s only have Firewire 800 ports. The easiest way to distinguish a powered-off Mac Pro is by taking the side panel off. For the Mac Pros, note the RAM configurations on the right-hand corner. The other sure-fire method is looking up the Serial Number.
Never be fooled by a PowerMac G5
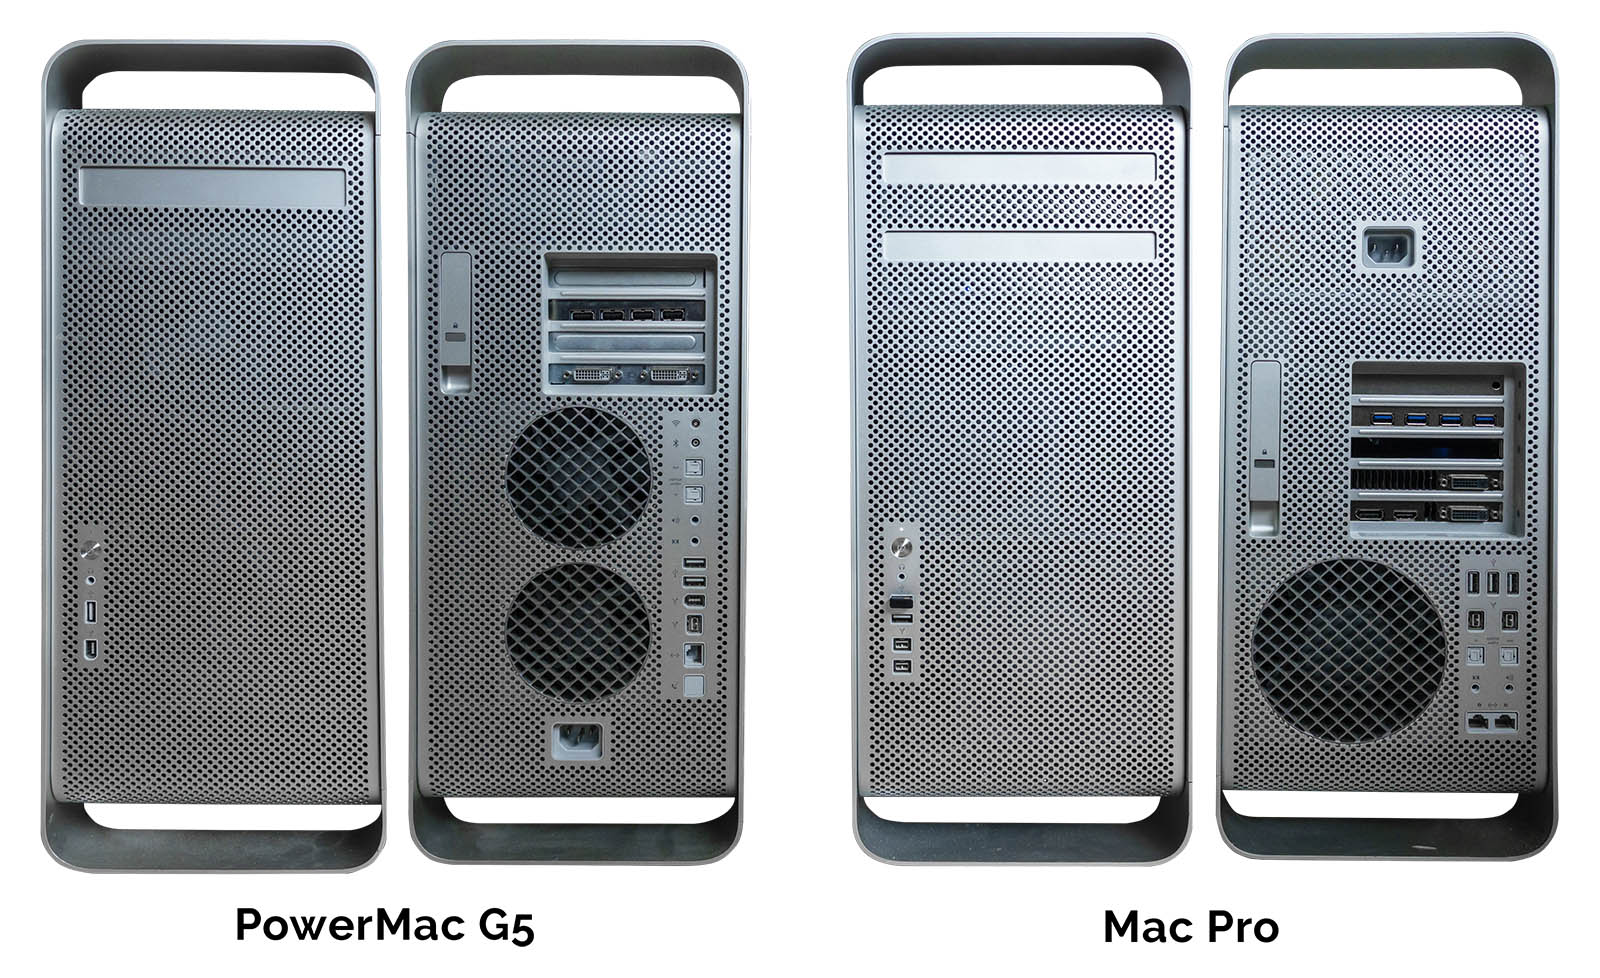
Picture provided by Peter R.M. Fitskie
The Mac Pro's case is based on the PowerMac G5. The Apple tower was produced from 2003-2006, which predated the Mac Pro. The G5 used an IBM PowerPC 970 CPUs and represented the last PPC Macs produced. They look exceptionally similar to the Mac Pro but sport only one optical drive, one front-facing USB port, one firewire port, and two fans on the back, among other differences. Sometimes mislabeled listings will list the PowerMac G5s incorrectly as "Mac Pro G5s" or even as a Mac Pro.
If the computer in question has one optical drive and two fans, it is a PowerMac G5, meaning it cannot run any OS later than 10.5. For more info about PowerMac G5's, see EveryMac: PowerMac G5 and Low-End Mac: PowerMac G5.
PCIe
Peripheral Component Interconnect Express (PCIe or PCI-E) is the evolution of PCI, which migrated from a parallel bus system (where all cards in a computer competed for the same bandwidth ) to discrete connections. Regardless of how many cards are connected, the bandwidth for each PCIe card will not be adversely affected. PCIe has become the backbone of computers since its first iteration in 2003 and continues to be used, even on laptops, for high-speed storage.
Mac pro 1,1/2,1- PCIe layout (uses PCIe 1.0)
| PCI Express Slot | Slot Speed |
|---|---|
| 4 | x4 |
| 3 | x4 |
| 2 | x1 |
| 1 | x16 |
Note: The Mac Pro 1,1/2,1 allowed for lane configuration using Expansion Slot Utility
Mac pro 3,1/4,1/5,1 - PCIe layout (uses PCIe 2.0)
| PCI Express Slot | Slot Speed |
|---|---|
| 4 | x4 |
| 3 | x4 |
| 2 | x16 |
| 1 | x16 |
Not all PCIe slots are the same. Since its inception, there have been several updates: PCIe 1.0, 2.0, and 3.0, with the very first 4.0 PC motherboards demoed in 2018 and shipping in many PCs today. Each iteration of PCIe radically increases the speed by doubling the available bandwidth. Also, to add a minor bit of confusion, different chipsets have different amounts of total "lanes," measuring speed for a PCIe slot. PCIe slots are not all equal in speed; thus, the total lanes are distributed across the PCIe slots, usually favoring one or two ports for maximum speed. In the Mac Pros (3,1 and above) case, all have a maximum of 40 lanes; thus, the lanes are pre-distributed among the PCIe slots. Since not all PCIe slots have the same amount of lanes, they are not all at the same speed. The amount of lanes a PCIe slot has access to is expressed numerically: 1x (1 lane), 2x (2 lanes), 4x (4 lanes), 8x (8 lanes), and 16x (16 lanes). Each lane's maximum speed depends on the PCIe version a computer has. A 1.x PCIe 1x slot has access to 250 MB/s. Thus, a 4x slot has a maximum of 1 GB/s, an 8x slot has a maximum of 2 GB/s, and so on. Each generation of PCIe effectively doubles the speed of a lane. A PCIe 2.0 lane is 500 MB/s and PCIe 3.0 lane is 1 GB/s. Generally, PCIe speeds are expressed in bytes, not bits. A PCIe 2.0 16x speed (8 GB/s) would be 64 Gbps (64000 Mbps). In this guide, I will use MB/s and GB/s instead of Gbps and Mbps, as transfer speeds are generally expressed in bytes, not bits.
To reiterate the dramatic speed increases of PCIe based on generation: A 16x port in PCIe 1.x has a maximum of 4 GB/s, whereas a 2.x 16x port can handle 8 GB/s, 3.x is almost 16 GB/s. All PCIe slots are backward compatible; however, the caveat is that PCIe cards may not be backward compatible (this is not common). Also, not all PCIe cards will operate at the maximum port speed, as the card's chipset may limit them. Conversely, a PCIe card may support much faster speeds but will work in any PCIe slot, which will be limited by the port's maximum speed. For example, you could use an AMD Radeon RX 580 in the Mac Pro's 4x slot but with a bit of a performance penalty.
For more information on the Mac Pro's PCIe slots, see EveryMac's Mac Pro PCIe overview (including how to install cards) and the archived article from developer.apple.com: PCI Product-Specific Details.
Bifurcation
Later, motherboards, starting with PCIe 3.0, commonly support bifurcation, which allows a PCIe port to be split in half: One 16x port becomes two 8x or in quarters. An 8x PCIe lane card thus can interface by splitting it into two sets of 4x lanes. Bifurcation is mostly used for SSDs, allowing a single PCIe card to host two SSDs. While the Mac Pro can use PCIe expanders (a separate technology for external PCIe slots by harnessing the bandwidth of a single PCIe slot), it doesn't support bifurcation. PCIe cards can host more than two M.2 NVMe SSDs without bifurcation, but they require specialized controller chipsets. The result is that multi-drive M.2 PCIe cards, which are Mac Pro compatible, cost more. This is also discussed in the PCIe NVMe sleds/blades section.
For a list of m.2 cards that support multiple NVMe drives, see the M.2 SSD hosts (sleds) section.
PCIe Power Delivery
By default, PCIe provides power via motherboard PCIe slot, up to 75w via 4-pin cables. The power requirements for high-performance GPUs have increased, going past PCIe's initial design. To combat the problem of power delivery, PCIe cards started coming with additional power ports and increased pins to carry more power. Generally, in PCs, additional power is drawn directly from 12v taps off the power supply that the user can configure. On the Mac Pros, two power ports on the motherboard can be tapped for additional power. This design choice means less cable mess but also requires buying special mini-PCIe to PCIe cables. Apple's implementation of the PCIe power ports is also non-standard, allowing for more power than the PCIe standard requires. Many PC power supplies also use similar configurations, so 6 to 8-pin adapters can be used. MacProUpgrade members like Brennan F. and MacRumors members have demonstrated that the Mac Pro using various techniques, can deliver roughly 120w and using 4-pin to 6-pin adapters, just shy of the more common 150w with 6-pin cabling.
If a PCIe card draws more power than the PCIe power can provide, it will trigger the Mac Pro to shut down instantly. This scenario is generally limited to GPUs with exceptionally high power requirements. The Mac Pro PSU can be modified to deliver more power to the PCIe power taps using modifications such as the Pixlas PSU Mod, allowing the Mac Pro to use high-power GPUs, providing the expected 150w safely.
PCIe 2.0 vs. 3.0 vs 4.0 and its impact on GPU performance
In computer parlance, the idea of bottlenecking is when a single component limits a computer system.
For whatever reason, there's an incorrect belief that modern GPUs require the bandwidth of a 16x PCIe 3.0 slot or would greatly benefit from using PCIe 4.0. This myth is persistent and wide despite much information clearly demonstrating otherwise for the GPU. This may be less true for much newer GPUs, most of which are unbootable in the classic Mac Pro. When benchmarked in the real-world using an 8x vs. 16x PCIe 3.0 slot, the impact is minimal, pugetsystems.com performed this very test, and it comes out to be roughly 3%-4% impact. An 8x PCIe 3.0 slot has the same bandwidth as a 16x PCIe 2.0 slot. In gaming, this tends to be even lower. See this YouTube vid comparing 16 4.0 vs. 3.0 vs. 2.0 and PCIe 4.0 vs. PCIe 3.0 GPU Benchmark Feat. GeForce RTX 3080 FE, which shows the impact of sticking the RTX 3080 in 16 PCIe 4.0, 16x PCIe 3.0, and 8x PCIe 3.0 slots. The story is always the same: GPUs are not very bandwidth-intensive. Another common misconception is the Mac Pro's CPUs/bus isn't fast enough to benefit from a high-end GPU, which is patently false. Notably, when it comes to graphics performance, the Mac Pro 2010/2012 remains a performance monster, in most tests besting the iMac Pro running a VII. It may not be as fast as a modern gaming PC running a VII, but depending on the tasks (especially GPU compute), it'll be only 1%-4% slower. More interestingly, when an AMD Radeon 5700 XT was tested in PCIe 2.0 vs. 3.0 vs. 4.0, TechPowerup, after many tests, found a 2% average performance difference between PCIe 2.0 and PCIe 4.0. DigitalCitizen found similar results by comparing PCIe 3.0 to 4.0. GPUs are not nearly as bandwidth-intensive as most people assume (other hardware like SSDs can easily saturate a PCIe bus). I'll give another example: if "bottlenecking" existed in a sense most people visualize it, performance would be capped by bandwidth. Thunderbolt 3, which is also even more bandwidth constricted than a PCIe 2.0 16x slot, still finds improvements running a Radeon VII in a Thunderbolt 3 case over less powerful GPUs, including an iMac's own internal AMD Vega 64. However, the performance is more realized when adequate bandwidth is available instead of a brick wall limitation. Also, the Mac Pro will be nearly as fast as a much more modern PC in gaming at high resolutions. At lower resolutions where the GPU can achieve extreme framerates, the number of calculations per second increases for the CPU to process, as data must be calculated per frame. 240 FPS means the CPU has more data to process per second than if a game was running at 60 FPS, regardless of the resolution. At higher resolutions, the frame rate goes down as the GPU becomes the limiting factor. The Mac Pro makes a fine entry-level 4k gaming machine if one desires to invest in a Vega series GPU or better and is willing to boot Windows 10.
PCIe 4.0 GPUs and the Mac Pro
When users complain about the lack of PCIe 4.0 on the 2019 Mac Pro, there's some truth to it, but its adverse effects are minimal. Many modern PCIe 4.0 GPUs run at PCIe 8x 4.0, which effectively places them at the same speed as a 16x PCIe 3.0 slot. However, when an 8x PCIe 4.0 PCIe card is placed into a 3.0 slot, it'll run at 8x 3.0 speed.
For the cMPs, this only gets worse as an 8x PCIe 4.0 GPU will only run at 8x PCIe 2.0, effectively 1/4th the speed of the intended 8x PCIe 4.0 slot. While the speed penalty for 16x cards is pretty negligible in a 2.0 slot, it is more so for 8x.
Fast Resource Loading API / DirectStorage API
The latest trend with Apple with Metal 3 and Microsoft Direct X is, in simple words, APIs that allow GPUs to have a much more direct route to the SSD. This has already been used in game consoles but now is making its way to Macs and PCs alike. The implications on performance and PCIe buses mean that the gains are likely to be much less realized on the Mac Pro lineup as storage is the one place that PCIe 4.0 has a clear advantage.
Currently, very little software supports this. As of December 2024, few games support full implementation on macOS or Windows, but as time passes, they will be more widely adopted.
Power Supply
The Mac Pro uses a non-standard PSU that does not follow the ATX convention and can deliver 980w continuous with a 1200w peak. Apple does not officially list the PSU's maximum power but can be found on PSU stickers, as seen here. It is recommended that PSUs be used from the same Mac Pros iterations as there are minor changes between models. The 4,1 and 5,1 generation Mac Pros are interchangeable as they are the same physically. MacRumors users have successfully used, PSUs in 3.1s.
PCIe Power
The Mac Pro uses an uncommon passthrough where the PCIe power is delivered via pass-throughs on the motherboard. The pass-throughs can deliver 120w via the PCIe power ports, 30w shy of the more common 150w found in many PCs. Thus, for high power requirement GPUs, clever users have turned to PSU modification to mimic a standard ATX power supply by bypassing the passthrough throughs to deliver more power. See the PCIe power and Pixlas PSU Mod sections for more info.
Sites like iFixit have pictorial guides for PSU replacements.
ATX Power Supplies?
Thus far, to my knowledge, there's only been a single instance of replacing the Mac Pro PSU with an ATX PSU. MacProUpgrade user Jay Fac's guide includes the pin-outs, a video, and plenty of photos of his completed project. He notes that he has lost the ability to put the computer to sleep. However, this modification is unnecessary for most people as users have successfully installed two GeForce 1080 Tis + NVMe + USB 3,1 and filled the drive bays on dual CPU 3.46 GHz 5,1s when using the Pixlas mod with no negative consequences. The Pixlas mod is much easier than a full PSU replacement.
We can do some guestimation to illustrate why so few users have attempted an ATX PSU conversion. Using back-of-the-napkin math: A theoretical top-of-the-line build would be two X5690s (peak 130w x 2), VII (peak 321w), four NVMe (peak 7w x 4), four 7200 RPM SATA HDDs (peak 8w x 4), eight 16 GB DDR3 DIMMs (3w x 8), Sonnet USB 3.1c card (75w peak), misc PCIe card (50w), DVD-RW (peak 20w). This means that even if everything was under peak loads at once (a nearly impossible feat), the power draw would be 824w, leaving a continuous supply of 166w for the cooling/motherboard well under the continuous 980w and 1200w peak. The Pixlas mod works sufficiently well.
Some users have taken to iMore: adding a second PSU to a Mac, MacRumors (from 2012) How To Rig A 2nd PSU (For Modern GPUs or Adding a Second GPU) (w/& w/o soldering.
Firmware upgrades/hacks
The Mac Pro line has had a history of Firmware updates. Depending on the model, there's quite a wide gamut of potential upgrades or hacks for your Mac Pro. The Mac Pro Firmware upgrades are now distributed as part of Mac OS and can only be performed when upgrading the operating system.
Check Your Firmware Version
From the Apple menu, select About this Mac and click System report. Under the Hardware Overview, you should see a Boot ROM version, which is your current Mac's firmware version. This is not to be confused with "About this Mac." For example, A 2009 Mac Pro will still be reported as a 2009 Mac Pro in the "About this Mac" tab after a firmware flash.
The Upgradable Firmware Macs
The Mac Pro 2006s (1,1) and 2009s (4.1) occupy a special place as both can be updated to enable a wider range of CPU configurations with a software update. The Mac Pro 1,1 to 2,1 enables later CPU (Clovertown) support. The 4,1 gets the bigger boost. The firmware update enables Westmere Xeon CPUs and faster bus/RAM. Once a 4,1 is flashed to the 5,1 firmware, it can then use all the 5,1 firmware updates, which enable quite a few goodies like APFS booting, native NVMe support, and such. This is one of those times when a software upgrade makes all the difference. See the CPU upgrades section for more details on CPU configurations. There is no performance difference between a flashed firmware Mac Pro vs. a Mac Pro that shipped with later firmware, assuming the hardware configurations are the same.
Ars Technica reported on the success of the 2009 Mac Pros being flashed by Netkas forum members.
2006 1,1 Mac Pro
The Mac Pro 1,1 flash allows for later CPU models to be used. Currently, there is a firmware hack to allow for Mac Pro flashing script (github.com) to boot alt OSes. Also, there's research being done on firmware hack to enable Harpertown CPU support.
- Netkas: Mac Pro 2006-2007 Firmware Tool Released
- LowEndMac (Facebook) troubleshooting upgrade the entire thread has appended instructions for Mac Pro 1,1s that fail to update due to a variation in the Bootrom version
- XLR8yourmac 2006 Mac pro firmware upgrade to 2.1
Note: Sometimes, it is incorrectly reported that the 1,1/2,1 Mac Pro cannot run 64-bit applications (such as Pindelski's upgrade guide), which is untrue. They are limited to a 32-bit EFI ROM. 64-bit Applications run natively, as this is independent of the EFI ROM. For reference, the G5 was the first Macintosh to support 64-bit, which mostly enabled them to address more than 4 GB of Maximum RAM. Every Intel Mac outside of the original Core Duos (not to be confused with the Core 2 Duo) is 64-bit. 32 bit only Intel Macs are an oddity,
2007 2,1 Mac Pro
There are no firmware upgrades for the Mac Pro 2.1s.
2008 3,1 Mac Pro
The Mac Pro 2008 remains a bit of the odd man out regarding firmware. With the DOSdude1 High Sierra patcher, this computer can boot APFS volumes but not from encrypted APFS volumes.
Clever hardware hackers discovered how to enable bootable NVMe on Mac Pro. It requires making a custom firmware using ROMtool and EXEinject on the 3.1. Today, this path is no longer necessary for NVMe support as OpenCore can inject the proper drivers for NVMe support.. Note: this hack was initially performed on Mac Pro 5,1s but is unnecessary as Apple has released NVMe compatible bootROMs for them. Below is a collection of links related to the bootROM procedure. Below is a collection of links related to the bootROM procedure. However, this hack falls into adventure territory. See the Mac Pro 3,1 NVMe Drive Natively Booting post below. It's highly recommended to stay with AHCI SSDs with the Mac Pro 3,1s.
- Step-by-Step Guide NVMe firmware upgrade (DO NOT USE FOR 4,1/5,1s), the original MacRumors post
- MacRumors: NVME boot on 3,1 in El Capitan - More importantly, a discussion on ROM hacking for NVMe on Mac Pro 3.1s
- MacRumors: Mac Pro 3,1 NVME Drive Natively Booting
2009 4,1 Mac Pro
Mac Pro 4.1s are flashable to the Mac Pro 5,1 firmware. Once flashed, they are a Mac Pro 5,1 and thus can use all Mac Pro 5,1 firmware updates. Below is a collection of links, all demonstrating how to upgrade a Mac Pro 4,1 -> 5.1. There are multiple guides on how to flash the Mac Pro 4,1 -> a 5,1. You will need the MacProFirmwareToolUpdate utility.
A Mac Pro 2009 running 5,1 Firmware will still appear as a 2009 Mac Pro in "About This Mac". However, this is not the firmware version but rather the manufacturer date. The firmware version can be found in the System Report. The firmware can be found in the System Report.
- How to Upgrade the Firmware of a 2009 Mac Pro 4,1
- MacRumors: Another Mac Pro 4,1 to 5,1 EFI Update Problem (boot ROM version fix)
- ArsTechnica: Firmware hack can transform a 2009 Mac Pro into a 12-core monster
- XLR8yourmac: Notes About the 2009->2010 Mac Pro EFI Updater (FYI to B08 Firmware users)
- Netkas: Mac Pro Firmware Upgrade Utility Released!
- Mac Pro 2009 firmware update and 5570 error - this link requires a membership to the MacProUpgrade FB group. 2009 Mac Pros can experience a 5770 Error when trying to update. Go to the link for Apple's firmware and manually download it, then Mac Pro 2009-2010 Firmware Tool is found within the DMG.
- GitHub: MacProFirmwareToolUpdate - MacEFIRom's Mac Pro 2009-2010 Firmware Tool ROM link seems to use a broken link when it tries to download the firmware images from Apple. This patch fixes it.
2010-2012 5,1 Mac Pro Firmware
Despite the obvious age of the Mac Pro 5.1s, someone or at least a group of someones are/is managed to throw a few bones to the community by providing updates for the Mac Pros 8 years after their release, an olive branch. Stability-minded users should not use beta OSes. Both 10.13 and 10.14 have been welcome surprises for Mac Pro 5,1 users, including firmware updates to enable APFS support and later NVMe booting. However, with macOS 10.15.x dropping 5,1 support, the Mac Pro 5,1s have hit the end of the road for EFI updates. Forum member Tsialex of MacRumors (one of the experts on Mac Pros on the interwebs) has compiled and maintained a list of Firmware versions for the Mac Pro 5.1. I highly recommend this blog post as I've directly lifted his notes from it, but there's more info in his original blog post. I credit his work below. The BootROMs are distributed as part of the Mac OS upgrades. It is unlikely that we will see continued firmware updates for the Mac Pro 5.1s in Catalina.
All Firmware updates are performed during the OS installation process. A Mac Pro can be updated to the latest firmware and continue to run older OSes. Mac OS 10.13 can run off an NVMe drive. Now that the classic Mac Pros have been dropped unceremoniously for 10.15 Catalina in Appleistic planned-obsolescence fashion, it's safe to assume we've seen the last firmware updates.
| Version | OS shipped with | Changes |
|---|---|---|
| with MP51.0083.B00 | 10.13 DP5 | Beta APFS support* |
| MP51.0084.B00 | 10.13 DP6 | Beta APFS support |
| MP51.085.B00 | 10.13.4 + Mojave DP/PB 1-3 | APFS support |
| MP51.087.B00 | 10.13.5 | missing the Intel Xeon microcodes |
| MP51.089.B00 | 10.13.6 | updating to the Spectre mitigated microcodes on the April 2 Microcode Update Guidance |
| 138.0.0.0.0 | 10.14 DP7/PB6 | 5GT/s support for every PCIe 2.0 card and new microcodes support |
| 139.0.0.0.0 | 10.14.1 DP1 | minor updates and corrections |
| 140.0.0.0.0 | 10.14.1 | NVMe boot, minor updates and corrections** |
| 141.0.0.0.0 | 10.14.4 DP2 | minor updates |
| 142.0.0.0.0 | 10.14.4 DP4 | W3xxx Xeon "bricker" & updated APFSJumpStart EFI module (see below for more details)*** |
| 141.0.0.0.0 | 10.14.4 final | NVMe boot, minor updates and corrections |
| 142.0.0.0.0 | 10.14.5 DP1 | 3xxx Xeon "bricker"*** |
| 141.0.0.0.0 | 10.14.5 DP2 | minor updates and corrections |
| 144.0.0.0.0 | 10.14.5 DP4 | lots of corrections, booting improvements |
* Mac OS 10.13 (High Sierra), comes bundled with a new EFI update for APFS bootablility and works with any 5,1 Mac Pros (including previously upgraded 4.1) Mac Pros but requires an EFI bootable graphics card as reported by MacRumors forum posters.
*** The Mac Pro Firmware upgrade v142.0.0.0 included in the developer preview 4 of MacOS Mojave 10.14.4 (20190304) and 10.14.5 DP1 included a bad BootROM, which is not part of the regular releases. Users at MacRumors are reporting that the update bricks Mac Pro 5.1s with W3xxx Xeon CPUs. See the check your CPU model section.
Updating a 4,1 to 5,1
The process of updating a 4,1 to a 5,1 requires disabling SIP in 10.11+ and running the Firmware Tool, I highly recommend following HouseOfMoth: Turning a 2009 4,1 Mac Pro into a 2010/2012 5,1 Mac Pro – 2021 Edition as it'll help you avoid common problems.
Sometimes firmware upgrades can be tricky. Users occasionally will see the "The program has encountered an error: 5570". There's a MacRumors thread, what's wrong? Why won't you let me upgrade 4,1 to 5,1 firmware? and MacProUpgrade: I'm trying to update my firmware for 4,1 to 5,1. I'm following the procedures, and I'm stuck at this error. Most threads recommend starting with disabling SIP, which the HouseOfMoth's guide starts with.
Updating Firmware Strategies for Mac Pro 5.1s
Mojave doesn't always make the update process clear, and it's possible to get stuck on 138.0.0.0.0 or 140.0.0.0.0 and miss upgrading to the last firmware-released version 144.0.0.0.0. The most tried and true solution is to have a spare drive or volume to install Mac OS 10.13, High Sierra, on. Then download from High Sierra the last version of Mojave, 10.14.6. The easiest way for most people is to use DOSDUDe1's Mojave installer and ignore the installer.
I've written a pictorial guide to walk anyone through upgrading to 144.0.0.0.0 for anyone looking to update their firmware, regardless of what OS they want to run.
Useful Links
OS upgrades

The Mac Pros can run much later OSes than officially supported, although there are caveats. Installing unsupported OSes can be done easily using scripts or using OpenCore. These scripts have been named after the authors who created them. Pike's Script is exclusively for the 1,1/2,1. DosDude1's scripts cover a brevity of Macs, including the Mac Pro 3,1/4,1/5,1. All but the 1,1/2,1s can run modern iterations of macOS using Dosdude1's hacks, which can be found at his website dosdude1.com. Below is a list of the official vs. unofficial supported OSes.
| Model: | Max officially supported OS | Max unofficially supported OS |
|---|---|---|
| Mac Pro 4,1/5,1 | macOS 10.14 | Sequoia |
| Mac Pro 3,1 | OS X 10.11 | Sequoia |
| Mac Pro 1,1/2,1 | OS X 10.7 | OS X 10.11 |
The Rise and Fall of OS Modification Scripts to OpenCore
To understand OpenCore, it's important to have a grasp of the history of hacking macOS to run on unsupported hardware. Prior to boot loaders, the vector to run the latest macOS were scripts that generally modified the OS itself so it'd pass hardware checks to install and boot and often included fixes. The most popular and prominent were the DOSDUDE1 installers.
While these scripts worked, they were an imperfect solution, as installing updates would break the modifications and ultimately left the updated OS unbootable. Installing updates meant re-running the entire macOS installer.
OpenCore came from a desire to create a bootloader to allow for per-boot injections to solve the problems for Hackintoshes or Apple hardware, be it legacy hardware support, drivers, or boot flags. The advantage is that macOS itself (mostly) was not being modified, and changes could easily be swapped by reconfiguring the boot loader.
While the process of OpenCore is more complex for the end-user, its advantages are massive, thus drawing in a larger community of both Apple hardware owners and Hackintosh users. Many notable people have contributed to OpenCore, including people like DOSDUDE1.
OpenCore History: chasing Apple's whims (SurPlus/MontRAND)
With OpenCore Legacy Patcher, the installation process of OpenCore's friction has been simplified into a point-and-click install. It wasn't always this way, and it took the work of many brilliant people to get to where we are today.
OpenCore wasn't without its own complications for the Mac Pros. This is largely due to the classic Mac Pros no longer being supported, as Apple's changes to macOS in later versions have created issues for the classic Mac Pros.
To give context to OpenCore's battles, Big Sur 11.3+ presented problems as boots would often fail. This potentially could result in a corrupted boot volume documented by users on MacRumors, which resulted in the experimental LateBloom OpenCore hack and eventually SurPlus.
Late Bloom worked by interjecting a delay() during the boot sequence to give the Mac Pro (hopefully) enough time to load properly without interrupting it entirely. It was a bandaid fix but was later resolved when the race condition was identified and patched.
The Mac Pro 4,1/5,1 is Big Sur compatible using OpenCore, and at least one user's preliminary test shows mildly improved Geekbench scores (Opencore - on the Mac Pro, requires membership). The Mac Pro 3,1s are still able to run with a bit of work. The most popular distribution of OpenCore at the time was, h9826790 (aka Martin)'s bundle.
macOS Monterey requires the SurPlus to boot safely, macOS Monterey 12.1 makes extensive use of RDRAND, a CPU random number generator that does not exist on the classic Mac Pros, and OpenCore - on the Mac Pro is recommending holding off on Monterey as it enables SecureBootModel (SBM) in OpenCore and resetting the NVRAM ram can leave your Mac in an unbootable state. Today, OpenCore offers OpenCore Legacy Patcher which automates configuration including the SurPlus/MontRaid to fix 11.3+ and above.
macOS Ventura has created its own set of long-term issues as it requires AVX and AVX2 for many OS functions. There have been inroads as Ventura is bootable, but some applications use AVX/AVX2, thus creating compatibility issues.
OS updates often drop old hardware support. This chart does not include notes for macOS and the 1,1/2,1s. See below for notes on OS upgrades for Mac Pro 1,1/2,1s.
* macOS 11.3 requires SurPlus, and macOS 12.1 requires MonteRand
OpenCore and OpenCore Legacy Patcher
As a quick primer, OpenCore is a boot loader. OpenCore functions as middle wear between the firmware and macOS. This allows changes to be injected without modifying the OS. Through these modifications, discontinued hardware can be supported. OpenCore was designed to replace Clover and other Hackintosh solutions to avoid repeatedly patching after minor OS changes. However, OpenCore proved not only to be useful for Hackintosh owners but also for Mac owners as well.
OpenCore Legacy Patcher (OCLP) is a utility that automates the installation of OpenCore on older Macs that Apple no longer supports and has matured to a point-and-click utility. Users do not have to understand esoteric software configuration in OpenCore; instead, they can rely on a community to test the latest developments from the OpenCore community and fold them into a package. The above issues like MontRand are folded into OpenCore Legacy Patcher, meaning the users do not need to understand the inner workings of OpenCore configuration.
I've written a guide, OpenCore and OpenCore Legacy Patcher Explained
| OS version: | Hardware Requirement Changes: | DOSDude1 required models: |
|---|---|---|
| 10.11: El Captian | none | none |
| 10.12: Sierra | Drops support for wireless chipset BCM4321 (found in the Mac Pro 3.1). 32-Bit EFI Mac support dropped / SSE 4 required. (Mac Pro 1,1/2,1s) | 3.1 |
| 10.13: High Sierra | No wireless BCM4321 support, switches to APFS as the default file system. | 3.1 |
| 10.14: Mojave | No wireless BCM4321 support, now requires Metal compatible GPU to install*, SSE4.2 requirement for AMD GPU Drivers**, no modern Nvidia support*** | 3.1 |
| 10.15: Catalina | No 32-bit Application/binary support, No wireless BCM4321 or BCM94322MC support (found in the Mac Pro 4,1/5,1), requires Metal compatible GPU to install*, SSE4.2 requirement for AMD GPU Drivers**, no modern Nvidia support*** See below for details. | 3.1, 4.1, 5.1 |
| 11.0 Big Sur | No 32-bit Application/binary support, No wireless BCM4321 or BCM94322MC support (found in the Mac Pro 4,1/5,1), requires Metal compatible GPU to install*, SSE4.2 requirement for AMD GPU Drivers**, no modern Nvidia support*** See below for details. Requires OS hack SurPlus. | None yet. |
| 12.0 Monterey | No 32-bit Application/binary support, No wireless BCM4321 or BCM94322MC support (found in the Mac Pro 4,1/5,1), requires Metal compatible GPU to install*, SSE4.2 requirement for AMD GPU Drivers**, no modern Nvidia support*** See below for details. Requires OS hack SurPlus. Currently, Recommended advice is to way because of SecureBootModel (SBM) configuration. See OpenCore - on the Mac Pro - MONTEREY WARNING!!. Monterey 12.1 appears like it will not be usable on the Mac Pro 5,1s without extensive hacking.. | None. |
| 13.0 Ventura | Requires AVX/AVX2. Massive changes. 2013 Mac Pro 2013 dropped. No 32-bit Application/binary support, No wireless BCM4321 or BCM94322MC support (found in the Mac Pro 4,1/5,1), requires Metal compatible GPU to install*, SSE4.2 requirement for AMD GPU Drivers**, no modern Nvidia support*** Drops support for any GPUs below AMD Polaris chipsets (GPUs before the RX 560/RX 570/RX 580, etc.), USB 1.1 drivers removed. | None. |
| 14.0 Sonoma | Requires AVX/AVX2. No 32-bit Application/binary support, No wireless BCM4321 or BCM94322MC support (found in the Mac Pro 4,1/5,1), requires Metal compatible GPU to install*, SSE4.2 requirement for AMD GPU Drivers**, no modern Nvidia support*** Drops support for any GPUs below AMD Polaris chipsets (GPUs before the RX 560/RX 570/RX 580, etc.). No Legacy USB 1.1 Drivers. | None. |
| 15.0 Sequoia | Requires AVX/AVX2. No 32-bit Application/binary support, No wireless BCM4321 or BCM94322MC support (found in the Mac Pro 4,1/5,1), requires Metal compatible GPU to install*, SSE4.2 requirement for AMD GPU Drivers**, no modern Nvidia support*** Drops support for any GPUs below AMD Polaris chipsets (GPUs before the RX 560/RX 570/RX 580, etc.). No Legacy USB 1.1 Drivers. | None. |
* Mojave and Catalina will not allow installation if any GPUs are Metal compatible plugged in, such as the GT120. Updating requires pulling non-Metal accelerated GPUs (they can be installed after the update and will still output video). See the Aftermarket GPUs section for a complete list of Metal compatible GPUs.
** The AMD drivers for off-the-shelf cards (like the Vega and Radeon 5xx series) do not support the Mac Pro 3,1 in Mojave but can be used with Netkas patched AMD METAL drivers. These are provided in the DosDude1 patchers for Mojave and Catalina.
*** NVidia Web Drivers are no longer supported, meaning any Kepler-based chipset has been dropped in macOS over a dispute between Apple and Nvidia. See the GPU section for more details.
Notably, some security updates may fail at installation since they require updating the recovery partition manually. See Update Recovery Partition on Unsupported Macs for more details.
The popular OpenCore bootloader enables installing the latest OS by tricking it by making the Mac Pro to the OS as appearing as an iMac Pro. The advantage is that all OS updates would be performed via the control panel. See the MacRumors thread for more details and h9826790 (aka Martin)'s OpenCore overview.
Mojave vs. Catalina vs. Big Sur vs. Monterey
Changes have not be nearly as drastic post Monterey.
| Feature | Mojave | Catalina | Big Sur | Monterey |
| Max GPU Support | Vega Series (Vega 56, 64, FE, VII) | Navi (5500, 5600, 5700 + XT) | Navi | Big Navi (6600 XT, 6800, 6800 XT, 6900 XT) |
| Application support | 32-Bit / 64-bit | 64-Bit | 64-Bit | 64-Bit |
| Graphics API | Metal (OpenGL depreciated) | Metal | Metal | Metal |
| Media | iTunes | Apple Music/Apple TV+ | Apple Music (Lossless and Dolby Atmos Support) Apple TV+ | Apple Music (Lossless and Dolby Atmos Support) Apple TV+ |
Monterey and Big Sur few major changes for Mac Pro users beyond GPU support, security updates, improved consumer audio formats, and new versions of Apple's applications (Music, Apple TV+, Messages, Safari, etc.). It runs stable on Mac Pros, and Big Sur has been demonstrated to slightly improve Geekbench scores. Users can view Apple's list of Monterey features here.
macOS 15 Sequoia
macOS 15 Sequoia is supported under OpenCore Legacy Patcher (and via manual configurations for OpenCore). See OCLP Supported Models page for the latest and most current details
Downloading old versions of macOS
Apple has finally wised up and allowed direct downloads of (some) DMGs, which can be found here going back as far as macOS 10.10. Apple does still sell CDs of 10.7 and 10.8, and finally offers them as direct downloads. Mac OS X 10.7 Lion and Mac OS X 10.8 Mountain Lion. Below is a list of download links (and source) for previous macOS versions.
- 10.6 - Snow Leopard (Archive.org)
- 10.7 - Lion (Apple)
- 10.8 - Mountain Lion (Apple)
- 10.9 - Mavericks (Archive.org)
- 10.10 - Yosemite (Apple)
- 10.11 - El Captian (Apple)
- 10.12 - Sierra (Apple)
- 10.13 - High Sierra (Apple App Store), Achive.org
- 10.14 - Mojave (Apple App Store), (Archive.org)
- 10.15 - Catalina (Apple App Store), (Archive.org)
OS Installer is Damaged error
If you are having problems with the Sierra / High Sierra / Mojave installer running, with an error reading to the effect of "This copy of the Install macOS Mojave.app application is damaged and can't be used to install macOS", the signing certificate expired. From the installer (if booted by USB), go from the menu, select terminal, and run the following command:
Date 1023120019This will set your Mac's date to October 23, 12 pm 2019, temporarily, and this will allow you to run the installer.
10.15+ - Known Issues
Upgrading to Catalina may not be in everyone's interest, as 32-bit applications are no longer supported. No Mac Pro (sans the 2019 xMP) can run Sidecar, although I wouldn't be surprised if enterprising hackers find a workaround.
Know Issues:
- Apple removed the BCM94322MC wifi chipset support, the original wifi card found in the Mac Pro 4,1/5,1s. However, BCM94360CD or BCM943602CD chipsets are still supported. These can be upgraded.
- NVIDIA Kepler GPU support is buggy.
- Sidecar (Apple's new screen-sharing for iPads) is actively blocked for the cMPs and even the trashcans.
Helpful Links
- MacRumors: OpenCore on the Mac Pro
- YouTube: DOSdude - Installing Catalina on Unsupported Macs
- DosDude1: macOS 10.15 Catalina Patcher Tool for Unsupported Macs
- DosDude1: macOS 10.14 Mojave Patcher Tool for Unsupported Macs
- DosDude1: macOS High Sierra Patcher Tool for Unsupported Macs
- MacRumors: MP3,1 never dies - Netkas patched AMD METAL drivers to work with MP3,1!
- MacRumors: Strange Audio Issue on MP 4,1>5,1 Mojave 10.14.4 - It appears E series Xeons have issues with audio for some users. The user replaced E series Xeons with later CPUs like the X56xx to fix the audio issue.
- Reddit: help-- 4,1 > 5,1 Mojave update black screen
Upgrading to Catalina / Big Sur / Monterey: OpenCore vs DosDude1
Currently, upgrading to Catalina has two vectors to upgrade to 10.15 Catalina: OpenCore and DosDude1. Hackintosh users may recognize OpenCore, the opensource bootloader, Big Sur, and Monterey are only obtainable using OpenCore.
OpenCore - see the install guide here as well as the refined instructions in the same thread.
Pros:
- Allows System Updates via the Update Panel
- OS is entirely unpatched
- Can run the latest macOS.
- Vectors for Hardware Acceleration for modern GPUs and Video
- Can enable a pre-boot boot selector (boot screen)
- Protects boot ROM from Windows 10 when installed in UEFI mode
- Can use 32 GB DIMMs in 5,1s for 256 GB of RAM
- Continues to evolve, bringing more support and stability for older hardware
Cons:
- Complex setup
- Requires Westermere CPU for Mac Pro 5,1s g
DosDude1 - official website for Catalina Patcher
Pros:
- Easy, intuitive installation
- Direct OS download from the installer
- Includes patched drivers for modern AMD GPUs for 3,1 Mac Pros
Cons:
- OS updates require re-running the Catalina Patcher process
- Does not include the benefits of OpenCore (boot screen, video codec acceleration, etc)
- No vector currently for beyond Catalina
OpenCore: Acceleration, Boot selection, and unpatched OS updates
The Mini-Glossary contains a good overview of OpenCore. In short, OpenCore is a boot loader that loads before macOS and can improve functionality, such as enabling full GPU acceleration for video codecs, enabling boot screens with aftermarket GPUs, and the only way to run macOS 12. It is now the standard recommended vector for Mac Pro users running 10.14 Mojave, 10.15 Catalina, 11.0 Big Sur, and 12 Monterey. The most popular implementation is the pre-configured OpenCore distribution found on MacRumors maintained by Martin Lo.
Regarding macOS, the Mac Pro is an iMac Pro that allows OS updates to be installed seamlessly.
Any OS beyond Big Sur 11.2.3 is susceptible to a serious bug, a PCIe race condition. This particular glitch caused the Mac Pro to fail to boot frequently and often, eventually, after repeated crashes resulting in a boot drive corrupting crash. As a stopgap, a very experimental workaround known as LateBloom, a hack to inject delays into the boot process to allow for the callbacks (that cause the crash) to respond. Now, the exact issue was identified, and SurPlus is included in h9826790 (aka Martin)'s OpenCore bundle. For users who've already installed OpenCore, Mac Sound Solutions has a great YouTube video demonstrating the process to upgrade to Big Sur 11.6, Jessie's Flying - macOS on unsupported Macs also some interesting OpenCore content as well.
OpenCore is continuously in development and has evolved to provide more stability and features for the Mac and Hackintosh communities.
Apple's EFI vs. UEFI and implications for OpenCore
Again, the Mini-Glossary covers EFI, but the short answer is that EFI that Apple used on its earliest Intel Macs predates the UEFI standard; thus, it creates issues around pre-boot graphics card drivers (hence lack of pictures before the drives fully load with aftermarket cards) and also with other OSes expecting UEFI. Typically, with PCs, before EFI, the boot order went: bios -> MBR (Master boot record) -> bootloader -> Kernel. With UEFI, this changed to UEFI -> EFI bootloader -> Kernel. Thus a properly partitioned drive for the EFI world has an EFI partition + GUID partition. However, Apple's implementation of both EFI and UEFI is unusual, to say the least, as as famed eclecticlight.co points out that the EFI partitions aren't particularly used for anything besides perhaps firmware updates. OpenCore provides a way to modify EFI to provide UEFI-like functionality. It works by adding a middle step to the boot sequence that can be altered, Mac EFI bootloader -> OpenCore Bootloader -> Kernel. This additional step is crucial as it allows OpenCore to inject changes without physically modifying the OS. This is much more desirable than OS patching, as changes happen as part of the boot sequence and will not be overwritten when the OS is updated.
OpenCore has rapidly progressed, with a flurry of massive successes, starting with GPU fixes, and now has moved towards extending the life of the classic Mac Pros. Thus, so has the complexity of OpenCore, and thus, for my own sanity (this guide is already massive), I am not providing a comprehensive guide but rather a primer in this section as OpenCore could easily be as large as this guide itself. End of the day, this guide is a road map.
The OpenCore Bootloader supports an EFI screen for newer GPUs by loading additional generic device drivers, enabling video output.
OpenCore Legacy Patcher
OpenCore also supports OpenCore Legacy Patcher which allows even deper legacy support. One of the most popular applications for OpenCore Legacy Patcher (often referred to as OCLP) is Nvidia driver injection for Kepler Metal compatible drivers in macOS Monterey.
OpenCore Legacy Patcher (OCLP) is now generally the preferred method for people installing e
OpenCore Guides
Most users should default to using OpenCore Legacy Patcher rather than attempt to manually configure OpenCore, and should follow the official Dortania's OpenCore Install Guide as it supporters a wide range of hardware.
For ages, the community, spearheaded by Martin LO, has maintained a preconfirguration for OpenCore at MacRumors and a user's YouTube video demonstrating OpenCore bridge boot rEFInd with legacy Windows and The OpenCore MacRumors thread for more details.
Also, Joerg Henninges's YouTube Channel has a fair amount of OpenCore Content and House of Moth has a good Quick Guide to installing OpenCore on the Mac Pro. Mac Sound Solutions has a great YouTube videos on OpenCore.
MacVidCards.eu has tutorial on how to configure OpenCore Legacy Patcher.
The Mac Pro 3,1 has its own special set of considerations. See the OpenCore and the 2008 Mac Pro 3,1.
MacRumor's Mac Pro Forum and Open Core on the Mac Pro (Facebook) are great OpenCore communities that are invaluable and where I frequented when I used OpenCore.
Lastly, there is now a Facebook Group dedicated to running OpenCore on cMPs, Opencore - on the Mac Pro.
DosDude1 Patcher
DosDude1 Patcher is no longer recommended but is simple to use for Catalina. You'll need a 16 GB+ drive or USB flash that can be wiped clean. Most will do, although some USB Flash drives can cause issues with the installer. For instance, a Lexar MicroSD card in a USB adapter and an old USB Flash drive caused the installer to crash when trying to boot off the installer volume. I used an old Firewire HDD to upgrade to High Sierra on my Mac Pro 3.1.
Also, it is very important to run the post-install scripts. Your Mac will likely reboot suddenly after the DOSdude1 installer has completed and most likely will try and boot from the new OS. It will crash. Fear not! Boot from the DOSDude1 installer and, run from the dropdown menu and run the Post Install Scripts. Force building cache may cause a lot of headaches (including the inability to boot without using safe mode). Unless you have a good reason to do so, I recommend not force-clearing the caches.
Disabling System Integrity Protection
As mentioned in the glossary, SIP functions as a method of system protection. Apple describes it as follows:
" (A) security technology in OS X El Capitan and later that's designed to help prevent potentially malicious software from modifying protected files and folders on your Mac. System Integrity Protection restricts the root user account and limits the actions that the root user can perform on protected parts of the Mac operating system."
Before Apple implemented SIP, any software that was granted root access (by the user entering her/his password) could modify/edit system files. Generally, a user shouldn't disable SIP unless there's a specific reason. That said, there are plenty of reasons to disable SIP, such as certain boot managers or unsupported hardware cases. SIP can always be re-enabled.
- Boot to recovery mode
- From the recovery mode, from the Utility dropdown, select "Terminal"
- Enter the command:
csrutil disable - Reboot
To re-enable SIP, repeat the above steps. Instead, run csrutil enable
You can check your SIP status at any time without booting to the recovery mode from the terminal with the following command: csrutil status
Stop the "Upgrade to MacOS..." banners
In the past few years, Apple has moved to nagware for OS updates, often pestering users running non-compatible configurations to upgrade (such as running a non-Mojave-compatible GPU). You can disable the notifications following osxdaily's handy guide.
Upgrade to High Sierra without APFS
As an extreme edge case for certain pros using legacy apps, High Sierra can wreak havoc on support. A few users have chosen to continue using HFS+ as it ensures compatibility with some legacy applications. Note: for Mac Pro 5,1 users, this can interfere with later firmware updates. MacProUpgrade group members, for instance, report that Updating to 10.4.5 firmware won't install with HFS+ on the boot drive.
Running Apps from unidentified developers
Gatekeeper no longer has a "allow apps downloaded from anywhere," but it is still possible to re-enable this setting using the terminal.
sudo spctl --master-disableThis can be re-enabled at any time by running the inverse of this command:
sudo spctl --master-enableBig Sur requires an entirely new paradigm. A user must Right-click an application and click open to be presented with the ability to safelist the application.
iMore has a good article explaining the entire process for the curious.
Mac Pro 1,1/2,1 and Pike's Script
The Mac Pro 2006s can run 10.11.6, but there are some hoops to jump through, notably a video card with at least 512 MB of VRAM, and you'll need Captain Pike's Script, which takes a lot of the leg work out. Also, Wi-Fi will be unsupported with the old chipset, but the airport can be upgraded.
- MacRumors: Install 10.8 on a Mac Pro 1,1
- MacRumors: Install 10.9 on Mac Pro 1,1
- SuperUser Exchange: Install 10.9 on Mac Pro 1,1
- MacRumors: 2006/2007 Mac Pro (1,1/2,1) and OS X Yosemite
- AskDifferent: Mac Pro 1,1 running any variant of the latest version of macOS (up to 10.11)
- Mac Rumors: 2006/2007 Mac Pro (1,1/2,1) and OS X El Capitan (Captian Pike's Script)
Final Cut Pro 7, Aperture, and later OSes
The open-source project, Retroactive, allows users to run Final Cut Pro 7 up to macOS 10.14 and Aperture on macOS 11, Big Sur.
CPU Upgrades

Every Mac Pro made (including the 2013 and 2019 Mac Pros) has sported multicore, interchangeable Xeon series CPUs. The Xeons are built on the same architecture as its desktop-grade siblings. The Xeon CPUs' main benefit has been more CPU cores, the ability to support multi-CPU motherboards, larger cache memory, more PCIe lanes, much higher maximum RAM, and Error-correcting code memory (ECC). These benefits come with a trade-off as the Xeon line had much higher price points, doesn't have built-in support for overclocking, and generally operates at (slightly) lower-clock speeds.
As a computer is the sum of many parts (not just the CPU), CPUs are not interchangeable between Mac Pro versions. For example, a CPU from a Mac Pro 4.1/ 5,1 cannot be used with a Mac Pro 2.1, as the supporting chipsets and the CPU socket itself are different. The Mac Pro 1,1/2,1s used 65-nm (nanometer) CPUs, and 3,1/4,1/5,1 used 45-nm CPUs. The Mac Pro 6,1s that came after the classic Mac Pros used a 22-nm. In 9 years, the Mac Pro CPUs had shrunk to roughly 1/3 the size. Incidentally, seven years later, Intel will not ship its first 10-nm CPUs until 2021, let alone a 7-nm. A smaller CPU means more efficiency (see Denard Scaling). AMD's Ryzen 4000 series is 7 nm. Apple's A14 CPUs are 5 nm.
Instruction Sets, SSE 4.2, VT-x/EPT, AVX/AVX2
Apple has (so far) gone through three major CPU changes with the Macintosh lineup, going from 68k (Motorola), PowerPC (IBM/Motorola), and currently x86 (Intel, AMD) and ARM (Apple/TSMC). Each of these terms refers to the family of instruction set architecture that a CPU can execute (the compiled binary code it can run). Among each of these instruction set architectures are various improvements that often require code to be optimized by code compilers, and/or the software developers must (re)write code so they can be taken advantage of.
Over time, CPUs have gained specialized single instruction, multiple data (SIMD) instruction sets that are beneficial for certain types of tasks where the same operation on multiple data points simultaneously (like changing the volume of PCM audio or rotating an image). This allows a CPU to perform the task with much greater efficiency. In a different era, these gains were often marketed to consumers like MMX or AltiVec (velocity engine), or 3Dnow. Today, these sorts of CPU changes aren't as frequent or as clearly advertised, but they still exist and affect performance.
Both SSE 4,1 instruction set and SSE 4.2 first appeared in the Harpertown (SSE 4.1) and Nehalem CPUs (SSE 4.2) found in the Mac Pro 4.1+, as well as both VT-x/EPT. SSE4.2 generally is not required for Mac software to run, but the Radeon drivers for Mojave* do. SSE 4.2 can make a world of difference in some applications, such as the application Serato Djay. The application is barely usable on a Mac Pro 2x Quad Core 2.8 GHz 3,1, whereas a Mac Pro 4,1 2.4 GHz 4-Core will have no trouble with it.VT-x/EPT are both technologies used in virtualization. While all the Mac Pros can run virtual machines as they include HyperVisor support, the Mac Pro 4.1s+ are noticeably more performant when running virtual machines as popular software like VMware and Parallels have VT-x/EPT support.
There are some CPU instructions that the Mac Pros 4,1/5,1s do not support, such as Advanced Vector Extension (AVX). Not much software requires AVX, but Massive X does. AVX/AVX2 dependency is unlikely to ever be required for macOS x86. Apple's own Rosetta 2 does not support AVX/AVX2/AVX 512. CPUs are unlikely to be the limiting factor for future macOSes.
There are plenty of quality high-level overviews on CPUs and their design which are much better than this guide.
*The AMD Drivers have been hacked to include SSE 4.2 emulation for Mac Pro 3.1s, enabling them to use modern AMD GPUs. See the GPU Upgrades section for more details.
Apple Silicon and the Mac Pro's fate (and additional observations)
The short answer is no one knows how long Apple intends to support Intel Macs. We have two statements from Apple, they will offer Intel Macs until 2022, and they pledged to support x86 for years.
Apple has transitioned its Mac lineup two times now, from 68k to PPC and from PPC to x86. To assist the previous transition, Apple offered Rosetta a real-time translation layer to run PPC binaries on x86, which included both PPC and x86 libraries for applications to access. This time, Apple has Rosetta 2, which works similarly, translating x86 to ARM. In an ironic twist, ARM is the second time Apple has switched to a RISC-based CPU.
Apple transitioned to x86 quickly, starting with offering in late 2005 Intel iMacs and laptops using the Core Duo, which quickly jumped to the 64-bit Core 2 Duos mere months later and, in 2006, refreshed its entire lineup with stark and drastic performance increases. Apple supported PPC Macs until 2009 when Mac OS X 10.6 Snow Leopard dropped support. Apple supported PPC for roughly three years.
However, the lay of the land is different today. In 2005, Apple sold 4.5 million Macs. Today, Apple sells roughly 20 million Macs. Roughly, Apple has 140-150 million still supported Intel Macs in Big Sur, vs. Apple, the 15 million PowerPC Macs capable of running OS X when Apple switched to x86. Apple is no longer the same company and now faces increased scrutiny as it finds itself the most valuable tech company and often the world's most valuable one. We can safely assume that Intel Macs will be supported until 2025, as Apple has supported PPC Macs for almost three years. My guess would be 2026-2027, as 4-5 years seems correct. It's also worth noting that, in May of 2020, Microsoft stopped distributing the 32-bit version of Windows 10 ( even owners of 20-year-old Pentium 4 desktops could run Windows 10 ). Windows will undoubtedly support old Intel Macs for many years. For comparison, Apple dropped 32-bit CPUs in 2011, axing support for the first 2005 Macs featuring Core Duo CPUs.
The performance of M1 Macs is impressive, boasting Geekbench single-core 3x as fast as the best cMP and besting its multicore performance by roughly 8%-10%, but also faces some hard limitations that are unanswered. Currently, the M1 cannot support eGPUs (or may not support eGPUs yet), currently capped at 16 GB of RAM, cannot run unsigned code (I and others disproved this), and cannot boot Windows. The synthetic benchmarks are very impressive. That said, in some more real-world tests like Logic or clickbaity Intel And AMD x86 Mobility CPUs, Destroy Apple's M1 In Cinebench R23 Benchmark Results (which isn't the case seeing as the m1 has half the cores and less than half the power consumption as a Ryzen 9 4900H). In many other real-world tests, the M1 shines very brightly. It's apparent that MacWorld has jumped the gun with With M1 Macs, memory isn't what it used to be, as more real-world testing is needed to back up such a claim. Apple uses a unified memory architecture, where both the GPU and CPU share the RAM instead of having a separate buffer for the GPU (VRAM). Unified memory previously was most commonly found in video game consoles (starting with the N64 and Playstation 2) and smartphones. Unified memory means that VRAM isn't required as both the CPU and GPU have direct access to items stored in RAM, and thus, there isn't additional latency when items are moved from RAM to VRAM. However, this comes at the cost of VRAM not operating independently of RAM when large amounts of VRAM are required, such as high-end gaming, certain machine learning operations, video compositing, etc. Tasks that require/greatly benefit from large amounts of RAM or VRAM will undoubtedly continue to benefit from large amounts of RAM (or VRAM) on Apple Silicon.
On its tight thermal budgets and against integrated graphics chipsets, the Apple Silicon is virtually unmatched. Apple Silicon still hasn't closed the gap against dedicated GPUs and remains lagging. Apple's laptop future looks exceptionally bright, but its professional desktop future is murky where core counts are high, thermal budgets are big, RAM measures into the terabytes, GPUs are massive, and modularity is king.
I can easily imagine a strange future where Apple's hardware aces high-end GPUs when rendering video from video editing applications but gets pummeled in gaming or tensor flow.
Will Apple release any Apple Silicon with modular components? Will they be based on current standards? We can only hope that the ideal Mac Pro is capable of using common GPUs like AMD's RX 6800 or the bigger AMD's RX 6900 XT.
How to replace the CPUs in a 4,1 - 5,1
The Hex 3.2 update from 2010 quad 2.8 photos new! CPU to use! from 2011 has been a community standby, amassing well over 200k views since it was first posted. ifixit it also has "Mac Pro 2009-2012 CPU (8 core) Replacement" that demonstrates the process of replacing the CPUs. There's also quite a bit of youtube content on the subject. The 4,1 dual trays use delidded CPUs.
Are "matched paired" CPUs worth it?
Occasionally, eBay sellers will sell "matched paired" CPUs. Intel has never sold "matched pair" Xeons as they are manufactured to precision to be directly interchangeable. Do not waste your money on this as it is nonsense.
CPU Compatibility Charts
I sourced the information from MacRumors, so all credit goes to the community there and forum member ActionableMango for compiling this list. This list is truncated to the most important bits of information. Also, 4,1/5,1 Mac Pro 1x to 2x CPU upgrades require a CPU tray capable of housing two CPUs, which often cost as much as the computer itself.
Mac Pro 2009 / 2010 / 2012 (4.1, 5.1)
Mac Pros maximum RAM depends on the CPU configuration in a Mac Pro. Dual CPUs enable more than 2x the maximum RAM. Not all Xeons sold are dual CPU compatible; thus, they cannot be paired with another CPU. i7 CPUs cannot be paired together. The CPUs must be the same, and installing a single CPU causes an error state. Also, go to the original thread to read up on 4.1 Mac Pro dual CPU upgrades.
- 56GB in a single-processor Mac Pro using a single-processor-compatible Xeon
- 64GB in a single-processor Mac Pro using a dual-processor-compatible Xeon
- 128GB in a dual-processor Mac Pro (although in certain circumstances, 160 GB of RAM works in 5.1s, RAM Upgrades section)
✔️* = Requires Mac Pro 4,1 -> 5,1 firmware upgrade. 4,1 dual CPU upgrades require the process of delidding the CPUs to deal with the height difference. 5,1 Mac Pros use regular CPUs. The process of delidding can be performed manually or bought pre-delidded. Most users elect to delid the CPUs themselves based on forums.
🚫 = The X5687, despite being socket compatible, does not work with the Mac Pro 4,1/5,1. It's been confirmed by a bold Mac Rumors poster. There's some misinformation on a few other sites, like pindelski.org's guide (a dated early attempt at a comprehensive Mac Pro upgrade guide), so be careful. I'm not picking on Pindelski's guide, as it certainly contains mostly good advice, but the collective community knowledge has progressed quite a bit since then.
*️⃣ = The iSeries CPUs cannot address ECC memory nor be used in dual CPUs. Multiple users have confirmed more 56 GBs of RAM with iSeries.
| Architecture | Cores | Grade | CPU-Model | GHz | Turbo | RAM | Watt | MP4,1 | MP5,1 |
| Westmere | 6 core | Dual Xeon | X5690 | 3.46 | 3.73 | 1333 | 130W | ✔️* | ✔️ |
| Westmere | 6 core | Dual Xeon | X5680 | 3.33 | 3.60 | 1333 | 130W | ✔️* | ✔️ |
| Westmere | 6 core | Dual Xeon | X5679 | 3.20 | 3.60 | 1066 | 115W | ✔️* | ✔️ |
| Westmere | 6 core | Dual Xeon | X5675 | 3.06 | 3.46 | 1333 | 95W | ✔️* | ✔️ |
| Westmere | 6 core | Dual Xeon | X5670 | 2.93 | 3.33 | 1333 | 95W | ✔️* | ✔️ |
| Westmere | 6 core | Dual Xeon | X5660 | 2.80 | 3.20 | 1333 | 95W | ✔️* | ✔️ |
| Westmere | 6 core | Dual Xeon | X5650 | 2.66 | 3.06 | 1333 | 95W | ✔️* | ✔️ |
| Westmere | 6 core | Dual Xeon | E5659 | 2.53 | 2.80 | 1333 | 80W | ✔️* | ✔️ |
| Westmere | 6 core | Dual Xeon | E5645 | 2.40 | 2.67 | 1333 | 80W | ✔️* | ✔️ |
| Westmere | 6 core | Dual Xeon | L5639 | 2.13 | 2.67 | 1333 | 60W | ✔️* | ✔️ |
| Gulftown | 6 core | Xeon | W3690 | 3.46 | 3.73 | 1333 | 130W | ✔️* | ✔️ |
| Westmere | 6 core | Xeon | W3680 | 3.33 | 3.60 | 1333 | 130W | ✔️* | ✔️ |
| Westmere | 6 core | Xeon | W3670 | 3.20 | 3.46 | 1066 | 130W | ✔️* | ✔️ |
| Gulftown | 6 core | Consumer *️⃣ | i7 990X | 3.46 | 3.73 | 1066 | 130W | ✔️* | ✔️ |
| Gulftown | 6 core | Consumer *️⃣ | i7 980X | 3.33 | 3.60 | 1066 | 130W | ✔️* | ✔️ |
| Gulftown | 6 core | Consumer *️⃣ | i7 970 | 3.20 | 3.46 | 1066 | 130W | ✔️* | ✔️ |
| Westmere | 4 core | Dual Xeon | X5687 | 3.60 | 3.86 | 1333 | 130W | 🚫 | 🚫 |
| Westmere | 4 core | Dual Xeon | X5677 | 3.46 | 3.73 | 1333 | 130W | ✔️* | ✔️ |
| Westmere | 4 core | Dual Xeon | X5672 | 3.20 | 3.60 | 1333 | 95W | ✔️* | ✔️ |
| Westmere | 4 core | Dual Xeon | X5667 | 3.06 | 3.46 | 1333 | 95W | ✔️* | ✔️ |
| Westmere | 4 core | Dual Xeon | X5647 | 2.93 | 3.20 | 1066 | 130W | ✔️* | ✔️ |
| Westmere | 4 core | Dual Xeon | E5640 | 2.66 | 2.93 | 1066 | 80W | ✔️* | ✔️ |
| Westmere | 4 core | Dual Xeon | E5630 | 2.53 | 2.80 | 1066 | 80W | ✔️* | ✔️ |
| Westmere | 4 core | Dual Xeon | E5620 | 2.40 | 2.66 | 1066 | 80W | ✔️* | ✔️ |
| Westmere | 2 core | Dual Xeon | X5698 | 4.40 | 4.54 | 1333 | 130W | 🚫 | 🚫 |
| Nehalem | 4 core | Dual Xeon | W5590 | 3.33 | 3.60 | 1333 | 130W | ✔️ | ✔️ |
| Nehalem | 4 core | Dual Xeon | W5580 | 3.20 | 3.46 | 1333 | 130W | ✔️ | ✔️ |
| Nehalem | 4 core | Dual Xeon | X5570 | 2.93 | 3.33 | 1333 | 95W | ✔️ | ✔️ |
| Nehalem | 4 core | Dual Xeon | X5560 | 2.80 | 3.20 | 1333 | 95W | ✔️ | ✔️ |
| Nehalem | 4 core | Dual Xeon | X5550 | 2.66 | 3.06 | 1333 | 95W | ✔️ | ✔️ |
| Nehalem | 4 core | Dual Xeon | E5540 | 2.53 | 2.80 | 1066 | 80W | ✔️ | ✔️ |
| Nehalem | 4 core | Dual Xeon | E5530 | 2.40 | 2.66 | 1066 | 80W | ✔️ | ✔️ |
| Nehalem | 4 core | Dual Xeon | E5520 | 2.26 | 2.53 | 1066 | 80W | ✔️ | ✔️ |
| Nehalem | 4 core | Xeon | W3580 | 3.33 | 3.60 | 1333 | 130W | ✔️ | ✔️ |
| Nehalem | 4 core | Xeon | W3570 | 3.20 | 3.46 | 1333 | 130W | ✔️ | ✔️ |
| Nehalem | 4 core | Xeon | W3565 | 3.20 | 3.46 | 1066 | 130W | ✔️ | ✔️ |
| Nehalem | 4 core | Xeon | W3540 | 2.93 | 3.20 | 1066 | 130W | ✔️ | ✔️ |
| Nehalem | 4 core | Xeon | W3530 | 2.80 | 3.06 | 1066 | 130W | ✔️ | ✔️ |
| Nehalem | 4 core | Xeon | W3520 | 2.66 | 2.93 | 1066 | 130W | ✔️ | ✔️ |
| Nehalem | 4 core | Consumer *️⃣ | i7 975 | 3.33 | 3.60 | 1066 | 130W | ✔️ | ✔️ |
| Nehalem | 4 core | Consumer *️⃣ | i7 965 | 3.20 | 3.46 | 1066 | 130W | ✔️ | ✔️ |
| Nehalem | 4 core | Consumer *️⃣ | i7 960 | 3.20 | 3.46 | 1066 | 130W | ✔️ | ✔️ |
| Nehalem | 4 core | Consumer *️⃣ | i7 950 | 3.06 | 3.33 | 1066 | 130W | ✔️ | ✔️ |
| Nehalem | 4 core | Consumer *️⃣ | i7 940 | 2.93 | 3.20 | 1066 | 130W | ✔️ | ✔️ |
| Nehalem | 4 core | Consumer *️⃣ | i7 930 | 2.80 | 3.06 | 1066 | 130W | ✔️ | ✔️ |
| Nehalem | 4 core | Consumer *️⃣ | i7 920 | 2.66 | 2.93 | 1066 | 130W | ✔️ | ✔️ |
Mac Pro 2008 (3.1)
The 2008 Mac Pros have the least CPU options, and with the base CPU configuration from Apple, the 2x quad-core 2.8 GHz Mac Pro makes for exceptionally modest gains in the benchmark department. Note, the Mac Pro 3,1s use Krotox as it's thermal grease/compound (the lubricant applied directly on the CPU between the heatsink.), a Perfluorinated compound (PFC) according to MacRumors posters, which is recognized by the United States Environmental Protection Agency (EPA) and EU as toxic to humans. Due to the health concerns, it's best not to reapply thermal grease on a Mac Pro 3,1 rather swap CPUs. It's recommended to let the Mac Pro 3,1 cool for at least an hour and the CPU thermal before changing the CPUs.
| Architecture | Cores | Grade | CPU-Model | GHz | RAM | Watt | MP3,1 |
| Harpertown | 4 core | Dual Xeon | X5482 | 3.2 | 800 | 150W | ✔️ |
| Harpertown | 4 core | Dual Xeon | X5460 | 3.16 | 667 | 120W | ✔️ |
| Harpertown | 4 core | Dual Xeon | E5472 | 3.0 | 800 | 80W | ✔️ |
| Harpertown | 4 core | Dual Xeon | X5472 | 3.0 | 800 | 120W | ✔️ |
| Harpertown | 4 core | Dual Xeon | X5450 | 3.0 | 667 | 120W | ✔️ |
| Harpertown | 4 core | Dual Xeon | E5450 | 3.0 | 667 | 80W | ✔️ |
| Harpertown | 4 core | Dual Xeon | E5440 | 2.83 | 667 | 80W | ✔️ |
| Harpertown | 4 core | Dual Xeon | E5462 | 2.8 | 800 | 80W | ✔️ |
| Wolfdale | 2 core | Dual Xeon | X5272 | 3.40 | 800 | 80W | ✔️ |
| Wolfdale | 2 core | Dual Xeon | X5260 | 3.33 | 667 | 80W | ✔️ |
Mac Pro 2006-2007 (1,1, 2,1)
The Mac Pro 1,1s with a firmware upgrade can use a wide array of CPUs, making it the second most upgradable in the series of Mac Pros. Note, a few of the Mac Pro 2,1s use Krotox as its thermal grease/compound (the lubricant applied directly on the CPU between the heatsink.), a Perfluorinated compound (PFC) according to MacRumors users (see the post for details on the 2,1 affected models) which is recognized by the United States Environmental Protection Agency (EPA) and EU as toxic to humans. Due to the health concerns, it's best not to reapply thermal grease on the affected Mac Pro 2,1 models rather swap CPUs. It's recommended to let the Mac Pro 3,1 cool for at least an hour and the CPU thermal before changing the CPUs.
| Architecture | Cores | Grade | CPU-Model | GHz | RAM | Watt | Min Firm- ware |
| Clovertown | 4 core | Dual Xeon | X5365 | 3.0 | 667 | 150W | 2,1 |
| Clovertown | 4 core | Dual Xeon | X5365 | 3.0 | 667 | 120W | 2,1 |
| Clovertown | 4 core | Dual Xeon | X5355 | 2.66 | 667 | 120W | 2,1 |
| Clovertown | 4 core | Dual Xeon | X5355 | 2.66 | 667 | 120W | 2,1 |
| Clovertown | 4 core | Dual Xeon | X5355 | 2.66 | 667 | 120W | 2,1 |
| Clovertown | 4 core | Dual Xeon | E5345 | 2.33 | 667 | 80W | 2,1 |
| Clovertown | 4 core | Dual Xeon | E5345 | 2.33 | 667 | 80W | 2,1 |
| Clovertown | 4 core | Dual Xeon | E5345 | 2.33 | 667 | 80W | 2,1 |
| Clovertown | 4 core | Dual Xeon | E5340 | 2.4 | 533 | 80W | 2,1 |
| Clovertown | 4 core | Dual Xeon | E5340 | 2.4 | 667 | 80W | 2,1 |
| Clovertown | 4 core | Dual Xeon | L5335 | 2.0 | 667 | 50W | 2,1 |
| Clovertown | 4 core | Dual Xeon | L5320 | 1.86 | 533 | 50W | 2,1 |
| Clovertown | 4 core | Dual Xeon | L5320 | 1.86 | 533 | 50W | 2,1 |
| Clovertown | 4 core | Dual Xeon | L5320 | 1.86 | 533 | 50W | 2,1 |
| Clovertown | 4 core | Dual Xeon | E5320 | 1.86 | 533 | 80W | 2,1 |
| Clovertown | 4 core | Dual Xeon | E5320 | 1.86 | 533 | 80W | 2,1 |
| Clovertown | 4 core | Dual Xeon | E5320 | 1.86 | 533 | 80W | 2,1 |
| Woodcrest | 2 core | Dual Xeon | 5160 | 3.0 | 667 | 80W | 1,1 |
| Woodcrest | 2 core | Dual Xeon | 5160 | 3.0 | 667 | 80W | 1,1 |
| Woodcrest | 2 core | Dual Xeon | 5160 | 3.0 | 667 | 65W | 1,1 |
| Woodcrest | 2 core | Dual Xeon | 5150 | 2.66 | 667 | 65W | 1,1 |
| Woodcrest | 2 core | Dual Xeon | 5150 | 2.66 | 667 | 65W | 1,1 |
| Woodcrest | 2 core | Dual Xeon | 5150 | 2.66 | 667 | 65W | 1,1 |
| Woodcrest | 2 core | Dual Xeon | 5130 | 2.0 | 667 | 65W | 1,1 |
| Woodcrest | 2 core | Dual Xeon | 5130 | 2.0 | 667 | 65W | 1,1 |
| Woodcrest | 2 core | Dual Xeon | 5130 | 2.0 | 667 | 65W | 1,1 |
Check your Exact CPU Model
You can check your CPU Model number using the terminal command:
sysctl -n machdep.cpu.brand_string Guides on Upgrading CPUs
CPUs are (mostly) plug-and-play upgrades but require applying thermal paste (thermal grease) to the CPU for proper heat transfer from the CPU to the heatsinks. There are many tutorials on how to upgrade a CPU, including YouTube videos and pictorial guides. In the case of the Mac Pro 1,1 and Mac Pro 4.1, the firmware can be updated to include support for later-generation CPUs using the same socket type. See Firmware Upgrades for more details on Firmware upgrades. Lastly, the Mac Pro 4.1s uses delidded CPUs for dual-core models. See the Delidding CPUs section for more details.
- EveryMac: How to upgrade 1,1, 2,1, 3,1 Mac Pro CPUs
- EveryMac: How to upgrade 4,1 Mac Pro CPUs
- EveryMac: How to upgrade 5,1 Mac Pro CPUs
- Paul Lefebvre: Upgrading the CPU in a 2009 Mac Pro
- Pindelski: removing the CPU cage on a Mac Pro 2009
- iFixit - 2009 Mac Pro CPU upgrade (single socket)
Delidding CPUs
Delidding is the process of removing the integrated heat spreader (silver cover) on a CPU that serves as a heat spreader and replacing it with a different thermal material. This is required for CPUs in the Mac Pro 4.1s due to the heatsinks in the dual CPU models. There are multiple ways to do this. The steady-hands method is to use a razor to scrape it off the CPU (inexpensive), and the more expensive is to buy a Delid-Die-Mate (roughly $40 USD).
The single CPU tray 4,1 uses a single CPU tray.
- TheHouseOfmoth: Delidding CPUs for use in a 4,1 Mac Pro (youtube)
- PCGamer: Delidding your CPU is scary but worth it—and surprisingly easy
- MacRumors: How To clean up a Mac Pro after delidding
Microarchitectural Data Sampling (MDS) vulnerabilities
A vulnerability in Intel CPUs was discovered called MDS, which targets hyperthreading (the ability to address two instructions in a single CPU cycle under stress loads). It affects CPUs from 2008+. Intel issued a microcode fix for CPUs designed in 2013 and up, leaving out the classic Mac Pros. Apple has updated Safari to prevent drive-by Javascript attacks. Using general safe browsing habits makes it not very likely that this exploit will affect users despite very sensational headlines like Wired's Meltdown Redux: Intel flaw lets hackers siphon secrets from millions of PCs. The only way to ensure total safety is to disable Hyper-Threading (a significant performance hit), and Apple issued the article How to enable full mitigation for Microarchitectural Data Sampling (MDS) vulnerabilities.
Benchmarking
CPU benchmarks are useful but always a relativistic endeavor. Rather than discussing the pros and cons of types of benchmarks, the most popular theoretical benchmarking software, GeekBench 5, was released recently. Most users are used to seeing Geekbench 4 numbers, which are not comparable to GeekBench 5. Geekbench's scoring system has always been tied to other CPUs as its anchor for scoring. Users will notice dramatically smaller benchmark numbers in the latest Geekbench as the new reference point is the Intel Core i3 8100, which earns a score of 1000. This doesn't mean the Mac Pro is performing worse, but rather, the baseline has risen. GeekBench 5 removes individual memory tests (which isn't very indicative of the real world) but is entirely 64-bit only for bigger memory stress tests. The encryption and codec manipulation tests have also been updated to reflect current standards and new tests related to machine learning and map calculations. The full list of changes can be read here: GeekBench: Geekbench 5 is released with all-new tests, modes, and scores.
GPU upgrades
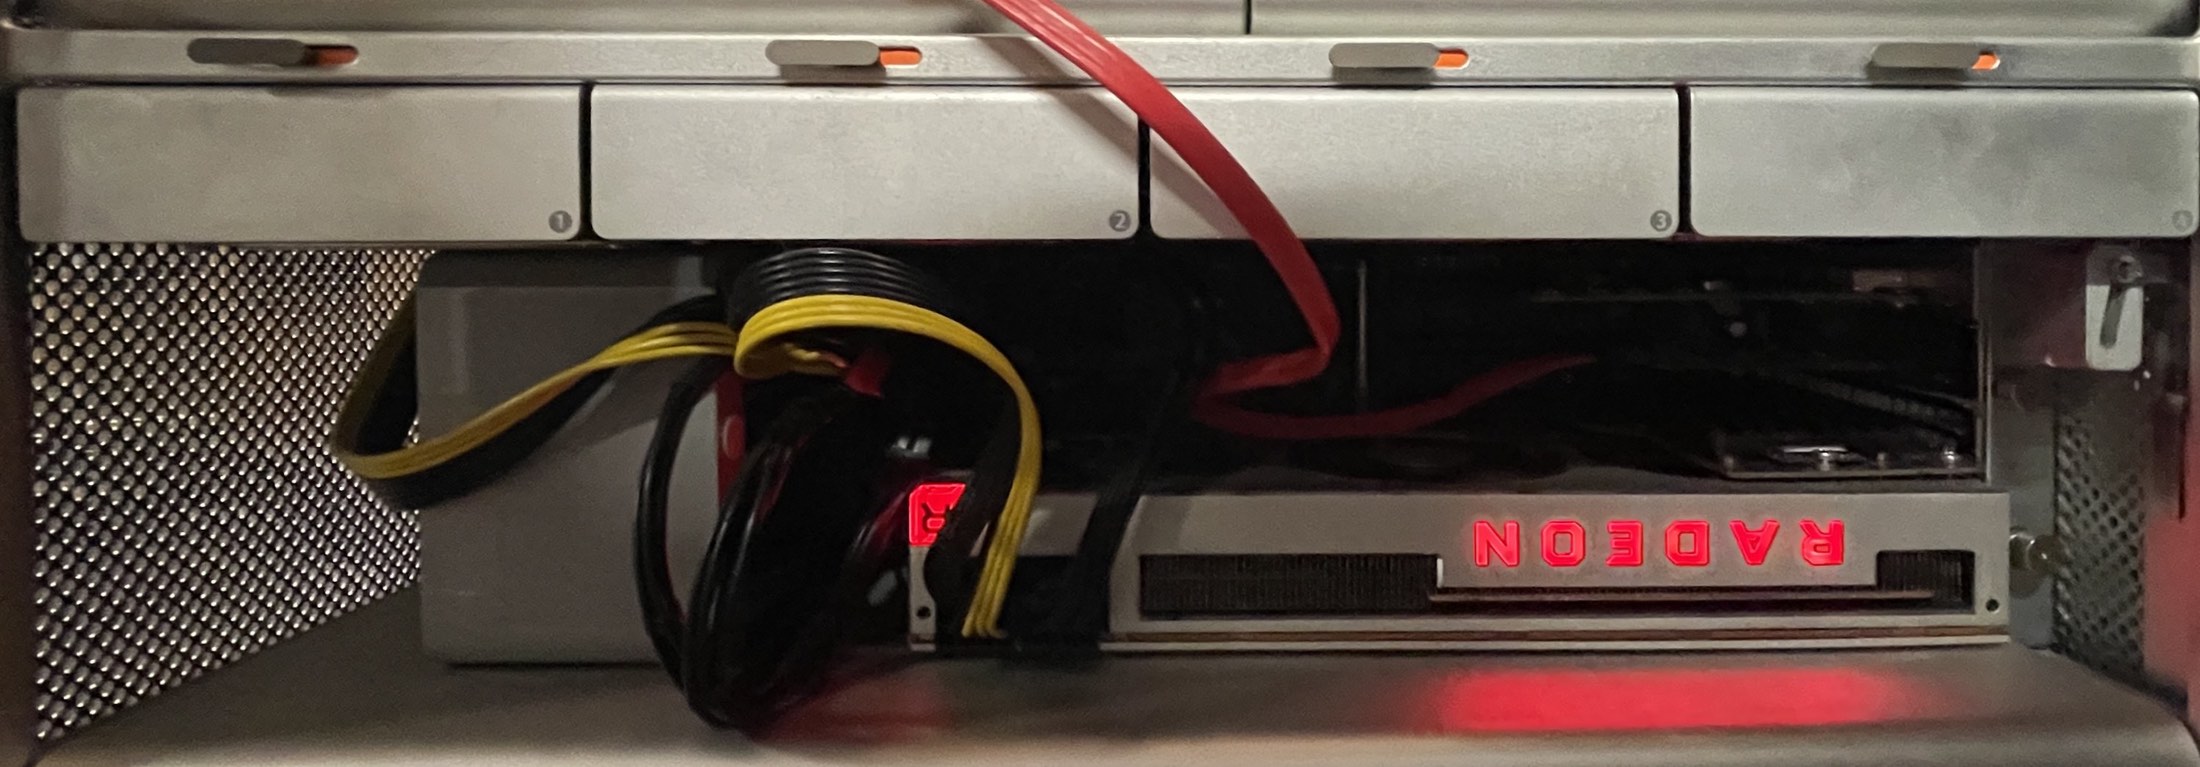
Mac Pro 5,1 running a Radeon VII using a Pixlas Mod
Thanks to PCIe, the Mac Pros have remained relevant as GPUs can be swapped out with ease. GPUs are probably the most annoying of the upgrades (due to the required research), yet one of the most commonly performed (and easy to do). There is no modern commercially available aftermarket GPU you can buy for macOS that supports an EFI boot screen (the preboot screen) and macOS Mojave 10.14 (and above). This could change, but it has not yet. When I originally wrote my first Mac Pro Upgrade guide over a decade ago, readers found it surprising that one could use off-the-shelf PC Nvidia / AMD cards. Today, this seems to be common knowledge.
I made a GPU overview video as a primer to the GPU section.
Annoyingly, Apple bundles its drivers with OS releases, and thus, GPU support is tied to OS upgrades. Thus, a modern GPU like the 5700 XT requires 10.15 Catalina and is not supported in 10.14 Mojave, nor probably never will be.
Discussing GPUs is confusing for the Mac Pro, and I've attempted to make this as clear as possible. I highly recommend reading the next section, dividing up the GPU landscape.
Dividing Up The GPU landscape
GPUs are routinely one of the most common upgrades to Mac Pros. I've identified roughly three classes of GPUs. Thus, I've divided the bulk of the GPU Guide into discussions of GPUs based on the following distinctions.
- OEM Mac EFI Bootable Cards / Aftermarket EFI Bootable: GPUs that are Mac Native - GPUs that out-of-the-box will display the Mac OS boot screen and do not require additional drivers if the minimum OS is met.
- Flashable to Mac EFI compatible cards: These are graphics cards that shipped as a PC graphics card but require a ROM flash to display the EFI Boot screen. Some GPUs may not work without first installing the Mac-compatible ROM on them. Many of the Flashable cards had Mac versions in some form. One enterprising modder has created custom ROMs for flashed cards but charges a premium for his service. See Custom Flashed Cards sections for more details.
- Non-EFI Bootscreen Cards: This is the most common upgrade path. They are GPUs that can be used in macOS but will not display the boot screen and may require (in the case of Nvidia) additional drivers to output video. With OpenCore installed (see the OpenCore section for details), a preboot screen can now be displayed with these cards.
After that, we have two more sub-classes of GPU based on support for Metal, Apple's replacement for OpenGL, used in 10.14+
- GPUs with Metal drivers for 10.14.x+
- GPUs that do not support Metal
We're not done yet. Finally, GPUs can require more power than the factory Mac Pro PCIe power taps. The Mac Pro's forward-thinking design tries to eliminate cable mess by taking the uncommon design of having passthrough PCIe power taps on the motherboard. These cables would be linked directly to the PSU on a standard PC. The Mac Pro's 980-watt PSU is up to the task of very large GPUs, but it requires bypassing the motherboard power taps. Clever hackers have created solutions like Mac Pro Pixlas Mod (also covered in the Other mods section of this guide) or using external PSUs. Users have successfully powered two GeForce 1080 TIs using the Pixlas mod and (possibly upgraded) internal PSU. GPUs that require additional power, for example, are the GeForce 1080 Ti, AMD Vega 64, AMD Vega FE, Radeon VII, and Radeon 5700 XT.
- GPUs that do not require any additional power
- GPUs that require additional power using a power supply modification like Pixlas or external PSU.
To summarize, a GPU could be OEM EFI compatible (boot screen), flashable to EFI compatible, or not EFI compatible (no boot screen, but with OpenCore can still display a boot screen) but still work under Mac OS, and it may or may not be Mojave/Catalina compatible and may not require PSU modification. Apple implemented EFI, which does not ≠ UEFI the PC standard, as they embraced EFI early on before the UFI standard. This used an older standard for EFI-level graphics drivers called Universal Graphics Adapter Protocol (UGA). UEFI uses the Graphics Output Protocol (GOP). GPU manufacturers typically have not supported UGA, which is why PC GPUs do not support pre-OS boot graphics. OpenCore can load a non-native preboot screen as it packs in the GOP preboot drivers.
Generally, anyone running a non-EFI-compatible boot screen will want to keep an EFI-compatible card around (even if not installed) for OS upgrades or emergencies. OS updates (including security updates) can stop aftermarket NVidia cards from displaying video until the proper drivers are installed. I've been in all camps: originally using a GeForce GTX 8800, flashing an ATI Radeon HD 6870 to Mac Native EFI, and then landing on the GeForce 760 and 1060, and finally an AMD Vega 56 over the decade-plus of owning a Mac Pro.
A GPU may or may not support Metal, the new graphics API used in 10.14.x and above. The GPU also might draw more power than the motherboard passthrough can handle.
Summary of the GPU options
- Very few GPUs can be flashed to support Mac EFI to display options. Most options are very old.
- Most aftermarket GPUs for the Mac Pro will not support the boot screen. This is due to Apple's implementation of EFI, which predated the later PC standard of UEFI. The boot screen is optional, and GPUs will work fine once the OS has loaded its display drivers. OpenCore now allows users to enable the boot screen.
- Many GPUs (mostly NVidia GPUs and very old AMD GPUs) are not supported in 10.14 because of the transition to the new graphics API, Metal, which replaces the dated OpenGL.
- Nvidia and Apple are feuding. There are no drivers for newer Nvidia hardware in 10.14 and above. Effectively, the upgrade options are limited to AMD.
- Apple bundles its drivers with the OS. GPU support is tied to the OS version. The newest GPUs, like the 5700 XT, only are supported in 10.15 Catalina.
- Very high-end GPUs like the Vega 64, Radeon VII, or Radeon 5700 XT draw more power than the Mac Pro can deliver via its PCIe power taps; thus, other methods must be used, like PSU modification or undervolting.
OEM EFI Bootable Cards / Aftermarket EFI Bootable
EFI compatible cards are GPUs that display a native Mac version: These are mostly OEM cards, although with a few notable aftermarket Mac Edition cards that included EFI Roms on the cards. The PC versions do not have EFI support. This list does not include MacVidCards GPUs, as those feature custom ROMs that aren't distributed.
DL DIV - Dual-Link DVI
SL DIV - Single-Link DVI
DP - Display Port * Pirated Mac Vid Cards ROM, see changelog for details
| NVIDIA GeForce 7300 GT | 256 MB GDDR2, 32 Bit EFI | 1 SL DVI 1 DL DVI |
| NVIDIA GeForce GT 120 | 512 MB GDDR3, | 1 Mini DP 1 DL DVI |
| NVIDIA GeForce 8800 GT | 512 MB GDDR3 | 2 DL DVI |
| NVIDIA Quadro FX 4500 | 512 MB 32 Bit EFI | 1 DL DVI 1 DP |
| NVIDIA Quadro FX 4800 | 1.5 GB GDDR5 | 2 DL DVI |
| NVIDIA Quadro 4000 | 2 GB GDDR5 | 1 DL DVI 1 DP |
| NVIDIA Quadro FX 5600 | 1.5 GB GDDR3 | 2 DL DVI Stereo 3D |
| EVGA GeForce GTX 680 | 2 GB GDDR5 | 1 HDMI 1 DP 1 DVI-I 1 DVI-D |
| PNY NVIDIA Quadro K5000 | 4 GB GDDR5 | 2 DVI 2 DP |
| NVIDIA Quadro K4200 (Mac Edition) | 8 GB GDDR5 | 2 DVI 2 DP? |
| NVIDIA Quadro K5200 (Mac Edition) | 4 GB GDDR5 | 2 DVI 2 DP? |
| NVIDIA GeForce GTX 780 * | 3 GB / 6 GB GDDR5 | 1 DL DVI, 1 HDMI, 1 DP |
| NVIDIA GeForce GTX Titan * | 6 GB GDDR5 | 1 DL DVI 1 HDMI 1 DP |
| NVIDIA GeForce GTX Titan X * | 12 GB GDDR5 | 1 DVI 1 HDMI 1 Triple DP |
ATI/AMD
ATI was purchased by AMD in 2006, and in 2010 retired the ATI name.
| ATI Radeon HD 2600 XT | 256 MB GDDR2 | 1 SL DVI 1 DL DV |
| ATI Radeon X1900 XT | 512 MB GDDR3 | 2 DL DVI |
| ATI Radeon HD 4870 | 512 MB GDDR5 | 1 Mini DP 1 DL DVI |
| ATI Radeon HD 5770 | 1 GB GDDR5 | 2 Mini DP 1 DL DVI |
| ATI Radeon HD 5870 | 1 GB GDDR5 | 2 Mini DP 1 DL DVI |
| AMD Firepro S10000 | 6 GB GDDR5 | 1 DP 1 DL DVI |
Flashable to EFI compatible cards
The most commonly flashable video cards have a Mac equivalent sold by Apple as an OEM or aftermarket Mac version. Users transferred the GPU's ROMs and then distributed them via the internet. A user can then download utilities to flash the ROM onto the card. A few cards require physical modification. The advantage is that once the ROM is installed, the card will act/behave like a native card. Still, with a few cards, some functionality might be lost (generally losing a video port functionality as the Mac version did not have the same ports). Below are software-only flashable cards.
- NVIDIA Quadro FX 5600
- AMD FirePro W7000
- AMD Radeon HD 5870, 6870 - Netkas: ROM for ATI Radeon 6870, Netkas RomCreator
- AMD Radeon HD 7950 - MacRumors: Guide to Flash XFX Double D HD 7950 Black Edition
- AMD Radeon HD 7970
- AMD R9 280/280X
- GeForce 285 GTX - MacRumors: Test the First Flashed GTX285
- GeForce GT 630 (2GB) - LoremIpsum: EFI Rom
- GeForce 680 GTX (2GB) - Netkas: Flashing the GTX680 2GB
- GeForce 680 GTX (4GB) - MacRumors: GTX680 4GB - ROM Image - Full Boot Screens, Full Clock Rates and PCI-E 2.0 - 5GT/s
- CreatePro: NVidia RTX 2080 Bootscreen - does not currently have driver support.
- RTX Series Cards have Native Bootscreen Support! - does not currently have driver support.
- 2010 Mac Pro Nvidia RTX 2070 + Radeon Pro WX 9100@16Gbps-TB3 (Mantiz Venus) + Win10 1803 [theitsage] - - does not currently have driver support
Non-Mac-EFI Compatible GPUs
The vast majority of the upgrade market is Non-Mac-EFI Compatible GPUs. These GPUs will work on a Mac but do not have the appropriate firmware to display the preboot screens on a Mac (video output that happens before Mac OS has loaded). Non-EFI Bootable Cards are firmly split between AMD and NVidia. Once the drivers are loaded (after the white Apple boot screen), the GPU will output video after loading the drivers during the boot process. Non-EFI Bootable Cards are firmly split between AMD and NVidia. Once the drivers are loaded (after the white Apple boot screen), the GPU will output video after loading the drivers during the boot process. See the Mini-Glossary for more info on EFI. However, adding an additional step in the boot process, using OpenCore (see OpenCore section for details), can deliver a boot screen.
Modern AMD GPUs are plug-and-play. Apple distributes Mac OS with AMD drivers; thus, new drivers are released within OS updates. This means there are no drivers to install. The downside is that users cannot install new GPUs on old OSes. To use later GPUs, you must be running an OS new enough to include drivers for that specific GPU.
Sadly, Apple does not support modern Nvidia GPUs in Mac OS. Apple includes support for older NVidia chipsets, as these GPUs are shipped once at a time in various Mac configurations. NVidia has chosen to write drivers (labeled "web drivers" as macOS is distributed with NVidia drivers for Mac EFI cards) for their video cards so that off-the-shelf cards can be used in Mac Pros. Previously, only GPUs based on the Kepler architecture could be used with a Mac without the web drivers. However, with a Mac-compatible EFI ROM, they can display video at boot and only output video once the driver has loaded. With the NVidia video cards, even security updates will require a web driver update, meaning if you update, the next boot will not output video until the driver has been updated. All the GTX 700-1000 series are supported by web drivers but are limited to 10.13.x. As NVidia has stated, Apple is refusing to sign its drivers. So far, 10.14+ does not have NVidia support (outside of the older Kepler NVidia GPUs up to macOS 11 Big Sur).
Aftermarket GPU Breakdown
The GPU landscape can be confusing. To recap, the above GPUs can be the following:
- EFI Flashable to show pre-boot screens
- Require additional drivers (NVidia-only)
- May not be 10.14+ compatible due to a lack of Metal support (Apple's new API for graphics to replace OpenGL)
- May require modifying the Power Supply using a technique like Pixlas mod to power the GPU properly
Macs today can use off-the-shelf GPUs. I've attempted to list all the GPUs going back to 10.8.x, although this list is growing. Metal support is required for 10.14. A few select GPUs can be flashed to show preboot bios listed as Mac EFI compatible. Lastly, some GPUs require more power than the default Mac Pro power taps can provide, requiring an additional Power Supply or a modification known as the Pixlas mod. Please note that this entire list includes many GPUs, broken down into two main categories: AMD GPUs and NVidia GPUs.
Note: I have excluded cards with custom EFI ROMs from MacVidCards as these aren't user-flashable.
AMD GPUs
Note: The minimum OS list required may not be correct. Please contact me if this is incorrect. Please read the supplemental links for confirmations and possible issues provided next to GPUs.
| AMD GPU | Min OS Support | Supports Metal | Mac EFI flashable | PSU Mod |
| Radeon X1900 XT (Mac) | 10.6 - 10.13.x | No | Yes* | No |
| Radeon 2600 XT (Mac) | 10.6 - 10.13.x | No | Yes* | No |
| Radeon 2600 Pro (Mac) | 10.6 - 10.13.x | No | Yes* | No |
| Radeon HD 3870 | 10.7 - 10.13.x | No | Yes | No |
| Radeon HD 4870 | 10.7 - 10.13.x | No | Yes* | No |
| Radeon HD 4890 | 10.7 - 10.13.x | No | Yes** | No |
| Radeon HD 5770 | 10.6.8 - 10.13.x | No | Yes*, ** | No |
| Radeon HD 5850 | 10.6.8 - 10.13.x | No | No | No |
| Radeon HD 5870 | 10.6.8 - 10.13.x | No | Yes* | No |
| Radeon HD 6850 | 10.7 - 10.13.x | No | Yes** | No |
| Radeon HD 6870 | 10.7 - 10.13.x | No | Yes** | No |
| Radeon HD 69x0 | No Support | No | No | No |
| Radeon HD 7950 | 10.8.3 - Curr | Yes | Yes* | No |
| Radeon HD 7970 | 10.8.3 - 10.13.6 or Curr | Yes | Yes** | No |
| Radeon HD 7970 (GHz Edition) | 10.8.3 - 10.13.6 or Curr | Yes | Yes** | No |
| Radeon HD 7990 | Buggy | No | ? | No |
| R7 250 | Requires hack | ?? | No | No |
| R7 260X | Requires hack | ?? | No | No |
| R9 270 | Requires Hack | No | No | No |
| R9 270X | 10.8.3 - 10.13.6 1 | No | No | No |
| R9 280X | 10.12 - Curr 1 | Yes | Yes** | No |
| R9 290X | 10.10 - Curr | Yes | No | No |
| R9 380 | Depends | Yes | Possible | No |
| R9 380x | Depends | Yes | Possible | No |
| R9 390 | Requires hack | Yes | No | No |
| R9 Nano | 10.11 - Curr | Yes | No | No |
| R9 Fury | 10.12 - Curr, 1 | Yes | No | No |
| R9 Fury X | 10.12 - Curr ? | Yes | No | No |
| Radeon RX 450 | 10.12 - Curr | Yes | No | No |
| Radeon RX 455 | 10.12 - Curr | Yes | No | No |
| Radeon Rx 460 | 10.12 - Curr 1 | Yes | No | No |
| Radeon RX 470 | 10.12.6 - Curr 1 | Yes | No | No |
| Radeon RX 480 | 10.12.6 - Curr 1 2 | Yes | No | No |
| Radeon RX 540 | No | No | No | No |
| Radeon RX 540x | No | No | No | No |
| Radeon RX 550 | 10.12.6 - Curr or None (Depends on card)1 (reddit), 2 3 | Yes | No | No |
| Radeon RX 550x | No | No | No | No |
| Radeon RX 560 | 10.12.6 - Curr 1 | Yes | No | No |
| Radeon RX 560x | 10.12.6 - Curr | Yes | No | No |
| Radeon RX 570 | 10.12.6 - Curr | Yes | No | No |
| Radeon RX 570x | 10.12.6 - Curr | Yes | No | No |
| Radeon RX 580 | 10.12.6 - Curr | Yes | No *** | No |
| Radeon RX 580x | 10.12.6 - Curr | Yes | No | No |
| Radeon Pro WX 2100 | No | No | No | No |
| Radeon Pro WX 3100 | No | Yes | No | No |
| Radeon Pro WX 4100 | 10.12- Curr | Yes | No | No |
| Radeon Pro WX 4130 | 10.12 - Curr | Yes | No | No |
| Radeon Pro WX 4150 | 10.12 - Curr | Yes | No | No |
| Radeon Pro WX 4170 | 10.13? - Curr | Yes | No | No |
| Radeon Pro WX 5100 | 10.13? - Curr | Yes | No | No |
| Radeon Pro WX 7100 | 10.13? - Curr | Yes | No | No |
| Radeon Pro WX 8100 | 10.13? - Curr | Yes | No | No |
| Radeon Pro WX 9100 | 10.13? - Curr | Yes | No | No |
| Radeon Pro Duo 32GB GDDR5 512-Bit too long for Mac Pro, requires removing PCIe fans | 10.13? - Curr | Yes | No | No |
| Vega 56 | 10.13.x - Curr | Yes | No | No **** |
| Vega 64 | 10.13.x - Curr | Yes | No | Yes |
| Vega Frontier Edition | 10.13 - Curr | Yes | No | Yes |
| Radeon VII | 10.14.5 - Curr | Yes | No | Yes |
| Radeon 5500 XT | 10.15.2 - Curr | Yes | No | No |
| Radeon 5600 XT | 10.15.3 - Curr | Yes | No | No |
| Radeon 5700 | 10.15.2 - Curr | Yes | No | ? |
| Radeon 5700 XT | 10.15.2 - Curr | Yes | No | Yes |
| Radeon 6600 (Not supported without firmware)*🚫 | 12.1 - Curr | Yes | No | ? |
| Radeon 6600 XT (Not supported without firmware)*🚫 | 12.1 - Curr | Yes | Yes? | ? |
| Radeon 6700 XT | None | - | No | ? |
| Radeon 6800 | 11.4 - Curr (Not supported without ROM flash)*🚫 | Yes | Yes? | ? |
| Radeon 6800 XT | 11.4 - Curr (Not supported without ROM flash) *🚫 | Yes | Yes? | ? |
| Radeon 6900 XT | 11.4 - Curr (Not supported without ROM flash)*🚫 | Yes | No | ? |
| Radeon 7900 XT/7900 XTX | None | - | - | ? |
* OEM/Retail ROMs are available for these cards
** Modified Netkas or Blacksheep ROMs are available for these cards
*** Mac Pro 3.1s can display bootscreens with the RX 580. See the Mac Pro 3.1s and AMD GPUs section.
**** The Vega 56 with the factory firmware does not require a Pixlas mod. However, firmware tuned for gaming or using the Vega 64 firmware does require a Pixlas Mod. See Vega 56 flashing section.
*🚫 Currently, MacVidCards (EURO) is selling flashed 6600 XT / 6800 and they can be flashed (Without a native boot screen) using Sychretic's ROM
Radeon R7 260 and R9 390 can be used in macOS but require Hackintosh libraries. I recommend looking at one of the many other options unless one is comfortable researching hackintosh forums and installing custom kexts and the possibility of the hardware not working.
The Radeon Navi 21 GPUs (Radeon 6800 - 6900 XT) and the classic Mac Pros
AMD's Navi 21 GPUs (the 6600, 6600 XT, 6800, 6800 XT, and 6900 XT) are officially supported in macOS 12.1+, but due to a firmware bug, it would interrupt the boot process in the classic Mac Pros. The original speculation was the ROM used AVX calls (see macrumors), but after a deeper look, it was due to poorly written code. After this discovery, MacVidCards (EURO) started selling flashed 6800, and they can be flashed (Without a native boot screen) using Sychretic's ROM.
The requirements to flash a card are as follows:
- The hacked ROM located at MacRumors: AMD Radeon RX 6800 XT / 6900 XT for macOS?
- A computer that supports the 6600 - 6900 XT (A PC newer than 2013 or Mac Pro 2019 with Windows)
- The ATI/AMD Flash utility
The process is straightforward: load the correct ROM to your card using the utility, but if you prefer a video how-to, see: Mac Sound Solutions inc: How to flash an RX6600XT RX6800XT RX6900XT for Mac Pro 5,1
NVidia GPUs
Note: The minimum OS list required may not be correct because of the lack of info in Web Drivers. Older OSes probably still require web drivers but in later OSes (10.13.x or higher), even for non-web driver Cards. Metal-compatible cards will not require web drivers in Mojave or Catalina. This section is very new (and, as far as I know, the first attempt that covers all categories), and there are MANY GPU variations. Please get in touch with me if I have listed something incorrectly. Be sure to search forums like MacRumors to confirm compatibility..
For macOS Monterey, any Metal-compatible Nvidia GPU requires using OpenCore Legacy Patcher to inject drivers.
❓ = Several NVidia GPUs shipped different chipsets under the same name; this is important as Metal only supports Kepler chipsets, and these GPUs had both Femi/Kepler variants. I recommend avoiding these particular GPUs if you are looking for Metal (10.14.x) support.
The RTX 2000 series is usable in Windows/Linux with hardware acceleration. The RTX 3000 series will not boot and thus cannot be used in an alternative OS. Multiple card variations have been confirmed as not working, such as the MacRumors thread and MacProUpgrade (Requires membership) groups.
Please read the previous sections for explanations of boot screens, EFI, Metal, and power supply modifications.
| Nvidia GPU | OS Support | Requires Web Drivers | Supports Metal | Mac EFI flashable | PSU Mod |
| GT 610 | 10.9 - Curr | No | Yes | No | No |
| GT 620 | 10.9 - Curr | No | Yes | No | No |
| GT 630 | 10.9 - 10.13.6 or Curr | Depends ❓ | Depends | Yes(HP) | No |
| GT 640 | 10.8 - 10.13.6 or Curr | Depends ❓ | Depends | No | No |
| GTX 650 | 10.9 - 10.13.6 or Curr | Depends ❓ | Yes | No | No |
| GTX 650 Ti | 10.9 - 10.13.6 or Curr | Depends ❓ | Depends | No | No |
| GTX 660 | 10.9 - 10.13.6 or Curr | Depends ❓ | Depends | No | No |
| GTX 660 Ti | 10.9 -10.13.6 or Curr | No | Depends | No | No |
| GTX 670 | 10.9 - Curr | No | Yes | No | No |
| GTX 670 Ti | 10.9 - Curr | No | Yes | No | No |
| GTX 680 | 10.8.3 - Curr | No | Yes | Yes | No |
| GTX 690 | 10.9 - Curr | No | Yes | No | No |
| GT 710 | 10.8 - Curr | No | Yes | No | No |
| GT 720 | 10.9 - Curr | No | Yes | No | No |
| GT 730 | 10.9 - 10.13.6 or Curr | Depends ❓ | Depends | No | No |
| GT 740 | 10.9 - or Curr | No | Yes | No | No |
| GT 750 | 10.9 - 10.13.6, or Curr | Depends | Depnds | No | No |
| GT 750 Ti | 10.10 - 10.13.6 | Yes | No | No | No |
| GTX 760 | 10.9 - Curr | No | Yes | No | No |
| GTX 770 | 10.9 - Curr | No | Yes | No | No |
| GTX 780 | 10.9.2 - Curr | No | Yes | No | No |
| GTX 780 Ti | 10.9.2 - Curr | No | Yes | No | No |
| GTX 950 | 10.10.5 - 10.13.6 | Yes | no | No | No |
| GTX 960 | 10.10.5 - 10.13.6 | Yes | No | No | No |
| GTX 970 | 10.9.5 - 10.13.6 | Yes | No | No** | No |
| GTX 980 | 10.10.5 - 10.13.6 | Yes | No | No** | No |
| GTX 980 Ti | 10.10.5 - 10.13.6 | Yes | No | No | No |
| GTX 1030 | 10.12 - 10.13.6 | No | No | No | No |
| GTX 1050 | 10.12 - 10.13.6 | No | No | No | No |
| GTX 1060 | 10.12 - 10.13.6 | No | No | No | No |
| GTX 1070 | 10.12 - 10.13.6 | No | No | No** | No |
| GTX 1070 Ti | 10.12 - 10.13.6 | No | No | No | No |
| GTX 1080 | 10.12 - 10.13.6 | No | No | No | Yes |
| GTX 1080 Ti | 10.12 - 10.13.6 | No | No | No | Yes |
| GTX 1080 Ti Founder's Edition (11 GB) | 10.12 - 10.13.6 | No | No | No | Yes |
| GTX Titan Black | 10.10 - Curr | No | Yes | No | Yes |
| GTX Titan X | 10.10 - 10.13.6 | No | Yes | No | Yes |
| Titan XP | 10.10 - 10.13.6 | Yes | No | No | Yes |
| RTX 20x0 series* | None | None | No | - | - |
| RTX 30x0 series** | Will not boot | None | No | - | - |
| RTX 40x0 series** | Will not boot | None | No | - | - |
** Dumped MacVidCards ROMs for these cards are floating around on the internet, making these particular cards flashable by users. Still, the modified ROMs only exist due to MVC putting in the effort to hack together Mac EFI-compatible ROMs. MVC has yet to give out its modified ROMs for free.
**Thus far, community members have tested the 3060, 3070, and 3080, and the classic Mac Pros will fail even to initiate the boot sequence. They cannot even be used in Windows or Linux.
*** The NVidia RTX series will output the EFI boot screen but do not have drivers.
NVidia Professional GPUs
The Quadro GPUs are widely supported by the Nvidia web drivers.
| Nvidia GPU | OS Support | Supports Metal | Requires Web Drivers | Mac EFI flashable | PSU Mod |
| Quadro P410 | 10.8 - 11.x | no | Yes | No | ? |
| Quadro K600 | 10.8 - 11.x | no | Yes | No | ? |
| Quadro K620 | 10.8 - 10.13.6 | Yes | No | No | No |
| Quadro K1200 | 10.11 - 11.x | No | Yes | No | ? |
| Quadro K2000 | 10.10 - 11.x | No | Yes | No | No |
| Quadro K2000D | 10.19 - Cu11.xrr | No | Yes | No | No |
| Quadro K2200 | 10.10 - 10.13.6 | Yes | No | No | No |
| Quadro K4000 | 10.10 - 11.x | no | Yes | No | No |
| Quadro K4000D | 10.10 - 11.x | no | Yes | No | No |
| Quadro K4200 | 10.10 - 11.x | no | Yes | No | No |
| Quadro K5000 | 10.10 - 11.x | no | Yes | Yes | No |
| Quadro K5200 | 10.10 - 11.x | no | Yes | No | ? |
| Quadro K6000 | 10.10 - 11.x | no | Yes | No | ? |
| Quadro M2000 | 10.9 - 10.13.6 | Yes | No | No | No |
| Quadro M4000 | 10.9 - 10.13.6 | Yes | No | No | No |
| Quadro M5000 | 10.9 - 10.13.6 | Yes | No | No | No |
| Quadro M6000 | 10.9 - 10.13.6 | Yes | No | No | ? |
| Quadro M6200 | 10.9 - 10.13.6 | Yes | No | No | ? |
| Quadro P620 | 10.11 - 10.13.6 | Yes | No | No | No |
| Quadro P1000 | 10.11 - 10.13.6 | Yes | No | No | No |
| Quadro P2000 | 10.11 - 10.13.6 | Yes | No | No | No |
| Quadro P4000 | 10.11 - 10.13.6 | Yes | No | No | No |
| Quadro P5000 | 10.11 - 10.13.6 | Yes | No | No | Yes |
| Quadro P6000 | 10.11 - 10.13.6 | Yes | No | No | Yes |
| RTX 20x0 series | None | None | No | - | - |
| RTX 30x0 series | Will not boot any OS | None | No | - | - |
| RTX 40x0 series | Will not boot any OS | None | No | - | - |
This is an ongoing project, and information for older OSes is harder to source due to the lack of info in NVidia web driver documentation. Please let me know if any GPUs are incorrect or missing. You can reach me by going to my contact page.
Unsupported by Metal GPUs
The above list can be summarized by chipsets as Apple distributes its OSes with GPU drivers. The unsupported chipsets by NVidia and AMD are as follows:
- NVidia Ampere Chipset (RTX 3060, RTX 3070, RTX 3080... etc.) These will not boot due to the firmware on the cards
- NVidia Turning Chipset (RTX cards + Quadro RTX + GTX 1650, GTX 1660, RTX 2060, RTX 2070, RTX 2080... etc)
- NVidia Pascal Chipset (GTX 10x0 series, Quadro P series, )
- NVidia Maxwell Chipset (GTX 9x0 series, Quadro M series, Quadro K620, K1200 K220)
- NVidia Femi Chipset (GeForce GT/GTX 4xx series, GeForce GT/GTX 5xx series)
- NVidia Tesla Chipset (Nvidia GT120)
- Pre AMD Radeons - ATI Radeon HD 2600 XT, 1900 XT, ATI Radeon HD 4870, 4890, 5770, 5850, 5870, 6850, 6870
* Buying older NVidia GPUs can be confusing as there are variants that are unlabeled chipsets. The GT 610, GT 620, GT 640, GT 730, and GTX 750 have Kepler and Femi chipset variants. If you have a Kepler GPU, you can run Metal, such as Mojave, Catalin, and Big Sur. If you are looking for a very cheap GPU for Mojave or to upgrade your firmware, the GTX 650s can be found on the used market for $20-$35 USD. Mojave GPU Buyer's guide is mostly accurate but doesn't note that GTX 750 variants.
*** The AMD RX 590 is an overclocked 580 with a larger fan. The larger fan tends to block the adjacent PCI slot, making it hard to recommend for its minimal performance gains.
For the best info on recommended versions of AMD cards, visit AMD Polaris & Vega GPU macOS Support.
Post Mojave updates have enabled hardware acceleration for video codecs on the RX580. You can read about it here and find full instructions to Activate AMD hardware acceleration. (Thanks for Martin LO. aka h9826790).
MacRumors forum-goers report that the following Radeons are supported in 10.13.4
AMD Vega loud idling
Some of the Vega GPUs suffer loud idling speeds under older OSX/ Mac OS versions, although that may not resolve it. Many of the cards can be flashed to different bios. See the first post in the thread (down towards the bottom) MacRumors: AMD Polaris and Vega GPU macOS Support.
The loud idling was solved in 10.14, thus making the firmware necessary for 10.13.x
Vega 56 -> Vega 64 Firmware flash
For a long time, the Vega 56s have been one of the best value GPUs for the Mac as they can grow with your setup. They can be flashed to use the Vega 64 firmware to increase performance. It isn't quite as fast as running a Vega 64, but it is close. That said, without a power supply modification, many users (self-included) experienced crashing when the GPU hit intensive loads and required reflashing it to Vega 56 Firmware. If you intend to mod your PSU, you can always flash a Vega 56 to a Vega 64 for a nice speed boost after you modify it.
The BIOs for both Vega 56s and Vega 64s can be found at Tech Powerup.
The AMD/ATI Flash utility can be found at TechPowerUp, as well. It requires Windows 10.
AMD GPUs and Mac Pro 3.1s and below
Several MacRumors forum members have found that Mac Pro 3.1s cannot use the AMD RX580 because drivers require SSE4.2 instruction set requirements for Mojave and above. However, and this is a big one, Netkas has been able to get the RX560 working in a Mac Pro 3.1 by adding inline emulation for the SSE4.2 instruction for the drivers. Any of the AMD Polaris cards are now compatible with Mac Pro 3,1. See the full list here. More recently, the 3.1s occupy an interesting niche. They can display a bootscreen without flashing. Both Catalina and Mojave are supported.
- RX 580 won't boot macOS on MP 3.1
- RX580 on a Mac Pro 3,1
- Netkas: Got rx560 working in Mojave on mp3,1, metal, and OpenGL
NVidia GPU and Mac OS
As previously mentioned, NVidia GPUs have been largely unsupported by Apple in macOS. The last chipset to appear in any OEM Mac configuration was from the Kepler era. Sadly, the RTX line of GPUs has never been supported in any shape or form in macOS, but the RTX 2000s can be used in Mac Pros in Windows 10.
The state of NVidia drivers
NVidia, for years, has written drivers for its unsupported GPUs for Mac OS called NVidia Web Drivers, as Apple does not bundle drivers for most NVidia chipsets with its OS. The only chipset that comes bundled with macOS is the Kepler chipset, as it is the last chipset Apple used in its computers. The Web Drivers allow previously unsupported GPUs to be used with OSX/MacOS.
With the advent of 10.14 Mojave, OpenGL has been deprecated and replaced with Apple's Metal library for GPU acceleration, which dropped support for many GPUs. Apple published an official list but did not list all compatible GPUs for Mojave. Any non-Kepler NVidia GPUs do not work in Mojave and above. Due to a public spat, Apple is blocking NVidia from releasing drivers to support its GPUs in 10.14.
Currently, NVidia blames Apple for not approving its drivers for Mojave.
As an act of desperation, fans have created a petition for Apple to allow NVidia to release drivers for Mac OS 10.14 Mojave. Rumors have ranged between Volta support, eGPUs, and most recently Metal vs. CUDA.
This is a shame as there is a massive performance gap of certain Adobe products on AMD hardware vs. NVidia hardware. Also, users are reporting that the RTX NVidia cards are displaying boot screens in macOS but do not have any mac drivers, meaning no hardware acceleration. The RTX has UGA to GOP firmware; thus, it is a happy accident.
NVidia Webdriver Manual Installation
The web drivers are vague and unclear. They do not list which cards are currently supported on its web pages. Secondly, you need to download the correct version of the drivers for whatever version of Mac OS you have.
TonyMacX86 forums do an excellent job of directly linking to the NVidia installers for driver version number by OS version. Currently, 10.14.x (Mojave) is not supported. The NVidia RTX series is also currently unsupported.
Note about SLI: Currently, there isn't any SLI support under macOS, and this seems unlikely to change. Windows, however, will support SLI in a Mac Pro.
- TonyMacX86: Latest NVidia Drivers - list of most current drivers
- TonyMacX86: Solving NVIDIA Driver Install & Loading Problems
NVidia Driver Automatic Installation
To avoid headaches of NVidia drivers, Benjamin Dobell wrote a CLI utility to install the appropriate Mac NVidia drivers for your system. He describes it as follows: "This script installs the best (not necessarily the latest) official NVidia web drivers for your system." Go to GitHub: NVidia Update.
Useful Links
- blog.greggant.com: Installing GeForce GTX 760/770/780 on a Mac Pro 3.1
- blog.greggant.com: Installing GeForce GTX 1060/1070/1080 on a Mac Pro 5.1
- netkas: GPU ROMs
- netkas: AMD Radeon 5770/5780 ROMs
- blog.greggant.com: Mac NVidia Web Drivers fail to update or cannot remove Kext files
- mac-pixel-clock-patch-V2: High Resolutions @60hz and HiDPI fix for old Macs
- MacRumors: How to Boot to Windows without a Boot Screen
- MacRumors: Adobe After Effects Benchmarks/Observations: NVIDIA GTX 1080 FE vs. Sapphire PULSE RX 580 8GB
- Boot Manager - open source boot manager, designed for Mac Pros, see the guide here.
- MacRumors: Enabling Hardware Acceleration for RX580s for video codecs
- MacRumors: How to get into Recovery Screen with a Web driver GPU
Custom Flashed Cards: Depending on how much time you've spent researching upgrades, you may have read about the website/business, MacVidCards. MacVidCards sells custom-flashed EFI NVidia and AMD cards. Initially, when I wrote this section, I hesitated to link directly to their site as several FaceBook (requires membership to MacProUpgrade) / MacRumors posts have been lukewarm. I worried readers might think I was endorsing a service they may not like. The cards do work, but the turn-around times are long, and communication infrequent (although since writing that, MacVidcards now boasts improved communication and turn arounds). Is that true? I don't know, FaceBook (requires membership to MacProUpgrade) really runs the gamut. The prices are high, but they are legitimate, with many testimonials floating around message boards from longtime members that they do indeed work as promised. Just be prepared to wait for any issues to be sorted out in a time frame that may not be acceptable. MacVidCards claims to have written custom EFI ROMs for NVidia and AMD cards. Rather than explain how said hack was done (Unlike previous releases TonyMacX86 / MacRumors / Netkas), MacVidCards chooses to be a monopoly. (Note: Dave of MacVidCards notes he did contribute to previous AMD card hacks and did not get paid for his work on this). I'd rather not weigh too much on its ethics, but software developers deserve compensation, and depending on the actual work performed on the EFI ROM, it may very well be truly custom. As of writing this, they are the only game in town when it comes to making the custom GPU cards Mac EFI compatible.
After seeing my guide (in a much earlier state) after reading the previous statement, Dave of MacVidCards reached out to me to correct errors found on this page. So, if nothing else, my experience with MacVidCards has been fair in my limited dealings with them, considering my hesitation in recommending them.
The era of firmware flashing GPUs for Macs is at an end as the 2019 Mac Pro uses modified UEFIl; thus, now, off-the-shelf GPUs provide boot screens, and OpenCore provides a pre-boot screen for users who require one.
Which card should I buy?
There are several issues, as explained repeatedly, and they are as follows:
- Mac OS switched from OpenGL to Metal. This means a lot of older cards do not have drivers in 10.14+ Mojave and above.
- It's AMD or bust for aftermarket GPUs. Modern NVidia GPUs do not have Metal drivers, which are incompatible with Mojave/Catalina. Only the old Kepler chipsets are supported up to macOS 11 Big Sur. Monterey removes them.
- Very few aftermarket GPUs can output a boot screen. There are multiple ways to deal with this, from utilities to OpenCore.
- The highest-end GPUs (Vega 64, VII) require PSU modifications or undervolting to run.
There isn't a "best card" for any computer, instead of how much money you're willing to spend and if the money could be better spent elsewhere. This is an arbitrary metric as even a 3,1 Mac Pro will see significant gains in GPU tasks, with AMD Radeon VII over lesser cards (for example, an AMD Radeon 580). Consider this: A Radeon VII sells for many times more than a Mac Pro 3,1 itself. Commonly, forums and groups will mention "pairs well" or "bottleneck" (see PCIe And You (PCIe overview) PCIe 2.0 vs. 3.0), but any high-end GPU will "pair well," the question is more about where a user can see more performance gains.
- Mac Pro 1,1/2,1 users are limited to a maximum of running Mac OS 10.11.x, thus, do not have to worry about the lack of NVidia support in Mojave. 1,1/2,1 users should consider the GeForce 680 for EFI boot screen support or the GeForce 7xx or 9xx series. Notably, 64-bit EFI-supported cards will not display the boot screen.
- Mac Pro 3,1 users tend to consider the AMD Radeon 580x a great choice. The AMD cards require a hack that can be enabled by special drivers that enable SSE 4.2 emulation. Also, for the Mac Pro 3.1s only, users have figured out a way to display the boot screen without flashing for the 580x. This only applies to the 3.1s. This isn't as important in the era of OpenCore, but it is worth mentioning.
- Mac Pro 5,1 users looking for modern performance should consider the AMD 580x, Vega 56, Vega 64, Vega FE, VII (10.14.6), or 5700 XT (10.15+). The 580x is relatively inexpensive and does not require any modifications to power the GPU. In contrast, the top-tier Vegas is power-hungry but one of the most performant GPUs supported in Mojave. Users not caring about performance may want to consider the R9 280x, as it can be flashed to include EFI support. The performance king is the VII currently for both compute and gaming, although the 5700xt represents a great value for users looking to run Catalina 10.15 or above.
Overwhelmingly, the most popular GPU for Mac Pros is the RX 580 due to its great price-to-performance and long support. However, for most users, I'd recommend looking at a Vega 56, as it's a completely different microarchitecture. It features the 14 nm Vega, much faster VRAM (HMB2 over GDDR5), and "Next Compute Unit," aka NCU, which all result in significant gains over the RX580 and do not require a PSU modification. The Vega line is well-suited for professional applications. Also, the Vega 56 can be flashed to the Vega 64 firmware, resulting in near Vega 64 performance. Using Vega 64 firmware will require a PSU mod.
I want a GPU that has a boot screen and is Metal (Mojave 10.14+) compatible...
I would recommend OpenCore, as any Metal-compatible GPU will output a basic boot screen or precede the boot screen entirely, as you can easily manage dual booting. If you are looking for a frictionless upgrade, you can buy GPUs from MacVidCards (they have RX 580s, Vega 56s, and 5700 XTs) or get one of the following:
- NVIDIA HP GeForce GT 630 (flashed) - Notes (spotty info, certain models)
- NVIDIA GeForce GTX 680 Mac Edition(or flashed) - Instructions, 4 GB ROM
- NVIDIA Quadro K5000 for Mac (or flashed) - 4 GB
- Radeon R9 280X (flashed) - Instructions
- SAPPHIRE Radeon HD 7950 Mac Edition (or flashed) - Instructions, Black Edition Instructions
Again, you can buy any supported aftermarket GPU with OpenCore and get a boot screen using OpenCore. Read more about it in the OpenCore section.
A MacProUpgrade (requires membership) member wrote a post "The Cheapest Metal Supported Card". I recommend reading it, but Doug's post for those bargain-hunting.
Installing a GPU
GPUs are straightforward to install except for two minor "gotcha"s: they use Mini PCIe power adapters on the motherboard and, for exceptionally power-hungry 250+ watt GPUs (GeForce 1080 Ti, Radeon Vega FE, etc.), require modification to power the cards. See the Mac Pro Pixlas PSU Mod or External Power Supplies sections of this guide for more information. Some readers have reported they are able to run high-power requirement GPUs off their internal power supply.
As mentioned above, the Mac Pro has two 6-pin mini-PCIe power ports, which require mini-PCIe to PCIe power cables. For reference, here are examples of a mini PCIe 6-pin to PCIe Power cable and a mini PCIe 6-pin to PCIe 8-pin cable. These are likely required to power your GPU. For example, a GPU that has a 6-pin power port and an 8-pin power port would require one of each cable.
I wrote two guides blog.greggant.com: Installing GeForce GTX 760/770/780 on a Mac Pro 3.1, and blog.greggant.com: Installing GeForce GTX 1060/1070/1080 on a Mac Pro 5.1, which both detail the installation process.
I tested a GeForce 760 Hackintosh vs. my Mac Pro outlined the installation process 2008 Mac Pro Full Instructions and benchmarks here. Upon purchasing a GeForce 1060, I wrote a follow-up how to install a GeForce 1060 into a Mac Pro 5.1.
For users looking for a tutorial, Every Mac has a video guide on how to install PCIe cards.
Installing a 2.5x height GPU (such as a Radeon 590x)
An enterprising MacRumors poster figured out a way to use a taller-than-normal-GPU in his Mac Pro. The secret is simply getting a single card slot mount and, replacing the dual height on the card, and using the fourth slot. It's not perfect, as it blocks off SATA ports.
HDMI (and Display Port) Audio
Many modern graphics cards have HDMI and are thus capable of outputting audio. There's a very long thread of intrepid hackers at Mac Rumors.
In modern Mac OS, HDMI should appear as an audio output as well as Display Port. However, if it does not, fear not. There are guides for older OSes.
- MacRumors: GUIDE: HDMI Audio
- MacRumors: GUIDE: HDMI Audio - 10.13
- LifeHacker: How to enable Mac Volume Control
Mixing and Matching GPUs
It's not uncommon for Mac Pro users to keep a secondary GPU installed for EFI boot screen access. Generally, it is okay to mix web driver NVidia GPUs with an old ATI/AMD GPU. If you use a modern AMD GPU with, for example, a GT 120, you may experience erratic behavior in certain applications like Photoshop and Firefox. For whatever reason, these (and various) applications prefer the GT 120 over the AMD GPU and thus perform poorly. When using a modern AMD GPU, you should remove the old GPU depending on if you experience slow performance or bizarre behavior in certain applications. This is a case-by-case issue and may or may not be an issue for various users.
The Most Powerful / Fastest GPU
The Mac Pros with PCIe 2.0 are not "speed capped", see the PCIe 2.0 vs. 3.0 vs. 4.0, and its impact on GPU performance and bottlenecking section for more details as GPUs currently do not require the bandwidth that even PCIe 3.0 offers.
This seems to be a burning question that comes a lot in Mac Pro communities, and it can be answered very easily with the flashable 6900 XT. Previously, before the hacked ROM to enable Navi 21 GPUs, by the benchmarks, the Radeon VII was hands down the most powerful consumer GPU available for macOS. The best place to check GPU performance for macOS is the Geekbench Metal Benchmarks, which is far from perfect.
The Radeon VII was especially a curiosity as it was a rebranded AMD Radeon Instinct with a minor speed cap on its FP64 performance, as it consisted of cards that failed to make the Instinct cut during testing. It's best to think of the Radeon VII as a compute GPU that plays games well and was manufactured as a stop-gap so AMD could recoup some losses on the Instinct line before its next chipset arrived. Thus, it occupies a strange space in the GPU market, only existing for about nine months and expensive on the used market as Mac Pro 2019 owners discovered it's about as fast as the 4x as expensive Radeon Pro Vega II MPX Module. AnandTech's comparison to the Instinct line shows why the VII was a curious card, existing as a power-hungry. It handily bests the 5700 XT in compute benchmarks (used for non-gaming, video editing, etc.) scores and is fractionally faster in 3D than the 5700 XT in some applications. It bests the 1080 Ti in everything sans CUDA, even though the support for the Nvidia card ends at 10.13, and the Radeon VII starts at 10.14. The Radeon VII ties with the M1 Ultra's GPU in Metal benchmarks.
The Navi 21 GPUs finally oust the Radeon VII as the 6900 XT tends to be roughly 75% faster overall vs the Radeon VII, and the 6800 XT is roughly 50% faster. This is supremely welcome news as so few Radeon VIIs were produced and became particularly sought after by crypto miners. For a large duration of the GPU shortage, the 6900 XT generally sold for less than the Radeon VII thanks to it using HDBM2 instead of GDDR6 memory.
The 6600 XT opens up the possibility of reasonably priced GPU performance with the classic Mac Pros as its performance is comparable to the Radeon VII in Metal benchmarks.
Previously, this section contained a line-by-line breakdown of the fastest cards, but with the newly supported-by-flashing 6900 XT, 6800 XT, and 6800, these are the fastest cards. Previously the Radeon VII and 5700 XT were the two fastest GPUs.
As GPU prices come back down to earth, price conscience shoppers should look for the 5700 XT (supported in Catalina), the Vega 56 or 64 (supported in Mojave) and, of course, the RX 580.
I recommend the article, Barefeats: Benchmarking AMD Radeon VII Gaming GPU with Mojave 10.14.5, as it shows the VII running in different hardware configs against the Vega 64, RX 580, D700s, and RX 560. Also, the 2010 Mac Pro tower with AMD Radeon RX 5700 XT GPU running under macOS 10.15.1 Catalina shows the Radeon VII vs. the 5700 Xt, GeekBench 5 Metal Benchmarks Pugetsystems: DaVinci Resolve GPU Roundup shows the 5700 XT, Vega 64, and VII on Windows.
I'd recommend checking out Mac Sound Solutions inc.: Mac Pro 5,1 with RX6800XT Benchmarks & Gaming Final cMP Upgrade!.
I/O Upgrades

The I/O (Input/Output) is a catch-all umbrella term I'm using for anything that doesn't fall under GPU, SSD interfaces, Wireless or audio PCIe cards such as networking and peripherals interfaces (USB/Firewire/SATA). This isn't a complete list of all possible I/O cards but rather a list of common ones.
The Mac Pros can support many more cards than listed here. NewerTech and Sonnet are reliable. Not all cards are equal. Some are more performant, such as USB 3.0/3.1, offering full-duplex per port instead of shared bandwidth. Also, some non-listed cards have issues. I had an off-brand Inateck PCI-E to USB 3.0, which worked but also caused a reboot loop when trying to shut down. The only way to turn off my Mac Pro was to hold down the power key forcibly. I personally use a SYBA SY-PEX40039 SATA card as my bootable SSD for my Samsung Evo. I've elected not to include USB 2.0 only or Gigabit Ethernet-only or SATA II-only cards as all are found natively on all versions of the classic Mac Pros.
Note: This is not to be taken as a complete list, but rather a list of known working cards that users have confirmed. If you know of a card that's supported by macOS, please reach out to me.
USB 3.0*see notes
- Sonnet Allegro USB 3.0 / Sonnet Allegro Pro
- Inateck KT4004
- RocketU 1144D / HighPoint RocketU 1144C
- HighPoint RocketU 1144E
- CalDigit FASTA-6GU3 Pro (Discontinued)
- HighPoint RocketU 1144CM -
- Inateck PCI-E to USB 3.0 - (Caused Reboot loop in 2008 Mac Pro)
- Sonnet Technologies Tempo Duo PCIe (2x eSATA / 2x USB 3.0) - (discontinued)
- Newer Technology MAXPower 2 port eSATA 6/GBs & 2 Port USB 3.0
USB 3.1 / USB 3.2 Gen 1 / Gen 2*see notes
The USB 3.x standard has had a few rebrandings, and the language on devices can often be confusing, as due to the recent rebranding, some devices might be labeled as "USB 3.0" or "USB 3.1 Gen 1" or "USB 3.2 Gen 1" which is entirely the same. Below is a small chart of names for each tier of USB.
| Original Name | 2013 Rebrand | 2019 Rebrand | Bandwidth |
| USB 3.0 | USB 3.1 Gen 1 | USB 3.2 Gen 1 | 5 Gbps (625 MB/s) |
| USB 3.1 | USB 3.1 Gen 2 | USB 3.2 Gen 2 | 10 Gbps (1250 MB/s) |
| USB 3.2 | - | USB 3.2 Gen 2x2 | 20 Gbps (2500 MB/s) |
If the above is confusing, I do not blame you as I find it too.
USB Cards and Performance
USB 3.x cards are one of the most common upgrades for a Mac Pro, but it is important to understand that there is a great deal of performance difference between cheap USB cards vs. high-end ones (such as Sonnet's Allegro Pro), and this comes down to three factors: How many controllers per port, USB generation and how much bandwidth.
Generally, inexpensive USB cards will feature one controller and 4-ports and be listed as USB 3.0 or USB 3.2 Gen 1. This means 625 MB/s is divided roughly 4 by 4 (although not exactly). A user should expect to see only roughly 150-250 MB/s on a singular port regardless of whether anything else is plugged into a card.
A USB 3.2 Gen 2 or USB 3.1 card with four ports and two controllers will likely see 625-800 MB/s per port.
The classic Mac Pros Perform well with USB 3.2 Gen 2. The above video provides benchmarks of the Mac Pro 5,1 vs. a Macbook Pro 2017 and a MacBook Pro M1.
Any card using the ASMedia ASM3142 should be macOS 10.11.x+ compatible as this controller is supported by macOS as long as it doesn't require external power. One of the most popular ASM3142 import cards (often a black PCIe card with names like Tuneway Usb3.1 Type-C, WEI-LUONG USB 3.1 to Type-C, YISUNF USB 3.1 to Type-C 2 Port, Camisin USB 3.1 to Type-C 2) is not macOS compatible due to the power requirements.
- MAXPower 4-Port USB 3.1 Gen 1
- Sonnet Technologies Allegro USB-C
- StarTech 4-Port USB 3.1 (10Gbps) Card PEXUSB314A2V
- CalDigit FASTA-6GU3 Plus (USB 3.1 / 2x eSATA)
- Sonnet Technologies Allegro™ Pro USB 3.1 PCIe
- Sonnet Technologies Allegro USB-C 4-Port PCIe
- Rosewill RC-20002 USB 3.2 Gen 2 Type-C, 2 x USB 3.2 Gen 2 Type-A ports
- FebSmart 1X USB-A & 1X USB-C 10Gbps Ports PCIE USB 3.1 Gen 2 Card
- FebSmart 2X 10Gbps USB-C Ports PCIE USB 3.1 Gen 2
- FebSmart USB 3.1 Gen 2 2X 10Gbps USB-A
- FebSmart 2X USB-C & 3X USB-A 10Gbps Ports PCIE USB 3.2 Gen 2 Card
- FebSmart 5X 10Gbps USB-A Ports PCIE USB 3.2 Gen 2
- BEYIMEI PCI-E 4X to USB 3.1 Gen 2
- LTERIVER PCI Express to 2 USB 3.1 Gen2 Type A 10Gbps Ports Expansion Card
- LTERIVER PCI Express to 2X USB 3.1 Gen2 Type C 10Gbps
- Ableconn PEX-UB158 USB 3.1 5-Port PCIe 3.0 Card (1x USB-C & 2X USB-A & 1x 2-Port Internal USB Header
- Aukey B01AAETL6Y USBc 2-Port (no longer manufactured, review)
SATA/eSATA*see notes
Note: Not all SATA cards are bootable on OS X. Currently, the list is expanding. Non-bootable cards will be listed as such. Known bootable cards will be listed as such. If no notes appear, I haven't researched this yet.
- NewerTech MAXPower PCIe eSATA 6G Controller - Bootable
- MAXPower 4-port eSATA 6G PCIe 2.0 - (bootable)
- MAXPowereSATA 6G PCIe 2.0 RAID 0/1/5/10
- MAXPower RAID mini-SAS 6G-2e2i
- Sonnet Technologies Tempo SATA Pro - Bootable
- Sonnet Technologies Tempo SATA E2P
- Sonnet Technologies Tempo SATA 6Gb/s PCIe 2.0 - (discontinued)
- Sonnet Technologies Tempo SATA Pro 6Gb PCIe 2.0 - (discontinued)
- SYBA SY-PEX40039 SATA III
- HighPoint Rocket 620 2 SATA
- ORICO PFU3-4P 3 Port
- ATTO ExpressSAS H680 Low-Profile x8-External Port
- ATTO ExpressSAS H644 Low-Profile 4-Internal/4-External Port
- ATTO ExpressSAS H6F0 16-External
Firewire*see notes
- Sonnet Technologies Tango Express Combo FireWire 400/USB 2.0 Card
- Sonnet Technologies Allegro FireWire 800 PCIe
- Sonnet Technologies Allegro FW400 PCIe - (discontinued)
Ethernet (10 Gigabit)*see notes
- Sonnet Technologies Presto 10GbE 10GBASE-T
- Sonnet Technologies Presto 10GbE SFP+
- Sonnet Technologies Presto 10GbE 2-Port - (discontinued)
- Small Tree P2E10G-1-T, P2E10G-2-T, P2E10G-4-T 10GbE One-Port / Two- Port/ Four-Port 10GBase-T
- Small Tree P2E10G-2-XR, P3E10G-4-XR, P3E10G-6-XR Two-Port / Four-Port/ Six-Port 10GbE 10G-SFP+
- Small Tree P2E10G-1-SR, P2E10G-2-SR, P3E10G-4-SR, P3E10G-6-SR One-Port/ Two-Port / Four-Port / Six-Port 10G-SFP+
- Solarflare / Solarstorm Cards (drivers last updated in 2013) - see release notes for supported devices
- Chelsio- See Release notes on drivers for supported devices
- Solarflare - See Release notes on driers for supported devices
Useful Links
Thunderbolt?
Thunderbolt 3 is possible on the classic Mac Pros, but with caveats:
- * Currently the only card that works Gigabyte GC-TITAN RIDGE, although reports have shown that the ASUS Expansion Card for Z170 & X99 Motherboards ThunderboltEX 3 card can produce video passthrough but will stop if the computer is put to sleep.
- * Initializing the card requires custom firmware (and physically modifying the card) or Windows 10 to warm boot to Mac OS. This means installing the custom TitanRidge Firmware via Windows 10 or simply booting Windows and then rebooting.
- * Sleeping can pose problems. For example, the Thunderbolt Display will not wake if the Mac Pro is put to sleep when it is connected to a Thunderbolt Port. (This may be fixed by modification of the physical card)
- * Thunderbolt Devices are not hot-swappable without OpenCore and physically modified cards. USB 2.0 is not supported... yet.
- * There is a Facebook Group for those dedicated to using custom firmware
- * I recommend checking out Mac Sound Solutions's YouTube video: Mac Pro 5,1 Thunderbolt 3 0 Titan Ridge pros and cons for an overview of what the install process and usage looks like.
A brief history of Thunderbolt on the Mac Pros
PCIe Thunderbolt cards were exclusively for PCs with compatible motherboards with specialized chipsets, generally requiring a passthrough jumper connection. The original speculation started at eGPU.io.
Shortly after, MacRumors Forum members started testing the Gigabyte GC-TITAN RIDGE and getting promising results. Afterward, a member of Mac Pro Upgrade and MacRumors posted a screenshot of ThunderBolt working on a cMac Pro using a digital audio interface and posted two YouTube videos Part 1 and Part 2, demoing his setup using Windows 10. Months passed, as users toyed with boot methods and firmware versions until unexpectedly, on hackintosh-forum.de (German Hackintosh forum), a user claimed success on a modified firmware with some info on the vector. Later, the moderator, DMS2, posted custom firmware on MacRumors despite some members being somewhat less-that-polite. Since then, the community has moved to using OpenCore to unlock more functionality like hot-swapping and Thunderbolt displays, this guide (posted by a GitHub user) is an excellent resource.
Using a TB3 Card
The following is not a guide but a quick overview as I do not own a Thunderbolt 3. The only way to use an unmodified Thunderbolt 3 card is to cold-boot to Windows 10. This will initialize the Thunderbolt 3 card with the proper drivers installed. Once Windows 10 is launched, the user can reboot to Mac OS, where the Thunderbolt 3 card will remain initialized. If you shut down/reboot your computer, you must repeat the process. Also, most Thunderbolt 3 devices work, but not all. The most commonly tested Thunderbolt 3 devices are audio interfaces.
Custom Firmware now exists and is available for download at MacRumors and requires modifying the card. A user created a pictorial guide. This eliminates the need for the warm boot method but does not solve any of the other issues pertaining to sleep (Hot swapping requires particular pin connections). Using OpenCore, devices can become hot-swappable, and the Titan Ridge can support Thunderbolt Displays.
Thunderbolt support is currently a moving target. As notable progress unfolds, this section will be updated to reflect it. For now, it's best to see the action on MacProUpgrade and MacRumors' forums on threads like testing TB3 AIC with MP 5,1 and Mac 5,1 Titan Ridge TB3 Custom Firmware Facebook group for the latest and best info.
I'm always open to corrections to this section (or anywhere in this guide). I've received a few emails requesting more information about Thunderbolt 3 on Mac Pros. Please understand that before contacting me, I did not have a Thunderbolt 3 card. I probably cannot answer any questions, and thus all I know is documented here.
Storage Upgrades
Like many data interfaces, SATA (aka Serial ATA) has gone through multiple iterations: SATA1 (max transfer speed of 150 MB/s), SATA2 (max transfer speed of 300 MB/s), and finally, its last incarnation, SATA3 (max transfer speed of 600 MB/s). The classic Mac Pros all carry onboard SATA 2, and (the cMP 1,1, and 3,1 also have older/slower ATA in the optical bay), which has a limit of 300 MB/s. The Mac Pro will accept any standard SATA HDD, 5.25-inch in the optical bay*, 3.5-inch in the four drive bays (or in optical bays with brackets), or 2.5-inch (with 3.5-inch mounting brackets or 5.25-inch brackets in the optical bays). The SATA standard is limited to 144 PB (petabytes), and the maximum volume size macOS supports with HFS+/APFS is 8 exabytes. (For the record, 1 Exobyte = 1000 Petabytes, 1 Petabyte = 1000 Terabytes). Needless to say, Hard Drives and SSDs are well below these caps. All SATA drives are compatible with Mac OS with the caveat that NTFS (Windows) is not writable by macOS without 3rd party utilities.
During the transition from OS X -> Mac OS (macOS), Apple replaced its default file system, HFS+, with APFS in Mac OS 10.13 to address. HFS+ is still supported in 10.13+, and it is unlikely to be removed soon.
* The Mac Pro 1,1 - 3,1 have two hidden unused SATA ports that can be run to the optical drive bays. The Mac Pro 1,1s - 3,1s also carry the ATA-6 (100 MB/s) standard that predates Serial ATA, which uses the larger ribbon connectors for its two optical drives. The design between the SATA ports also allows users to upgrade the ports using a PCIe controller.
See the 3D Printed Replacement Hard Drive Trays / 2.5-inch Adapters for replacement hard drive sled mounts and adapters for 2.5-inch drives.
SSDs come in multiple flavors: SATA, AHCI, and NVMe. The Mac Pro's SATA2's 300 MB/s is limiting for SATA SSDs. SATA SSDs can come very close to the theoretical maximum of SATA3's 600 MB/s when performing certain read/write activities. NVMe (today's fastest SSDs) can hit roughly triple the speed of a SATA SSD in certain read/write tasks. The Mac Pros can use SATA SSDs without any special modifications, with the caveat that read/write speeds are significantly lower than their potential max speeds.
SATA2 still hasn't yet been fully saturated even by performant 3.5 spinning disk drives. Even the fastest current-gen 3.5 drives, such as the Western Digital Black drives, are well below SATA2. Thus, the four internal bays are still useful for hard disk drives and workable for SATA SSDs. For those looking to sacrifice optical bays, OWC made a series of multi-mounts to go inside the dual 5.25 drive bays for 3.5 and 2.5-inch drives. SATA HDDs are still the best value price-per-gigabyte, thus useful archiving/large media/backup.
Time Machine
New Mac users may not be aware, but built into macOS is a mighty backup utility that not only keeps a backup of your entire boot drive (and any selected external drives), but it also can undeleted files and resurrects old versions of files in addition to being able to restore your entire computer. For my fellow developers, it's essentially version control (like Git) but for your entire computer. I highly encourage all users to use Time Machine. Unless you do not care about the data on your Mac Pro, Time Machine is the single best upgrade you can add to your Mac. Simply put, if you value any data on your computer, it is the best investment in this upgrade guide I can recommend.
Strictly speaking, from a data backup strategy, Time Machine is one of the best backup methods due to the data parity and ability to restore from previous backups, making it far more effective than RAID or cloning an HDD. You can attach multiple HDDs for multiple Time Machine drives. Each drive is a separate backup with file histories, whereas RAID1 requires double the drives and only works for mechanical failures, not data loss. Cloning loses parity when new files are added/modified/deleted and is not performed hourly. This isn't to say RAID arrays or clones of HDDs do not provide value, but RAID is not a backup strategy, and drive clones are frozen states but bootable, whereas Time Machine must be restored.
I've written a mini-guide, Making the most out of Time Machine. It covers recommended ignore paths, how to use Networked Drives, how to change the update intervals, and so forth.
Hard Disk Drives
Mechanical hard drives still have a place in the SSD world thanks to their price-per-gigabyte. The Mac Pro can use any SATA Hard disk drive, including 2.5-inch drives with 2.5-inch to 3.5-inch mounting brackets for the four drive bays. This also extends to eSATA, although an eSATA PCIe card must be present to use eSATA drives.
Not all HDDs are equal, and more goes into HDDs than cache sizes and RPMs. Many of the inexpensive HDDs use Shingled Magnetic Recording (SMR), which lowers the cost per gigabyte by allowing more data on a platter but with a performance penalty. It's important to do research, depending on the application.
Any external HDD should be presumed to be compatible with Mac OS (outside of extreme edge cases), although, without USB 3.0 or 3.1c cards, the performance of newer USB 3.0+ HDDs will be capped when plugged into a USB 2.0 port.
Soft RAID and post 10.13
RAID (Redundant Array of Inexpensive Disks) comes in management styles, hardware controllers that handle the RAID volume's setup, and presents the RAID cluster as a single volume to the OS and RAID that relies on OS drivers to manage the RAID cluster. For years, macOS has supported soft raid for those looking to make use of multi-volume drives, supporting both RAID 0 (striping, no data mirror) and RAID 1 (Data mirroring, no parity/striping). The axiom goes, RAID 0 means you'll get zero files back if a drive fails in a RAID 0 cluster. Mac OS also supports RAID 1 + 0 (often incorrectly referred to as RAID10), allowing for the benefit of mirroring the parity/striping drives. RAID 1+0 requires a minimum of 4 drives at the cost of 1/2 the storage of the array.
However, with the switch to APFS, Apple no longer supports APFS for soft RAID for bootable volumes. Hardware RAID is still supported with APFS as the OS is unaware of the RAID Cluster, NVMe cards like the Western Digital Black AIC will work under macOS despite being a raid array thanks to the hardware controller.
Making APFS bootable requires first having a bootable drive, then creating an APFS RAID array, and then cloning the boot drive to the RAID array. Any updates to the OS will require first updating the boot drive and then copying over to the RAID array, as you cannot update the RAID volume's OS. This is usually done using Carbon Copy Cloner but means users will spend a non-trivial amount syncing amount of syncing data as the usual update flow is: sync APFS RAID to single drive APFS, then boot single drive APFS, update, then sync to APFS RAID array, finally booting back to the APFS RAID array.
Generally, many users opt to boot off a single SSD and use RAID as a storage/scratch disk.
- lesniakrafal: How to Install Mac OS Catalina on a soft RAID Volume
- Appletalk Australia: HOW TO: Install MacOS Mojave onto a RAID0 volume with APFS that is Bootable
HDD RAID still has its place for a subset of users, but increasingly, the prospect of even cheap SSDs having much quicker random access and much faster read/write times has led to less support. That said, it is possible to create SSD Raid arrays for even greater performance.
PCIe SATA + SSD Sleds
Historically, the most popular upgrades are PCIe sleds for SATA SSDs, which often feature two trays for RAID0 configurations on the PCIe board, bringing up the speeds to the 1 GB/s range. These are essentially SATA 3 cards with two mounting ports for 2.5-inch SSDs, making them more convenient than a regular SATA 3 card. That said, users can still use PCIe SATA 3 cards + SATA SSD drives.
The 1,1, 2,1, and 3,1 Mac Pros also have two extra SATA ports hidden on the motherboards, which can be routed up to the optical bay for modders looking for more SATA storage or replace optical bays with SATA variants; see Accessing SATA Ports section. 4,1/5,1 Mac Pros removed ATA and thus have SATA accessible. Newer Technology made an eSATA Extender Cable Adapter specifically for users looking to make eSATA ports out of the hidden ports but blocking off a PCIe port in the process.
Both OWC and Newer Technology make 2.5 -> 3.5 sleds for the drive bays found in Mac Pros. I can attest for two years of not using a sled that they are optional if you rarely move your Mac Pro as 2.5-inch SSDs are extremely light and will stay suspended in place when plugged in.
- Sonnet Technologies Tempo SSD (2x 2.5 SSD) - bootable
- OWC Accelsior series - bootable
- OWC Accelsior S: PCIe to 2.5" 6Gb/s SATA SSD Host Adapter - bootable
- Sonnet Technologies Tempo SSD 6Gb/s SATA PCIe 2.5" SSD Host Adapter
- Sonnet Technologies Tempo SSD Pro Plus 6Gb/s eSATA / SATA PCIe 2.5" SSD Host Adapter
Useful Links
The M.2 format and host PCIe cards
One half of the NVMe puzzle
M.2 (also known as NGFF, Next Generation Form Factor) is the latest common format for high-speed SSDs. M.2 is the interconnect, and modern motherboards often have M.2 card slots built-in, especially in the laptop market.
M.2 has two main variants, AHCI and NVMe, which are discussed in the AHCI SSD and NVMe SSD sections.
Note: Apple is the aberration as the Mac Pro 2013s, 2015s, iMac Pro, and Mac Pro 2013 and 2019 use non-standard slots for NVMe Apple's semi-proprietary NGFF variant, which doesn't have an official name. Fortunately, classic Mac Pro users needn't worry about Apple's annoying proprietary format. Also, for owners of computers using Apple's proprietary format, plenty of adapters exist to convert M.2 to Apple's format.
Using M.2 SSDs requires a host PCIe card, as the Mac Pro does have M.2 slots. The Mac Pro, being older, doesn't quite have the options that the PC field has for host card options because it does not support bifurcation, the ability to split high-speed PCIe port into two lower speed ports (see the PCIe and You portion of this guide for more info). Instead, the classic Mac Pros must use cards with controller chipsets specifically for computers that do not support bifurcation, hence making them more expensive. Also, it is important to note that some M.2 cards' physical sizes can pose problems for certain host cards, so go to the MacRumors thread for more info.
The Mac Pro also uses PCIe 2.0, in which cheap host controllers do not support additional lane switches. Many NVMe drives can perform beyond a 4x PCIe slot, reducing the peak read/write speeds. The more expensive cards have controller chipsets, mostly the ASMedia ASM2824 and PLX8747, which have a switch for PCIe 2.0 to use more than four lanes. This requires putting the card in one of the two 16x slots on the Mac Pro to obtain faster speeds. It will benefit both single drives and multi-drive setups. The daring can search for cards that use the ASM2824 or generic PLX8747, which are usually macOS compatible. Notably, 8x PCIe cards are capped at sub 4 GB/s (real-world at about 3 GB/s), whereas 16x cards can run at sub 8 GB/s (real-world 6 GB/s). Lastly, these chipsets can run warm, so it's recommended to get cards with heat sinks, although less important for the SSDs themselves. All cards support both AHCI and NVMe unless listed otherwise. The Apple proprietary SSDs can be used in a host adapter with the Sintech NGFF M.2 adapter.
Credit goes to MisterAndrew for doing the original compiling of this list here.
The ASM2824 chipset is currently the most popular NVMe chipset for multiple NVMe drives as it is less expensive and able to achieve faster speed caps in single-drive performance. However, the PLX8747 is the performance crown used in the Sonnet and Highpoint 16x cards.
The ASM2812 chipset can address multiple NVMe drives but will be performance capped at 4x, thus 1500 MB/s, unlike the ASM2824. This card is more useful for Mac Pro 2019s as the performance hit is much less. These are generally the least expensive multi-drive cards.
Most generic single drive M.2 hosts will work with the Mac Pro and will be capped at 1500 MB/s. Due to the sheer number of options and white-label importers, a dirt-cheap host will likely work. My only recommendation is just to make sure the retailer has a nice return policy.
Multi-drive cards with a single drive can sometimes have issues. I, for instance, had no issues with the Ableconn card running a single drive with 10.14 off an HP EX950, but readers have reported this wasn't the case for them until they installed a second card. Thus far, I'm unaware of the variables that affect bootability. I highly recommend checking Macrumors or other communities.
| Model | NVMe M.2 slots | Max Speed in Tests |
| Kingston HyperX Predator (AHCI only) | 1 | 1200 MB/s 4x PCIe |
| NGFF M key M.2 This is a generic card with multiple variants by various importers | 1 | 1500 MB/s 4x PCIe |
| Lycom DT-120 | 1 | 1500 MB/s 4x PCIe |
| ULANSEN M.2 to PCIe | 1 | 1500 MB/s 4x PCIe |
| Angelbirds Wings PX1 | 1 | 1500 MB/s 4x PCIe |
| Aqua Computer kryoM.2 | 1 | 1500 MB/s 4x PCIe |
| Aqua Computer kryoM.2 Evo | 1 | 1500 MB/s 4x PCIe |
| Wolftech pulsecard | 1 | 1500 MB/s 4x PCIe |
| RIITOP M.2 NVMe/DIEWU TXB122 (This particular card has multiple variants by various importers) | 2 | 1500 MB/s 4x PCIe - uses ASM2812 thus limited to 4x speeds per drive. Facebook: MacProUpgrade thread, see Petri's comment, available on Aliexpress |
| Syba I/O Crest SI-PEX40129 (ASM2824) (This particular card has multiple variants by various importers, (ASM2824)) Warning: Require two drives to work in the card. | 2 | 2500 MB/s (Single drive) / 3000 MB/s (RAID) 8x PCIe |
| Ableconn PEXM2-130 / StarTech PEX8M2E2 / Lycom DT-130 / etc (This particular card has multiple variants by various importers, (ASM2824)) | 2 | 2800 MB/s (Single drive) / 3000 MB/s (RAID) 8x PCIe |
| Accelsior 4M2 (PLX8747) | 4 | 3000+ MB/s (RAID) 8x PCIe |
| Amfeltec Squid series Some are PLX8747 | 4 | 5900+ MB/s (RAID) 16x PCIe |
| PLX8747 Generic | 4 | 5900+ MB/s (RAID) 16x PCIe |
| Highpoint 7101A (PLX8747) | 4 | 5900+ MB/s (RAID) 16x PCIe |
| ASM2824 Quad M.2 NVMe SSD (aliexpress generic card) confirmed working by MacProUpgrade (requires FaceBook Membership). This is card also available from many no-name white-label vendors: Add On/ADWITS/RIITOP/BGNing etc. | 4 | ? (prelim tests show 2500 MB/s single drive) |
| Sonnet M.2 4x4 PCIe Card FUS-SSD-4X4-E3: | 4 | 5900+ MB/s (Raid) 16x PCIe MacProUpgrade (requires FaceBook Membership), Barefeats |
| Sonnet M.2 4x4 PCIe Card (Silent) | 4 | 5900+ MB/s (Raid) 16x PCIe |
Can I use a card that isn't listed above that hosts multiple NVMe drives?
Almost 99% of the time, no. Most M.2 hosts rely on bifurcation. The Mac Pro does not support bifurcation. See the bifurcation section for details. Many cards that support bifurcation can be used for a single drive. Popular cards like the ASUS Hyper M.2 x16 Card v2 4 x M.2 Socket 3 will not host multiple drives in a Mac Pro. However, if the card uses the ASM2824 or a PLX8747 chipset, you can use it.
Untested Cards Might Work
The card Highpoint SSD7540 controller-based cards should work as they advertise 2019 Mac Pro support like HighPoint Technologies SSD7540 PCIe 4.0 x16 8-Port M.2 NVMe RAID Controller.
Also untested is the new version of the ADWITS Ultra Speed Quad M.2. The previous version used molex, which caused issues for the Mac Pro.
M.2 and Heatsinks
When looking at SSD options, you'll probably notice some hosts include heat sinks and others do not.
It's pretty easy to find conflicting info on AHCI and NVMe SSDs and heat sinks. The short answer is that SSDs are intelligent enough to self-throttle if they get too hot. Thus, it is extremely unlikely heat will damage them. That said, NVMes run warm, but it takes quite a bit to heat them. The NAND memory itself doesn't require any cooling and is generally supposed to be warm to the touch. The controller chipset is the portion of the SSD that heatsinks benefit the most from cooling. There have been debates about whether cooling could be detrimental, but the current consensus is a passive heatsink, at worst, doesn't do much and likely keeps the SSD running at optimal speeds. Even a cheap generic SSD heat sink in many tests shows a drop of 10-15C (roughly 50 degrees Fahrenheit).
For most users, self-included, the heatsink won't change day-to-day operation. Only when you get to cards that can operate four drives, tend to be the consensus that a heatsink is advisable.
Aftermarket heatsinks can be bought and attached to SSDs. Still, if you do go this route, some experts recommend removing the label, as many labels function as heat distribution/heat dissipation, like those found on Samsung drives. Multi-drive M.2 cards require a heatsink over the PCIe switch/controller chipset, as the popular ASMedia 2824 or the PLX8747 runs warm. Often, this is folded into the entire chassis, like in the Highpoint and Sonnet designs, which provide a large heatsink that works for both the PCIe card itself and the drives.
PCIe AHCI SSD
Without any firmware updates or modifications, Mac Pros can boot AHCI SSDs, which are faster than the standard SATA drives via PCIe sleds, offering significantly faster speeds, often double that of SATA SSDs but tend to cap out at 1500 MB/s (usually more roughly in the 1 GB/s mark). Most NVMe adapters also accept AHCI. However, due to the speed limitations and age, there aren't many models on the market. The price per GB tends to be high, as the industry has largely pivoted to NVMe.
AHCI (Advanced Host Controller Interface) is what the SATA standard is based on although, PCIe AHCI interfaces can exceed SATA3 speeds.
PCIe NVMe
Due to its extreme performance, NVMe (Non-Volatile Memory Express) is currently the holy grail of storage. NVMe is roughly triple to quadruple the read/writes of SATA (and often nearly double of AHCI M.2 SSDs), clocking in at transfer speeds over 2 GB/s (and nearly as fast writes). Also, due to the improvements in SSDs, NVMe tends to sport faster 4k Random read/write times, which also greatly affects the "zippiness" of a computer. NVMe was constructed to work only via the PCIe standard; thus, it'sit has a speed advantage over AHCI.
NVMe wasn't always supported under OS X. NVMe support started with the appropriate PCIe sleds under 10.13 with the glaring issue of only being read/writable but not bootable. Clever users found workarounds. They discovered that creating a Fusion Drive with NVMe, with only the boot record on the AHCI storage (it can be a thumb drive), allowed for NVMe boots, allowing Mac Pros to attain the incredible speeds of NVMe (See Fusion Drives section). Then, users found using firmware hacking. They could enable NVMe booting by using a firmware hack upgrade. See the entire thread here. Notably, this firmware hack appears to work for 3,1/4,1/5,1 Mac Pros. The latest Mac Pro 5,1 bios have NVMe support. See below for more details.
PCIe NVMe sleds aren't all created equal as the performance is limited on the PCIe max slot speed (and which slot the card is placed in the Mac Pro) (see the PCIe and You portion of this guide for more info). Also, some cards can host multiple NVMe SSDs. To make matters more confusing, many PCIe NVMe multi-SSD adapters require bifurcation, which is a technology for later-gen PCIe not supported on the Mac Pro, which allows a PCIe slot to be split, example: One 16x port becomes two 8x ports (see the PCIe and You portion of this guide for more info). Multi-drive NVMe cards that support the Mac Pro are more expensive as they have a controller that handles the PCIe IC and registers, and some are more powerful than others.
The Mac Pro is limited to 1500 MB/s on a card unless the card uses a PCIe controller switch. The PCIe switch lets the user toggle the PCIe maximum speed. A PCIe 3.0 NVMe card with a switch allows the user to toggle the card to PCIe 2.0 (the Mac Pros only have 2.0). Without it, most NVMe PCIe 3.0 sleds will fall back to PCIe 1.0, which is the above speed cap. Outside of PCIe 2.0 support, single-slot NVMe cards have little performance difference.
PCIe 4.0 NVMe SSDs have hit the market (semi) recently, which thus far have offered marginal speed increases over PCIe 3.0 SSDs. These aren't recommended for the Mac Pro, as preliminary speculation has been they will run in 4x PCIe 1.0. I have not seen anyone try a PCIe 4.0 NVMe in a sled with a controller.
To summarize. NVMe speed is a function of three factors: the NVMe sled, the NVMe itself, and the PCIe port's maximum speed.
Not all NVMes are Mac OS compatible. Rather than list all that are compatible, here's a shortlist of incompatible or ones that need firmware updates models, as they are few and far between.
- Samsung 950 PRO
- Samsung 970 EVO Plus*
- Samsung PM981
- Samsung 860**
* The Evo and Evo Pro variants of the 970 are Mac-compatible. There is a firmware update for the Evo Plus that fixes issues. Most drives at this point should have the new firmware preinstalled at this point, but it should be noted.
** There are mixed reports on the 860s
Useful Links
- MacRumors: PCIe M.2 NVMe on MacPro
- MacRumors: Boot OSX on an NVMe Card
- Beettech: The Ultimate Guide to Apple's Proprietary SSDs (notably no info directly to classic Mac Pros but a good overview of Mac NVMe)
- Google Docs: Step-by-Step Guide NVMe firmware upgrade
- MacRumors: Entire thread related to the 5,1 ROM hack for NVMe.
- MacRumors: Blade SSDs - NVMe & AHCI
- MacRumors: MP5,1: Mojave 10.14.1 DP3 BootROM 140.0.0.0.0 has native NVMe support!!!
Not all SSDs are equal
While this guide will not explain the finer points of SSDs, it is important to understand that SSDs come in multiple variants based on their storage capacity. Data density in mechanical hard drives has greatly improved read/write speeds as more data can be read by a drive-head on a hard drive each time the platter rotates. More data per square millimeter = more data read per second. This is one of the main reasons why HDD performance has steadily increased over time. However, the same cannot be said for SSDs. Each storage unit in an SSD is represented as a cell. The first SSDs could store a single bit per cell, positive or negative. This is referred to as a single-layer cell. Shortly after came the Multi-Layer Cell (MLC) introduction, which allowed for 2 bits per cell. Then came Triple Level Cell (TLC), which allowed for 3 bits of data per cell, and Quad Level Cell (QLC), which can store 4 bits per cell. The doubling of data per cell comes at a price: speed and reliability. This additional data load per bit increases stress on each cell and takes more time to access the data, which is fractional, but 3 bits vs. 4 bits means 8 vs. 16 possible values stored in an individual cell and more time to retrieve and write.
SLC is the fastest/most reliable and expensive. QLC drives have dropped the price floor in the SSD market but are hard to recommend with their reliability being untested, with only roughly 1000 read/write cycles (the data can be overwritten roughly 1000 times before that cell becomes unstable and is retired). Worse, in very large file transfers, QLC can occasionally dip below HDD speeds. TLC offers roughly 3000-5000 read/write cycles, making it three to five times as reliable as QLC, and it's much faster. Samsung estimates 114 years for 1 TB TLC. Although this is entirely unproven, Windows utilities provide entirely hypothetical guestimates of your SSD life. Does a QLC have 1/5 the reliability of a TLC SSD? Is it worse? Does it compare to a mechanical HDD? There are better sources on the internet, but it is somewhat speculative. The best estimates are using Mean Time to Failure vs. Terabytes, which is written from large data centers, and we simply do not have the data. My bet is on QLC > HDD, but I would pay the extra money for a TLC drive.
Memory density isn't the only factor; the very first SSDs didn't use a controller with a DRAM cache, and thus performance would "stutter. In an effort to harass the power of SSDs, controllers started packing DRAM to store the data map, as DRAM is much faster than NAND and alleviates a common choke point in the SSD design. Many inexpensive SSDs are now also switching to DRAMless configurations, which generally result in lesser performance and lesser longevity due to the lack of a buffer to quickly read/write to before going to the SSD. Tomshardware's has an excellent summary of DRAMless SSDs.
Enabling TRIM
SSDs write data in data in units known as pages, and (usually) 128 pages form a block. For an SSD to write data to a block, it first must delete the block (reset the cell state) before new data can be written, thus slowing down data writing speeds to previously used blocks. TRIM enables the operating system to tell an SSD what data blocks are no longer in use and can be reset. TRIM speeds up the SSD and also improves drive longevity. If only some of the pages are changing in a block, TRIM will shuffle current relevant data to a different block, freeing up the entire block to be written instead of having to rewrite the block. I suggest searchstorage.techtarget.com's summary for the curious.
Unlike Windows, by default Mac OS does not have TRIM enabled for 3rd party drives. You can validate if your SSD has TRIM enabled by going to About This Mac -> System Report -> then locating your Drive under the flag, "TRIM Support".
In previous iterations of Mac OS, TRIM utilities could be downloaded and installed. In 10.10.x Mac OS switched to Kernel extension signing and thus needed Apple approval locking 3rd party TRIM utilities out unless SIP was disabled. In 10.10.4, Apple made it possible to use its own TRIM utility for 3rd party drives. Open up a Terminal window to enable a drive and use the following command. Almost all newer SSDs are TRIM compatible, but I recommend validating this before enabling it.
sudo trimforce enable
You will be prompted for your password and given a warning. TRIM can be disabled at any time by using disable instead of enable.
The Fastest Boot
One of the ironies of NVMe on the Mac Pro is that it will not greatly improve your boot speed over a SATA SSD connected to the internal SATA slots. This has to do with the PCIe Bus scan and speed negotiation. In fact, in many cases, the SATA SSD will boot faster.
That said, the NVMe is the clear winner once the OS has loaded. If your concern is primarily boot times, go with a SATA SSD connected to the Mac Pro's internal bus.
NVMe and the Mac Pro 3,1
The Mac Pro 3,1 has multiple vectors to enable NVMe booting: NVMe EFI driver and BootROM modification. Currently, MacRumors has a work in progress guide.
Making PCIe drives appear as internal Drives
OpenCore can fix the mislabeled NVMe/SATA drives as external.
A MacRumors forum member has written a kext called Innie, which makes PCIe (SATA/NVMe) drives behave and appear as internal, useful for users not running OpenCore. MacRumors: Innie: A fix for PCI drives seen as external that helps solve issues revolving around Boot Camp Assistant and the macOS Installer. This, however, may be optional for many users. As a user for 6+ years of a SATA3 card + SATA SSD, I've never had issues with the misidentification as I installed Windows without Bootcamp assistant and have never had issues with the installer.
Summary: Getting the most out of your SSD
As there's quite a bit of info to digest, below is a quick bullet point summary.
- NVMe SSDs are the fastest, much faster than SATA or AHCI, but speeds differ wildly depending on model/make. (See not All SSDs are created equal).
- NVMe booting requires the updated firmware for 4,1/5,1s. 3.1s require ROM hacking, which is tricky, or you can use OpenCore to support NVMe. Mac Pro 3.1s can use AHCI and SATA HDDs without any issues.
- NVMe speeds with cheap host cards will be capped to a maximum of 1500 MB/s, as the card will address the PCIe bus in 4x PCIe regardless of what port the card is plugged into. Hosts with compatible controller chipsets will address additional lanes when plugged into a 16x Port, unlocking single NVMe speeds of 3 GB/s or nearly 8 GB/s for a RAID setup. However, host cards with controller chipsets cost significantly more, but pretty much all of these cards support multiple NVMe drives, which can be used as multiple volumes or RAID. You will want one of these cards to get the most out of your NVMe drive. Most Host cards with multiple slots are incompatible with the Mac Pro, as they require the controller chipset to address multiple NVMe drives. The list of compatible cards is listed above.
- AHCI PCIe SSDs are fairly uncommon today and thus fairly expensive. They are faster than normal SATA SSDs but not as fast as NVMe. Since SATA uses AHCI, these drives are bootable on Macs without NVMe firmware.
- RAID isn't supported by APFS, but there are workarounds (see below). RAID0 will improve latency as well.
- SATA SSDs can be plugged into the Mac Pro's SATA ports but will be capped at 300 MB/s thanks to SATA2. Using a SATA3 interface will double the bandwidth to 600 MB/s max. That said, the random read/write times, latency, and other properties are mostly unaffected. Going to SATA3 is mostly noticed when working with large transfers/files.
- The difference between SATA SSD and NVMe generally favors SATA for startup times due to firmware limitations (as the computer must go through PCIe negotiation). However, after initially booting, NVMe is much faster.
- For most users, the perceived speed difference from HDD -> SATA SSD is much greater than SATA SSD -> NVMe.
- NVMe will not greatly improve boot times as the NVMe drive must perform the PCIe Buss scan and speed negotiation. SATA SSDs generally will boot faster.
- Heatsinks for NVMe drives aren't required.
- OpenCore benefits NVMe SSDs by making them appear as internal drives
Benchmarking SSDs
The best benchmarking software for SSDs is on Windows, as there are many utilities, whereas the Mac landscape is limited. Previously, users would use utilities like AJA Disk Speed or Blackmagic disk speed, which are, quite frankly, bad as they only test continuous read/write speeds. The popular Windows utility, CrystalMark now has a Mac clone called AmorphousDiskMark. It tests more aspects of an SSD, such as random reads/writes. I've written more about it in a blog post, AmorphousDiskMark is CrystalDiskMark for macOS; let's all stop using BlackMagic Disk Speed Test and AJA Disk Test.
RAID and APFS and performance
As previously mentioned, RAID after 10.13.6 is very ugly for booting. The process involves cloning your boot disk to a single disk drive and cloning the updates back to the RAID array. This remains unchanged from 10.14 - 11.x I recommend reading Catalina on RAID with APFS on MacPro 5,1.
RAID0, though may be "worth it" for users looking for the maximum performance. A 16x NVMe RAID0 can hit 6000+ MB/s read and write speeds, but far more important is that it improves the latency, giving a perceptual "snappiness" that is noticeable, as demonstrated in this old but a good article by PCPER.com, Triple M.2 Samsung 950 Pro Z170 PCIe NVMe RAID Tested – Why So Snappy?. Users are more likely to notice this than running an NVMe at 4x rather than with an 8x or 16x M.2 Host PCIe card.
Fusion Drives
The Fusion Drive once was Apple's solution to mitigating the high cost/low storage space of SSD. The Fusion drive was an OS-level pairing between a standard spinning disk SATA drive and an SSD. These days, the idea of creating a Fusion drive might seem strange, with SSD prices continuing to drop, and the economics of terabyte-sized SSDs are much more attainable.
Fusion Drives have become en vogue once again thanks to the partial support of earlier MacOS versions regarding NVMe and Mac Pro 3.1s lacking firmware updates. NVMe isn't natively bootable prior to the 140.0.0.0.0 firmware update for the Mac Pro 5.1s, but Fusion drives are.
Note the following hack is no longer necessary for 5.1s. The hack goes as follows: Disable SIP / Install the hacked NVMe driver for 10.12 (you may still need it for specific brands in 10.13), then a string of installation commands... Rather than re-outline them, the following links are useful.
Useful Links
- MacRumors: JedNZ -Samsung 960 EVO 500GB NVMe SSD ROM hack - not recommended
- AnandTech: Understanding the Fusion Drive
- OWC: Creating your own fusion drive
- 10.13.2+ Fusion Drive with a USB stick for boot record
- jolly.jinx.de: Fusion drive on older Macs? YES!
OWC Aura and Accelsior SSDs and APFS
OWC appears to make the only SSDs that are incompatible with APFS, the default file system for 10.13+. According to the MacRumors forum posters, OWC Aura owners have been offered a rebate on Aura Pro SSDs. The Aura series is unlikely to be found in a cMac Pro setup as it requires an external case. Users report that Accelsior SSDs work with HFS+ with 10.13.
Display Upgrades
The Mac Pro's display limitations are a factor of graphics cards, what OS you are running, and whatever monitor you can afford or are willing to pay for. The Mac Pros running 10.9 or later can use resolution scaling akin to Macs that ship with "retina" (high-density pixel-per-inch displays).
5k and Beyond
There are users with 5k displays and Mac Pros, including a user confirming two 5k displays working perfectly fine on his Mac Pro.
The current state of 8k
So far, users have only been able to get macOS to output 8k at 30 Hz regardless of macOS version or GPU, but Windows 10 with a Mac Pro can output 8k@60 Hz. I recommend checking out the following threads: Mac Rumors: 8k (or '8k4k') display support in macOS?, Reddit: My journey for 8K on MacOS, and MacRumors: Dell UP3218K 8K Monitor on Mac Pro 2019?. Most likely, a Big Sur update or a later macOS will introduce native 8K support. It is unlikely older macOSes will ever output 8k@60 Hz.
10-Bit Color / Color Spacing
10-bit color spacing requires a minimum of 10.12 (although Apple introduced 10-bit in 10.11 for the 5k iMac), and it'sits support is somewhat hazy as few Apple apps support 10-bit color (Preview, Photos, Final Cut Pro) and some 3rd party apps. The latest Catalina adds desktop-wide HDR color spacing support, whereas Windows has had this feature for years.
Older NVidia GPUs with the web drivers will not support 10-bit color, but the latest GPUs do. AMD's GPU Drivers lockout 10-bit on its consumer GPUs (sans the VII), but the Pro variants unlock 10-bit color. Unfortunately, Apple's drivers confusingly report 30-bit (aka 10-bit) color even when non-compatible hardware is used. If the GPU can address downsampling 30-bit color spaces to 24-bit, it will report 30-bit color. Many true 10-bit displays will report when they're receiving a 10-bit signal. Under Windows, non-pro AMD GPUs will use 10-bit color in games, whereas 2D operations are still wedged into 8-bit color spaces. Most displays (especially budget) use Frame Rate Control (FRC) to achieve simulated 10-bit. FRC works by parsing the 10-bit color stream and for colors that fall outside the 8-bit range, cycling between near shades of colors within the 8-bit spectrum. This visually creates a simulated 10-bit experience and improves the perceived gamut. This is acceptable for many purposes, but film editors, colorists, and graphic designers may require the accuracy of true 10-bit color. These come with a much higher price tag.
When buying a display, it's also important to consider color-space coverage. Color spaces for the unfamiliar are standards of color ranges that a display, projector, or printer setup can represent. Monitors may brag about their color space profile. Not all color spaces are equal, some representing a lot fewer colors than others. The important thing is that sRGB is a dated standard from the 1990s, based on CRTs rather than any clear standard. It severely suffers in representing shades of green and some blues. Today, Apple prefers DCI P3 for its monitors. This standard vastly improves the range of colors available to a display (roughly 45% of the human eye can see as opposed to the 35% of sRGB) and is designed for digital cinema. Adobe RGB is also similar to P3. Both represent a much wider gamut than sRGB. Selecting monitors based on color spaces can assist you in finding a display that's more suitable for photo editing and color grading, capable of more range in the expression of color, and feels more "Mac-like". The wider the color gamut, the wider range of colors a display can produce.
The latest macOS Catalina brings HDR color space support finally to the Mac platform for compatible GPUs and displays.
Refresh rates: 60 Hz (and above) 4k
The Hz of a display measures how many times a second the screen is refreshed, which defines the maximum frames-per-second (FPS) a display can render. A 120 Hz display can render a maximum of 120 FPS. 60 Hz is generally considered the minimum refresh rate for "smooth" user interfaces, like mouse tracking, dragging windows, scrolling, etc. As computer hardware has improved, so have refresh rates. FreeSync and G-Sync are technologies that allow for variable refresh rates to improve the visual experience (prevent effects like "tearing"), especially in the realm of gaming. Mac OS currently does not support Freesync/G-Sync. I can attest that enabling Freesync on a Freesync display caused the monitor to stop outputting video in 10.13.x with a GeForce 1060 and a Vega 56. Also, both tonymacx86 and MacRumors forum members have experienced the same sort of issues. The workaround is to disable the G-sync and Freesync if the monitor produces no video output. Under Windows 10, FreeSync/G-Sync is supported as the limitation is tied to Mac OS.
Depending on the setup, 4k @ 60 Hz+ via HDMI may require workarounds, whereas DisplayPort tends to be far more reliable. I've personally used several 4k displays with my Mac Pro at 60 Hz via DisplayPort with no issues beyond Freesync. Forum members at MacRumors have confirmed that 144 Hz 4k displays do work.
There's a minor caveat that flashed 7950s and 7970s booting with 60 Hz 4k displays will hang, thus must run at 30 Hz at the boot screen. Most 79xx cards have dual ROM, so day-to-day, the UEFI ROM can function as the card's default, which bypasses the boot-screen video output. Later GPUs do not have this issue.
Dual-Link DVI Displays & Modern GPUs
(and the 30-inch Cinema Display)
Many modern GPUs do not have DVI ports, and many older monitors use DVI. Buying an HDMI -> DVI or DisplayPort -> DVI cable should work, right? Not so fast. If the monitor's resolution is over 1920 x 1200 @ 60 Hz, you will need an active Dual-Link DVI convertor.
DVI has always been a bit of a hodge-podge standard, owing to the era it came from when displays were mostly analog. There are multiple variants, DVI-A (analog only), DVI-I (analog or digital), and DVI-D (Digital). To add to the confusion, there's also Dual-Link DVI, which doubles the cable serial links (using the pin-outs) in the cable to effectively double the bandwidth for DVI-D signals, allowing for 1080p @ 120 Hz/2560 × 1600 (or 2560 × 1440) @ 60 Hz/3,840 × 2,400 @ 30 Hz).
Because of the data rate limitations of DVI-D, the industry has primarily shifted to the newer DisplayPort and High-Speed HDMI. Both support 8k resolutions at their current iterations, as well as audio. Modern GPUs often do not have DVI connections and only have HDMI and DisplayPort. However, because of the pin-out shenanigans and also bitstream differences, using DVI-D displays (any display that allows for the resolutions listed above) requires an Active Dual-Link DVI to DisplayPort Adapter/Conversion. The converters need additional power; thus, they usually have a USB connector to draw power. Otherwise, DVI to DisplayPort or HDMI is limited to 1080p @ 60 Hz. This means the ever-popular 30-inch Apple Cinema Display with many modern GPUs will require active conversion, which often costs north of $120 USD for decent quality ones.
If you are wondering, "What about HDMI to Dual-Link DVI"? There isn't any solution as no such device exists on the market.
Why you can go HDMI to DisplayPort but not the inverse
There are plenty of HDMI -> DisplayPort cables on the market, but they will not work going DisplayPort -> HDMI.
HDMI was developed directly as a follow-up to DVI, whereas DisplayPort is a different beast. HDMI and DVI are both based on TMDS (Transition-Minimized Differential Signaling) for data transfer at 5V. Thus, a DVI and HDMI cable can be used interchangeably. DisplayPort is entirely different, running its LVDS signal protocol instead and at 3.3v. This is where things get a little more confusing. DisplayPort was later adapted to carry the 5V TMDS called DisplayPort Dual-Mode but became so ubiquitous that most manufacturers don't even bother to list it. It can pretty much be assumed that any device with a DisplayPort manufactured in the last decade can accept video from an HDMI source. As mentioned above, DisplayPort requires active conversion to carry the Dual-Link DVI signal. DisplayPort, like HDMI, can also carry audio. It can also do more than that and can even transmit bi-directional USB data.
HDMI has no such mode to carry LVDS video signals and wasn't designed to be as all-encompassing as DisplayPort. Also respectively, HDMI predates DisplayPort by four years, released in 2002, whereas DisplayPort was released in 2006. The summary is you cannot connect an HDMI Display to a DisplayPort on a GPU without a convertor.
Using a 4k TV as a display
The short answer is: yes, you can do it. TVs generally require some minor tweaking of the picture, such as enabling overscan correction in macOS. Those looking to use a TV as a full-time monitor should keep a few things in mind. Not all TVs use Chroma 4:4:4 subsampling. Video editors are probably familiar with this concept as not all cameras are 4:4:4, but they may not realize it, nor are all displays. Chroma subsampling refers to pixel clusters and data representation. The Human eye is much more receptive to changes in luminance than color. Thus, video data can be compressed easily by tracking clusters of chroma values and mapping them over pixels of chroma value. This works great for video codecs when the data is at an endpoint where precision isn't as important (a streaming video, for example). TVs, to cut corners, often use this in the panels to both improve response times and lower cost, whereas PC displays are almost always 4:4:4 outside of extremely odd-ball instances. With lower Chroma Subsampling, things like text look blurry due to the decreased chroma resolution. Rtings has a great running list of The 6 Best 4k TVs For PC Monitors and pictorial examples of Chroma subsampling. A 60 Hz 4:4:4 Chroma Subsampled 4k 43-inch display suitable for a PC can be had for as low as $230 USD, making them popular for many users. Mac OS supports audio over HDMI as well. See the GPU section for details.
Notably, with the increase in size comes a decrease in sharpness. For a monitor, one intends to sit at a normal desk distance; 43 inches is appropriate as its Pixels Per Inch (PPI) is approximately 102 PPI. For comparison, Apple's 30-inch Cinema display was roughly 101 PPI, and its 27 Inch Cinema Display was 109 PPI. Apple's laptops pre-Retina generally were around 110 PPI and its retina laptops at 220 PPI. A 4k 42-inch TV is roughly 105 PPI, making it appropriate as a very large standard-definition display. I suggest the PPI calculator for calculating a display's PPI quickly.
UI scaling
External monitors receive the same UI scaling abilities as found in MacBooks. UI scaling requires Mavericks 10.9.3+, although the GPU may require a later version of Mac OS. Some 4k displays will not report all scaled resolutions. To display all the scaled resolution options:
- Open preferences and click the Displays.
- If the option "Default for display" is selected, option-click Scaled.
- If Scaled is already selected, option-click "Scaled."
Does my GPU support 4k?
This is where Google is your friend. Search your GPU's model and max resolution (GPU model can be found in the About This Mac section). That said, there's another way to check, too: If your GPU does not have HDMI or Display Port, it cannot output 4k, as Dual-Link DVI maxes out at 2560 x 1600. That said, an HDMI port and/or DisplayPort does not guarantee 4k support but makes it a possibility.
Control Brightness via keyboard a 3rd Party Display
Some displays use the DDC/CI spec to control the brightness/volume (as well as other features), a kind MacRumors member wrote a utility to assist for those displays.
The utility, MonitorControl, can be installed from a dmg or homebrew. Lastly, the MonitorControl FAQ is a bit buried but contains useful info.
Apple 27-inch Thunderbolt Display
(and the 27-inch LED Cinema Display)
Apple made two 27-inch displays, the LED Cinema Display and the Thunderbolt Display. Both look very similar and thus cause a lot of confusion as they are frequently mislabeled. The LED model uses mini DisplayPort and has the model number A1316. It can be connected via an adapter from HDMI to a mini-DisplayPort port or DisplayPort to a mini-DisplayPort. However, it is less common than its successor.
The Apple Thunderbolt Display, often incorrectly referred to as the "Thunderbolt Cinema Display" (technically, it is not part of the Cinema display line), is a poor choice for Mac Pros because it does not use mini-DisplayPort but rather uses Thunderbolt (despite the connector looking the same as its predecessor). You cannot use an adapter to make the Thunderbolt display backward compatible with other technologies (HDMI, DisplayPort, DVI).
On the backside of the display, the Thunderbolt display has multiple ports: three USB 2.0 ports, single Firewire 800 port, and a single Gigabit Ethernet port, whereas the LED Display only has USB 2.0 Ports.
The Mac Pro, by default, is not equipped with Thunderbolt. Yet a MacProUpgrade user using an ASUS Expansion Card for Z170 & X99 Motherboards ThunderboltEX 3 to enable video passthrough, from his GPU. This isn't recommended as the computer will not wake from sleep and remains experimental. Currently, there is progress with Thunderbolt 3 cards.
Recommended Places to go for Monitor Recommendations
The wonderful thing about monitors is the large variety, but it can make it daunting to select one. I'm personally a fan of the following sites: Rtings, PCmag, Wirecutter, Consumer Reports, Tomshardware, Digital Trends, as all sites do actual hands-on reviews as opposed to listicles of dubious rapport. I ended up with a BenQ PD3220u as it's a true 10-bit 4k panel that has a wide gamut, supporting 95% of the P3 color profile after trying several lesser displays but I also found that a 43 inch 4k Sony X800H TV that I picked up for less than half of the BenQ covers the same P3 space and looks every bit as good as the BenQ which goes to show there are bargains to be had.
Bluetooth / Wireless Upgrades
The Mac Pros 1,1 - 5,1 all include one mini PCIe slot for Airport cards but can also use USB and PCIe Wi-Fi adapters for both 802.11.x and Bluetooth. The advantage of the mini-PCIe slot is that you do not have to sacrifice a PCIe slot, and you can also upgrade Bluetooth and 802.11 internally. Mac OS 10.14 Mojave drops the support for the BCM94321MC chipset found in many Mac Pros. Users must upgrade their Wi-Fi chipset to use Bluetooth and Wi-Fi (ethernet remains unaffected). Users need a BCM94360. If you are already running a BCM94360, you may need to purge your Wi-Fi settings for Mojave. Users can look up their chipset by going to About this Mac -> System Report -> Network -> Wi-Fi. The chipset will be located within the Interfaces section, usually with the starting numbers of the card's chipset in the firmware. Most upgraders prefer to use the mini-PCIe slot upgrade as PCIe slots are in short supply.
Mini PCIe Airport Cards
Apple's Airport cards originally started at 802.11.x wireless network adapters. With the advent of Bluetooth, Apple folded Bluetooth and 802.11x into one card that was in many different Mac models, making it possible to upgrade the Wi-Fi abilities in those Mac models. All models of the classic Mac Pros shipped with an AirPort Extreme (802.11a/b/g/n + Bluetooth 2.0+). Any Mac Pro can be upgraded to 802.11 a/b/g/n/ac + Bluetooth 4.0+, and this enables features like Airdrop. With an upgraded Wi-Fi chipset, Continuity and Handoff can be enabled to work with a Mac Pro. See enabling Continuity and Handoff in this guide.
Buying/Installing a Mini PCIe Airport card
Vendors like OSXWifi sell a mini PCIe to Apple Airport adapter + the Apple Airport BCM94360. Each can be bought separately or packaged together. However, more intrepid users have noticed that you can buy for much cheaper the Broadcom BCM94331CD Mini PCIe to wireless Wi-Fi card Adapter Bracket adapter for a Mac Pro 4,1/5,1 and the Mini PCIe Adapter. The BCM94322MC can be found on Amazon for roughly $15-$20, as well.
I bought a card from osxwifi.com and outlined my experiences here. Connecting the Airport cables before the card is seated will make installing a card much easier.
Installing the cards isn't much harder than regular PCIe cards.
Mac Pro 3.1s looking to keep Wi-Fi support for unsupported OSes can keep native Wi-Fi / Bluetooth with the BCM94360CD.
- Apple Broadcom BCM94360CD - 1,1 / 5,1 Mac Pros (The Mac 1,1-3,1s have a Bluetooth antenna that's attachable via USB data lines; the 4,1/5,1s antennas are located off the logic board; thus, an extension cable is needed)
Useful Links
- blog.greggant.com: Installing 802.11 n/ac / Bluetooth 4.0+ airport card on a Mac Pro 3.1
- oliverwolfson.com: Disable internal Bluetooth (for USB dongles)
- jf9web.azurewebsites.net: How to install a Wi-Fi card on a Mac Pro 5.1
- Wifi Installation in a Mac Pro 4,1/5,1
- OSXwifi: Card install instructions (PDF)
- FaceBook: MacProUpgrade (requires joining the group)
- MacRumors: 802.11ac, BT 4.0, and Continuity & Handoff are working on Mac Pro 2010 (Keep Updating)
USB Bluetooth Adapters
Many users go the easier route of using USB Dongles. USB Bluetooth dongles aren't perfect, but they do (mostly) work. You may need to get Apple Bluetooth explorer, go to Apple Developer Bluetooth and click downloads. It'll require a developer account. The basic developer account is free. Users of MacRumors recommend USB dongles using the Broadcom BCM20702 chipset for compatibility. Readers of MacProUpgrade report both the Asus BT400 and IOGear BT4 USB GBU521 work without hitches.
PCIe Wifi Cards
Again, like the actual mini PCIe upgrades, any card based on the BCM94360CD works in a Mac Pro. The best place to get information on compatible PCIe Wi-Fi cards is from the Hackintosh community, such as TonyMacX86's buyer's guide. Any cards that function without any hacks in a Hackintosh will also work in a Mac Pro without hacks. Popular cards include the TP-Link PCI Express Wi-Fi Adapter 802.11N (N900), Fenvi 802.11AC A/B/G/N/AC Desktop Wi-Fi Card (No Bluetooth), and Rosewill PCI Express Wi-Fi Adapter 802.11N (the US only).
Useful Links
Ram Upgrades (Memory)
As many users probably are already aware, the Mac Pros, in certain cases, can address more RAM than Apple officially lists. It depends on the CPU configuration. If, for some reason, you intend to run pre-10.9, OS X pre-Mavericks had a maximum of 96 GB of RAM.
By default, Apple shipped all models of the Mac Pros with Error-correcting code memory (ECC memory), although all the Mac Pros support non-ECC RAM. Most users choose to stick with ECC RAM for its increased stability. Mixing and matching RAM is feasible on the later Mac Pros.
Mac Pro 5,1 (2010/2012)
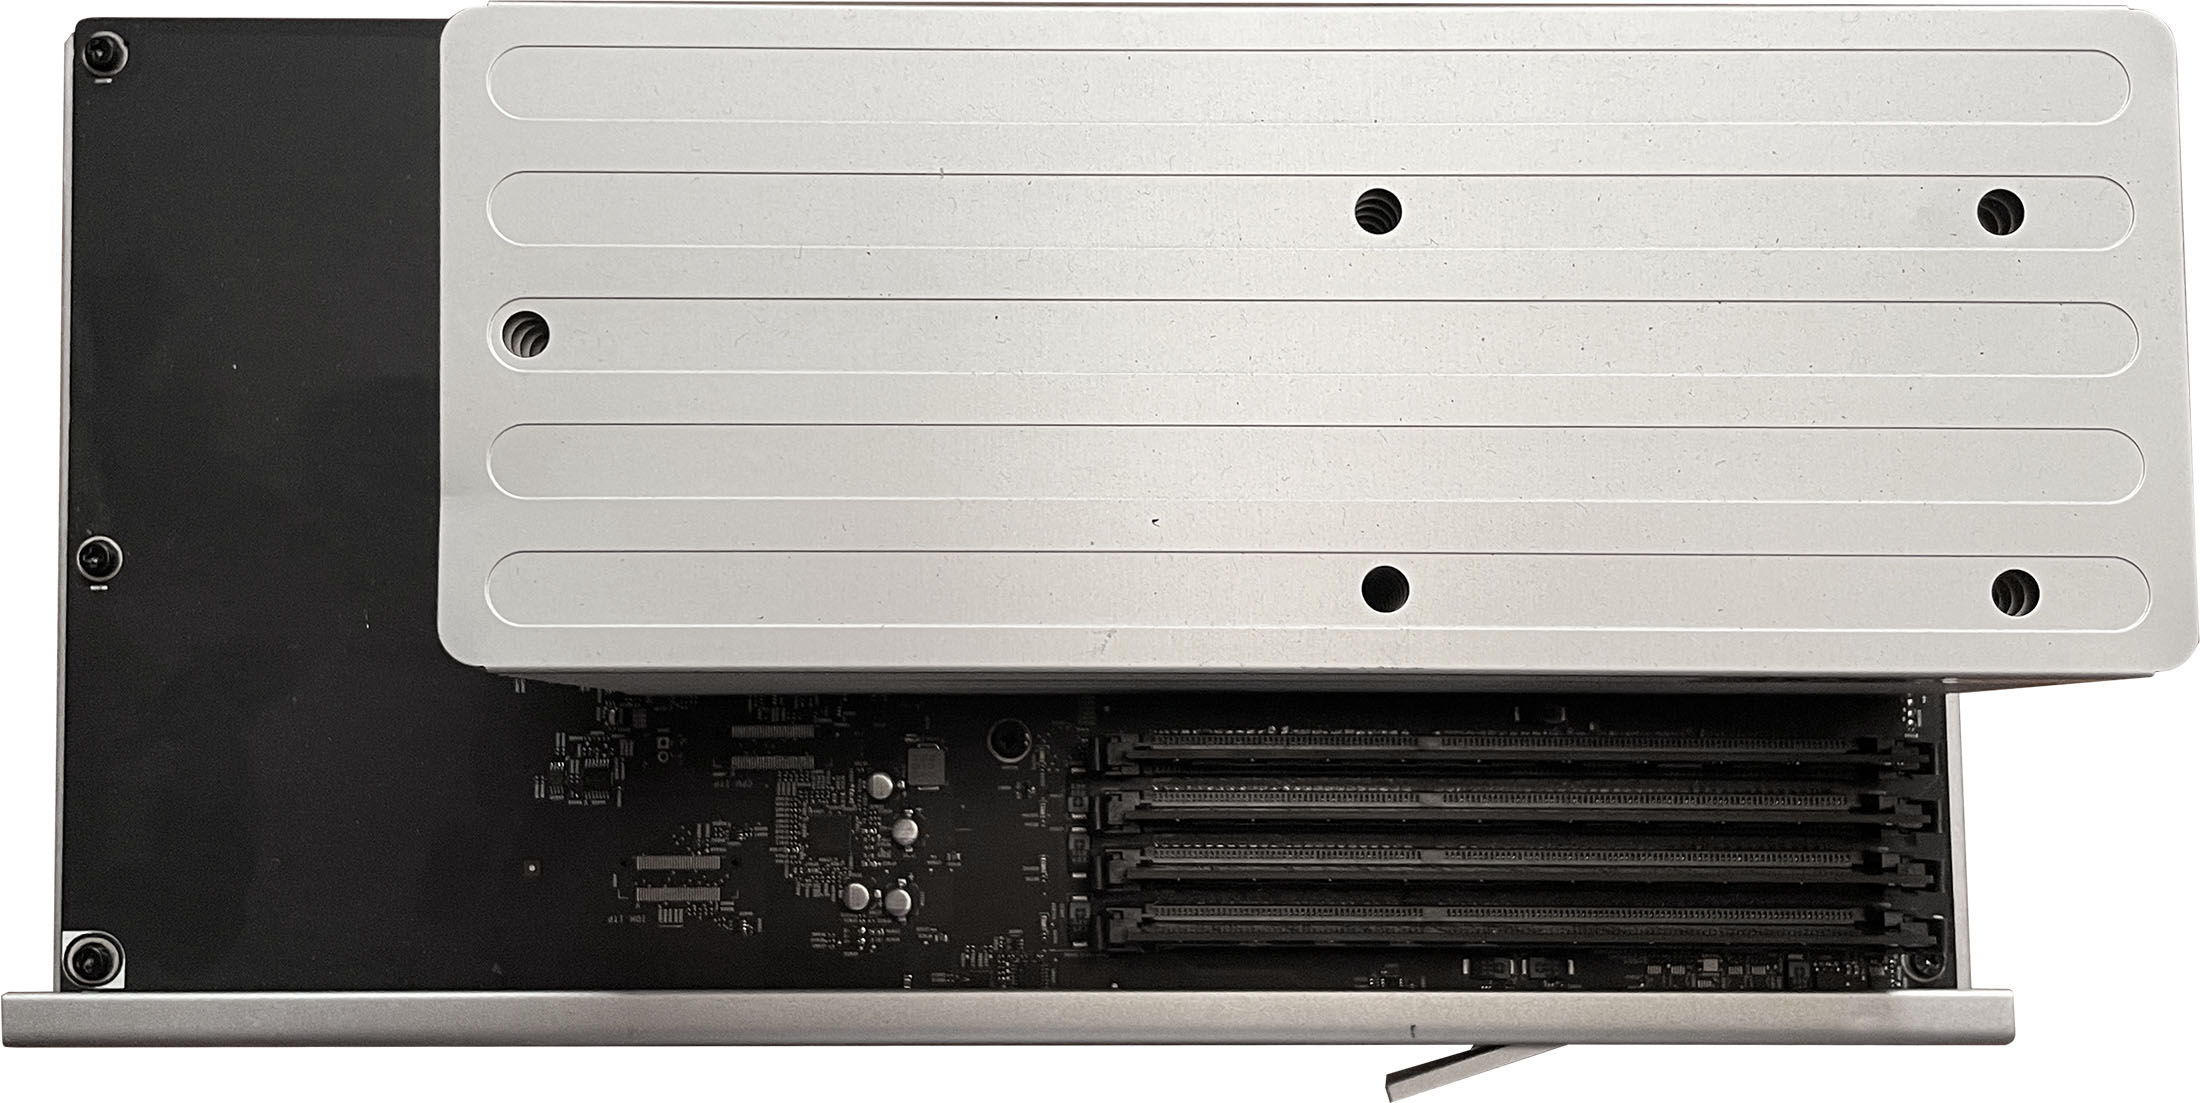
Pictured: Single CPU tray. The Mac Pro 4,1 and 5,1 use a combined CPU/Memory Tray design. The dual CPU trays contain double the amount of memory slots.
The 5.1s are the most flexible of the Mac Pros when it comes to memory. The 5,1 Mac Pro, depending on CPU config, may run 1333 MHz RAM at 1066 MHz if 1066 MHz Dimms are present. See the RAM (Memory) Upgrades for a list of the CPUs and their bus speeds to determine which CPU supports 1333 MHz RAM. Any CPU config can use the slower clocked memory; there is some debate on performance effects Mac Performance Guide tests for information. Users also report mixed ECC/non-ECC ram bootable, RDIMMS with UDIMMs, and again mixing ECC and non-ECC on the Mac Pro 5.1. Lastly, OWC and EveryMac generally report the maximum ram on the 5,1 as 128 GB, but users have confirmed that 160 GB is possible, although it appears not to be feasible after 10.13.x. The Mac Pro will not boot macOS with more than 160 GB of RAM.
. Using OpenCore, it may be feasible to boot macOS with 192 GB of RAM.Dual-Channel vs. Triple-Channel
As computers advanced, memory controllers have changed significantly, which in the case of dual-channel memory, allowed for two datapaths for the CPU to access memory per clock cycle, effectively doubling the throughput. Triple-channel memory adds yet another datapath to increase memory performance.
The Mac Pro 5,1 can run in both Dual and Triple-channel memory modes. Channel modes depend on how many matched pairs of RAM are placed into the Mac Pro. This depends on configuration depends on whether the Mac Pro is a single or dual CPU computer, as the dual CPU Macs.
A dual CPU Mac Pro 5,1 can run in triple-channel mode with six paired DIMMs, whereas if 2, 4, or 8 DIMMs are used, the Mac Pro will run in dual-channel mode. A single CPU Mac Pro can run triple-channel memory mode with 3 DIMMs installed. Thus, the maximum RAM in triple-channel memory mode in a single CPU Mac Pro is 48 GB, and a dual CPU is 96 GB. Notably, memory performance is increased roughly 50% by running a Mac Pro in triple-channel mode but result in small real-world performance tests equate to a 3-4% speed increase in limited testing, a much more recent test by a Mac Rumors user showed that Triple channel memory results in notable gains again in synthetic benchmarks and less-so in Valley Unigine. Other applications may see larger differences, as it is a significant bandwidth increase. Also, see "Is Tri Channel functionality maintained when 4th memory stick used?" for further info. Perhaps another enterprising blogger/forum poster will one day test more broadly dual-channel vs. triple-channel modes to show the real-world gains.
Maximum DIMM size: 32 GB*
Maximum RAM:
- Single Processor Xeon: 64 GB
- Dual-Processor Xeon: 128 (8x16) 160 GB (5x32)* OpenCore 256 GB , 32 GB DIMMs work in OpenCoreFacebook: OpenCore - on the Mac Pro (requires membership) and Facebook: MacProUpgrade - 256 GB Mac Pro 5,1 running Big Sur(requires membership)
- Dual-Channel configuration: 2, 3, 4, 5 or 8 DIMMs
- Triple Channel: 6 DIMMs (Dual CPU) 3 DIMMs (Single CPU)
- Supports non-ECC**
- Supports 1066 and 1333 MHz memory (1333 MHz requires CPU that supports 1333 MHz bus. Otherwise, Memory runs at 1066)
Apple's Recommended DIMM type:
- PC3-10600E, 1333 MHz, DDR3 SDRAM UDIMMs
- 72-bit wide, 240-pin ECC modules
- 36 ICs maximum per ECC UDIMM
- Error-correcting code (ECC)
It's also worth noting that the Mac Pro 5,1 has a narrow chance of supporting more than 160 GB of RAM due to a few factors: Mac OS 10.9 Mavericks increased the maximum RAM in OSX above 96 GB. The Mac Pro supports 32 GB DIMMS in certain scenarios. The latest iMac Pros now have larger RAM configurations. Windows can support 192 GB in the Mac Pro. Recently, users running OpenCore have tested the viability of 32 GB DIMMs in the Mac Pro, opening the possibility for 192 GB support in macOS. Facebook: OpenCore - on the Mac Pro (requires membership). OpenCore emulates later Mac firmware, thus allowing macOS to boot with more than 128 GB reliably.
* So far, Mac OS 10.14 and 10.15 appear to no longer support 32 GB DIMMs (without OpenCore). See MacRumors: note here and the threadMacRumors: Crazy idea. 32GB RAM modules in a cMP. Anyone tried this?. 32 GB DIMMs work in Windows and Linux. With OpenCore, users have been able to run more than 128 GB successfully.
** A few users have had issues with certain non-ECC DIMMs. Many users advise against mixing and matching, but there seem to be no repercussions. See the above links about non-ECC RAM.
DDR3 and Heatsinks
Unlike DDR2, the DDR3 design means heatsinks are optional. The Mac Pro has a fan set that operates over the memory chamber, and there are users who have been using it for a decade now without any RAM failures. Some vendors, like Samsung with its ECC RAM, come with heatsinks. In the case of the Mac Pro, there's little-to-no real-world benefit.
Mac Pro 4,1 (2009)
Maximum DIMM size: 16 GB
The 4,1 Mac Pros can be firmware upgraded to 5.1, which changes the RAM support and maximum RAM. Like the Mac Pro 5.1, it can run in dual and triple-channel modes.
Maximum RAM:
- Single Processor Xeon: 48 GB
- Dual-Processor Capable Single Xeon: 64 GB
- Dual-Processor Xeon: 128 GB
Apple's Recommended DIMM type:
- PC3-8500, 1066 MHz, DDR3 SDRAM UDIMMs
- 72-bit wide, 240-pin ECC modules
- 36 ICs maximum per ECC UDIMM
- Error-correcting code (ECC)
- Unlisted Spec: Single or Dual Rank memory (see rank section)
Like the Mac Pro 5.1, even with the 4,1 firmware, you can use non-ECC memory, with confirmations here. Placing 1333 MHz RAM in an unflashed 4,1 will only run at 1066 MHz.
Mac Pro 3,1 (2008)
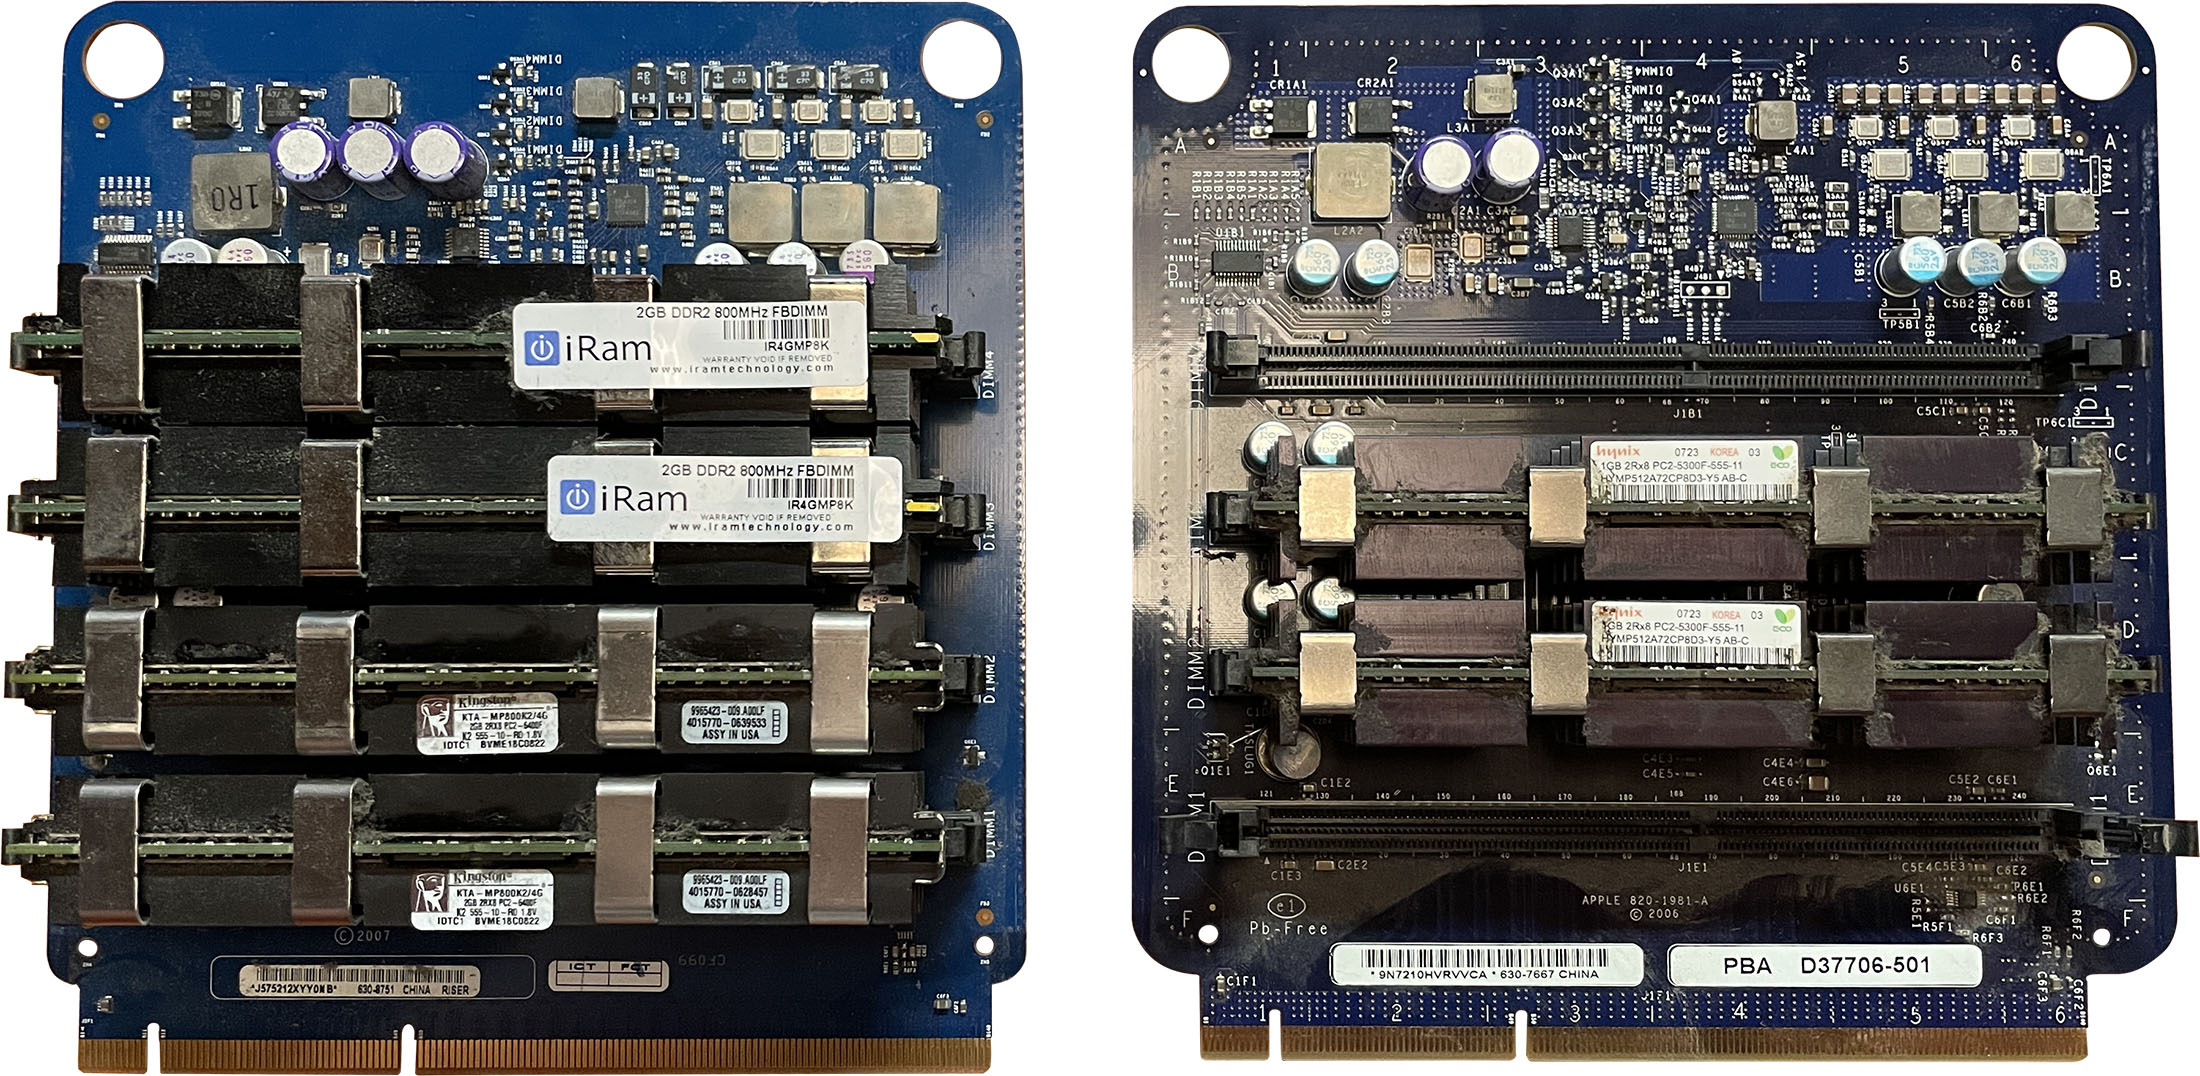
Pictured: Both the Mac Pro 3,1 and Mac Pro 1,1 use very similar card trays for the RAM upgrades. On the left is a 3,1 tray and on the left is a 1,1 tray
Maximum RAM: 64 GB
Maximum DIMM size: 8 GB
RAM must be installed in pairs, and Apple recommends Apple-approved heatsinks to keep fans at a minimum. The 3.1 can use 667 MHz FB-DIMMs as found in the 1,1/2,1 but with a speed penalty as all installed RAM will run at the 667 MHz speed if a 667 MHz DIMM is present. Also, XLR8yourmac's mixed speed pairing tests.
Apple's Recommended DIMM type:
- 800 MHz, DDR2, FB-DIMMs
- 72-bit wide, 240-pin modules
- 36 memory ICs maximum per DIMM
- Error-correcting code (ECC)
The Mac Pro 3,1 has confirmation that ECC is not required. However, you cannot mix and match ECC with non-EC due to the fully-buffered RAM differences in DDR2.
MacRumors forum members report Mac Pro 3,1 has a speed penalty when running 64 GB of ram. The workaround is to modify NVRAM the Mac Pro 3,1 to boot with 62 GB of RAM. Other OSes like Windows/Linux can use 64 GB of ram without issues.
sudo nvram boot-args="maxmem=63488" To explain the code above, this adds a boot flag that sets the maximum RAM to 63488 KB. To arrive at this number, 1024K * 62 = 63488. See MacRumors: Mac Pro 3,1 NVMe support + Upgrade Guide + Questions for more info.
Mac Pro 1,1/2,1 (2006/2007)
The Mac Pro 1,1/2.1s Mac RAM depends on the firmware, 1,1 Mac Pros are limited to 32 GB, whereas flashing to the 2,1 firmware ensures 64 GB support. See the Firmware Upgrades section for more details. OWC(macsales)/Everymac reports the 2,1 Mac Pro with a maximum of 32 GB, which is incorrect. Users have confirmed using 8 GB DIMMs in 2.1s as well as LowEndMac.com: Install 64 GB of RAM in Your Mac Pro 1,1 or 2,1.
RAM must be installed in pairs, and Apple recommends Apple-approved heatsinks to keep fans at a minimum.
Maximum RAM:
- Mac Pro 1,1: 32 GB
- Mac Pro 2,1 (Dual CPU): 64 GB
Maximum DIMM size:
- Mac Pro 1,1: 4 GB
- Mac Pro 2,1: 8 GB
Apple's Recommended DIMM type:
- 667 MHz, FB-DIMMs
- 72-bit wide, 240-pin modules
- 36 devices maximum per DIMM
- Error-correcting code (ECC)
The Mac Pros 1,1/2,1s have reports of non-ECC RAM working. Users report using 800 MHz RAM. However, the 1,1/2,1 will downclock the ram to 667 MHz.
Useful Links
- EveryMac: How to install RAM in 1,1/2,1 Mac Pro - scroll to the video, (note: EveryMac doesn't list correct maximum RAM)
- EveryMac: How to install RAM in 4,1 Mac Pro - scroll to the video, (note: EveryMac doesn't list correct maximum RAM)
- EveryMac: How to install RAM in 5,1 Mac Pro - scroll to the video, (note: EveryMac doesn't list correct maximum RAM, the information lists OS X can only support 96 GB which is out-of-date)
- MacRumors: All We Know About Maximizing CPU Related Performance
- XLR8yourmac: Mac Pro 2008 FBDimm Pairing Guide Tests (w/mixed pairs)
CAS latency
Not all RAM is created equal. Depending on the source of the RAM you buy, the CAS (Column Address Strobe or Signal) latency is the count of how many clock cycles it takes for a RAM module to access a specific set of data. For example, if a stick of PC3-10600E (1333 MHz) RAM has a very low CAS latency of 6, then at 1333 MHz (each full cycle taking 1.5 Nanoseconds), the latency would be 9 Nanoseconds. A high CAS latency of 9 would take 13.5 Nanoseconds.
Notably, the higher the MHz rating of RAM, the larger the CAS Latency is because of the increasingly smaller cycle length. DDR4 RAM, for example, starts at a CAS latency of 15. Crucial has a break down of the true CAS latencies across memory formats
The CAS latencies can be mixed, and most users won't notice the difference between memory speeds. When put to the test in real-world benchmarks, the results are pretty minuscule. See HardwareSecrets: Do memory timings affect real-world computer performance? for examples.
DDR3: Registered vs. Unregistered (unbuffered) RAM (RDIMM vs. UDIMM)
The Mac Pros 4,1/5,1 can accept both Registered and Unregistered (unbuffered), and users have reported mixing the two successfully, but it is generally not recommended and actively discouraged as it may have negative performance implications.
UDIMMs and RDIMMs have performance implications: UDIMMs are slightly faster at single-channel modes, whereas RDIMMs perform better than UDIMMs in multichannel modes. I recommend Spiceworks: How to: Difference between RDIMM and UDIMM for anyone looking to dive deeper between the two. Most users elect to buy RDIMMs.
RAM ranks (1Rx4 vs 2Rx4, vs 4Rx4)
RAM also has yet another factor to consider, known as "Ranks." You'll see it expressed in a number like 2Rx4. The Mac Pros use ECC Memory, which has 72-bit wide data blocks. A DIMM may have multiple data blocks that are expressed as ranks. To determine the Rank, a 1Rx4 would be a 1R or one rank. This would be a single rank, 2R would be dual rank, and 4R is quad rank.
Then the second portion of this refers to how many data banks are on the said module. crucial, a respected manufacturer of RAM has a deeper dive on this topic.
While there is some conflicting info, Mac Pro Guru tsialex reports that Quad Rank was never officially supported and will downgrade its clockspeed. Quad Rank RAM is best avoided.
Buying RAM
RAM can be purchased rather cheaply if you know where to look, for example, aliexpress or eBay.
Audio
Every iteration of the Mac Pro comes with a front-facing headphone Analog Output, a back-facing analog output, a back-facing line-in analog input, and S/PDIF (Sony/Phillips Digital Interface) I/O in the form of two Optical (Toslink). It is capable of transmitting audio via both USB and Firewire interfaces (and even Thunderbolt 3). The Mac Pro's internal hardware is limited to a maximum of 24-bit sound and 96 kHz (Mac Pro 4.1, 5.1) via the analog output and 96 kHz, 24 PCM audio bit via the SPDIF interface. With various audio interfaces, the Mac Pro can support many, many channels of high-resolution audio, commonly tapping out at 24-bit, 192 kHz. A sound's bit-depth and sample rate (resolution) are analogous to a graphic file's bit-depth and resolution.
Surround Sound and High-resolution audio
The short answer is the Mac Pro can output multichannel audio but only passthrough popular surround sound used for movies (Dolby Digital, DTS, AAC) codecs via applications like VLC. It cannot output games in surround sound in Mac OS. This isn't a hardware limitation unique to the Mac Pros but rather software. In Windows, the Mac Pro fairs better for surround sound. Also, the Mac Pro's ability to output 96 kHz 24-bit sound via the analog output is a bit dubious, but it can playback high-resolution media without specialized hardware. Whether via the analog outputs is noticeable is questionable.
macOS 10.15 Catalina finally added mapping of surround sound hardware in the Audio/Midi Setup. It remains only a rudimentary implementation compared to Windows 10.
To explain the above adequately (analog outputs, surround sound, etc.), I've elected to hide by default as the long answer is long: Click to show long answer for
Speakers, headphones and more
Most likely, you will not be using the internal speaker in the Mac Pro other than to hear the startup chime.
Audio output is very free form when it comes to computers as they play nicely with analog and digital hardware. There are many routes to go, from inexpensive computer speakers, studio monitors, and home theater receivers to esoteric audiophile brands. For most consumer applications, there's not much reason to use any dedicated computer hardware as digital out is digital out. Audio can be outputted via the analog outputs, SPDIF, Firewire, USB, HDMI (GPU dependent), DisplayPort (GPU dependent), and Bluetooth out-of-the-box. Other formats can be added via upgrades.
Prosumer/Professional Audio
Professional hardware is less of a grab bag than consumer audio as Mac OS has a very long and proud history as the defacto choice for studios, audio engineers, and musicians. CoreAudio supports low-latency multichannel audio interfaces without any specialized drivers. For most audio interfaces, the basic functionality works out of the box. That said, audio interfaces come in various formats, like PCIe Cards, USB, Firewire, and Thunderbolt, and additional functionality can be tied to both the drivers and compatible software.
CoreAudio allows device aggregation, which will map multiple pieces of hardware to appear to software applications as a single device, making it easier to assign inputs and outputs to a software application. Listing compatible hardware would be a losing game for this guide as there are decades worth of compatible gear. Most USB audio interfaces are HID-compliant, meaning even cheapo-USB audio boxes designed for Windows generally are compatible on a fundamental level with Mac OS. However, if they rely on additional drivers, they may not work with Mac OS. It's best to do your research. Hardware makers like Ableton, AKIA, Apogee, Behringer, Focusrite, IK, Korg, Line, M-Audio, MOTU, Native Instruments, Numark, Presonus, RME, Steinberg Tascam, Universal Audio, and Yamaha make almost exclusively hardware compatible for both Mac OS and Windows (not one or the other). There's plenty more I didn't list. Again, I must stress about doing your homework. Most likely, the piece of PC audio gear you have your eyes on is Mac-compatible.
CoreAudio also supports by default Midi, which can be done via Midi interfaces or via USB. For general midi devices, no specialized drivers are needed, but often additional drivers are needed for extended functionality like saving presets or configuration settings (it's worth noting some devices can also use esoteric midi commands to perform these same settings as well).
Overall, the Mac Pro is a very capable audio workstation and more than capable of professional work even today. That said, as audio applications become more advanced/complicated/full-featured/robust, as do the CPU requirements. Your mileage will inevitably depend on the number of software instruments/synths/effects and their combined requirements, but audio software has a much lower bar for hardware requirements than video.
Lastly, the Mac Pro 3.1s and below do not support SSE 4.2 CPU instructions. I have personally encountered with Serato DJ that an 8-core 2.8 GHz Mac Pro 3,1 with 20 GB of RAM would often display buggy behavior and latency, whereas even a modest 2013 quad-core i5 MacBook Pro with 8 GB of RAM and a Mac Pro 5,1 had absolutely zero problems running this software. I wouldn't be surprised if other software suffers under older Mac Pros as well, although Logic, Cubase, and Ableton all ran adequately on a 3,1 Mac Pro.
There's no real hard-fast rule to determine what audio projects require. It largely depends on how many audio tracks, virtual instruments, and plugins are being run and how efficient each one is. RAM usage is generally determined by the number of audio tracks and the size of the sample libraries. With memory compression introduced in Mavericks 10.9, macOS is pretty efficient.
Audio over HDMI
See the GPU section of this guide.
Audio over Thunderbolt
Audio interfaces tend to be one of the most desirable applications to use Thunderbolt 3.
See the Thunderbolt section of this guide.
Pro-audio Applications and the Classic Mac Pro
The classic Mac Pro remains wildly popular in the audio world as they're fairly quiet and sport PCIe slots and large amounts of RAM, and for many cases, still fast enough, especially the 5,1s outfitted with dual 6-Core CPUs.
Users reported that Massive X requires AVX which is a CPU instruction set not found on the classic Mac Pro.
Other Upgrades
Blu Ray / Blu Ray Writer
The Mac Pro can use any SATA or USB 3.0 Blu-Ray Drive as Blu-Ray is ISO compliant. Thus no individual drivers are needed, but macOS does not have native support for Blu-Ray disc creation or watching Blu-Ray movies. VLC supports Blu-Ray playback in all its HD glory, and Roxio Toast can burn Blu-Ray disks. There's also plenty of software for ripping Blu-Rays for macOS. If you're wondering why you'd want a Blu-Ray, see House of Moth (Jay) 's blog post on reasons why such as much longer shelf-life than CD/DVDs. Notably, VLC has 4k and 8k hardware decoding, HDR10 support, and Blu-Ray Java menus. However, this only works on unencrypted media. Using VLC to playback Blu-Ray is a bit of an adventure, and iMore.com has a review of the existing options. I had better luck than the reviewer with VLC, but it wasn't pretty. The LG Black 12X BD-ROM 16X DVD-ROM 48X CD-ROM SATA Internal Blu-ray Burner is a popular model with several reviews confirming Mac OS X support and in Classic Mac Pros.
Fan Control
Macs Fan Control is the champion of the best fan control software, allowing users to use different thermal sensors to control fan clusters or other values. The best parts are the application is free, and there's both a Mac and Windows port.
Mojave has its own share of users experiencing fan rev-ups. A forum user at MacRumors wrote a simple app Airout to stress the GPU quickly to cause the fans to rev back to a normal speed.
Accessing the hidden SATA ports on a Mac Pro 1,1s/2,1/3,1
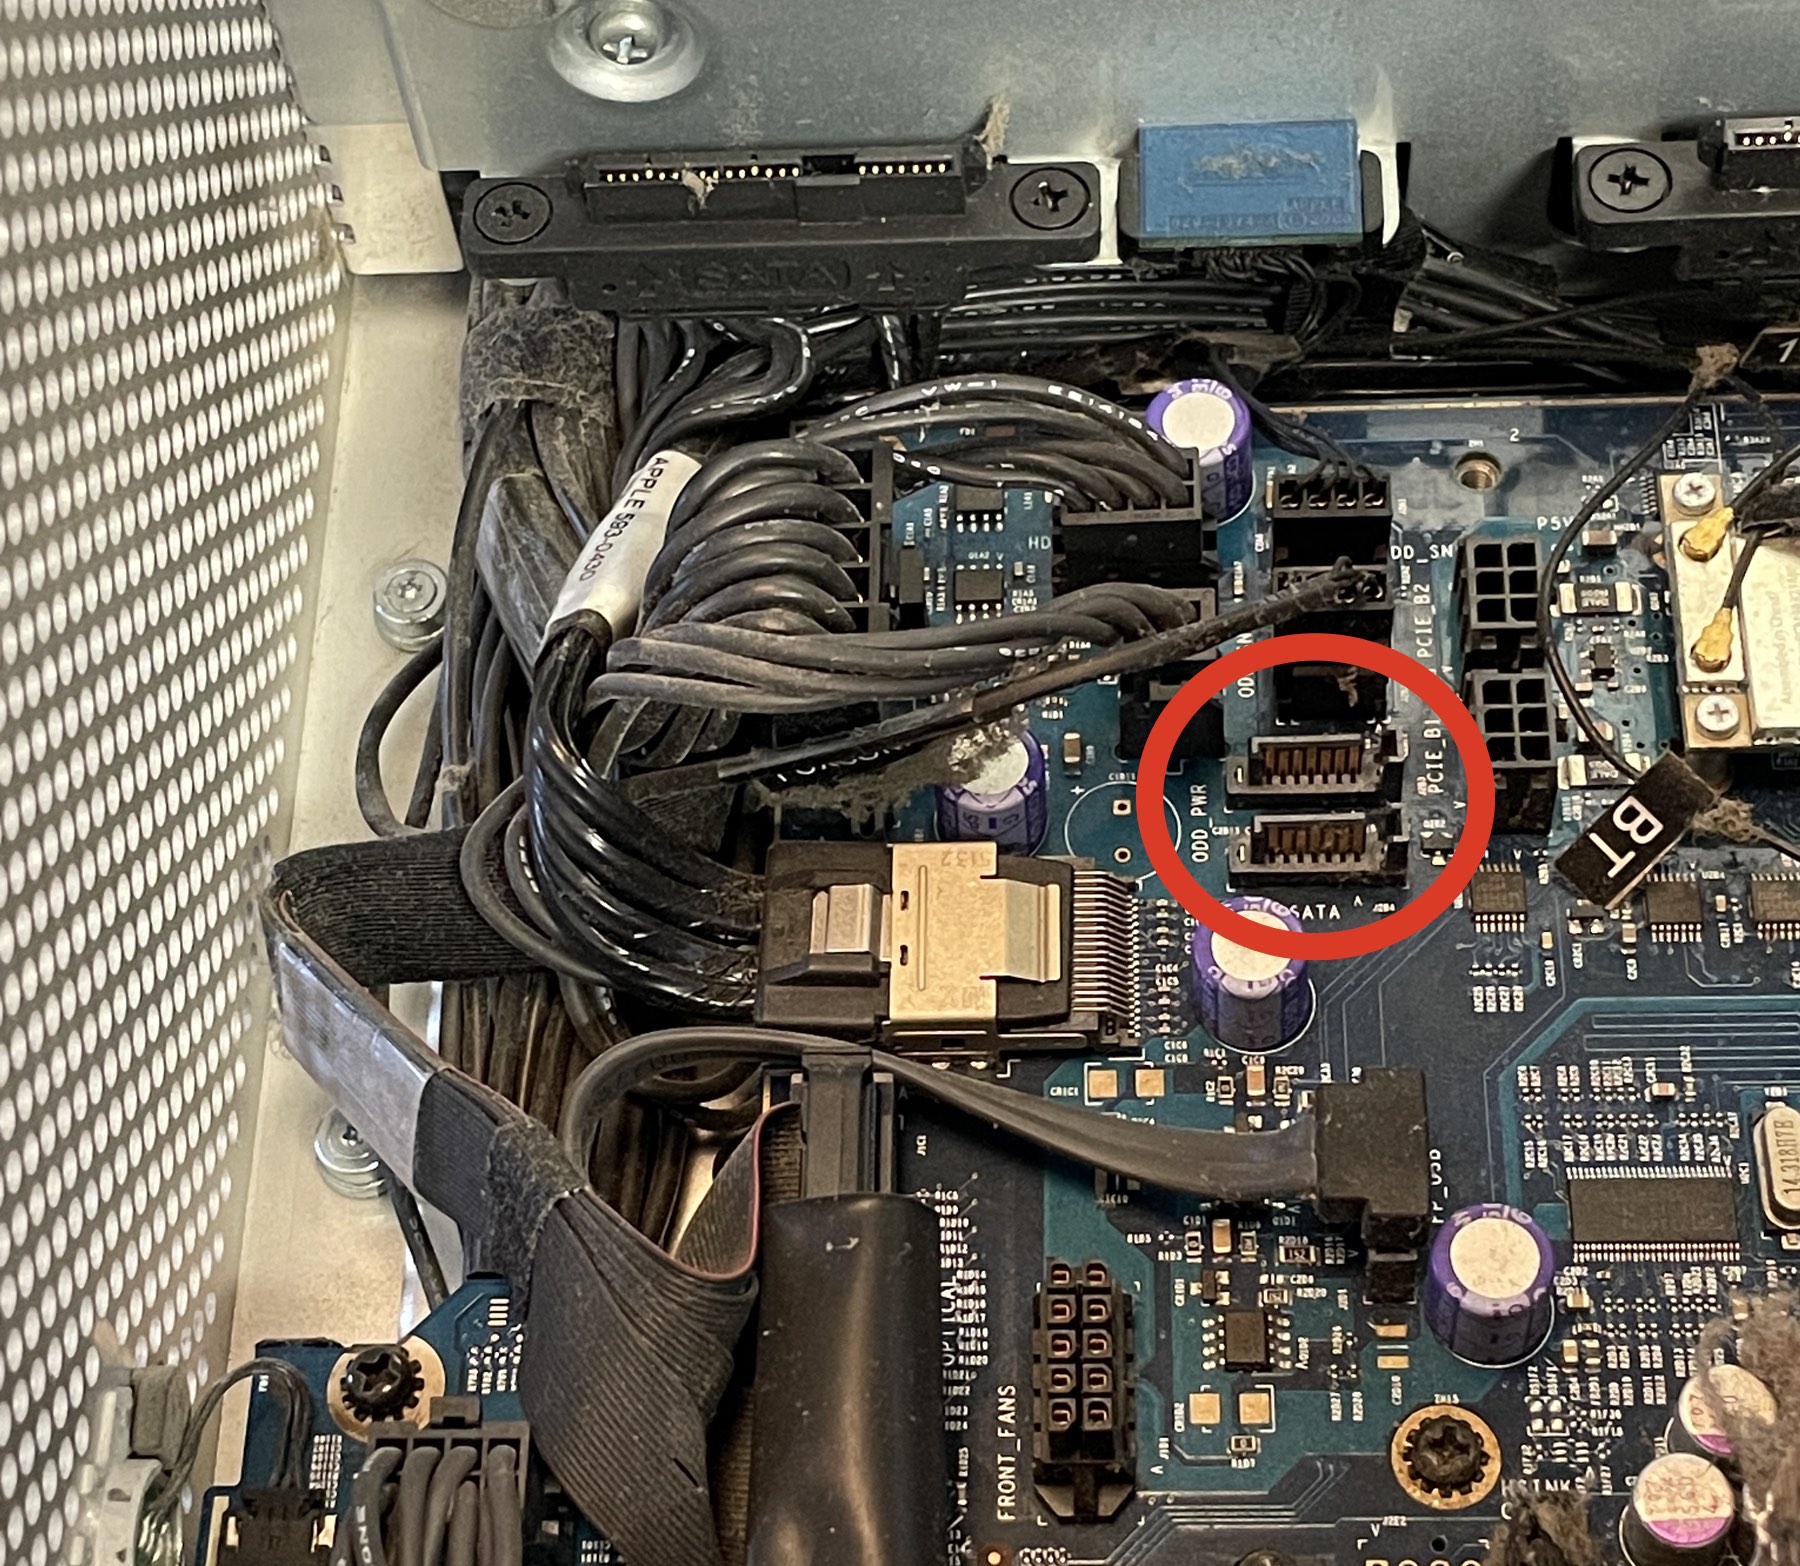
The Mac Pro 1,1 through 3,1s have two unused SATA ports located in the upper left corner of the motherboard, behind the fan assembly under drive bay 1. These later were co-opted for the SATA optical drives on the 4,1 and 5,1s when Apple and Intel removed the ATAPI controller. Accessing them requires taking out the fan assembly, which is relatively easy. Clever hardware hackers have routed the cables into the optical bay.
First, remove the CPU cover. It has no screws and only takes reaching to the underside to remove. The fan assembly only has two screws to remove (pictured below). One is located under the fan assembly's lip next to the CPU, and the other is easily accessed where the assembly is connected to the motherboard. After these are removed, they can then be slid out.

PCIe expansion
The Mac Pros do support PCIe expansion chassis. Specialty companies like Cubix and Dynapower USA Netstor series make macOS compatible PCIe expanders, generally taking a 16x PCIe slot as a host and dividing its bandwidth into more PCIe slots. These do not come cheap as they're uncommon.
Mac Pro Pixlas PSU Mod
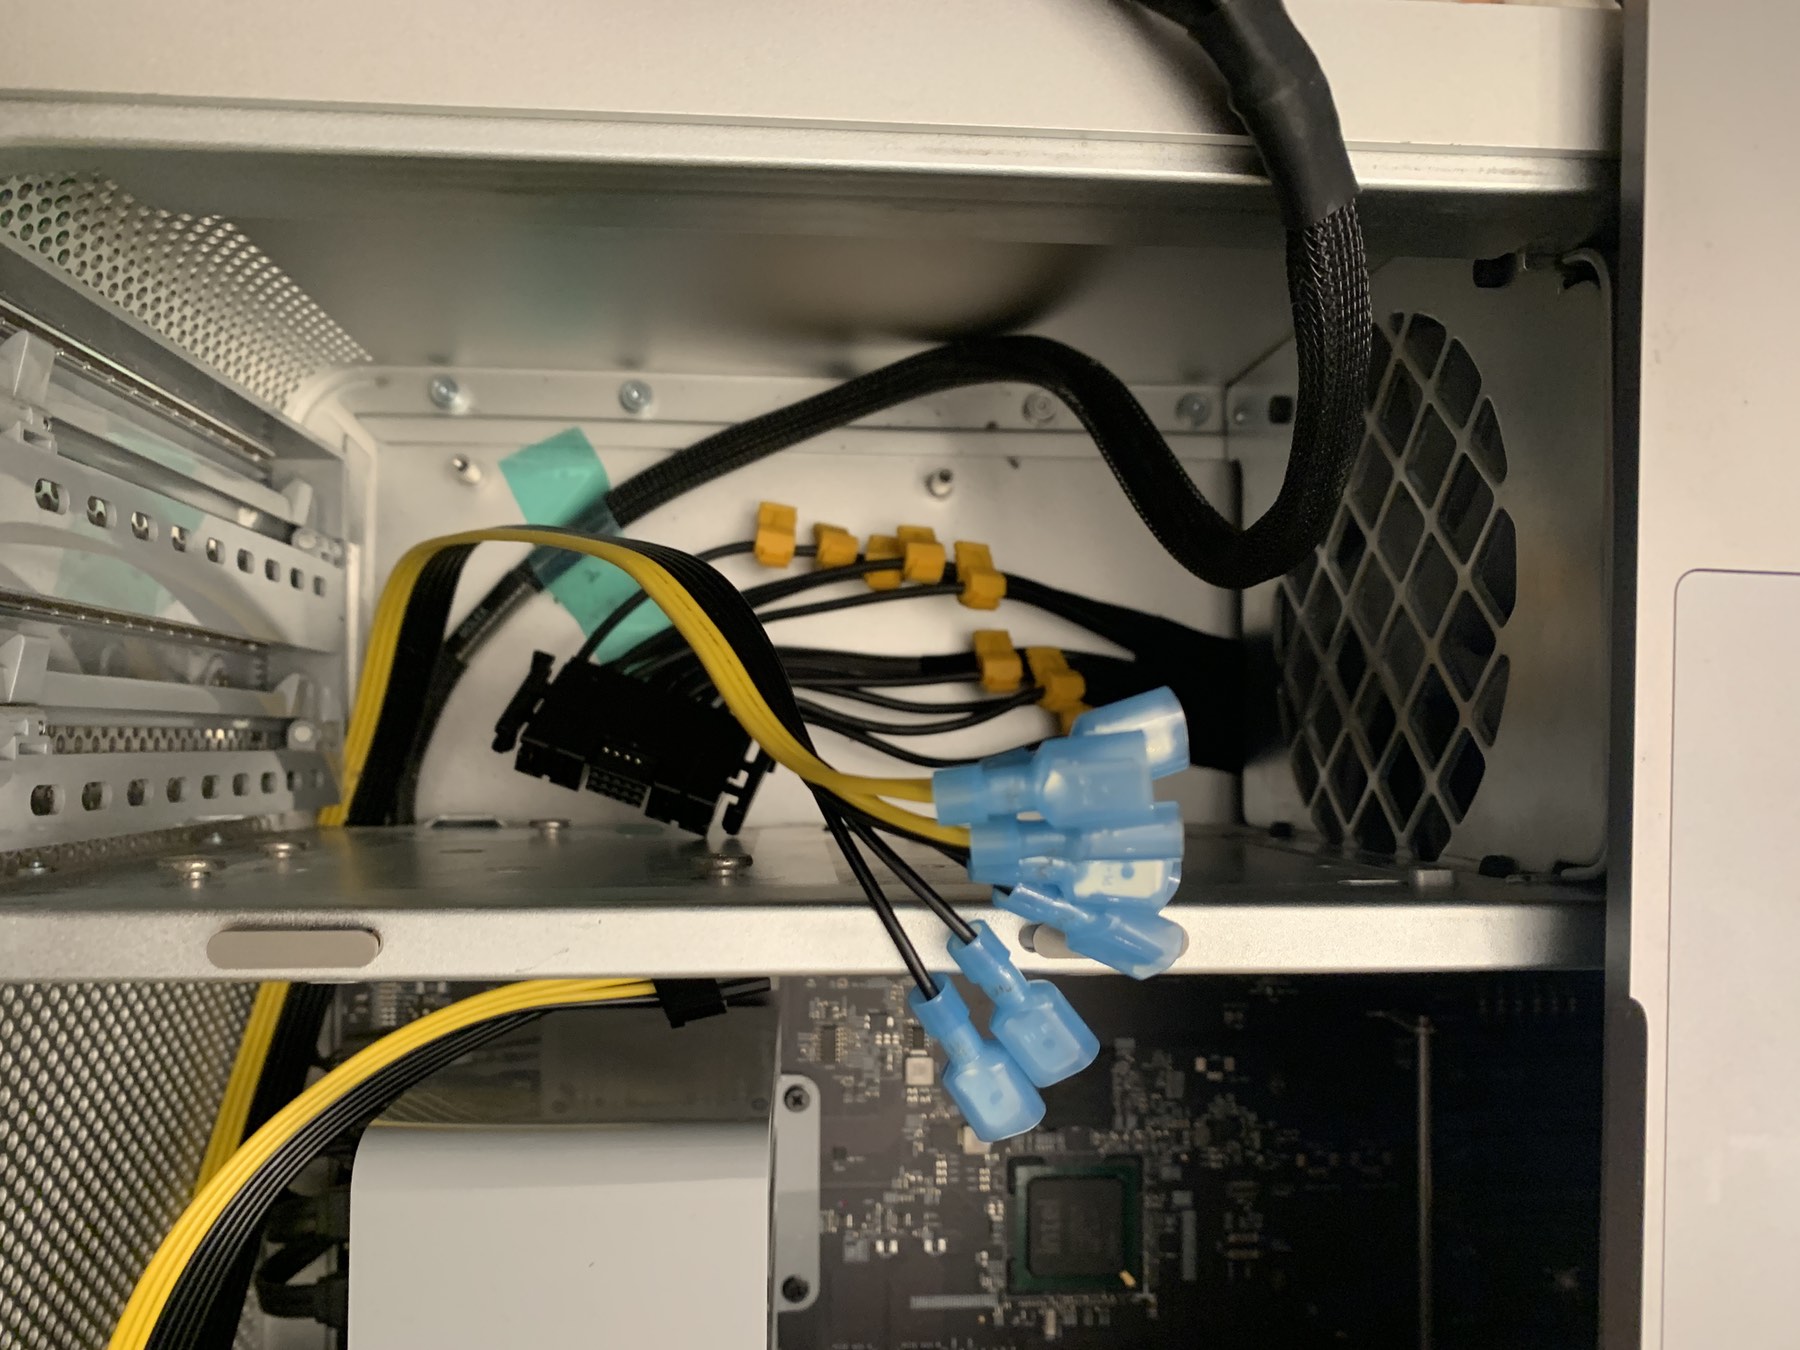
Pictured: Mac Pro during the final portion of Pixlas mod
The Pixlas mod is a power supply-specific modification to draw taps directly from the PSU as opposed to using the standard PCIe power cables. Apple's implementation of the PCIe power taps is non-standard, delivering roughly 130w max per tap, above most PCs of the era, but unable to make the full power draw needed for the 250+ watts required for extreme-end GPUs.
When a GPU draws too much power, it'll trigger an immediate shutdown. This generally happens with GPUs like the Vega 56 running Vega 64 Bios (normal Vega 56s are fine), Vega 64, Radeon VII, 5700 XT, and GeForce 1080/1080 Ti. The auto-shutdown occurs to protect the motherboard leads.
The modification works by bypassing the high-gauge leads on the motherboard and going directly to the PSU. Users have been running this modification safely for years.
Mac-build specialist Big Little Frank has run 2x GeForce 1080 Ti + NVMe successfully using the Pixlas modification.
Normally, I try to shy away from personal anecdotes in this guide, but I followed House of Moth's guide as it comes with both a blog post and an additional video. The upgrade isn't for the faint of heart, but with the online resources, even someone as a novice with electrical components as myself (I can install a power outlet, but that's as far as I'd go) was able to complete it without destroying my computer. Changing the CPUs is more precarious than the Pixlas mod.
There are Pixlas kits floating about, but the specialized cable Jay uses in his guide is often hard to acquire/out-of-stock/slow delivery. I used a generic set of T-taps I bought on Amazon.com and an 8-Pin Male to Dual 2X 8 Pin and cut the singular 8 pin end off and stripped the wire (the exact cable I used, but I'd recommend getting one that's a bit longer for a bit more flexibility).
- The House of Moth: Pixlas Mod Guide and YouTube: House of Moth - Pixlas Mod
- MacRumors: Pixlas 4,1 Mac Pro mod
- The House of Moth: Mac Pro Pixlas Mod, is it really needed?
External Power Supplies
To mitigate the stress on the Mac Pro's power supply (tallying in at 980w of power), some users use external PSUs for their GPUs, especially if they have two high-end GPUs such as the GeForce GTX 1080 as they peak at 250w power.
- MacRumors: How to guide - Install Auxiliary PSU without drilling (requires soldering)
- MacRumors: Precise instructions for getting x2 ATI Radeon HD 5870's in your Mac Pro (2009-2010)
Replacing the Battery
Over the years, batteries can go bad and cause errant behaviors (generally resolved temporarily by zapping the NVRAM, holding down command-shift-p-r). The Mac Pro uses a 3-volt BR2032, located on most models above the bottom PCIe slot.
NorthBridge High-Temperature fix
The NorthBridge chipset is the host bridge chipset found on modern x86 computers. It is connected directly to the CPU via the front-side bus (FSB) and manages the highest performance activities (PCIe, RAM), and is usually paired with a SouthBridge chipset that handles other interfaces (USB, PCI, IDE, etc.). More recent Intel architecture has integrated the NorthBridge design into the CPU.
The NorthBridge chipset runs typically hot, to begin with, around 65C/150F, but there have been a few owners who've had extraordinarily high temps (120C/250F) or have noticed NorthBridge Heatsink damage. Fortunately, users have tips for fixes.
- xlr8yourmac: 2009 Mac Pro Northbridge High-Temperatures due to broken Heatsink Retainer
- MacRumors: De-Dusting AND Northbridge temp reduction in Dual CPU cMP 4,1 & 5,1
- ifxitit: Mac Pro Single CPU Northbridge Heatsink Repair
3D Printed Replacement Hard Drive Trays / 2.5-inch Adapters
The 3D printing community has a solution for Mac Pros missing hard drive trays or ones for different screw positions that newer HDDs use. These are free to download and can be printed at home or at various companies that offer 3D printing services.
- Mac Pro 1,1-3,1 2.5-inch SSD adapter
- Mac Pro (generic) 2.5-inch SSD adapter and it's remixed (modified) version Mac Pro (generic) 2.5-inch SSD adapter
- Mac Pro 4,1 and 5,1 HDD adapter (regular screw positions)
- Mac Pro 4,1 and 5,1 Universal 3.5" HDD Sled (has newer HDD screw position and old), created by MacProUpgrade community member
- Mac Pro 2.5 inch sled Adapter for 4,1 and 5,1 posted by Kim Janson
Fan / Heat Sink / other case part Replacement
Shops like dvwarehouse, welovemacs, and macpartsonline carry parts for classic Mac Pros. eBay also tends to be popular grounds for finding classic Mac Pro replacement pieces.
- dvwarehouse: Mac Pro Fan Assemblies
- dvwarehouse: Mac Pro Heat Sinks
- welovemacs: Mac Pro Parts
- macpartonline: Mac Pro Parts
Replacing the Mac Pro fans with 3rd party fans is not recommended unless you have a very strong desire to tinker. The Mac Pro fans operate at "silent" in low RPMs, making them on par with typical "silent" PC case fans. They can move a lot more cubic feet per minute of air (CFM) than many silent fans as they have very large RPM ranges running between 800-5200 RPMs (the PCI chamber fans have a range of 800-4500, PSU/Exhaust/intake fans 800-2800 and the Boost fans 800-5200). Also, in most Mac Pros running modern GPUs, the GPU fans are more likely to be the loudest component as the GPU has the largest power draw. As the adage goes, watts in = heat out. Thus, GPU cooling modifications are likely to result in a larger reduction in heat/sound.
The bigger problem is that the Mac Pros use custom fan RPM controls, and thus the Mac cannot detect the fan RPMs, causing them to run at the maximum speed for the offending set of fans. Thus, the solutions are fairly limited: users can either install custom manual fan controls. There's a MacRumors post detailing a few users' experiences, including using PWM NA-FC1 PWM controller or create a custom PCB, as outlined in MacProUpgrade (requires membership via FaceBook). If absolute silence is the endgame, the most sure-fire way to silence a computer is to build or buy a computer isolation box, which is sometimes found in studios.
For the same reason as replacing the fans, liquid cooling is extremely uncommon. A user sent me a decade+ old YouTube video Asetek Liquid Cooled & Overclocked Apple Mac Pro. The 2008 Mac Pros had an overlocking utility that somewhat worked, unlike other Mac Pros that worked in 10.6.
Custom Front USB 3.0 PCB
In one of the more technical-yet-impressively-cool upgrades, MacRumors forum member MaikPfaffenrath designed and manufactured a custom replacement Printed Circuit Board (PCB) to replace the front-facing USB 2.0 ports with 3.0 ports.
- MacRumors: Custom Front USB 3.0 PCB - complete with details and instructions.
iPhone as a webcam
Since many people are virtually these days, webcams are in short supply. This isn't Mac Pro specific, but the iPhone's cameras are higher quality than pretty much all dedicated webcams and have decent audio to boot. I wrote a short guide on How to use Zoom with external webcams, iPhones / Android Phone, and/or Snap Camera on MacOS.
This isn't the only vector, as you can use NDI HX, but it requires more setup. OBS-NDI also interfaces with professional cameras, so it is possible to use studio cameras in video conferencing, too.
Custom Cases
To date, I'm not aware of anyone who's successfully transitioned a Mac Pro into a PC case. The Dune PC case comes up often in Mac Pro groups as a source of interest, but the following hurdles would have to be addressed, among other things:
- Custom Backplane
- Custom Front plate
- Non-standard PSU
- Custom Motherboard Mount
- Custom PCB for fans or fan custom system to manage fans for cooling
- Machining a mechanism for the CPU Trays (or RAM Trays, depending on the model)
- Antennas for wifi (if using internal miniPCIe slot)
The immense hurdles have left case replacements almost exclusively to Mac Pro -> Mac Pro. It's an exercise of frivolity and would be a technical feat but void of practical gains sans (possibility) more drive bays. The Mac Pro's case is one of the most loved features of the Mac Pro for its zoned cooling, extremely easy-to-access bays, and CPU, and RAM.
Boot Managers
Due to the nature of the Metal requirements of Mojave, many users have had to eschew their old GPUs for Metal-compatible CPUs that do not display the EFI boot screen. There are a few options available to Mac users. However, boot managers are not required for dual-booting to Windows. I personally recommend using the brigadier method of installing Bootcamp drivers that support APFS rather than using a boot manager or using opencore. See the Windows 10 section for more details. L
- Boot Manager - open source boot manager, designed for Mac Pros. See the guide here.
- Bootrunner
- Bootchamp (discontinued) but if SIP is disabled MacRumors readers report it will still work
Look up serial Number
This may seem like an odd thing to do, but if you're buying a used Mac Pro 5.1, you may want to see a computer's stock information to see if the Mac was originally a 4,1 Mac Pro. This can be done at sites like appleserialnumberinfo.com.
Linux on 2006 Mac Pros
Running Linux on 32-bit EFI Macs takes more effort than 64-bit EFI Macs to run the 64-bit distros. Below are guides on running Linux on older Macs.
- Mattgadient.com: Reducing the 30-second delay when starting 64-bit Ubuntu in BIOS mode on the old 32-bit EFI Macs
- Mattgadient.com: Linux DVD images (and how-to) for 32-bit EFI Macs (late 2006 models)
Windows 10 on Mac Pros
Officially Apple does not support Bootcamp with Windows 10 on the Mac Pro 5.1s, but that shouldn't stop anyone. I've personally used Windows 10 on both a 3,1 and 5,1 Mac Pro. Running Bootcamp on separate drives will make your life easier. Installing Windows via USB installers is not recommended as it has managed to mess up some people's Mac Pros when trying to install in UEFI mode, which can harm the firmware. Installing off an optical disk runs in legacy mode. Legacy mode is required for Mac Pro compatibility unless running OpenCore.
By default, the Apple boot camp drivers for the 3,1 - 5,1 do not support APFS boot drives, meaning they cannot be selected from the Windows Boot Camp control panel. This can be bypassed using the brigadier utility and installing the new Bootcamp drive utility for Windows. Using this method, it's easy to operate your Mac Pro without a boot screen as everything is native. There are two popular methods two are installing Windows 10 via optical drive or Virtualbox, although some users have reported success using utilities like Rufus.
For the Mac Pro 4,1/5,1s, it's highly recommended to update to the latest firmware to ensure compatibility with later gen GPUs as some users have had issues getting video to output or to get the Bootcamp utility to function properly.
Windows 10 Install via Optical Drive
The entire install process is outlined in the following post: MacRumors: How to: Boot Camp without a Boot Screen. The process is as follows: Install Windows 10 in Legacy mode (if not installed already this way), Download Brigadier, and use it to install the correct drivers for your Mac Pro 5,1. After it's installed, use Brigadier to uninstall the control panel. Then, install the iMac Pro's control panel for APFS support so you can reboot to 10.13+ with APFS volumes.
Windows 10 Install via Virtualbox
The other recommended method is to use the Install Windows on MacPro 5,1 on physical drive through Virtualbox method, as it will install Windows 10 in legacy mode and does not require shutting down macOS during the install method. This process requires the use of free virtualization software, Virtualbox. Afterward, go to MacRumors: How to: Boot Camp without a Boot Screen and follow from step 15 to install the correct version of the Bootcamp startup utility.
As a bonus, using this method will preconfigure access to Windows 10 with Virtualbox. This means if you are in macOS, you can still launch Windows 10 as a virtual machine and interact with your Windows drive such as performing updates, running Windows-only software like Quickbooks without rebooting, downloading/installing large items like Steam games while still in macOS (and rebooting when updates are done or games installed, etc.)
Many users like using a boot manager utility, but users only using Windows and macOS. They are not required to use the brigadier method.
Windows 10 and Mac Pro 1,1 - 2,1s
You can run Windows 10 x64 on the very old Mac Pros, following Installing Windows 7/10 x64 on Mac Pro 1,1/2,1 or Native Install Windows 10 on mac pro 1,1 / 2,1 without USB or DVD or Bootcamp.
Currently, it seems feasible, according to scattered forum posts, that you can install Boot Configuration Data on a SATA drive and use an NVMe drive. This also applies to the Mac Pro 3,1.
Windows 10 and OpenCore
OpenCore most likely will create issues for Windows 10 installs that were installed using legacy mode but are compatible with modern installations using a USB stick. See MacRumors: Windows 10 install on OpenCore cMP 5,1? and also Joerg's "HowTo": Bootcamp your (OCed) Mac (without using Bootcamp) video. OpenCore is the only reliable way to run Windows 10 via NVMe.
Users with existing Windows 10 installs can convert their installs. Microsoft offers MBR2GPT.exe as a free-to-download utility for editing the Master boot Record without modifying/deleting any other data. This can be used to update Windows to legacy (bios) to UEFI, and it includes a video explaining the process. Also, there are YouTube videos that cover the same process.
Another vector is to use the method know as bridge booting for legacy support.
- Help Installing Windows 10 on Mac Pro 5,1
- 9to5mac: Windows 10 updates for Mac put on' temporary hold' for older machines
- MacRumors: h9826790 (Aka Martin LO)'s way to run Bootcamp
- Mac Pro Users (Facebook): Installing Windows 10 on a 2009 - 2012 Mac Pro via BootCamp and a USB drive
- GitHub: brigadier utility - an easy utility to download the drivers for your specific Mac Pro's model for Windows.
- Classic Mac Pro (5,1): installing Windows 10, switching between macOS Mojave & Windows without boot screen - This is also referred to as the brigadier method as it uses the Open source brigadier utility.
- 9to5mac: How to install Windows 10 on your Mac using a "Boot Camp" external drive via Windows To Go [Video]
If you do not want to use the Native method, see the Boot Managers section for more information related to managing Windows 10 / Mac OS booting with an EFIless GPU (a graphics card incapable of displaying video before drivers are loaded).
Enabling Handoff/Continuity
The Mac Pros for Handoff/Continuity require using the Continuity-Activation-Tool to enable it once the hardware requirements have been met. The Mac Pro 1,1/2,1s cannot use Handoff/Continuity due to OS limitations.
- Mac Pro 3,1 requires BCM94360CD (Airport Extreme)
- Mac Pro 4,1/5,1 requires Bluetooth Adapter + original wifi Chipset OR BCM94360CD (Airport Extreme).
Source for above: Continuity-Activation-Tool
- iMore: How to add Handoff capabilities to your older Mac Pro
- MacProUpgrade (Facebook, requires membership): 802.11ac IS NOT NEEDED FOR CONTINUITY & AIRDROP
Enabling Nightshift on Mac Pros
Sometimes hardware support is entirely arbitrary, as in the case of Nightshift. Nightshift can be enabled in 10.14+ Mojave using a nifty script written by a community member.
Enabling Apple Watch Auto Unlock with the Mac Pro
Officially Apple does not support classic Mac Pros for Apple Watch Auto Unlock. Of course, enterprising users have figured out how to enable it, but it requires disabling SIP and a few terminal commands. Notably, you'll need a Mojave-compatible Airport card.
Sidecar and the Classic Mac Pros (and 2013)
Sidecar allows an iPad to be used as a secondary display, and the Apple Pencil can be used akin to a Wacom stylus with pressure sensitivity. Sidecar can be enabled on many non-officially supported Macs using various projects/instructions, but thus far, no one has successfully run Sidecar any system without an integrated GPU or a T2 chipset.
I posed this question in an OpenCore group, and a few notables, including OpenCore gurus Martin Lo and John DeGroof, had a quick discussion/debate. I seemed unable to really produce or reach a consensus as to why. My theory is that Sidecar uses Apple's Video Toolbox framework's VTCompression acceleration (supported in popular applications like Handbrake). Hardware VTCompression allows for hardware acceleration to encode video. It requires a computer with either Intel's QuickSync or Apple's T2 or Apple Silicon (where the T2 is baked into the SOC). This would explain why neither the classic Mac Pro nor Mac Pro 2013 cannot run Sidecar, and yet later Xeon systems (the 2019 Mac Pro or the iMac Pro) can, and how older MacBooks and Mac Minis can run Sidecar. Meanwhile, Martin Lo suspects it could be requiring a CPU instruction set or (possibly) DRM.
How to Update the Recovery Partition in High Sierra on unsupported Macs / fix security Updates
High Sierra Security Updates will often fail on unsupported Macs as they require updates to the Recovery Partition. Luckily, MacRumors readers have concocted a script to automate this process.
- MacRumors: How to Update the Recovery Partition in High Sierra
- MacRumors: How to fix an unbootable recovery partition in Catalina
Multi-OS USB Bootable Flash Drives
Recently in the Mac Pro forums, a user linked a "Five in one" USB solution that includes five versions of macOS on a single USB. These can be easily created by users following the directions from Apple, How to create a bootable installer for macOS. The only difference is the user first must divide the USB flash drive into multiple partitions (large enough for the Mac OS installers), which Apple also provides Partition a physical disk using Disk Utility on Mac.
Upgrading from a single CPU to dual CPU on a 2009 - 2012
It is possible to upgrade any 4,1/5,1 from a single CPU to a dual CPU, but this requires a dual CPU tray, which is uncommon and often costs as much as an entire used Mac Pro. They occasionally do pop-up when someone parts out a non-functional Mac Pro.
Notably, you cannot use the trays from Mac Pro 5,1 in a 4,1 even if the Mac Pro is flashed to 5.1. When 4,1 is flashed to 5.1, the tray and backplane SMC are not updated and stay at 1.39f5. The 2010-2012 are at version 1.39f11. Trying to use a tray with a different SMC than the backplane confuses the fans, causing them to go into full leaf blower mode.
You cannot swap CPU trays from 4,1 (2009) Mac Pros with 5,1 (2010-2012).
Oculus Quest/Quest 2 and the Mac Pro (and other VR headsets)
Yes, you can use popular VR headsets with the classic Mac Pro, and they will run fine, assuming you have Windows, the appropriate software (Oculus Link for the Quest, Steam VR, current drivers for your AMD GPU), a powerful GPU, a USB 3.0 card that delivers high bandwidth, and proper cabling. I've written a mini-guide and made a video on the topic.
Diagnosing Issues / Troubleshooting
This section is a work in progress...
Determining if a problem is a hardware or software issue can be difficult. The best resource for troubleshooting is searching using a search engine like Google and entering in exact error messages or symptoms. Impressively, rarely do Mac Pros have Apple-specific hardware failures, thus if hardware, the most likely culprit is a component: storage, RAM, GPU, etc.
Your computer needs a firmware update to install to this volume. Choose a Mac OS Extended Journaled volume instead.
This is a common issue for Catalina and recovery mode on Mac Pros. You'll need to Turn on VMM and turn off SMBIOS spoofing. See MacRumors thread for details.
Time Machine: An Error Occurred Restoring from Backup
A common issue (not for Mac Pros but for Macs in general) is Time Machine failing to restore from a backup.
- Boot off a recovery partition or bootable installer, reinstall macOS
- At the end of the installation, you will see the Migration Assistant. Select transfer files from another computer/device/Time Machine, then select your time machine drive
Following this process will restore all your applications/documents/preferences and configuration.
RAM isn't Running at 1333 MHz after a CPU upgrade
A MacProUpgrade (requires membership) user noted after upgrading his CPUs that it lowered his 1333 MHz ram to 1066. Resetting the NVRAM resolved the issue. (see glossary for more info on the NVRAM).
OS Installer is Damaged error
See the OS Installer is Damaged error for more details.
Can't get to the option-boot EFI screen
A user of MacRumors discovered that the keyboard he was using was at the core of his issues trying to use boot key commands. The problem was remedied by swapping keyboards.
Can't put the Mac to sleep
Occasionally, cued print jobs can interrupt the ability of a Mac Pro to sleep. Other issues can be PCIe cards, notoriously USB cards that require external power will interrupt the Mac's ability to sleep. It can even prevent the Mac Pro from shutting down.
Internal Light error codes
The Mac Pros include a series of LEDs to help troubleshoot the computer. They are located near the back of the logic board, next to the PCI slot #1.
- One short flash followed by a longer off period: No valid memory.
- Three short flashes followed by a longer off period: Failed memory.
Below is a quote from Apple's service manuals.
Diagnostic LEDs
You can view these LEDs by removing the computer's side access panel and looking through the memory cage to the logic board below. LEDs 2, 3, 4, and 5 are normally off and will automatically illuminate if an error occurs. To read LEDs 1, 6, 7, and 8, you must press the DIAG_LED button, which is adjacent to the LEDs (white button to the right). To press the DIAG_LED button, use a nylon probe tool.
Power Supply Verification
To power on, the computer's logic board requires "trickle" power. If the system fails to power on, first reset the SMC. If the computer still doesn't power on, follow the procedure outlined below to determine whether the issue is related to the power supply.
Verify trickle power
Diagnostic LED 1 indicates the presence of trickle power required by the logic board to begin the startup process. LED 1 should be yellow when the DIAG_ LED button is pressed, indicating that trickle voltage is present.
Verify Power Supply Is Providing Power
Diagnostic LED 7 indicates that the main power is OK and within regulation. Plugin AC power cord, and press the power-on button on the front panel. LED 7 should be green when the DIAG_ LED button is pressed, indicating that the main power is OK and within regulation.
Bent Handles
A semi-common issue is the Mac Pro handles are slightly prone to bending. A youtube video shows the process one user took to rebend his handles. (The video can be slightly disorienting as the user seems to have used an aggressive digital stabilization warp that creates a bizarre effect)
A word on Malware Protection
I urge users to install Malware protection. Personally, I rely on Malwarebyte. Anyone who has done the same or has irreplaceable data should do the same. That said, rather than write an entirely new section dedicated to Malware protection. I'm going to recommend reading HouseOfMoth: Do I need malware protection?
I strongly agree with Jay's run-down and recommendations. If you have never run any malware protection because "I've never used AV and never had a problem" or "Macs don't get viruses" and read HouseOfMoth: Do I need malware protection?
Service Manuals
All the support manuals can be found at Apple.com - Manuals - Mac Pro, but for ease of use, I've organized them in this section. Notably, the 4,1/5,1 Mac Pros (2009, 2010-2012) are very similar internally; thus, any 2009/2010 manual works for the 2012 Mac Pro.
Note: All the manuals are linked are PDFs.
User Guide Manuals
- Apple: Mac Pro (Mid 2012) User Guide
- Apple: Mac Pro (Mid 2010) User Guide
- Mac Pro (Early 2009) User Guide
- Apple: Mac Pro (2008) Users Guide
- Apple: Mac Pro (2007) Users Guide
- Apple: Mac Pro (2006) Users Guide
Instruction Manuals
- Apple: Mac Pro (Mid 2010) - Solid State Drive - Replacement Instructions
- Apple: Mac Pro (Mid 2010) - Solid State Drive Carrier Adapter - Replacement Instructions
- Apple: Mac Pro (2009 - 2010) - Memory DIMMs - Replacement Instructions
- Apple: Mac Pro (2009 - 2010) - Speaker Replacement Instructions
- Apple: Mac Pro (2009 - 2010) - Mac Pro RAID Card and Battery Replacement Instructions
- Apple: Mac Pro (2009 - 2010) - Processor Cage Fans Replacement Instructions
- Apple: Mac Pro (2009 - 2010) - Processor Cage and Clips Replacement Instructions
- Apple: Mac Pro (2009 - 2010) - PCIe/Graphics Card Replacement Instructions
- Apple: Mac Pro (2009 - 2010) - PCIe Fan Replacement Instructions
- Apple: Mac Pro (2009 - 2010) - Optical Drive Replacement Instructions
- Apple: Mac Pro (2009 - 2010) - Bluetooth Cable Replacement Instructions
- Apple: Mac Pro (2009 - 2010) - Front Panel Board Cable Replacement Instructions
- Apple: Mac Pro (Early 2008) Memory Riser Card DIY Replacement Instructions
- Apple: Mac Pro - PCI Express/Graphics Card - Replacement Instructions
Buyers Guide
At this point in time, the classic Mac Pros and Mac Pro 2013s are many years out of officially supported with Apple due to drop support any day. With the continued high price of used GPUs, they should be best thought of as legacy hardware. It is possible to drive one daily, but most users would be better off buying a used Mac Mini M1 or M2 as they have plummeted in price.
Buying Used Mac Pros on eBay
Seeing as the Mac Pros are no longer made, used markets are the only places to find Mac Pros. I bought my 2008 Mac Pro from Apple but, bought my 2010 from eBay. I had a good experience.
If you're here, I assume you already are a capable user, but it bears repeating the Mac Pro is not a value conscience decision or a pain-free one. The Mac Pro is a tinkering box and is ideal for a certain class of users. It's by far the best computer Apple has ever engineered, and possibly any computer maker has ever produced, for its sheer longevity and insane upgradability.
This may seem obvious, but it bears repeating: local is almost always cheaper than eBay. Check Craigslist and FaceBook marketplace.
Users love to point out absurdly bad deals on user groups. This isn't always what it appears to be. Frequently on eBay, hardware will be listed many times more than what it is worth. This is often a strategy for larger vendors to keep the SEO alive (and possibly skirt listing charges) when they are out of stock. It's not uncommon to find a Mac Pro for sale for $10,000. The vendor has no intention to sell said hardware, and if for some reason they get an order, they can then spend the money or effort to acquire said item and resale it.
- If considering a single CPU Mac Pro, Dual CPU trays for Mac Pro 4,1/5,1s are hard to come by and often cost nearly as much as the computer itself (sometimes more).
- The Dual CPU 2009 (4,1) Mac Pro is considered the upgraders choice as they're very hackable, and it only takes a firmware flash to convert them to a Mac Pro 5.1. The only caveat is upgrading the CPUs requires delidding them on the dual CPU tray.
- Used CPUs can be found on quite a few sites for reasonable deals. The X5690 is the fastest CPU money can buy for the Mac Pro 4,1/5,1, but the X5680 is roughly half the price, making it the bargain upgrade. Look for these CPUs on sites like AliExpress, as they're generally cheaper.
- Some sellers sell 5,1 Mac Pros, formerly 4,1s upgraded. Some sellers mislabel the Mac Pro as "Mac Pro G5" or are unable to identify its generation. If you're unsure, or the seller is, the serial number can tell you when the computer was manufactured or its model type. Also, you can request a photo of the computer with the panel removed to identify it as 4,1/5,1.
- Mac Pro 1,1/2,1s haven't been able to run later than OS X 10.11, which limits their longevity or utility. Personally, I would not invest any money into a Mac Pro 1,1/2,1 at any price.
- The Mac Pro 3,1 can run the latest OS X with minor hacks, making them bargains, but are limited in upgrades and performance. 10.12+ will break wifi if the internal chipset isn't replaced or another is added. 10.14+ requires a metal GPU.
- The best Mac Pro 3,1 is considerably slower than a single CPU 6-Core Mac Pro 4,1/5,1.
- 2010 and 2012 Mac Pros are virtually the same. There are no performance differences other than the base configurations.
- Markets vary quite a bit based on geo-location. Based on my limited observation, North America is considerably cheaper than the rest of the world. </li>
Collected Articles on classic Mac Pro and the 2019 Mac Pro
- TheHouseOfmoth: The Future of the Mac Pro is here
- Apple Insider: Apple's management doesn't want Nvidia support in macOS, and that's a bad sign for the Mac Pro - I really hate to link Apple Insider but, this is interesting instead of its usually defending Apple for being user-hostile
- Motherboard@Vice: The Most Powerful Mac Is 6 Years Old and Not Sold By Apple
- TechRadar: People want the new Mac Pro so badly they're upgrading the old one
- Why you should build a Hackintosh
- ExtremeTech: Mac Pro Customers, Desperate for a Refresh, Are Upgrading 6-Year-Old Hardware
- AppleInsider: Apple's Mac Pro' cheese grater' is 12 years old, and is the best Mac ever made - an ode and yet apologist drivel AppleInsider.
- The House of Moth: Classic Mac Pro gone but certainly not forgotten (Still King)
- The Verge: Apple admits the Mac Pro (2013) was a mess
- TechCrunch: Apple's 2019 Mac Pro will be shaped by workflows
- blog.greggant.com: The Mac Pro that wasn't (2016 reaction)
- MacObserver: The new Mac Pro is a failure
- blog.greggant.com: The Future is a gated community (2013 response to the Mac Pro update)
Communities & Blogs
You're not alone. There are more people out there than you'd think who still love the classic Mac Pro.
- MacRumors Mac Pro Forum - The center of the Mac Pro universe, if it's happening, it's probably here. My go-to for sourcing information, as one can gather by reading this guide.
- MacProUpgrade - The premier Facebook group, very international with Mac Pro users across the globe. It requires requesting access, but if they let anyone in, I'm there. Also, it is a strangely friendly and nice community. They are always willing to answer questions from the obscure to novice and have a lot of high-tier creative professionals who can answer your questions about AVID, Premier, FCPX (etc.) related to your Mac Pro.
- Mac Pro Users - Another major FaceBook group for Mac Pro users, smaller but still helpful, and it has the benefit of being public too (no signup process and can be browsed without a Facebook account). Helpful and friendly community with a lot of creative professionals too.
- Reddit.com/r/macpro - not a Redditor myself but another group that is fairly active and has the benefit of not being under the regrettable Facebook umbrella.
- House of Moth - Jay's mac related blog, it's not explicitly Mac Pro related but has probably the best guide on the Pixlas mod and delves into old Mac hardware in super-geeky ways (in a good way). I name-check his blog a few times here for a good reason.
- Mac Pro Discord This is an offshoot of the Reddit Mac Pro group.
- Quinn's Tech Corner This is a small but growing group of retro Mac enthusiasts, not Mac Pro-centric, but if you're interested in retro PowerPC Mac emulation, this is a good start.
- eGPU.io - Not classic Mac Pro related in the slightest, but where I go for Thunderbolt information
- Netkas - Blog related to GPU flashing and hacking
- forums.netkas.org - The original group of firmware flashers for GPUs.
- blog.greggant.com/topics/#macpro - I've written for six years now semi-frequent Mac Pro-related blog posts.
Other Guides
I'm hardly the sole source of Mac upgrade guides. In the spirit of the web, I used to remember.
- ameyrupji: My MacPro 5,1 Upgrade Journey
- pindelski's guide - Credit where credit is due, this guide is roughly the same age as my first upgrade guide (and pindelski's was better), but somehow I never knew about it. Perhaps had I seen it, I may have never started this guide.
Mac Pro 2013 Upgrade guide
Looking for information about the cylinders? It started out as a joke, but it is real! The Definitive Trashcan Mac Pro (2013) Upgrade Guide
Mac Pro 2019 Upgrade Guide?
Here we go again, The Definitive Mac Pro 2019 7,1 Upgrade Guide beta is now public, 100% ad-free and open to the world.
PDF version of this guide
A few readers have requested PDF versions of this guide. It is important to note that a PDF will not contain the most current information as this blog post is continually updated. I encourage people to use the HTML version of this guide as it'll provide the best experience.
That said, instead of maintaining a separate PDF Version, I've included CSS (styling) to my blog to make printing better, capping the image sizes, slightly reducing the font size, and expanding the column to make use of a full page. This reduces the page count by about 1/5. If you would like a PDF version of this guide, hit print from any Mac web browser. I recommend Safari to ensure that the links within the guide work. In the printer dialogue, click the "PDF" dropdown in the lower-left corner of the printer box and hit "Save As PDF". All the links contained will work when viewed from Preview.
You do not need a printer connected to print to PDF.
Changelog
Due to the ever-evolving list of possible upgrades and hacks, this guide is a living document, and thus, the information contained may change; I've included a robust log of recent changes to help repeat visitors discover new content. Making and maintaining this guide takes a fair amount of work, and user feedback is greatly appreciated to make this the most accurate/best guide possible. If you have new information not included here, suggestions, corrections, or edits, please feel free to contact me. I get a fair amount of questions and may not reply promptly or at all. I apologize in advance, but this blog has zero advertisements or any monetization; thus, everything is in my own free time. It makes more sense for me to refine this guide so I can assist the most people possible vs 1:1 support. I'd recommend asking the MacRumors forum, Reddit or one of the Facebook upgrade groups first as I'm just one person vs. the collective intelligence of a community.
03/27/25 - Fixed broken link to the MacProFirmwareToolUpdate
12/23/24 - For once I managed to shave out several hundred words. Another major round of copy editing, removed dated info around OpenCore, and trimmed it down, trimmed down buyers guide, added a few minor missing bits like Nvidia 4000 series compatibility, realized I never mentioned Sequoia, so that has been updated .
05/26/24 - HTML errors are now gone.
05/22/24 - Mostly corrections.
08/27/23 - Starting the long path of updates for Sonoma. Added Patreon.
12/24/22 - Lots of editing and Typo corrections, cleaning up on language around Monterey and Ventura.
12/23/22 - Typo corrections, added prelim info about the 7900 XT. A few more lines about Ventura and OCLP.
10/11/22 - Typo corrections, links to flashing video for 6600-6900 XT by MacSoundSolutions
07/26/22 - There isn't much to report on the Ventura front but I put some notes in. Added Fast Resource Loading API / DirectStorage API notes.
05/07/22 - 4 years of updates, Minor correction.
04/25/22 - OpenCore section clean up, updated the most powerful GPU section to reflect the Navi 21 GPUs.
04/23/22 - 04/24/22 - Cleaned up 6000 series info section, removed old 6000 video and replaced with new video.
04/22/22 - Info about the 6000 series flashable
04/18/22 - More info on RAM Ranks and mentions, added link to more recent test on RAM.
04/17/22 - 6800 XT firmware notes regarding AVX. General typos and grammar corrections.
04/16/22 - Added notes about the 6800 XT and MacVidCards.eu and liquid cooling, added links on CPU replacement (finally). Removed out of date text on the Mac Pro 2019 section. Finally added RAM ranks (finally)
01/27/22 - Delidded single CPU note
01/23/22 - GPU updates + communties
01/02/22 - Linked video on Thunderbolt 3.
12/27/21 - Some minor restructuring started in the OS upgrades section, added 6600 XT info.
12/19/21 - Added video about Mac Pro versioning. Added MonteRand link to the OS section.
10/30/21 - Updated OpenCore Monterey Info.
10/22/21 - Added AMD 6800 - 6900 XT to GPU section
10/12/21 - Added Nvidia vs Apple video to GPU section
10/07/21 - Added tip jar section
10/06/21 - Tweaks to info about OpenCore and linked video showing the 11.6 upgrade process.
10/03/21 - The Mac Pro Isn't Dead video added to special announcements, added House of Moth's Quick guide to installing OpenCore on a Classic Mac Pro (cMP). I thought I linked it. I hadn't.
10/01/21 - Bad news, that AMD 6800 you were dreaming about sticking into your classic Mac Pro may never work.
09/28/21 - More cleanup for SurPlus and the latest OpenCore package with SurPlus.
09/27/21 - Added references to SurPlus, depreciated LateBloom references.
09/12/21 - Added more OpenCore notes, including a video by Jeorg for OpenCore the Basic Way: Latebloom.
09/11/21 - Added notes about macOS 12 Monterey and OpenCore.
09/10/21 - Added GPU video and R9 Nano to GPU list
08/06/21 - Added image of 4,1 vs 5,1 CPU trays, thanks to Stuart Secker
07/19/21 - Added archive.org links to previous updates of macOS
07/12/21 - Added notes about LateBloom
07/03/21 - Added link to the 256 GB Max RAM and changed the notes from me speculating OpenCore would enable 256GB bootable macOS to actual confirmation. Pretty impressive that at 12 year old computer could potentially have 256 GBs of RAM as even today that's a very significant amount.
05/31/21 - Added notes about Sidecar
05/21/21 - OpenCore can boot with 32 GB Dimms. OpenCore may have solved the 11.3 Big Sur issues. What can't OpenCore do?
05/10/21 - Correction about ASM2824 and the PLX8747, misindentified the PLX8747 as a part number and not a chipset, oh well, at least I can correct it. Oh hey, this blog post is now 3 years old!
05/01/21 - Notes about Windows 10 + firmware upgrades.
04/24/21 - Info about Big Sur 11.3-11.4 and the new AMD GPUs.
03/28/21 - Added 5,1 Firmware Upgrade Vid. Added note about RX 550s as they seem to be problematic.
03/25/21 - Added section benchmarking SSDs.
03/23/21 - Quick error fix thanks to reader where I conradicted myself and added Jay's Firmware update Guide.
03/21/21 - Added info about 8k.
03/18/21 - Minor copy edits. Fixed a render glitch caused by Jekyll 4's lower tolerance MD convertor.
03/17/21 - Added info about RAID0 and latency. Noticed an error about NVMe running at PCIe 4x 1.0 (incorrect), and corrected it.
03/16/21 - More copy editing, added LTERIVER and Febsmart USB cards to list of compatible cards. Added info about the ASM chipset and macOS
03/15/21 - More copy editing
03/14/21 - Another round of copy editing, caught an embarassing amount of typos and grammatical issues.
03/13/21 - Added GeForce RTX 3000 series information. Much needed copy editing on the M1 Apple silicon section, some more typo corrections.
03/08/21 - Added VR headset information, minor corrections in the index.
03/05/21 - Added USB performance section.
02/13/21 - Broken link fixed thanks to reader feedback.
02/05/21 - Added USBc 3.2 Gen 2 notes and vid.
01/23/21 - Added ASM2812 chipset info, fixed table glitch in card listings, added video about Radeon 56 flashing, removed link to Aliexpress memory as the listing had changed.
01/06/21 - Updated APFS information, added second video, this time about NVMe. Minor edits.
12/26/20 - NVMe host cards updated to include two more cards and with heatsink info. Windows 10 and Mac Pro 1,1s added.
12/24/20 - Added the first of YouTube content to storage section.
12/10/20 - Updates to the M.2 adapters, mis-labeled the OWC card's max speed as it is 8x. Added two cards. Noted problems with the Syba card.
11/14/20 - Info about 3,1 thermal paste, a bit more on Apple Silicon.
11/07/20 - Added Accessing hidden SATA Ports section.
11/06/20 - Added photos of memory tray. Expect to see a a few more visuals to the guide in copy weeks. minor copy edits (typos, phrasing etc). If it seems like I'm obsessed with editing, many users are not native English speakers and us translation software. Clearly and correctly formatted sentences will yeild much better results for them.
10/31/20 - minor edits (added note about Big Navi, link to opencore vid, etc)
10/19/20 - Started expanding the contents index... its huge. Still need to present it in a more human way, probably with a nav. Added a bit more unnecessary info about the VII, added note about NVMe + OpenCore in storage and more up-to-date HDMI Audio. Added notes about PCIe 4.0 SSDs. Added link about unidentified apps from devs. Added to troubleshooting "Your computer needs a firmware update to install to this volume. Choose a Mac OS Extended Journaled volume instead." Added link on how to installl PCIe Cards to GPU section. Added link to lowendmac's facebook thread on Mac Pro 1,1 failed firmware updates.
10/18/20 - Slightly updated OpenCore info, started adding more of the headers to the Contents, Added info about 8x PCIe 4.0 GPUs. Noted the last of SSE4 on Mac Pro 1,1/2,1s as well as introduction point of SSE4.
10/05/20 - Updated with more Big Sur Data + Mac Pro 1,1 Firmware hacking info. Minor copy editing.
07/03/20 - Big Sur update, slightly changed the intro.
06/17/20 - Removed language around Mojave betas. Added info about Apple's NGFF.
06/12/20 - More GPU corrections around R7/R9 GPUs. Fixed link to USB PCBs. Added custom case section.
06/11/20 - Added link to Thunderbolt 3 guide. Correction on R7 260X GPU thanks to a reader. Added 3rd party monitor brightness section. Added Bridge boot method link for Win10. Added link to Noctua fan mod. Added link to fixing recovery partition in Catalina. Added latest OpenCore install instructions.
06/05/20 - Minor copy editing.
06/03/20 - Added info about MBR2GPT.exe for Windows 10. Windows 10 sections are linked at the top of the blog post. Thanks to MacProUpgrade members Antonio Adams, Adam Stokes for the assist in finding the info. Added 3D printed parts sections.
06/03/20 - Added info about a successful ATX PSU replacement. Minor copy editing, mostly typos.
06/02/20 - Mostly based on observing the community frequent issues. Minor udpates to troubleshooting, update bootcamp, minor update to clarification of Pixlas mod, Added clarification about DDR3 and heatsinks, added clarification on NVMe, Added clarification on ATX Power Supplies, added OpenCore to the mini glossary.
05/25/20 - minor updates about finding firmware version. Minor error corrections thanks to user feedback on GPU section.
05/11/20 - Minor clarification to 1,1/2,1 max ram. Edited the custom flashed cards section. At this point I might as well link MacVidCards in the interest of making this guide more complete. For some users, the EFI support is worth the premium. For me? Nah.
05/07/20 - Two year anniversary, a few minor typos from new content. This guide has gone from 7000 -> 37,000 words in that space. Completed the Pixlas mod for my Mac Pro, linked Jay's Pixlas Mod vid.
05/06/20 - more GPU section cleanup
05/05/20 - GPU corrections thanks to readers! This section should have been done ages ago but due to the work involved, I put it off. Minor update to CPU trays swapping to be more clear. 10-bit, HDR info updated. Added link to PPI calculator.
05/04/20 - Almost two years! Reworked the GPU section to now include massive list of GPU compatibility. I'm sure its not 100% correct yet but should be fairly accurate. Removed the old metal section. Incorporated reader feedback include GT 630 with flashing info.
04/20/20 - Copy editing + correction on Thunderbolt Display being called Thundervolt Cinema Display.
03/24/20 - Added links to PCIe 4.0 performance vs 2.0 and linked it the topics.
03/04/20 - added list of GPUs that support Metal with boot screen. Added more to Open Core. Added more to SIP explination. minor editing. Added more to the Thunderbolt Display as users keep trying to pair it with the Mac Pro.
02/29/20 - Thunderbolt 3 custom firmware has landed, also minor editing and added more info about visually identifying a Mac Pro, thanks to Peter R.M. Fitskie for kindly providing the images, he retains rights to the image.
02/25/20 - minor editing.
02/24/20 - Another OpenCore link, correction about Accelsior from a reader, Michel D., noticed the intro needed to be updated as the 2019 Mac Pro has been shipping.
02/21/20 - Thunderbolt section updated and cleaned up.
02/12/20 - Added another link to Best GPU section to provide more context. Added more OpenCore referenes in GPU section.
02/03/20 - Added OpenCore section. Most likely this will become standard path for users running Catalina and later.
01/23/20 - Minor glossary change.
01/19/20 - Minor correction on GPU section.
01/16/20 - PCIe Power clarification, including sources. Added Power Supply Section.
01/15/20 - Added summary of SSDs.
01/14/20 - bold glitch fix + very minor editing.
01/13/20 - Happy 2020. Updated with OpenCore vs DOSdude, another round of copy editing.
12/27/19 - Added 2019 section and another NVMe host .
12/17/19 - Added NVRAM/PRAM definition, more unsupported Mojave GPUs, soft RAID info.
12/16/19 - Added small section on RAID support. Added notes on RDIMMs vs UDIMMs and CAS Latency with RAM. Added more anchor tags and links in the Contents section. Minor edits.
11/19/19 - Added description of Virtualbox Windows 10 install method, removed special announcement on chrome issue, added kext to glossary, Dosdude1 update warning.
11/07/19 - Added alternate link for the Mac Pro 4,1 -> 5,1 utility
11/06/19 - pretty cool, was informed this guide appears in this youtube video. Added Innie link + kekt description. Minor ram notes.
11/05/19 - 5700 XT is now supported, and listed.
10/31/19 - Windows 10 native clarification + x5700 link + link to techspot for CPU + OS Installer is Damaged error edit + fixed broken links in Blu-Ray section
10/29/19 - As much as I want to clean up, more stuff keeps coming in. Info on AVX instruction sets, info Mac Pro 3,1 and NVme, Info on Max RAM issue with 3.1. Added much needed M.2 format info for cleanup and a PCIe m.2 host card table, more consistent use of links opening new windows.
10/21/19 - In what has to be a first, I removed quite a bit of content. The OS section should be easier to digest. Updated notes in GPU section, removed some redundancy, oh and changed the graphic to Catalina instead of Mojave in OS section.
10/18/19 - Reworking the GPU section has begun. I'm trying to list the Metal compatible GPUs. Expect this section to change considerably as I try to condesne and clean the information. Added notes to PCIe section about PCIe 2.0 vs 3.0 and GPUs.
10/15/19 - Mostly copy editing, should be mostly typo-free. Add instructions on how to disable SIP and how to disable Gatekeeper. Switched Know Your Mac Models to tables. Added links to monitor review sites.
10/12/19 - Added the Mac Pro 3,1 link for enabling a bootscreen with the 580x. Added mixing and matching GPUs. Added table view for firmware upgrades. Added DosDude1 notes.
10/11/19 - Wrote a mini guide on upgrading Mac Pro 5,1 firmware and added it links to it as not to bog down this page with more images.
10/07/19 - Added DosDude1 youtube link.
10/04/19 - Changed language around Catalina as the 5.1s are officially unsupported. Added note about i7 CPU compatibility.
09/26/19 - Added links for Windows 10 on external drive, 2.5 PCIe height card hack, booting to Recovery Mode with a web driver GPU, and short trouble-shooting firmware upgrades section.
09/19/19 - Minor copy editing.
09/10/19 - Happy Apple Event day. Added GeekBench 5 notes. Added a link about Mojave audio issues. Added note about Catalina support. Added custom PCB for front facing USB 3.0. Added Malware section which is essentialy a link to HouseOfMoth. Also added F.lux VS Night Shift. General typo and copy corrections.
09/09/19 - Busy two weeks on this guide, trying to provide a base-level for novice users to become more aquanited with their hardware. Added a little more info to the Firmware section, such as how to check. Added intro text to the CPU section and info about instruction sets. A few minor corrections in the GPU section. Added links CPU upgrade and Northbridge. Added short explination of NorthBridge chipset. Added link for the Samsung 970 Evo Plus. Still more to do but the list is whittling down. Added information on screen refresh rates.
09/06/19 - Added info on nightshift.
09/05/19 - GPU section editing. Still needs work but more clear and organized, and up-to-date. Added notes about Continuity to be more correct. Added Night Shift on Unsupported Macs. Added bits vs. bytes as I believe it is helpful.
09/04/19 - Added more current info about 32 GB DIMMs, one of the many things needed to be addressed.
09/03/19 - The past month has been the most significant for this guide in the last 4-5 months due to the re-writing and information validation. Re-added the Audio section now with the long explanation hidden. Added info about Dual-Link DVI. Updated Handoff section with more correct information thanks to Peter K in the MacProUpgrade group.
09/02/19 - error correction on SATA 3. Whoops, it was a typo too. Typo fixes. Slightly reduced intro. Ram Upgrades have more info on ECC.
09/01/19 - Added link to Delidding CPUs to thehouseofmoth vid. Broke out delidding into own section.
08/26/19 - Added Vega 56 Firmware flash info. Minor Corrections. Minor topic organization change in the GPU section.
08/25/19 - I received feedback for a PDF version of this guide. Rather than maintain one, I've added some basic CSS for print rules that reduces the guide (as of writing this) from 85 to 62ish pages.
08/19/19 - As planned, more rewriting. Reworked the Wifi section, now includes info on PCIe and USB. Reworked the Storage section to explain more about SATA, Time Machine, and SSD Memory types. The goal is both increase clarity, ease of reading, and onboard less-technical users.
08/13/19 - Man, I have some great readers, Jamie S. emailed me with two updates, noting I hadn't listed the GeForce 680 GTX 4 GB flashing instructions (I meant to) and one I never considered, updating the recovery partition. Reworked displays section as it was one big ugly wad of text. Added info about 4k TVs, chroma subsampling. It's now a proper section Fixed JS error.
08/05/19 - Grammar/punctuation edits. Moved "identify your mac" out of the PCIe section. Added RX 590 to GPU list. Added note about OWC overcharging for RX 580s as I find this egregious/predatory. Added Note about flashed RX 580s.
08/02/19 - Added more info on PCIe power for clarification, added more info on bifurcation. NVMe cleanup. Table for OS support. Added xMP 2019 to the Mac Pro list. It's annoyed me I haven't followed a clear structure on many topics (sometimes 2006 Mac pros are listed first, while other times 2012). I'll start doing more house cleaning. Started a troubleshooting section which is opening pandora's box.
07/17/19 - Added more info on Wifi chipsets (where to buy), and continuity. Added note on buying RAM. A few minor edits.
07/10/19 - Fixed bad URL thanks to a reader. Noticed I had two boot manager sections and consolidated them.
07/05/19 - Added more info about Bootcamp and Windows 10, more editing, typo fixes. Hid the old intro by default. Updated Intro. Added notes on THunderbolt 3. Added info about Vega chipset fans.
06/26/19 - Added more notes about the Radeon 580s in Mac Pro 3.1s and the first notes on 10.15 Catalina. Also added notes on Mac Pro Processor trays. Minor clarification on Know your Mac Pro, and added DosDude1 as a definition
06/03/19 - Fitting just north of the 1 year anniversary, the Mac Pro 2019 has been announced, and it is a beast. Those specs are beyond what I hoped for, and thus the price is beyond what I hoped for too, 2x the price of the 2006-2012 Mac Pros.
06/03/19 - Happy WWDC day, let's see if we're all disappointed. Added info about the RX560 in Mac Pro 3.1s.
05/17/19 - Editing, and clarity, Added how to install GPU section.
05/18/19 - Linked Jay’s article on Blu-Ray and added notes about VLC and Blu-Ray drive, added better recommendation against 3.1s and NVMe, added incompatible NVMe list.
05/13/19 - 10.14.5 notes on GPU AMD Radeon VII and added notes on enabling AMD video codec acceleration. Editing (typos + punctuation + corrections)
05/11/19 - Now that this guide has matured. The new focus is organization. More cleanup. I noticed a few typos. Reordered things a little more in the GPU section and other places. I dislike to make executive recommendations on hardware, but I ended up bowling it down in the GPU section. If you disagree with me, do e-mail me.
05/08/19 - Biggest update in a long time. Massive cleanup around the Firmware upgrades and OS upgrades sections as it annoyed me that the information wasn't organized well, better notes about Mojave on Mac OS 3.1s, better placement about 3.1s and NVMe, and lastly added a list of the firmware updates to the Mac Pro 5.1s. I tried to reduce redundancy. Reduced the GPU recommendation section to be less verbose and made it clearer. Removed warning about firmware and issued a general recommendation. Added a mini-glossary, added a few more anchors to sections. Still plenty more clean up to happen in the future.
05/07/19 - One year anniversary! Added links to The Definitive Trashcan Mac Pro 6.1 (2013) Upgrade Guide.
05/03/19 - Hey, it's almost been one year for this blog post! Added notes about custom fans on Mac Pro and RX 580 drivers. Added links to articles on Mac Pro 3,1s and NVMe. Also, as always a few grammar/editing corrections.
03/29/19 - Added the link the AMD Polaris/Vega GPU thread, added a note about 3.1s and Mojave GPU support. Minor typo corrections.
03/11/19 - Reader Benjamin R noted I was missing the Quadro K5200 and sure enough there's a Mac version as well as K4200. Also listed the Firepro S10000 to list of natively compatible GPUs.
03/05/19 - Added CPU check terminal command. Added version number, using the date, since this guide has evolved quite a bit and this gives repeat visitors a quick reference for when the guide was last updated. Updated Fusion drive section. Updated NVidia driver section only lists TonyMacX86's latest drivers rather than versions, and clarified RTX series. Added link to Expansion Slot Utility for Mac Pro 1,1/2,1s. Also, saw two FB users wondering if Apple bricked computers with the 142 firmware on purpose. I can assure you they did not. The W3xxx series aren't nearly as common, and if Apple wants to drop support, they can do so at any time. They do it frequently with major OS updates for both macOS and iOS. Why bother to play a cloak and daggers game and open themselves up to a potential class-action lawsuit? Not everything is a conspiracy (most things aren't in fact, youtube and social media is making us stupid), Occam's razor says this was an edge case that wasn't tested. As a developer, I can tell you this happens more than you ever want to know.
03/04/19 - Created the Special Announcements, as the DP4 of Mojave 10.14.4 has a new firmware the bricks the higher-end CPUs. Added more notes to the firmware section. Minor copy edits/grammar-y corrections are littered through this update.
02/27/19 - Wow, this guide is about 10 months old now has had nearly 50k visits. Added link to Mac Pro Users, added tables to PCIe section, clearer explanations on PCIe, linked a user confirming dual 5k displays and added a few lines to the eBay buying. Also took off a little of the AppleInsider slandering. It's not my favorite site but doesn't really add anything of value.
02/01/19 - Added new Sonnet USB 3,1 cards to compatibility, Added a link to Delidding cleanup.
01/24/19 - Added image to illustrate the Mac Pro generations under know your Mac Pro and subsection. Added RX580 Mac Pro 3,1 compatibility note.
01/23/19 - Moved the Thunderbolt info into its own section as it's moved beyond speculation. I'll track this best as I can. Added a communities section. Added an anchor to the changelog. Minor copy edits.
01/18/19 - Just when you think you've considered pretty much any upgrade feasible, there's a new one. It looks like there's been progress made on the Apple Watch Auto Unlock for the cMP, so I added it to the guide. I added minor corrections to grammar and punctuation as it'd been a while since I've proof-read this entire monster of an article. Fun fact, this article is 12,500+ words now, which is 24 pages, single-spaced 12-point text (48 double-spaced). For reference, a novel is generally considered to be 40,000+ words. Apple Insider, seems to think that PCIe 5.0 might be in the 2019 Mac Pro. Why? Because it was ratified as a standard. I find this incredibly silly as PCIe 4.0 first motherboards were demoed in June and there aren't many floating around right now nor hardware. PCI 4.0 was finalized on Oct 26, 2017, and took roughly a year for the first devices to ship. With the extreme lack of PCIe 4.0 hardware, let alone 5.0, this is extremely dubious.
01/17/19 - Reader Arif pointed out an error on my guide, and I didn't have a checkmark next to the X5675 on the Mac Pro 5.1, also looks like more progress on thunderbolt and added it. First, update for 2019 and 7 months running of updates.
12/21/18 - Added a note about the X5687 since recently there's been a few posts on Mac Pro communities again. It's incompatible, and this guide lists it as incompatible. I linked a forum poster's attempt at getting it to work (despite knowing it was listed as incompatible). Hopefully, this saves a few people the heartache and money. Added notes about UI scaling to monitors and Freesync
12/14/18 - Thanks to reader Ian for confirming the RX 590 works in the cMPs. I hadn't even noticed it had been released. He even created a video. You can watch it here. Also, added info about the latest in NVidia driver updates as NVidia released new drivers for 10.13, but without Volta support, lending a lot of weight to the previous rumor that the drivers were pulled over a dispute with Apple's AMD contract. The issue has landed itself in Forbes under the blistering headline Apple Turns Its Back On Customers And NVIDIA With macOS Mojave. Hopefully, this helps Mac Pro users out, such as myself. I've had my NVidia GeForce 1060 less than a year. Oh, and this blog now supports Dark Mode for Mojave users using Safari Tech Preview 68 or higher.
11/28/18 - With the stalemating of NVidia drivers, I've added a link to the petition for drivers and updated the GPU section a bit to reflect better that it's AMD or bust right now for Mojave.
11/05/18 - Bad news on the Mojave front for NVidia users, NVidia blames Apple for not approving its drivers. Added links to the said article.
11/02/18 - Updated intro, Apple released Mac Minis, minor clarification in the intro and call to the right to repair.
10/29/18 - Big reworking of storage section (now ordered by ATA, AHCI, and NVMe), Added direct links to NVMe firmware.
10/26/18 - lots of copy editing on new (and some old) sections. Also thanks to Pressure G on Mac Pro Users (on Facebook) for spotting an error. This guide is now roughly 40 pages long! Added to Contents list of the "other upgrades."
10/25/18 - The first draft of NVMe section, and editing to more accurately reflect NVMe status, plus added first draft PCIe, and You section to explain PCIe ports. Both will require editing.
10/22/18 - 2018 is the year of the cMac Pro. In the space of not updating for a month, we have native NVMe support, bootscreens on RTX cards and the craziest of them all: promising ThunderBolt results. Added notes in relevant sections. Added Boot manager to both GPU and it's own section under other upgrades. Also, I was mentioned in a podcast a while back Brograph Podcast - Episode 134 (at the 33:05 mark). Added a TechRadar link. Added more AppleInsider insults. Why? It's apologist fanboy propaganda.
9/26/18 - It's Mojave time! Added notes on 10.14 Mojave installation, Metal, Mojave patcher for Mac Pro 3.1s, and OWC APFS problems.
9/19/18 - Added link to After Effects GeForce 1080 vs.Radeon 580
9/04/18 - Mild copy edit + driver downloader.
8/27/18 - Added note about DynaPower USA to PCIe expanders, full list of AMD cards and some minor copy editing.
8/3/18 - Added eBay purchasing notes, Minor copy editing to new content
8/2/18 - Special thanks to reader Geo B. for sending me info about the FASTA-6GU3 and Amfeltec SQUID. Added notes on Triple channel memory. Also, Big list of corrections (typo spot, correction about the language around UEFI, 2006 Mac Pro OS compatibility, and other bullet points), thanks in part to Dave @ MacVidCards for his very-direct (read: confrontational) but informative e-mail (Dont'worry, we're cool, or at least I assume we are. If we aren't, whatever.). As per request, any reference was changed to from "Mac Vid Cards" to "MacVidCards." Notably, Dave mentions that the Mac 780/Titan/Titan X EFI compatible cards use a pirated version of his custom/hacked ROM. While I haven't verified this, as I don't really have means or time to do so (this page is for fun and to help other people like me), I see no reason to doubt this claim as it's not like there's Mac versions of these cards.
6/13/18 - Added Know Your Mac Pro, link to Pixlas dual GPU mod by Big Little Frank, added HDMI Volume control Lifehacker link.
6/12/18 - Minor update to GPUs list, also added firmware update info, finally added a blur about delidding, xlr8yourmac fixed.
6/1/18 - NVMe is now bootable with firmware hacks, added info in NVMe and firmware sections.
5/27/18 - Added link to Netkas Mac Pro 1,1 -> 2,1 firmware utility and StarTech 4-Port card to USB list.
5/23/18 - Added link to wifi install guide for 5,1 Mac Pros, link cleanup so links consistently open blank page, minor proofing.
5/22/18 - Added HDMI Audio links, Mac Pro 5,1 Update for 10.13, Also, time for some proofing: Fixed quite a few typos, grammar blunders, and punctuation.
5/21/18 - Added Mac Pro manuals from Apple.com
5/17/18 - Added Linux on 2006 Mac Pros links
5/16/18 - 5770 Error correction info
5/15/18 - Minor copy editing, fixed bad link to anchor tag for CPU upgrades, a note about SLI.
5/14/18 - Reworked the intro, it's wordy now. Minor copy editing, more PCIe sled info, more 4,1 firmware upgrade links.
5/13/18 - Added Pixlas mod info, Classic Mac Pro gone but certainly not forgotten.
5/11/18 - Added Upgrade to High Sierra without APFS, added NVIDIA Quadro FX 5600, AMD FirePro W7000 to flashable cards, AMD Radeon 770/5780 Roms link, mac-pixel-clock-patch-V2 link, How to Boot to Windows without a Boot Screen link, NVMe links, Disable internal Bluetooth (for USB dongles), note about pre-10.9 RAM, serial number lookup, note about 64-bit on 1,1/2,1 mac pros.
5/10/18 - Links to EveryMac for RAM instructions, quick thoughts on graphics cards purchases, and links to NVidia web drivers.
5/9/18 - Copy Editing + Responsive CPU tables + links open new windows.
5/8/18 - Images + feedback from users (added Replacing battery + memory) + restructure so contents supersedes intro.
5/7/18 - Guide launch, first published