Drawing an SVG line between multiple DOM objects
HTML offers the <canvas>, but with some limitations, it's pixel based but can use SVGs but generally meant as "viewport" as opposed to DOM spanning. Rather than go into the "whys," Canvas doesn't quite fit what I'm after to create. SVGs can be positioned via absolute positioning anywhere on the viewport (just like any DOM object). Unlike other image types, the content inline SVGs can easily be altered via the DOM as they're XML data. This means I can easily change the color, or size, even shape of objects.
Hopefully, this tutorial is understandable for novices, more seasoned devs may want to skip the bottom for the codepen example. I've written my tutorial using only ES5 syntax although my codepen has some ES6 syntax.
Our Goals
- Draw an SVG line between objects on the screen.
- On resize change the SVGs position in objects on the screen have changed.
- Allow to have lines between multiple objects, and do this dynamically.
SVGs can be quite complicated, and drawing them with javascript is quite an art. There are plenty of libraries designed simply for manipulating SVGs and animating them but drawing a line is pretty easy.
<svg>
  <line stroke-width="1px" stroke="#000000"  x1="0" y1="0" x2="100" y2="100" id="mySVG"/>
</svg>
The above will create a black line 1px wide that starts at 0 pixels and span 100 pixels to the right and 100 pixels down, to create a diagonal line.
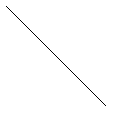
Pictured: simple SVG line using the above code
Offset
It's 2018, but jQuery still has its place, offset reliably can get us the absolute positioning of elements on the screen to the document as its base even if they aren't absolute positioned. This isn't a complete win for our goal of drawing a point between two objects as this only gets us the top-left corner of our a <div>. We need the center of that a <div>.
So with a bit of simple math, we can figure out the center position of a <div> by querying the width and height of the div and dividing by 2, then adding it to the offset position. This will measure diagonally to the center.

    var centerX = $("myPoint").offset().left + ($("myPoint").width()/2);
    var centerY = $("myPoint").offset().top + ($("myPoint").height()/2);
Now to draw an SVG, we need two sets of center coordinates. X1, Y1 and X2, Y2.
var x1 = $("myPoint").offset().left + ($("myPoint").width()/2);
var y1 = $("myPoint").offset().top + ($("myPoint").height()/2);
var x2 = $("myPoint2").offset().left + ($("myPoint2").width()/2);
var y2 = $("myPoint2").offset().top + ($("myPoint2").height()/2);
Now if we just apply this to #mySVG, we can draw a line that goes between the center of these two hypothetical DOM objects. We want to place the SVG in our body tag and then give it some really basic styling in CSS so it can occupy any space on the viewport.
#mySVG{
  position: absolute;
  top: 0;
  left: 0;
  width: 100%;
  height: 100vh;
} $("#mySVG").attr('x1',x1).attr('y1',y1).attr('x2',x2).attr('y2',y2); //svg attributesResizing Event
Not bad right? What happens if we resize? Our hypothetical DOM objects on the screen might move, thus we'd need a window resize event. We better make this a function now, and clean up the legibility first.
function drawSVG(target, div1, div2) {
  var x1 = div1.offset().left + (div1.width()/2);
  var y1 = div1.offset().top + (div1.height()/2);
  var x2 = div2.offset().left + (div2.width()/2);
  var y2 = div2.offset().top + (div2.height()/2);
  $(target).attr('x1',x1).attr('y1',y1).attr('x2',x2).attr('y2',y2);
}
drawSVG($("#mySVG"), $("myPoint"), $("myPoint2") )
Adding resizing is pretty easy now:
$(window).resize(function() {
  drawSVG( ($("#mySVG"), $("myPoint"), $("myPoint2") )
}
More objects!
Pretty nifty right? Now that we've covered the basics of drawing and redrawing the SVG, we can use jQuery's clone to duplicate our line within our SVG and call our drawSVG multiple times.
  function drawSVG(target, div1, div2) {
    var x1 = div1.offset().left + (div1.width()/2);
    var y1 = div1.offset().top + (div1.height()/2);
    var x2 = div2.offset().left + (div2.width()/2);
    var y2 = div2.offset().top + (div2.height()/2);
    $(target).attr('x1',x1).attr('y1',y1).attr('x2',x2).attr('y2',y2);
  }
  drawSVG($("#mySVG"), $("myPoint"), $("myPoint2") )
  $("#mySVG").clone().addClass("clone").insertAfter(this);
  drawSVG($(".clone"), $("myPoint2"), $("myPoint3") )
  $(window).resize(function() {
    drawSVG( ($("#mySVG"), $("myPoint"), $("myPoint2") );
    drawSVG($(".clone"), $("myPoint2"), $("myPoint3") );
  }
This isn't very dynamic as we're assuming we always know that we want to draw a line between 3 things on our screen. We're getting close but this isn't dynamic. It's time to break out .each and convert what we have into an object to cut down on our mess. We're going to do a few changes. First let's simplify our SVG.
Refactoring
Now that we're going to copy and paste our SVG, we don't need any co-ordinates. In fact, we do not want them at all until. A line without the required x1, x2, y1, and y2 won't be rendered to the screen. This works for us as we want to use this as a template for future lines but do not want our original to display.
  <svg>
    <line stroke-width="1px" stroke="#000000" id="mySVG"/>
  </svg>
Also, for legibility, we can turn the messy code above into something more readable and hopefully maintainable.
drawBetweenObjects = {
  drawSVG: function(target, div1, div2) {
    $("#mySVG").clone().addClass("clone").insertAfter(this);
    var x1 = div1.offset().left + (div1.width()/2);
    var y1 = div1.offset().top + (div1.height()/2);
    var x2 = div2.offset().left + (div2.width()/2);
    var y2 = div2.offset().top + (div2.height()/2);
    $(target).attr('x1',x1).attr('y1',y1).attr('x2',x2).attr('y2',y2);
  }
}
Let's also assume all our hypthetical myPoints use the class .myPoint and not IDs. We can now call our function drawBetweenObjects.drawSVG($(".myPoint"), more paramets)
Each()
If you're not familiar with iterating over arrays, now would be a grand time to learn. There are far better people who can explain it than I can. The long and short is using jQuery, we can create a variable that contains an array of objects based on our query. This way we can apply our drawSVG function to each entry in our array. This is where for newer javascript developers some of the lines of code might look confusing.
drawBetweenObjects = {
  drawSVG: function(target, div1, div2) {
    $("#mySVG").clone().addClass("clone").insertAfter(this);
    var x1 = div1.offset().left + (div1.width()/2);
    var y1 = div1.offset().top + (div1.height()/2);
    var x2 = div2.offset().left + (div2.width()/2);
    var y2 = div2.offset().top + (div2.height()/2);
    $(target).attr('x1',x1).attr('y1',y1).attr('x2',x2).attr('y2',y2);
  },
  iterateOverObject: function(object) {
    $(object).each(function(index, el){
     drawBetweenObjects.drawSVG($("#mySVG"), $(this), object.eq(index + 1));   //args order - line, div1 and div2 - the next div.
   }
  }
}
iterateOverObject has some funky stuff, such as $(this) which you have probably seen before. jQuery's $(this) and javascript's this aren't quite the same, What's the difference between '$(this)' and 'this'? but in the array of objects, it will use the current entry. Next we will need to select the next item in our query, eq creates a new a query to the specific entry on the array of objects. So if I ask for var myLi = $("li"), and there are four <li>s on the page, myLi.eq(2) would only require the data for the second <li>. Using our index, we ask next in the list, using index + 1.
Now we can update our script resizing.
  iterateOverObject($(".myPoint")); //init

  $(window).resize(function() {
    iterateOverObject($(".myPoint"));
  }
Removing old clones
If you run the code, you'll be able to redraw the points, but the problem is our old lines are still in the DOM. So the best place to remove them is before we re-iterate over the object. So before we create new lines, we delete the old ones. Time to add a simple jQuery remove to the iterateOverObject.
drawBetweenObjects = {
  drawSVG: function(target, div1, div2) {
    $("#mySVG").clone().addClass("clone").insertAfter(this);
    var x1 = div1.offset().left + (div1.width()/2);
    var y1 = div1.offset().top + (div1.height()/2);
    var x2 = div2.offset().left + (div2.width()/2);
    var y2 = div2.offset().top + (div2.height()/2);
    $(target).attr('x1',x1).attr('y1',y1).attr('x2',x2).attr('y2',y2);
  },
  iterateOverObject: function(object) {
    $(".clone").remove(); //remove any clones
    $(object).each(function(index, el){
     drawBetweenObjects.drawSVG($("#mySVG"), $(this), object.eq(index + 1));   //args order - line, div1 and div2 - the next div.
   }
  }
  iterateOverObject($(".myPoint")); //init
  $(window).resize(function() {
    iterateOverObject($(".myPoint"));
  }
}
Now we should have an SVG line that will draw between any DOM objects with the class of .myPoint and redraw the lines on a window resize.
Below is the hyper spiffy version that has a config file and the ability to delay rerenders on resize. To make this work for pages larger than 100vh, the SVG height of the #svg would need to set the height as $(document).height();
See the Pen SVG Line Between Divs (multi-point) by Greg Gant (@fuzzywalrus) on CodePen.
It'd be feasible to make this without jQuery, by replacing jQuery with Document.querySelectorAll() and removing the offset with techniques such as offsetLeft and offsetTop.